In Brief (TL;DR)
- The Strapi MCP server lets AI clients like Claude and Cursor manage content, but connecting one is a developer task.
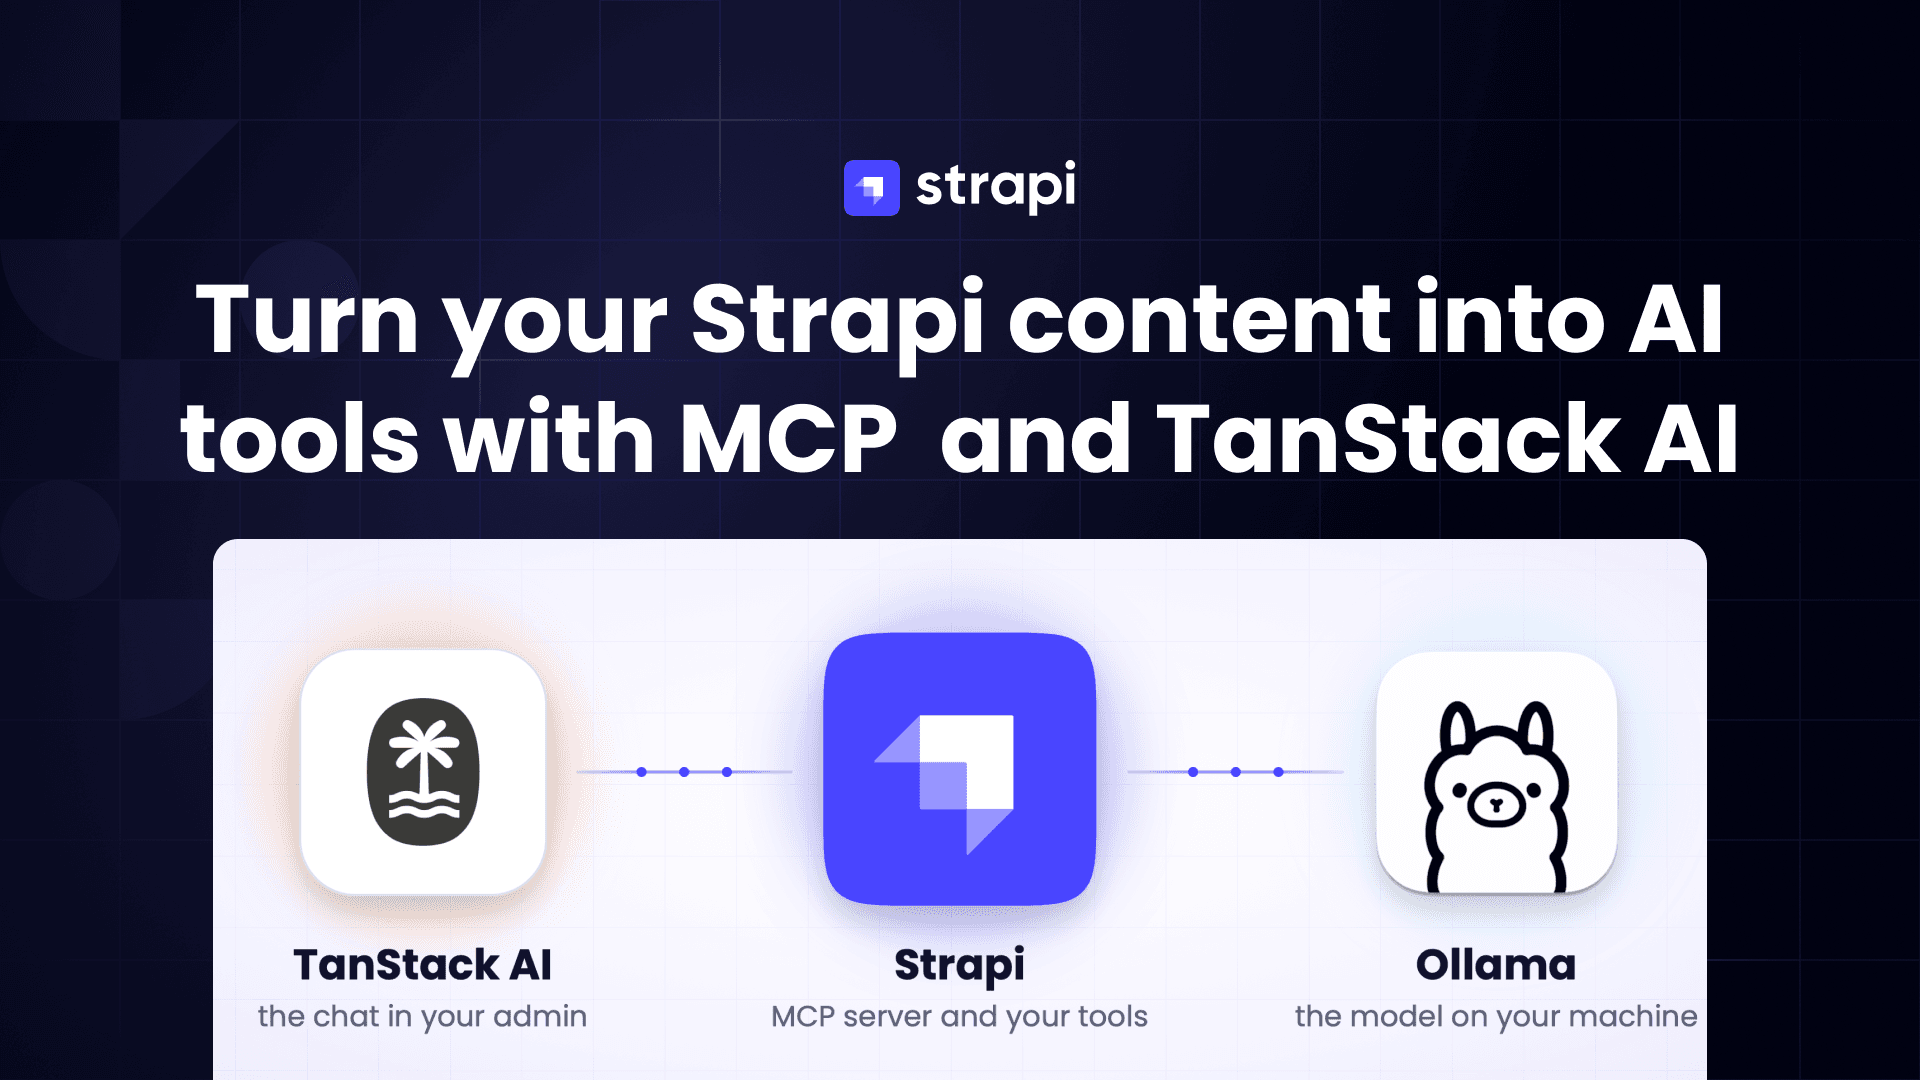
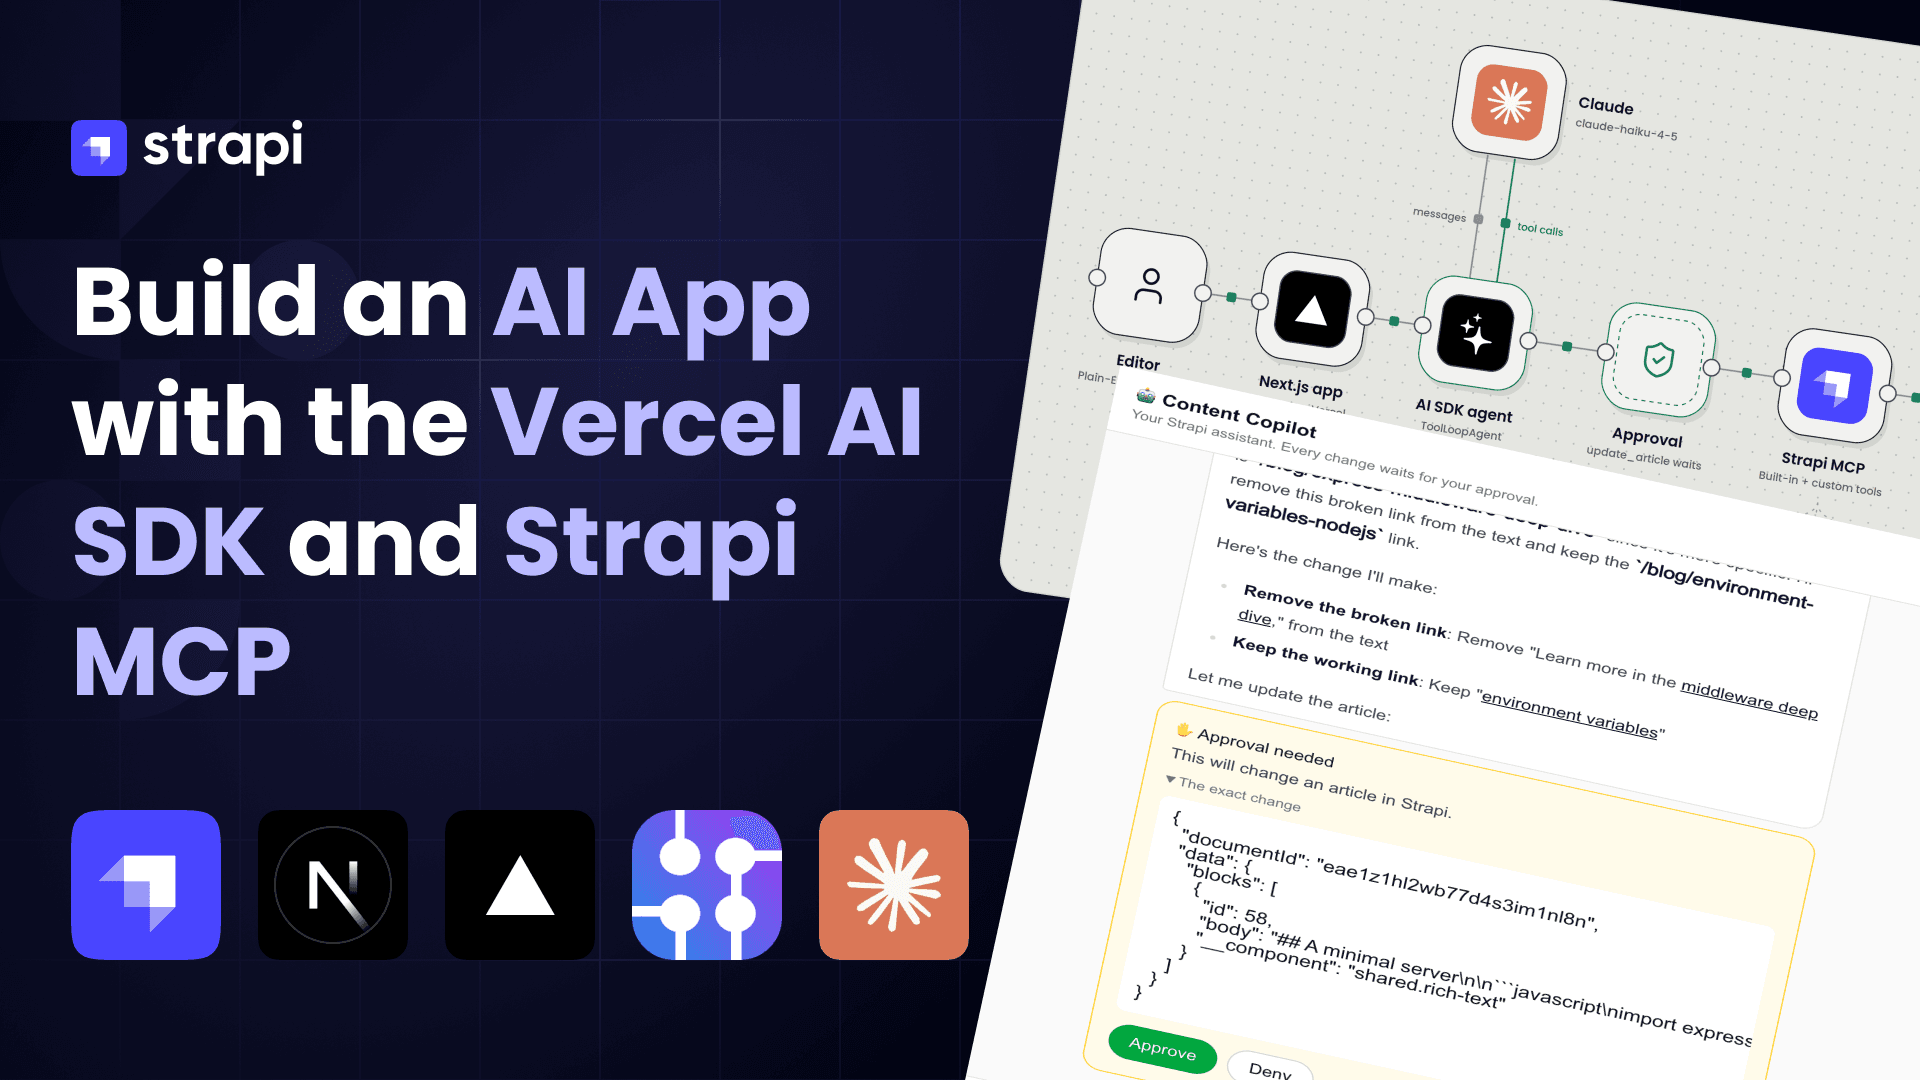
- This tutorial builds a Next.js app with the Vercel AI SDK and Claude that gives editors the same power through a URL.
- You add 3 custom Strapi MCP tools: related articles, broken-link checks, and competitor research through SerpApi.
- The Admin token stays server-side, every uppdate waits for editor approval.
- The app has no login yet. Before you deploy it anywhere public, add authentication (covered in Next Steps).
Introduction
Is an AI app just an LLM wrapper? And why build one when you can talk to Claude directly?
It can be just a wrapper, if all it does is pass prompts to a model. What makes it more is what you connect the model to and what you decide it may do.
With Strapi’s Model Context Protocol (MCP) server, you can already manage content through an AI client. Building your own app lets you shape that experience for editors, with a chat interface, useful result cards, and approval before changes reach Strapi.
In this tutorial, you’ll build a Next.js content assistant with the Vercel AI SDK and Claude, then add three custom Strapi MCP tools to find related articles, check internal links, and research competing content.
What You'll Build
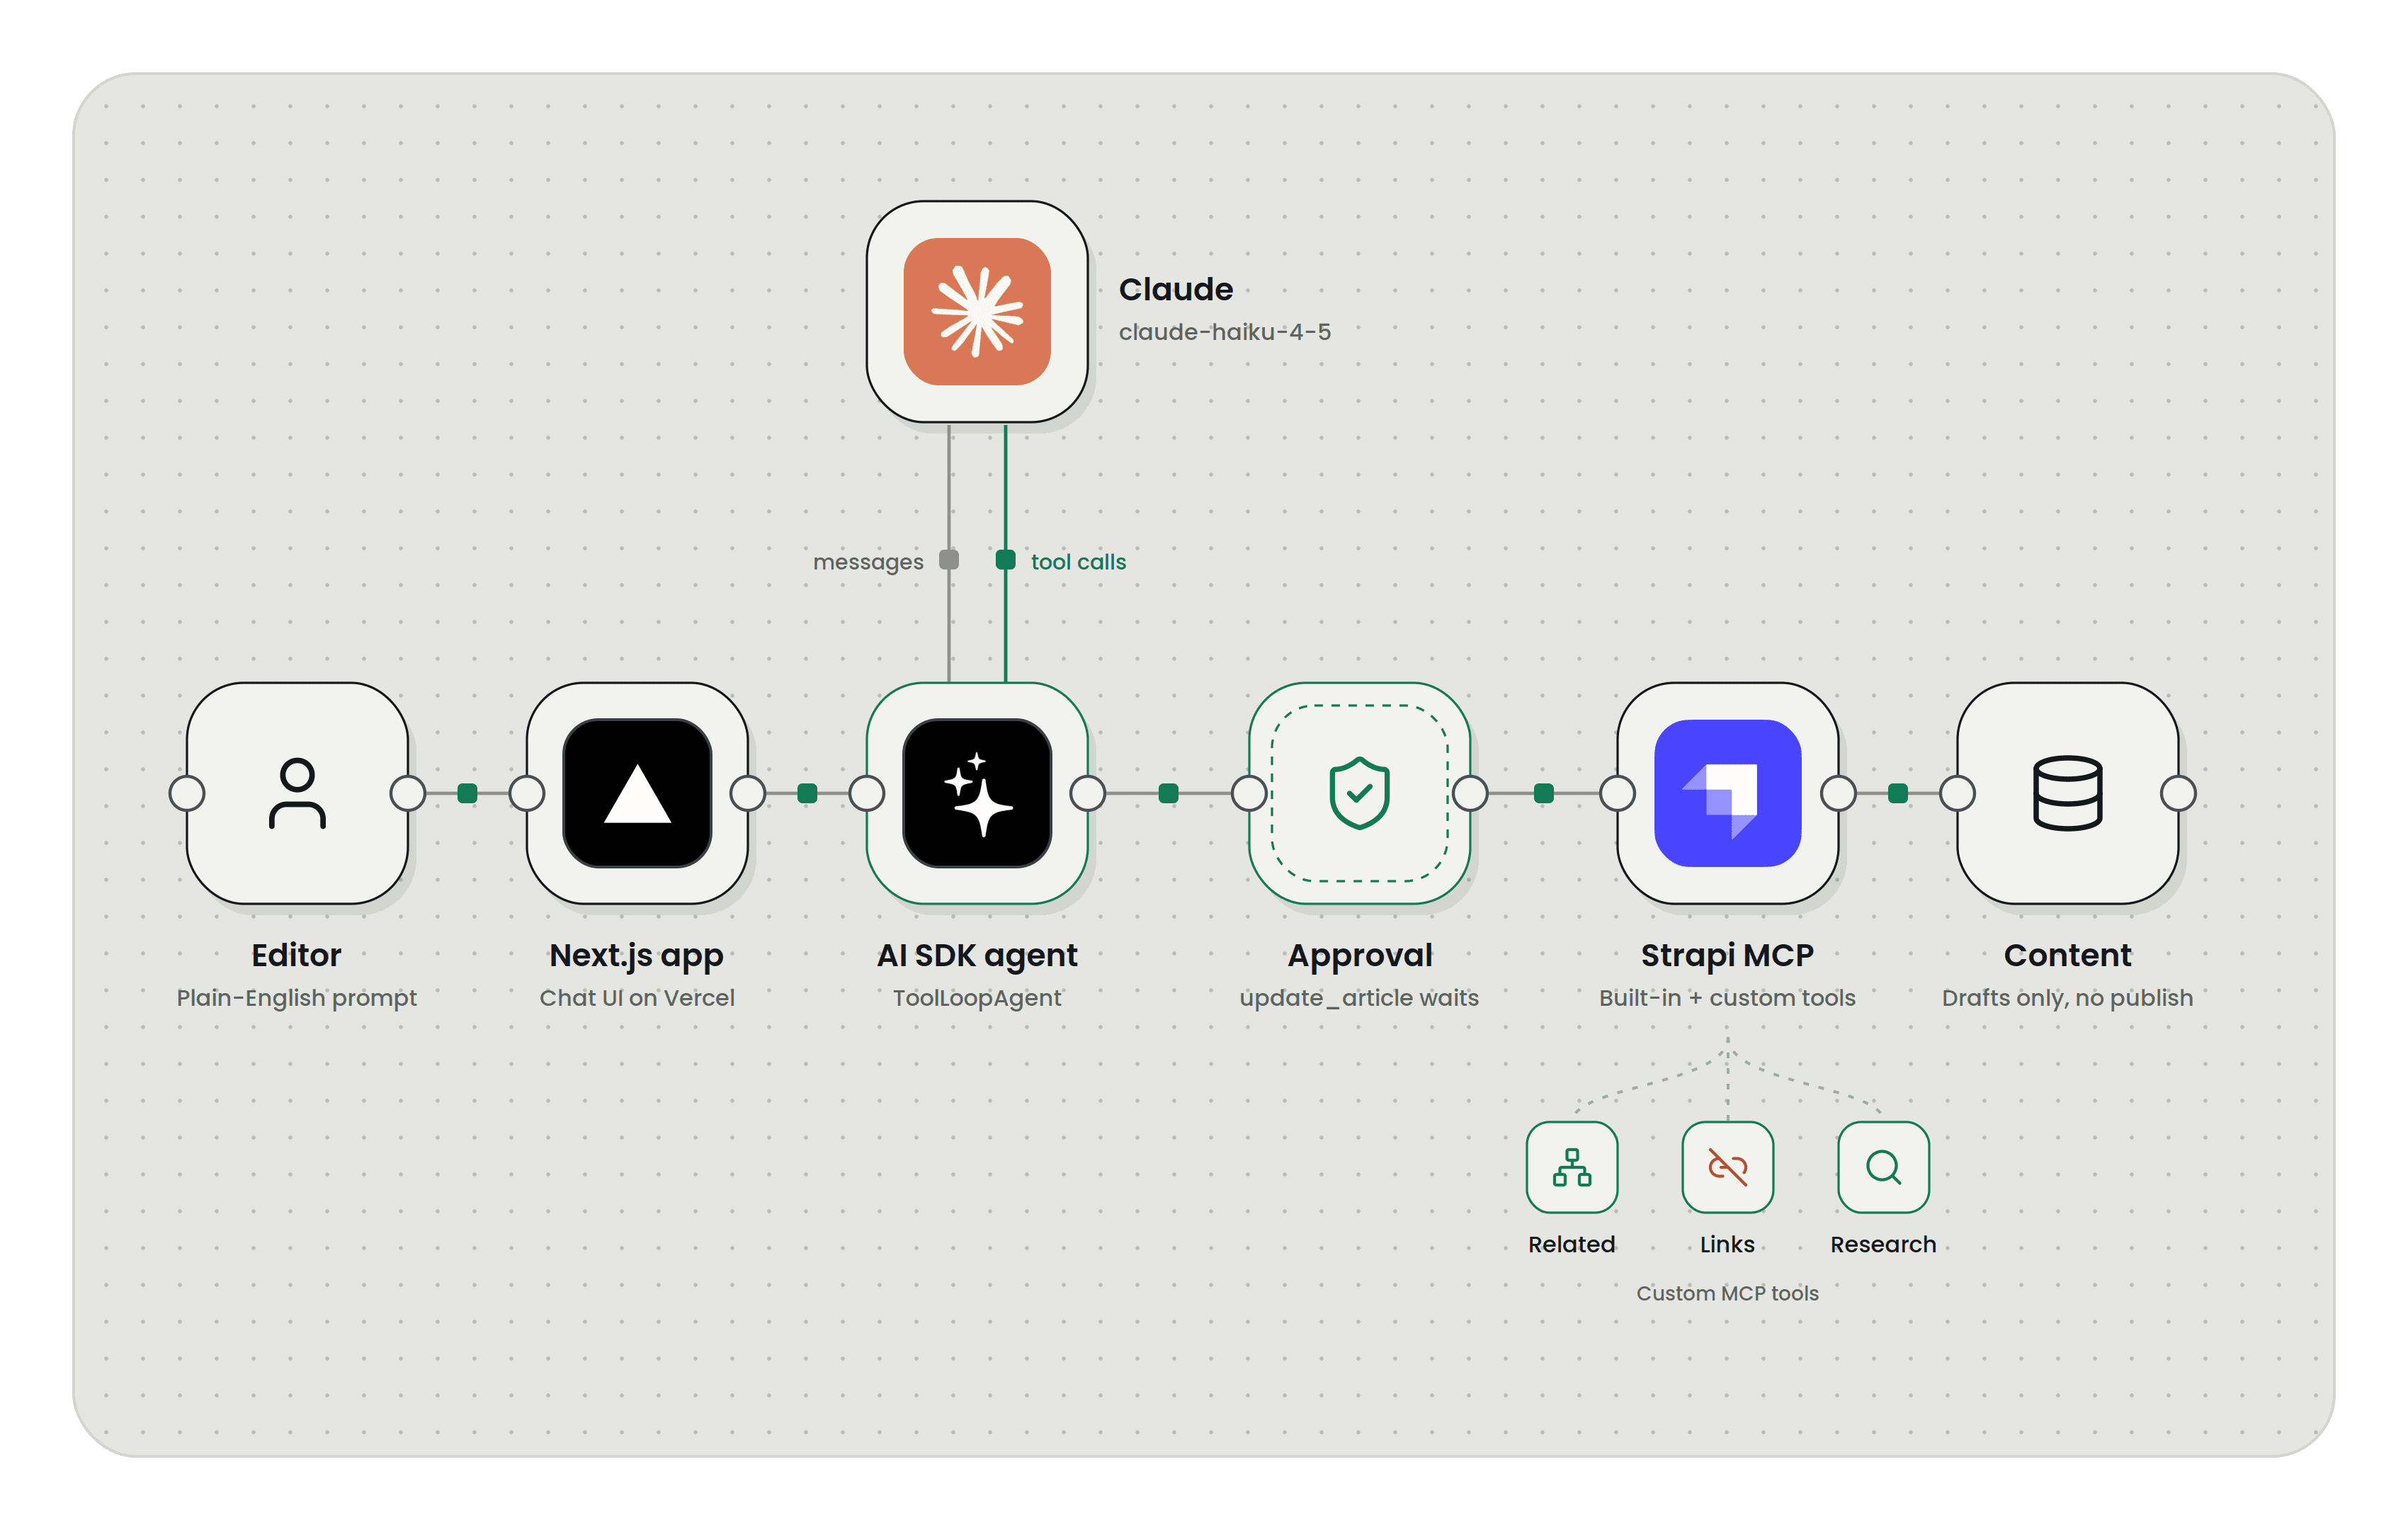
You will build an AI-powered app that extends Strapi MCP with 3 custom tools alongside the Strapi MCP default tools:
research_competing_content: searches Google for an article's topic through SerpApi.find_related_content: finds published articles in the same category.check_internal_links: finds/blog/{slug}links that point to missing or unpublished articles.
An editor can ask "Research and update article on Getting Started with Node.js". The agent finds the article, calls your tools, and pauses for approval before editing it, as shown above.
Prerequisites
- Node.js v22, v24, or v26. Strapi supports Active and Maintenance LTS releases only.
- An Anthropic API key (any AI SDK provider that supports tool calling works)
- A SerpApi API key (the free plan is enough)
Set Up Strapi
Create a Strapi 5 project with Strapi's example blog:
npx create-strapi@latest strapi-backend --example --non-interactive
cd strapi-backend
npm run develop
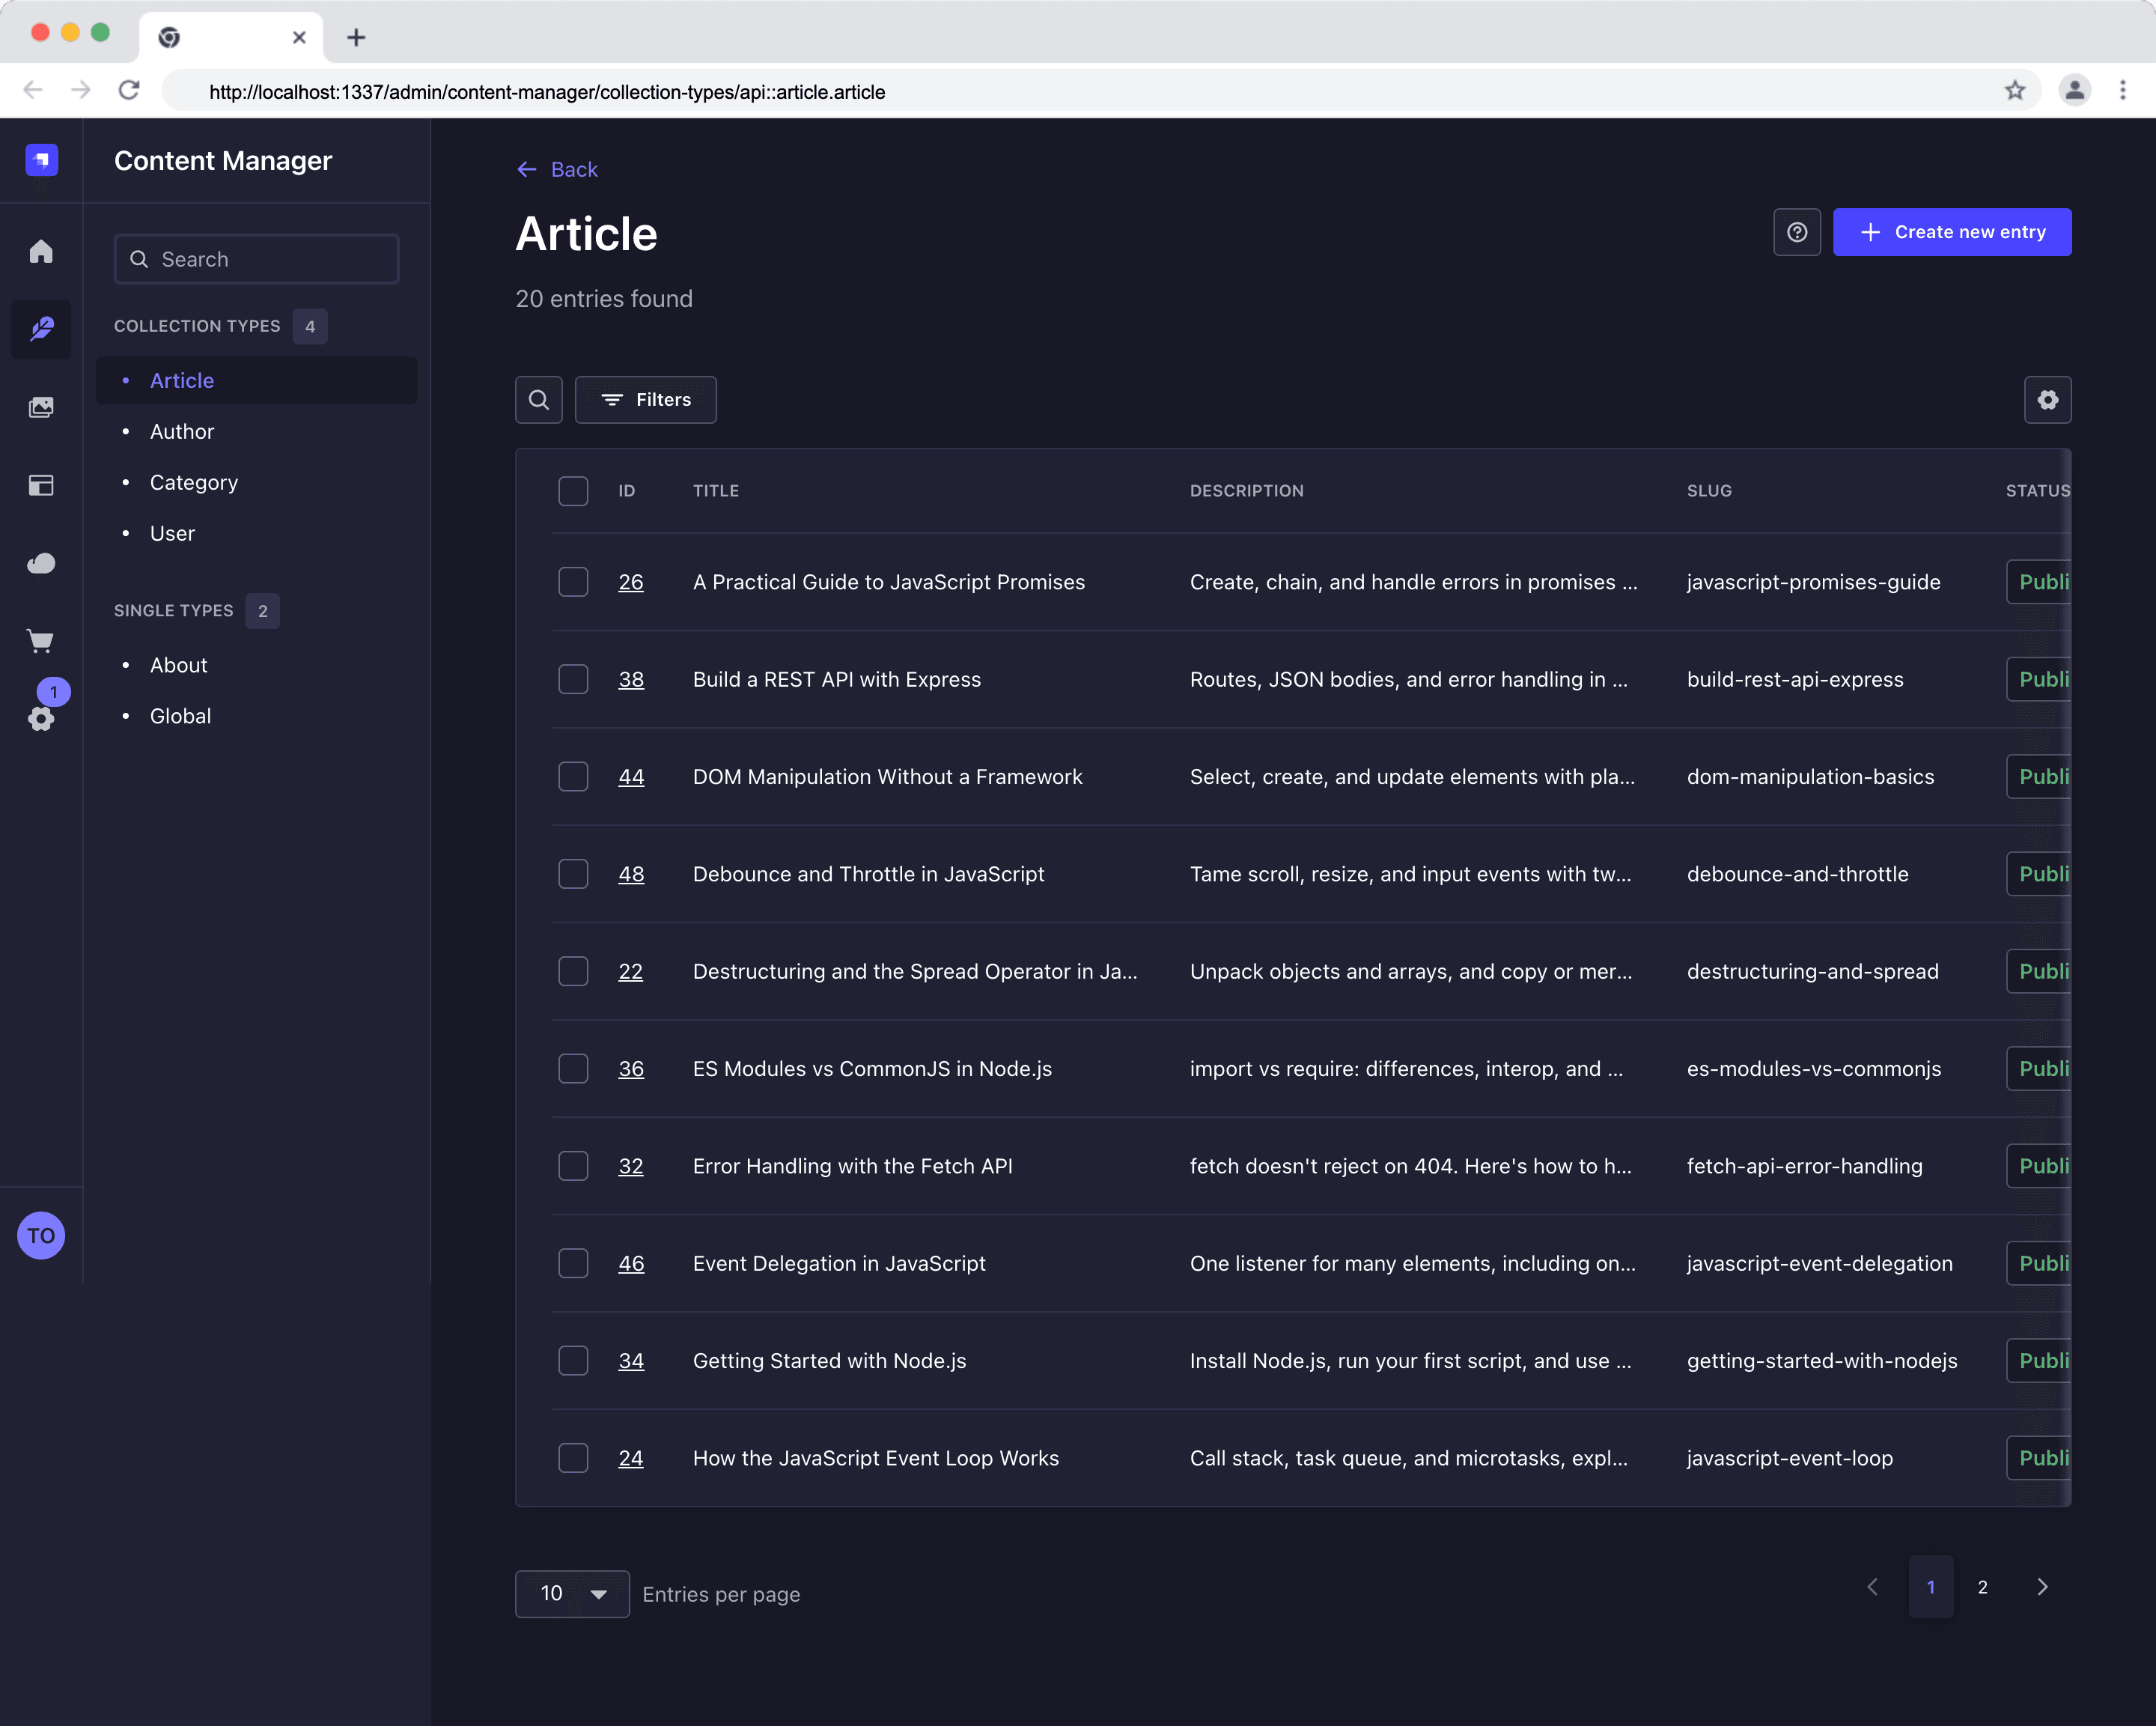
The --example flag adds Article, Author, and Category content types and five sample articles. Each Article has a category and an author relation, and its text lives in Rich text blocks inside a blocks dynamic zone.
Register your admin user and publish the articles.
💡 Add a few articles of your own before testing. The five sample articles sit in different categories and contain no internal links, so
find_related_contentandcheck_internal_linkswon't have much to work with. Add 3 or 4 articles that share a category, and in their Rich text blocks link to each other with relative links such as/blog/javascript-event-loop. Leave one linked article as a draft so the link checker has something to catch. The screenshots in this tutorial use a set of 20+ JavaScript articles built this way.
Enable the MCP Server
Add an mcp block to the generated server config:
// ./config/server.ts

import type { Core } from "@strapi/strapi";

const config = ({
  env,
}: Core.Config.Shared.ConfigParams): Core.Config.Server => ({
  host: env("HOST", "0.0.0.0"),
  port: env.int("PORT", 1337),
  app: {
    keys: env.array("APP_KEYS")!,
  },
  webhooks: {
    populateRelations: env.bool("WEBHOOKS_POPULATE_RELATIONS", false),
  },
  // add and enable mcp
  mcp: {
    enabled: true,
  },
});

export default config;
Restart Strapi. The endpoint is live at http://localhost:1337/mcp.
What the Built-in Tools Can and Can't Do
Each collection type gets its own set of tools, such as list_article, get_article, create_article, and update_article, each gated by the matching permission. There's also a built-in utility log tool.
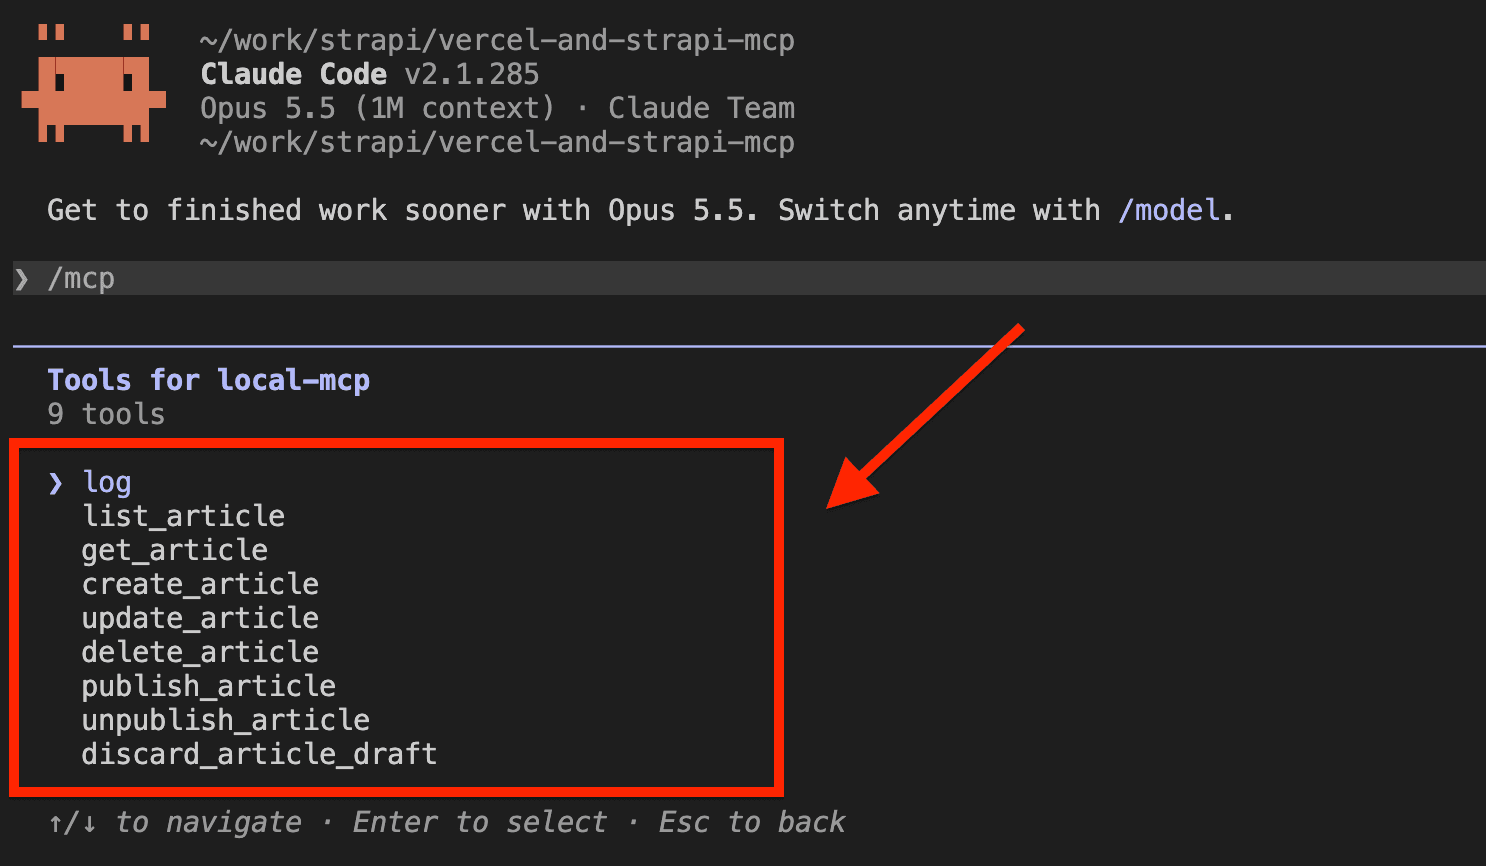
They cover single-document operations well, with two limits:
list_articlecan only filter on plain fields like text and dates, not relations such ascategory.- Relations come back as bare IDs, not objects the agent can follow.
So "articles in the same category" would mean pulling every article into the model's context. A custom tool runs that as one server-side query.
There are also tools for single types and the Media Library. Learn more about available tools.
Write the Custom Tools
Custom tools are registered with strapi.ai.mcp.registerTool(). Below is the specification:
| Option | What it does |
|---|---|
name, title, description | Identify the tool. The model reads description to decide when to call it |
auth | Permission gate: the tool only appears for tokens that pass it |
resolveInputSchema / resolveOutputSchema | Return Zod schemas for arguments and results |
createHandler | Returns the function that runs |
Check out the documentation on extending the MCP server.
Now, let's create some custom tools. Create a folder called mcp inside the src folder to begin.
1. Create the find_related_content Tool:
Create the tool to find related articles. The handler loads the article's category, then queries other published articles in that category.
Create the custom tool file ./src/mcp/find-related-content.ts and add the following code:
// ./src/mcp/find-related-content.ts

import { z } from "@strapi/utils";
import type { Core } from "@strapi/strapi";

export function registerRelatedContent(strapi: Core.Strapi) {
  strapi.ai.mcp.registerTool({
    name: "find_related_content",
    title: "Find related content",
    description:
      "Find up to 5 published articles in the same category as an article, newest first. " +
      "Use it to suggest internal links.",
    auth: {
      policies: [
        {
          action: "plugin::content-manager.explorer.read",
          subject: "api::article.article",
        },
      ],
    },
    resolveInputSchema: () =>
      z.object({
        documentId: z
          .string()
          .describe("The article to find related posts for."),
      }),
    resolveOutputSchema: () =>
      z.object({
        related: z.array(
          z.object({
            title: z.string(),
            slug: z.string(),
          }),
        ),
      }),
    createHandler:
      (strapi) =>
      async ({ args }) => {
        const articles = strapi.documents("api::article.article");
        const article = await articles.findOne({
          documentId: args.documentId,
          populate: ["category"],
        });
        if (!article)
          throw new Error(
            `No article found with documentId ${args.documentId}.`,
          );
        if (!article.category)
          throw new Error("This article has no category to match on.");

        const docs = await articles.findMany({
          status: "published",
          filters: {
            documentId: { $ne: args.documentId },
            category: { documentId: article.category.documentId },
          },
          sort: "publishedAt:desc",
          fields: ["title", "slug"],
          limit: 5,
        });
        const related = docs.map((doc) => ({
          title: String(doc.title),
          slug: String(doc.slug),
        }));

        return {
          content: [
            {
              type: "text",
              text: `Found ${related.length} related article(s).`,
            },
          ],
          structuredContent: { related },
        };
      },
  });
}
Here is what the code above does:
- Registers the
find_related_contentMCP tool in Strapi that is visible only to Admin tokens with article-read permission - Takes an article's documentId and loads its category (throwing a clear error if the article or its category is missing)
- Fetches the five newest other published articles in that category (only their titles and slugs)
- Returns them as a text summary for the AI plus structured data for the chat UI.
2. Create the research_competing_content Tool
This one calls the SerpApi service, which is an external service. It searches Google for an article's title and returns the top 5 results.
Add your key to the Strapi project's .env:
# ./.env
SERPAPI_API_KEY=your_serpapi_key
Then create src/mcp/research-competing-content.ts and add the following code:
// src/mcp/research-competing-content.ts
import { z } from '@strapi/utils';
import type { Core } from '@strapi/strapi';

type OrganicResult = { position: number; title: string; link: string; snippet?: string };

export function registerResearchCompetingContent(strapi: Core.Strapi) {
  strapi.ai.mcp.registerTool({
    name: 'research_competing_content',
    title: 'Research competing content',
    description:
      "Search Google (via SerpApi) for an article's title and return the top 5 results. " +
      'Use it to see what already exists on a topic. Each call uses one SerpApi search credit.',
    auth: {
      policies: [{ action: 'plugin::content-manager.explorer.read', subject: 'api::article.article' }],
    },
    resolveInputSchema: () =>
      z.object({ documentId: z.string().describe('The article whose topic to research.') }),
    resolveOutputSchema: () =>
      z.object({
        query: z.string(),
        results: z.array(
          z.object({ position: z.number(), title: z.string(), link: z.string(), snippet: z.string() }),
        ),
      }),
    createHandler: (strapi) => async ({ args }) => {
      const apiKey = process.env.SERPAPI_API_KEY;
      if (!apiKey) throw new Error('SERPAPI_API_KEY is not set in the Strapi environment.');

      const articles = strapi.documents('api::article.article');
      const article = await articles.findOne({ documentId: args.documentId, fields: ['title'] });
      if (!article?.title) throw new Error(`No article found with documentId ${args.documentId}.`);

      const params = new URLSearchParams({ engine: 'google', q: article.title, api_key: apiKey });
      const response = await fetch(`https://serpapi.com/search?${params}`);
      const data = (await response.json()) as { error?: string; organic_results?: OrganicResult[] };
      if (!response.ok || data.error) throw new Error(`SerpApi error: ${data.error ?? response.status}`);

      const results = (data.organic_results ?? [])
        .slice(0, 5)
        .map(({ position, title, link, snippet }) => ({ position, title, link, snippet: snippet ?? '' }));

      return {
        content: [{ type: 'text', text: `Top ${results.length} Google results for "${article.title}".` }],
        structuredContent: { query: article.title, results },
      };
    },
  });
}
Here is what the code above does:
- Registers the
research_competing_contentMCP tool in Strapi that is visible only to Admin tokens with article-read permission, - Takes an article's documentId, checks that the SerpApi key is set
- Loads the article's title
- Searches Google for that title through SerpApi (throwing a clear error if the key, article, or request fails)
- Returns the top five results (position, title, link, snippet) as a text summary for the AI plus structured data for the chat UI.
3. Create the check_internal_links Tool
The last custom tool is the check_internal_links tool. This will find article links in an article's rich-text blocks that point to missing or unpublished articles.
Create src/mcp/check-internal-links.ts and add the following code:
// src/mcp/check-internal-links.ts
import { z } from '@strapi/utils';
import type { Core } from '@strapi/strapi';

export function registerCheckInternalLinks(strapi: Core.Strapi) {
  strapi.ai.mcp.registerTool({
    name: 'check_internal_links',
    title: 'Check internal links',
    description:
      "Find /blog/{slug} links in an article's rich-text blocks that point to missing or unpublished articles. " +
      'Read-only: fix broken links with update_article.',
    auth: {
      policies: [{ action: 'plugin::content-manager.explorer.read', subject: 'api::article.article' }],
    },
    resolveInputSchema: () =>
      z.object({ documentId: z.string().describe('The article to check, as returned by list_article.') }),
    resolveOutputSchema: () =>
      z.object({ checked: z.number(), broken: z.array(z.string()) }),
    createHandler: (strapi) => async ({ args }) => {
      const articles = strapi.documents('api::article.article');
      const article = await articles.findOne({ documentId: args.documentId, populate: ['blocks'] });
      if (!article) throw new Error(`No article found with documentId ${args.documentId}.`);

      const text = (article.blocks ?? [])
        .map((block) => (block.__component === 'shared.rich-text' ? block.body : ''))
        .join('\n');
      const slugs = [...new Set([...text.matchAll(/\]\(\/blog\/([\w-]+)\)/g)].map((match) => match[1]))];

      const live = slugs.length
        ? await articles.findMany({ status: 'published', filters: { slug: { $in: slugs } }, fields: ['slug'] })
        : [];
      const liveSlugs = new Set(live.map((doc) => doc.slug));
      const broken = slugs.filter((slug) => !liveSlugs.has(slug));

      return {
        content: [{ type: 'text', text: `Checked ${slugs.length} internal link(s): ${broken.length} broken.` }],
        structuredContent: { checked: slugs.length, broken },
      };
    },
  });
}
Here is what the code above does:
- It joins the text of every Rich text block and extracts each
/blog/{slug}link. - It checks all the slugs against published articles in one query. A link to a draft counts as broken, since readers can't open it.
findOnereads the draft by default, so editors check the version they're working on.
💡 The regex only matches relative Markdown links in the exact form ](/blog/slug). Absolute URLs (https://yoursite.com/blog/slug), trailing slashes, #anchors, and query strings are skipped. Extend the pattern if your content uses them.
All three tools only read articles, so they're gated on the built-in plugin::content-manager.explorer.read permission.
For failures, they throw: Strapi returns the error message to the model as a failed tool result.
Register the Tools
To register tools, register them in your application's register() function:
// src/index.ts

import type { Core } from "@strapi/strapi";
import { registerRelatedContent } from "./mcp/find-related-content";
import { registerResearchCompetingContent } from "./mcp/research-competing-content";
import { registerCheckInternalLinks } from "./mcp/check-internal-links";

export default {
  register({ strapi }: { strapi: Core.Strapi }) {
    registerRelatedContent(strapi);
    registerResearchCompetingContent(strapi);
    registerCheckInternalLinks(strapi);
  },

  bootstrap(/* { strapi }: { strapi: Core.Strapi } */) {},
};
⚠️ Use
register(), notbootstrap(). The MCP server starts before your app'sbootstrap()runs, andregisterTool()throws once it has started.
After registering the custom tools, restart your Strapi project.
Create an Admin Token
The MCP server authenticates with Admin tokens, not Content API tokens.
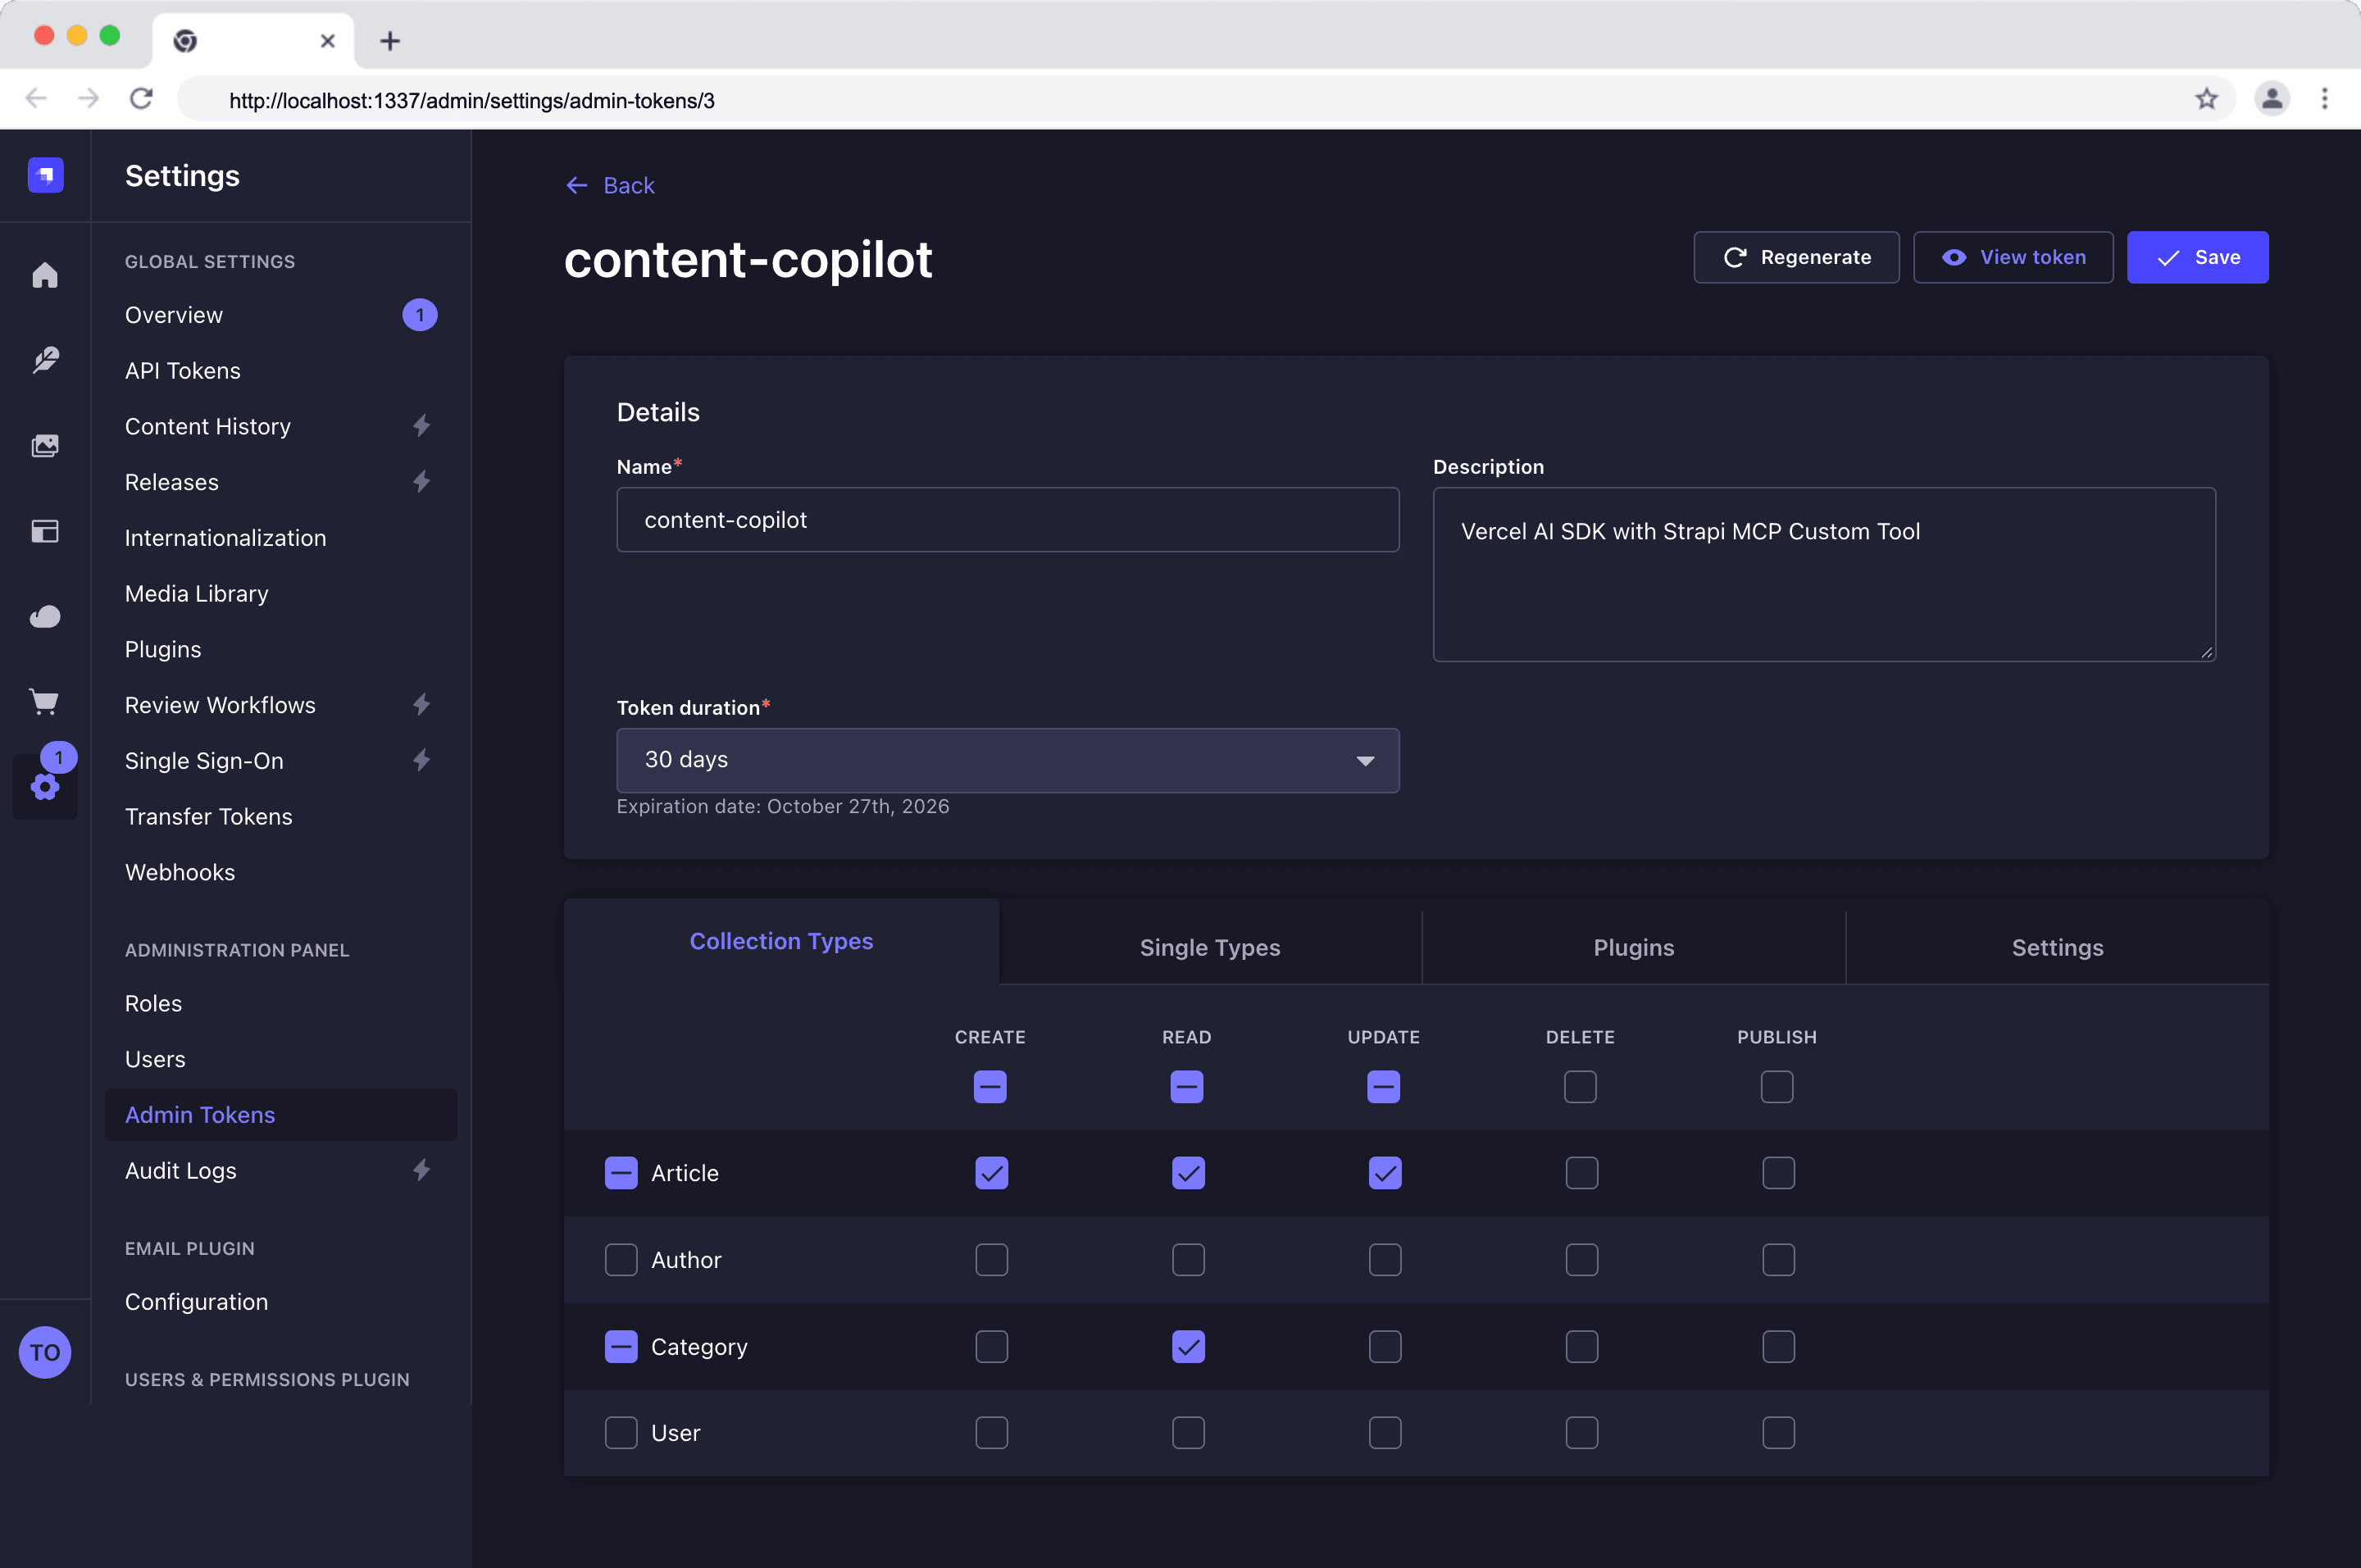
Go to Settings → Administration Panel → Admin Tokens → Create new Admin Token, and grant read, create, and update on Article. For the Category, grant only read.
Don't grant publish or delete: the agent can then only work on drafts and never change the live site.
Copy the token. It's shown only once.
Check that your tools are live:
curl -s -X POST http://localhost:1337/mcp \
  -H "Authorization: Bearer YOUR_ADMIN_TOKEN" \
  -H "Content-Type: application/json" \
  -H "Accept: application/json, text/event-stream" \
  -d '{"jsonrpc":"2.0","id":1,"method":"tools/list"}' \
  | grep -oE '"name":"[a-z_]+"' | sort -u
You should see your three tools next to list_article, get_article, create_article, update_article, discard_article_draft, and log.
If yours are missing, check that you used register() and restarted Strapi.
Build the Next.js App
Start by installing Next.js and other dependencies.
npx create-next-app@latest nextjs-frontend --typescript --app --tailwind
cd nextjs-frontend
npm install ai @ai-sdk/anthropic @ai-sdk/mcp @ai-sdk/react zod react-markdown remark-gfm @tailwindcss/typography
The commands above do the following:
- Creates a new Next.js app called
nextjs-frontendwith TypeScript, the App Router, and Tailwind CSS - Moves into its folder and installs the AI SDK with its Anthropic, MCP, and React packages, plus Zod for validating tool results
react-markdownandremark-gfmfor rendering the AI's Markdown replies- And the Tailwind Typography plugin for styling them.
Create Environment Variables
# .env.local
STRAPI_URL=http://localhost:1337
STRAPI_ADMIN_TOKEN=your_admin_token
ANTHROPIC_API_KEY=your_anthropic_key
TOOL_APPROVAL_SECRET=   # generate with: openssl rand -base64 32
Enable the Typography
Enable the Typography plugin, which styles the Markdown in the AI's replies, in app/globals.css:
@import "tailwindcss";
@plugin "@tailwindcss/typography";
Connect to Strapi
We need to create a helper function that connects to Strapi's MCP server with your Admin token and keeps only the tools this app needs.
Create a library file ./app/lib/strapi-mcp.ts.
// app/lib/strapi-mcp.ts

import { createMCPClient } from "@ai-sdk/mcp";
import type { ToolSet } from "ai";

const ALLOWED_TOOLS = [
  "list_article",
  "create_article",
  "get_article",
  "update_article",
  "find_related_content",
  "research_competing_content",
  "check_internal_links",
];

export async function connectToStrapi() {
  const mcpClient = await createMCPClient({
    transport: {
      type: "http",
      url: `${process.env.STRAPI_URL}/mcp`,
      headers: {
        Authorization: `Bearer ${process.env.STRAPI_ADMIN_TOKEN}`,
      },
    },
  });
  const allTools = await mcpClient.tools();
  const tools = Object.fromEntries(
    Object.entries(allTools).filter(([name]) => ALLOWED_TOOLS.includes(name)),
  ) satisfies ToolSet;

  return { mcpClient, tools };
}
The mcpClient.tools() function fetches every tool the token can use and converts each one into an AI SDK tool, so you write no tool definitions on the client.
The allowlist keeps only the seven this app needs: every tool definition is sent to the model on every request, so fewer tools means lower cost and better choices.
Create the Agent
Next, create the chat API route. For each request, it connects to Strapi's MCP server, creates an AI agent with Claude (or any model you prefer) and instructions on when to use each tool and how to edit articles safely, then streams the replies back to the browser.
Create the route file for the chat api ./app/api/chat/route.ts
// app/api/chat/route.ts

import { anthropic } from "@ai-sdk/anthropic";
import { ToolLoopAgent, createAgentUIStreamResponse } from "ai";
import { connectToStrapi } from "@/app/lib/strapi-mcp";

export const maxDuration = 60;

export async function POST(req: Request) {
  const { messages } = await req.json();
  const { mcpClient, tools } = await connectToStrapi();

  const agent = new ToolLoopAgent({
    model: anthropic("claude-haiku-4-5"),
    maxOutputTokens: 8192,
    instructions: [
      "You are a content assistant for a Strapi CMS.",
      "Use find_related_content to suggest internal links for an article.",
      "Use check_internal_links before claiming an article has no broken links.",
      "Use research_competing_content only when asked what exists elsewhere on a topic; each call costs a credit.",
      "Article text lives in the blocks field. Before editing, call get_article, then send",
      "update_article the COMPLETE blocks array, changing only what you mean to change.",
      "create_article is only for creating new articles, not editing existing ones.",
      "Any block you leave out is deleted. Explain each change before making it.",
      "When a tool execution is not approved, do not retry it.",
    ].join("\n"),
    tools,
    toolApproval: ({ toolCall }) =>
      toolCall.toolName === "update_article"
        ? {
            type: "user-approval",
            reason: "This will change an article in Strapi.",
          }
        : "not-applicable",
    experimental_toolApprovalSecret: process.env.TOOL_APPROVAL_SECRET,
  });

  return createAgentUIStreamResponse({
    agent,
    uiMessages: messages,
    onFinish: async () => {
      await mcpClient.close();
    },
    onError: (error) =>
      error instanceof Error ? error.message : String(error),
  });
}
Here is what the code above does:
- The
ToolLoopAgentruns the loop. - The model calls a tool, reads the result, and decides what to do next.
toolApprovalpausesupdate_articleuntil the editor approves.experimental_toolApprovalSecretsigns each approval request, so a client can't forge one.maxOutputTokensgives the model room to send a fullblocksarray in one call.onErrorsends error messages to the browser, which helps while you build. In production, return a generic message instead.
⚠️
update_articlereplaces the wholeblocksdynamic zone. If the agent sends only the block it changed, the other blocks are deleted. That's why the instructions tell it to send the complete array. The damage is limited: edits only touch the draft, and the approval card shows the full payload.
Build the Chat UI
Create a component that renders a single chat message. For the interface, start with a component that renders one message:
- The editor's on the right with a 🧑 avatar
- The AI on the left with a 🤖
- Replies as Markdown,
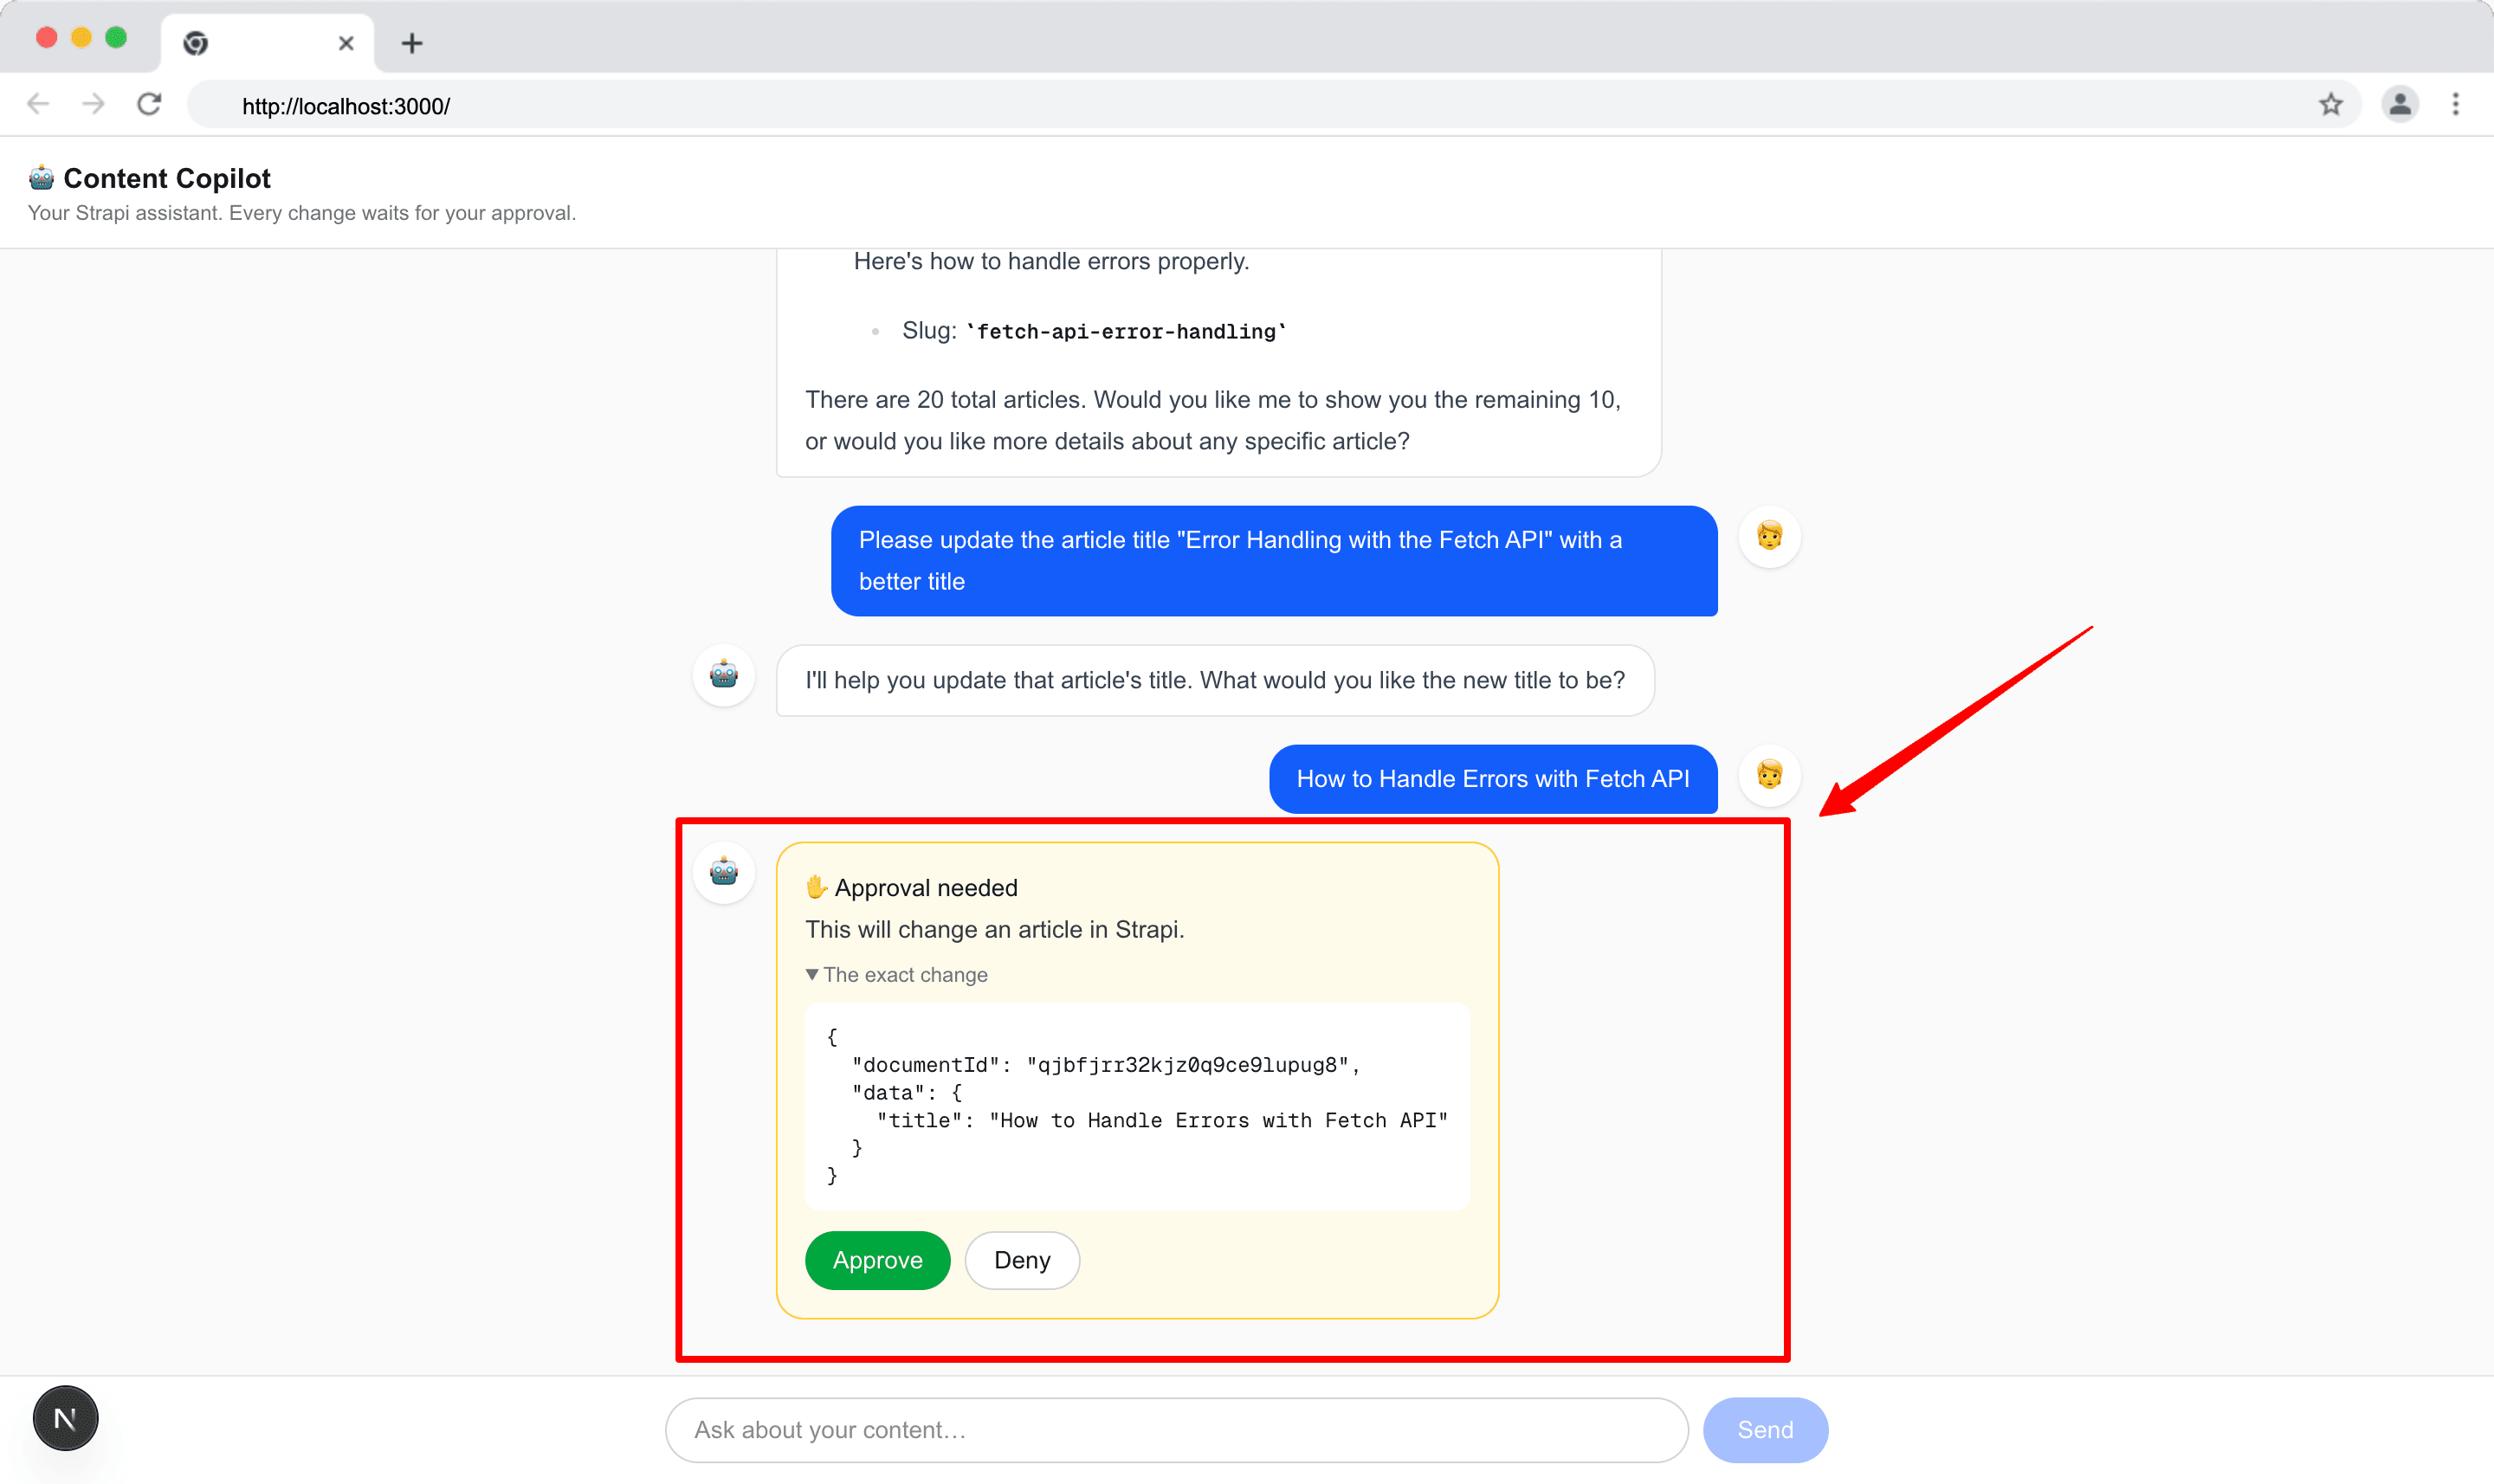
- An approval card for each write,
- And a result card for each custom tool.
Inside the ./app/components folder, create the chat-message.tsx file and add the following code:
📝 This component imports the result cards from tool-
results.tsx, which you'll create in Render the Results. The app won't compile until that file exists.
// ./app/components/chat-message.tsx

import type { ChatAddToolApproveResponseFunction, UIMessage } from "ai";
import type { ReactNode } from "react";
import ReactMarkdown from "react-markdown";
import remarkGfm from "remark-gfm";
import {
  BrokenLinks,
  CompetingContent,
  RelatedArticles,
} from "@/app/components/tool-results";

// Which card renders each custom tool's result.
const RESULT_VIEWS: Record<string, (props: { output: unknown }) => ReactNode> =
  {
    find_related_content: RelatedArticles,
    check_internal_links: BrokenLinks,
    research_competing_content: CompetingContent,
  };

type Props = {
  message: UIMessage;
  onApproval: ChatAddToolApproveResponseFunction;
};

export function ChatMessage({ message, onApproval }: Props) {
  const isUser = message.role === "user";

  return (
    <div className={`flex gap-3 ${isUser ? "flex-row-reverse" : ""}`}>
      <div className="flex h-9 w-9 shrink-0 items-center justify-center rounded-full bg-white text-lg shadow-sm">
        {isUser ? "🧑" : "🤖"}
      </div>

      <div
        className={`flex min-w-0 max-w-[80%] flex-col gap-2 ${isUser ? "items-end" : "items-start"}`}
      >
        {message.parts.map((part, i) => {
          if (part.type === "text") {
            const bubble = isUser
              ? "rounded-br-sm bg-blue-600 text-white"
              : "rounded-bl-sm border border-neutral-200 bg-white";
            return (
              <div
                key={i}
                className={`prose prose-sm max-w-none wrap-break-word rounded-2xl px-4 py-2 ${bubble}`}
              >
                <ReactMarkdown remarkPlugins={[remarkGfm]}>
                  {part.text}
                </ReactMarkdown>
              </div>
            );
          }

          if (part.type !== "dynamic-tool") return null;

          if (
            part.state === "approval-requested" &&
            !part.approval.isAutomatic
          ) {
            return (
              <div
                key={part.toolCallId}
                className="w-full rounded-2xl border border-amber-300 bg-amber-50 p-4 text-sm"
              >
                <p className="font-medium">✋ Approval needed</p>
                <p className="mt-1 text-neutral-700">
                  {part.approval.requestReason}
                </p>
                <details open className="mt-2">
                  <summary className="cursor-pointer text-xs text-neutral-500">
                    The exact change
                  </summary>
                  <pre className="mt-2 max-h-64 overflow-auto rounded-lg bg-white p-3 text-xs">
                    {JSON.stringify(part.input, null, 2)}
                  </pre>
                </details>
                <div className="mt-3 flex gap-2">
                  <button
                    onClick={() =>
                      onApproval({ id: part.approval.id, approved: true })
                    }
                    className="rounded-full bg-green-600 px-4 py-1.5 font-medium text-white hover:bg-green-700"
                  >
                    Approve
                  </button>
                  <button
                    onClick={() =>
                      onApproval({ id: part.approval.id, approved: false })
                    }
                    className="rounded-full border border-neutral-300 bg-white px-4 py-1.5 hover:bg-neutral-100"
                  >
                    Deny
                  </button>
                </div>
              </div>
            );
          }

          if (part.state === "output-available") {
            const View = RESULT_VIEWS[part.toolName];
            return View ? (
              <View key={part.toolCallId} output={part.output} />
            ) : (
              <p key={part.toolCallId} className="text-xs text-neutral-500">
                ✅ {part.toolName} done
              </p>
            );
          }

          if (part.state === "output-denied") {
            return (
              <p key={part.toolCallId} className="text-xs text-neutral-500">
                🚫 Change denied
              </p>
            );
          }

          return (
            <p key={part.toolCallId} className="text-xs text-neutral-500">
              🔧 Running {part.toolName}…
            </p>
          );
        })}
      </div>
    </div>
  );
}
remark-gfm adds tables and other GitHub-style Markdown. MCP tools arrive as dynamic-tool parts, so the component looks up each result card by part.toolName.
Here is what the approval card looks like:
Update the Home Page
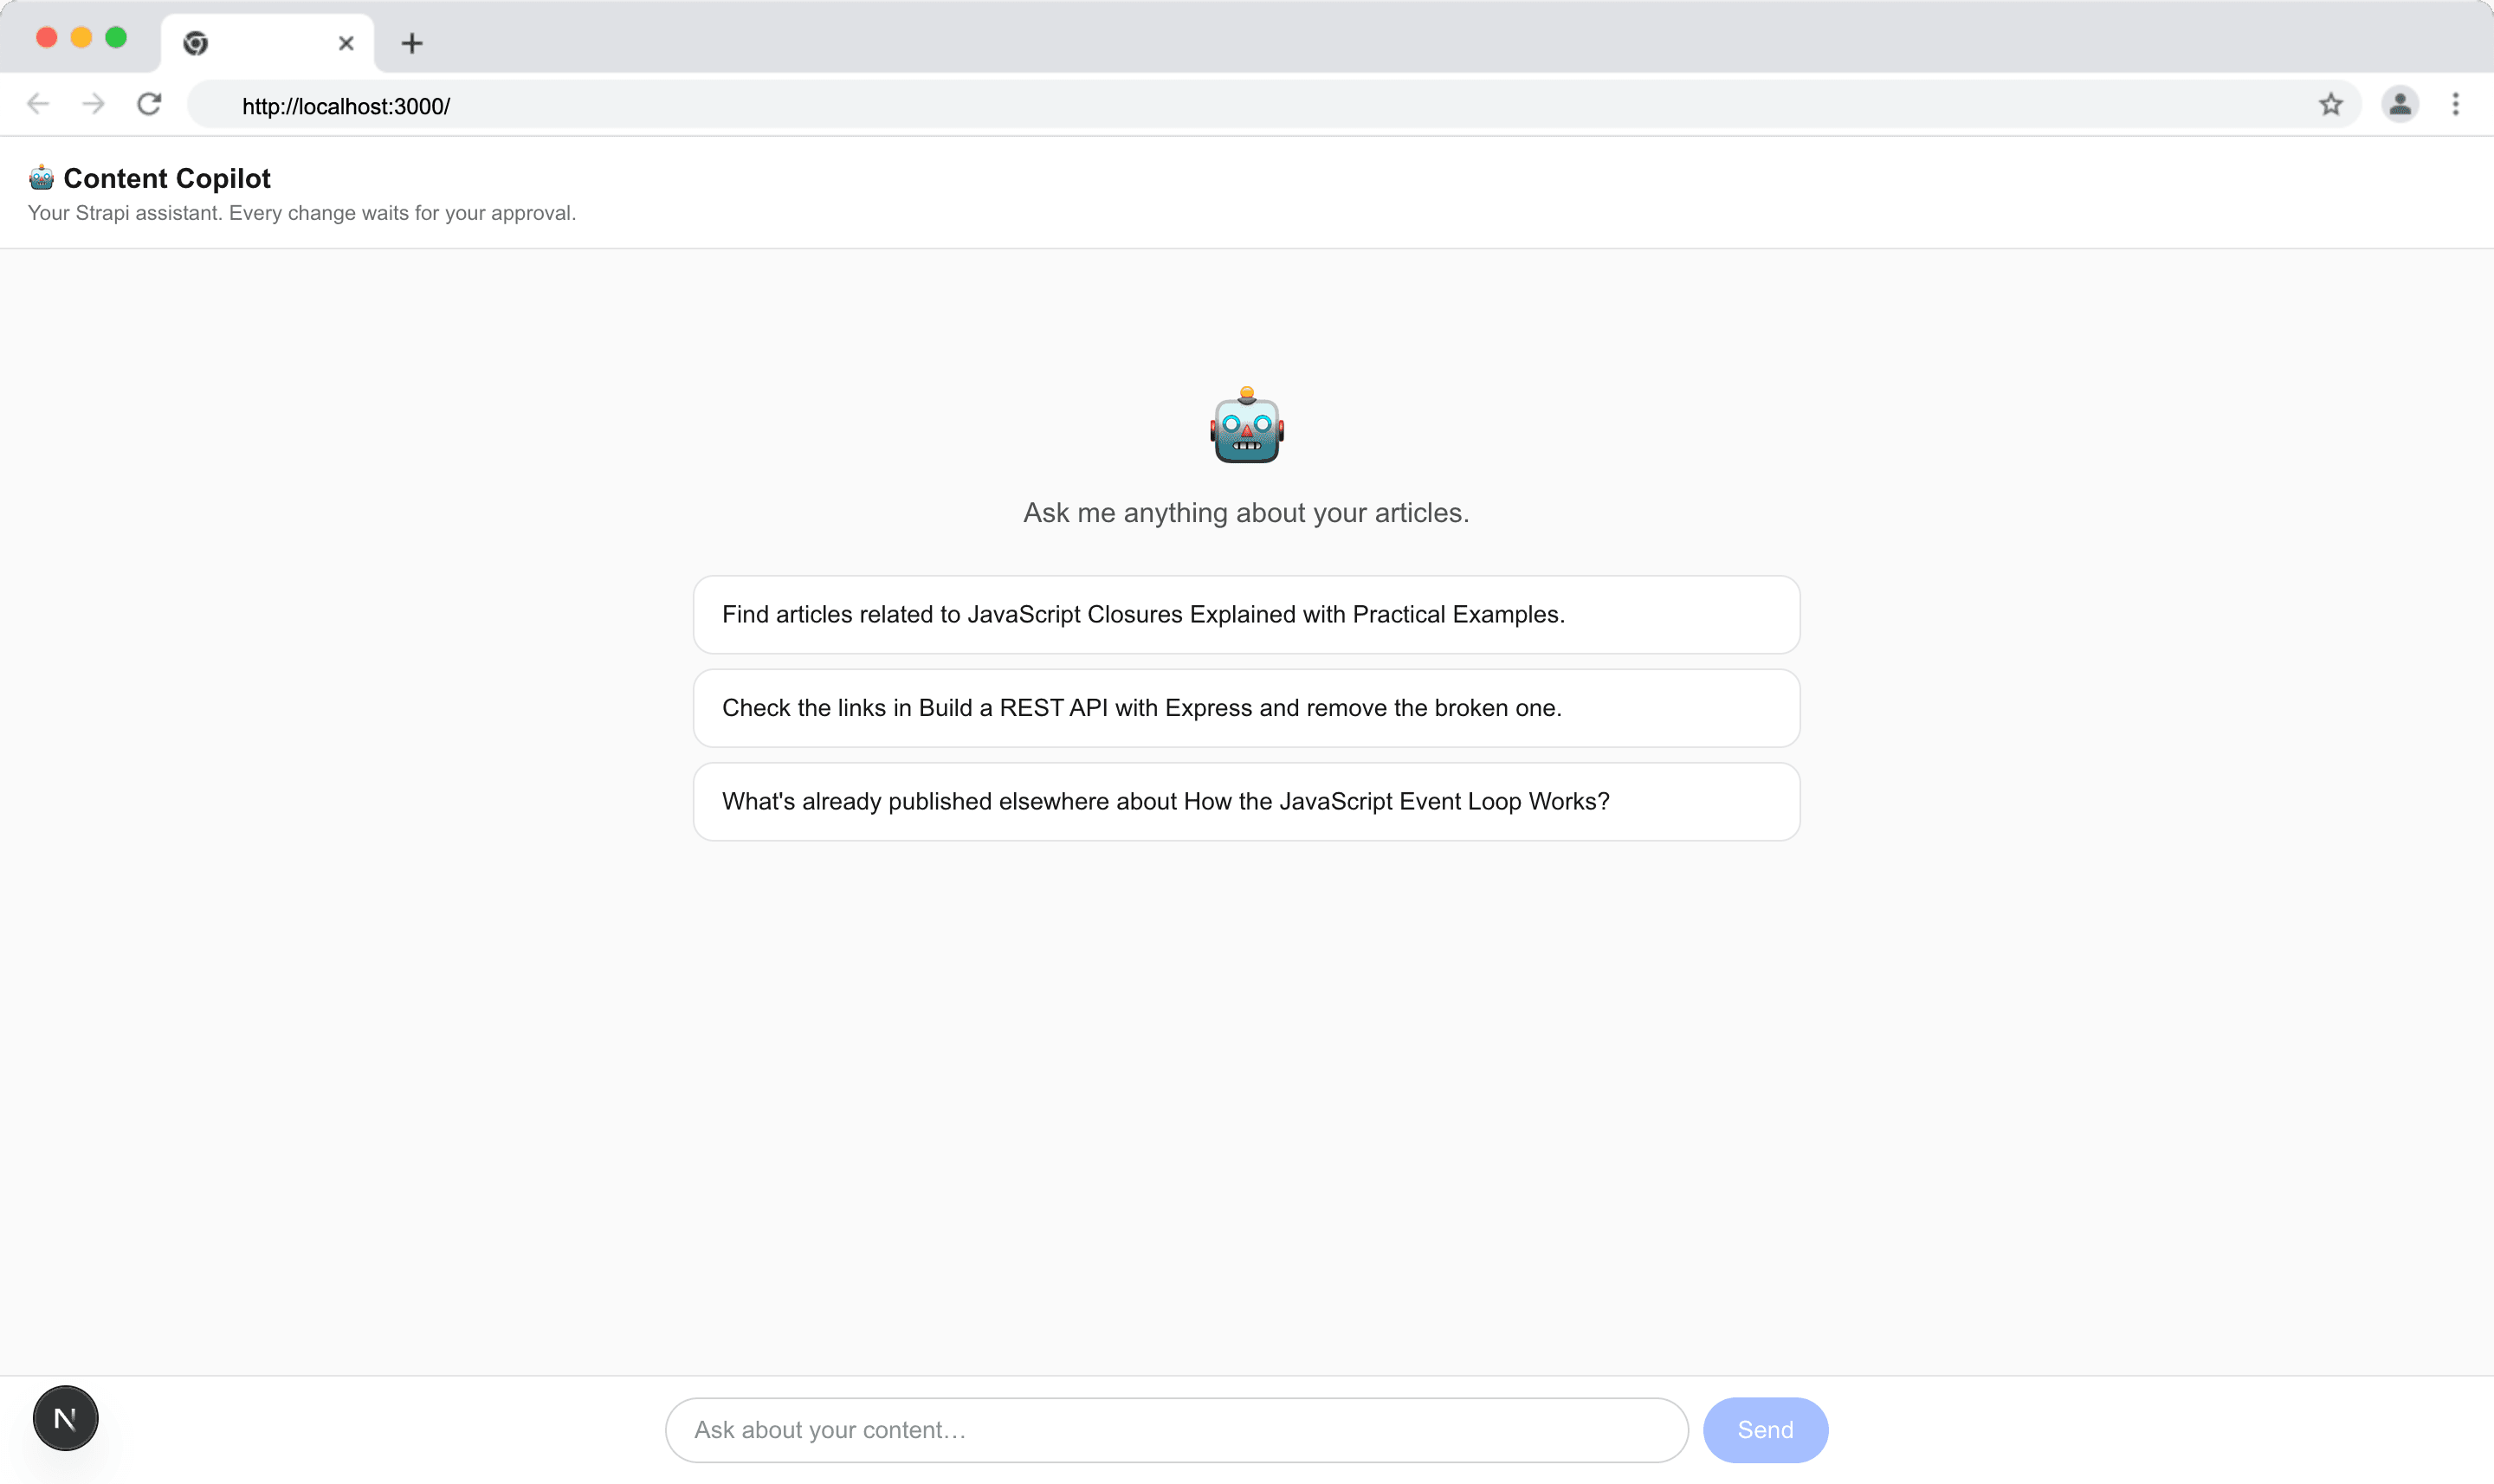
Head over to ./app/page.tsx and update it to hold the conversation with a header, suggested prompts to start with, the message list, and an input bar.
Replace ./app/page.tsx with the following code:
// ./app/page.tsx

"use client";

import { useChat } from "@ai-sdk/react";
import {
  DefaultChatTransport,
  lastAssistantMessageIsCompleteWithApprovalResponses,
} from "ai";
import { useEffect, useRef, useState } from "react";
import { ChatMessage } from "@/app/components/chat-message";

const SUGGESTIONS = [
  "Find articles related to JavaScript Closures Explained with Practical Examples.",
  "Check the links in Build a REST API with Express and remove the broken one.",
  "What's already published elsewhere about How the JavaScript Event Loop Works?",
];

export default function ContentCopilot() {
  const { messages, sendMessage, addToolApprovalResponse, status, error } =
    useChat({
      transport: new DefaultChatTransport({ api: "/api/chat" }),
      sendAutomaticallyWhen:
        lastAssistantMessageIsCompleteWithApprovalResponses,
    });
  const [input, setInput] = useState("");
  const bottomRef = useRef<HTMLDivElement>(null);
  const busy = status === "submitted" || status === "streaming";

  // Keep the newest message in view.
  useEffect(() => {
    bottomRef.current?.scrollIntoView({ behavior: "smooth" });
  }, [messages]);

  function send(text: string) {
    if (!text.trim() || busy) return;
    sendMessage({ text });
    setInput("");
  }

  return (
    <div className="flex h-dvh flex-col bg-neutral-50 text-neutral-900">
      <header className="border-b border-neutral-200 bg-white px-4 py-3">
        <h1 className="font-semibold">🤖 Content Copilot</h1>
        <p className="text-xs text-neutral-500">
          Your Strapi assistant. Every change waits for your approval.
        </p>
      </header>

      <main className="flex-1 overflow-y-auto">
        <div className="mx-auto flex max-w-2xl flex-col gap-4 p-4">
          {messages.length === 0 && (
            <div className="mt-16 text-center">
              <p className="text-5xl">🤖</p>
              <p className="mt-3 text-neutral-600">
                Ask me anything about your articles.
              </p>
              <div className="mt-6 flex flex-col gap-2">
                {SUGGESTIONS.map((suggestion) => (
                  <button
                    key={suggestion}
                    onClick={() => send(suggestion)}
                    className="rounded-xl border border-neutral-200 bg-white px-4 py-3 text-left text-sm hover:bg-neutral-100"
                  >
                    {suggestion}
                  </button>
                ))}
              </div>
            </div>
          )}

          {messages.map((message) => (
            <ChatMessage
              key={message.id}
              message={message}
              onApproval={addToolApprovalResponse}
            />
          ))}

          {status === "submitted" && (
            <p className="text-sm text-neutral-500">🤖 Thinking…</p>
          )}
          <div ref={bottomRef} />
        </div>
      </main>

      <p>{error?.message}</p>
      <form
        onSubmit={(e) => {
          e.preventDefault();
          send(input);
        }}
        className="border-t border-neutral-200 bg-white p-3"
      >
        <div className="mx-auto flex max-w-2xl gap-2">
          <input
            value={input}
            onChange={(e) => setInput(e.target.value)}
            placeholder="Ask about your content…"
            className="flex-1 rounded-full border border-neutral-300 px-4 py-2 text-sm outline-none focus:border-blue-500"
          />
          <button
            type="submit"
            disabled={busy || !input.trim()}
            className="rounded-full bg-blue-600 px-5 py-2 text-sm font-medium text-white hover:bg-blue-700 disabled:opacity-40"
          >
            Send
          </button>
        </div>
      </form>
    </div>
  );
}
Here is what the code above does:
- Builds the chat page
- Uses
useChatto send messages to the/api/chatroute and automatically resumes the agent after each approval - Shows a header and three suggested prompts as clickable buttons when the chat is empty
- Renders every message with
ChatMessage - Displays a "Thinking…" indicator and any error
- Keeps the newest message scrolled into view
- And provides an input bar whose "Send" button is disabled while the AI is responding or the input is empty.
Render the Results
Finally, we have to render the cards that display each custom tool's result.
Tool output is typed as unknown on the client, so each card validates it with Zod before rendering.
Create the file ./app/components/tool-results.tsx and add the following code:
// ./app/components/tool-results.tsx
import type { ReactNode } from "react";
import { z } from "zod";

// MCP results arrive as { content, structuredContent }. Parse, don't cast.
function structured<T>(schema: z.ZodType<T>, output: unknown): T | null {
  const candidate = (output as { structuredContent?: unknown })?.structuredContent ?? output;
  const parsed = schema.safeParse(candidate);
  return parsed.success ? parsed.data : null;
}

function Card({ title, children }: { title: string; children: ReactNode }) {
  return (
    <div className="w-full wrap-break-word rounded-2xl border border-neutral-200 bg-white p-4 text-sm shadow-sm">
      <p className="mb-2 font-medium">{title}</p>
      {children}
    </div>
  );
}

const RelatedSchema = z.object({
  related: z.array(z.object({ title: z.string(), slug: z.string() })),
});

export function RelatedArticles({ output }: { output: unknown }) {
  const data = structured(RelatedSchema, output);
  if (!data) return null;

  return (
    <Card title="🔗 Related articles">
      {data.related.length === 0 && <p className="text-neutral-500">No related articles found.</p>}
      <ul className="space-y-1">
        {data.related.map((article) => (
          <li key={article.slug}>
            {article.title} <span className="text-neutral-500">/blog/{article.slug}</span>
          </li>
        ))}
      </ul>
    </Card>
  );
}

const LinksSchema = z.object({ checked: z.number(), broken: z.array(z.string()) });

export function BrokenLinks({ output }: { output: unknown }) {
  const data = structured(LinksSchema, output);
  if (!data) return null;

  return (
    <Card title="🧭 Link check">
      <p className="text-neutral-600">
        {data.checked} internal link(s) checked, {data.broken.length} broken
      </p>
      <ul className="mt-2 space-y-1 text-red-600">
        {data.broken.map((slug) => (
          <li key={slug}>❌ /blog/{slug}</li>
        ))}
      </ul>
    </Card>
  );
}

const CompetingSchema = z.object({
  query: z.string(),
  results: z.array(z.object({ position: z.number(), title: z.string(), link: z.string() })),
});

export function CompetingContent({ output }: { output: unknown }) {
  const data = structured(CompetingSchema, output);
  if (!data) return null;

  return (
    <Card title={`🔎 Top Google results for "${data.query}"`}>
      <ol className="space-y-1">
        {data.results.map((result) => (
          <li key={result.link}>
            {result.position}.{" "}
            <a href={result.link} className="text-blue-600 underline" target="_blank" rel="noreferrer">
              {result.title}
            </a>
          </li>
        ))}
      </ol>
    </Card>
  );
}
Here is what the code above does:
- Defines the 3 result cards for each custom tool.
- A shared
structured()helper validates the tool's output with Zod (rendering nothing if it doesn't match) - A shared Card which gives them a consistent look
RelatedArticles,BrokenLinksandCompetingContentdisplay the related articles with their slugs, the link-check count with each broken link marked ❌, and the top Google results as numbered links that open in a new tab.
Testing the App
Run npm run dev and try the suggested prompts.
Search Competing Content
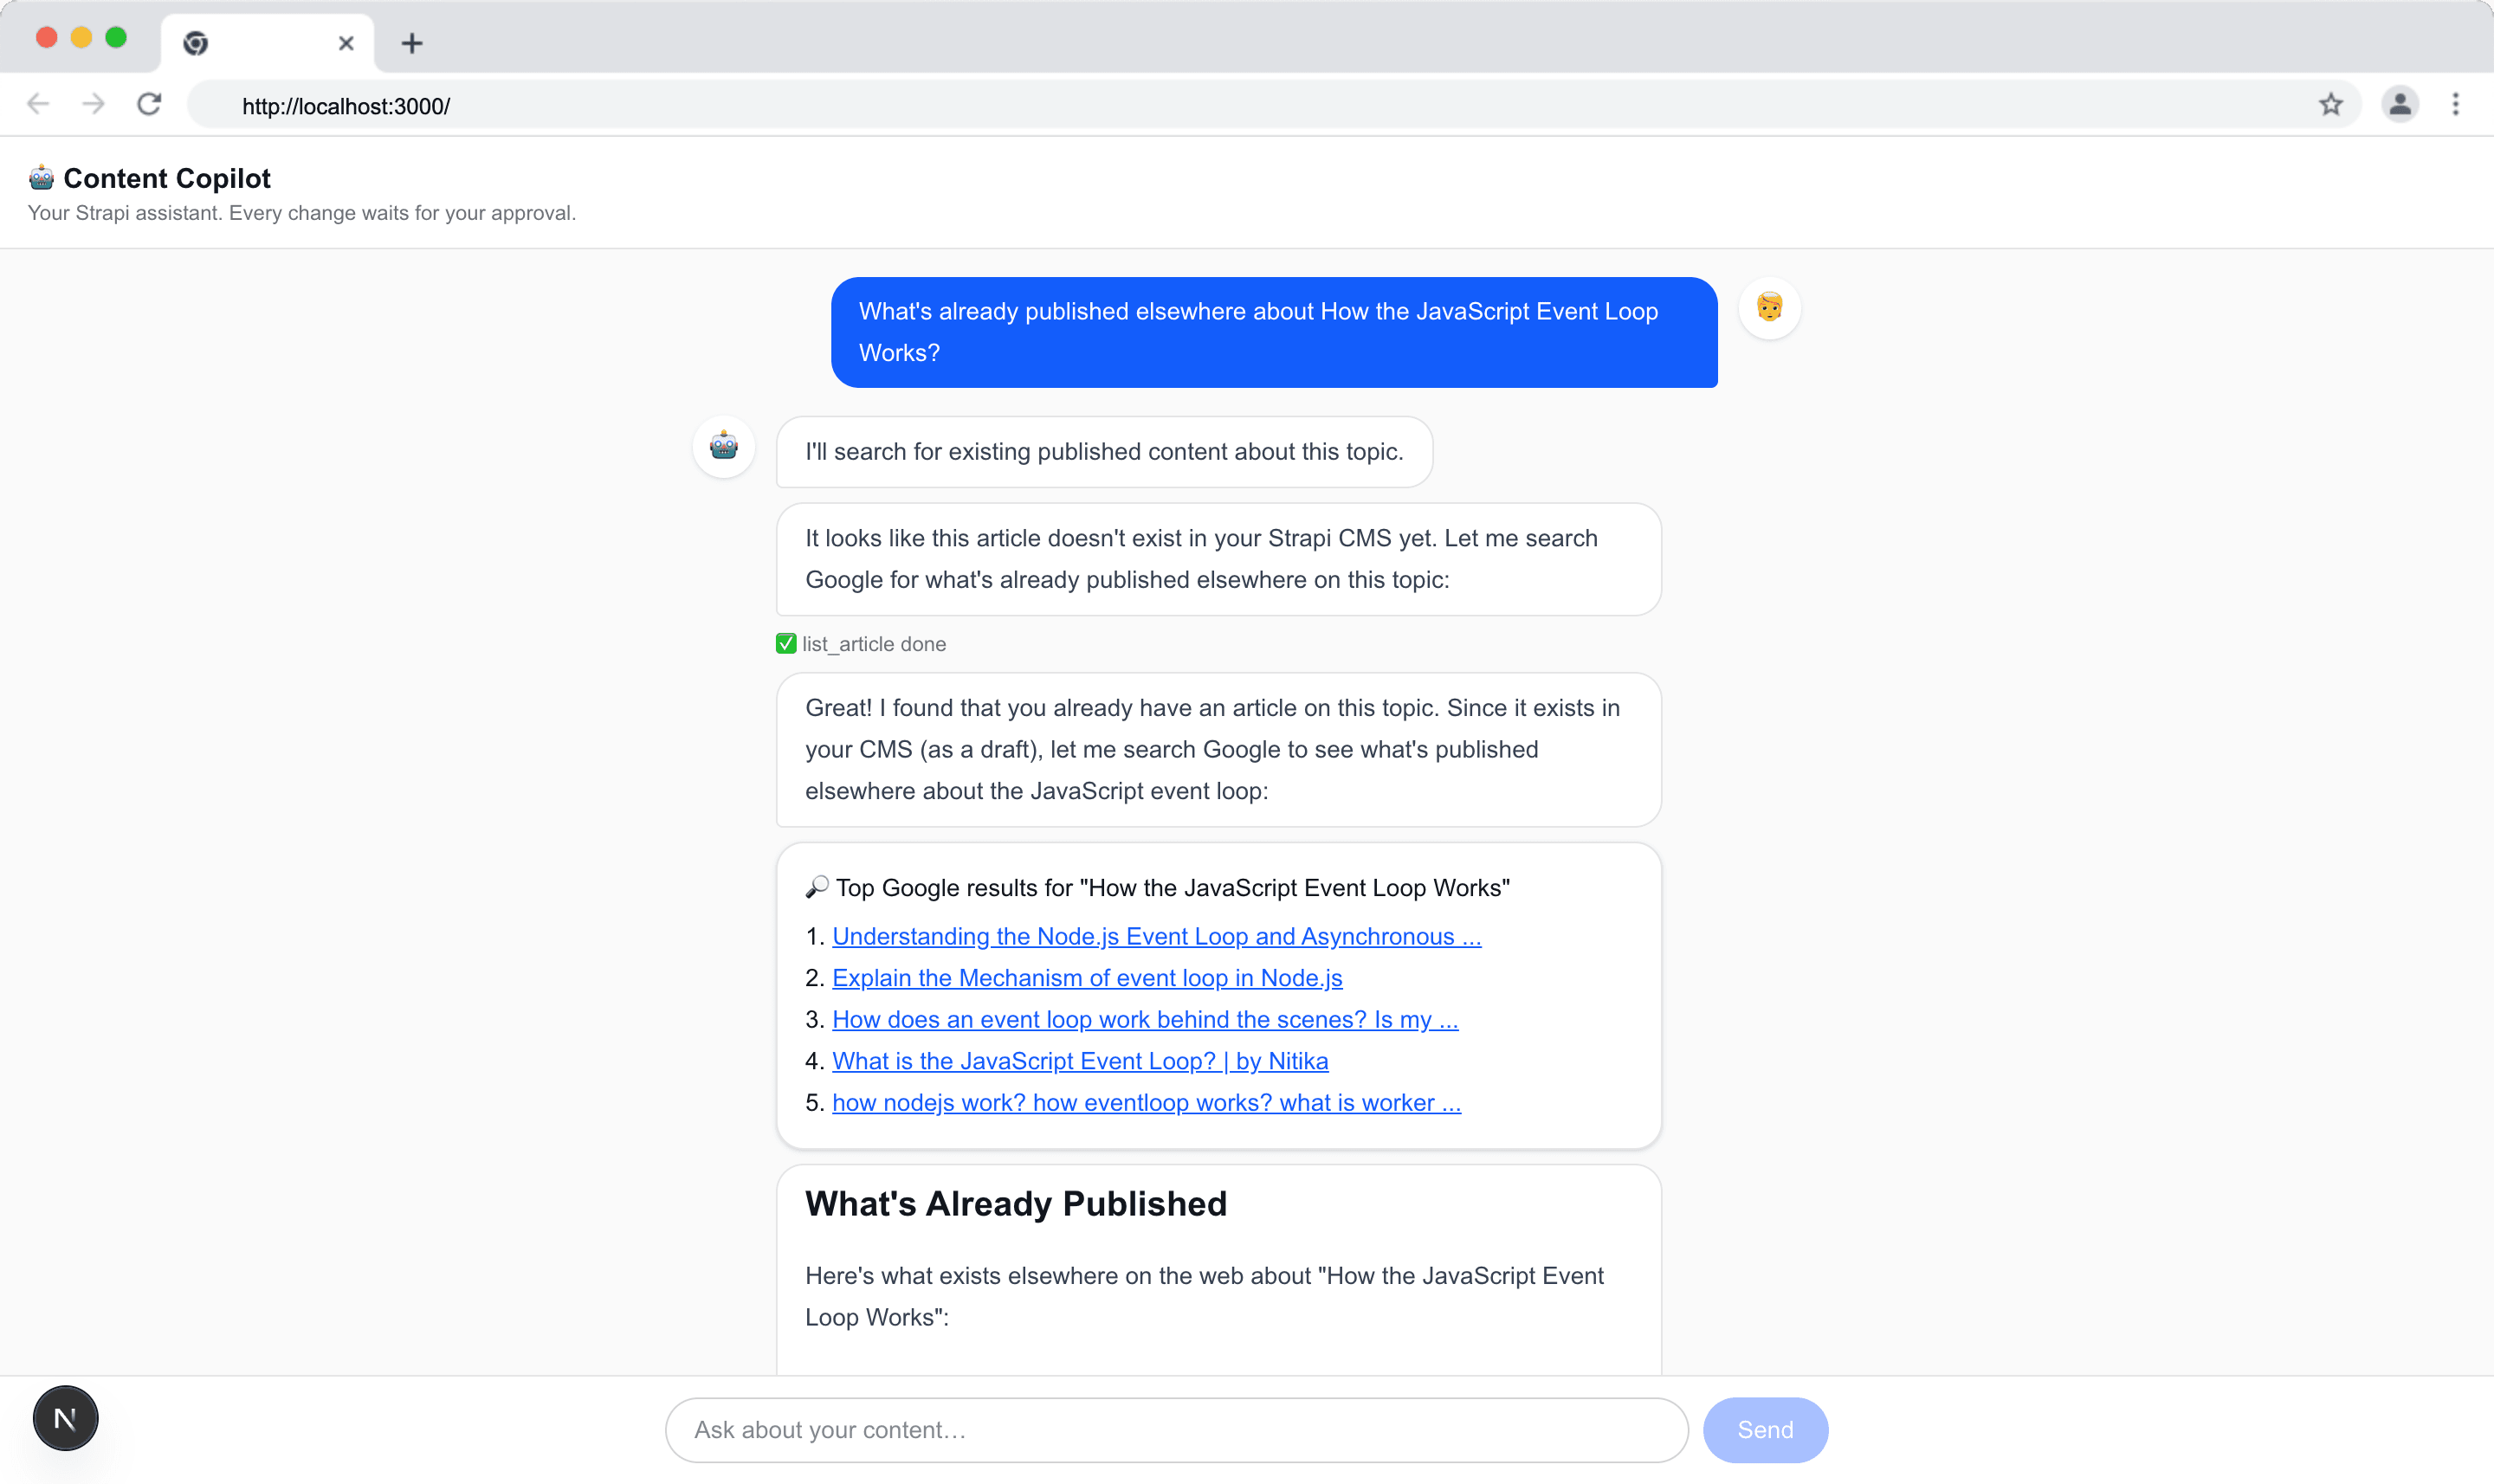
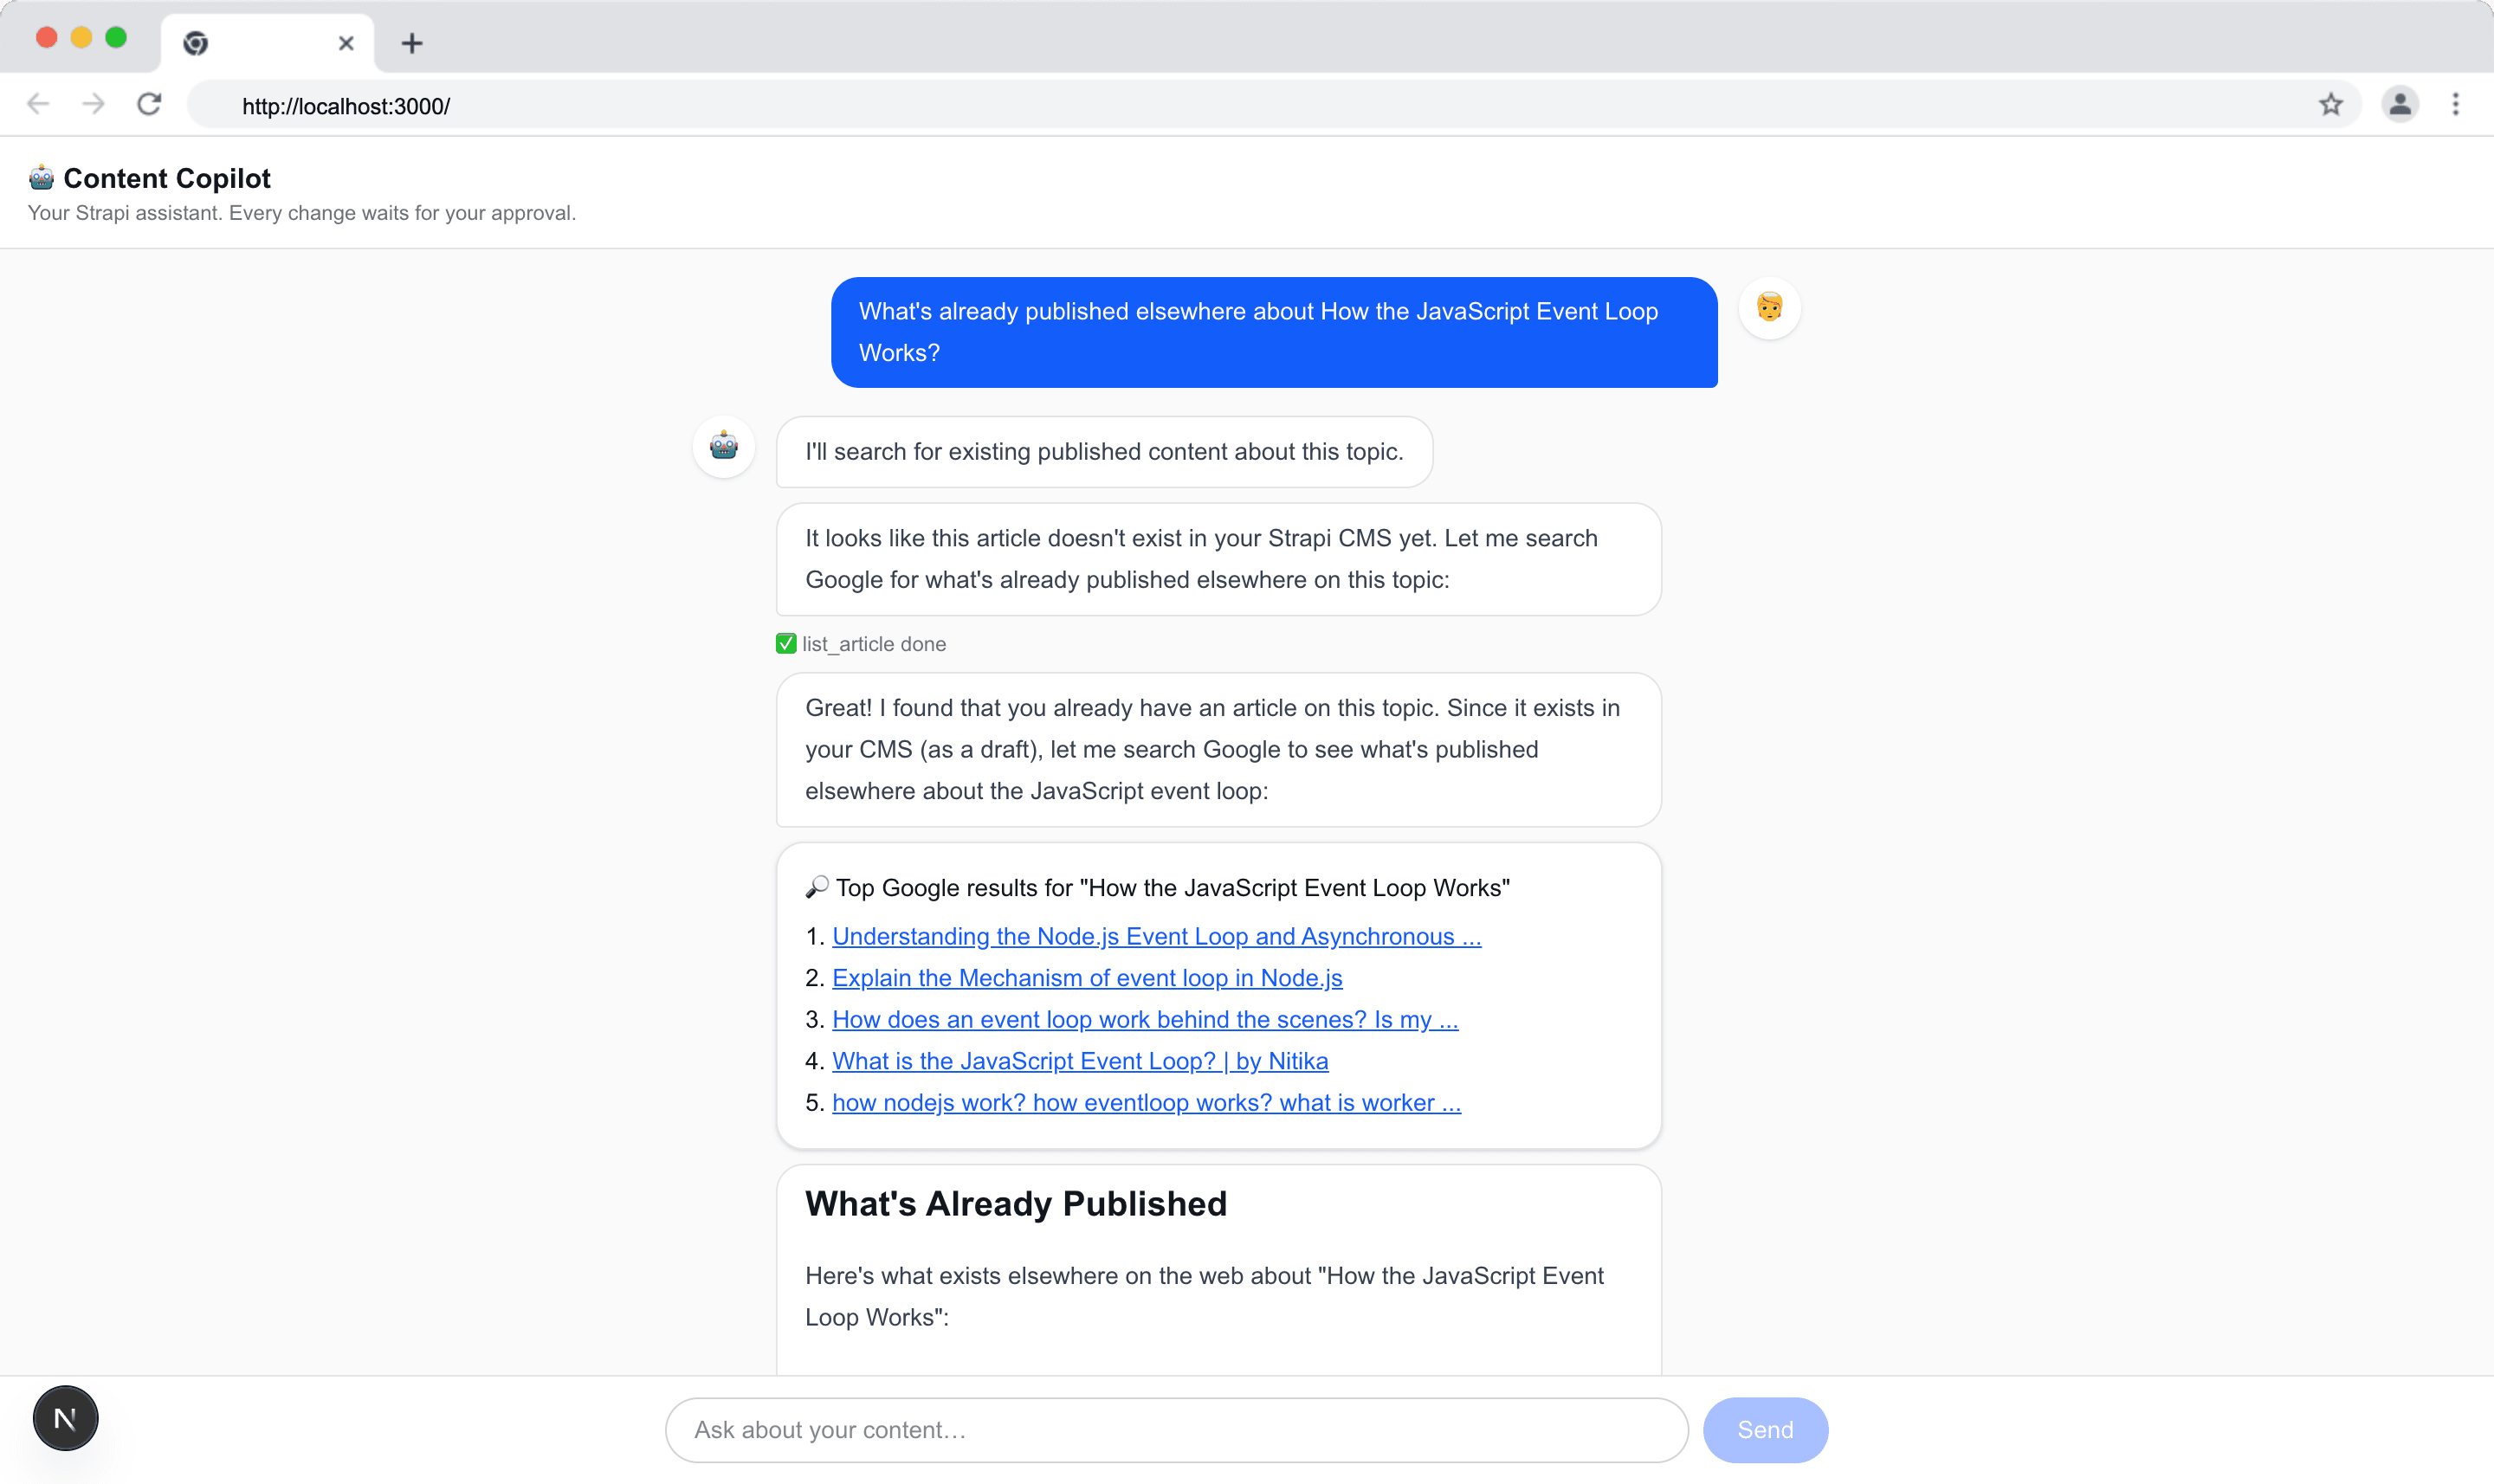
Ask the app what's already published about one of your articles. It calls research_competing_content and shows the top Google results from SerpApi.
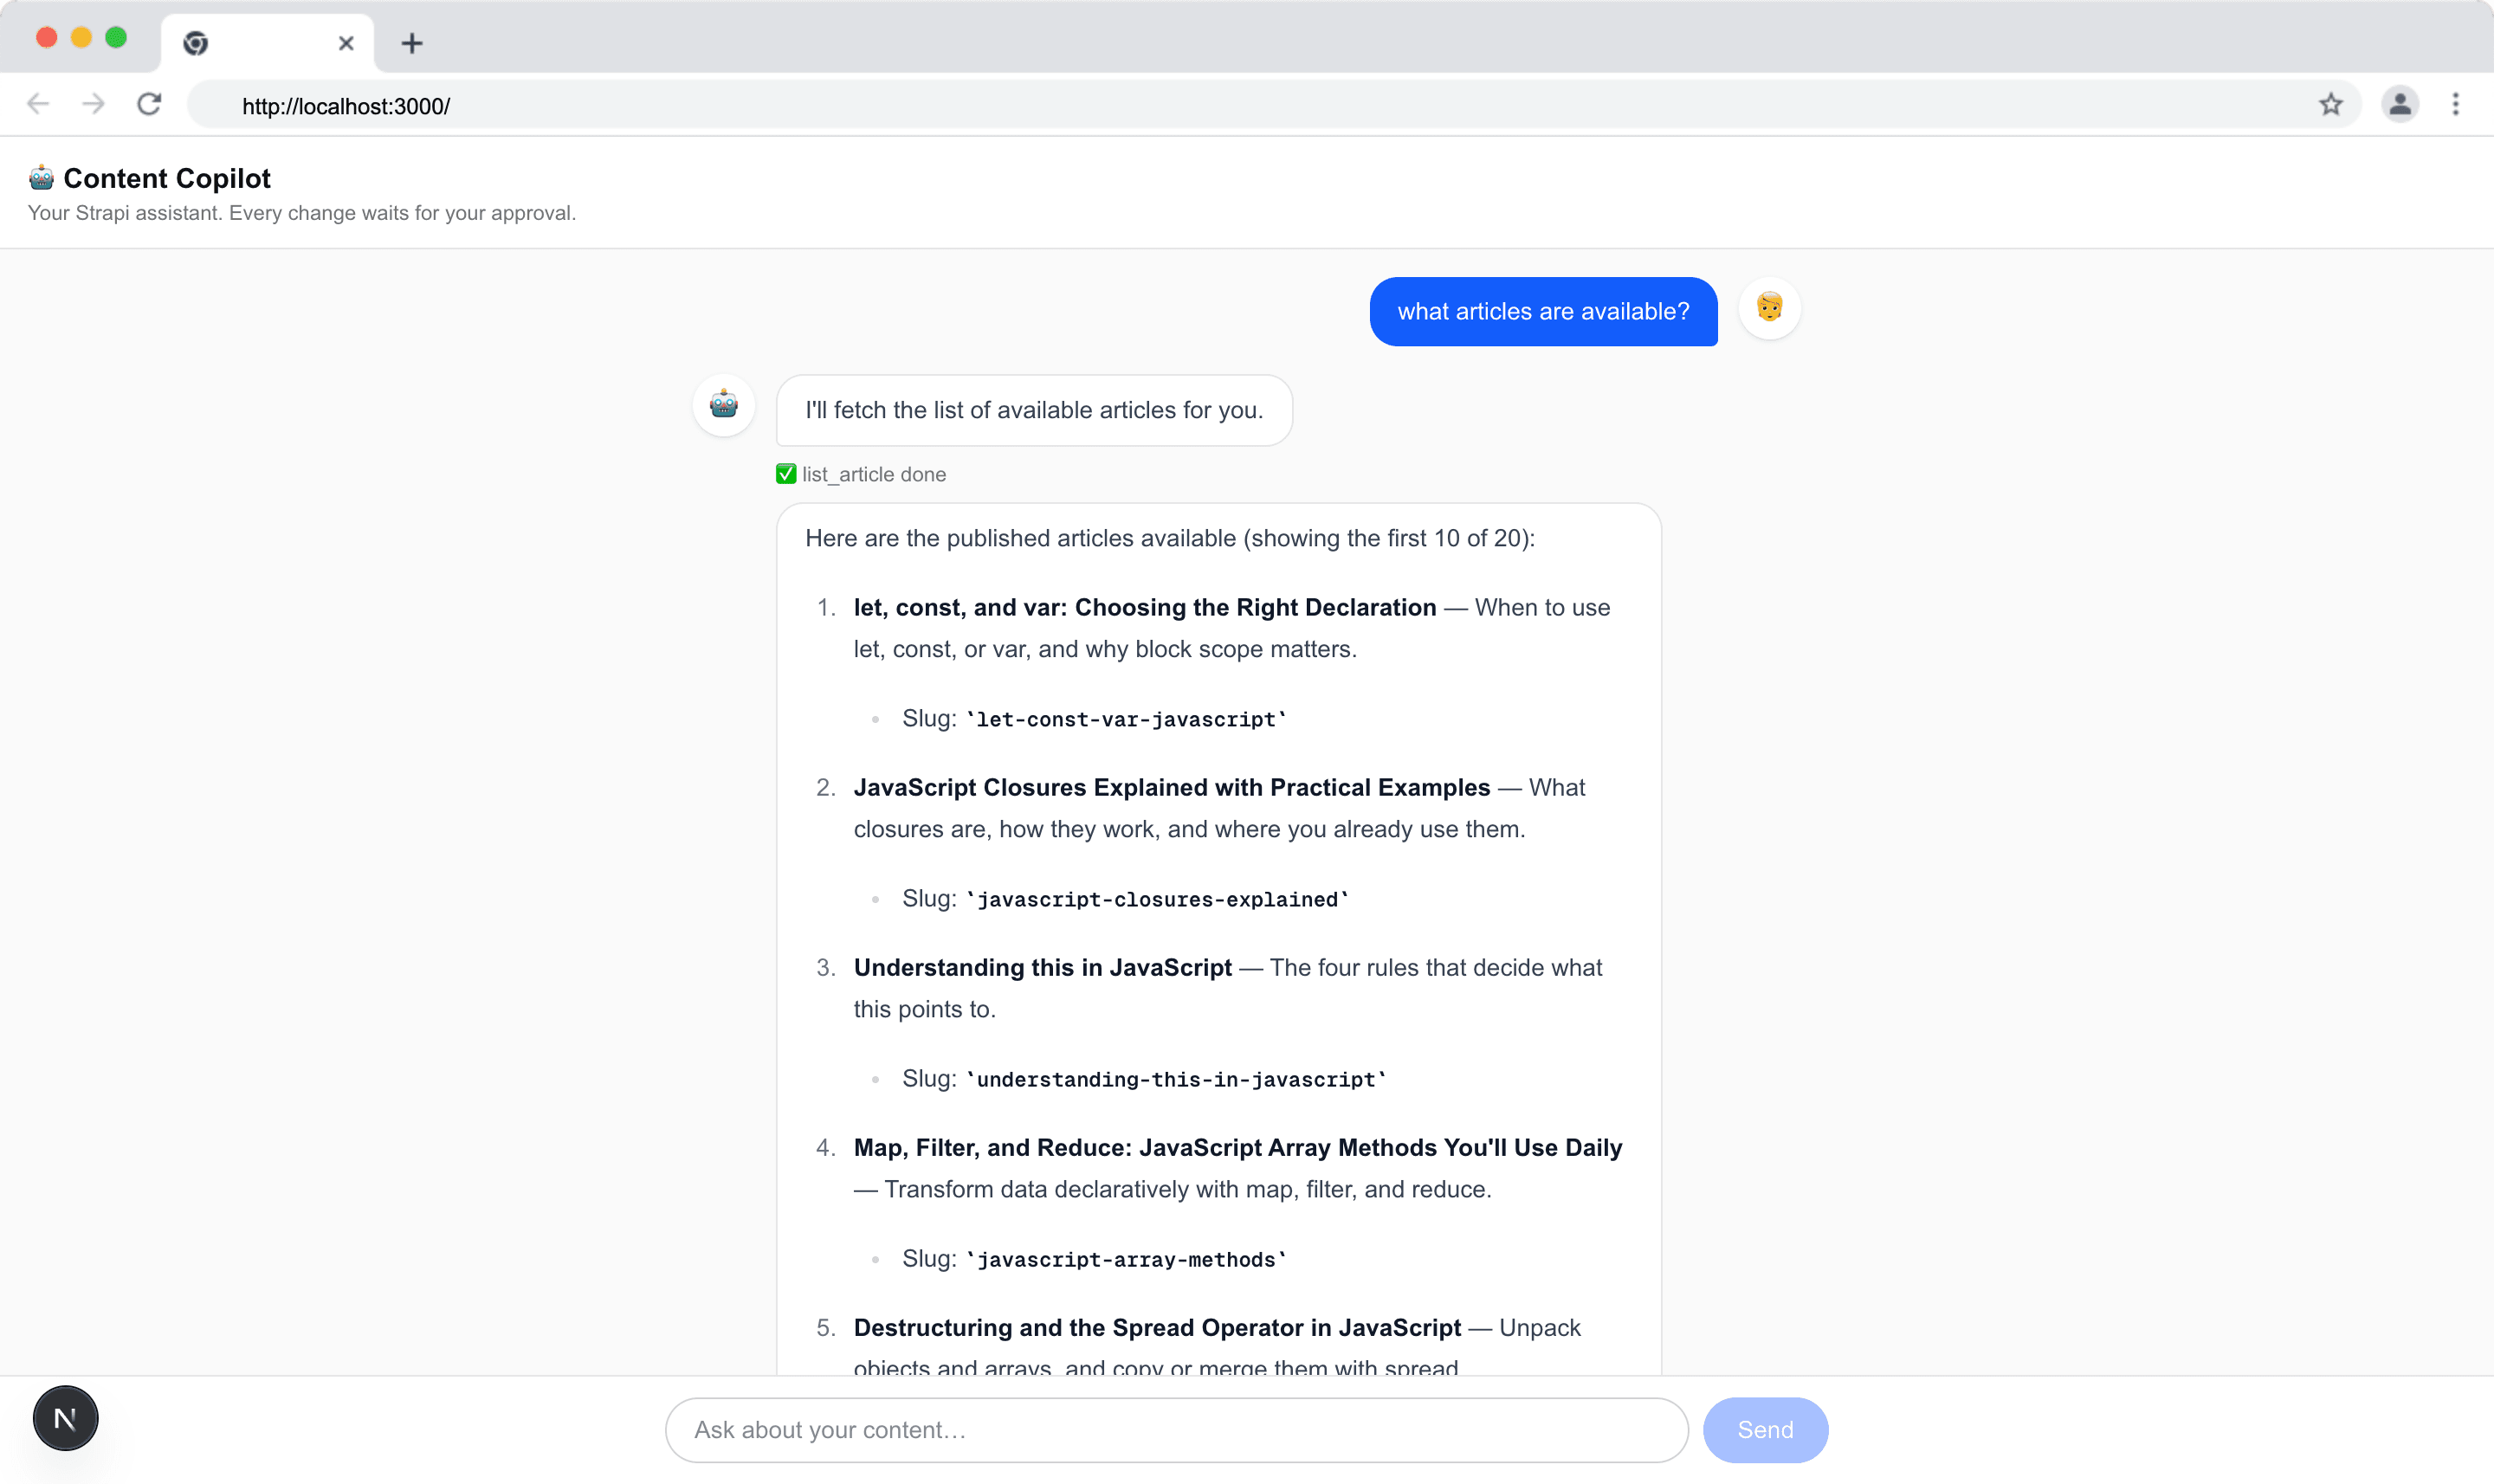
Listing Articles
Ask the app to list your articles, and it calls the list_article tool.
Approving an Edit
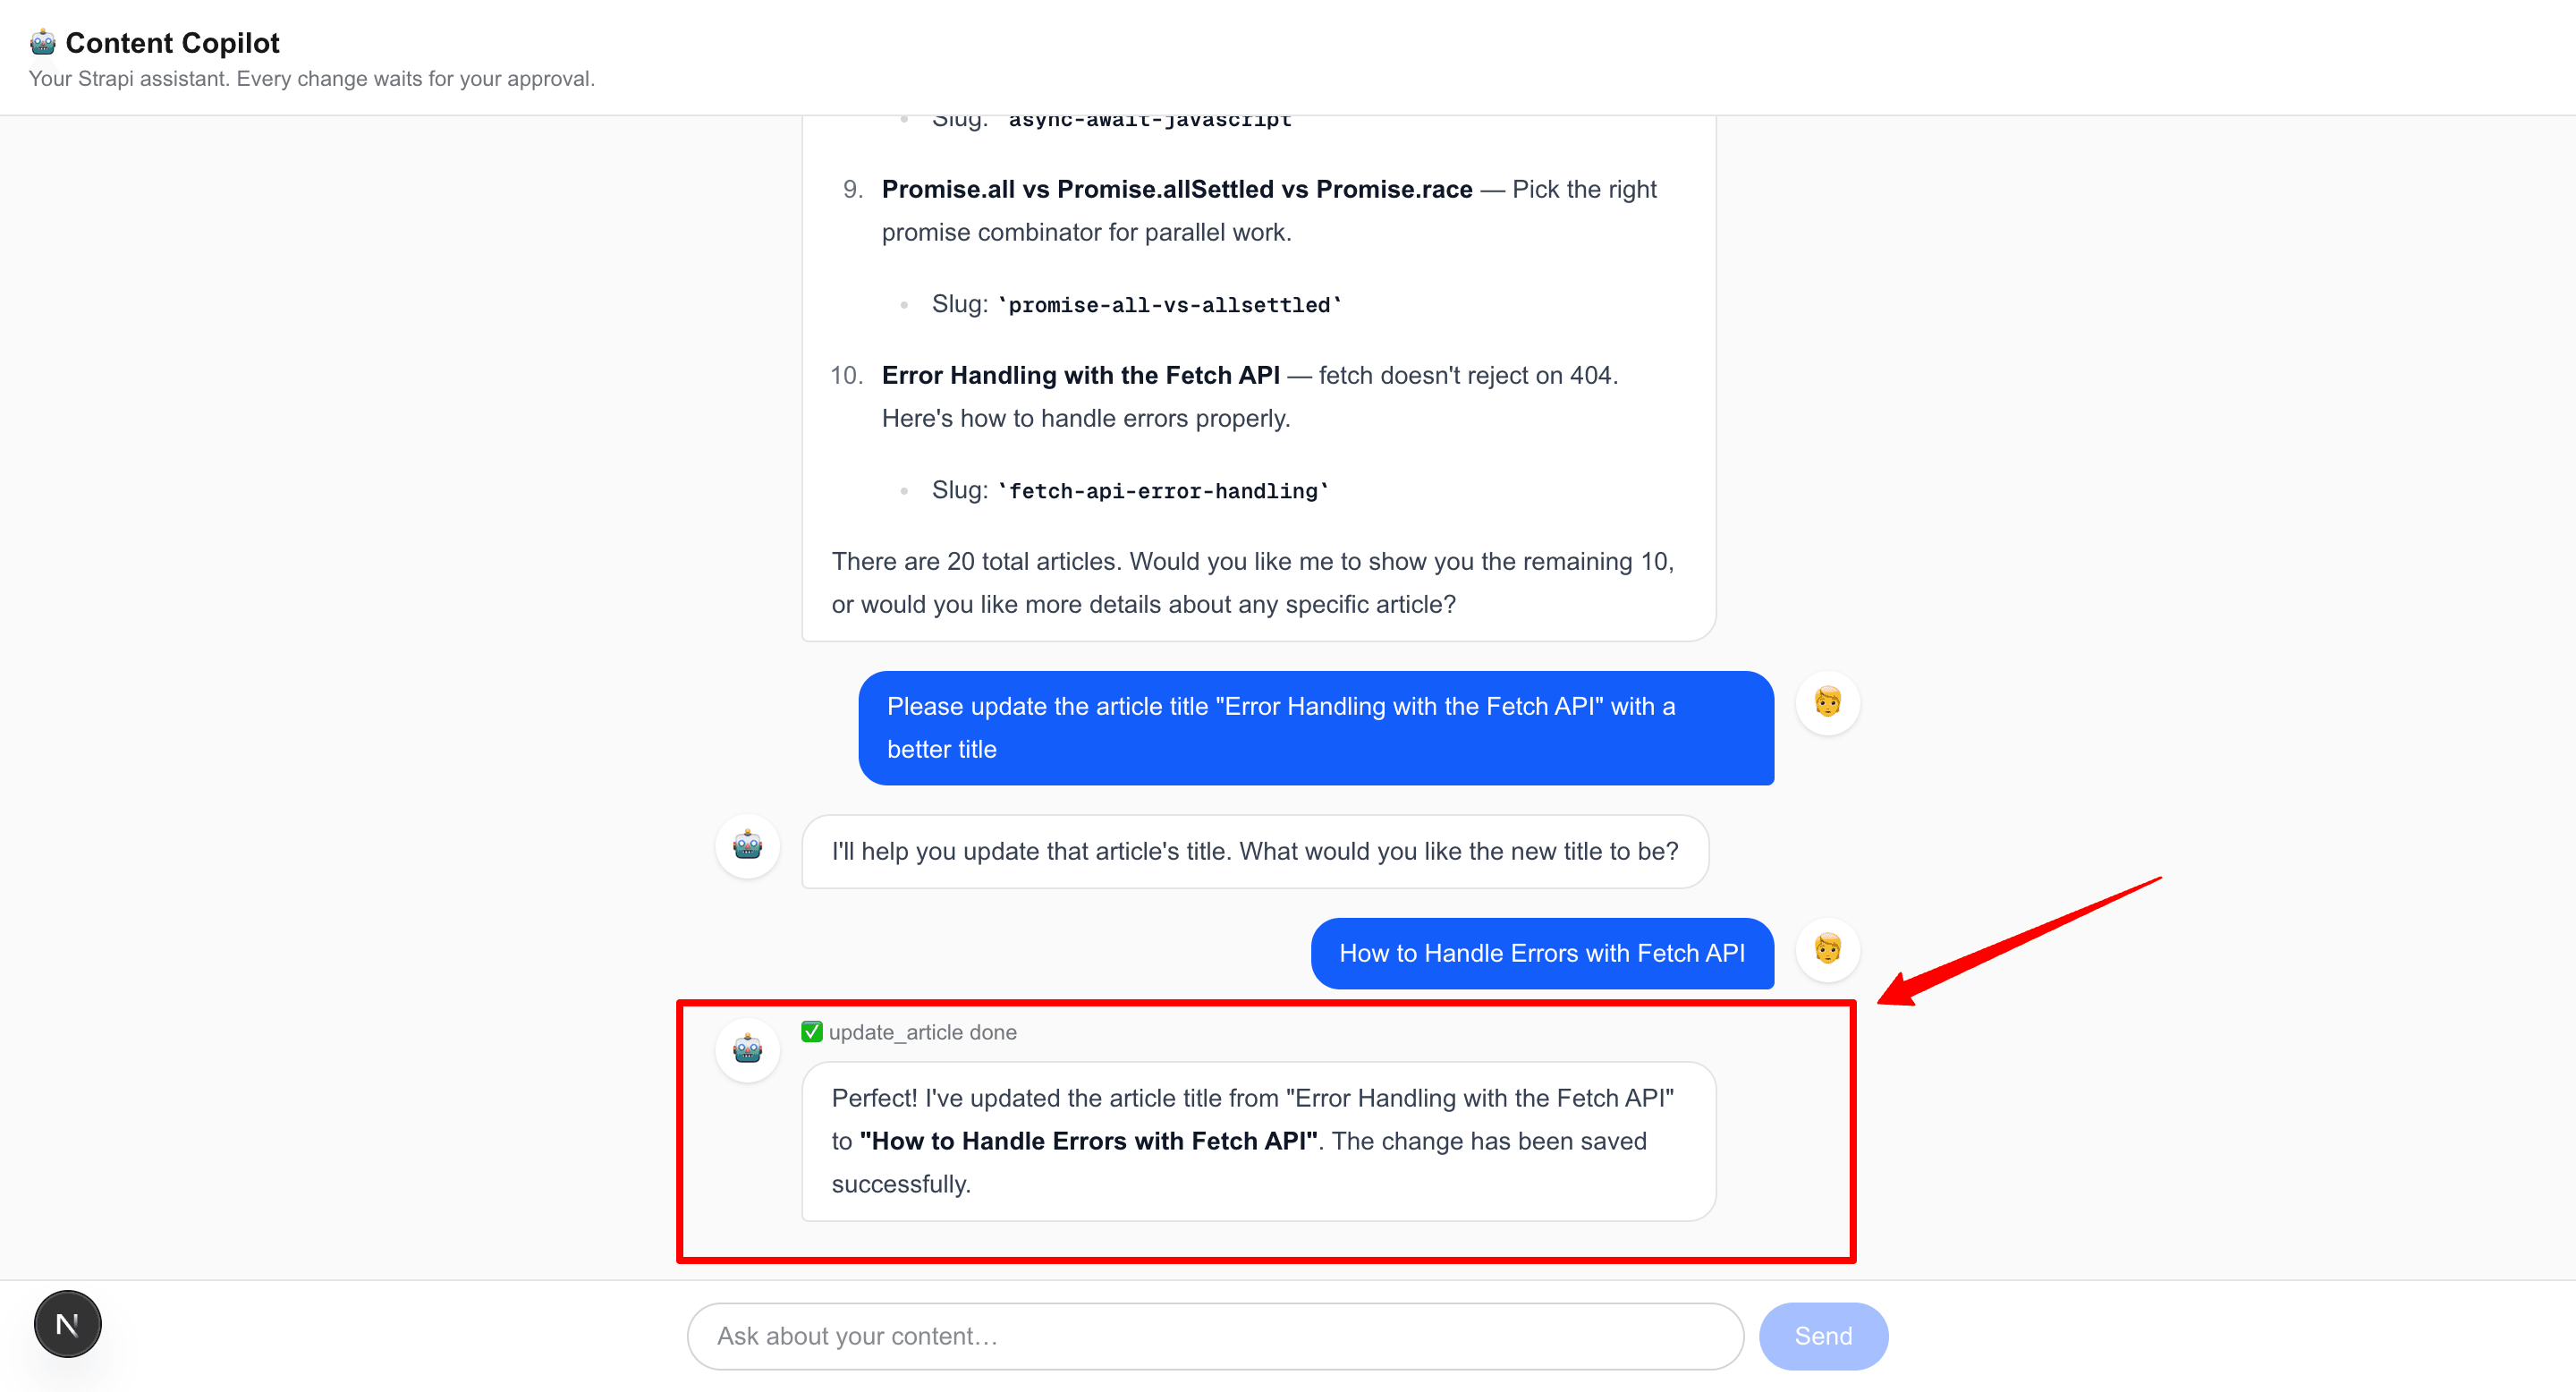
Write a prompt to edit one of your articles. The agent finds it with the default get_article tool, then asks for approval before calling update_article.
Before approval.
After you approve, the update_article tool runs:
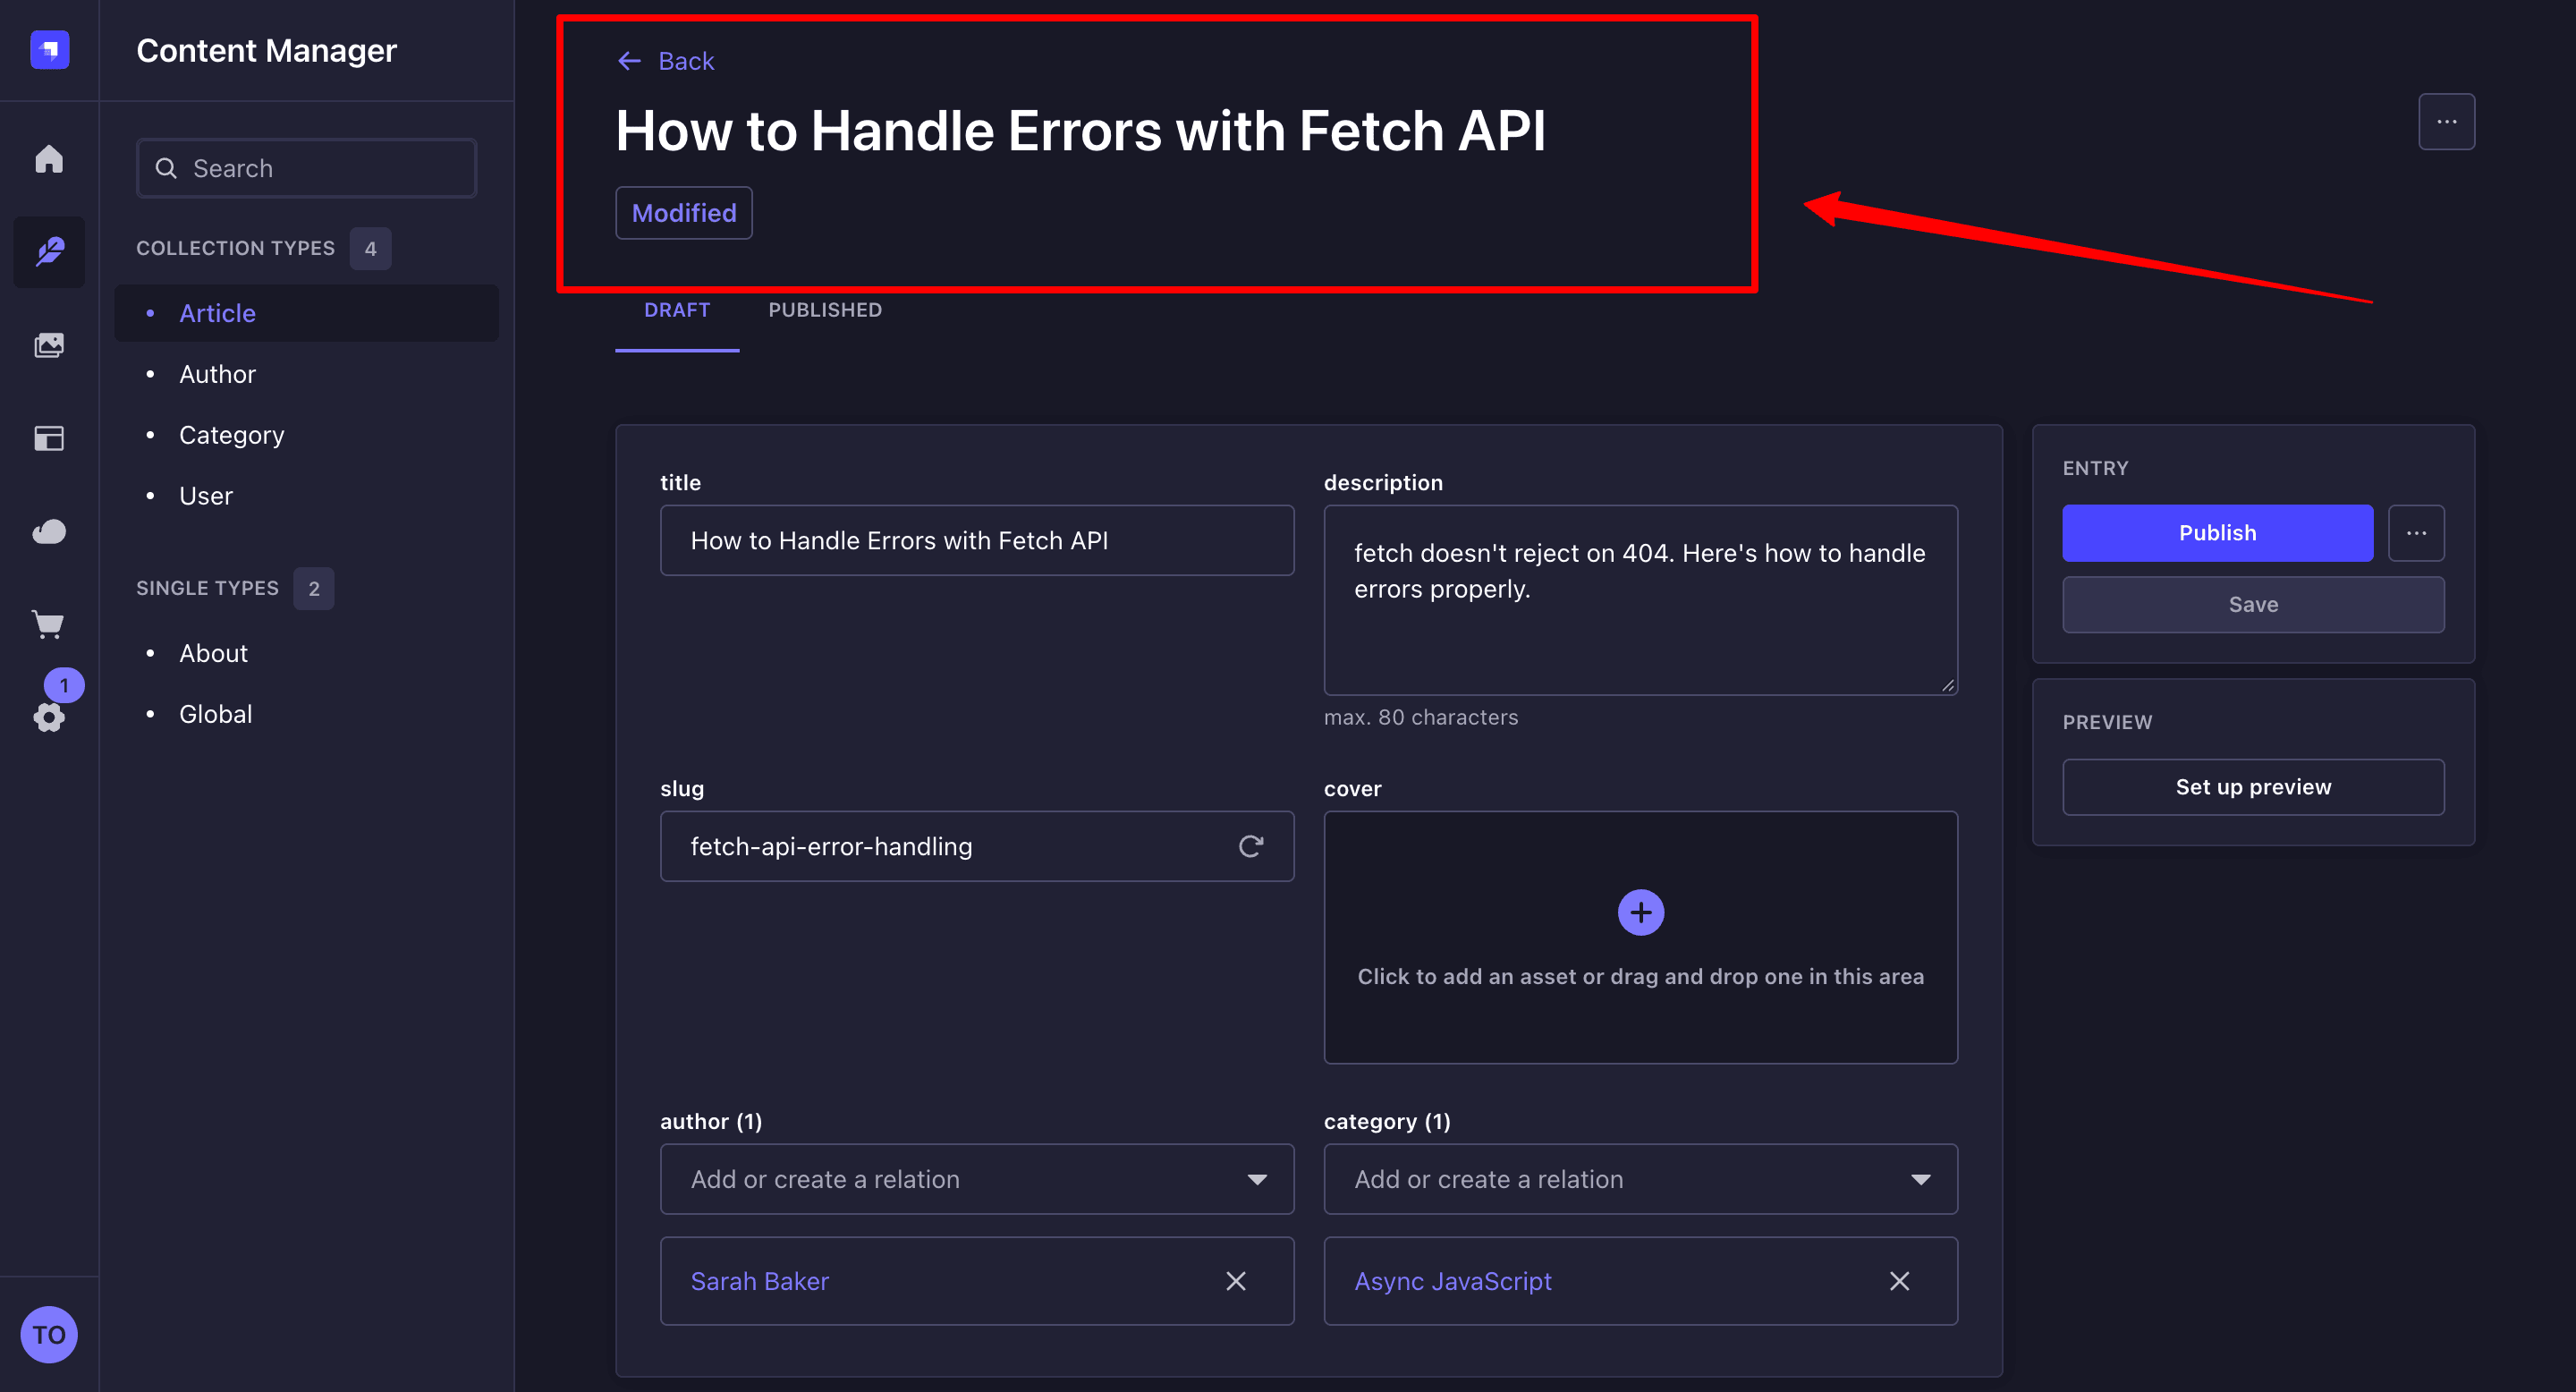
In the Strapi admin, the modified article is now a draft waiting to be published.
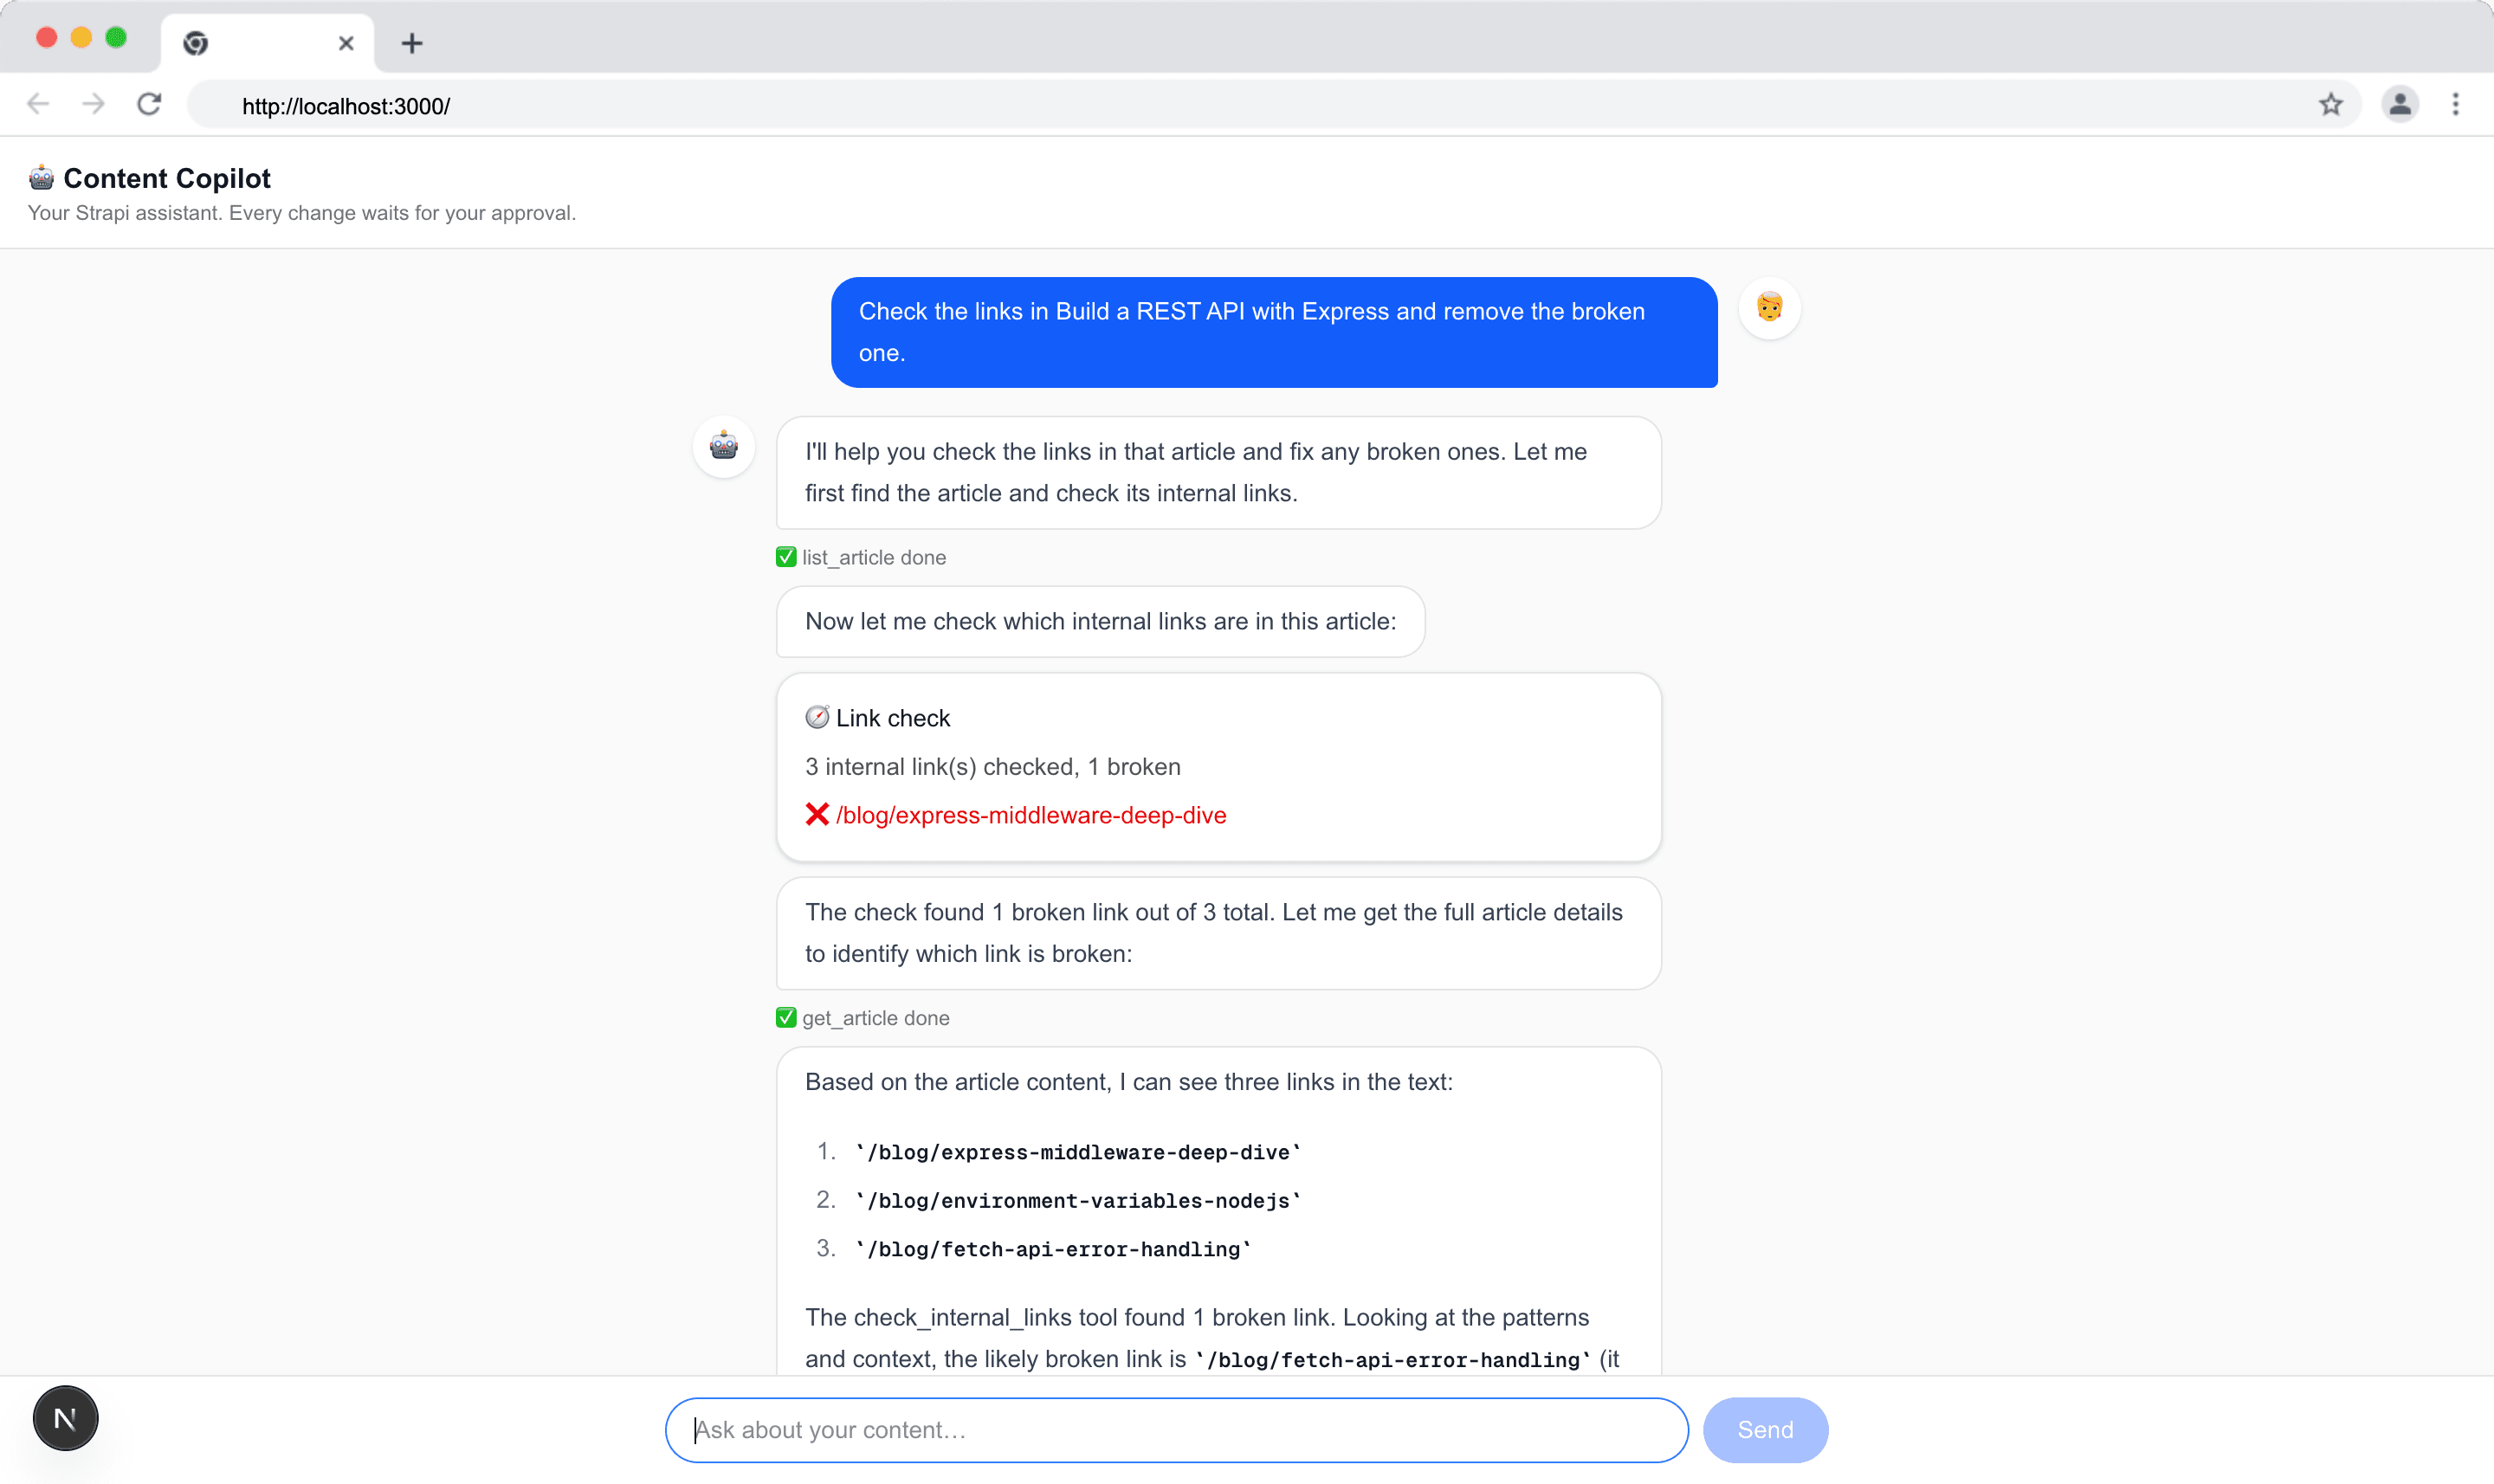
Check Broken Links
You can also prompt your app to check internal links that are valid in an article as shown below.
Next Steps
- Add authentication and per-editor tokens. At this point, anyone who reaches the URL can edit drafts. So, put the app behind a login.
- Automate guardrails. Make
toolApprovaldeny anyupdate_articlecall whoseblocksarray is shorter than the article's current one, and add rate limits on model tokens and SerpApi credits. - Trace every step. Turn on the AI SDK's telemetry and send traces to an observability tool, so you can see each prompt, tool call, and token count. Render
reasoningparts too, so editors see why the agent chose a tool. - Write evals. Keep a set of test prompts with the tool calls you expect, and run it whenever you change the model, instructions, or tools, to catch regressions before editors do.
- Add semantic search. Embed your articles with the AI SDK's
embedMany()and build a custom tool that finds related content by meaning, not just by category. - Work with images. Grant the Admin token Media Library
readandupdateso editors can fix alt text, and leavemedia_delete_assetsandmedia_delete_folderout ofALLOWED_TOOLS, sinceupdateexposes them too. A custom tool can return an image to the model, so Claude can describe it. - Package the tools as a plugin. Create one with
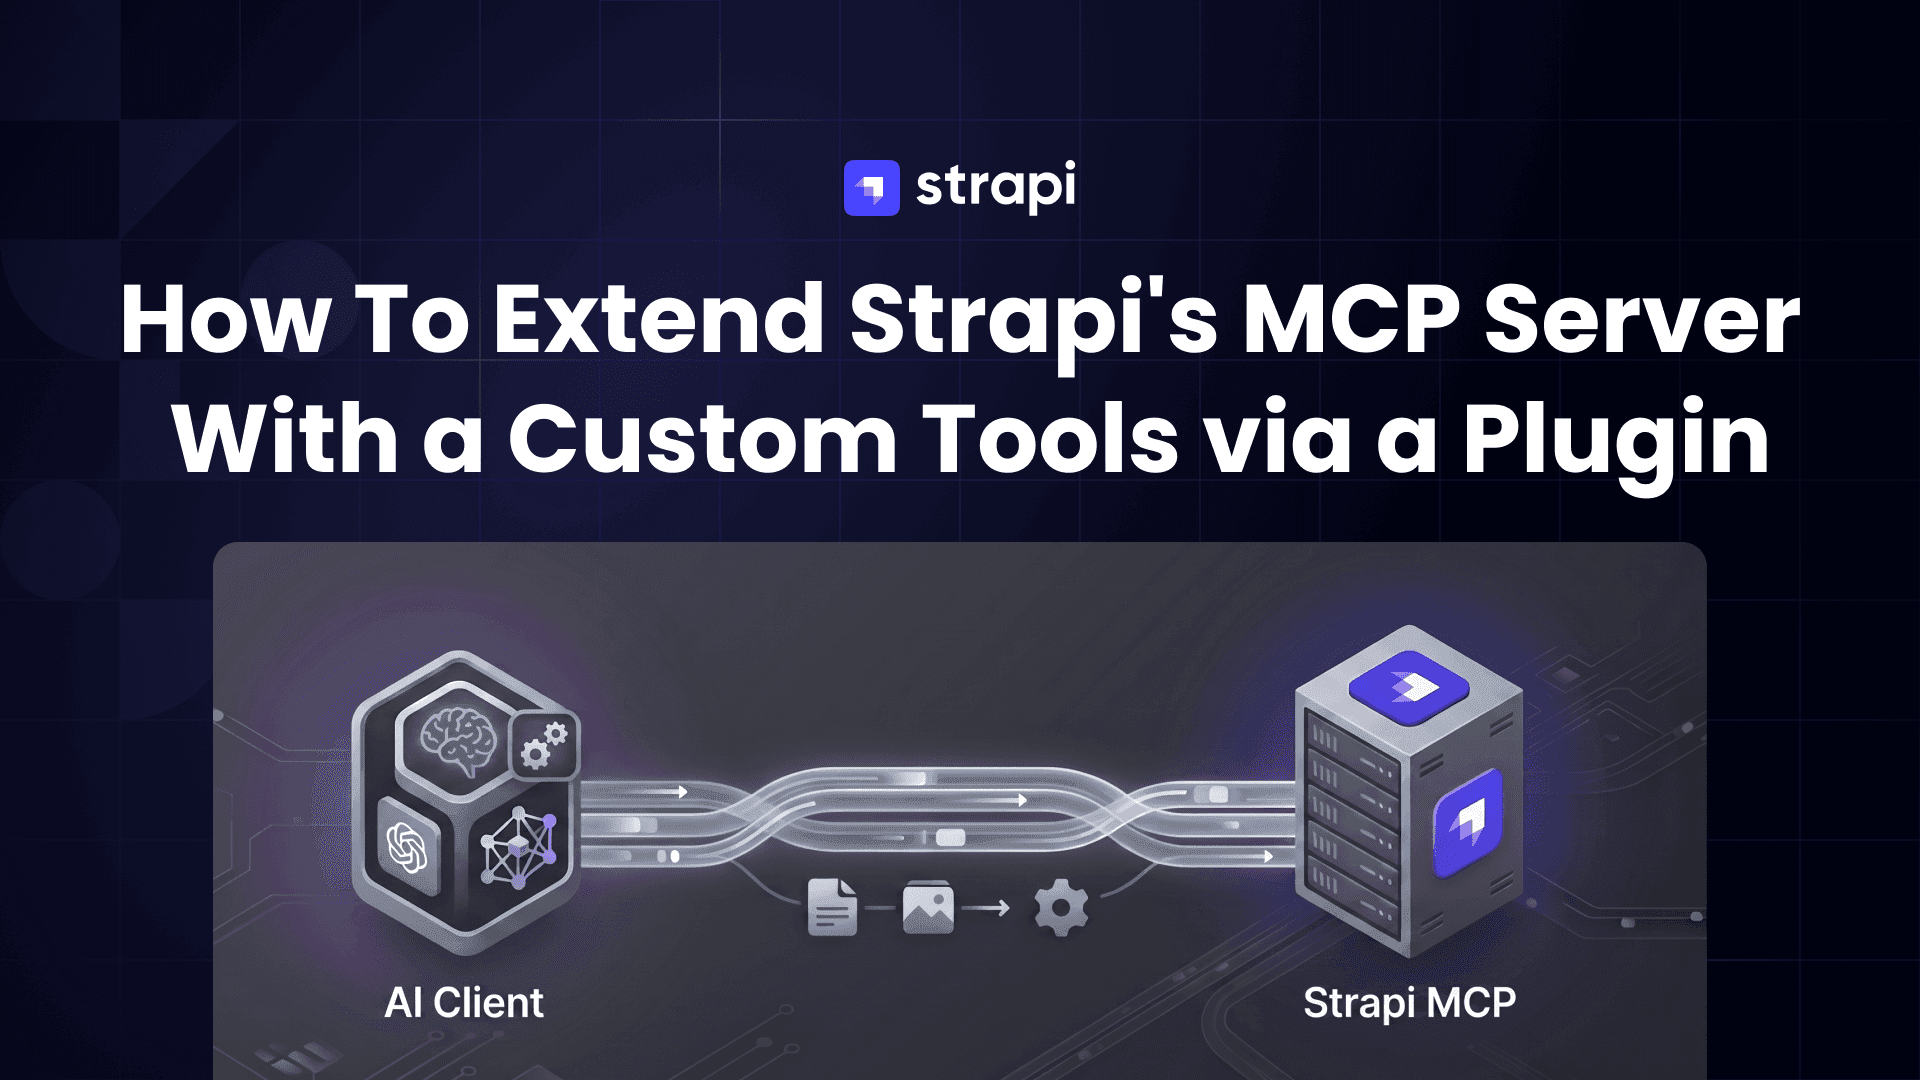
npx @strapi/sdk-plugin init, move theregisterTool()calls into its serverregister()function, and enable it inconfig/plugins.tsor publish it to the Strapi Marketplace for other projects.
Complete Code
The complete code for this tutorial can be found in this GitHub repository.
Wrapping Up
You now have an app that lets anyone on your team work with Strapi content in plain English, with the Admin token on the server and a human approval for any update.
The Strapi MCP built-in tools made it possible. The custom tools are what make it more useful.
With a Next.js frontend, editors manage content by chatting, with no config files and no digging through the dashboard. Developers stay in control of which tools exist, where the token lives, and what needs approval.
The value of AI is what you connect it to, and who you make it usable for. Start with one custom tool of your own, and grow from there.
Build amazing AI apps!
Resources
- Extending the MCP server with plugins: the
registerTool()API - Strapi MCP server
- Strapi Admin tokens
- AI SDK: MCP tools
- AI SDK: Tool approvals