TL;DR
- Strapi 5.47+ ships an MCP server. Turn it on in
config/server.ts, create an admin token in the admin panel, and Claude or Cursor can list, read and write your content. - Tools you write live in a service. One
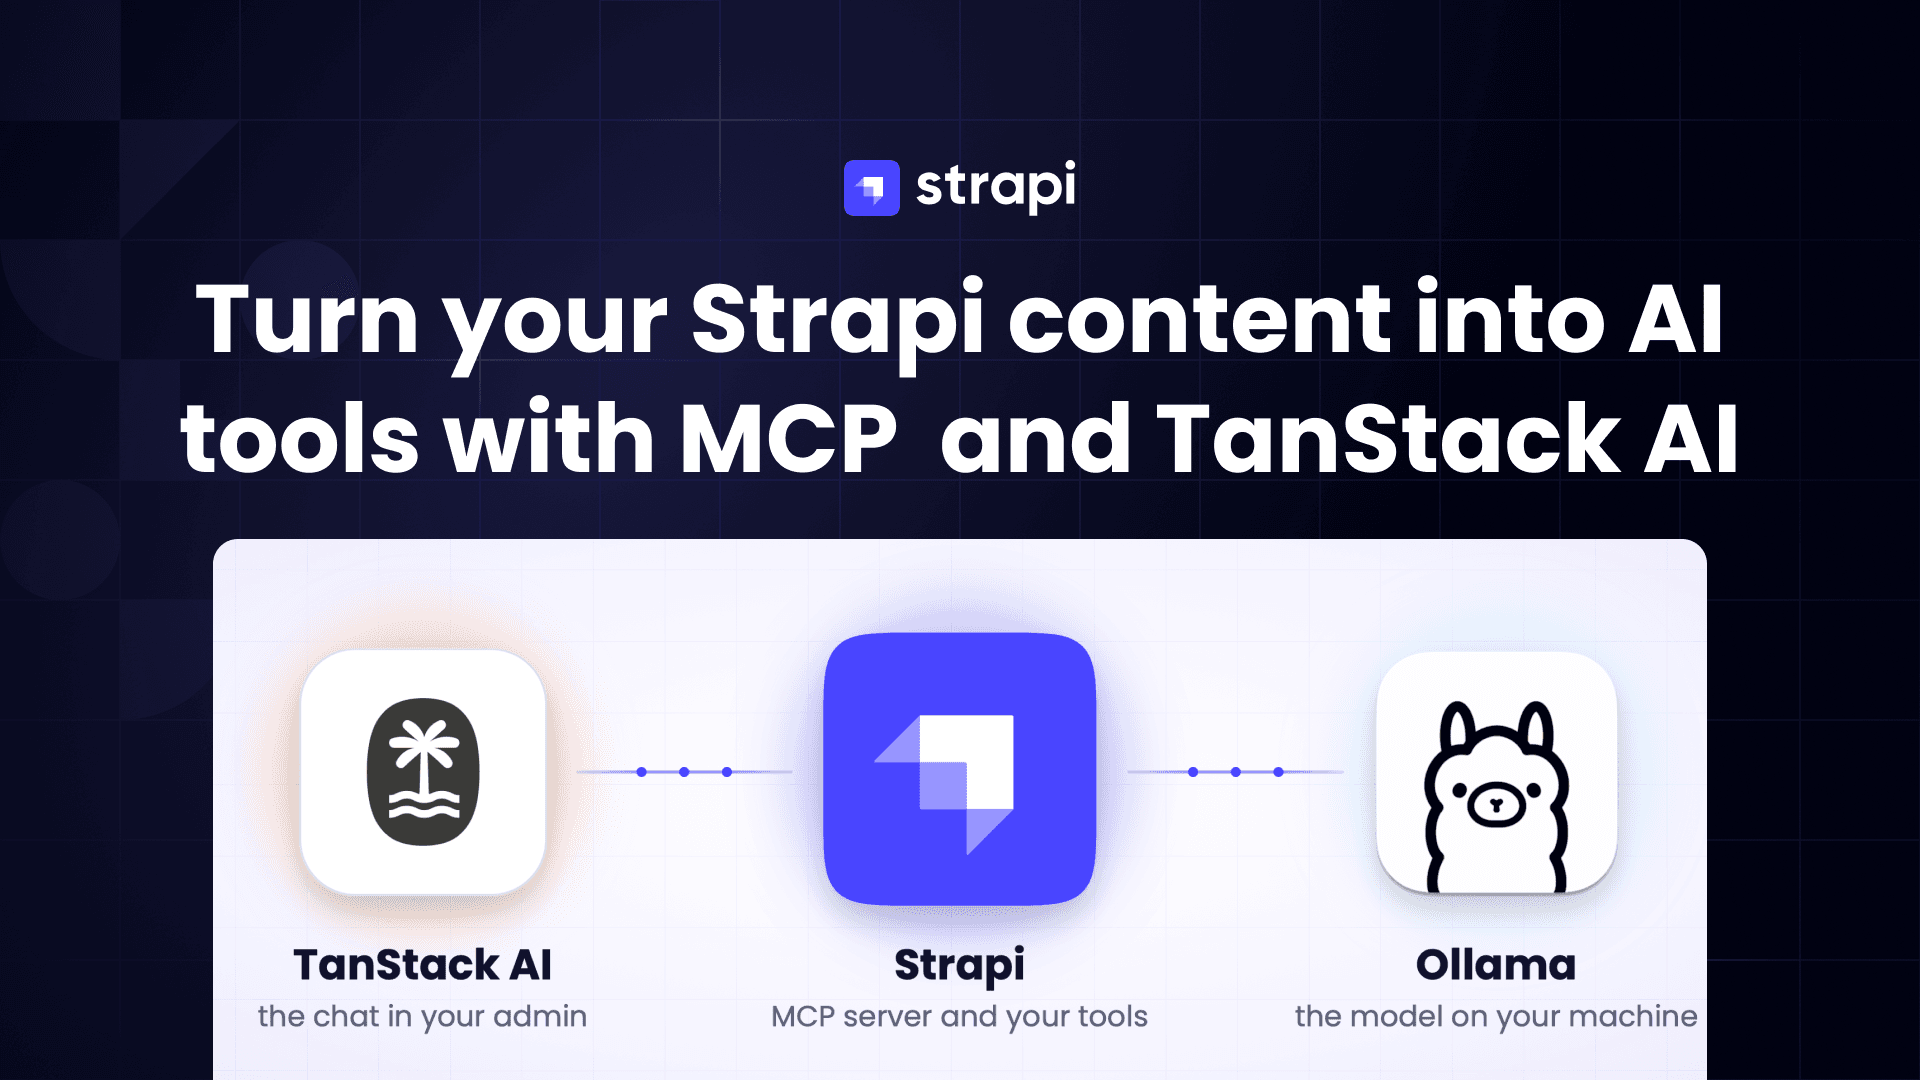
healthcheckservice answers as a REST route, as an MCP tool for AI clients, and as a chat tool inside the admin. strapi-plugin-tanstack-aiadds a chat panel that runs on a model on your own machine through Ollama, so no content and no API key leaves the laptop.- The chat picks up tools from installed plugins, and from services your project lists in
chat.toolSources(plugin 1.4.0+). Permissions decide what each caller sees, and a missing permission is silent.
Everything below was run against Strapi 5.55.1, plugin 1.6.0, Node 24, on macOS. The model is qwen3:14b through Ollama.
What we're building
A Strapi project with its MCP server turned on, so Claude, Cursor or any MCP
client can list, read and write your content. Then one tool of your own, a
healthcheck that reports whether Strapi and its database are up. It is
written once as a service and answers in three places: a public REST route, an
MCP tool for AI clients, and a chat tool inside the admin. The chat itself runs
on a model on your own machine.
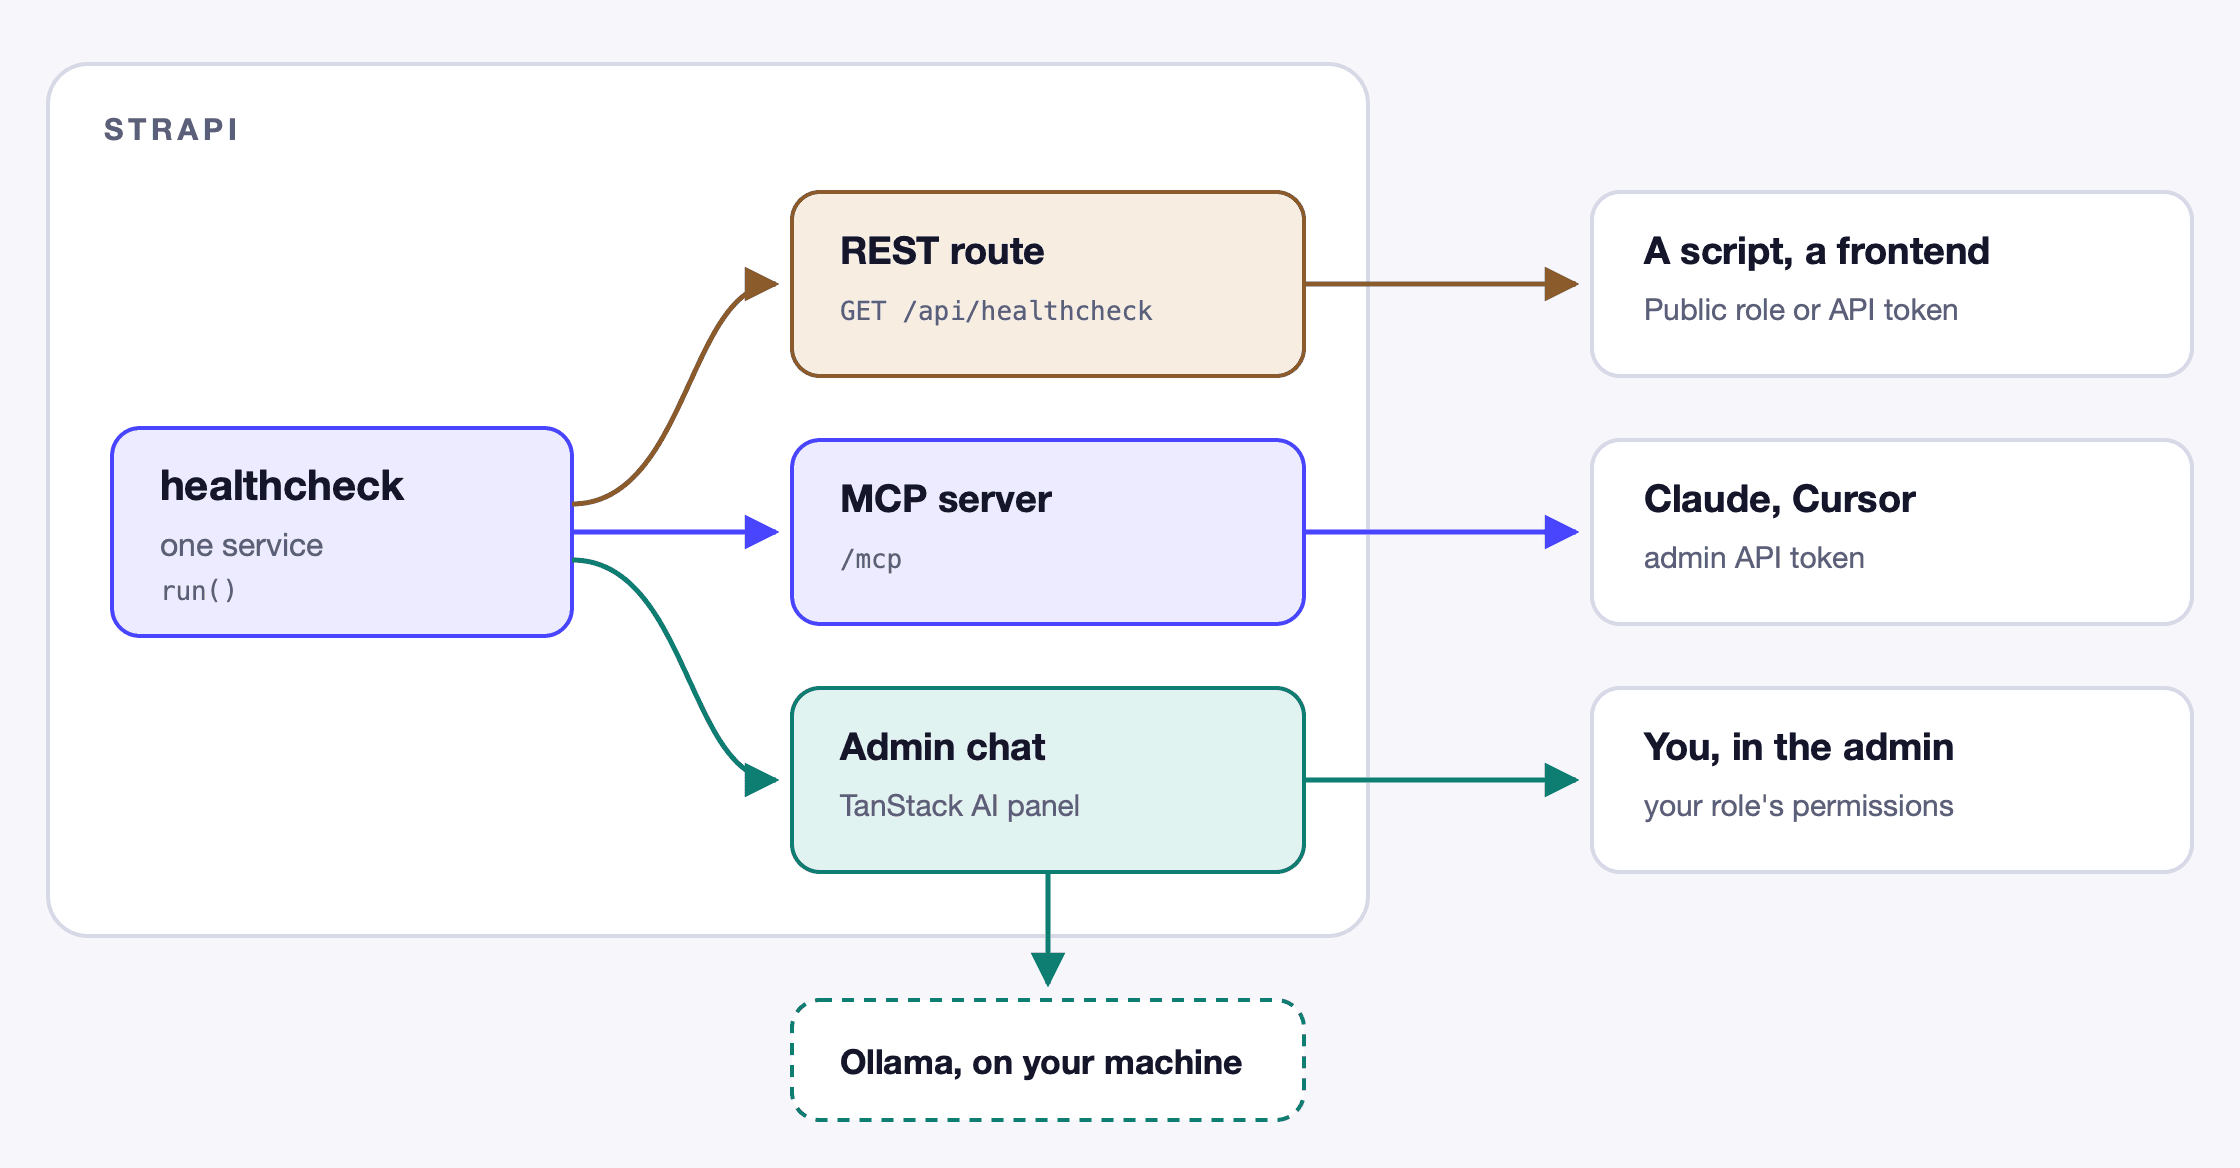
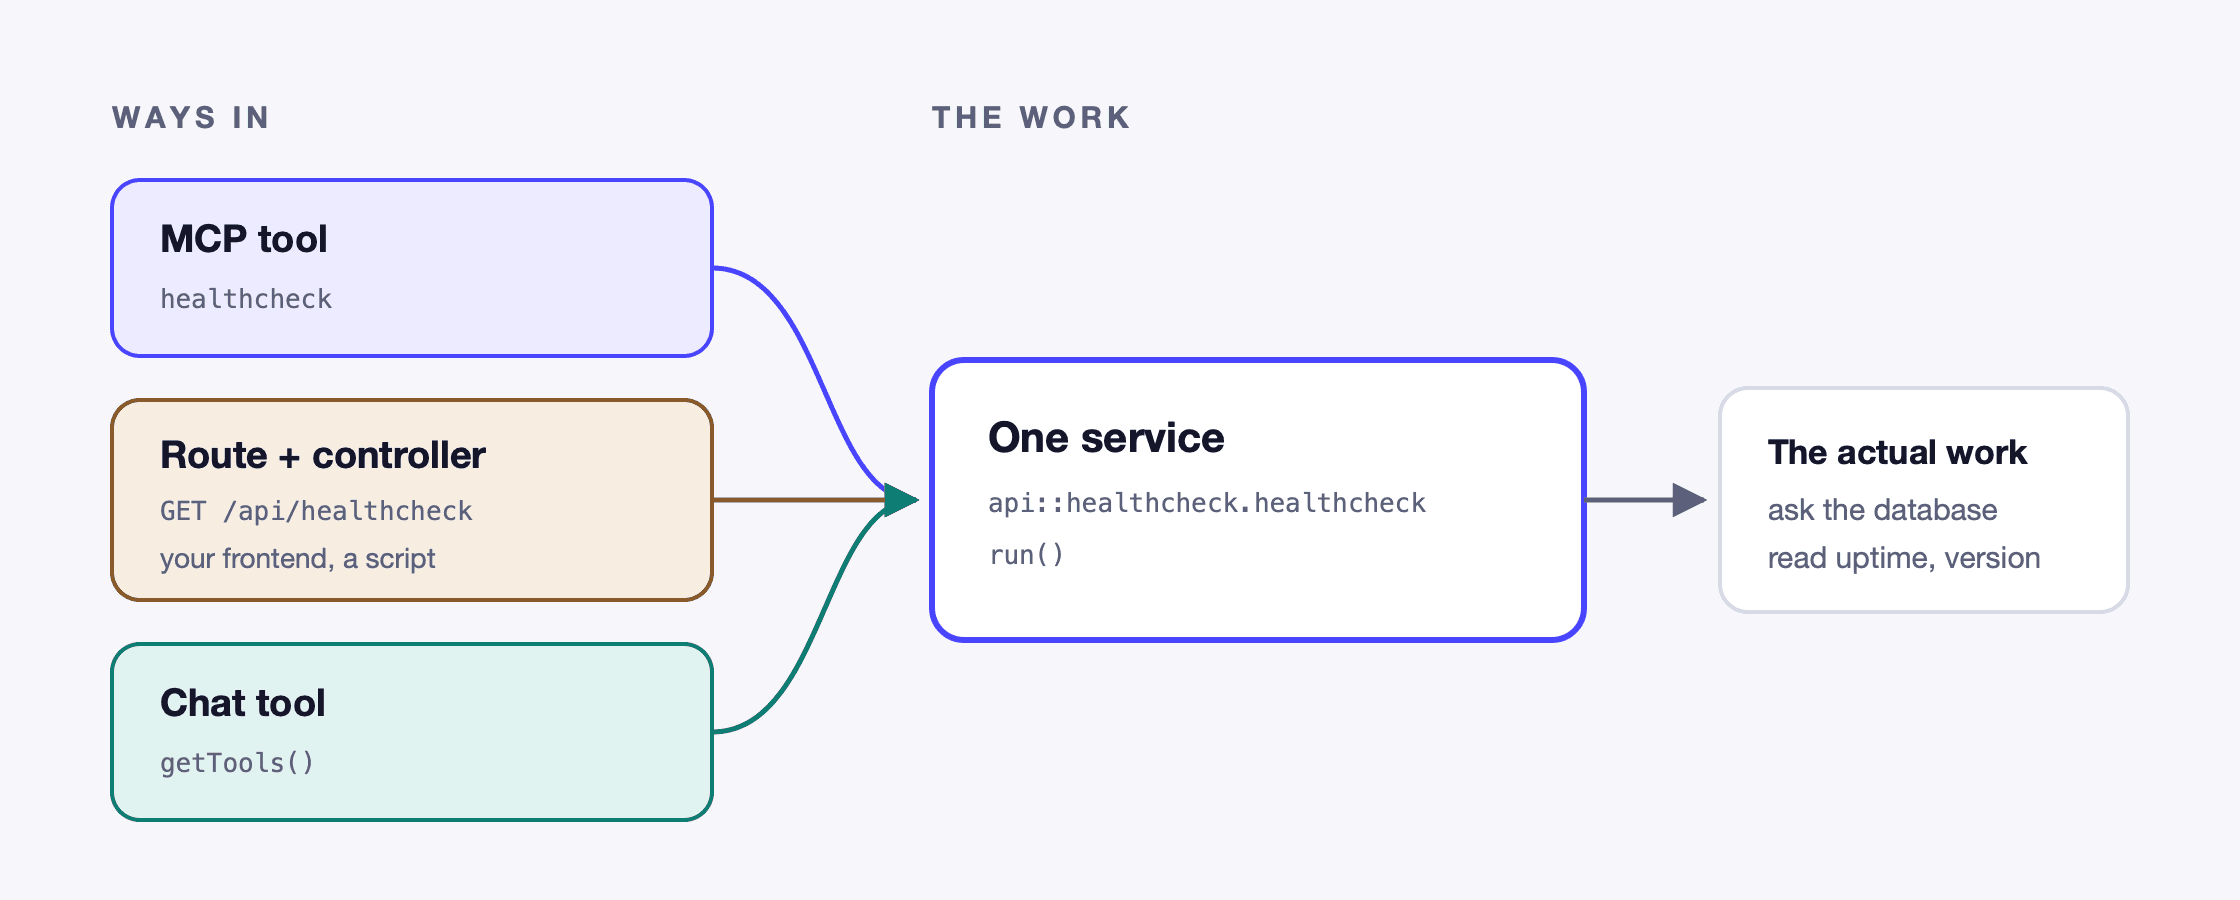
One healthcheck service, three ways to reach it. Each has its own
permission: the REST route is granted to a role or an API token, the MCP tool
needs an admin token that holds its action, and the chat offers the tool only
if your own role holds it. The model behind the chat runs locally in Ollama.
What you walk away knowing:
- How to turn on Strapi's MCP server and connect a client to it
- Why MCP needs an admin token, and how that differs from an API token
- How to register your own MCP tool, and the permission that makes it visible
- How to run an AI chat inside the admin against a local model, with no API key
- Where tools can live (the app or a plugin) and what each choice costs you
Before you start
You need Node 20 or newer, which you probably have:
node -v # v24.16.0If that prints nothing or an older version, nvm
is the quickest fix: nvm install 22 && nvm use 22.
Step 4 runs the chat on a model on your own machine, through Ollama. That install and its model download take about ten minutes, and the instructions are in step 4. Start the download early if you want to read ahead while it runs.
What MCP is
The Model Context Protocol is a standard way for an AI client to discover and call tools. Strapi ships a server for it, so your content becomes tools without you writing one.
1. Create a Strapi project with example content
Create a project with the example data with the following command and options:
npx create-strapi-app@latest strapi-mcp-tutorial

 Strapi   v5.55.1 🚀 Let's create your new project


To deploy your project, create a new project on the Strapi Cloud dashboard.

? Please log in or sign up. Skip
? Do you want to use the default database (sqlite) ? Yes
? Start with an example structure & data? Yes
? Start with Typescript? Yes
? Install dependencies with npm? Yes
? Initialize a git repository? Yes

 Strapi   Creating a new application at /Users/paul/work/blog-working/mcp-setup/strapi-mcp-tutorial
cd strapi-mcp-tutorial
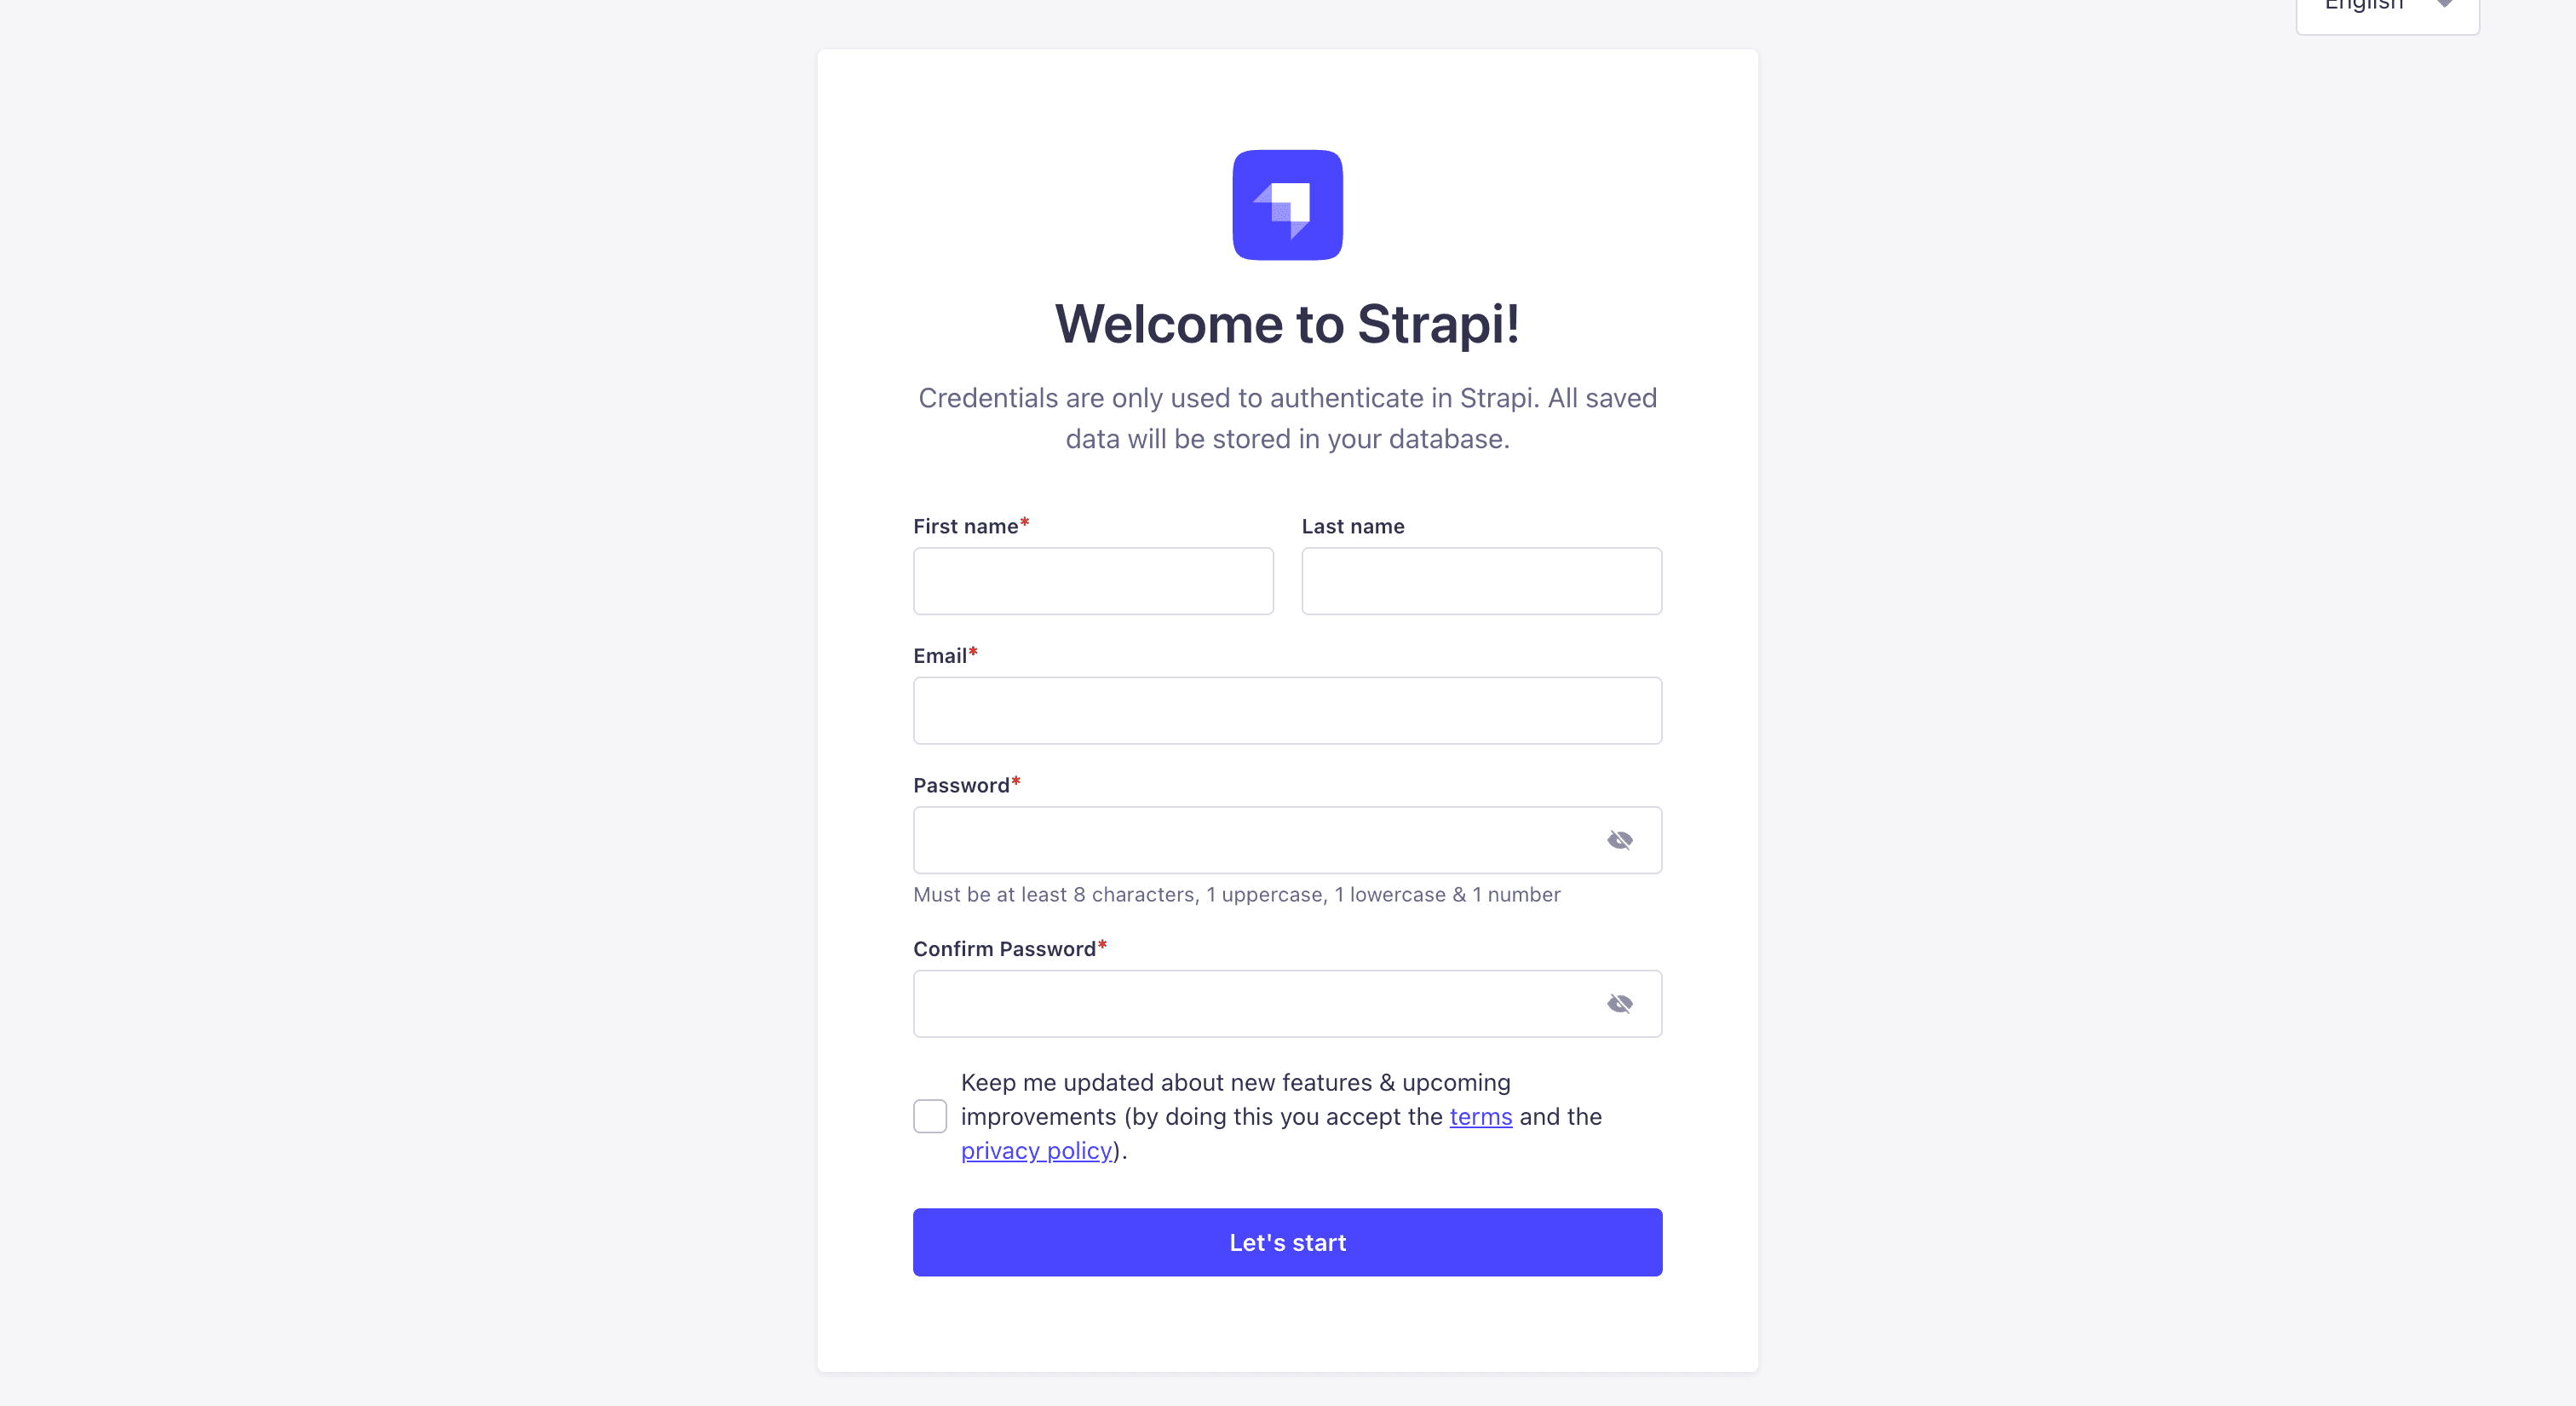
npm run developThen create your first Admin User and log in:
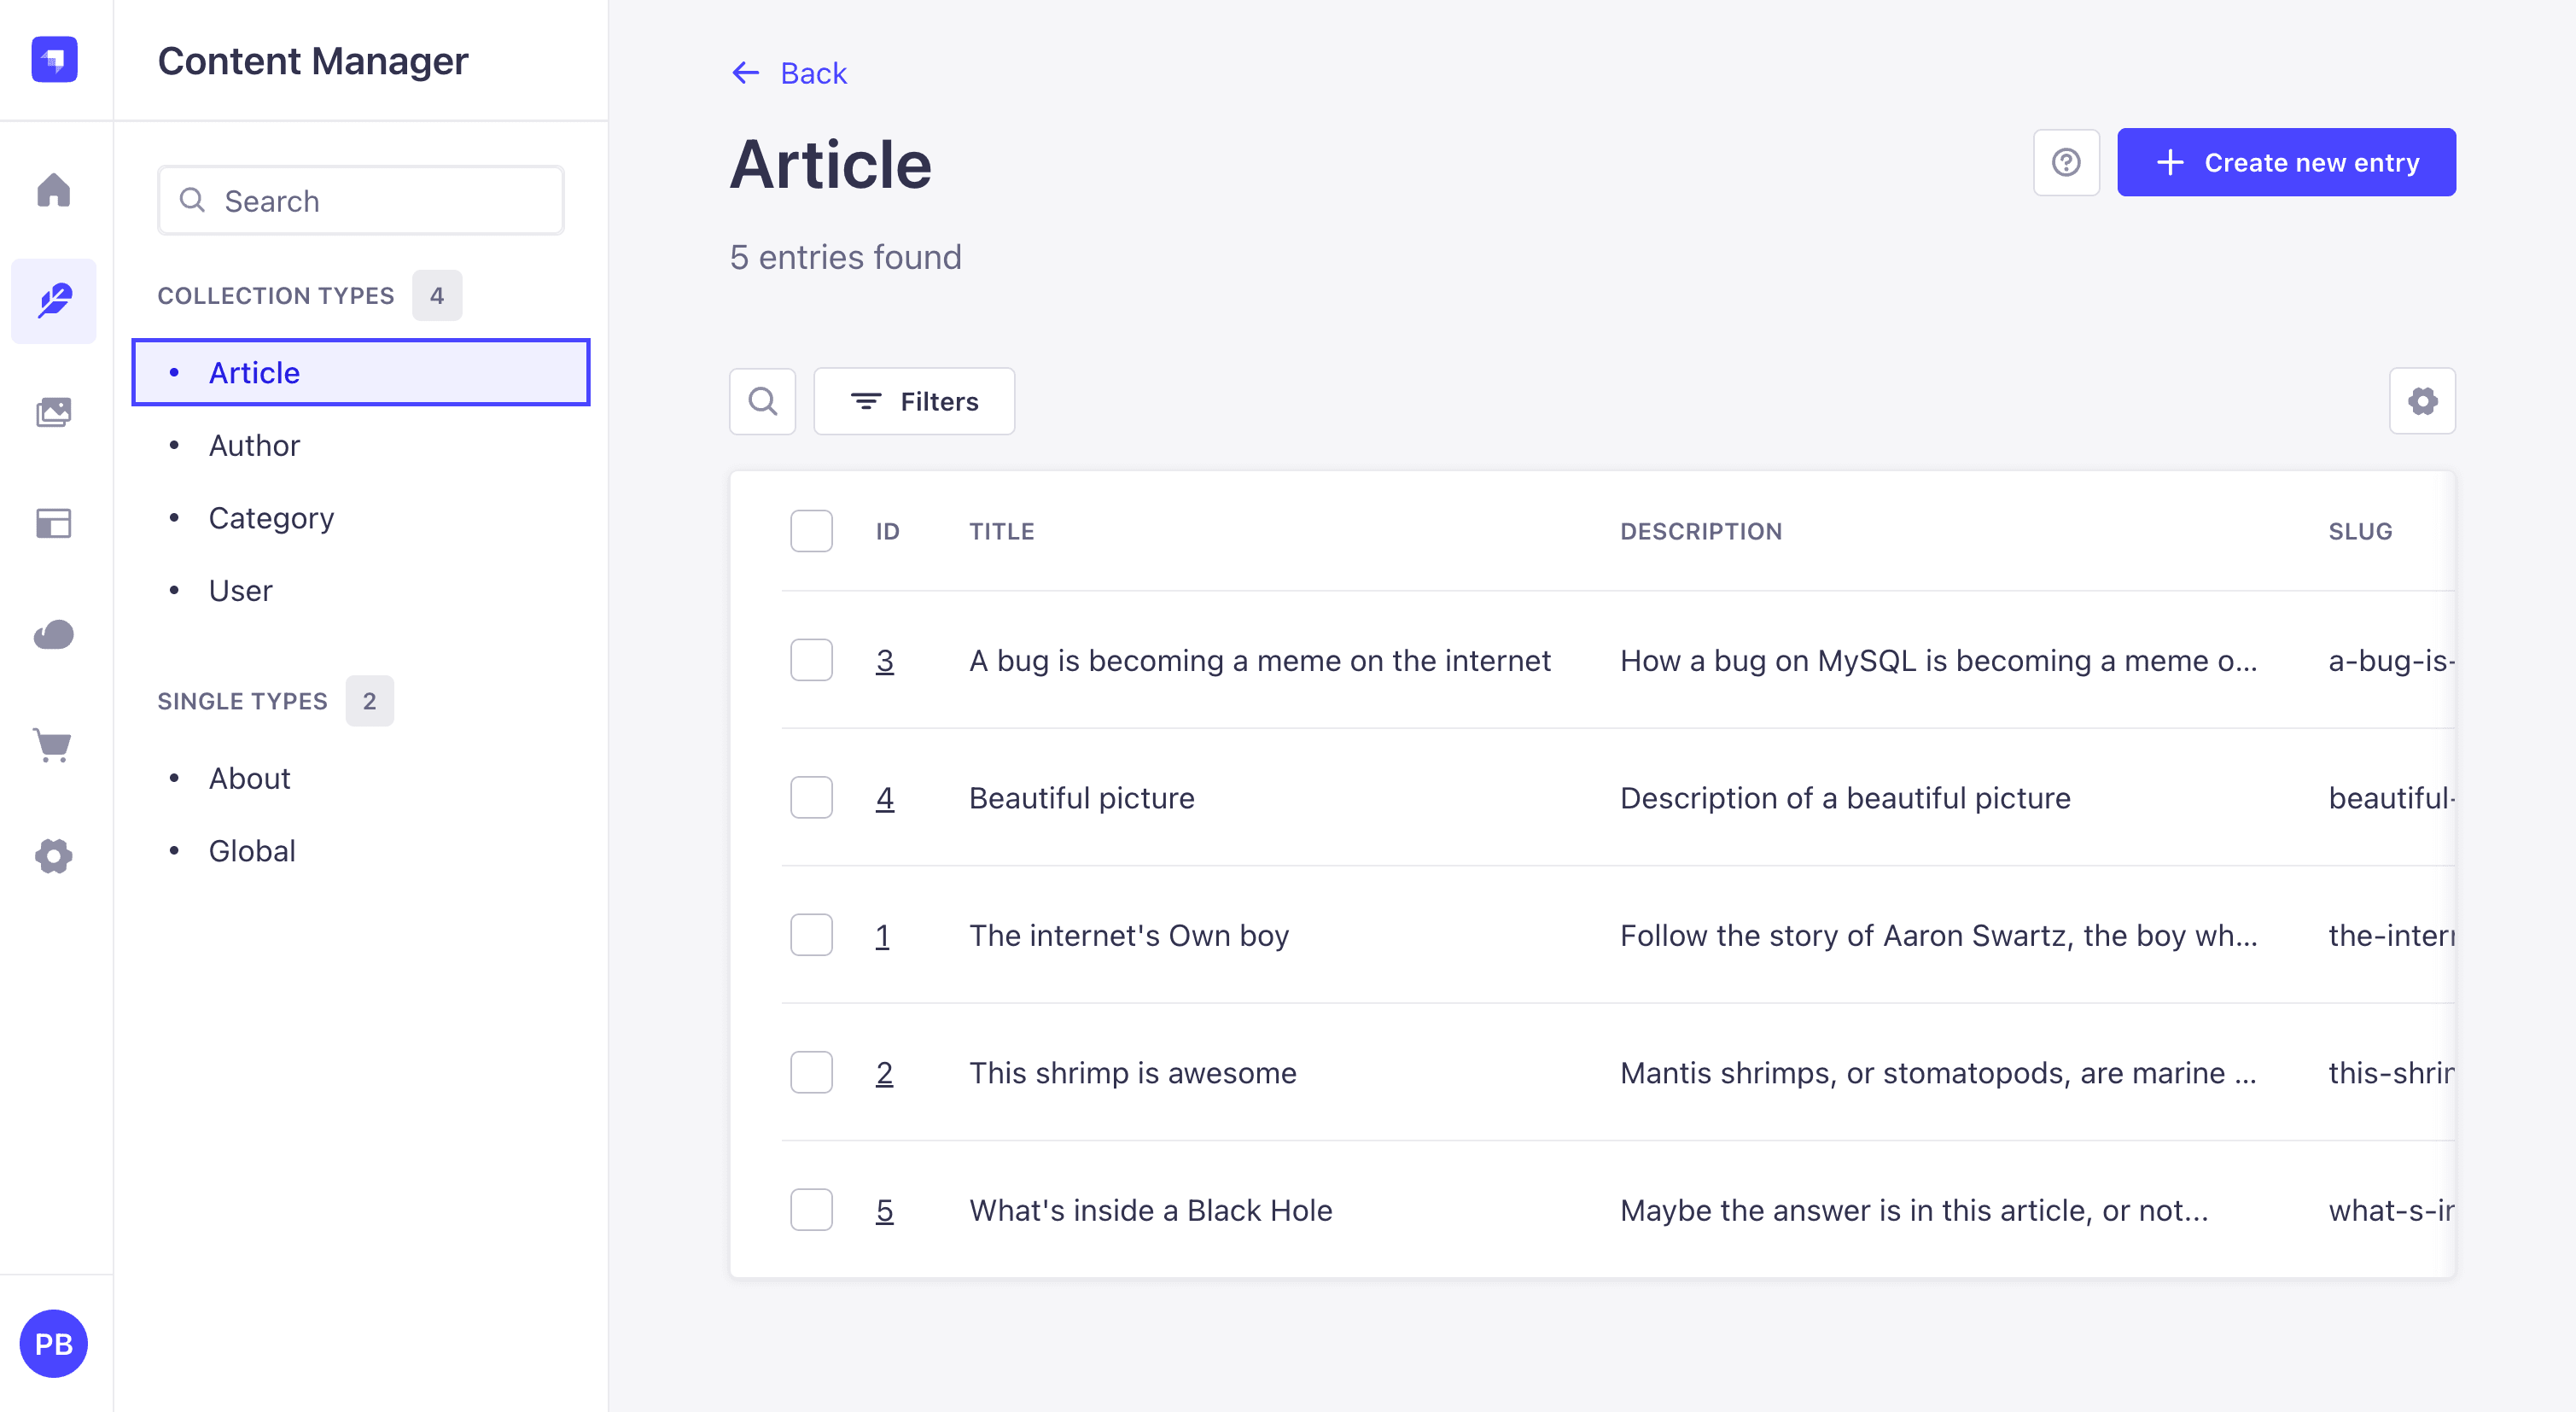
You get Article, Author, Category, About and Global content types, and the
example data is already seeded: the CLI runs npm run seed:example for you at
the end.
2. Connect Claude to your Strapi content
Turn the MCP server on
It ships off. In config/server.ts
(docs):
import type { Core } from "@strapi/strapi";

const config = ({
  env,
}: Core.Config.Shared.ConfigParams): Core.Config.Server => ({
  host: env("HOST", "0.0.0.0"),
  port: env.int("PORT", 1337),
  app: {
    keys: env.array("APP_KEYS")!,
  },
  webhooks: {
    populateRelations: env.bool("WEBHOOKS_POPULATE_RELATIONS", false),
  },

  mcp: {
    enabled: env.bool("MCP_ENABLED", true),
  },
});

export default config;
Now restart your strapi application.
Create an admin token
MCP authenticates with an admin token. In the admin panel, go to Settings → Administration Panel → Admin Tokens → Create new Admin Token, name it, pick a duration, and tick the permissions the token should carry. For the content tools, that is Content Manager read, create and update on the content types you want reachable, Article among them.
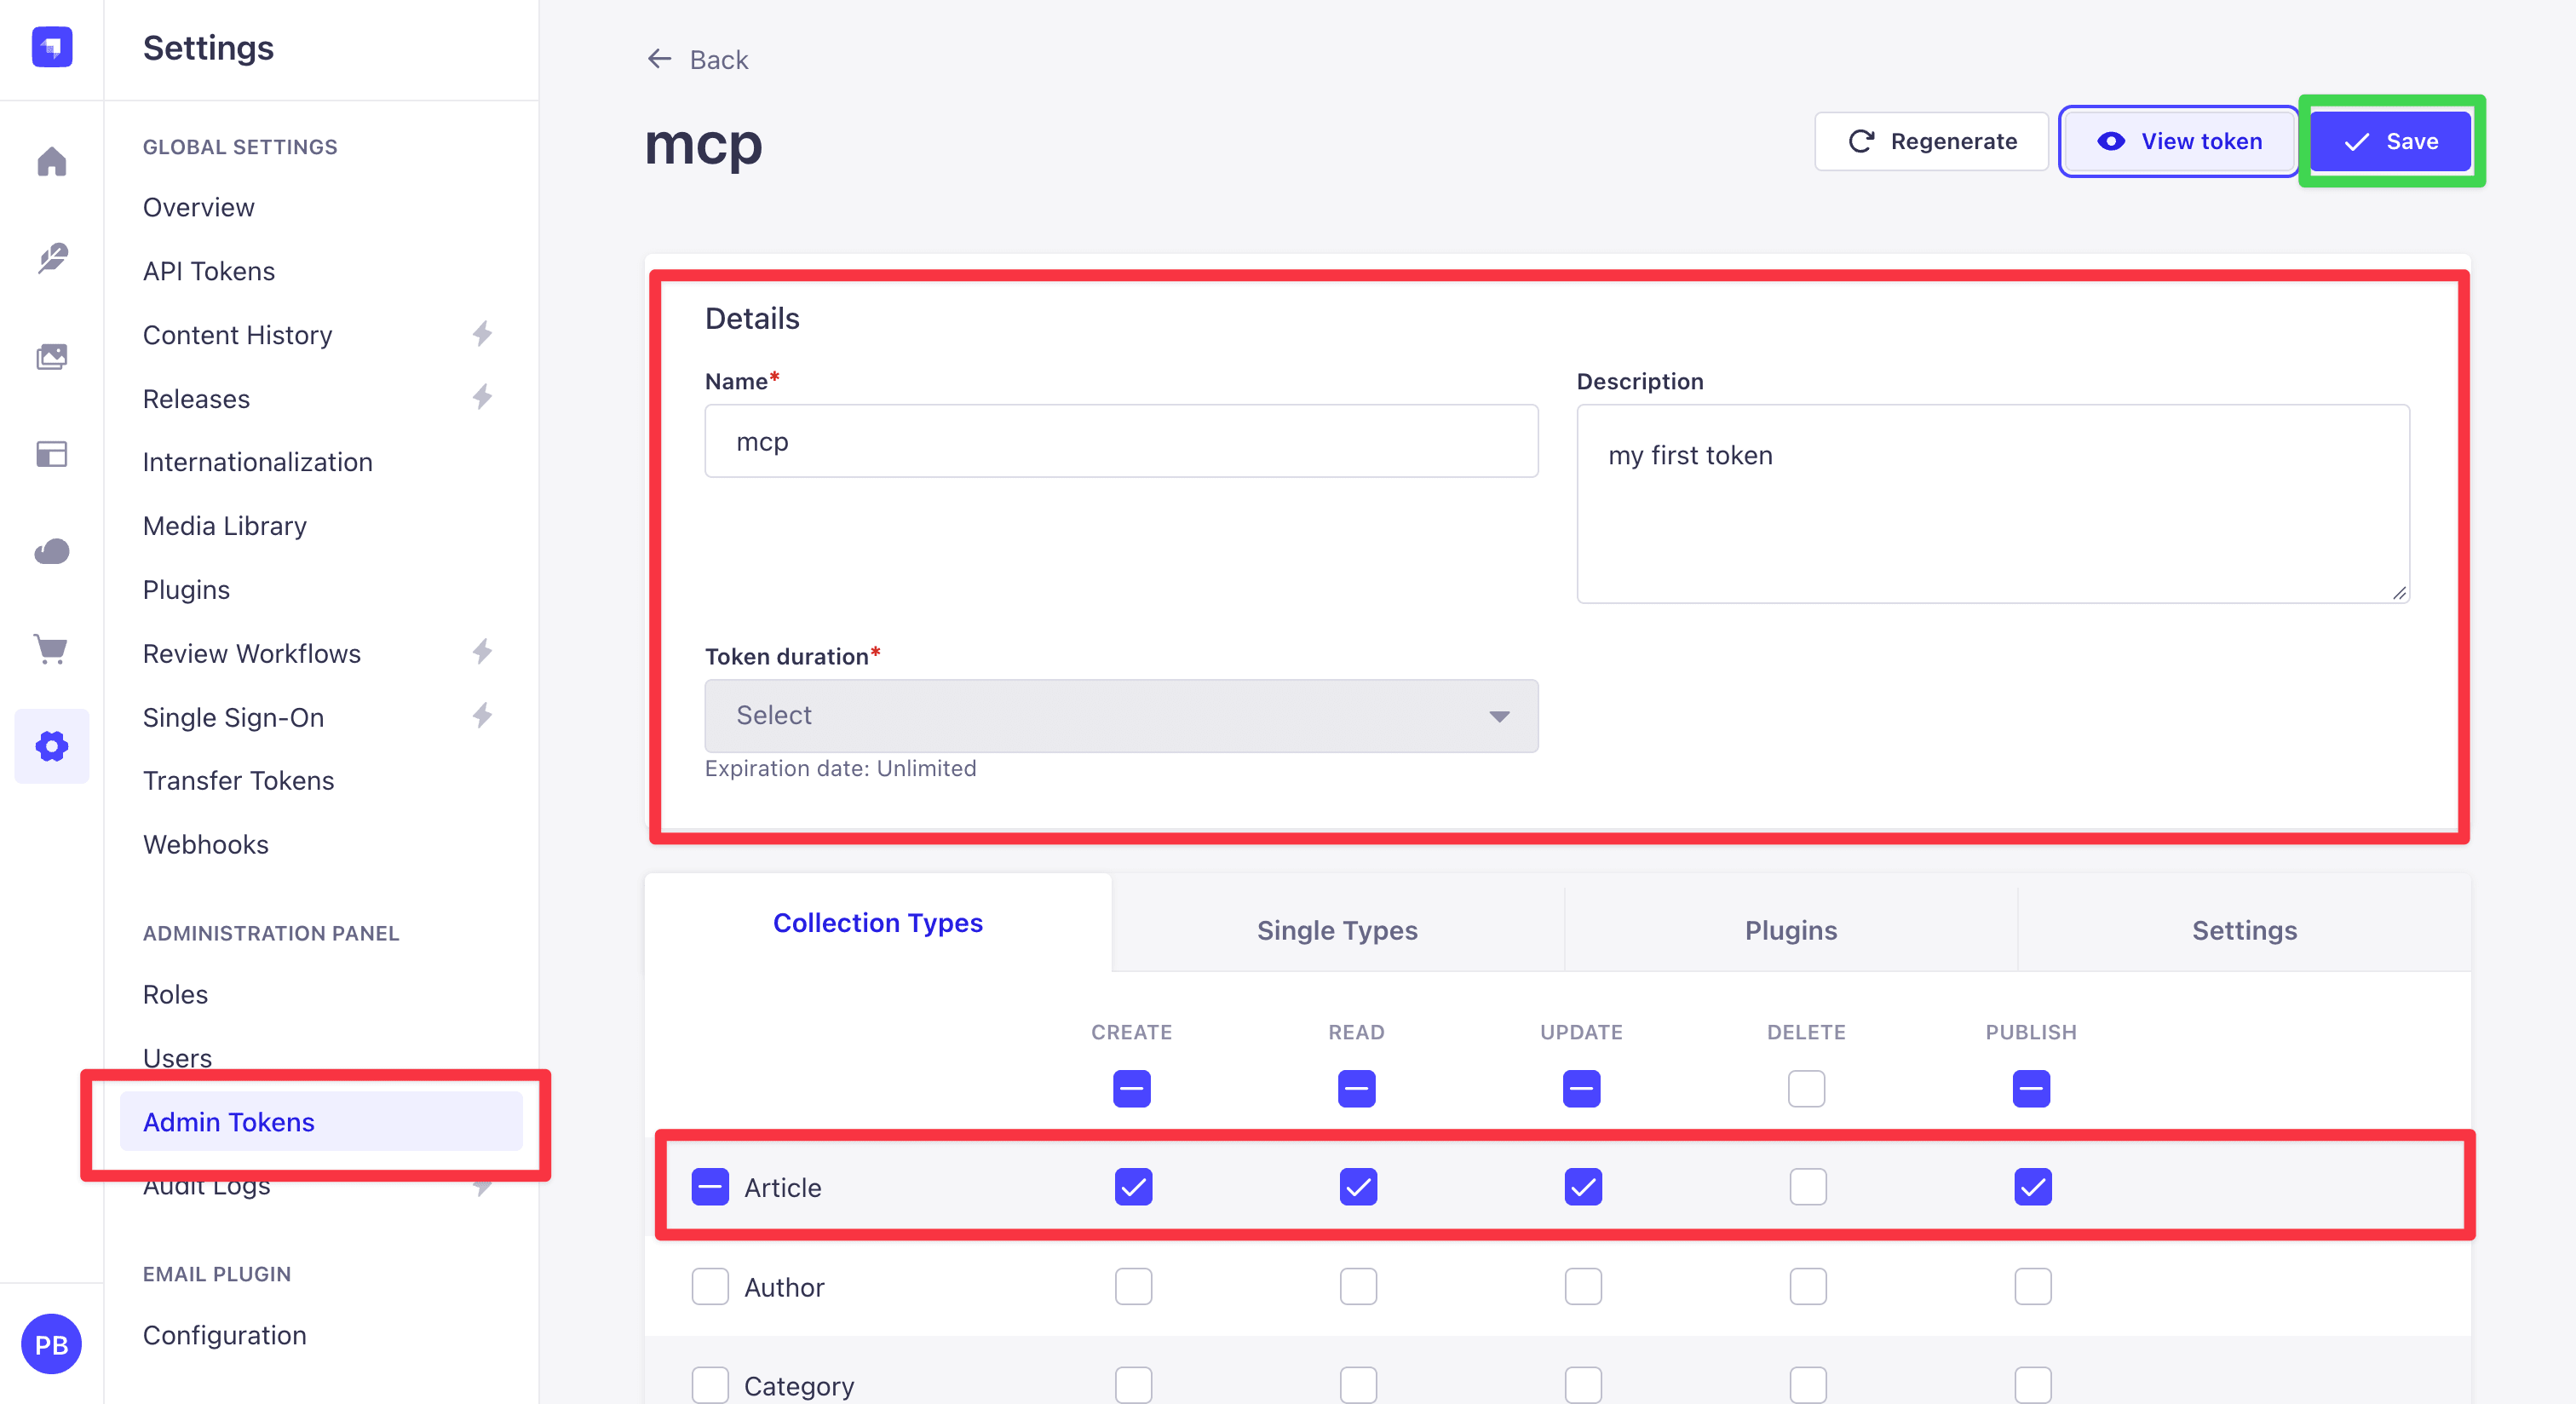
Copy the token when it is shown. It is displayed once, and Strapi stores only a hash of it. Keep it in your shell for the commands below:
export MCP_TOKEN=paste-your-token-hereConnect a client
Claude Code:
claude mcp add --transport http strapi http://localhost:1337/mcp \
--header "Authorization: Bearer $MCP_TOKEN"Cursor, in .cursor/mcp.json:
{
  "mcpServers": {
    "strapi": {
      "type": "streamable-http",
      "url": "http://localhost:1337/mcp",
      "headers": { "Authorization": "Bearer paste-your-token-here" }
    }
  }
}
Claude Desktop, in claude_desktop_config.json, which reaches an HTTP
server through mcp-remote:
{
  "mcpServers": {
    "strapi": {
      "command": "npx",
      "args": [
        "-y", "mcp-remote", "http://localhost:1337/mcp",
        "--header", "Authorization: Bearer paste-your-token-here"
      ]
    }
  }
}
Other clients, and Windsurf and Codex, are covered in the MCP server docs.
Or from a terminal, which is the fastest way to debug. MCP needs an
initialize call before anything else:
U=http://localhost:1337/mcp
H=(-H "Authorization: Bearer $MCP_TOKEN" -H 'Content-Type: application/json' -H 'Accept: application/json, text/event-stream')
SID=$(curl -s -D - -o /dev/null "${H[@]}" $U \
  -d '{"jsonrpc":"2.0","id":1,"method":"initialize","params":{"protocolVersion":"2025-06-18","capabilities":{},"clientInfo":{"name":"curl","version":"1"}}}' \
  | grep -i mcp-session-id | awk '{print $2}' | tr -d '\r')
curl -s "${H[@]}" -H "mcp-session-id: $SID" $U -d '{"jsonrpc":"2.0","method":"notifications/initialized"}' > /dev/null
curl -s "${H[@]}" -H "mcp-session-id: $SID" $U -d '{"jsonrpc":"2.0","id":2,"method":"tools/list"}'
We will use Claude Code in this tutorial.
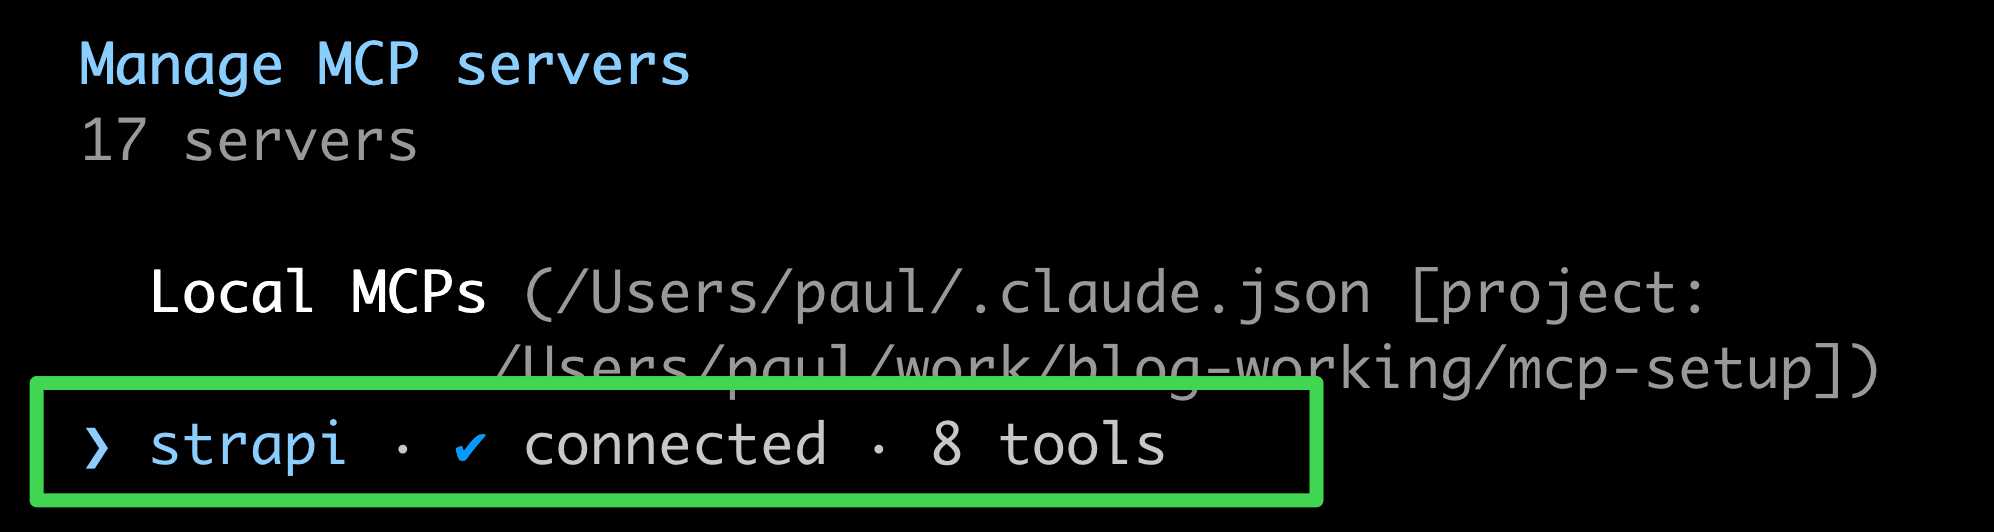
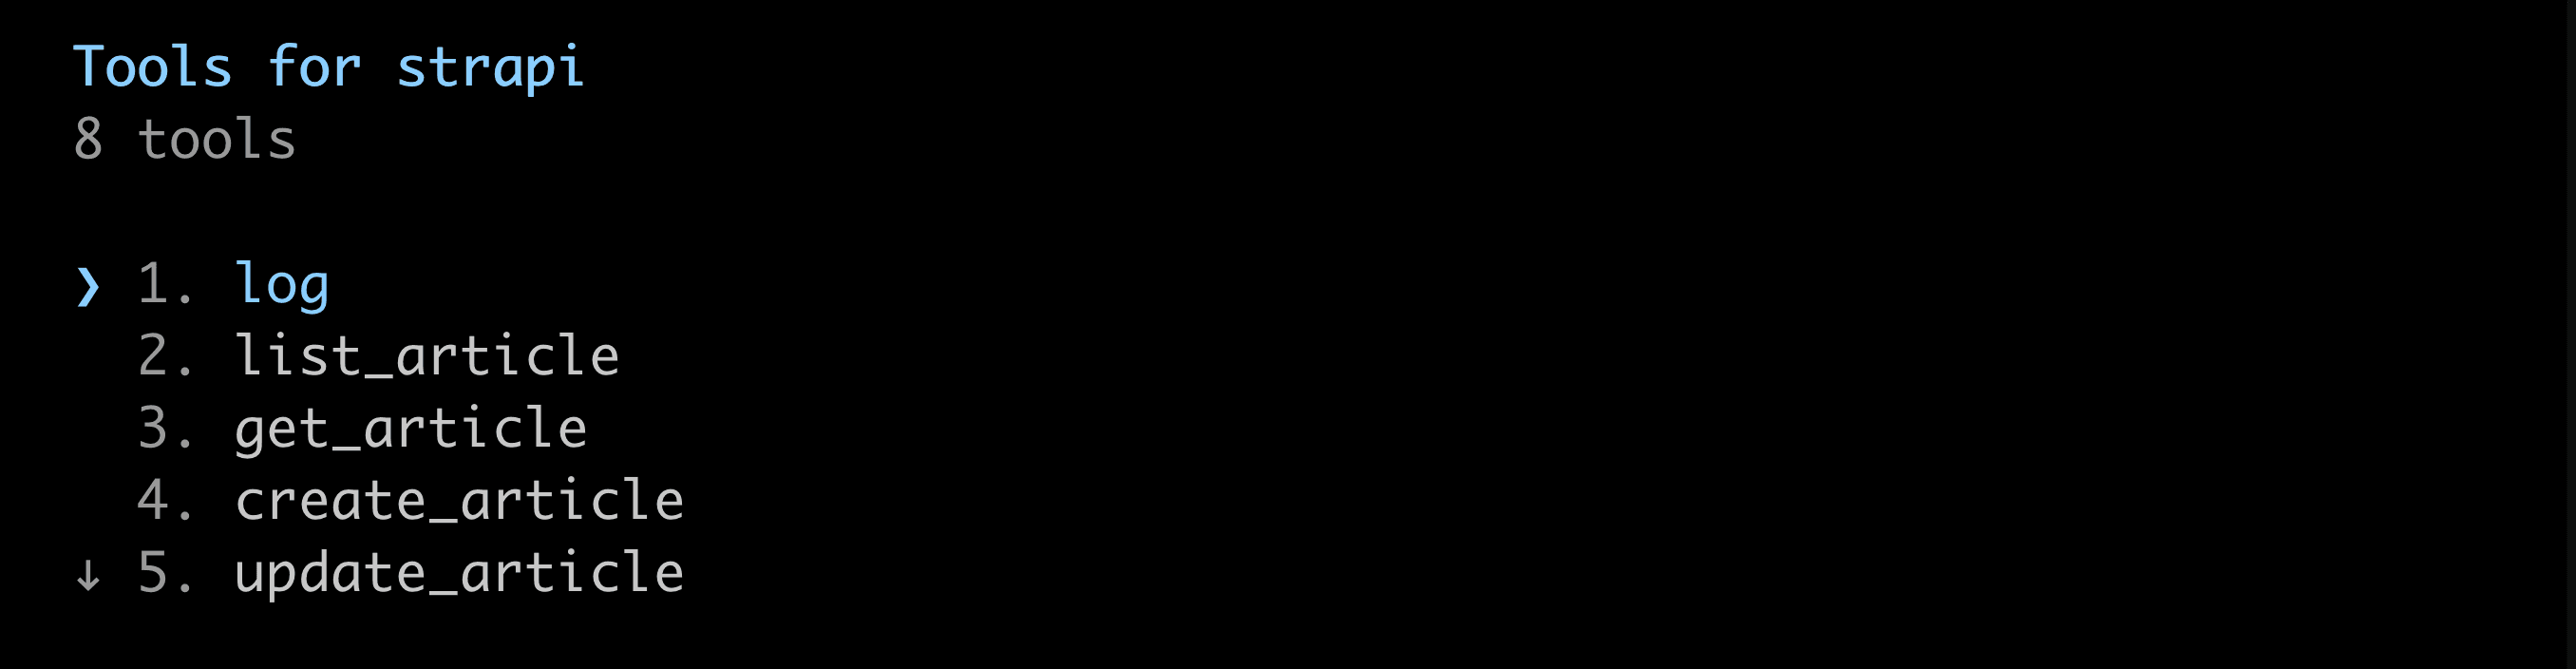
The list contains a tool per content type and action: list_article,
get_article, create_article, update_article, discard_article_draft,
plus Strapi's log.
Ask your client "list all my strapi articles" and it calls list_article.
strapi MCP — 5 articles (all draft, seed data)

┌───────────────────────────────┬──────────────────────────────────────────┐
│             Title             │                   Slug                   │
├───────────────────────────────┼──────────────────────────────────────────┤
│ A bug is becoming a meme on   │ a-bug-is-becoming-a-meme-on-the-internet │
│ the internet                  │                                          │
├───────────────────────────────┼──────────────────────────────────────────┤
│ Beautiful picture             │ beautiful-picture                        │
├───────────────────────────────┼──────────────────────────────────────────┤
│ The internet's Own boy        │ the-internet-s-own-boy                   │
├───────────────────────────────┼──────────────────────────────────────────┤
│ This shrimp is awesome        │ this-shrimp-is-awesome                   │
├───────────────────────────────┼──────────────────────────────────────────┤
│ What's inside a Black Hole    │ what-s-inside-a-black-hole               │
└────────────────────────────────────────────────┘
Those are the seeded articles, read out of your database by a client that was never told how Strapi works. MCP is on, the admin token carries the Content Manager permissions you ticked, and the content tools came from your content types.
The next step is a tool Strapi does not ship: a healthcheck that reports
whether the app and its database are up. You write it once as a service in
your project, and the rest of the tutorial gives it three callers.
3. Write your own tool and call it over MCP
Strapi's tools cover CRUD. A healthcheck, an internal report, a deploy trigger: those you register yourself.
A tool is a function you hand to the AI client, described well enough that a model can decide to call it.
It has a name, a description, a schema for its arguments, and a permission that decides who may call it. list_article is a
tool. So is the healthcheck you are about to write.
A route maps an HTTP method and path to a controller handler:
GET /healthcheck to healthcheck.run. It also carries that endpoint's
config, which is where authentication, policies and middlewares are set.
A controller is the handler a route points at. It reads the request, calls the code that does the work, and shapes the response. It is the HTTP end of things and nothing else.
A service is a plain module of your own code, registered with Strapi under
a uid like api::healthcheck.healthcheck. Anything in the app can call it:
strapi.service('api::healthcheck.healthcheck').run(). Nothing in it knows
whether the caller arrived over HTTP, over MCP, or from the admin panel.
A route and a controller are how anything that speaks HTTP gets in: your
frontend, a curl command, a script that pings the site every minute. A tool
is how an AI client gets in. A service is the work itself, and both ways in
should end at the same one.
That is what lets this healthcheck answer an AI client over MCP, a script over HTTP, and the chat panel in the admin, with one implementation and one place to fix a bug.
Put the logic in the tool handler instead and the controller needs its own copy, which drifts the first time either changes.
Put the work in a service
src/api/healthcheck/services/healthcheck.ts
(services docs):
import type { Core } from '@strapi/strapi';

export interface HealthcheckResult {
  status: 'ok' | 'degraded';
  uptimeSeconds: number;
  database: string;
  databaseOk: boolean;
  strapiVersion: string;
  checkedAt: string;
}

export default ({ strapi }: { strapi: Core.Strapi }) => ({
  async run(): Promise<HealthcheckResult> {
    const database = String(strapi.db?.config?.connection?.client ?? 'unknown');

    // Ask the database something, rather than trusting that a configured
    // connection is a working one.
    let databaseOk = true;
    try {
      await strapi.db.connection.raw('select 1');
    } catch {
      databaseOk = false;
    }

    return {
      status: databaseOk ? 'ok' : 'degraded',
      uptimeSeconds: Math.round(process.uptime()),
      database,
      databaseOk,
      strapiVersion: strapi.config.get<string>('info.strapi', 'unknown'),
      checkedAt: new Date().toISOString(),
    };
  },
});
Register the service as an MCP tool
Tools go in their own folder, one file each, so the list can grow without
src/index.ts growing with it. Four files, in this order:
src/
  tools/
    types.ts        1. the shape every tool file follows
    healthcheck.ts  2. this tool
    index.ts        3. the list of tools to register
  index.ts          4. registers everything in that list
Step 1. Create the folder src/tools, and in it types.ts. This says
what a tool file has to export: the permission that gates the tool, and a
function that registers it.
import type { Modules } from '@strapi/types';

/**
 * What every tool in this folder exports.
 *
 * `register` takes the MCP service rather than the tool definition, so each
 * file hands `registerTool` the exact type `ai.mcp.defineTool` inferred for
 * it. A shared array of tool definitions would widen those generics and cost
 * the type checking that the builder exists to provide.
 */
export interface AppTool {
  /**
   * The admin permission action that gates the tool.
   *
   * With no `pluginName`, Strapi builds the action id from the uid alone, so
   * `uid: 'healthcheck.run'` becomes `api::healthcheck.run` — the id the
   * tool's `auth.policies` has to name. A `settings` action also needs a
   * `category`, which is the group it appears under in the admin.
   */
  permission: {
    section: 'settings';
    category: string;
    uid: string;
    displayName: string;
  };
  register: (mcp: Modules.MCP.McpService) => void;
}
Step 2. Create src/tools/healthcheck.ts. This is the tool: what the
model sees, the permission it needs, and a handler that calls the service you
just wrote.
import { ai } from '@strapi/strapi';
import { z } from '@strapi/utils';
import type { Core } from '@strapi/strapi';
import type { HealthcheckResult } from '../api/healthcheck/services/healthcheck';
import type { AppTool } from './types';

/**
 * A healthcheck tool, registered by the APPLICATION rather than by a plugin.
 *
 * Everything an MCP tool needs is here: a name the model calls it by, a
 * description it decides from, an input and output schema, the permission that
 * gates it, and the handler.
 *
 * `auth.policies` names an admin permission action. A tool appears in
 * `tools/list` only for a token that holds one of its actions, so the action
 * has to be registered too — see `register()` below. Do NOT borrow a
 * Content Manager action such as `plugin::content-manager.explorer.read`:
 * those grants are scoped to one content type, Strapi checks a subject-less
 * policy with `ability.can(action)`, and the tool then silently never appears.
 */
const healthcheck = ai.mcp.defineTool({
  name: 'healthcheck',
  title: 'Healthcheck',
  description:
    'Report whether this Strapi instance is healthy: its uptime, the database client it is ' +
    'connected to, and whether that connection answers a query right now. Call this before ' +
    'a long job, or when another tool fails and you need to know if Strapi itself is up.',

  auth: { policies: [{ action: 'api::healthcheck.run' }] },

  resolveInputSchema: () => z.object({}),

  resolveOutputSchema: () =>
    z.object({
      status: z.enum(['ok', 'degraded']).describe('"degraded" when the database did not answer.'),
      uptimeSeconds: z.number().describe('How long this Strapi process has been running.'),
      database: z.string().describe('The database client, e.g. "sqlite" or "postgres".'),
      databaseOk: z.boolean().describe('Whether a trivial query succeeded just now.'),
      strapiVersion: z.string(),
      checkedAt: z.string().describe('ISO 8601, UTC.'),
    }),

  createHandler: (strapi: Core.Strapi) => async () => {
    // The tool is a thin wrapper: the work lives in a service, which
    // GET /api/healthcheck calls too. See
    // src/api/healthcheck/services/healthcheck.ts.
    const result: HealthcheckResult = await strapi
      .service('api::healthcheck.healthcheck')
      .run();

    // Both shapes are required: `content` is what a model reads, and
    // `structuredContent` is what must match the output schema.
    return { content: [{ type: 'text' as const, text: JSON.stringify(result) }], structuredContent: result };
  },
});

const tool: AppTool = {
  permission: {
    section: 'settings',
    category: 'healthcheck',
    uid: 'healthcheck.run',
    displayName: 'Run healthcheck',
  },
  register: (mcp) => mcp.registerTool(healthcheck),
};

export default tool;
Step 3. Create src/tools/index.ts. This is the list Strapi registers
from. A second tool is a new file next to healthcheck.ts plus one more entry
in this array.
import type { AppTool } from './types';
import healthcheck from './healthcheck';

/**
 * Every tool this application contributes to Strapi's MCP server.
 *
 * Adding one is two steps: write the file next to this one, then add it to
 * this list. `src/index.ts` registers each tool's permission and then the
 * tool itself, so it never has to change again.
 *
 * Listed, never auto-discovered from the folder: a tool that appears because
 * a file was dropped in is a tool nothing in the code accounts for.
 */
export const tools: AppTool[] = [healthcheck];

export type { AppTool };
Step 4. Replace src/index.ts with this. It registers each tool's
permission, then each tool, and names none of them, so it does not change
again when you add the next one.
import type { Core } from '@strapi/strapi';
import { tools } from './tools';

export default {
  /**
   * register() runs before the app is initialised — and, importantly, before
   * Strapi starts its MCP server. Tools must be registered while that server
   * is idle, so this is the place.
   *
   * Nothing here names a tool. Each one lives in `src/tools/` and appears in
   * the list that file exports, so adding a second or a tenth tool does not
   * touch this function.
   */
  async register({ strapi }: { strapi: Core.Strapi }) {
    // Permissions first: a tool whose action nobody can hold is invisible.
    // AWAITED, because registerMany is async and an action missing from the
    // registry when the MCP session evaluates a policy naming it behaves
    // exactly like an action that was never declared.
    const actionProvider = strapi.service('admin::permission')?.actionProvider;
    await actionProvider?.registerMany(tools.map((tool) => tool.permission));

    // `strapi.ai` exists from Strapi 5.47, and `isEnabled()` is false unless
    // `mcp: { enabled: true }` is set in config/server.ts. Neither is worth
    // crashing a boot over, so both are checked.
    const mcp = strapi.ai?.mcp;
    if (!mcp?.isEnabled?.()) {
      strapi.log.info('[tools] MCP is off — no tools registered. Enable it in config/server.ts.');
      return;
    }

    for (const tool of tools) {
      tool.register(mcp);
    }

    strapi.log.info(`[tools] registered ${tools.length} tool(s) on /mcp`);
  },

  bootstrap(/* { strapi }: { strapi: Core.Strapi } */) {},
};
Restart Strapi.
⠹ Loading Strapi[2026-09-26 13:24:02.091] info: [tools] registered 1 tool(s) on /mcp
⠸ Loading Strapi[2026-09-26 13:24:02.279] info: [MCP] Starting MCP server...
[2026-09-26 13:24:02.279] info: [MCP] Server available at /mcp
Three things to keep in mind:
- Register in
register(). Strapi starts its MCP server after the app's register phase, and a tool can only be added while that server is idle. - Its own permission. A tool appears in
tools/listonly for a token that holds one of the actions in itsauth.policies. awaitthe registration.registerManyis async. An action missing from the registry when the session gate runs behaves exactly like an action that was never declared.
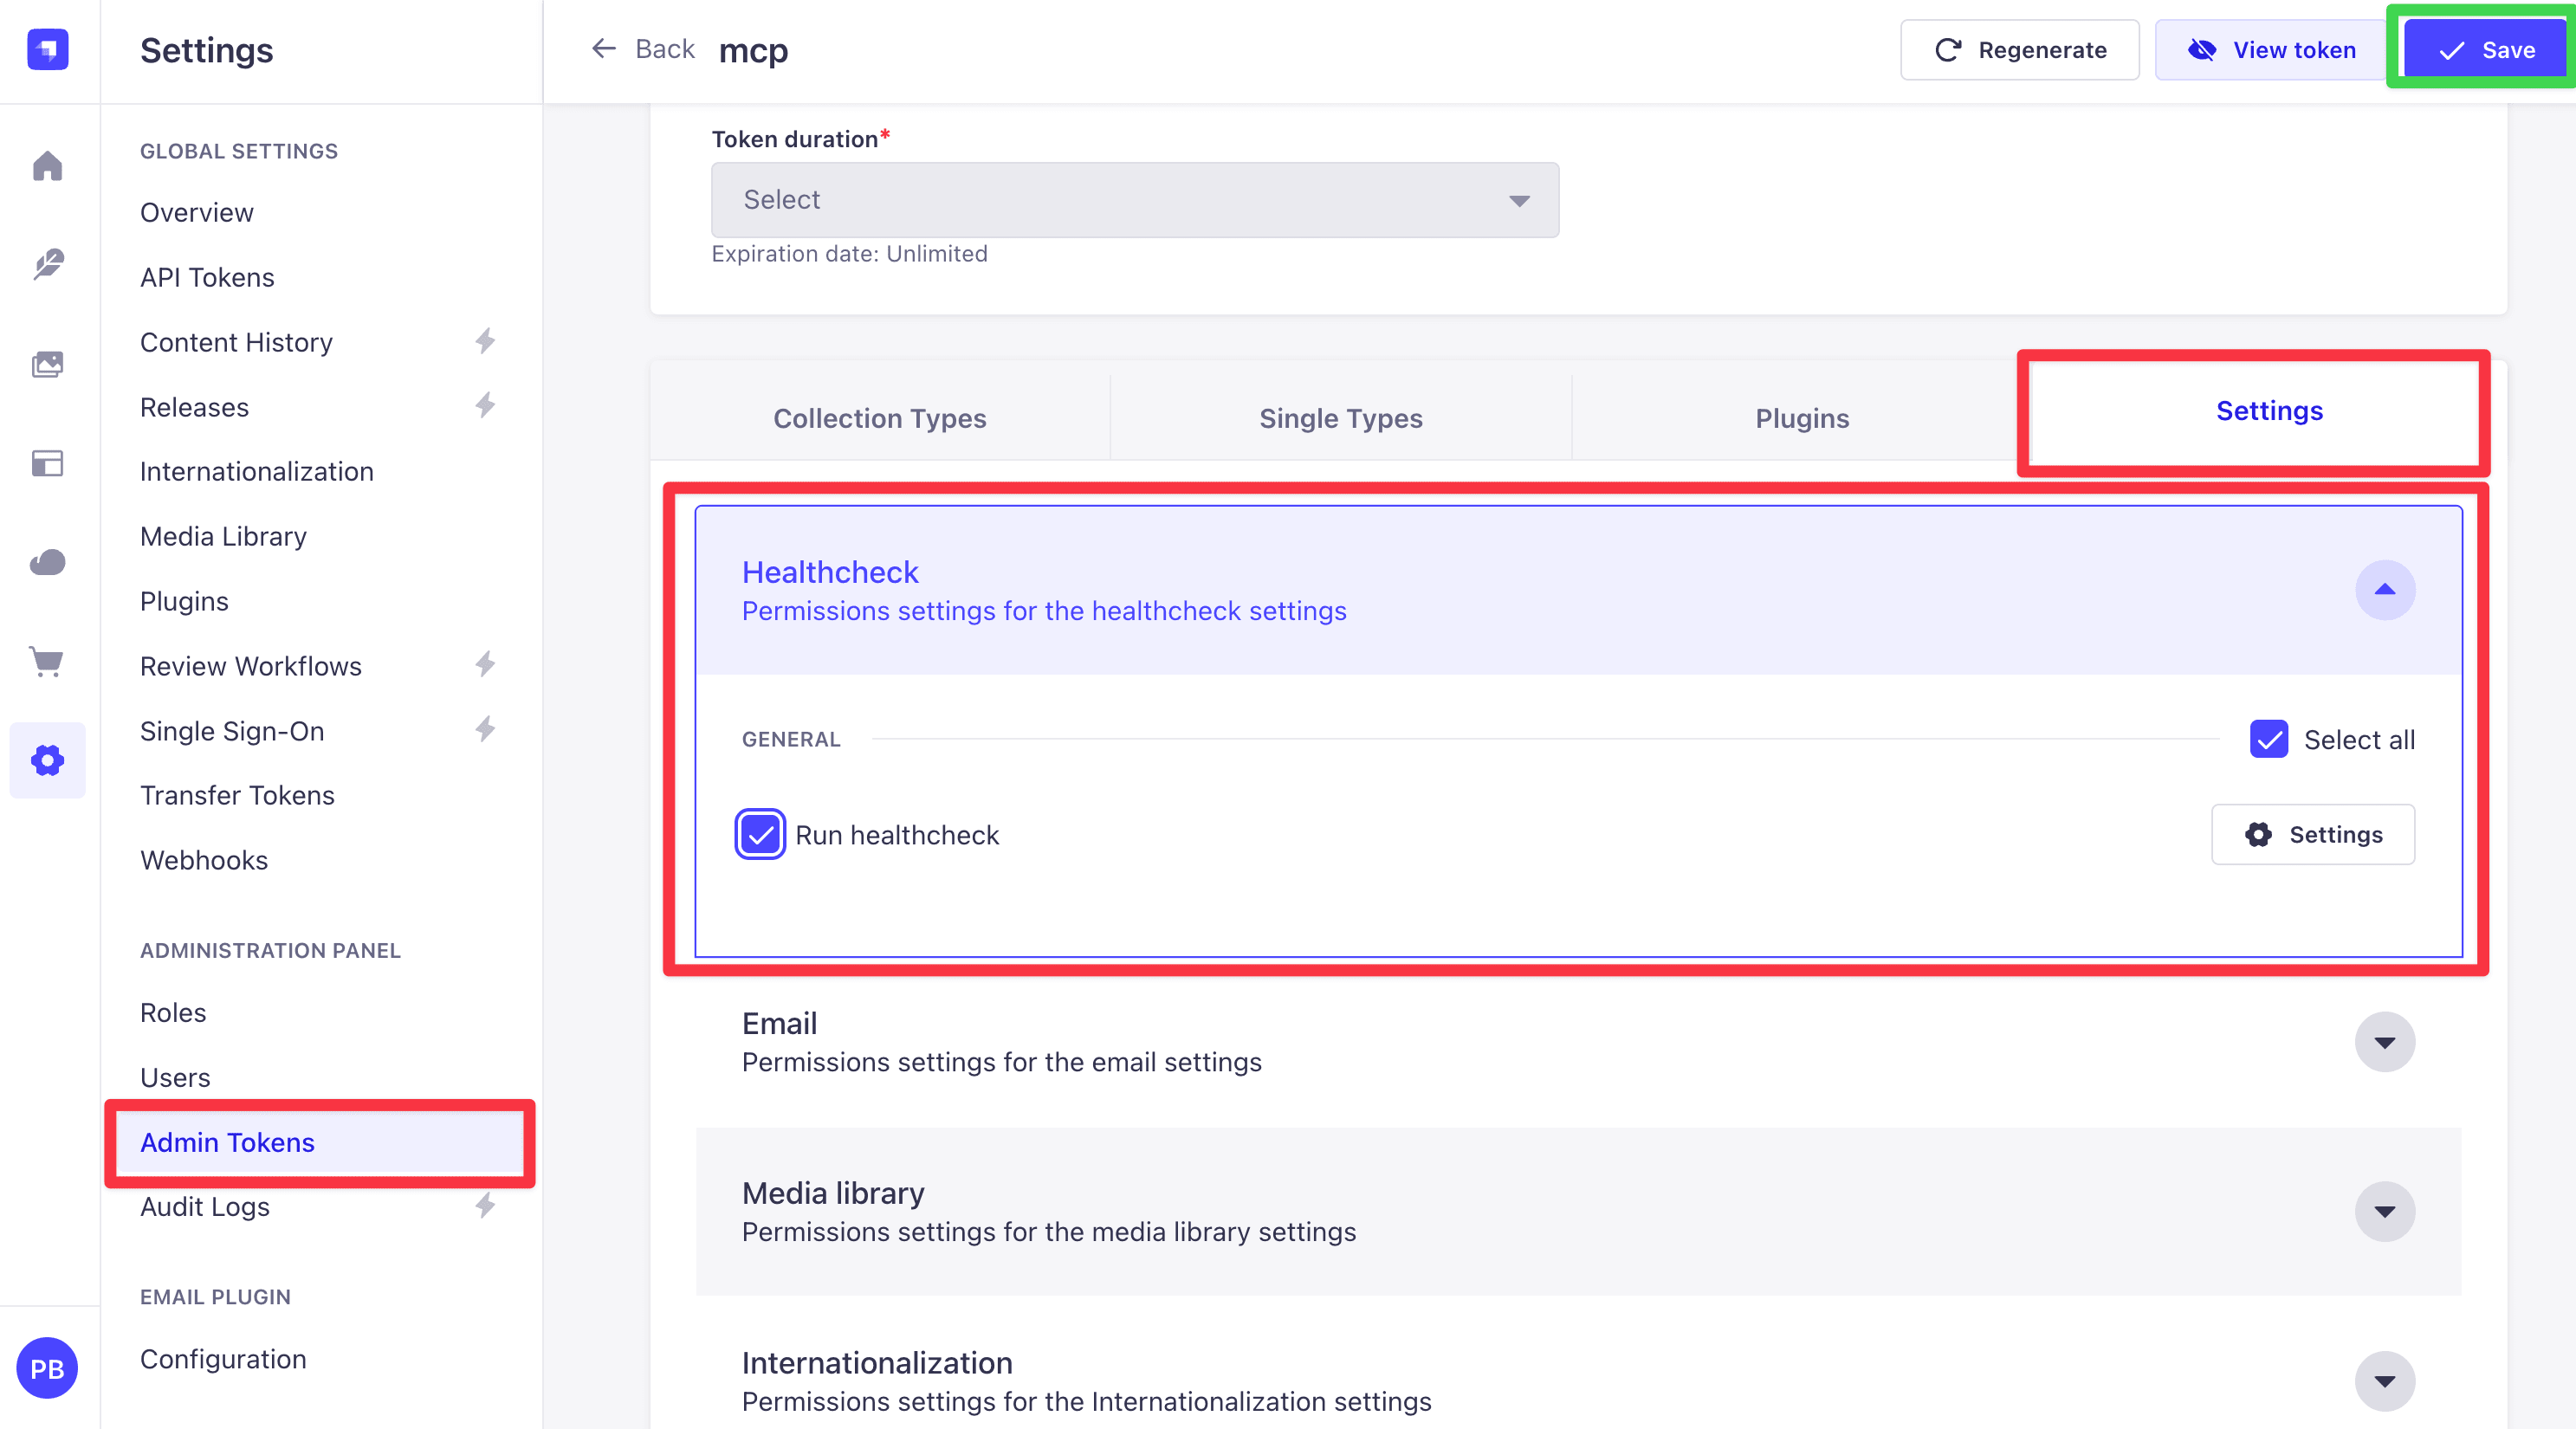
Back in Settings → Admin Tokens, edit your token, tick Run healthcheck under Healthcheck, and save.
Now ask your client to use it. In Claude Code:
Use the strapi healthcheck tool and tell me whether the database is up,
which client it is, and how long Strapi has been running.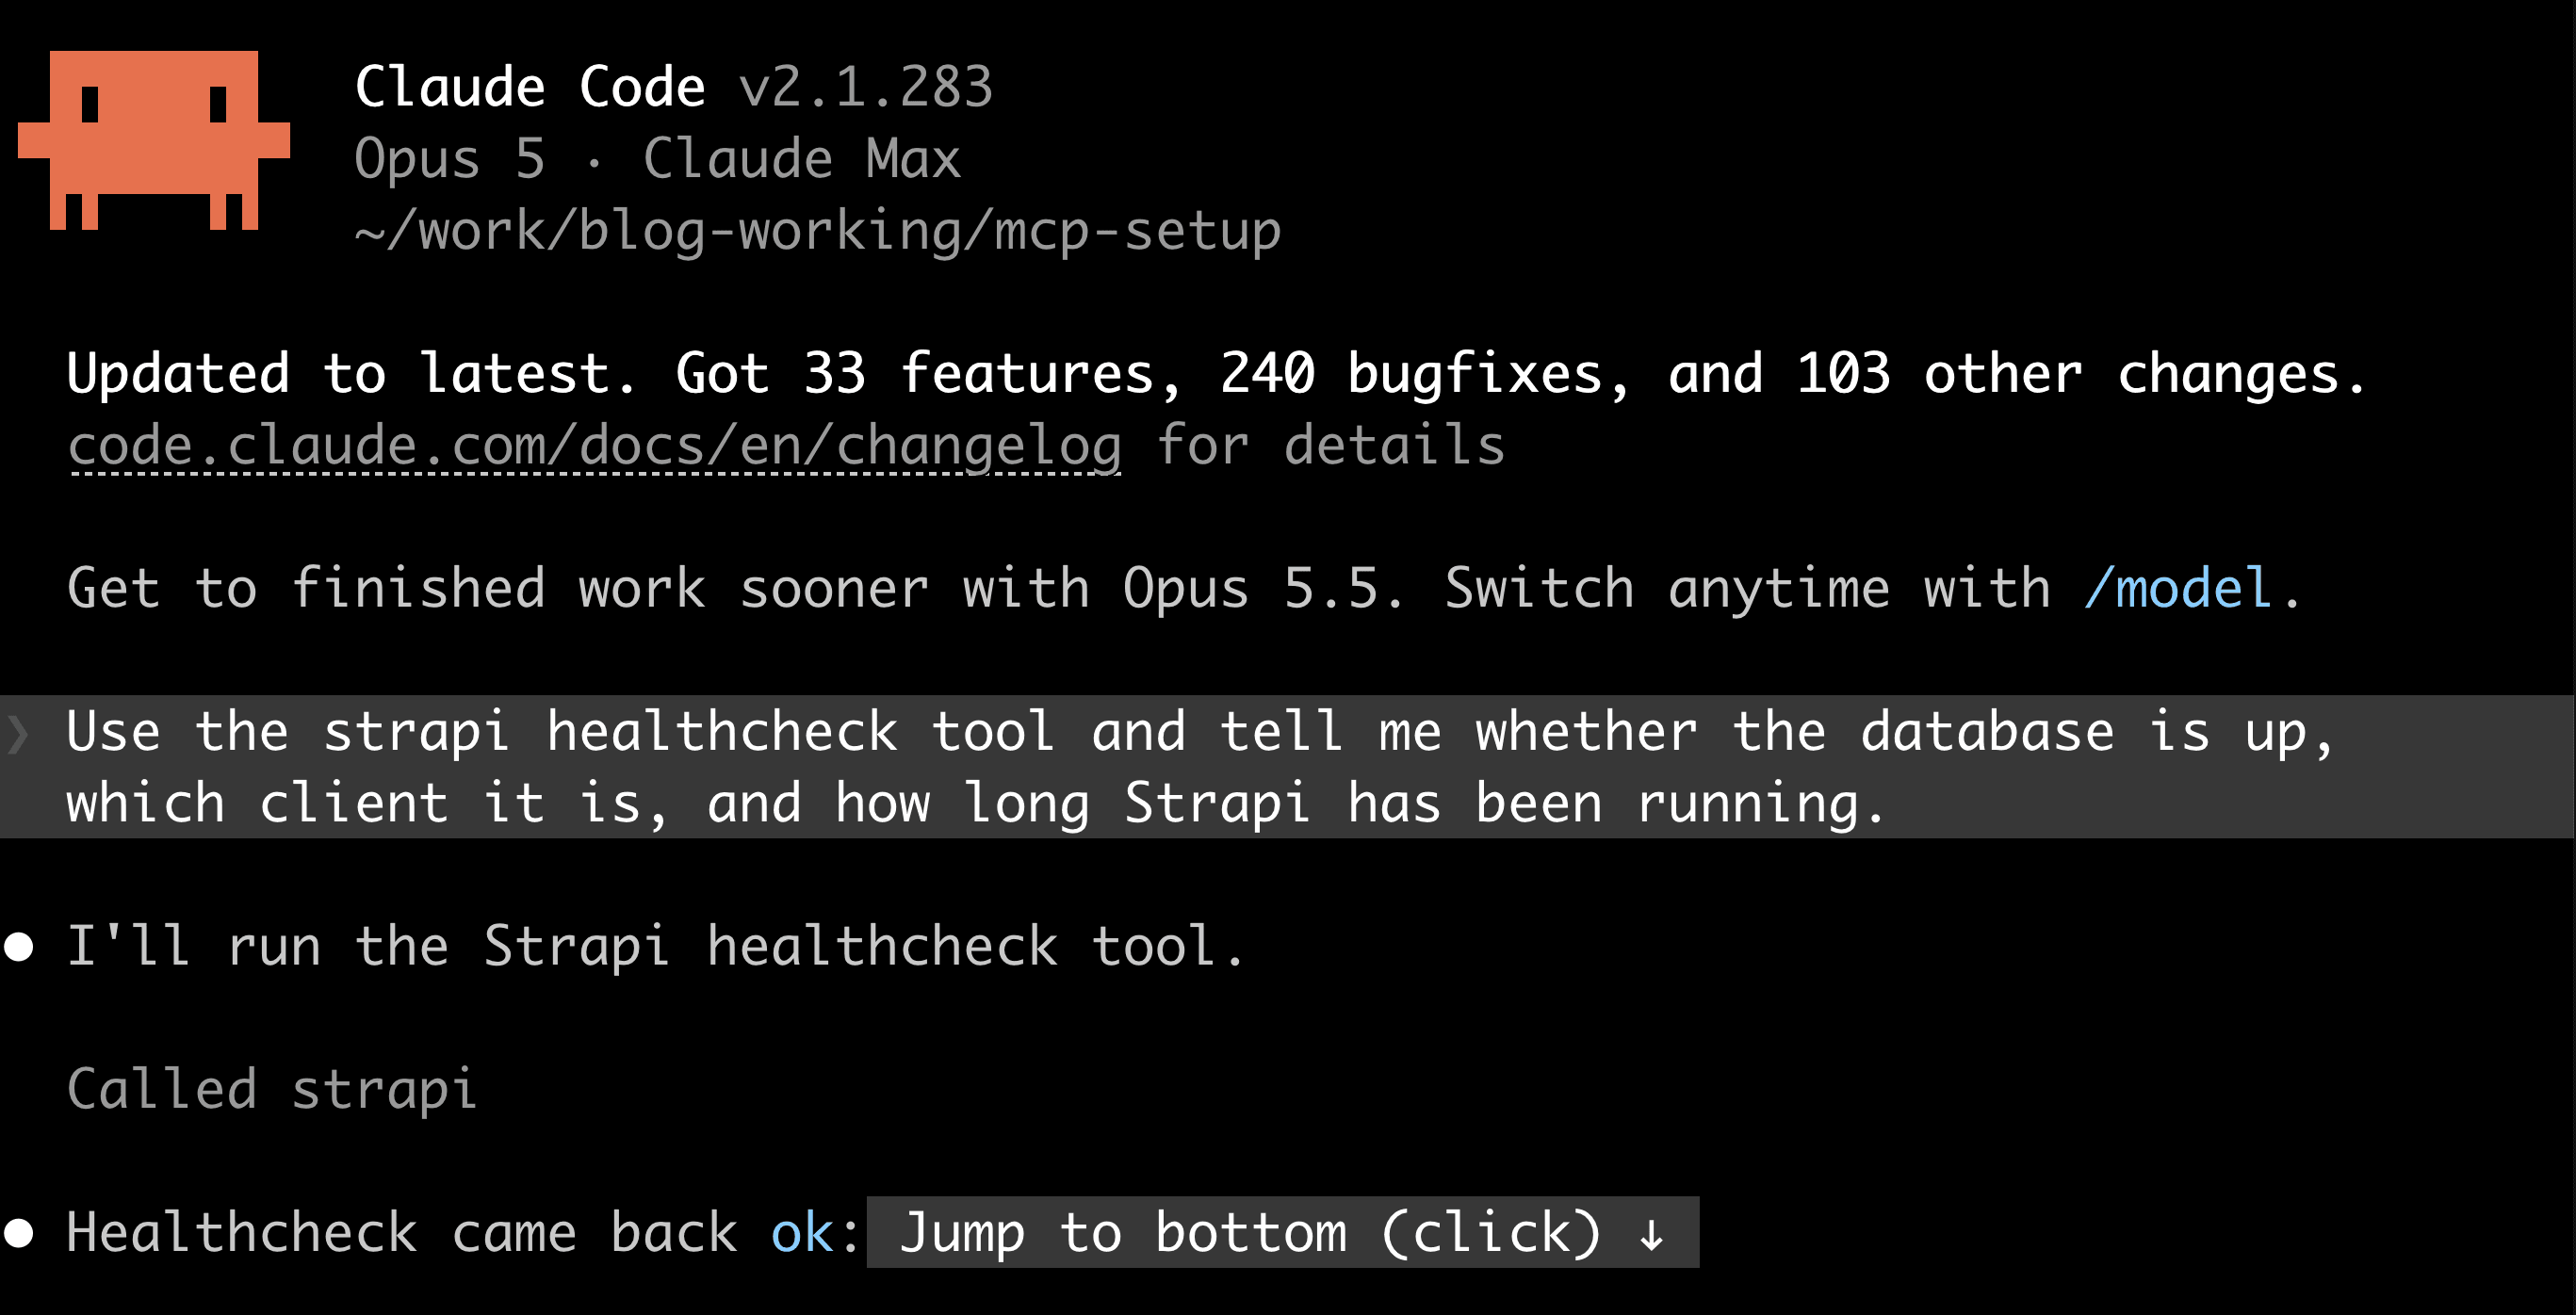
It calls healthcheck and answers from the result:
{ "status": "ok", "uptimeSeconds": 4, "database": "sqlite",
  "databaseOk": true, "strapiVersion": "5.55.1", "checkedAt": "2026-09-26T18:20:17Z" }
You do not have to name the tool. Ask "is my Strapi healthy?" and the model picks it out of the list on its own, because the description you gave it says when to call it.
Call the same service over HTTP
You already wrote the healthcheck code, in the service. To call it from
curl or a browser, add two more files.
routes/healthcheck.ts— the URL:GET /api/healthcheck, handled byhealthcheck.runcontrollers/healthcheck.ts— that handler: it calls the service and returns the result
So curl localhost:1337/api/healthcheck reaches the same run() the MCP tool
calls:
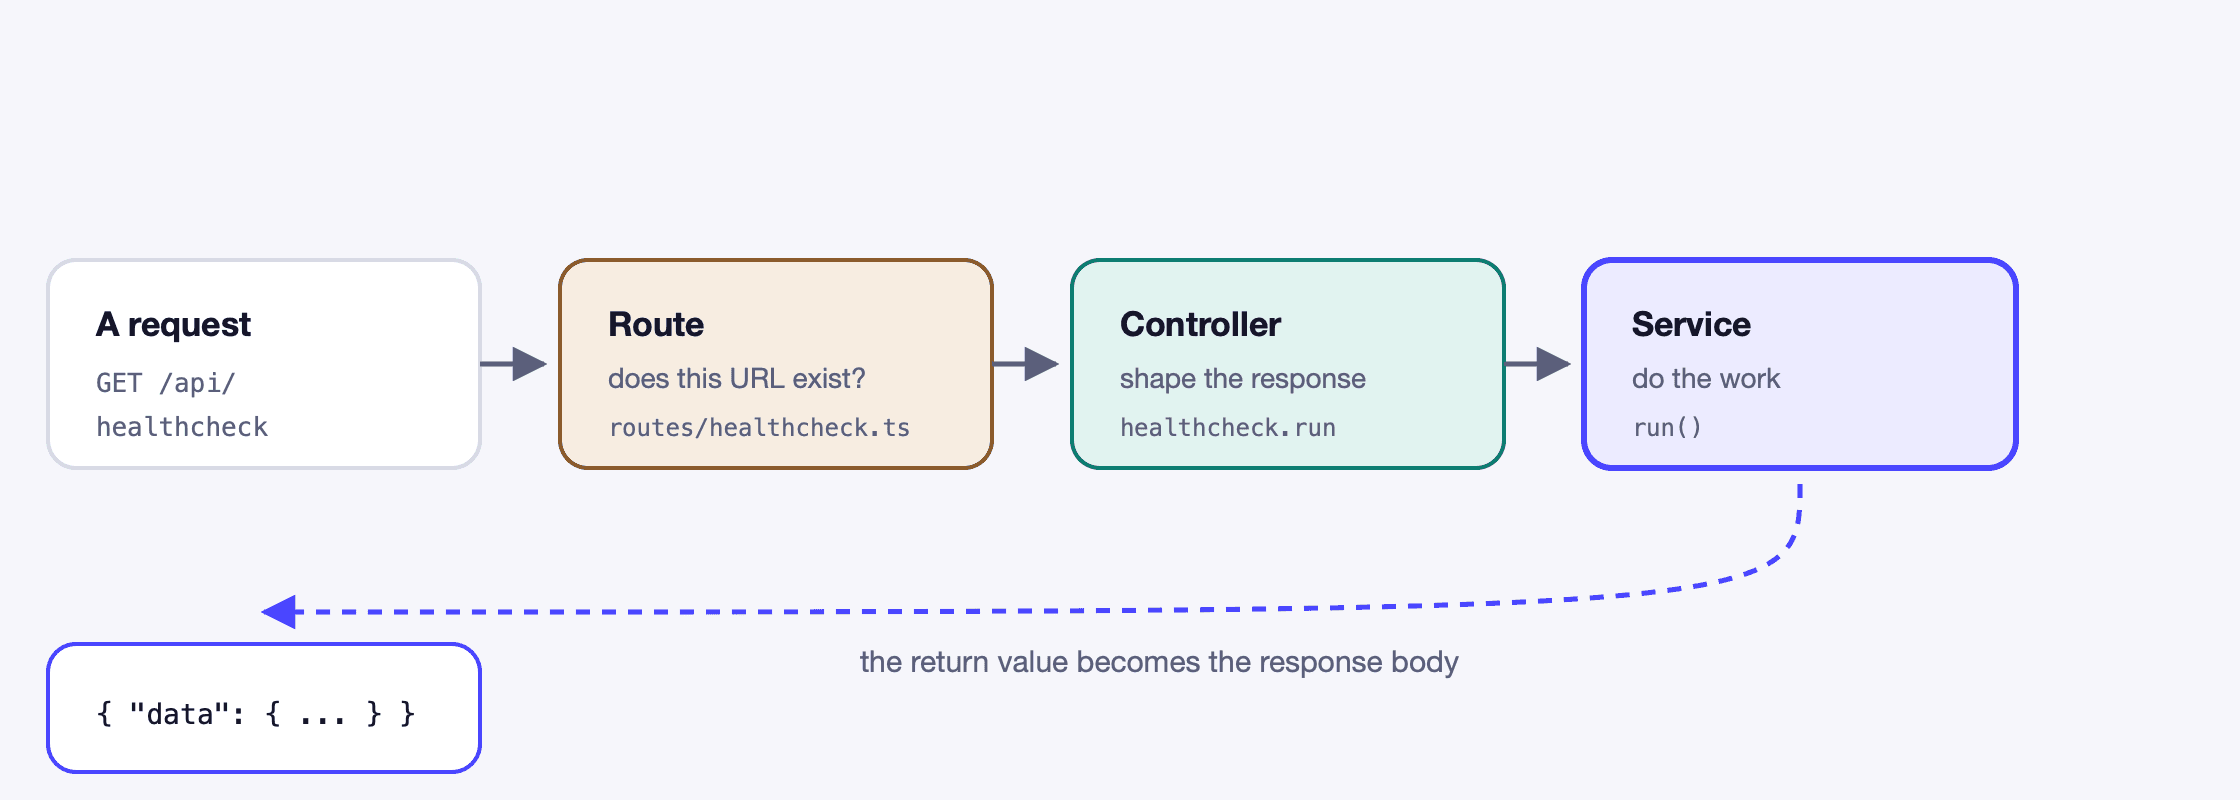
Both files live under src/api/healthcheck/, next to the service you already
wrote.
Step 1. Create src/api/healthcheck/routes/healthcheck.ts. This declares
the URL and points it at a controller method
(routes docs):
export default {
  routes: [
    {
      method: 'GET',
      path: '/healthcheck',
      handler: 'healthcheck.run',
      config: { policies: [], middlewares: [] },
    },
  ],
};
Step 2. Create src/api/healthcheck/controllers/healthcheck.ts. The
handler: 'healthcheck.run' above resolves to the run method here
(controllers docs):
import type { Core } from '@strapi/strapi';
import type { Context } from 'koa';

export default ({ strapi }: { strapi: Core.Strapi }) => ({
  async run(ctx: Context) {
    ctx.body = { data: await strapi.service('api::healthcheck.healthcheck').run() };
  },
});
Step 3. Restart Strapi, then give the route a permission.
Grant it in the admin panel. Go to Settings → Users & Permissions plugin → Roles → Public, tick healthcheck → run, and save. Anyone can now call the route.
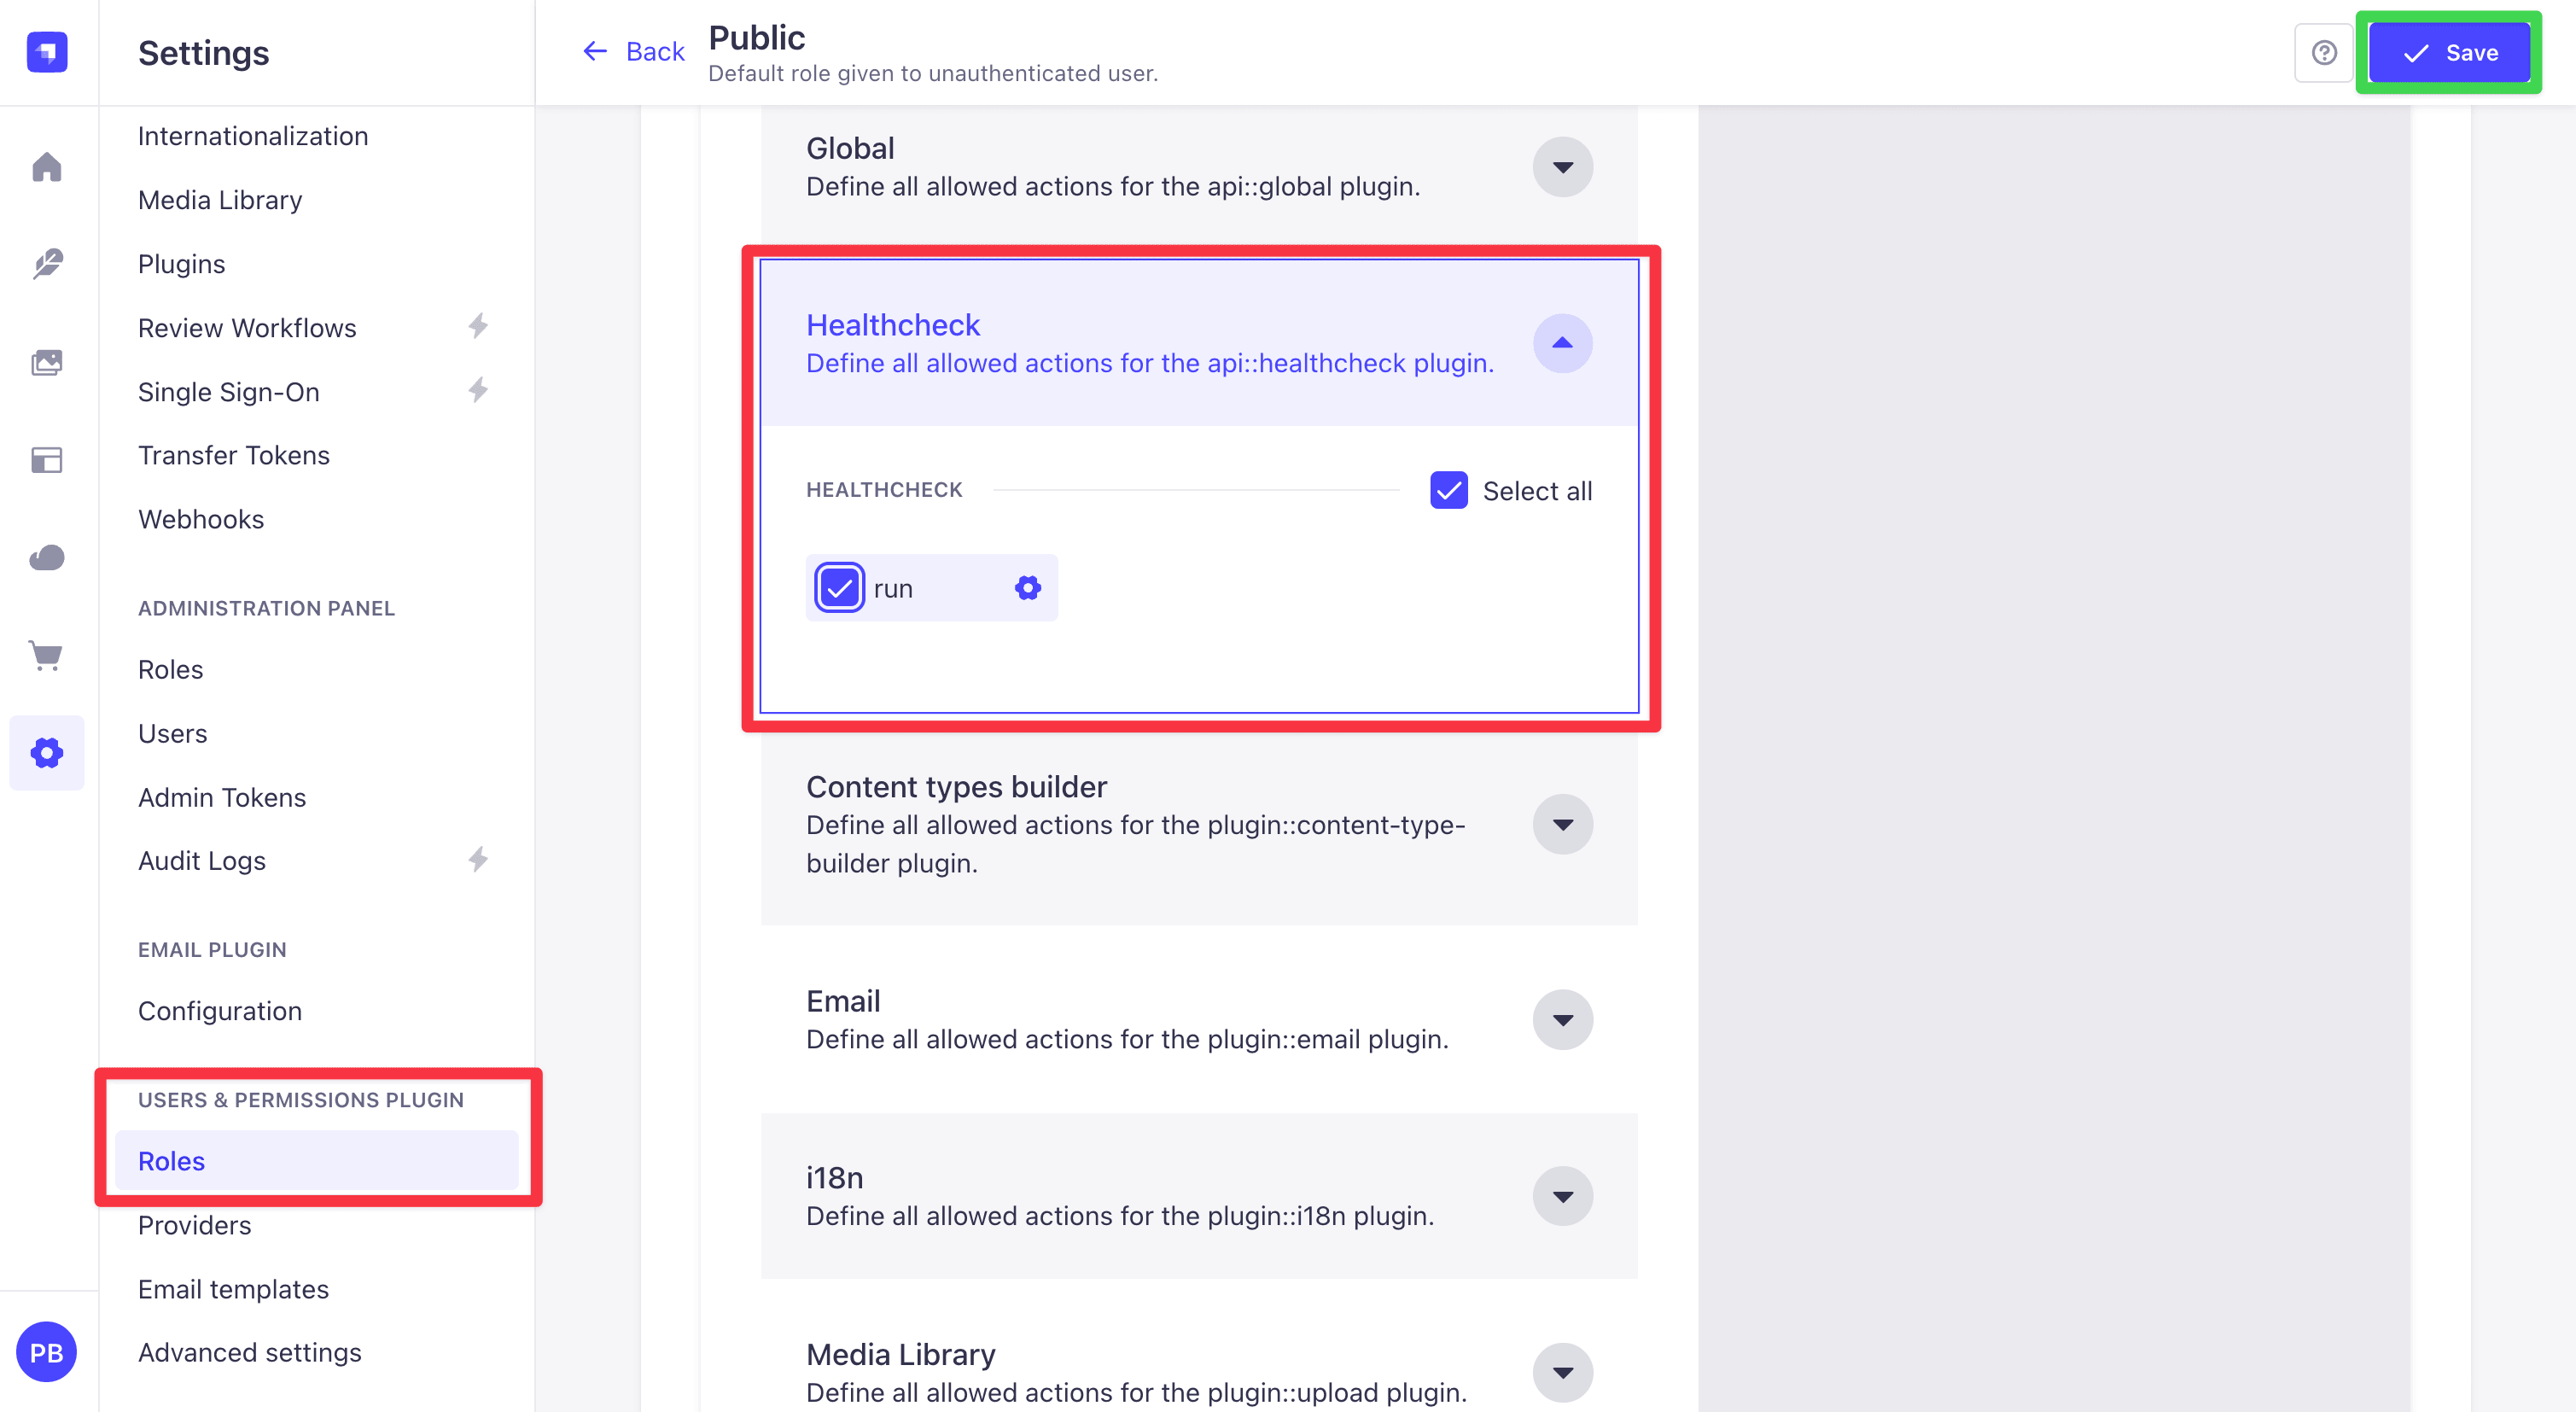
Want it credentialed instead? Grant it to the Authenticated role, or to an API token under Settings → API Tokens, and send the token with the request:
curl -s -H "Authorization: Bearer YOUR_API_TOKEN" localhost:1337/api/healthcheckWith the Public role ticked:
curl -s localhost:1337/api/healthcheck
# {"data":{"status":"ok","uptimeSeconds":3,"database":"sqlite","databaseOk":true,
#   "strapiVersion":"5.55.1","checkedAt":"2026-09-26T20:45:49.509Z"}}
Or just call the endpoint via Postman:
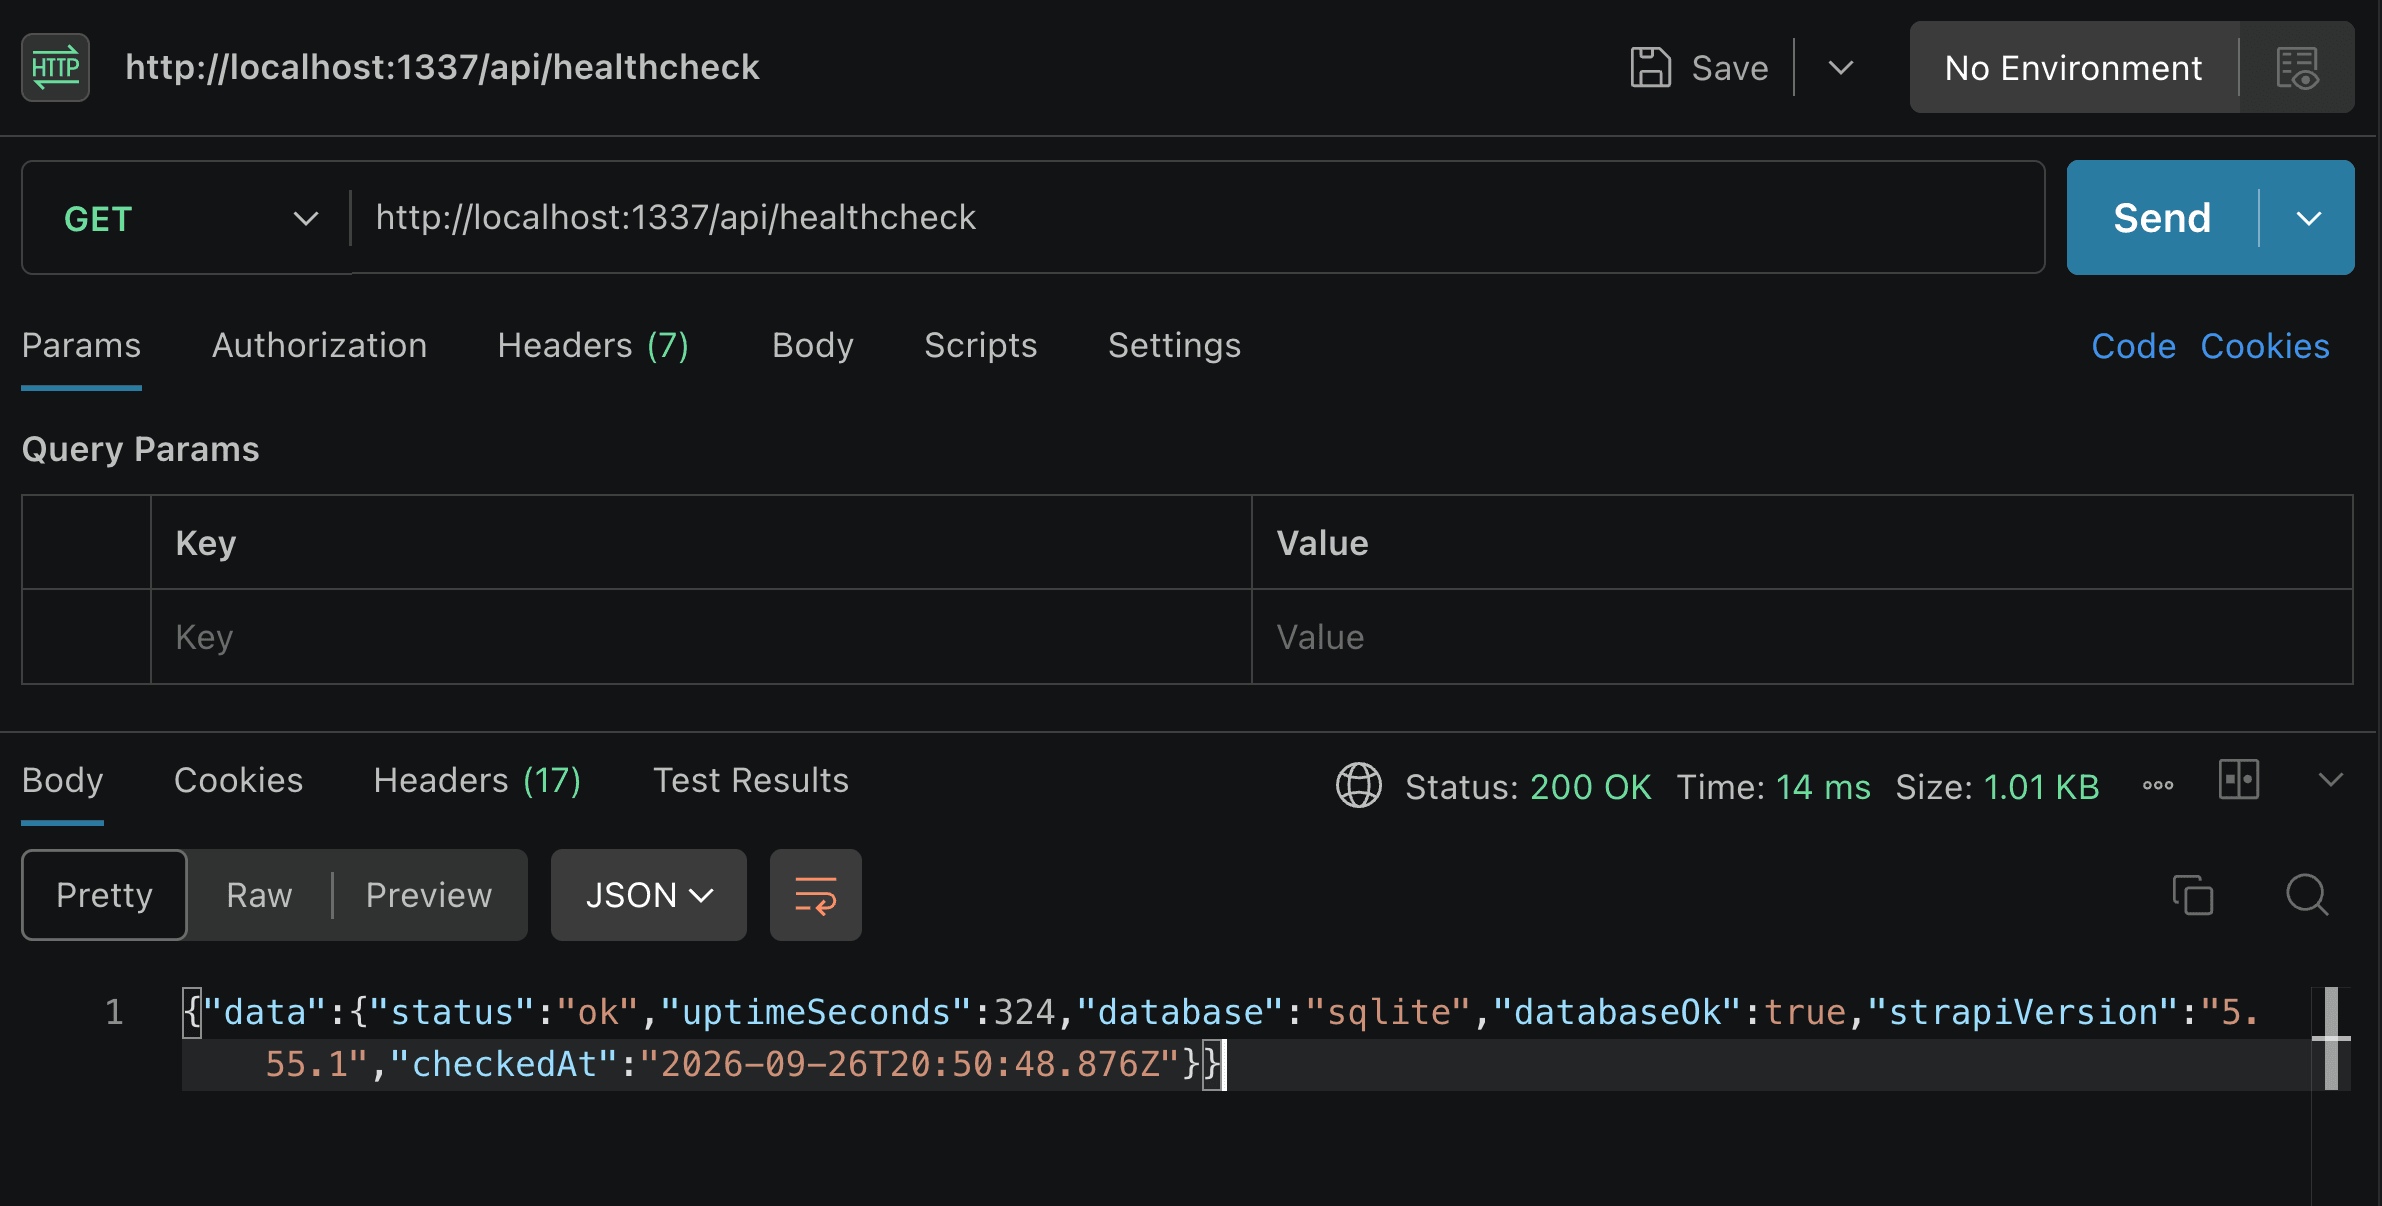
That is the same service the healthcheck MCP tool calls, reached a different
way.
How Strapi decides who can call what
Which system applies depends on who is calling. There are four, and they do
not overlap: send an API token to /mcp and you get a 401, send an admin
token to /api/* and you get one too.
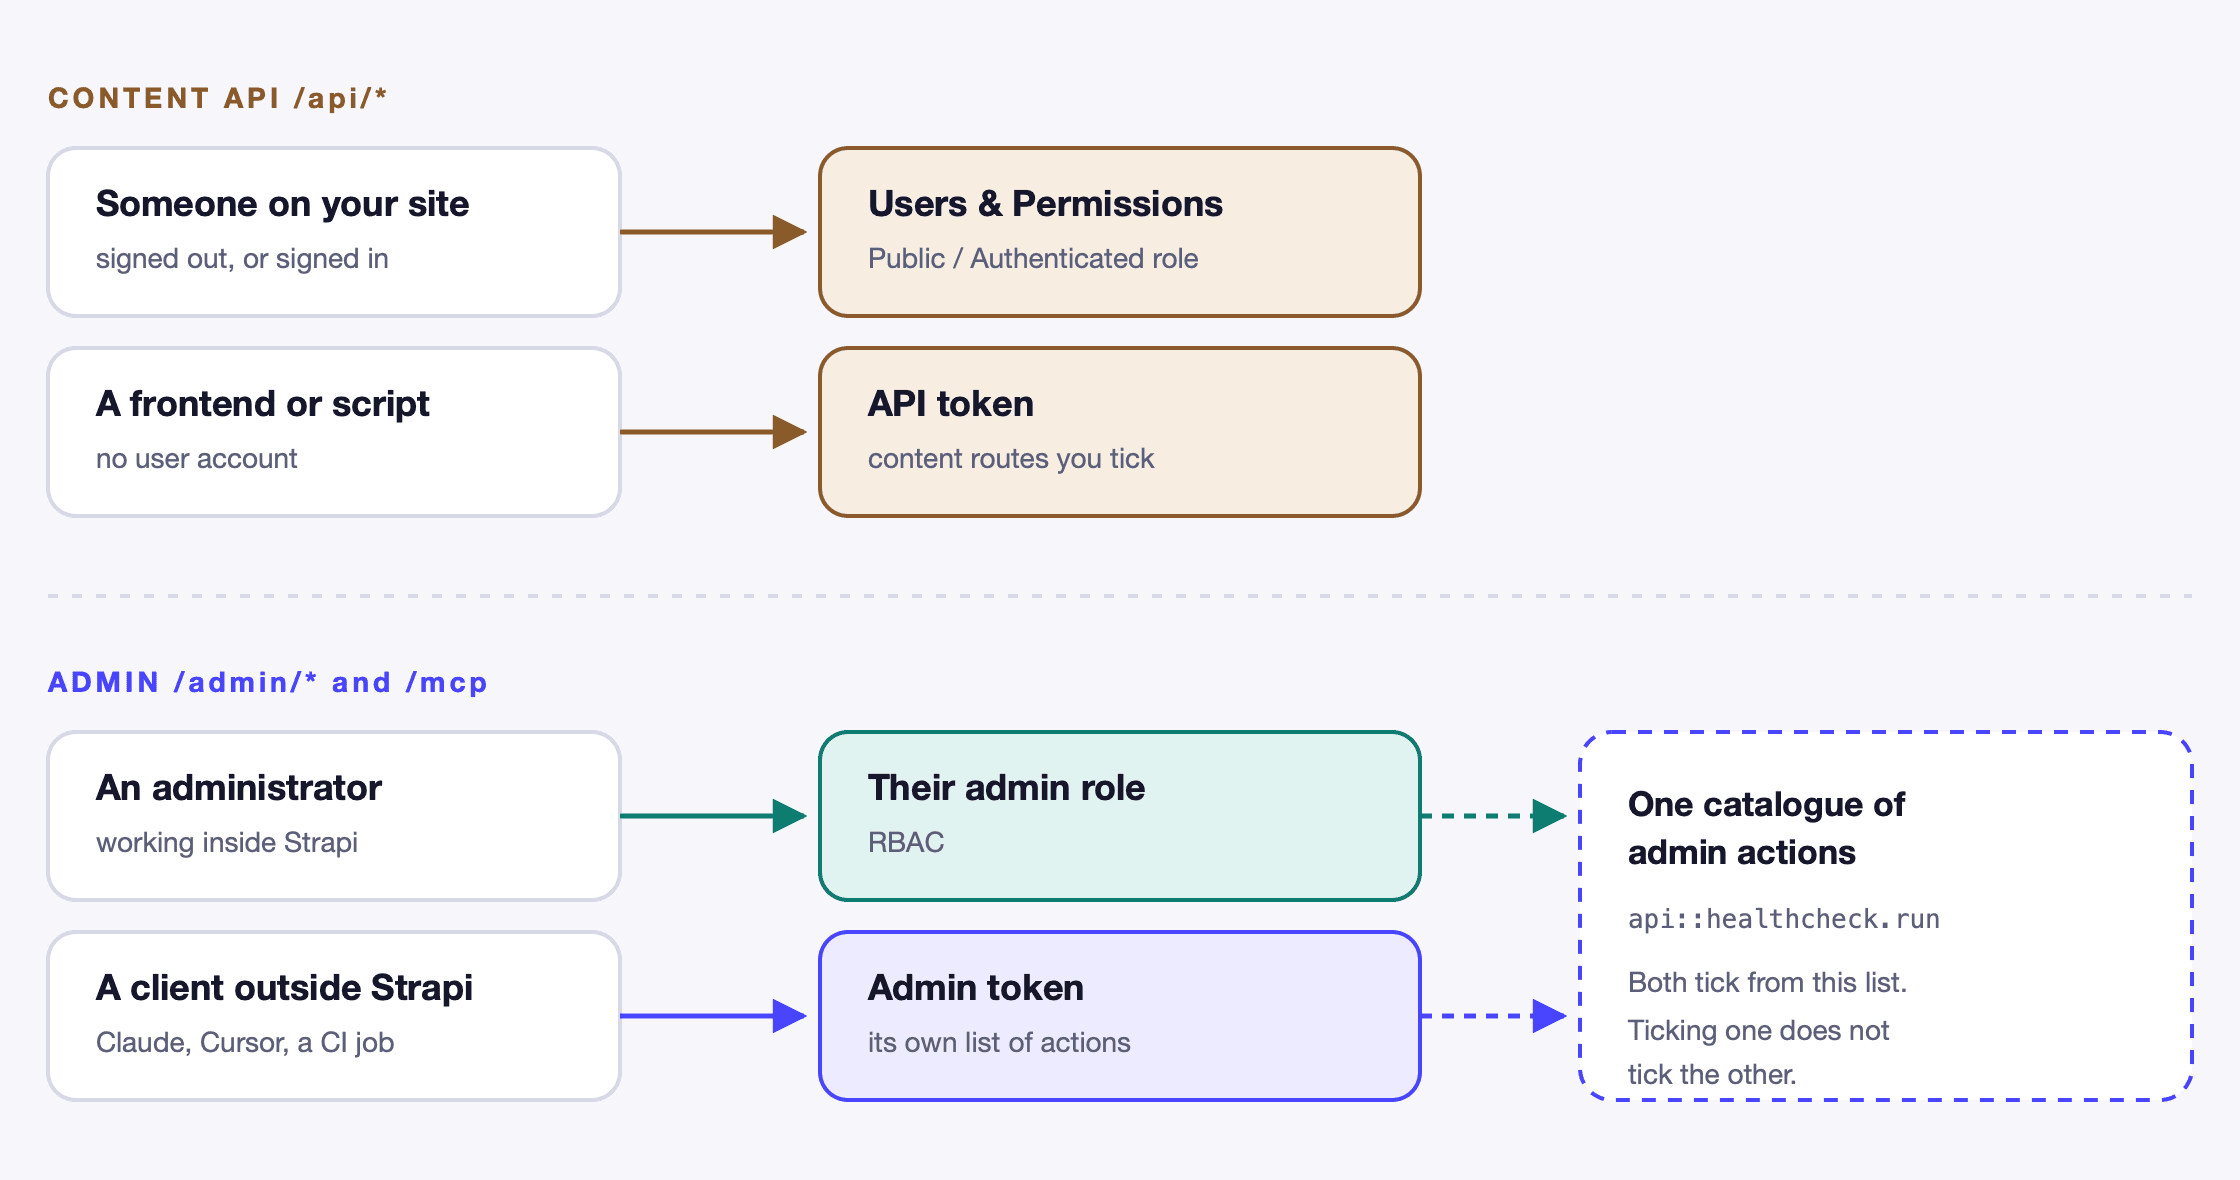
| The caller | What lets it in |
|---|---|
| Someone browsing your site | Users & Permissions roles: Public when signed out, Authenticated when signed in |
A frontend or script calling /api/* | an API token |
| A person logged into the admin panel | their admin role, which is RBAC |
An AI client calling /mcp | an admin token |
Users & Permissions covers the people who visit your site. They are end
users, not administrators, and they never see the admin panel. Public is the
role a signed-out visitor gets, which is what you ticked to open
GET /api/healthcheck.
API tokens let a program call /api/* without being a user at all. You
pick the content routes it may call when you create it.
RBAC is for people working inside Strapi. It is the permissions on an administrator's role: which content types they see, which settings pages they open, and which tools the chat panel offers them. Set in Settings → Administration Panel → Roles.
Admin tokens are for something outside Strapi calling in: an MCP client, a CI job, a script. The token is its own credential, not a role. It carries a list of admin actions you tick when you create it, and it can never hold more than the administrator who created it, so an action you do not have appears disabled in the form.
The two admin systems are separate, but they choose from the same catalogue of
actions. That is why the api::healthcheck.run you registered appears in both
places: in the token form, where it decides what an AI client sees over MCP,
and under the Settings tab of the role editor, where it decides who gets
the tool in the chat. Ticking it in one does not tick it in the other.
4. Add an AI chat to the admin, running on your own machine
strapi-plugin-tanstack-ai
adds three cross-type MCP tools and a chat panel in the admin. The chat is
built on TanStack AI and takes one of two
providers:
ollamaruns the model on whatever machine Ollama is listening on. This tutorial uses your laptop, butbaseURLpoints anywhere, so an open model on a GPU box you rent is the same two lines of config.anthropicsends the conversation to Claude, withmodeland an API key.
Ollama is what this tutorial uses: no key, and no content leaves the machine.
Install Ollama
Ollama runs the model on your machine. That is what keeps your content and your questions local, with no API key anywhere.
- macOS: download the app from ollama.com/download,
or
brew install ollama - Linux:
curl -fsSL https://ollama.com/install.sh | sh - Windows: the installer from ollama.com/download
Check it:
ollama --version # ollama version is 0.34.2The macOS app starts the server for itself. On Linux, or if the next command cannot connect, start it in its own terminal:
ollama servePull a model that can call tools
Tool calling is the whole point here, so the model has to support it. qwen3:14b
does, and it is a reasonable size for a laptop:
ollama pull qwen3:14b # about 9.3 GBSmaller models answer faster and call tools worse. llama3.2:3b is fine for a
first look; qwen3:14b is what this tutorial was written against. Plan for
roughly 10 GB of disk and 16 GB of RAM at this size.
Check that the model is there and the server answers:
ollama list
# NAME          ID              SIZE      MODIFIED
# qwen3:14b     bdbd181c33f2    9.3 GB    5 weeks ago

curl -s localhost:11434/api/tags | head -c 80
# {"models":[{"name":"qwen3:14b", ...
If that curl fails, Ollama is not running. Start it with ollama serve and try
again.
Install the plugin
npm install strapi-plugin-tanstack-ai@^1.6.0That one package brings the chat, its SDK, and the adapters for both providers. Which model the chat talks to is set in config, next.
config/plugins.ts:
export default ({ env }) => ({
  'tanstack-ai': {
    enabled: true,
    config: {
      chat: {
        enabled: env.bool('TANSTACK_AI_CHAT', true),
        provider: 'ollama',
        model: env('TANSTACK_AI_MODEL', 'qwen3:14b'),
        baseURL: env('OLLAMA_HOST', 'http://localhost:11434'),
      },
    },
  },
});
To run the model somewhere other than this laptop, point baseURL at it. The
rest of the config is unchanged:
OLLAMA_HOST=http://gpu-box.internal:11434To use Claude instead, switch the provider and give it a key. The chat tools work the same either way:
chat: {
  enabled: true,
  provider: 'anthropic',
  model: 'claude-sonnet-5',
  apiKey: env('ANTHROPIC_API_KEY'),
},
Restart. You should see the following in the log:
info: [tanstack-ai] registered 3 permission action(s)
info: [tanstack-ai] chat ENABLED
info: [tanstack-ai] registered 3/3 MCP tool(s)
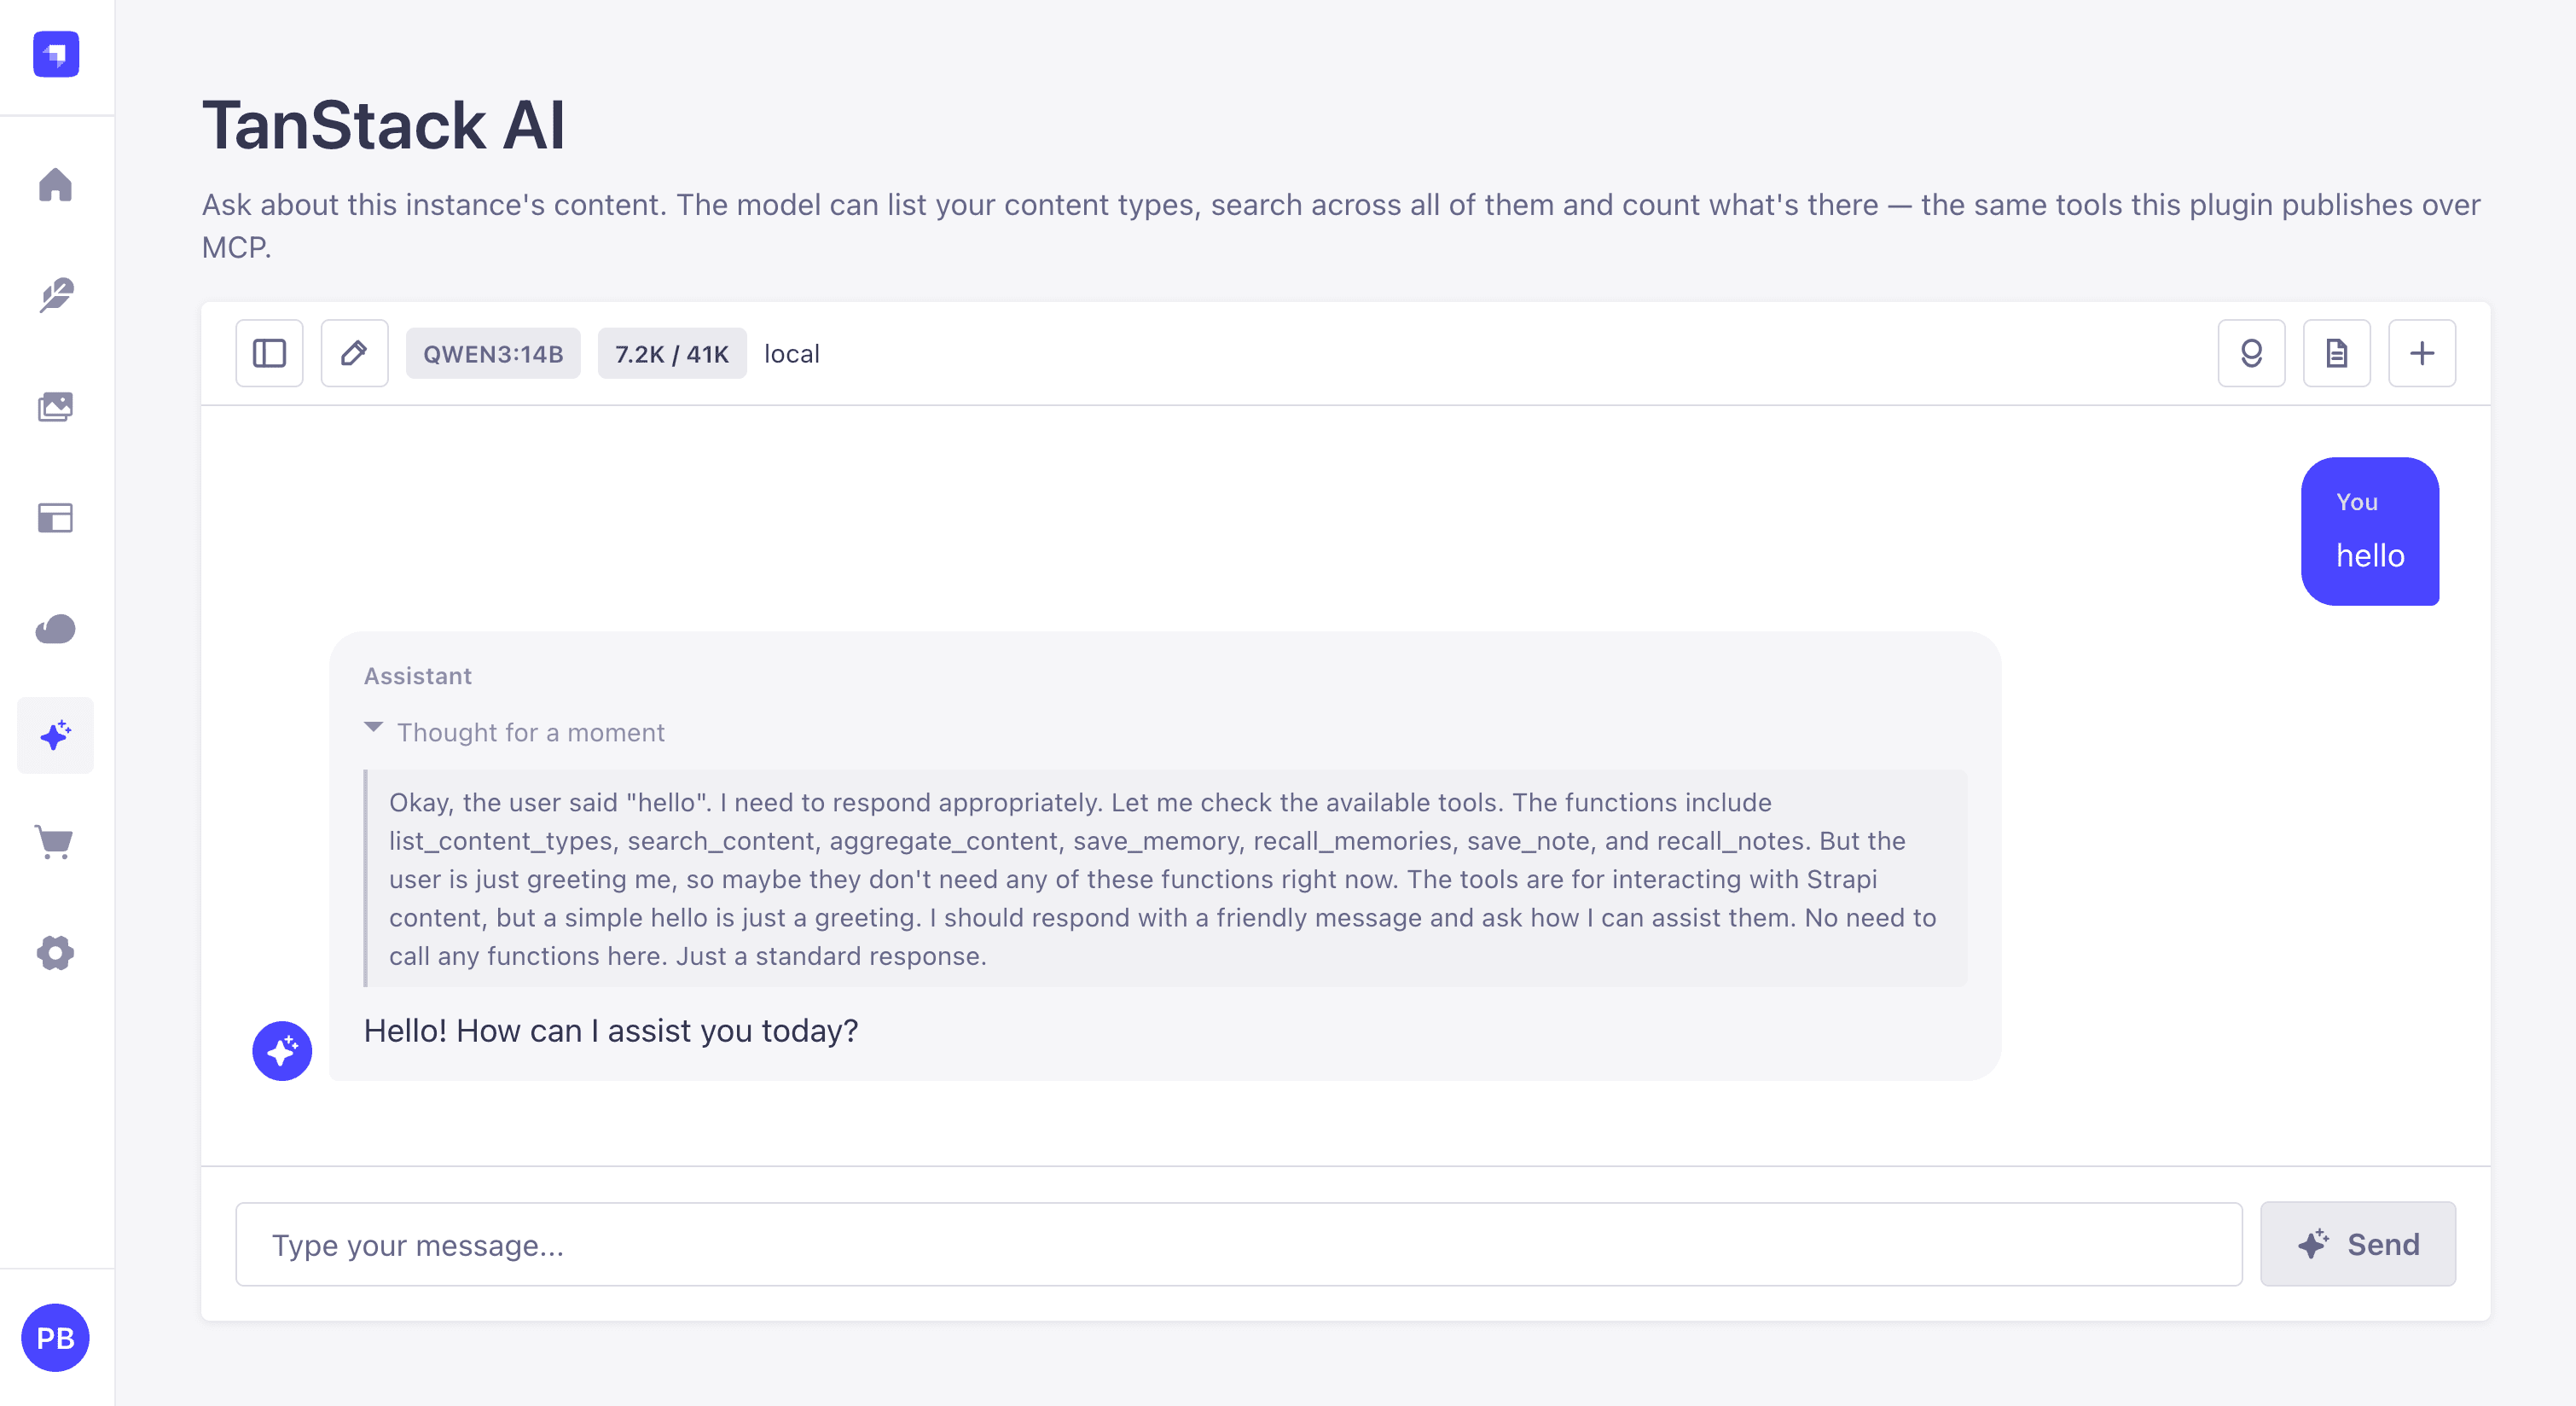
Open TanStack AI in the sidebar and ask:
How many articles do I have, and what categories are they in?
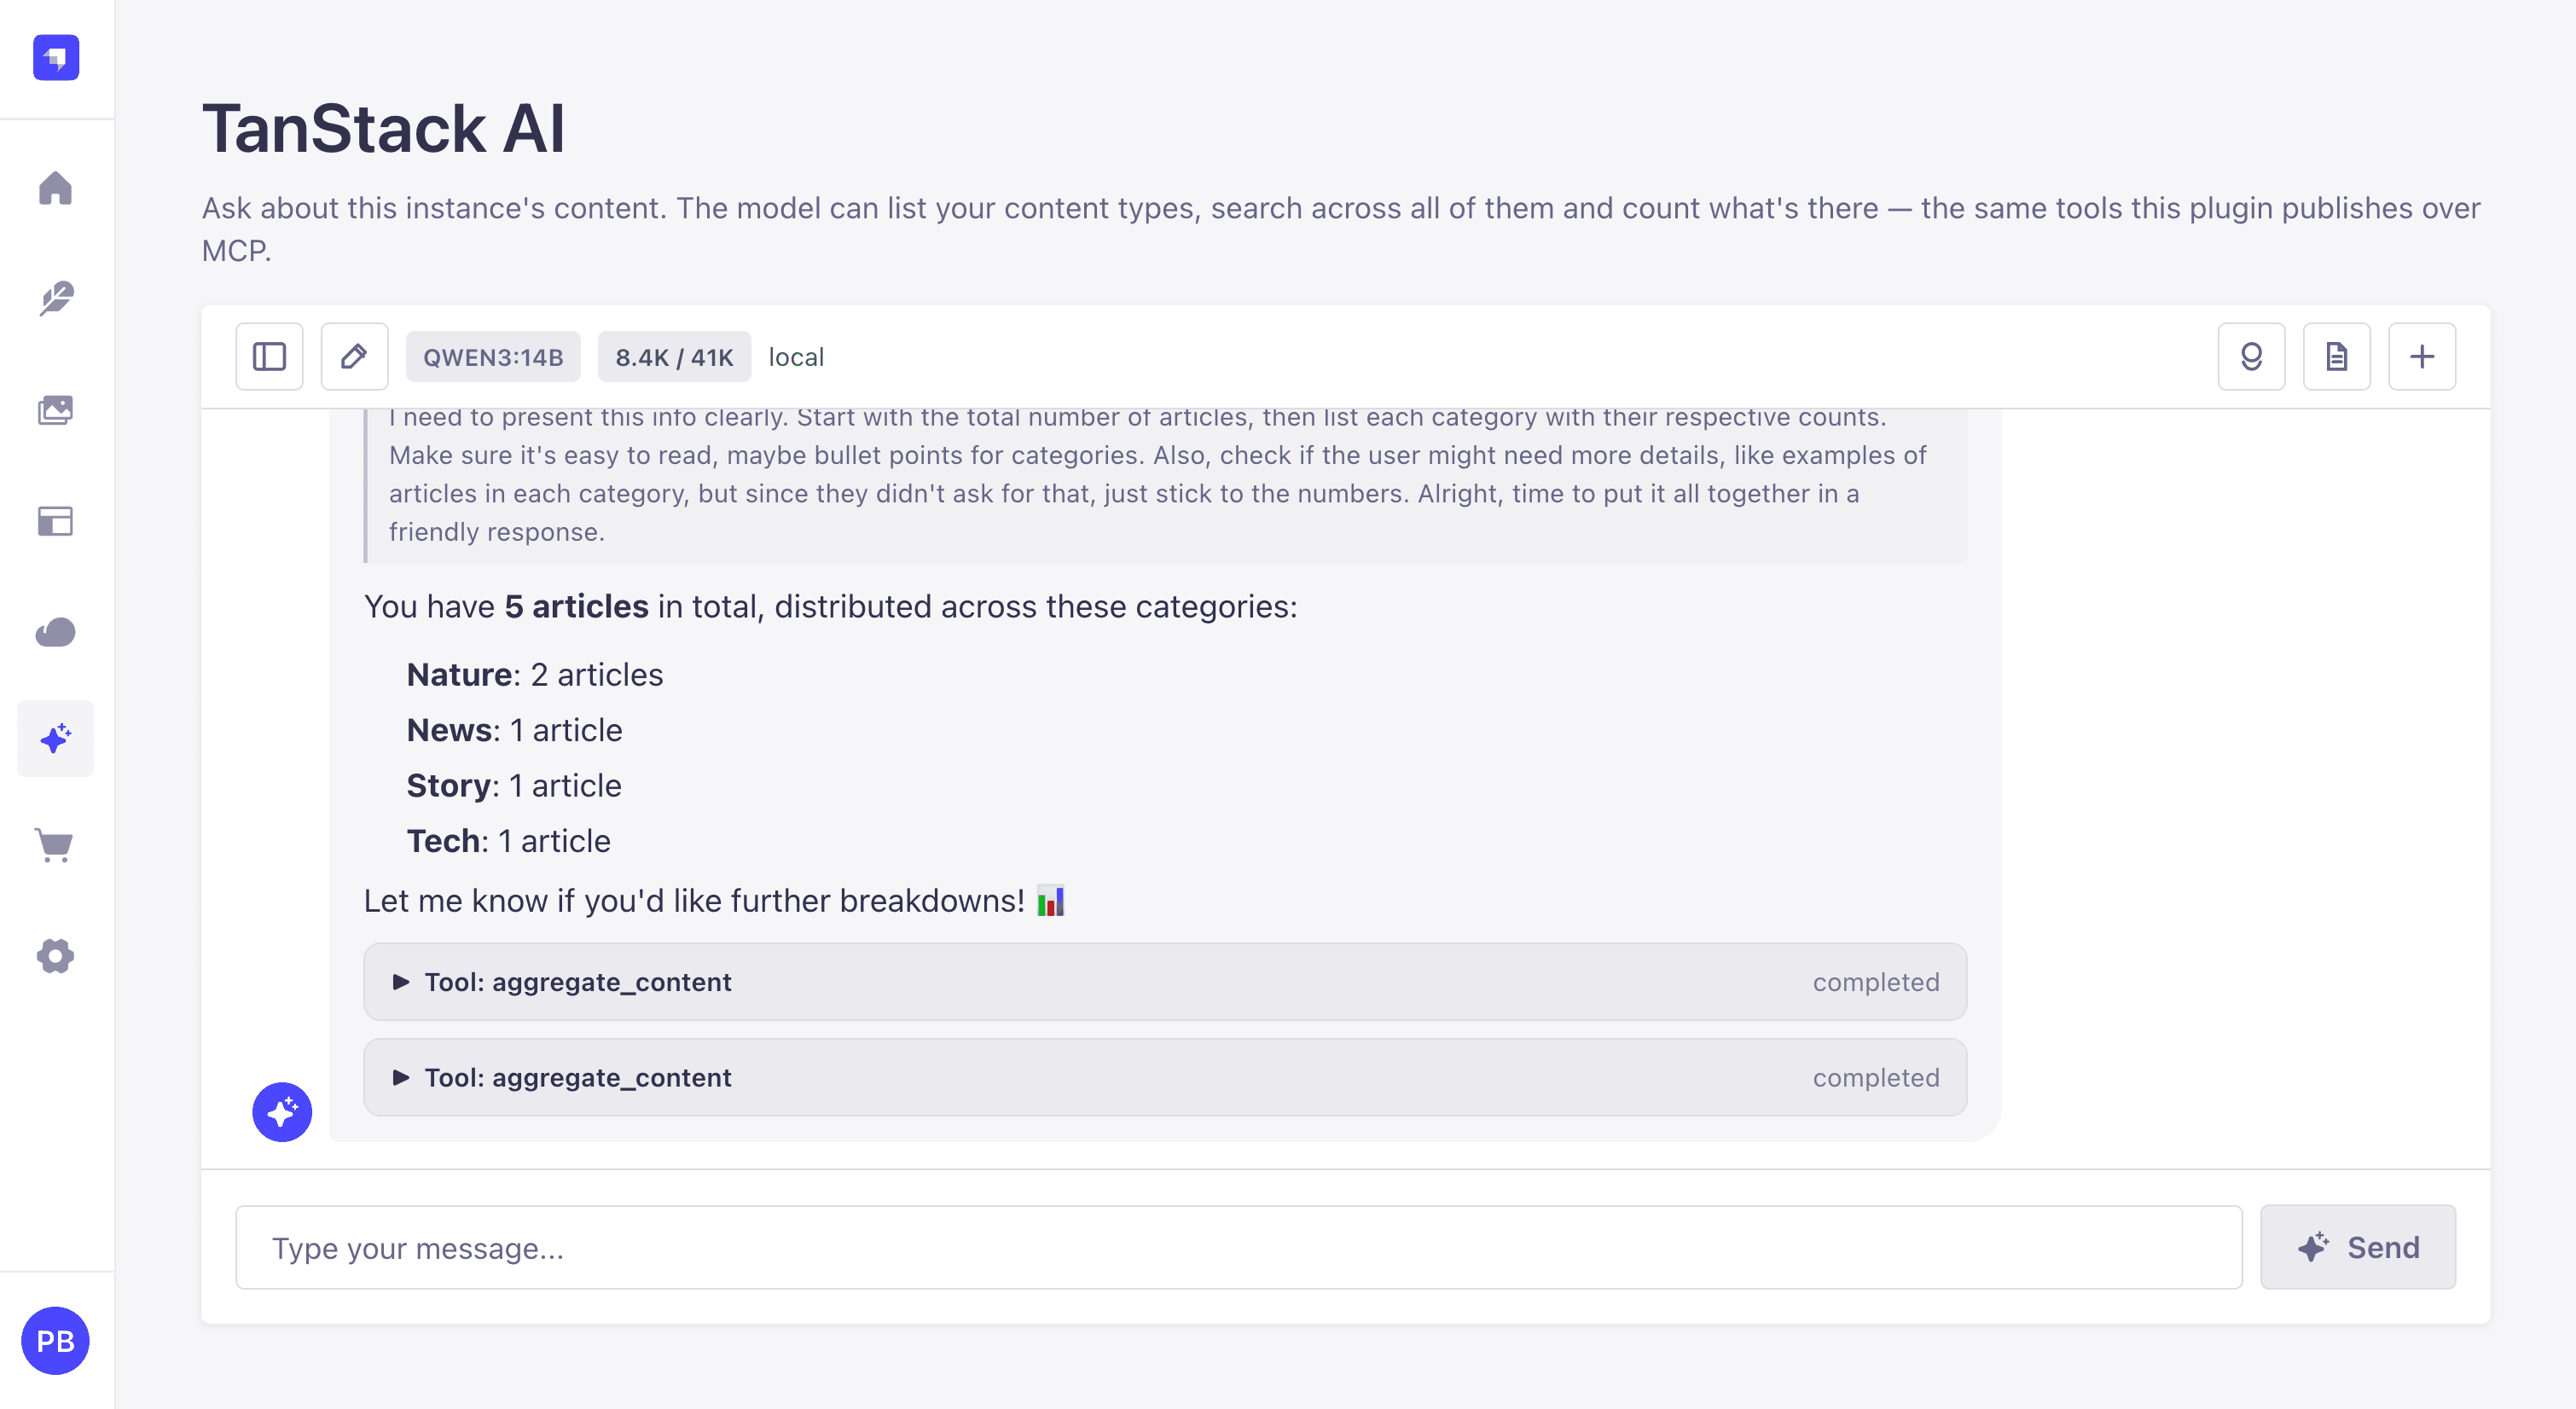
Each tool call is shown as it happens, which is the point: the answer comes out of your content, not out of the model.
Gotcha: the chat runs as you. It can use a tool only if your role holds that tool's action, under Settings → Roles → Plugins → Tanstack ai. Super Admin gets new permissions automatically; other roles do not. The chat also respects Content Manager permissions, so a role that can read only Articles gets answers about Articles.
5. Let the chat call your healthcheck tool
The healthcheck tool answers over MCP and over HTTP, but the chat does not
offer it yet. You need two things, and they happen in two different places:
- Register the tool with the chat. Tools from installed plugins are registered automatically. A tool in your app is registered with two edits: one line of config, and a description of the tool in its service.
- Grant its permission in Strapi. The permission is already registered with Strapi, since step 3. Tick it on a role and the chat offers the tool to administrators with that role.
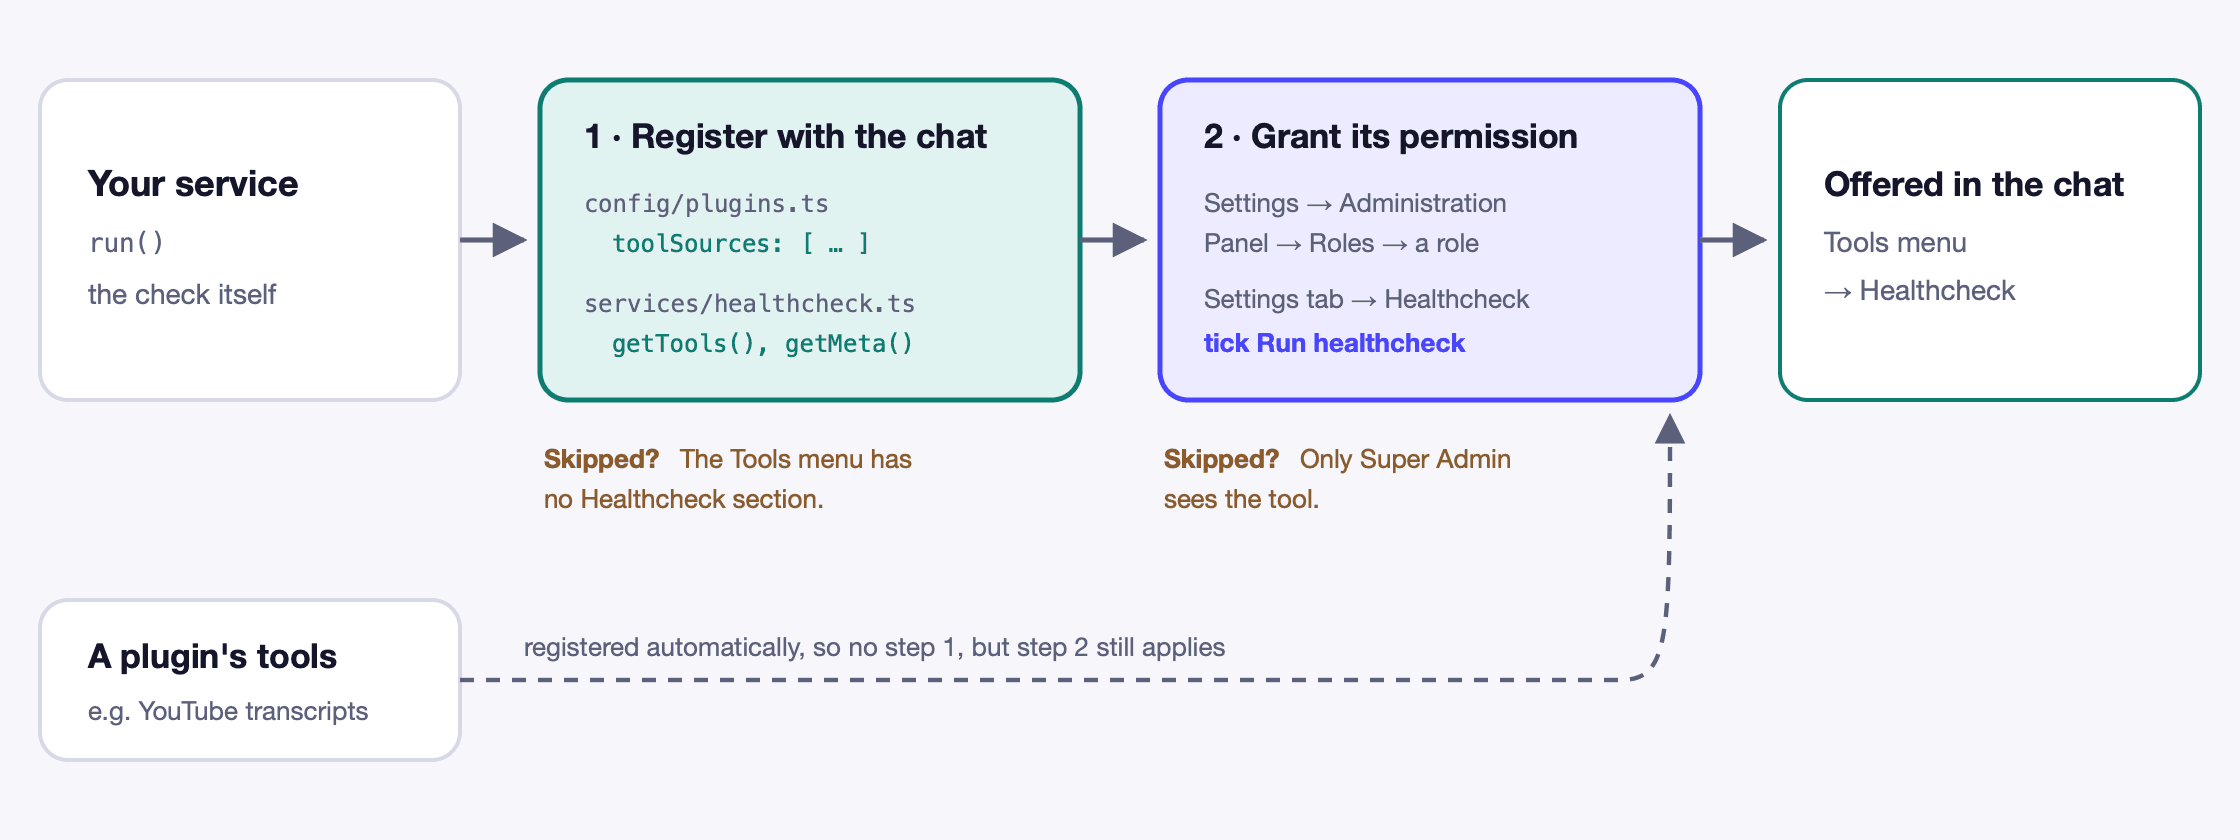
Diagram source (Mermaid)
flowchart LR
  SVC["Your service<br/>run()"] --> G1["1 · Register with the chat<br/>toolSources, getTools(), getMeta()"]
  G1 --> G2["2 · Grant its permission<br/>Roles → Settings tab → Healthcheck"]
  G2 --> OUT["Offered in the chat<br/>Tools menu → Healthcheck"]
  PLUGIN["A plugin's tools"] -. registered automatically .-> G2
Recommended: put tools you want to keep in a plugin. This step wires a tool that lives in your app, which suits a one-off like this healthcheck. For tools you will reuse or share, a plugin is the better home. The chat finds a plugin's tools automatically, with no config line. The plugin owns its permissions under its own name, and it installs into another project with one
npm install. See Move your tools into a plugin.
Register the tool with the chat: the config line
In config/plugins.ts, add one line, toolSources, inside the chat block
you wrote in step 4:
'tanstack-ai': {
  enabled: true,
  config: {
    chat: {
      enabled: env.bool('TANSTACK_AI_CHAT', true),
      provider: 'ollama',
      model: env('TANSTACK_AI_MODEL', 'qwen3:14b'),
      baseURL: env('OLLAMA_HOST', 'http://localhost:11434'),
      toolSources: ['api::healthcheck.healthcheck'],   // ← add this
    },
  },
},
api::healthcheck.healthcheck is the name Strapi gives your healthcheck
service. Without this line the chat never opens that file.
Register the tool with the chat: the tool description
The chat now looks in your healthcheck service, but it only has run(), which
is the check itself. It needs a description of the tool as well.
You might expect the chat to reuse the MCP tool from step 3. It cannot, for two reasons:
- The chat does not go through MCP. It runs inside Strapi and calls its tools directly, so it never sees what the MCP server offers.
- Strapi cannot hand the MCP registration back. Its MCP service lets you register a tool, but has no way to list the tools registered, so nothing else in Strapi can read yours.
So the chat reads tools from its own two functions, the same pair every source
provides, plugin or app. getTools() returns the tools. getMeta() names the
source for the Tools menu.
Add an import at the top and the two functions next to run():
// src/api/healthcheck/services/healthcheck.ts
import type { Core } from '@strapi/strapi';
import { z } from '@strapi/utils';                       // ← add

// HealthcheckResult interface unchanged

export default ({ strapi }: { strapi: Core.Strapi }) => ({
  getTools() {                                            // ← add
    return [
      {
        name: 'healthcheck',
        description:
          'Report whether this Strapi instance is healthy: uptime, database client, and ' +
          'whether the database answers a query right now.',
        schema: z.object({}),
        action: 'api::healthcheck.run',
        execute: async () => strapi.service('api::healthcheck.healthcheck').run(),
      },
    ];
  },

  getMeta() {                                             // ← add
    return { label: 'Healthcheck', description: 'Is this Strapi healthy?' };
  },

  async run(): Promise<HealthcheckResult> {
    // your existing code, unchanged
  },
});
getTools() describes the tool so the chat can hand it to the model:
| Field | What it is |
|---|---|
name | what the model calls it |
description | how the model decides when to use it |
schema | the arguments it takes, none here |
action | the permission that gates it, the one you registered in step 3 |
execute | the function that runs, which calls your existing run() |
getMeta() is only the label shown in the chat's Tools menu.
execute calls your existing run(), so the check is still written once.
What you write twice is the description: once for MCP clients in
src/tools/healthcheck.ts, and once here for the chat.
Grant its permission in Strapi
You registered api::healthcheck.run in step 3, so it is already a checkbox.
Go to Settings → Administration Panel → Roles, open a role, switch to the
Settings tab, find Healthcheck, tick Run healthcheck, and save.
That checkbox has been there since step 3. Seeing Healthcheck in the role editor means the permission is registered with Strapi. It does not mean the tool is registered with the chat: that is what the two edits above do, and the Tools menu below is where you check it.
Super Admin holds every permission automatically, so if you are logged in as Super Admin the tool appears without this. An Editor or Author will not see it until their role is ticked.
This is the same checkbox you ticked on the admin token in step 3. The token and the role are separate grants, so ticking one does not tick the other.
Try it
Restart, open TanStack AI, and click the tools button next to the model
name. This is the chat's own list of tools, not the role editor. Below the two
groups marked always on, there should be a Healthcheck section listing
healthcheck.
If it is missing, the tool is not registered with the chat: check
toolSources and getTools(). The permission cannot hide a whole section,
only a tool inside one, so a missing section is always a registration problem.
Then ask the chat:
Is my Strapi healthy?It calls the tool and answers from the result. Expand the tool call at the bottom to see the raw JSON it got back:
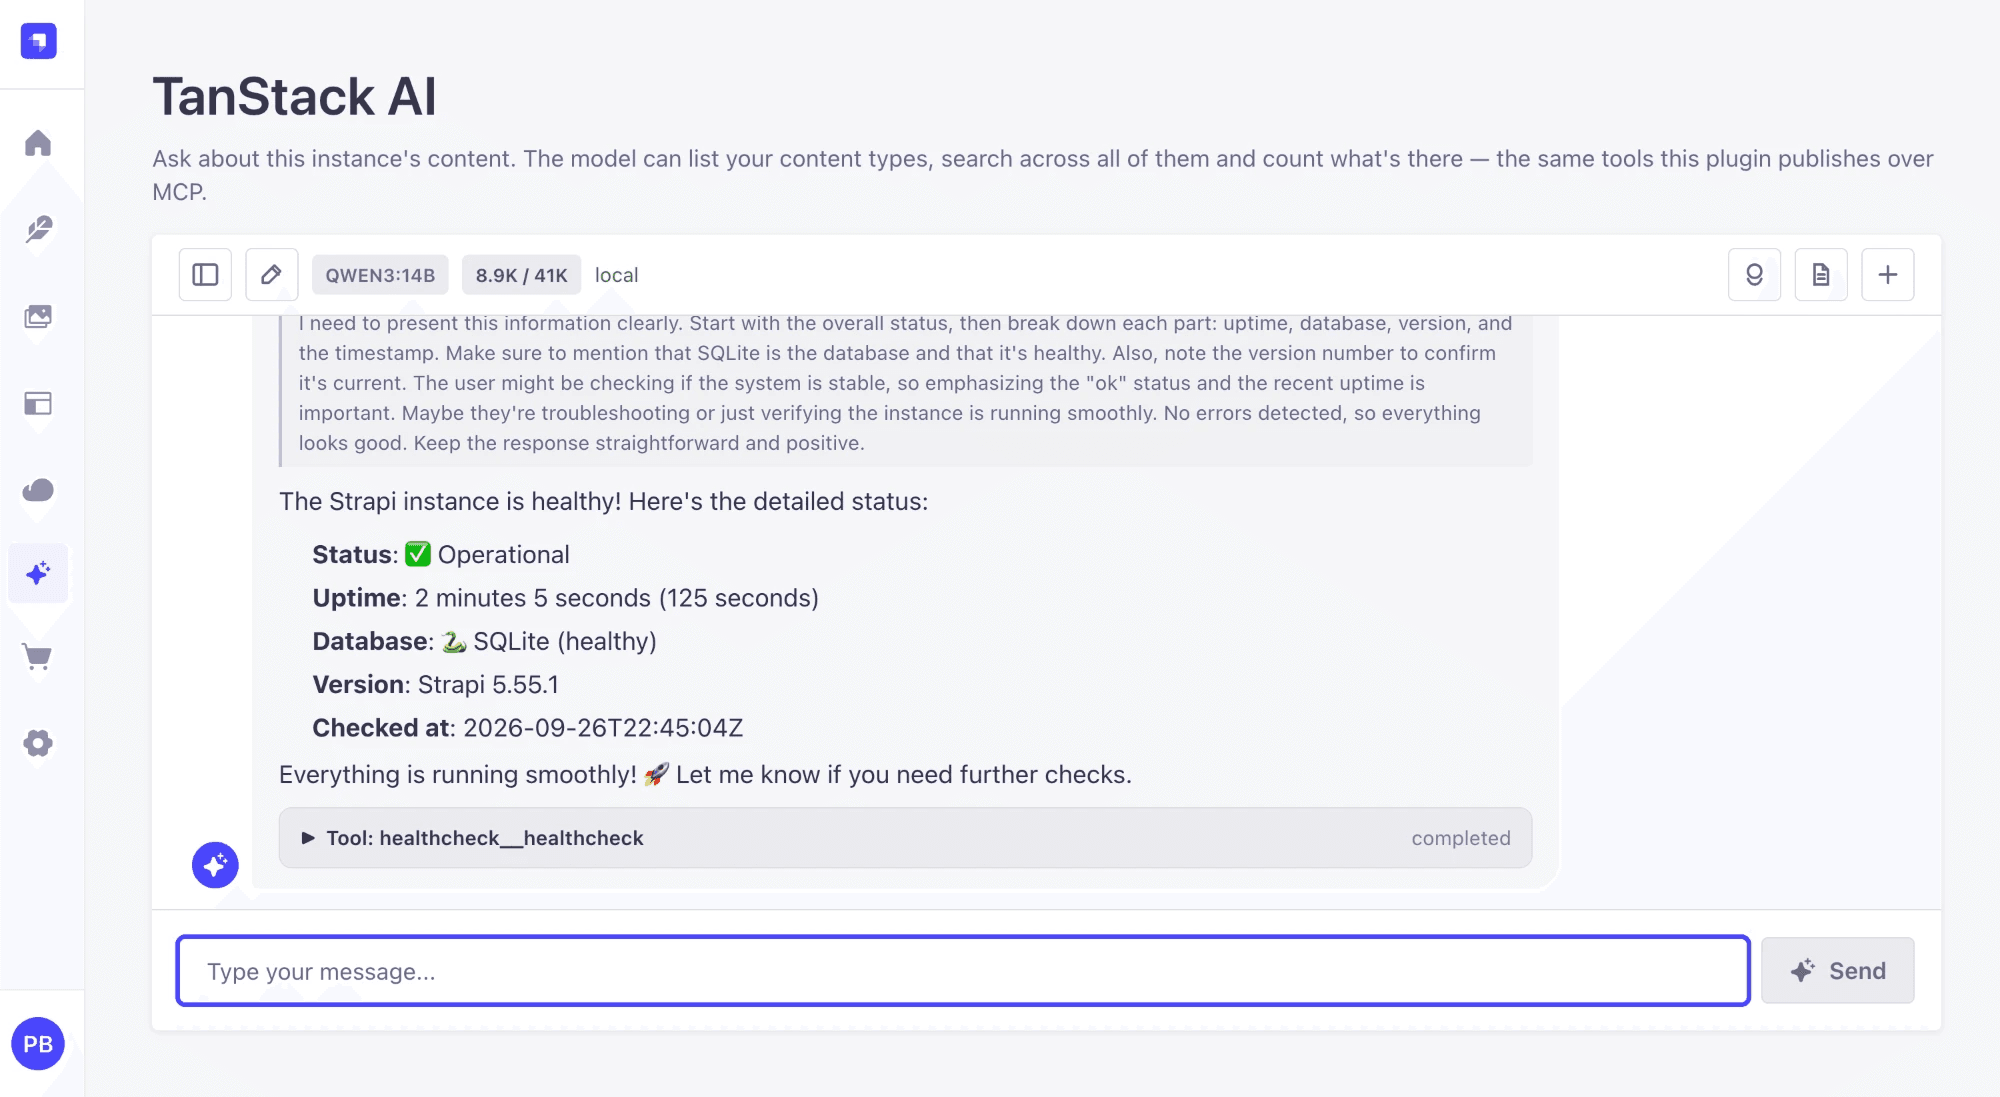
The tool shows as healthcheck__healthcheck: the chat names every tool
<source>__<tool>, so two sources can never collide.
One service now answers in three places: GET /api/healthcheck, an MCP tool
for AI clients, and a chat tool for admins.
Move your tools into a plugin (recommended)
What you built in steps 3 and 5 is the right size for a one-off like this healthcheck. For tools you want to keep, reuse or share, put them in a plugin instead. Everything you learned carries over; three things get simpler.
| Tool in your app | Tool in a plugin | |
|---|---|---|
| Registered with the chat | a toolSources line in config | automatically, once installed |
| Tool description | written twice, for MCP and for the chat | written once, one list feeds both |
| Permission | api::healthcheck.run | plugin::<your-plugin>.…, owned by the plugin |
| Reuse in another project | copy the files | npm install |
Step 5's second half, granting the permission on a role, still applies. A plugin makes the tool available; RBAC still decides who gets it.
A plugin that contributes tools has three parts:
server/src/
  tools/                 one file per tool, and an index.ts that lists them
  bootstrap.ts           registers each tool's permission, then each MCP tool
  services/ai-tools.ts   hands the same list to the chat
The chat looks for a service named ai-tools in every installed plugin, which
is why nothing goes in your config:
// server/src/services/ai-tools.ts
import { tools } from '../tools';

export default () => ({
  getTools() {
    // The same list bootstrap.ts puts on MCP, each tool with the permission
    // bootstrap.ts registered for it.
    return tools.map((tool) => ({ ...tool, action: `plugin::my-tools.${tool.name}` }));
  },
  getMeta() {
    return { label: 'My tools', description: 'What these tools are for' };
  },
});
For a complete plugin built this way, with five tools on MCP and in the chat,
see
strapi-plugin-youtube-transcripts.
Strapi's guide to
extending the MCP server from a plugin
covers the MCP half.
Troubleshooting
A tool is missing from tools/list.
Permissions, nearly always. The token needs the tool's action, and content
tools need that action scoped to the content type. Reconnect the client
afterwards, because some cache the tool list.
If the tool is one you wrote, check which action gates it. Reusing a Content
Manager action such as plugin::content-manager.explorer.read looks like a
shortcut and fails in silence: those grants are scoped to a content type,
while a tool policy is checked without one, so ability.can(action) returns
false and the tool is simply left out. Give your tool its own action.
A route is reachable by anyone and no permission says so.
Check the route file for config: { auth: false }. That takes the route out
of Strapi's authentication system, so no role and no API token governs it,
and the admin panel shows nothing about it. Remove the line and grant the
route to a role instead.
401 from /mcp.
A content token where an admin token is needed.
400 from /mcp with an empty body.
A malformed Authorization header, usually a token captured together with
surrounding log output.
A tool is on MCP but not in the chat.
The chat needs it listed in chat.toolSources (plugin 1.4.0+) or shipped in a
plugin. Registering it on MCP is not enough.
The chat says it is not ready.
The page names the reason: a missing baseURL, key, or optional
@tanstack/* package. Restart after changing config.
A field is invisible to a tool after you rename or add it. Content Manager permissions store an explicit field list and only Super Admin is re-synced. Re-tick the field on the role or token.
Citations
- Strapi MCP server: https://docs.strapi.io/cms/features/strapi-mcp-server
- Admin tokens: https://docs.strapi.io/cms/features/admin-tokens
- API tokens: https://docs.strapi.io/cms/features/api-tokens
- Routes: https://docs.strapi.io/cms/backend-customization/routes
- Controllers: https://docs.strapi.io/cms/backend-customization/controllers
- Services: https://docs.strapi.io/cms/backend-customization/services
- Lifecycle functions (register, bootstrap): https://docs.strapi.io/cms/configurations/functions
- Extending the MCP server with plugins: https://docs.strapi.io/cms/plugins-development/extend-mcp-server
- Admin permissions for plugins: https://docs.strapi.io/cms/plugins-development/guides/admin-permissions-for-plugins
- How to extend Strapi's MCP server with custom tools via a plugin: https://strapi.io/blog/how-to-extend-strapi-s-mcp-server-with-a-custom-tools-via-a-plugin
- Model Context Protocol: https://modelcontextprotocol.io
- TanStack AI: https://tanstack.com/ai
- strapi-plugin-tanstack-ai: https://github.com/PaulBratslavsky/strapi-plugin-tanstack-ai
- strapi-plugin-youtube-transcripts: https://github.com/PaulBratslavsky/strapi-plugin-youtube-transcripts
- Ollama: https://ollama.com