Introduction
Publishing a post in your Strapi CMS is one part of the job. Sharing it on Dev.to, Medium, LinkedIn or any social platform for your audience means another set of steps.
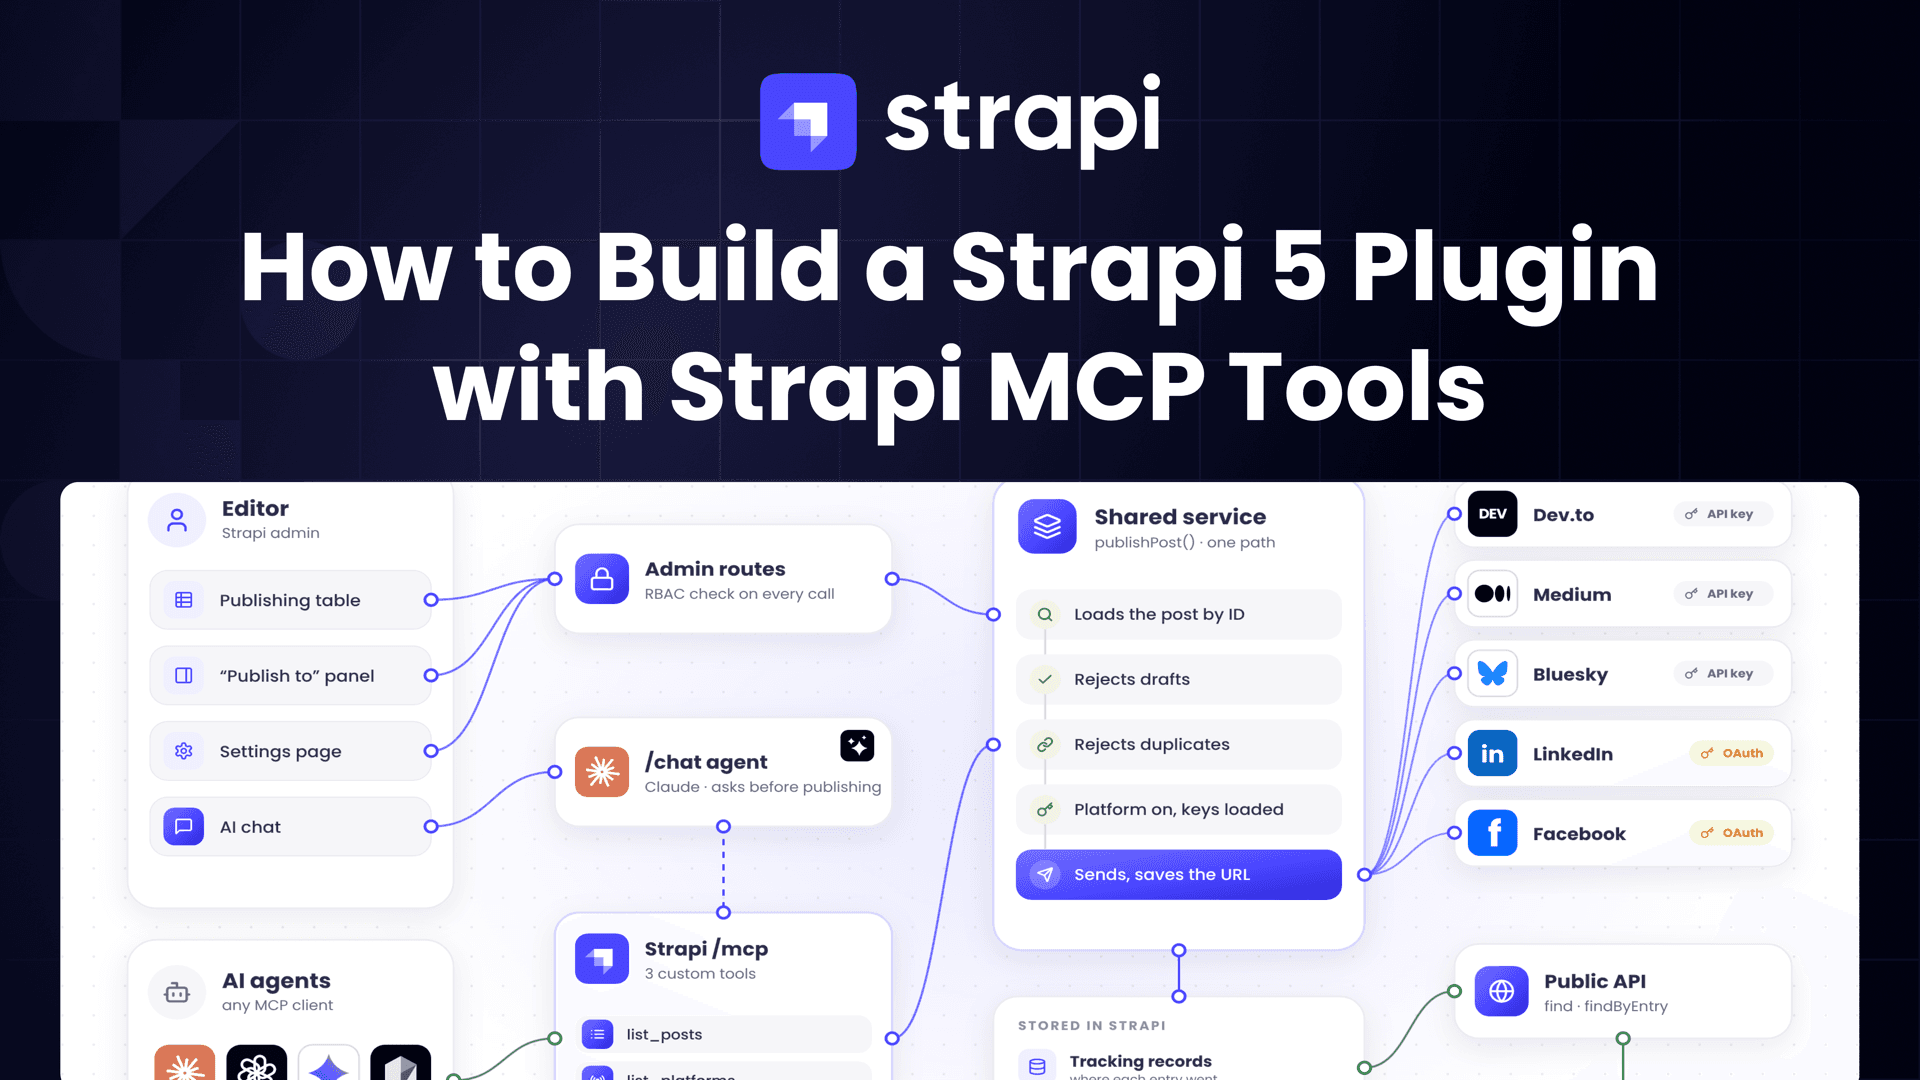
For this reason, let's build a plugin that brings that work into the Strapi admin. A plugin that publishes entries to Dev.to, Medium, Bluesky, LinkedIn and Facebook. It also adds 3 tools to Strapi's built-in Model Context Protocol (MCP) server, so an AI client, including a chat inside the plugin, can publish too.
This blog post covers how the pieces fit together and the implementation choices that matter if you're building something similar. The source is on GitHub. Paths below are relative to src/plugins/content-publisher/.
TL;DR
- A hidden
postcontent type keeps one tracking record per entry, kept in sync by database lifecycles. - All publishing logic lives in one service. The admin table, the Content Manager panel, the MCP tools and the chat all call it.
- Each platform is described as data (its API fields and env vars), so one route and one MCP tool cover all five.
- Admin routes check RBAC permissions, and each MCP tool has its own permission you grant on admin tokens.
- The AI chat runs on the Vercel AI SDK, gets only the tools the editor is allowed to use, and waits for the editor's approval before publishing.
Prerequisites
You'll need:
- Strapi 5.47 or later for the built-in MCP server.
- Node.js 24, or 26.
- A Strapi plugin to work in. You can scaffold one with
npx @strapi/sdk-plugin init my-plugin, then enable it in the project'sconfig/plugins.ts. Learn more about plugin creation. - An MCP client, such as Claude Code, Cursor or Claude Desktop, to test the tools.
- An Anthropic API key
Business Problem
1. Cross-Posting by Hand to Five Platforms
Copying an article into five editors is slow, and each platform wants different things. Dev.to takes Markdown in body_markdown. Bluesky caps a post at 300 graphemes. LinkedIn and Facebook need an OAuth sign-in before they'll accept anything. Doing this by hand every time is where mistakes creep in.
2. No Record of Where Each Post Went
Once something is cross-posted, the answer to "where is this already published?" lives in someone's head. Strapi has no field for it, and adding one to every content type would mix plugin data into the project's own schema.
3. AI Clients Only Get CRUD Tools
Strapi 5's MCP server generates tools such as list_blog and update_blog from your content types. They know your fields, not your rules. An AI client working with them can't tell a draft from a published entry, and has no way to publish to Dev.to at all. If AI is going to publish, it needs tools that run the same logic as the admin UI.
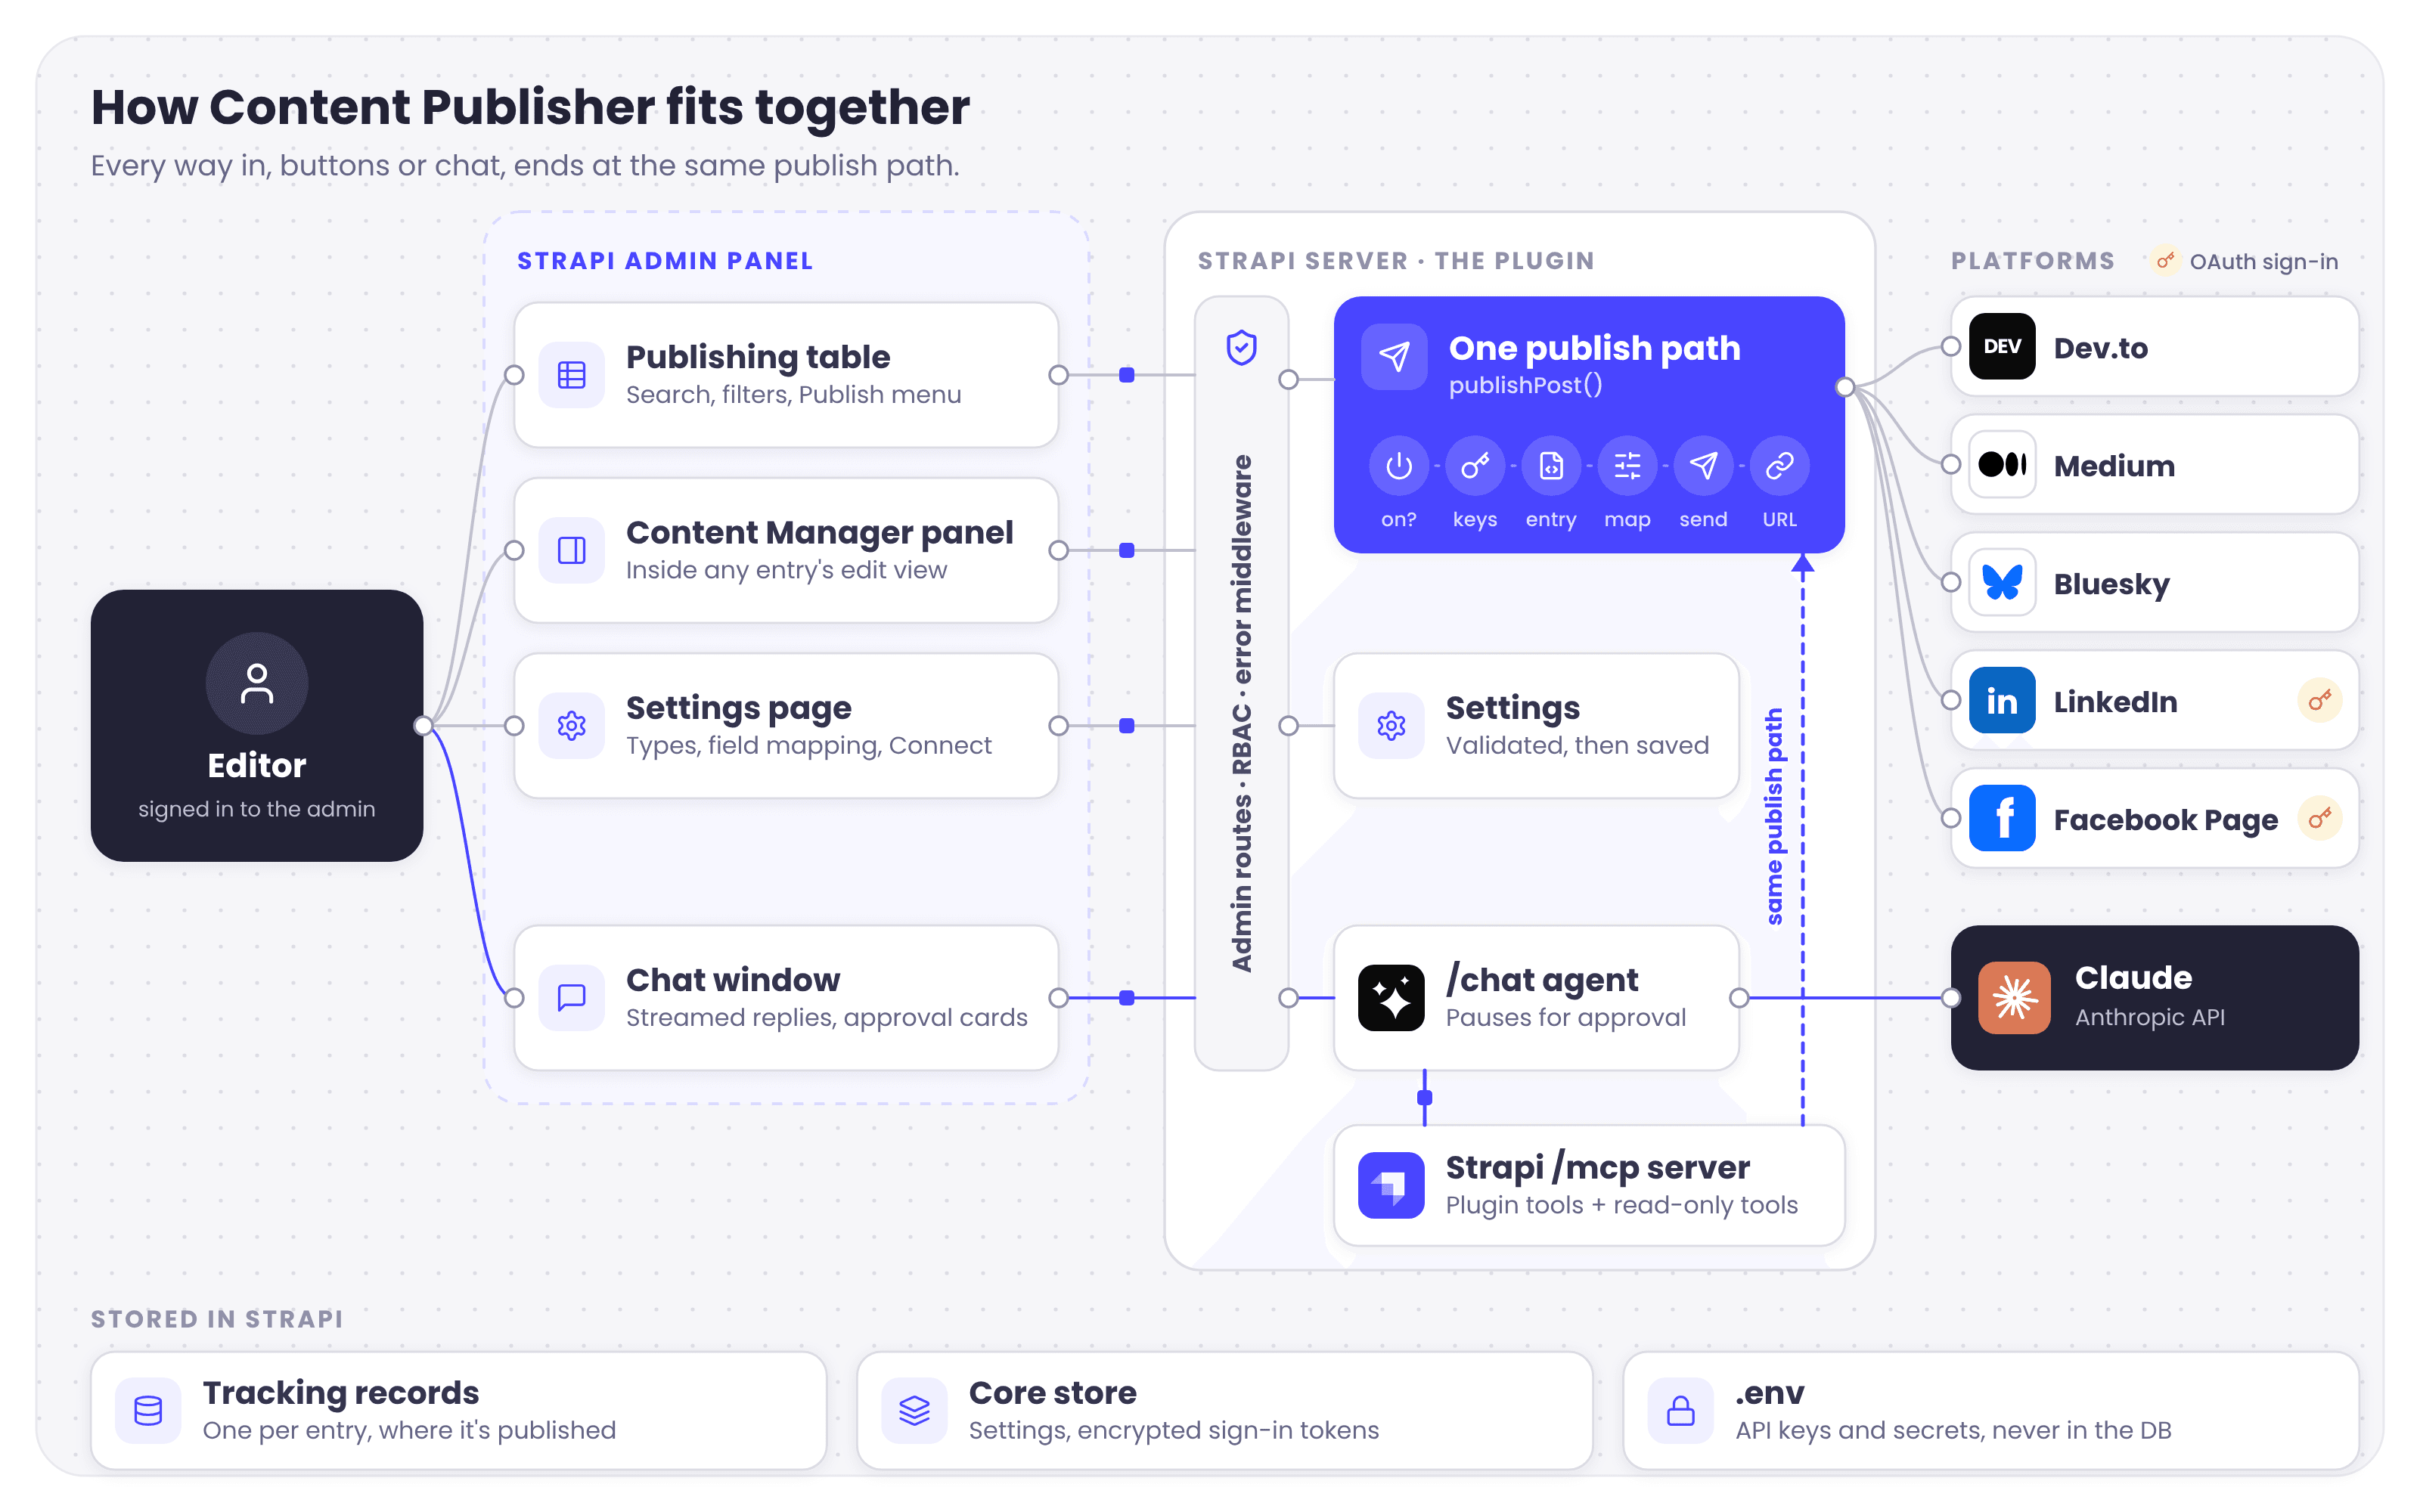
How It Works: Architecture
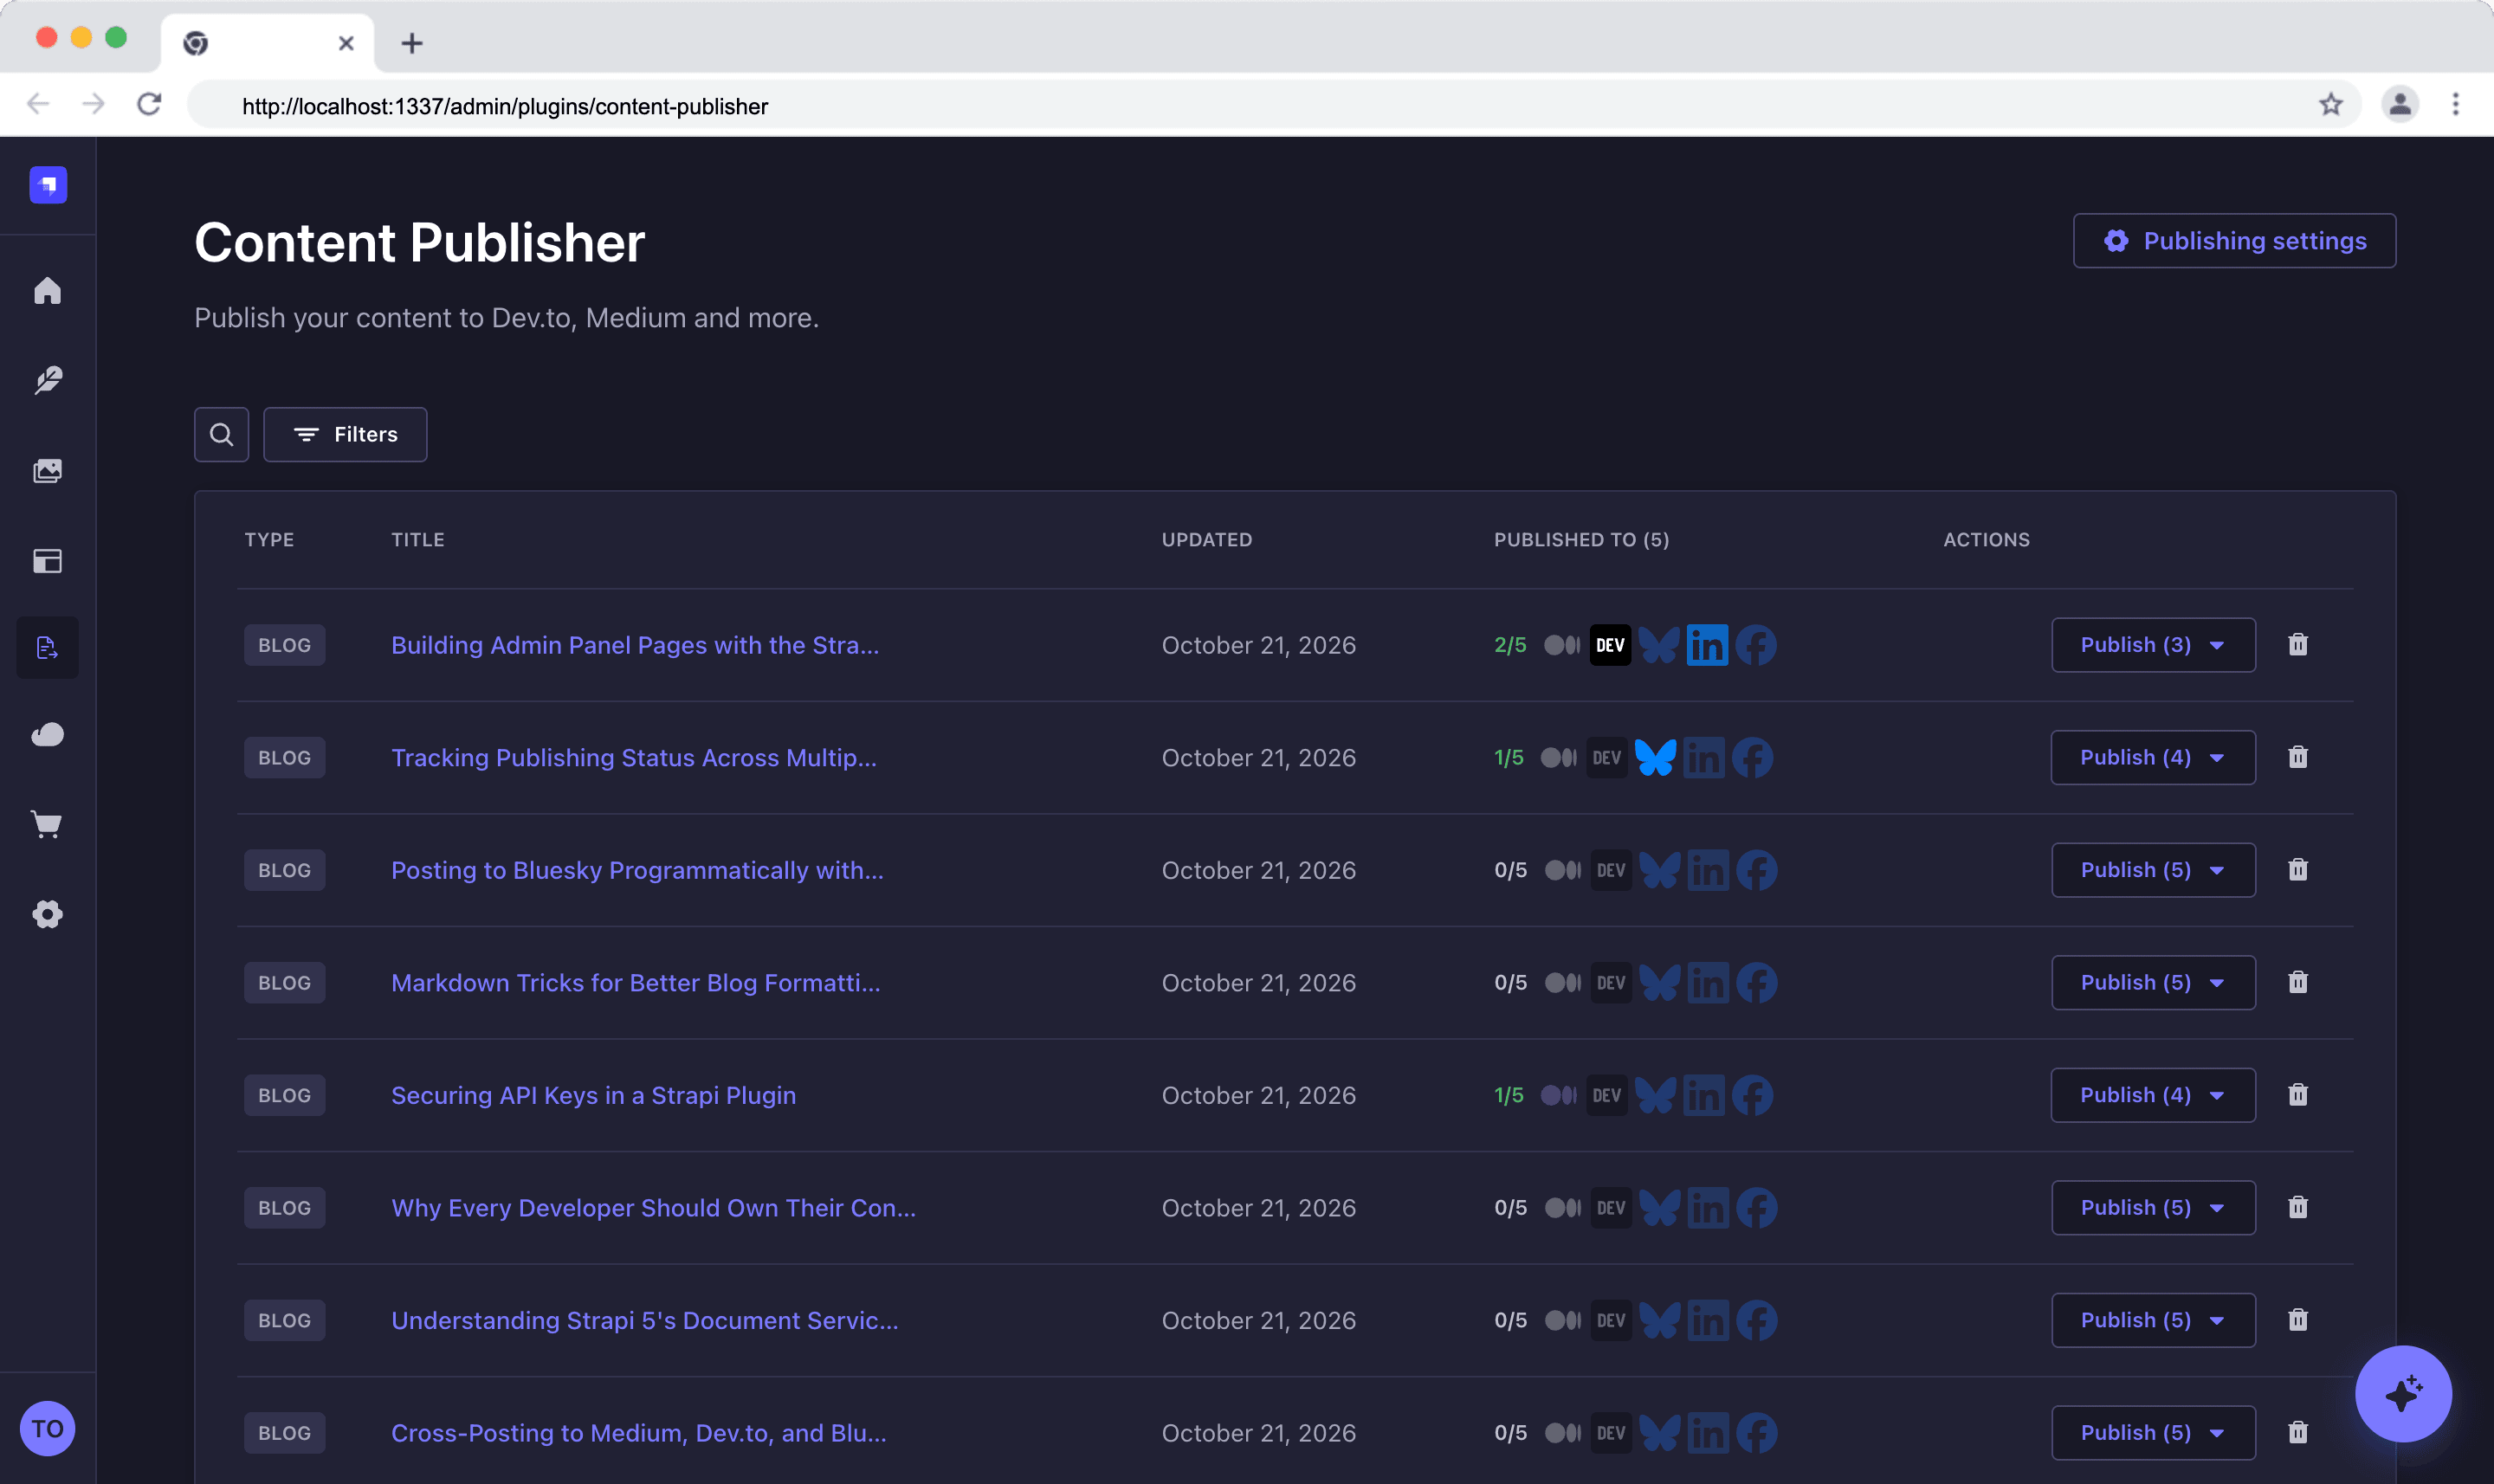
1. Publishing Table
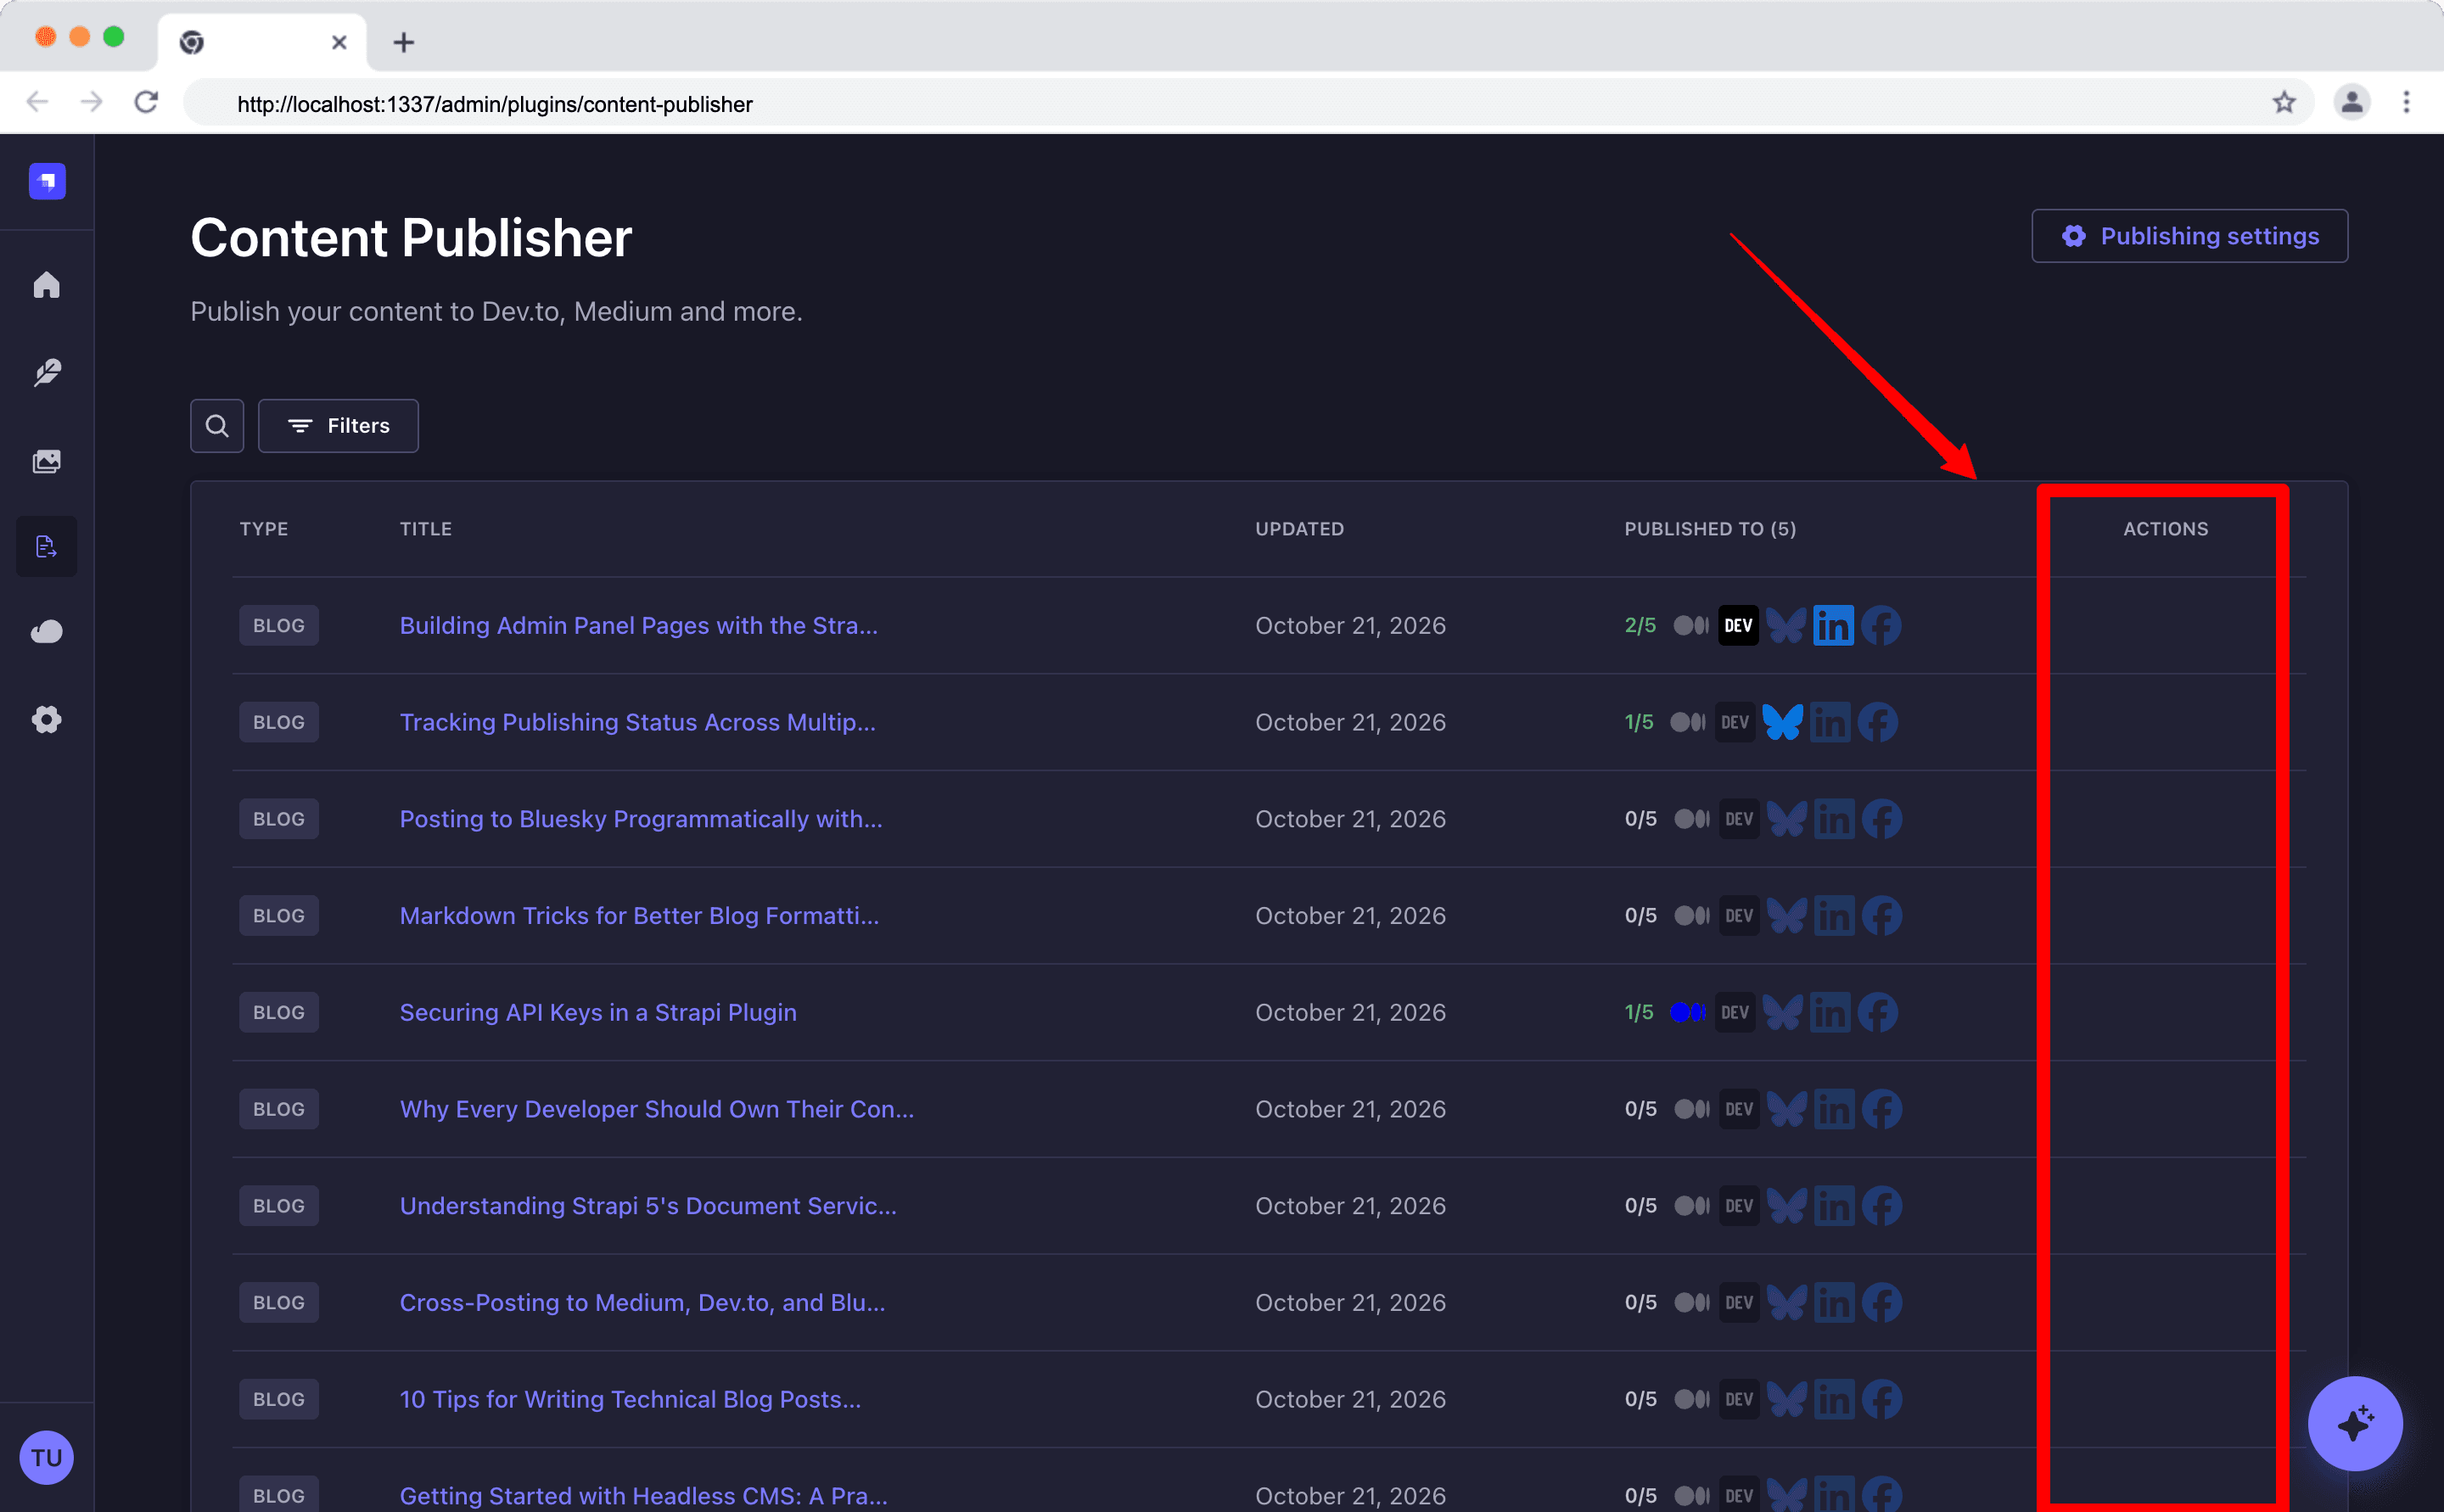
The plugin's main page lists every tracked entry and shows which platforms it has reached. Editors search, filter, and publish one entry to one platform or to all the remaining ones.
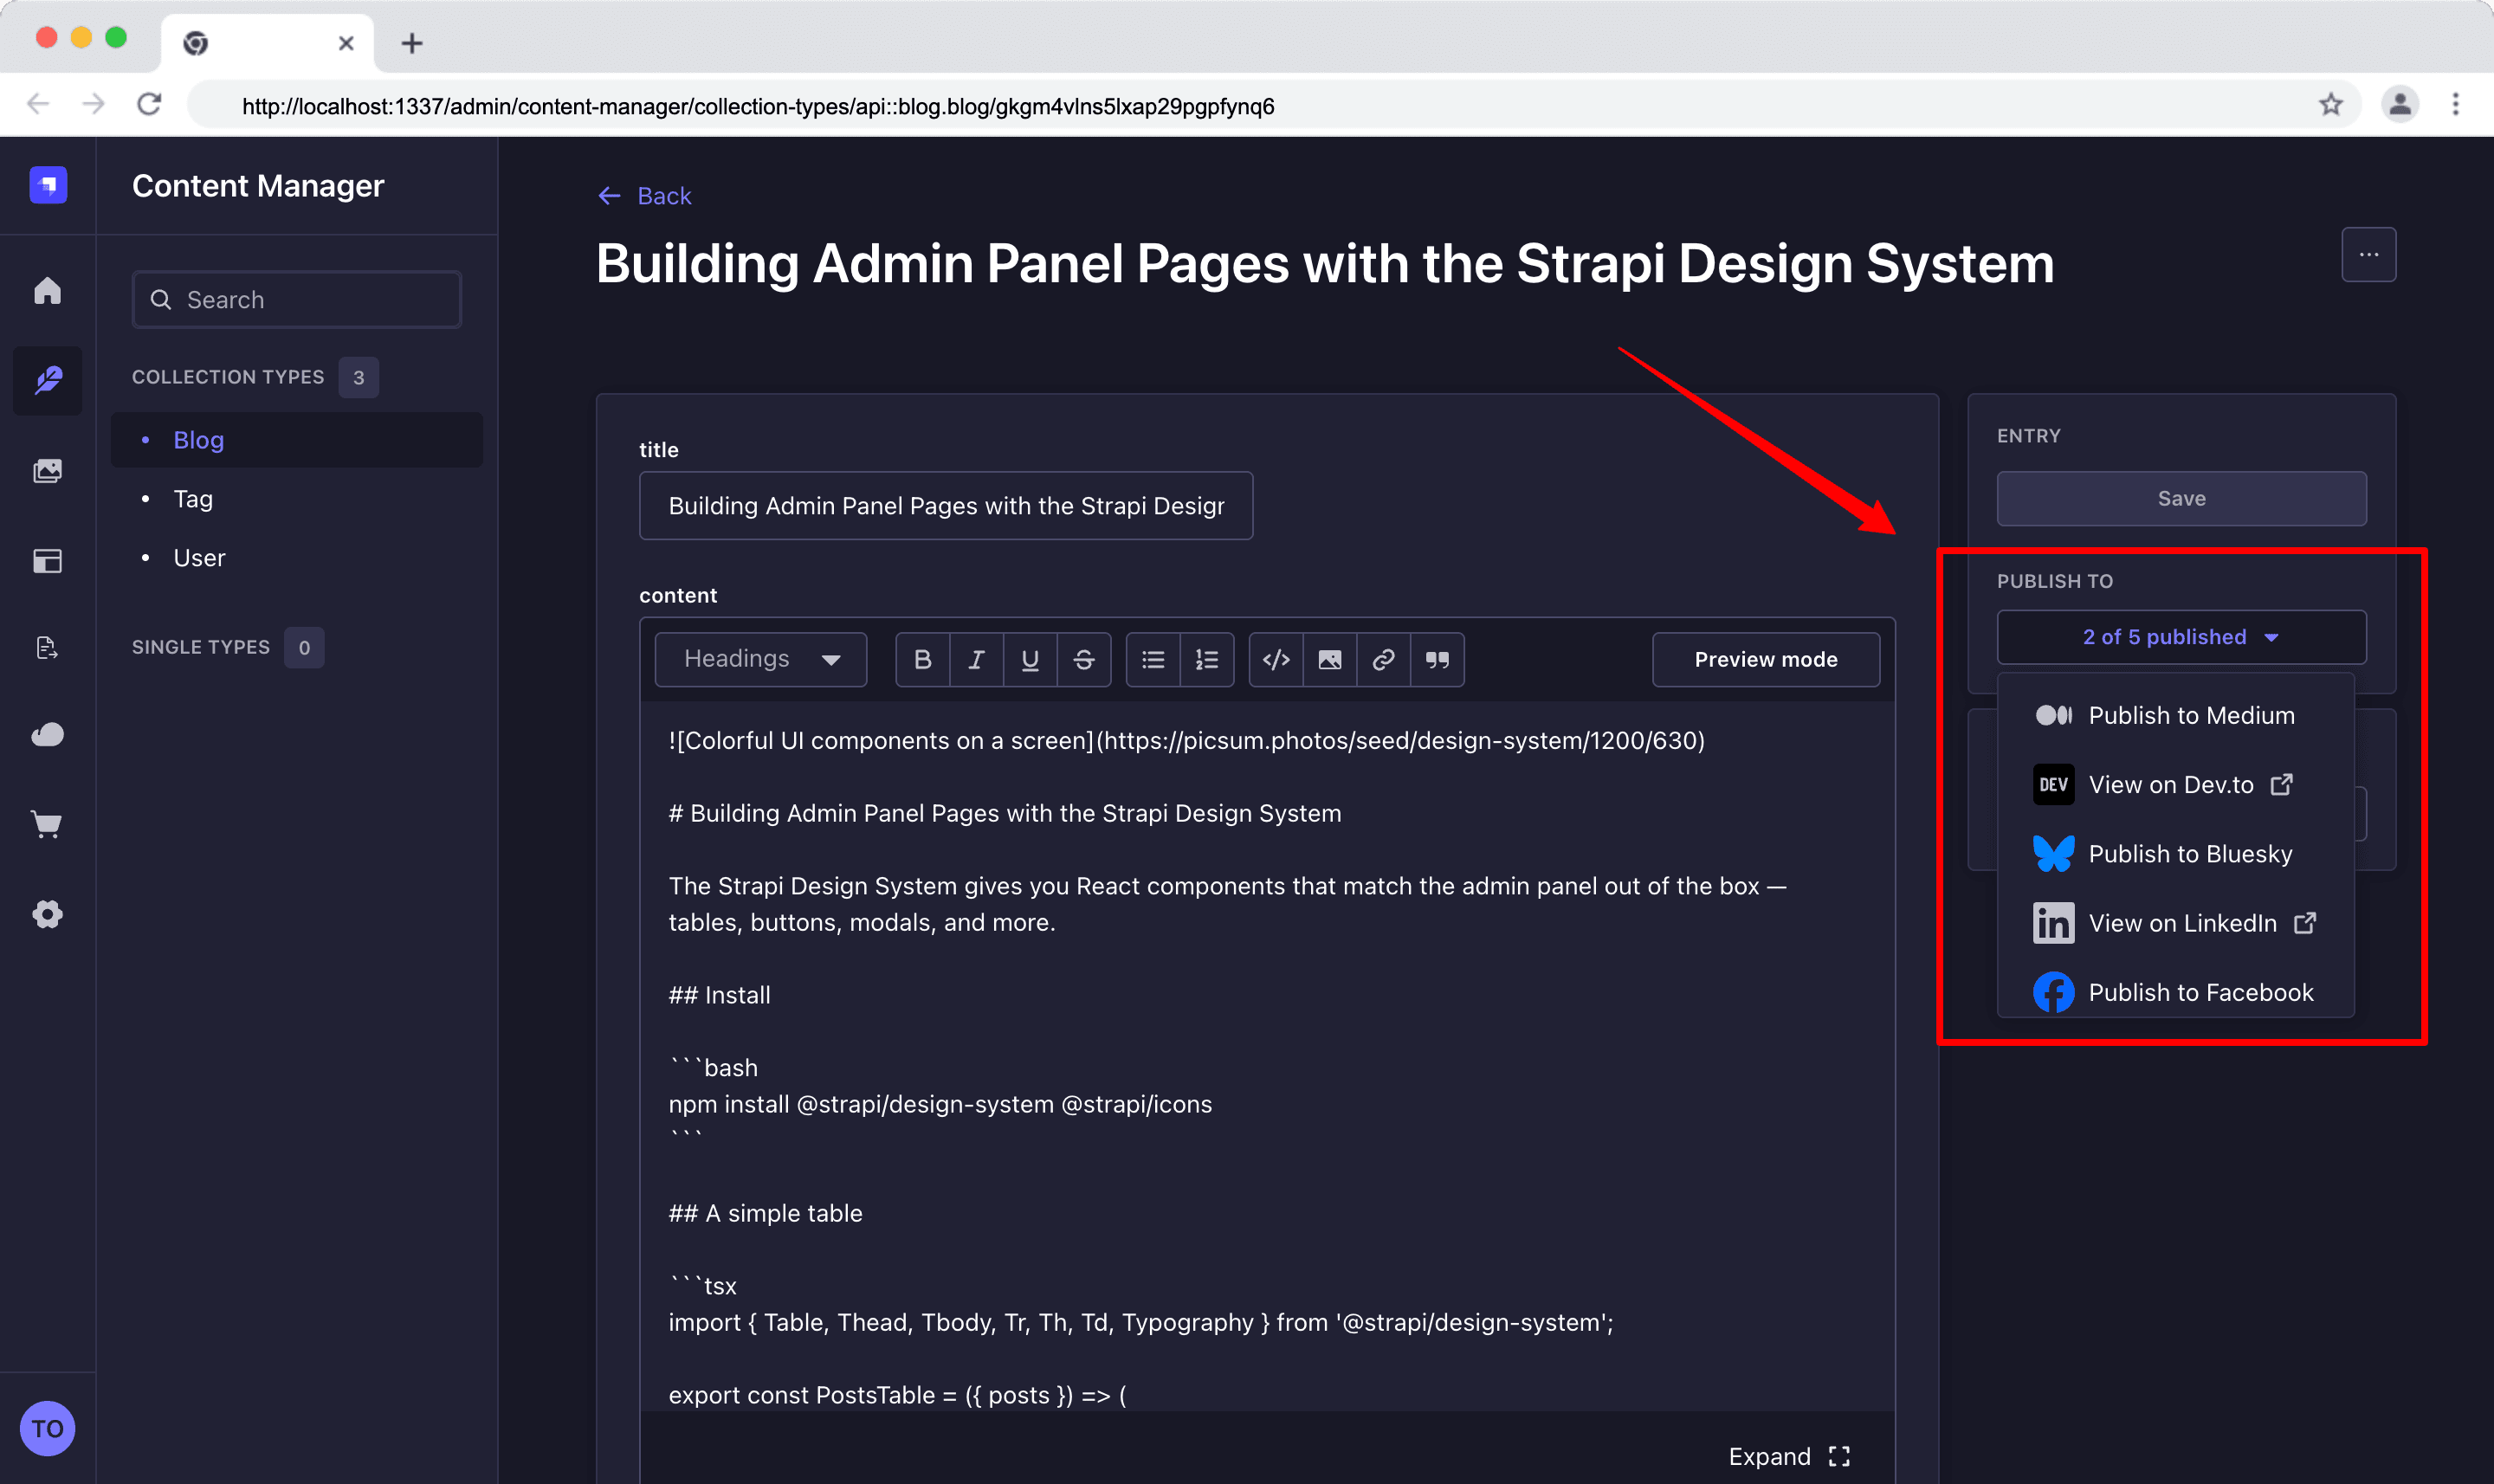
2. Content Manager Publish Panel
A Publish to panel in the Content Manager's edit view lets editors publish without leaving the entry.
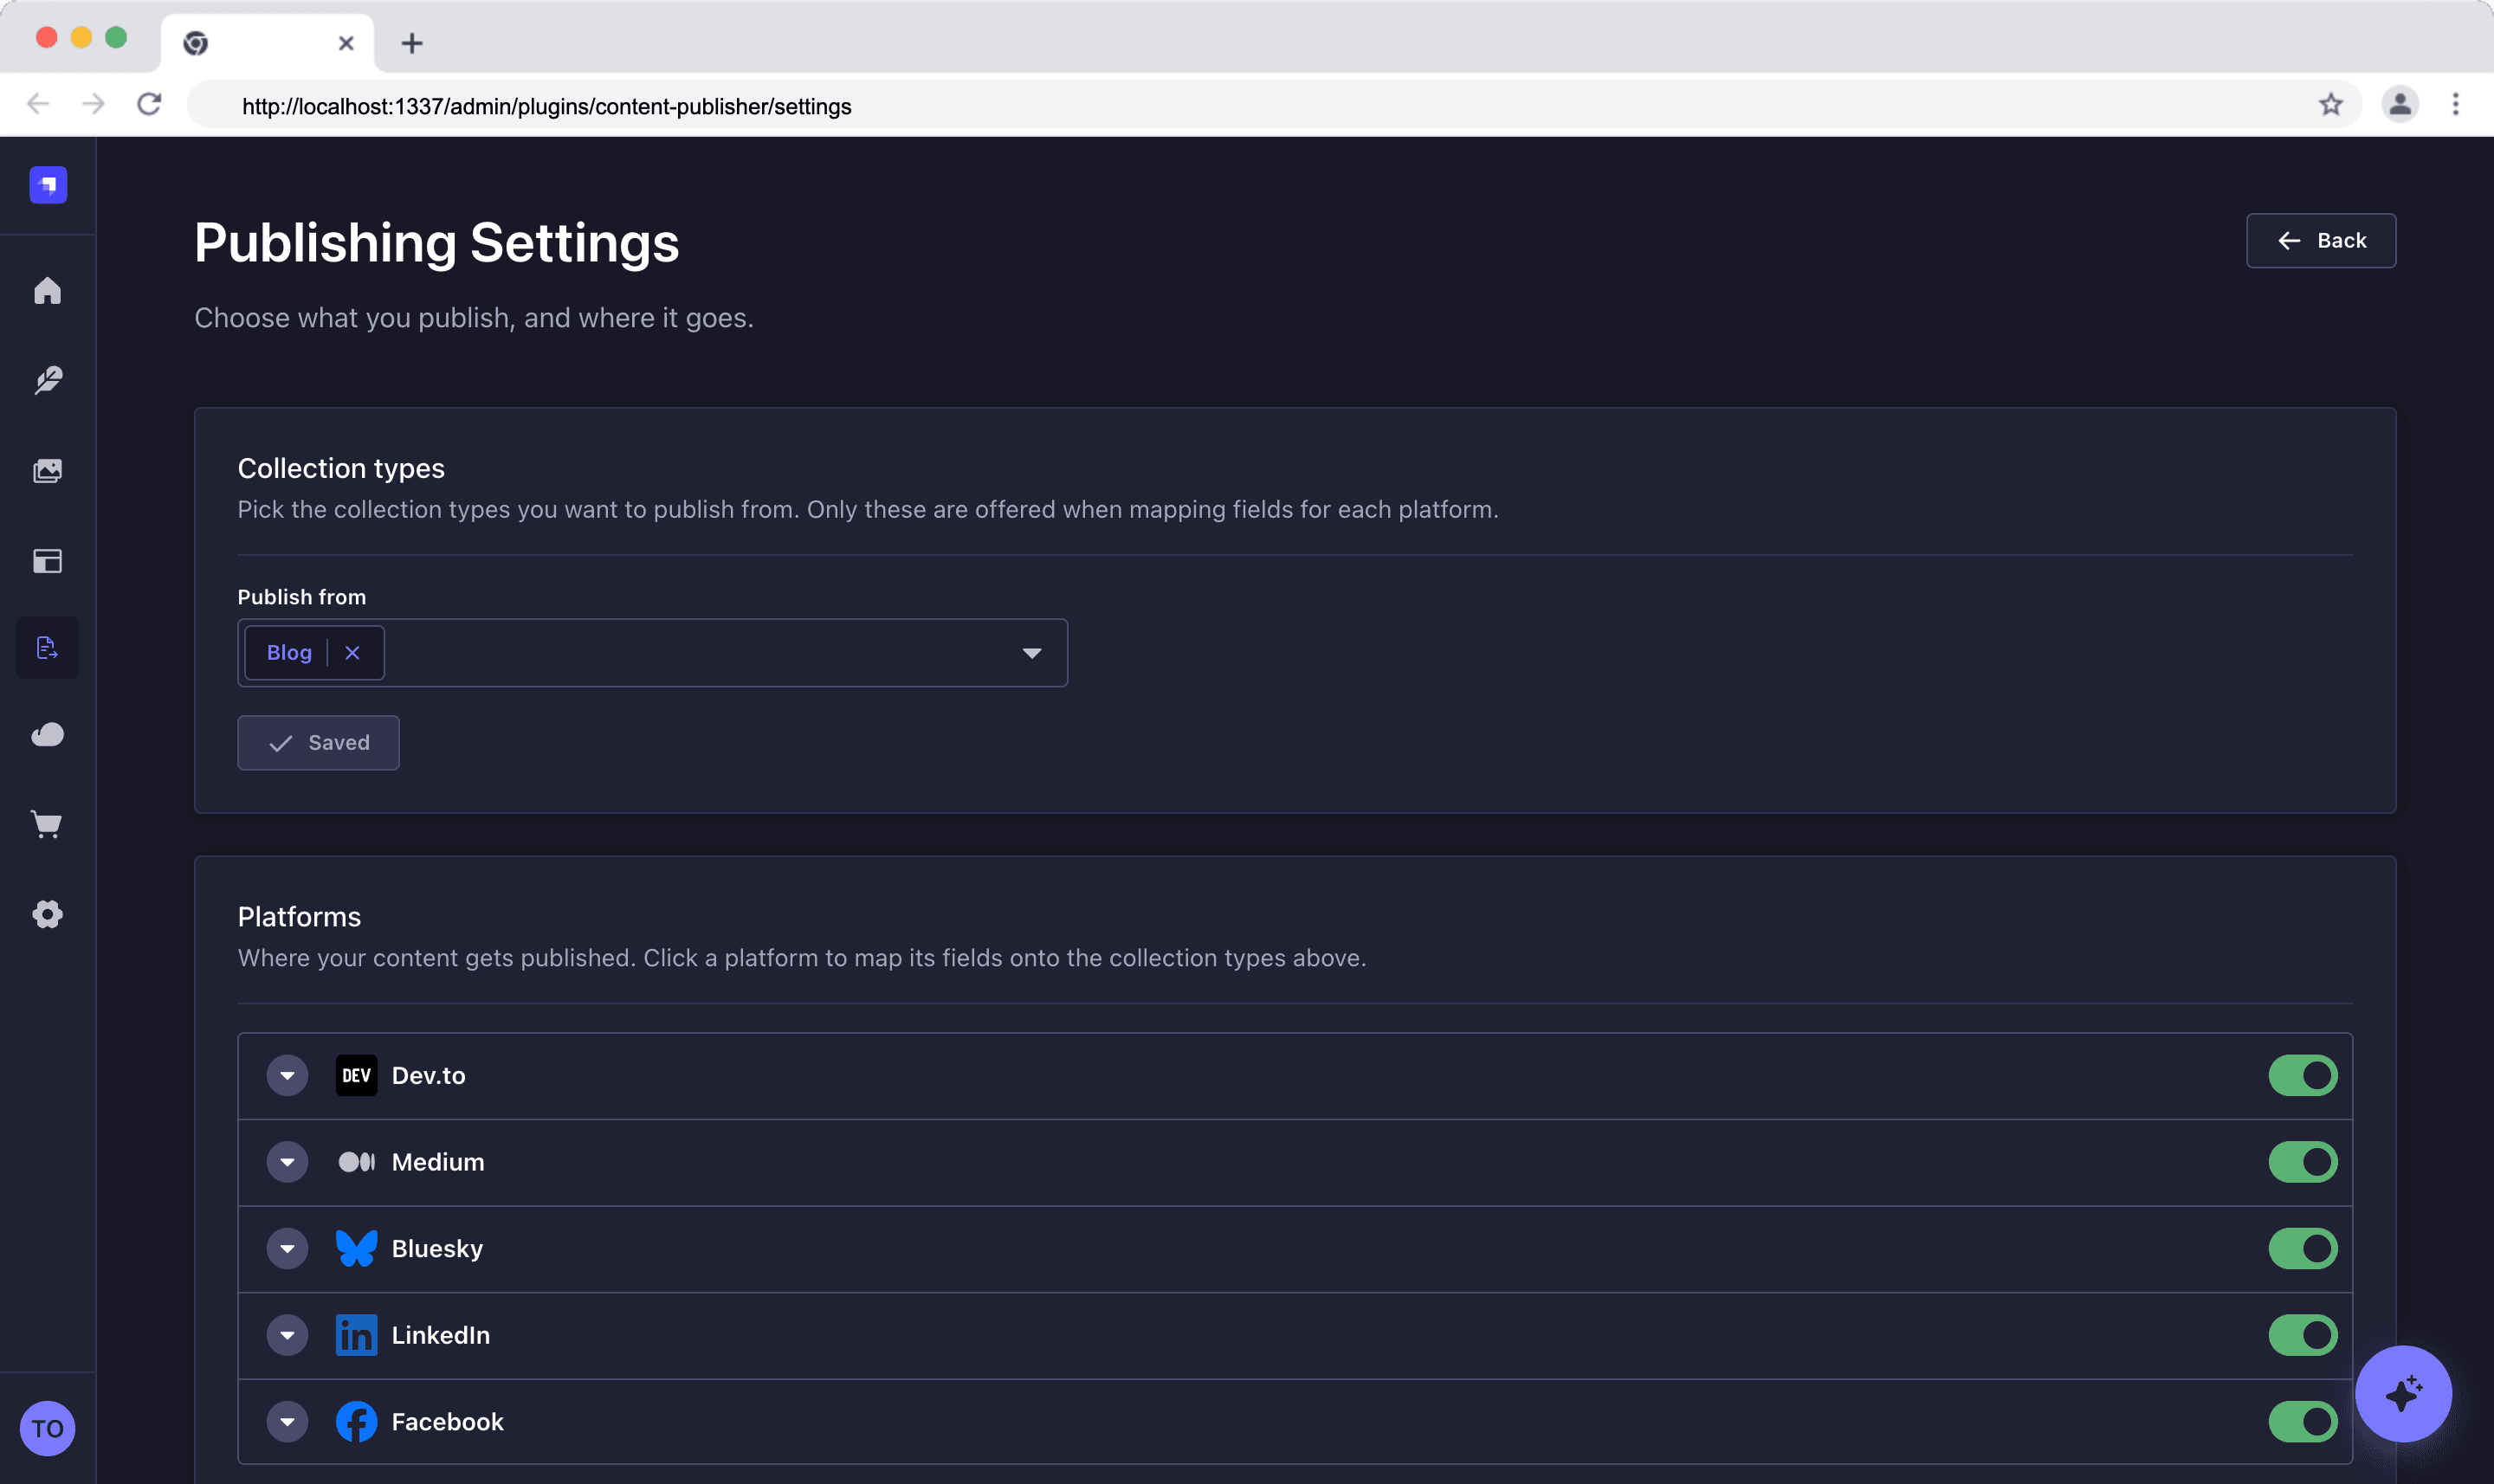
3. Settings Page
Admins choose which collection types are publishable, map each platform's fields to their own attributes, turn platforms on or off, test credentials, and connect LinkedIn and Facebook.
4. AI Chat and MCP Tools
3 custom MCP tools, content_publisher_list_posts, content_publisher_list_platforms and content_publisher_publish_post, are available to any MCP client to publish posts.
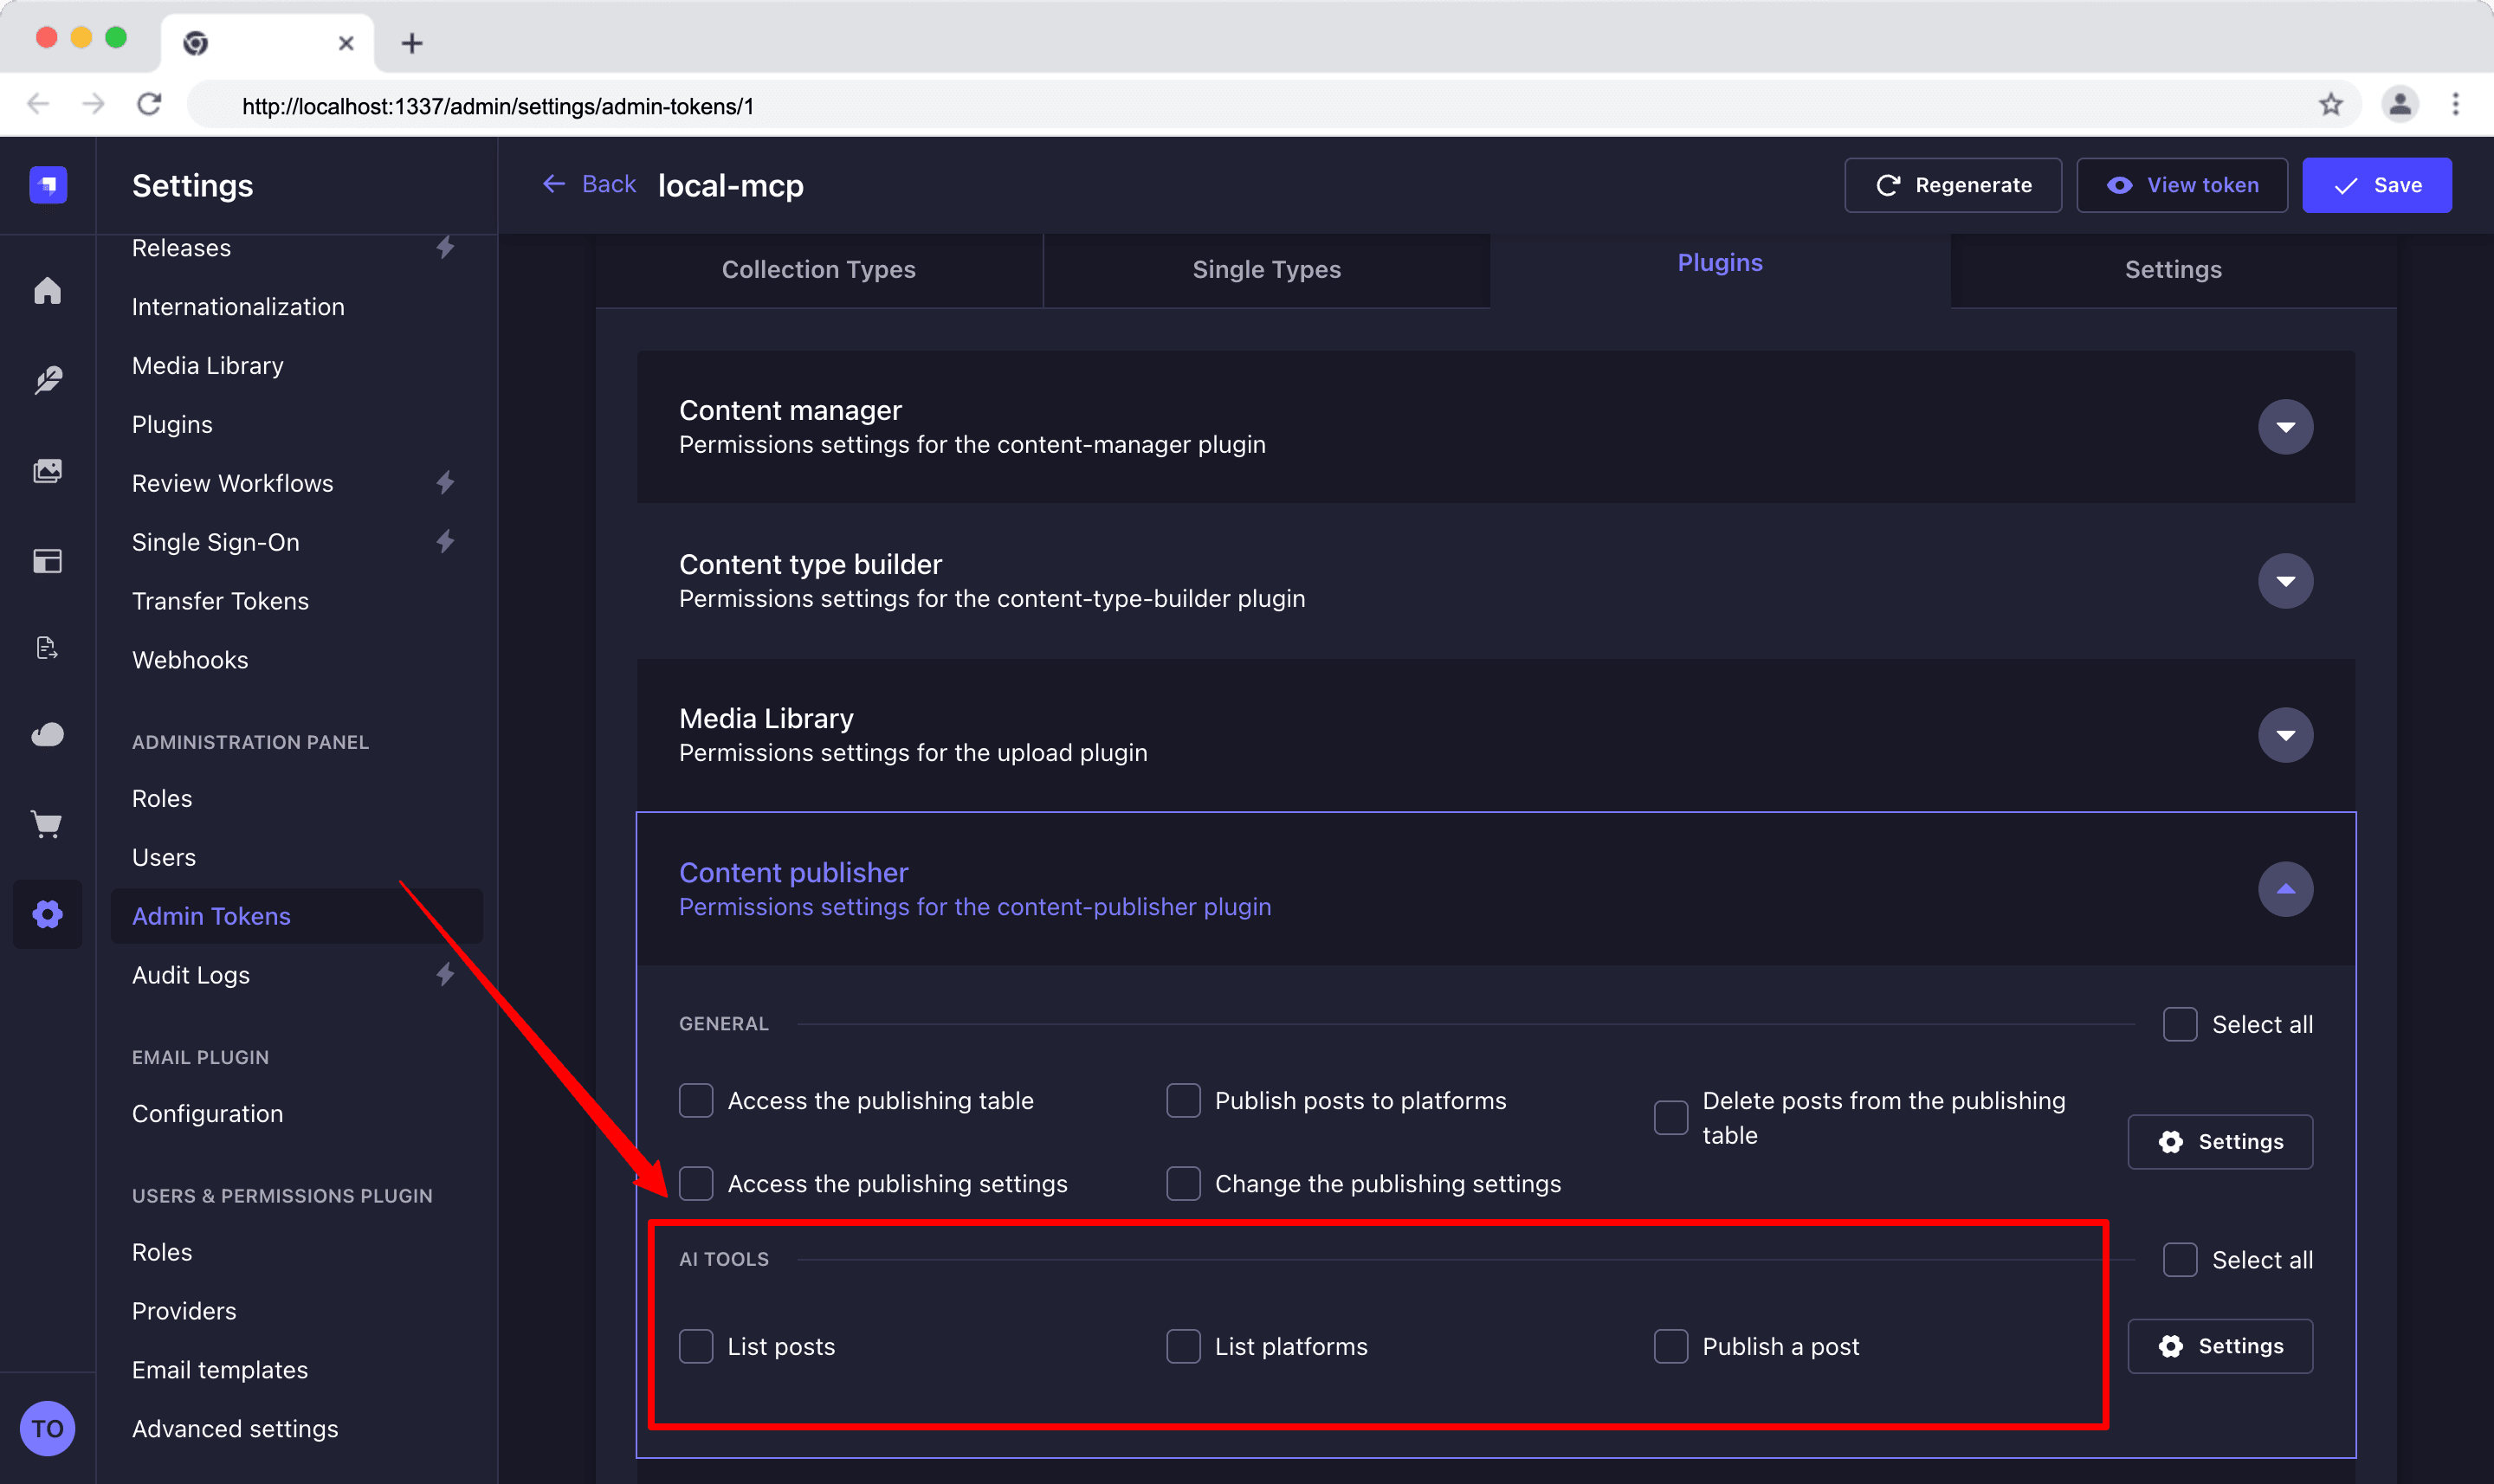
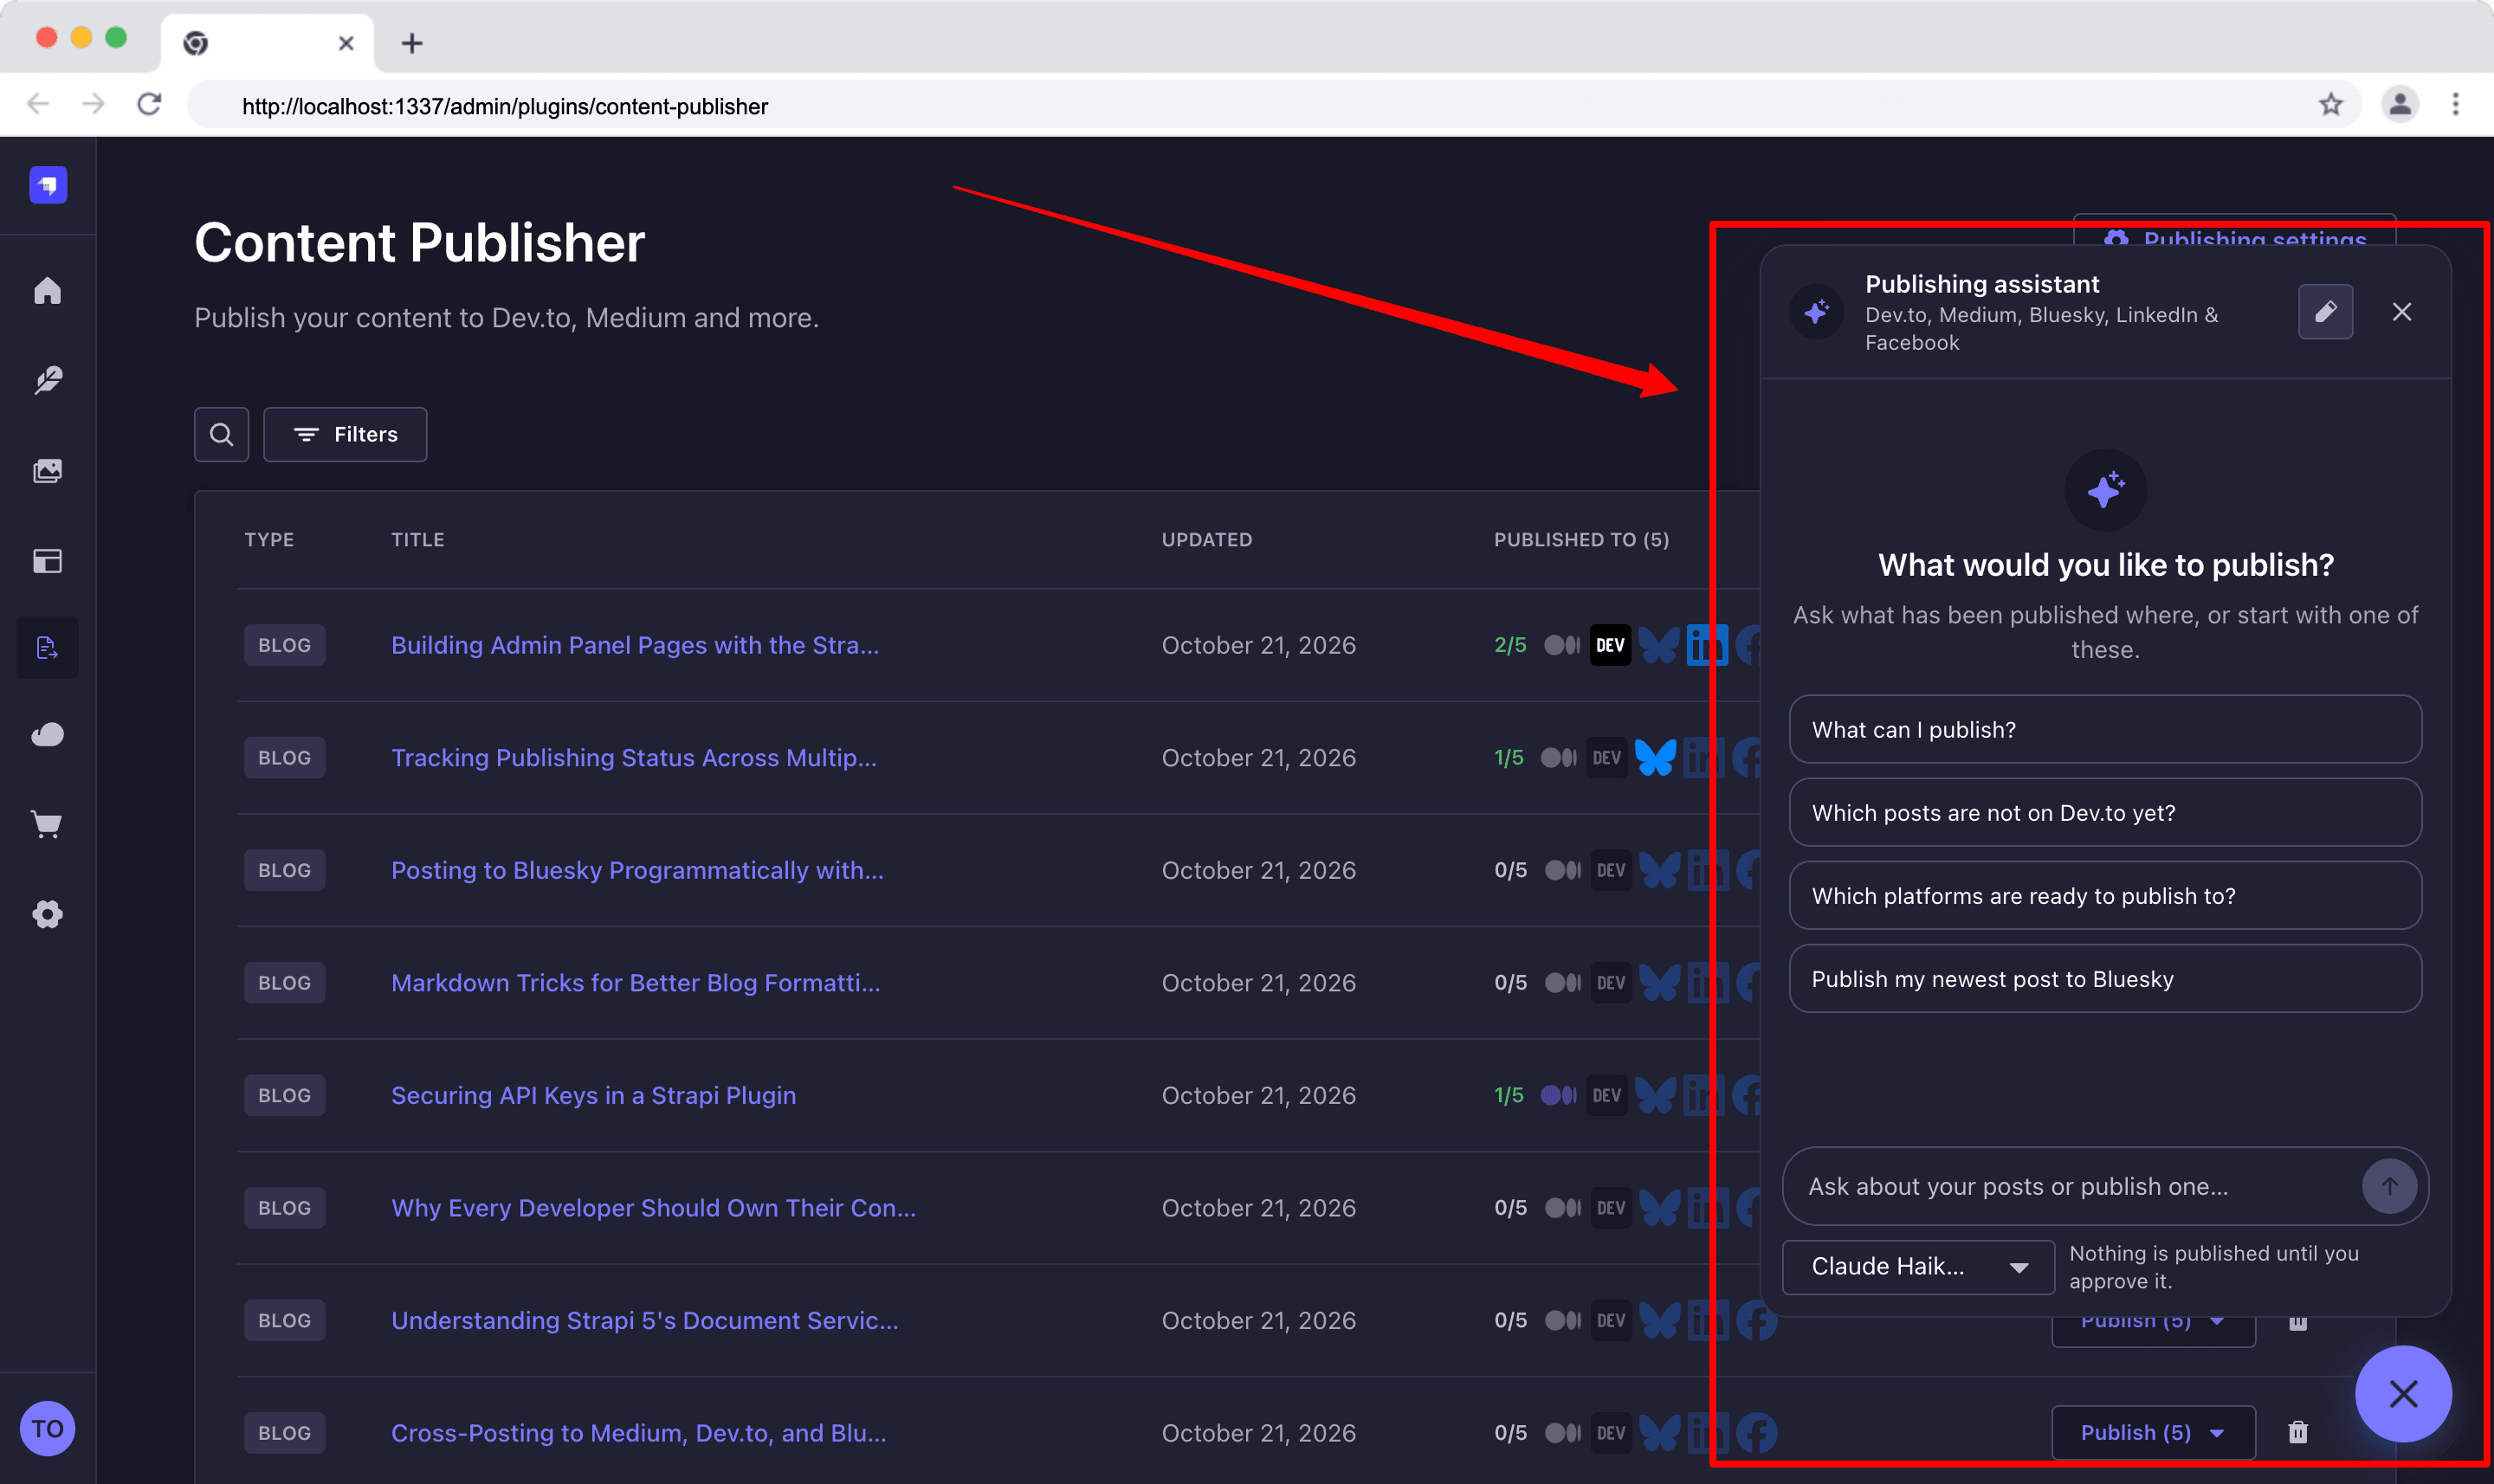
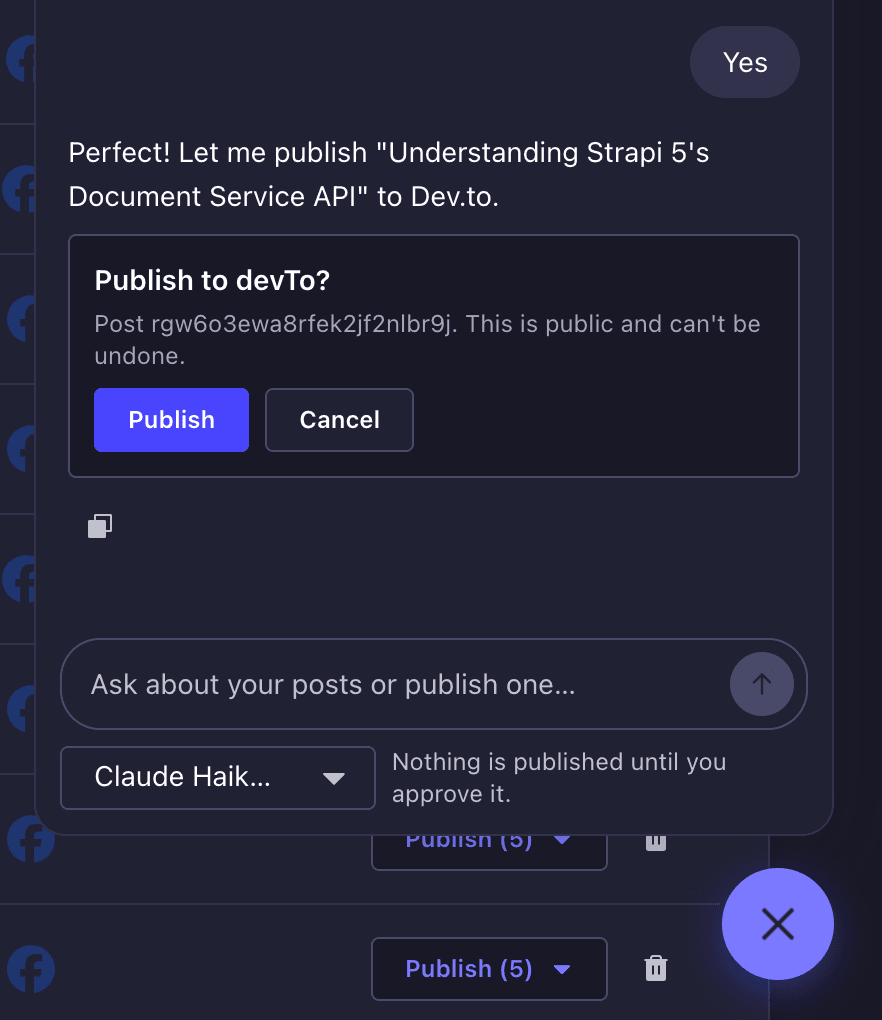
A chat on the plugin's pages uses them, and asks the editor to approve every publish.
5. Public API
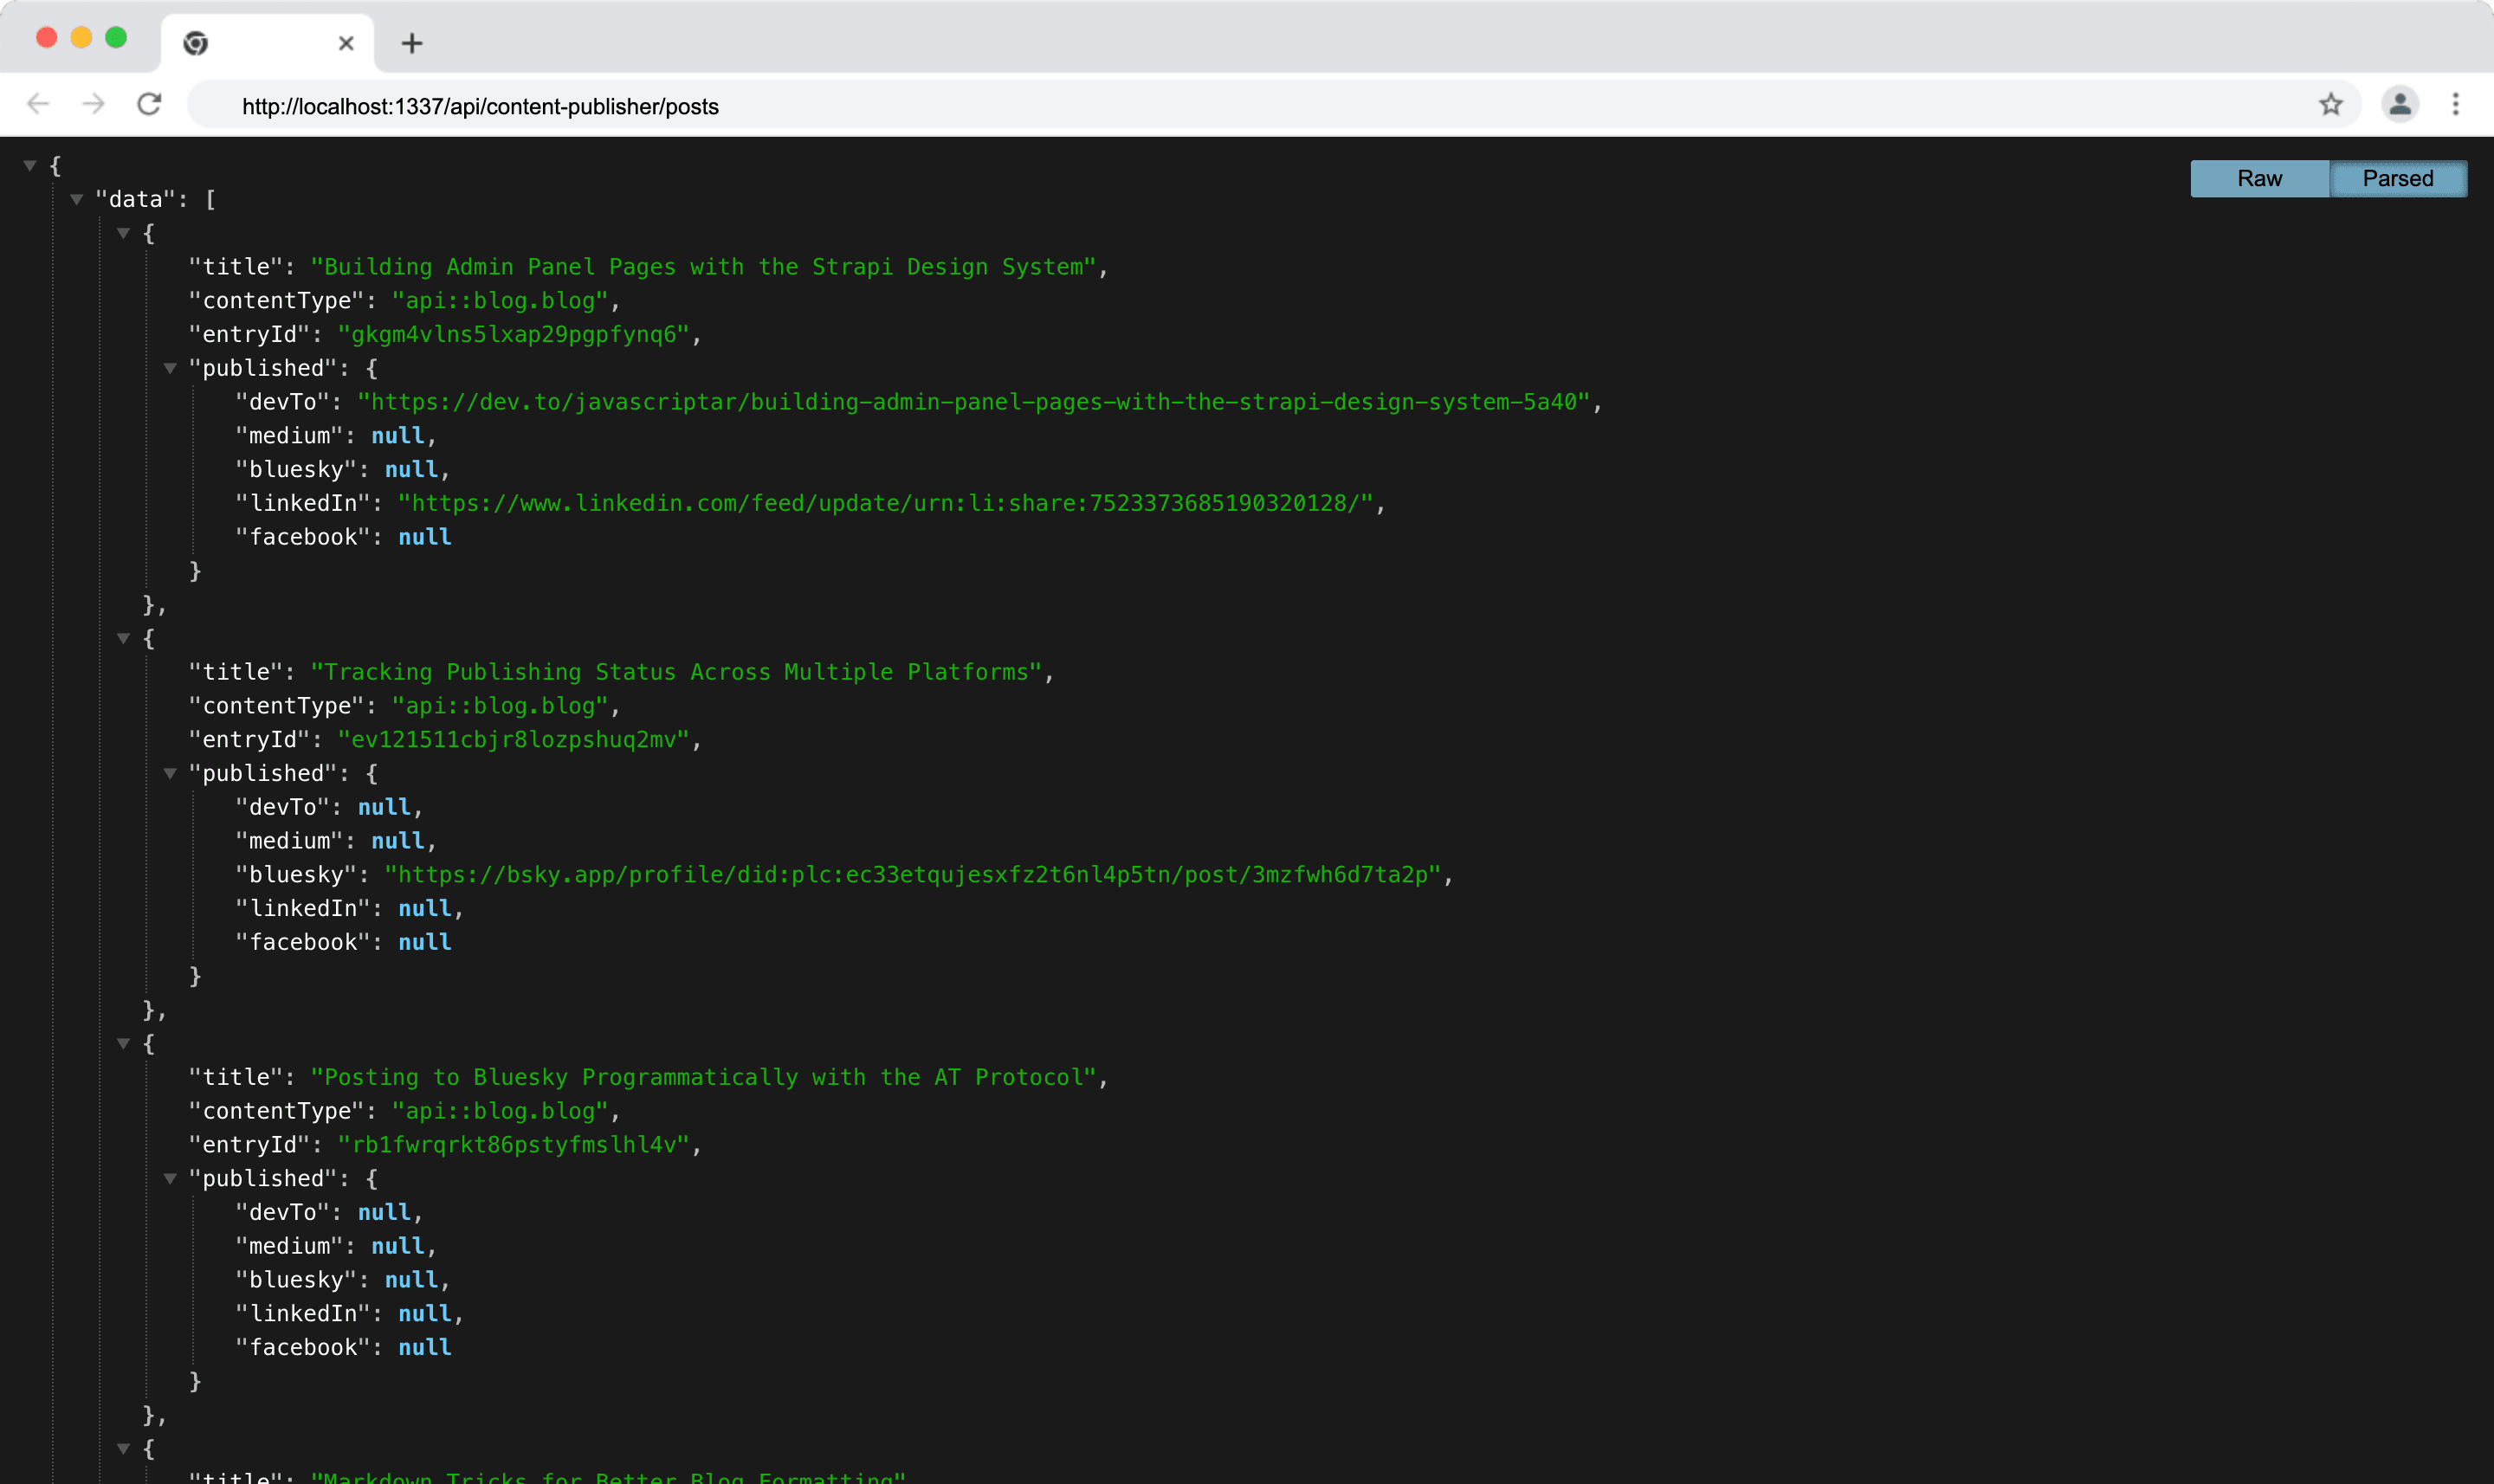
2 read-only content API routes return published entries and their platform URLs.
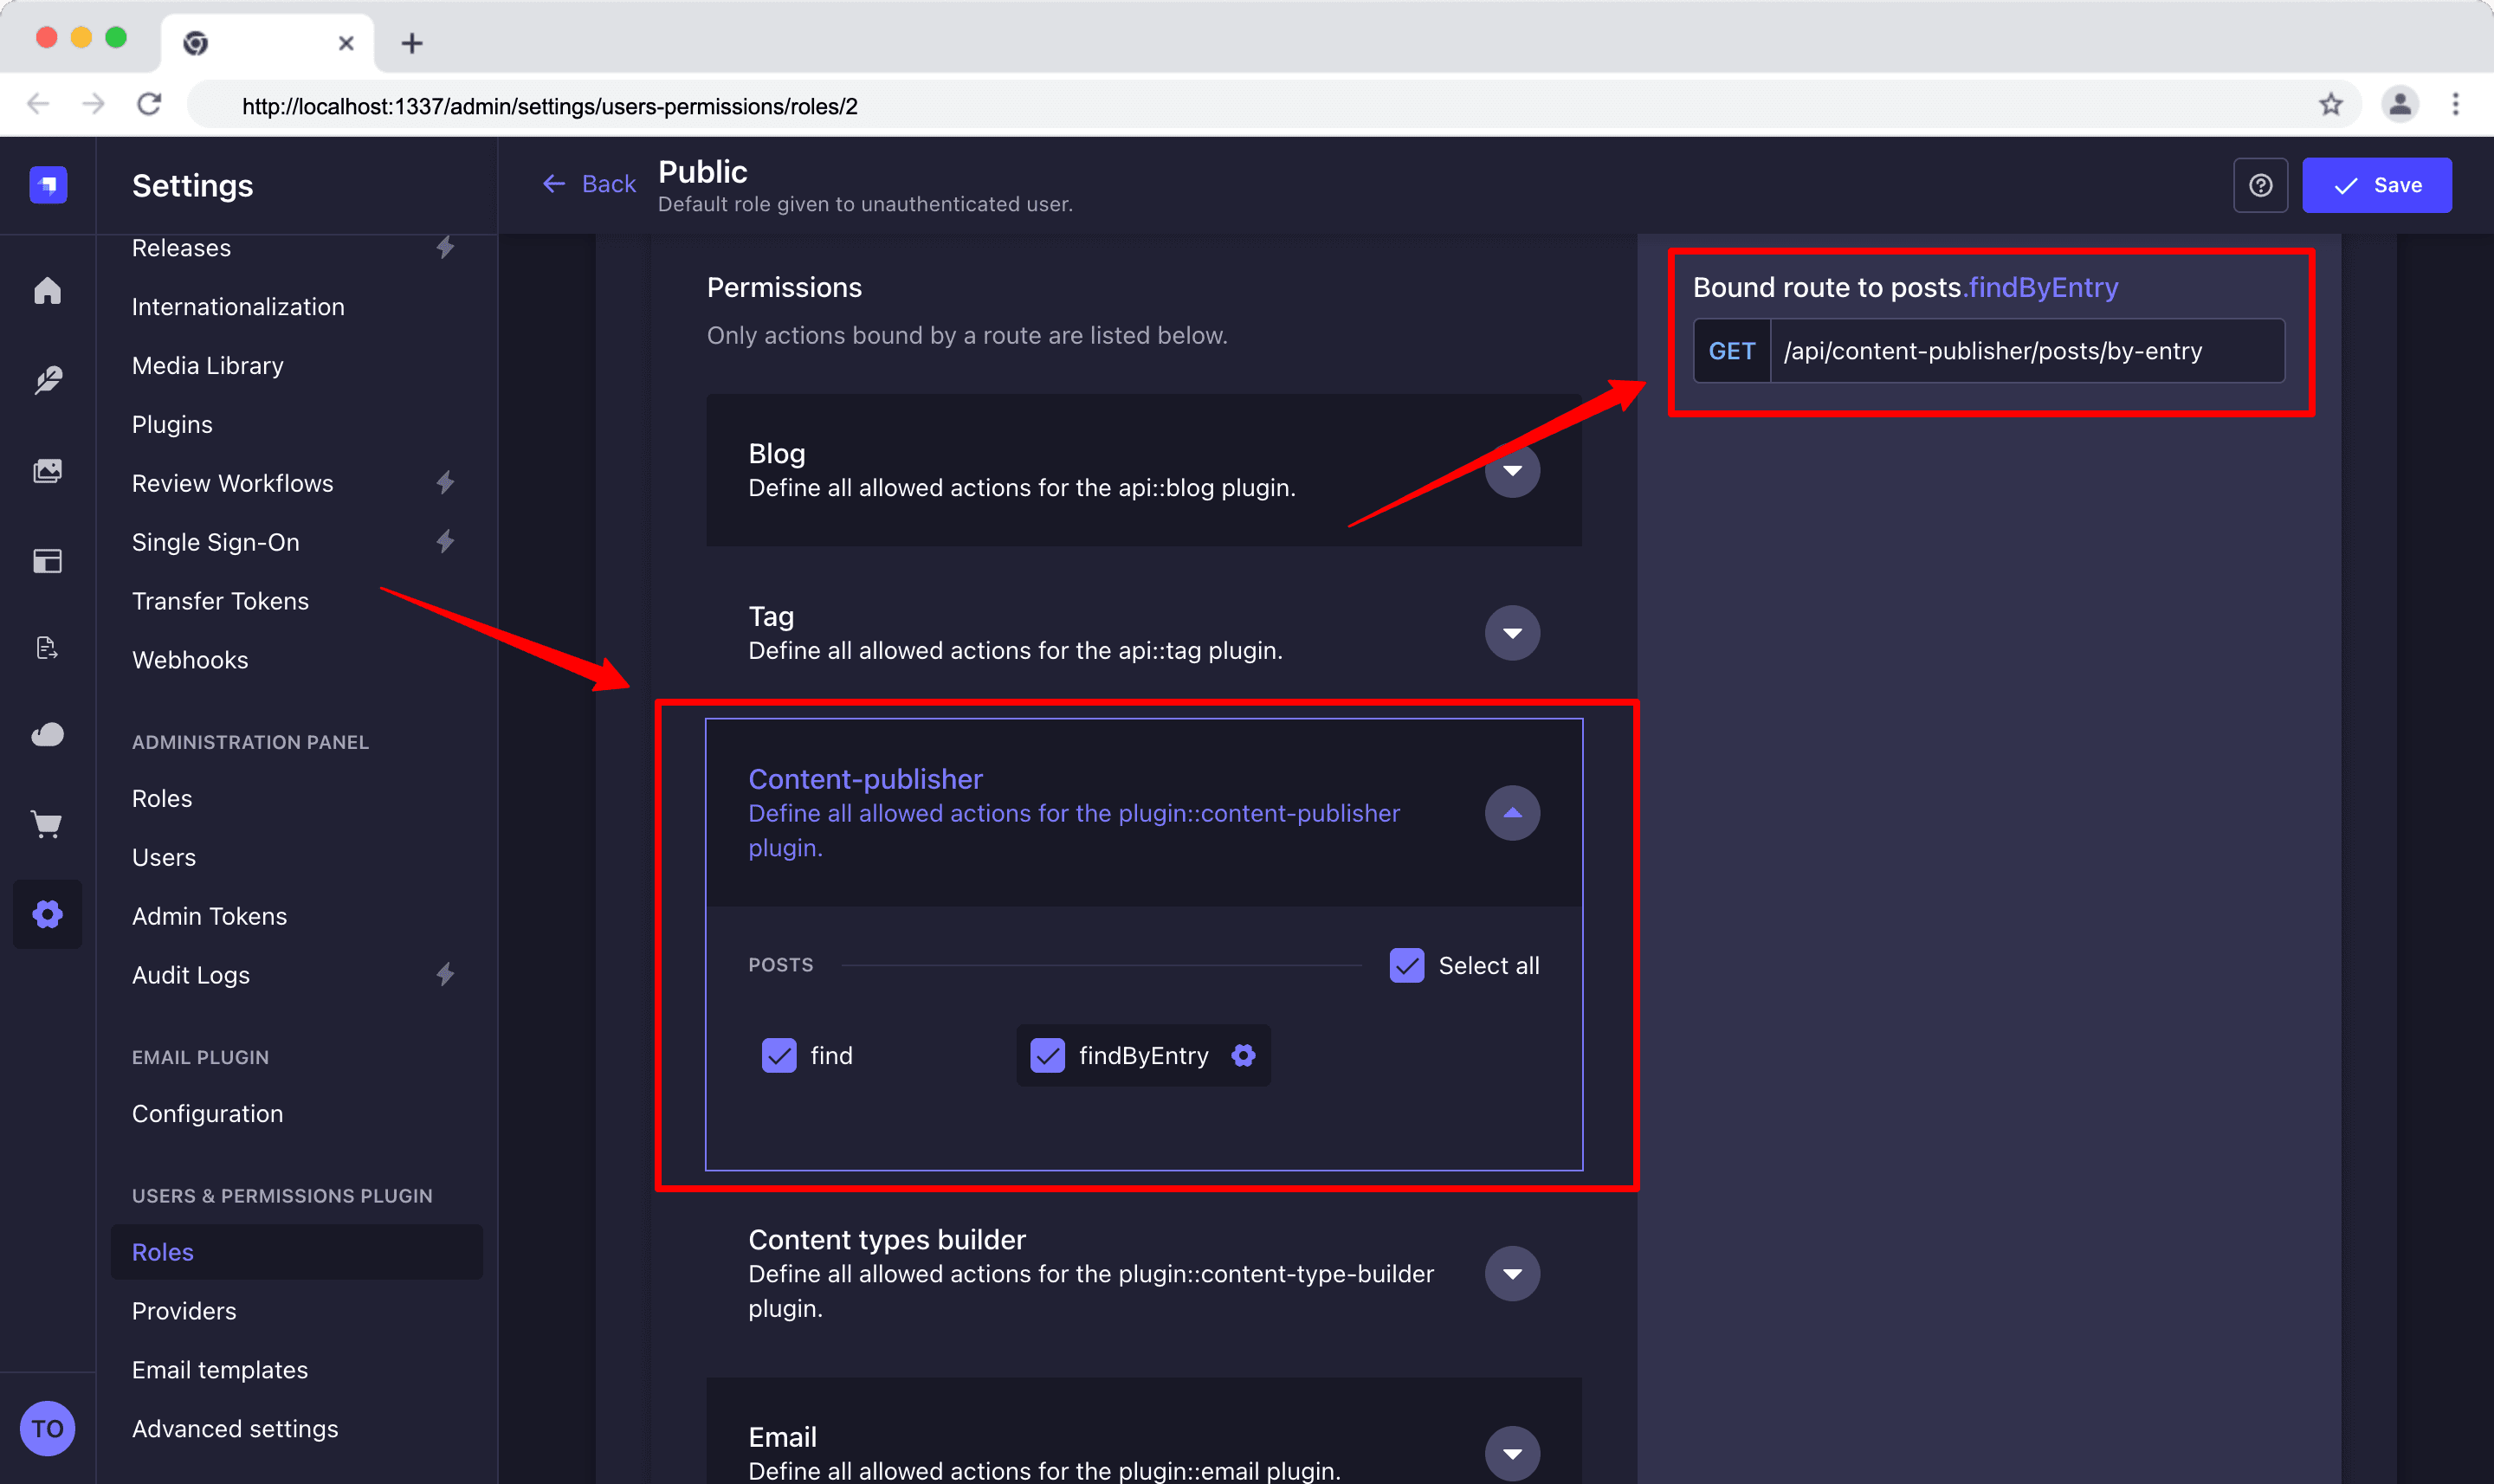
This means that a frontend can show "Also on Dev.to" under a post because it could fetch public posts.
Behind all the 5 sections mentioned, the server has one service layer as we will see soon. None of these surfaces talks to the database directly.
How I Solved It
Before we begin, ensure you have your environmental variables file, .env, at the root of your Strapi project:
# .env

# Platforms that use an API key
DEVTO_API_KEY=
MEDIUM_USER_ID=
MEDIUM_API_TOKEN=
BLUESKY_IDENTIFIER=        # your handle, e.g. you.bsky.social
BLUESKY_APP_PASSWORD=      # an app password, not your account password

# Apps behind the LinkedIn and Facebook Connect buttons
LINKEDIN_CLIENT_ID=
LINKEDIN_CLIENT_SECRET=
FACEBOOK_APP_ID=
FACEBOOK_APP_SECRET=
ENCRYPTION_KEY=            # encrypts their sign-in tokens; new Strapi projects have one

# Optional: the AI chat
ANTHROPIC_API_KEY=
STRAPI_MCP_TOKEN=          # an admin token, covered in the MCP section below
ANTHROPIC_MODEL=           # defaults to claude-haiku-4-5
Step 1: Scaffolding the Plugin and Connecting the Strapi Docs MCP Server
From the root of a Strapi project run the command below. The Plugin SDK creates the plugin under src/plugins/:
npx @strapi/sdk-plugin init content-publisherThen enable it in config/plugins.ts:
// config/plugins.ts
export default {
  'content-publisher': {
    enabled: true,
    resolve: './src/plugins/content-publisher',
  },
};
Ensure you keep npm run watch running in the plugin directory.
While building, I kept Strapi's Docs MCP server connected to my coding assistant because the docs server answers from current documentation.
In Claude Code run the command to add Strapi Docs MCP server:
claude mcp add --transport http strapi-docs https://strapi-docs.mcp.kapa.aiYou can learn more about the Docs MCP Server.
Step 2: Creating the Plugin Content Type
The tracking records live in a content type the plugin owns called Post.
The pluginOptions property keeps it out of the Content Manager and the Content-Type Builder, because editors see these records in the publishing table instead:
// server/src/content-types/post.ts (trimmed)
const schema = {
  kind: 'collectionType',
  collectionName: 'posts',
  info: { singularName: 'post', pluralName: 'posts', displayName: 'Post' },
  options: { draftAndPublish: false },
  pluginOptions: {
    'content-manager': { visible: false },
    'content-type-builder': { visible: false },
  },
  attributes: {
    contentType: { type: 'string' },  // the tracked entry's uid, e.g. "api::blog.blog"
    entryId: { type: 'string' },      // its documentId
    title: { type: 'string' },        // a copy, so the table can search in one query
    entryPublished: { type: 'boolean', default: false },
    devToLink: { type: 'text' },      // one URL field per platform
    mediumLink: { type: 'text' },
    // … blueskyLink, linkedInLink, facebookLink
  },
};

export default { schema };
Step 3: Keeping Records in Sync with Lifecycles
A tracking record has to follow its entry. The plugin subscribes to database lifecycles in the server register():
// server/src/register.ts (trimmed)
const isTracked = async (uid) => {
  if (uid === POST_UID) return false; // the plugin's own writes would trigger this again
  const { contentTypes } = await getSettings(strapi);
  return contentTypes.includes(uid);
};

const sync = async (event) => {
  const uid = event.model?.uid;
  if (await isTracked(uid)) await onEntryChanged(strapi, uid, event.result);
};

strapi.db.lifecycles.subscribe({
  afterCreate: sync,
  afterUpdate: sync,
  async afterDelete(event) {
    const uid = event.model?.uid;
    if (uid === POST_UID) return;
    const documentId = event.result?.documentId;
    // unpublishing deletes the published row but keeps the draft, so check first
    const stillThere = await strapi.documents(uid).findOne({ documentId });
    if (stillThere) await onEntryChanged(strapi, uid, stillThere);
    else await onEntryRemoved(strapi, uid, documentId);
  },
});
The plugin keeps its tracking records in step with your chosen content types. It updates a record when an entry is created, updated or unpublished, and removes it when the entry is deleted.
Step 4: Adding the Business Logic in Services
4 places publish: the table, the edit view panel, the MCP tool and the chat.
If each had its own database code, each would carry its own copy of the rules. So publishing is one method on one service:
// server/src/services/service.ts (trimmed)
const service = ({ strapi }) => ({
  async getPosts(query) {
    return queries.getPosts(strapi, query);
  },

  // one method for every platform: devTo, medium, bluesky, linkedIn or facebook
  async publish(platformKey: string, postId: string) {
    return publishPost(strapi, platformKey, postId);
  },
});
publishPost loads the post by id, then checks the rules before sending anything:
// server/src/services/publish-post.ts (trimmed)
const post = await strapi.documents(POST_UID).findOne({ documentId: postId });
if (!post) throw new NotFoundError(`No post with id ${postId}.`);

if (!post.entryPublished) {
  throw new ApplicationError(`"${post.title}" is a draft. Publish it in Strapi first.`);
}
if (post[LINK_FIELDS[platformKey]]) {
  throw new ApplicationError(`"${post.title}" is already on that platform.`);
}

// is the platform on, load credentials, read the entry, send it, save the URL
const { url } = await publishEntry(strapi, post, platformKey, senders(strapi)[platformKey]);
return { url, title: post.title };
publishEntry checks if the platform is turned on, it loads its credentials and maps the entry's fields to what the platform expects.
Then it sends the post and saves the returned link on the tracking record.
// server/src/services/publish.ts (trimmed)

export const publishEntry = async (strapi, post, platformKey, send) => {
  const platform = getPlatform(platformKey);
  const settings = await getSettings(strapi);

  // a missing flag means on; only an explicit false turns a platform off
  if (settings.enabled?.[platformKey] === false) {
    throw new ApplicationError(`${platform.label} is turned off in the publishing settings.`);
  }

  // an API key from .env, or for LinkedIn and Facebook the signed-in account's token
  const secrets = await secretsFor(strapi, settings, platform);

  // the published version of the entry, plus this content type's field mapping
  const { uid, entry, fieldMap } = await resolveSource(strapi, post, platform, settings);
  const url = await send(resolveFields(strapi, uid, platform, fieldMap, entry), secrets);

  await strapi.documents(POST_UID).update({
    documentId: post.documentId,
    data: { [LINK_FIELDS[platformKey]]: url },
  });

  return { url };
};
Step 5: Adding RBAC Permissions
When building applications, Role Based Access Control (RBAC) could be very important because of the roles you assign to users in your app.
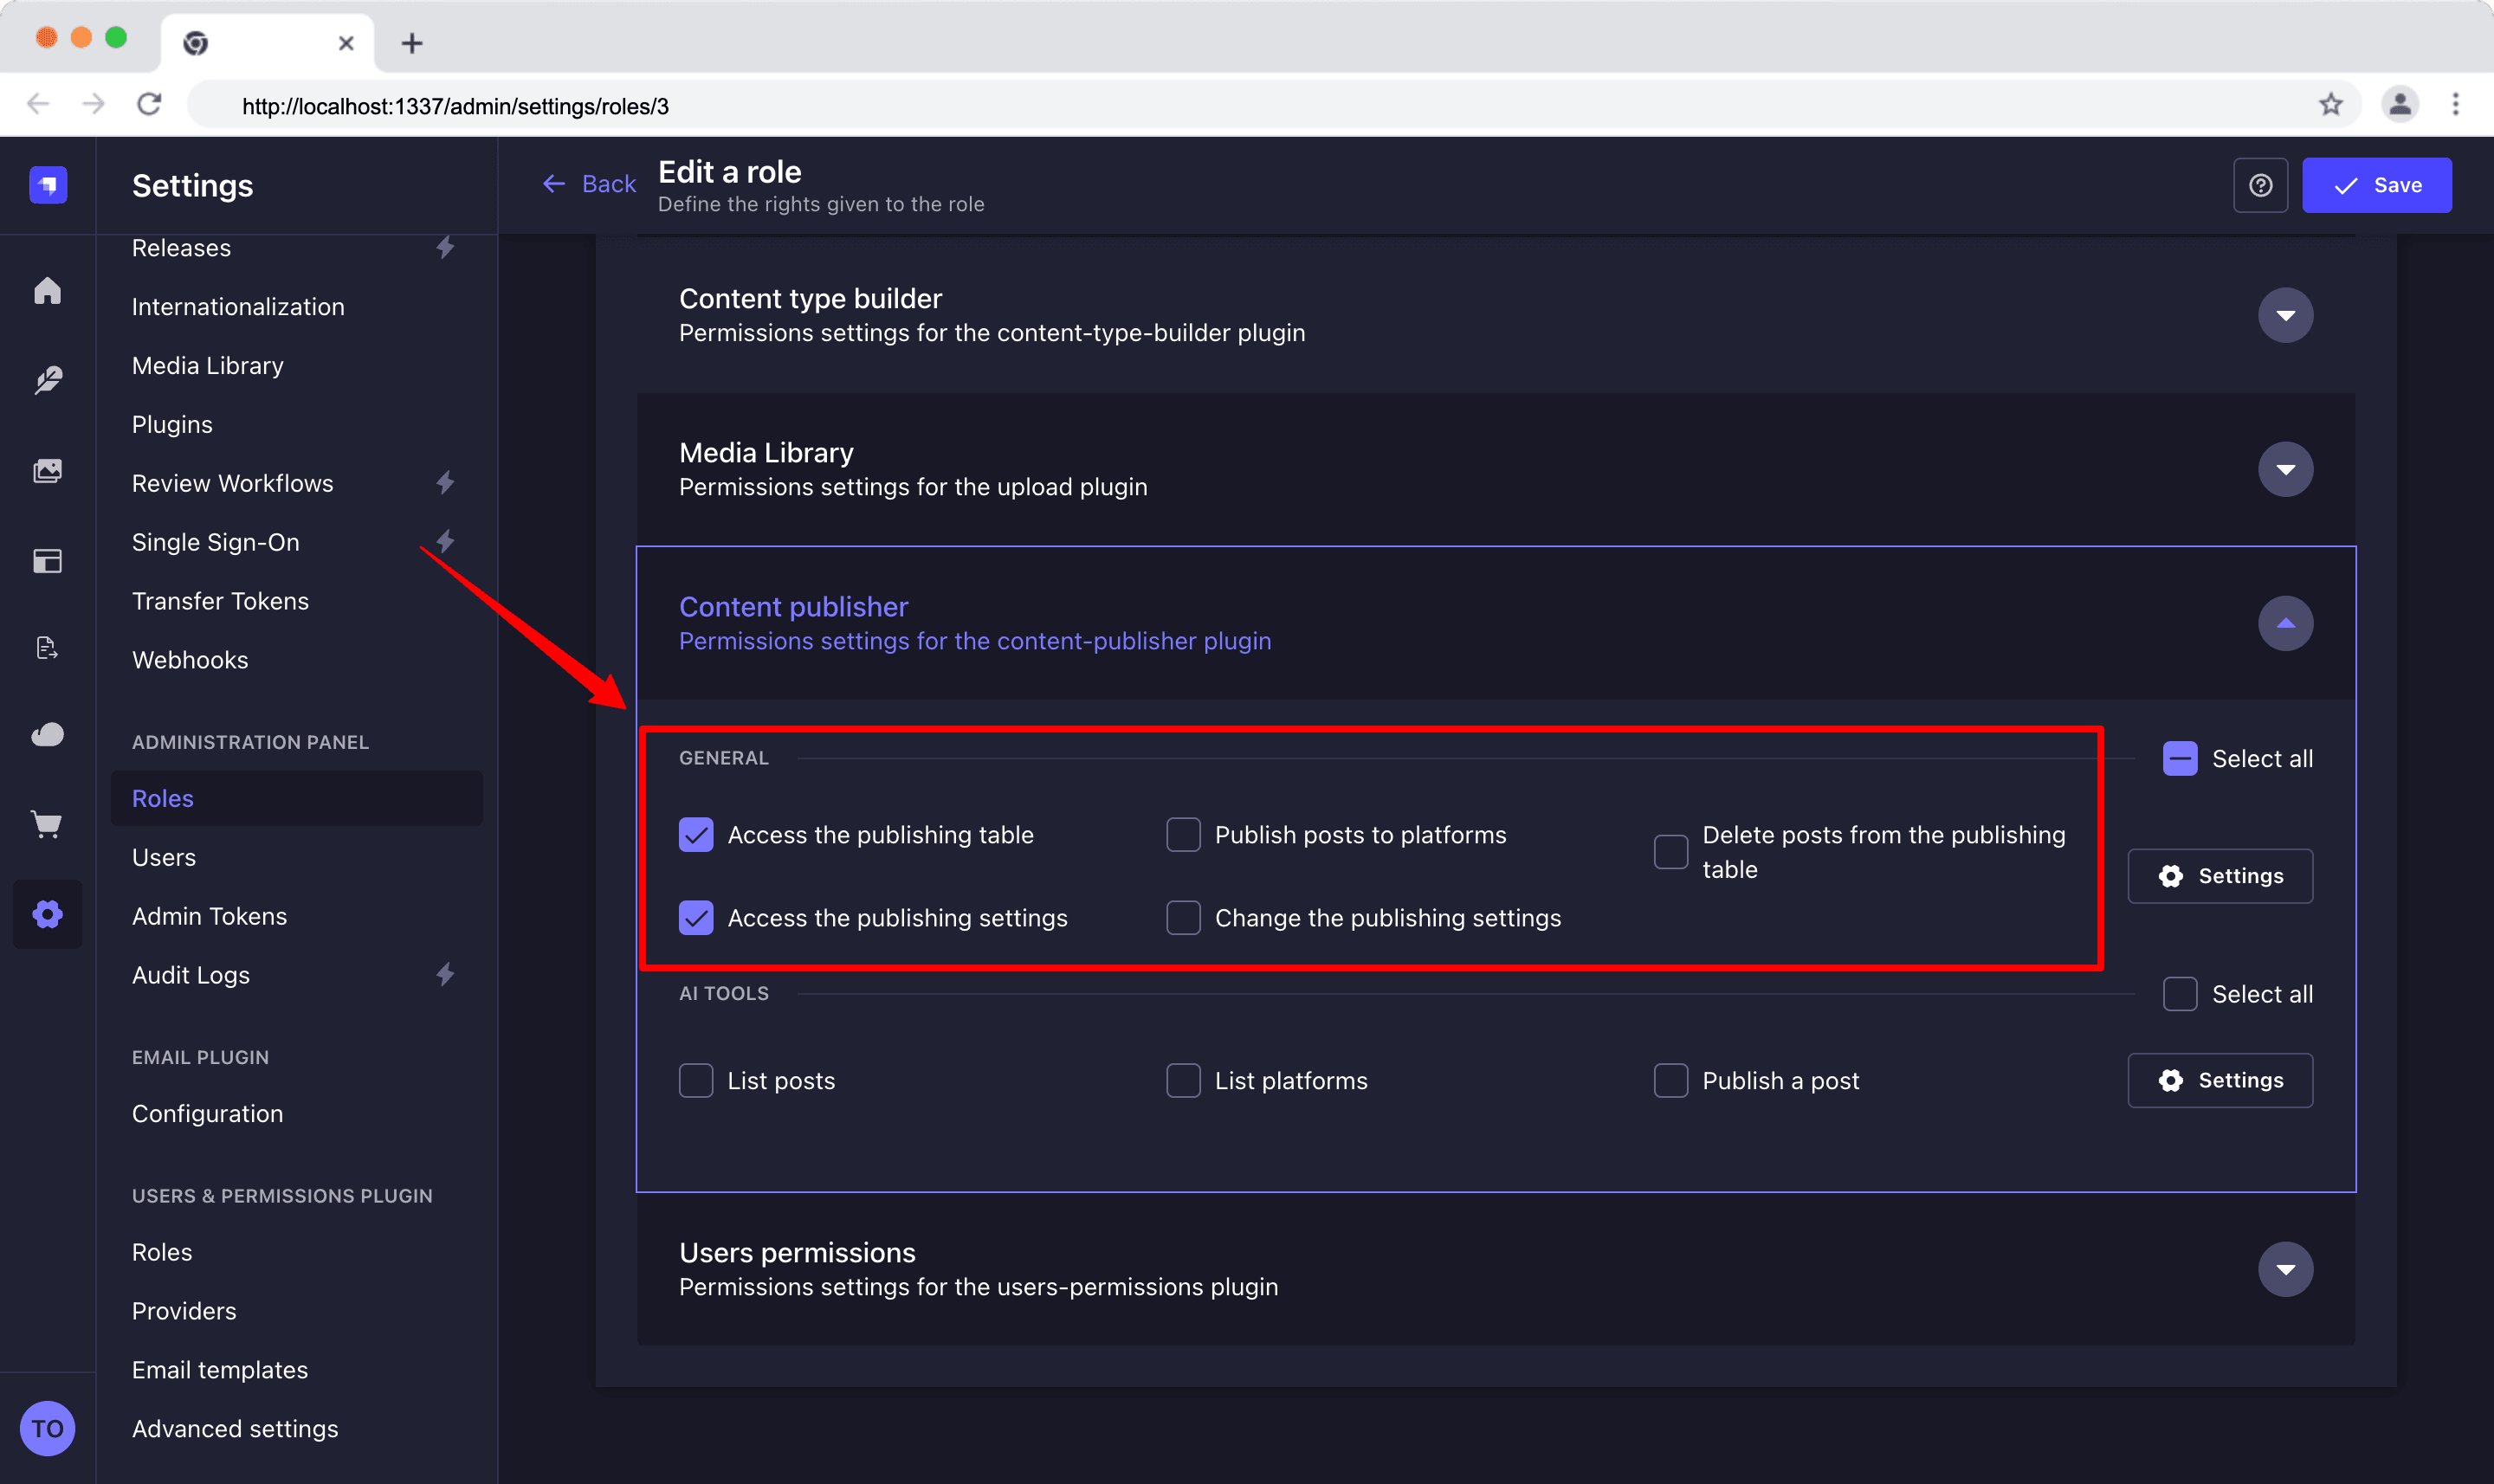
For example, an editor can see where posts went without being able to publish them as shown below, and only trusted admins can change the settings.
A plugin's permissions only show up in the admin panel once the plugin registers them.
Content Publisher registers separate actions for viewing, publishing, deleting, reading settings and changing settings depending on the role of the user:
// server/src/permissions.ts (trimmed)
const action = (uid: string, displayName: string, subCategory?: string) => ({
  section: 'plugins',
  pluginName: 'content-publisher',
  uid,
  displayName,
  ...(subCategory ? { subCategory } : {}),
});

export const ACTIONS = [
  action('read', 'Access the publishing table'),
  action('publish', 'Publish posts to platforms'),
  action('delete', 'Delete posts from the publishing table'),
  action('settings-read', 'Access the publishing settings'),
  action('settings-update', 'Change the publishing settings'),
  // … plus one action per MCP tool, shown later
];
// server/src/bootstrap.ts (trimmed)
await strapi.service('admin::permission').actionProvider.registerMany(ACTIONS);Now, admins can tick each one on or off per role under Settings → Roles.
Step 6: Creating Admin Routes and Content API Routes
Admin routes check who's calling before they do anything, and public routes stay locked until you open them. For example, someone without permission who calls the publish URL directly gets a 403, while your website can still fetch "Also on Dev.to" links.
1. Admin Routes Admin routes go through a small helper that applies Strapi's 2 admin policies:
// server/src/routes/can.ts
export const middlewares = ['plugin::content-publisher.plugin-errors'];

// hasPermissions requires every listed action, so can(READ, PUBLISH) means both
export const can = (...actions: string[]) => ({
  policies: [
    'admin::isAuthenticatedAdmin',
    { name: 'admin::hasPermissions', config: { actions } },
  ],
  middlewares,
});
In the code above,
can()lets a request through only if the caller is a logged-in admin with every permission listed. For example,can(READ, PUBLISH)on the publish route blocks someone who can view the table but isn't allowed to publish.- It also adds the error middleware, so any error comes back as a clear message instead of a bare 500.
Next we create the routes with the policies. These are
// server/src/routes/posts.ts (trimmed)
{ method: 'GET', path: '/posts', handler: 'controller.getPosts', config: can(READ) },
{
  method: 'POST',
  path: '/posts/:id/publish/:platform',
  handler: 'controller.publish',
  config: can(READ, PUBLISH),
},
{
  method: 'DELETE',
  path: '/posts/:id',
  handler: 'controller.deletePost',
  config: can(READ, DELETE),
},
Above are the plugin's admin endpoints for listing, publishing and deleting posts, and each one requires its own permission.
2. Content API or Public Routes
The public routes are content API routes. They have no admin policies, because Users & Permissions controls them:
// server/src/routes/content-api.ts
const config = { policies: [], middlewares };

export default [
  { method: 'GET', path: '/posts', handler: 'posts.find', config },
  { method: 'GET', path: '/posts/by-entry', handler: 'posts.findByEntry', config },
];
Strapi turns each content API handler into a checkbox under Settings → Users & Permissions → Roles → Content-publisher → Posts. They return 403 until someone ticks them.
The controller returns only titles and platform URLs, which are already public.
Step 7: Building the Publishing Page
The publishing page is a table built with the Strapi Design System.
It shows every published entry and the platforms it has reached, with Publish and Delete buttons for people whose role allows them. It's built from Strapi's ready-made admin components.
When you search, filter, sort or change page, the Design System components add that to the URL, for example ?_q=strapi&page=2. The page sends the same query to the plugin's API, so a refresh or a shared link shows the same results:
Here is a trimmed version of the component:
// admin/src/components/PublishingTable.tsx (trimmed)
const { posts, pagination, isLoading } = usePostsQuery();
const { canPublish, canDelete } = usePostPermissions();

return (
  <Flex direction="column" alignItems="stretch" gap={4}>
    <SearchInput label="Search for an entry" placeholder="Search by title" />

    <Table.Root rows={posts} headers={headers} isLoading={isLoading}>
      {/* … one row per post, given canPublish and canDelete */}
    </Table.Root>

    <Pagination.Root pageCount={pagination.pageCount} total={pagination.total}>
      <Pagination.PageSize />
      <Pagination.Links />
    </Pagination.Root>
  </Flex>
);
canPublish and canDelete come from Strapi's useRBAC hook, which checks the logged-in user's role. Each row uses them to decide which buttons to show:
// admin/src/components/PublishingTable.tsx (trimmed)
const { canPublish, canDelete } = usePostPermissions();

<Table.Body>
  {posts.map((post: any) => (
    <Row key={post.id}>
      <PostCells
        post={post}
        platforms={platforms}
        onChanged={refresh}
        onDelete={canDelete ? remove : undefined}
        canPublish={canPublish}
      />
    </Row>
  ))}
</Table.Body>

// admin/src/components/table/PostCells.tsx (trimmed)
{canPublish ? <PublishMenu post={post} onPublish={publishTo} /> : null}
{onDelete ? <DeleteDialog onConfirm={() => onDelete(post.documentId)} /> : null}
So if the admin user doesn't have publish or delete permissions they won't be able to perform both actions:
Step 8: Adding a Publish Panel to the Content Manager with an Injection Zone
An injection zone is a spot in Strapi's admin where a plugin can add its own component.
The Content Manager's edit view has one called right-links, in the sidebar next to the entry. The plugin adds its panel there from the admin bootstrap().
// admin/src/index.tsx (trimmed)
async bootstrap(app) {
  app.getPlugin('content-manager').injectComponent('editView', 'right-links', {
    name: 'content-publisher',
    Component: EntryPublishPanel,
  });
},
Editors can publish from the entry they're working on, without going to another page. For example, after finishing a blog post in the Content Manager, they click "Dev.to" in the sidebar and it's posted.
Strapi shows the panel on every content type's edit view, so it first checks whether the open entry is one you chose to publish from. Then it shows whichever message fits:
// admin/src/components/EntryPublishPanel.tsx (trimmed)
const { slug, id } = unstable_useContentManagerContext();
const enabled = Boolean(contentTypes?.includes(slug));

if (!enabled) return null; // not a content type you publish from

if (!post) body = <Note>Save this entry first to publish it.</Note>;
else if (!post.entryPublished) body = <Note>Publish this entry first, then publish it to other platforms.</Note>;
else body = <EntryPublishMenu post={post} platforms={platforms} onPublish={publishTo} canPublish={canPublish} />;
The menu uses the same publish hook and permission check as the table, so publishing from here works exactly the same way. When you publish the entry in Strapi, the panel updates straight away, without a page reload.
Step 9: Building the Settings Page
From the settings page, admins can choose what to publish, how fields match each platform, and which accounts are connected, all in one place.
For example, they pick "Blog" as the content type, map its content field to Dev.to's body, and click Connect LinkedIn to sign in.
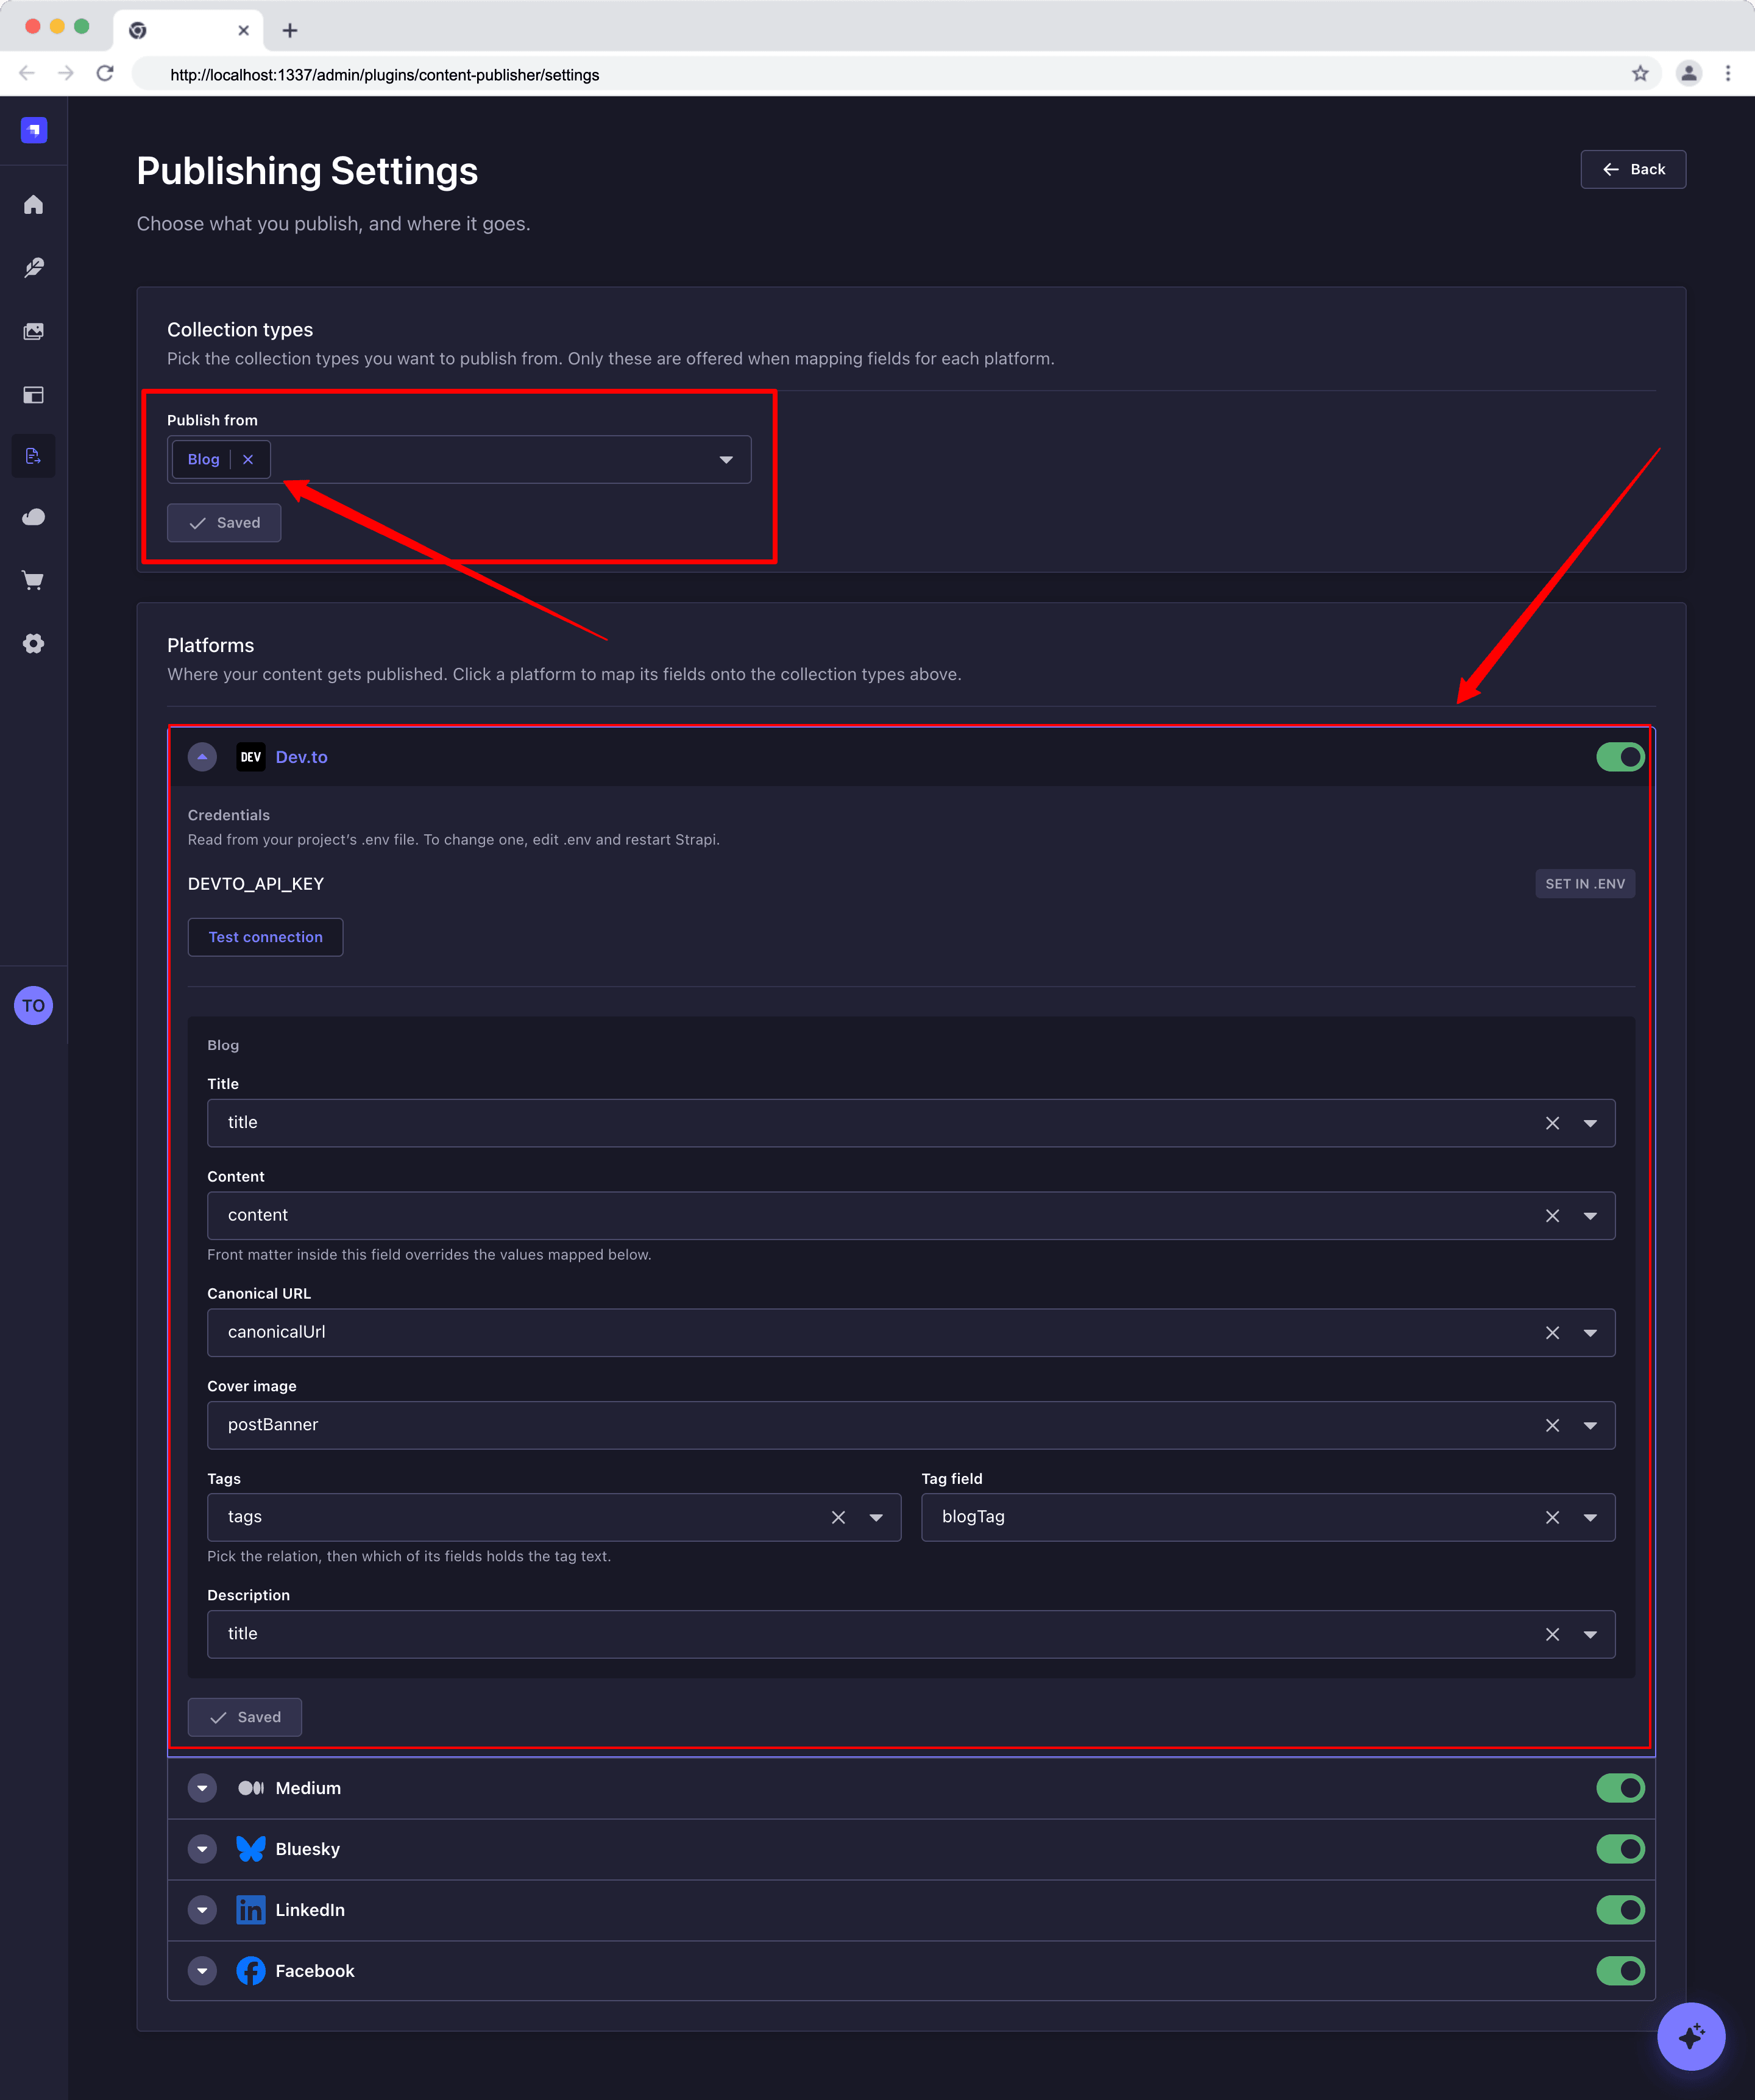
Settings are configuration, not content, so they're kept in Strapi's built-in key-value store instead of a content type. Saving merges the change into what's already there, so saving one part of the settings never wipes another:
// server/src/services/settings-store.ts (trimmed)
const store = (strapi) =>
  strapi.store({ type: 'plugin', name: 'content-publisher', key: 'settings' });

export const saveSettings = async (strapi, patch) => {
  const next = { ...(await getSettings(strapi)), ...patch };
  await store(strapi).set({ value: next });
  return next;
};
1. Selecting Collection Types to Publish From The settings page lists your collection types, such as Blog and Tutorial, and you tick the ones you want to publish from.
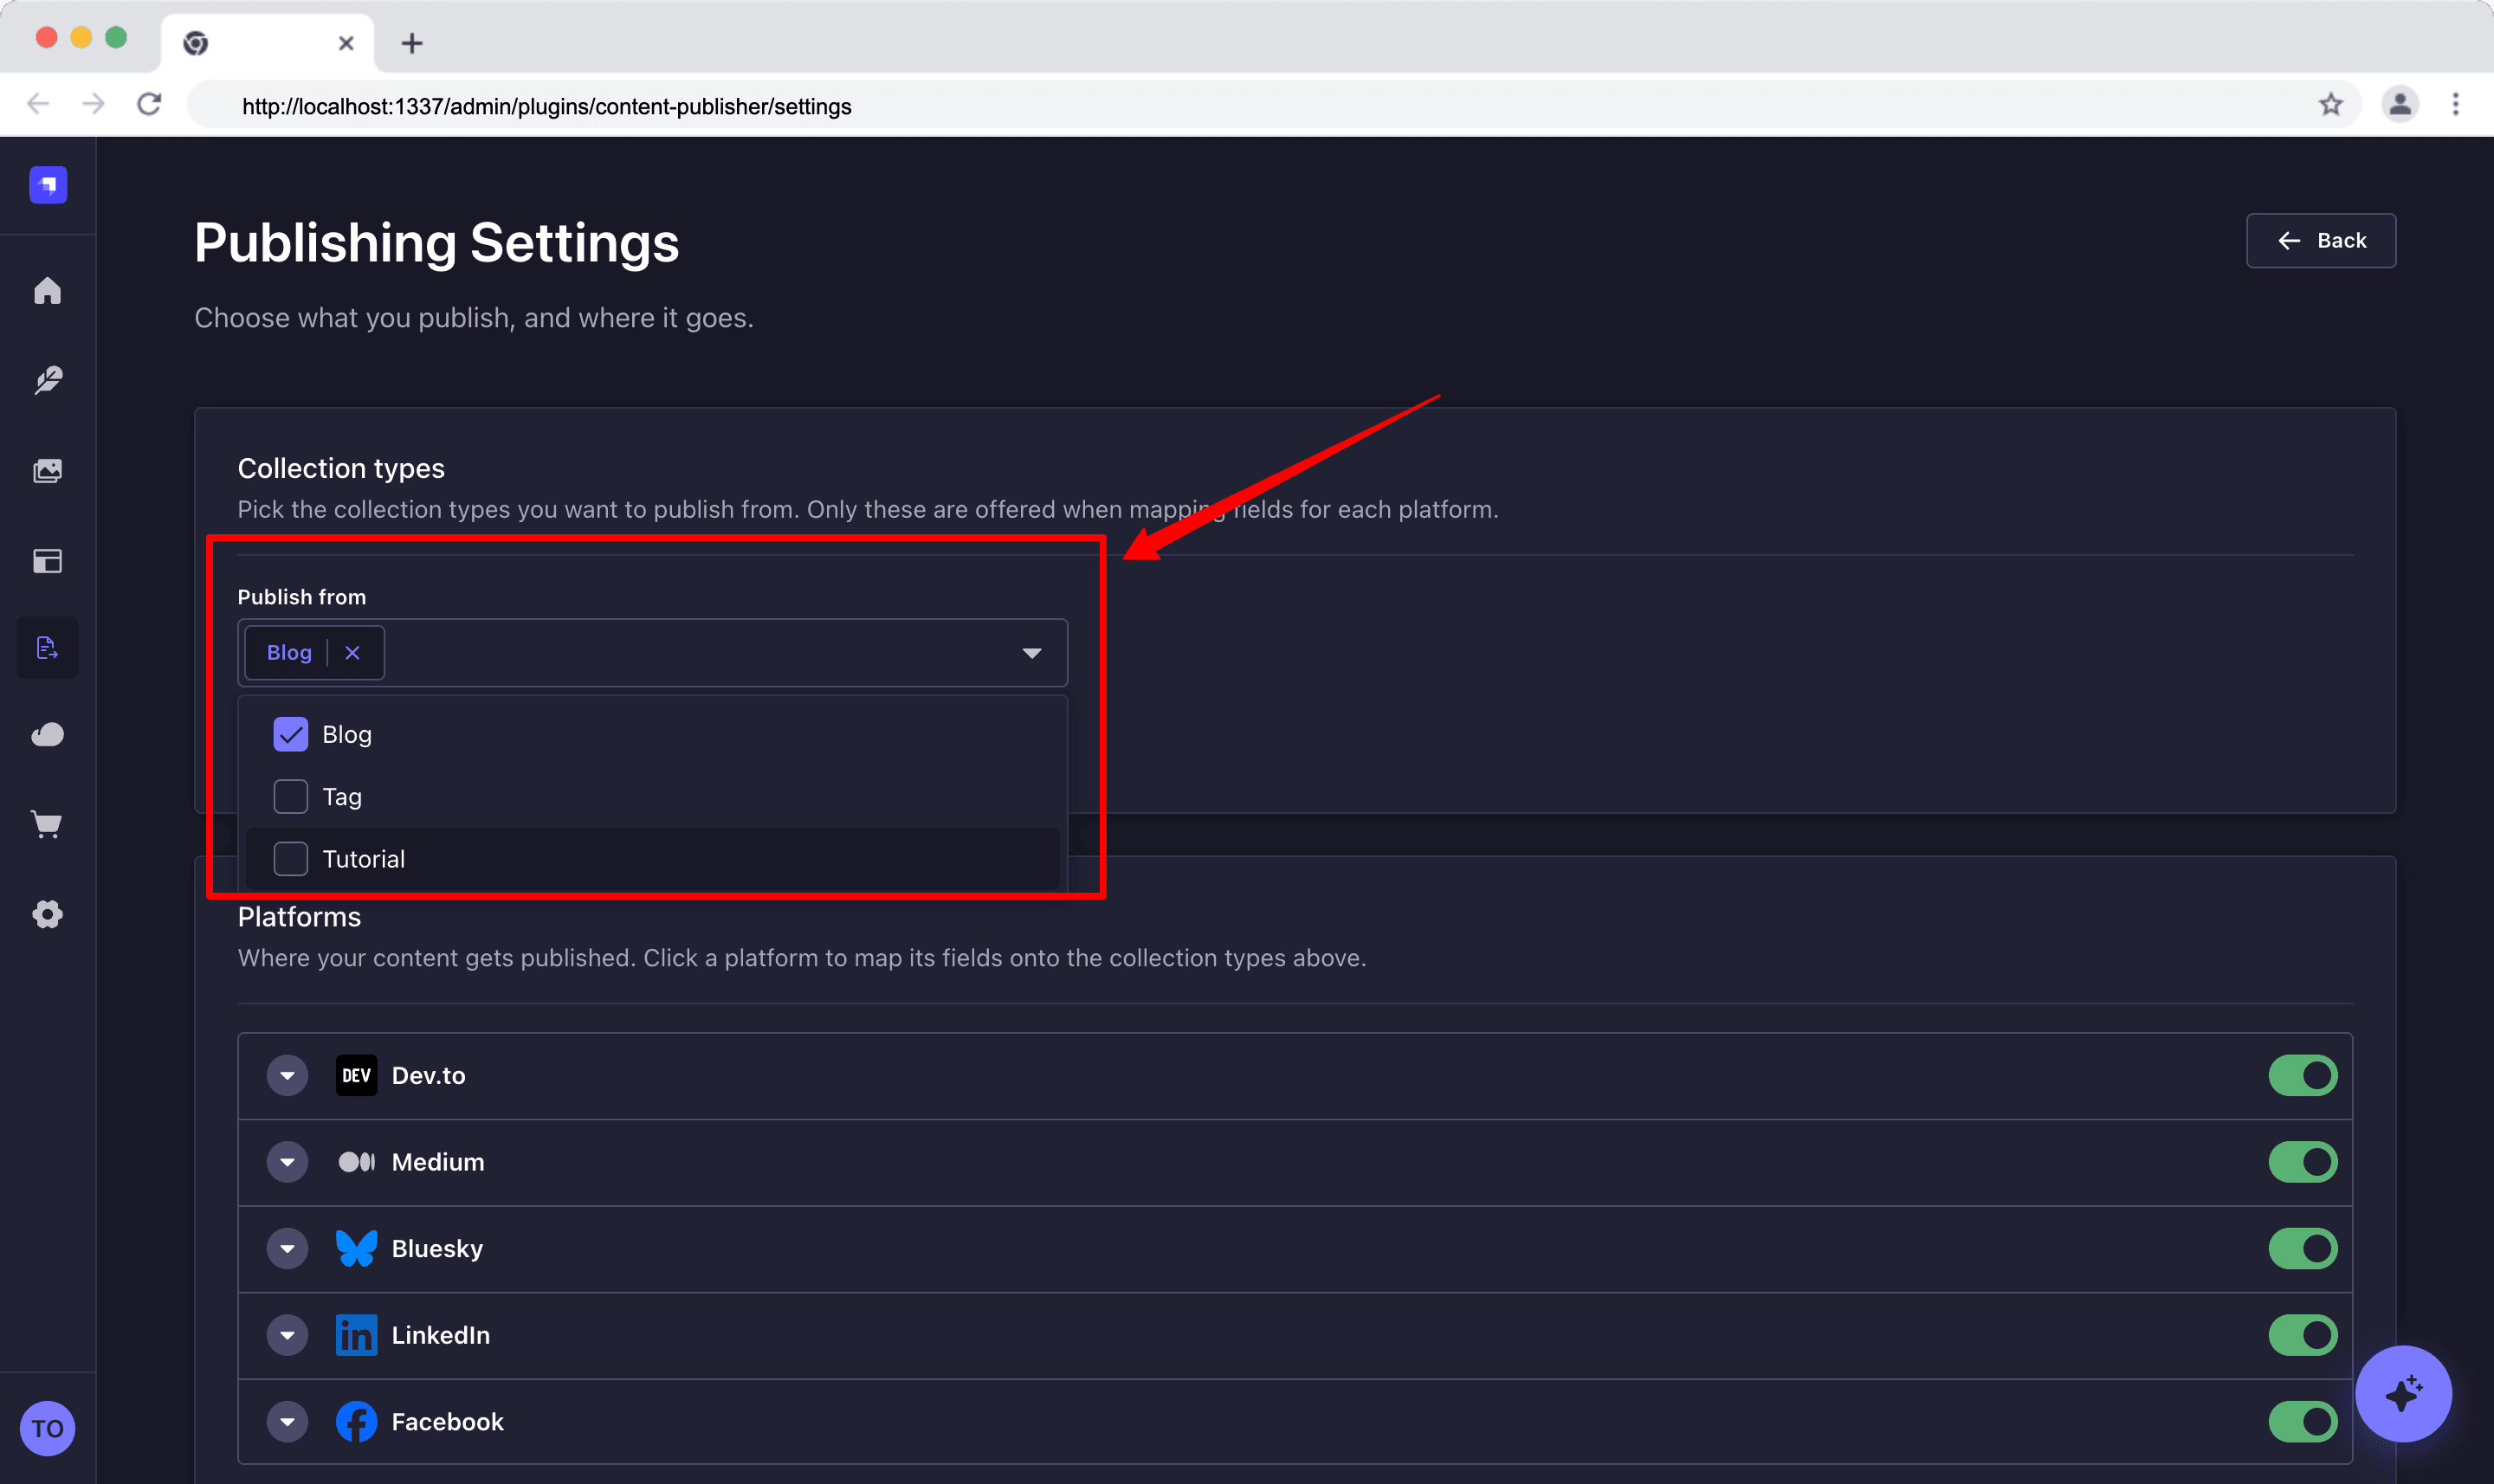
When you save, the plugin creates tracking records for the entries that already exist, so they show up in the table straight away:
// server/src/services/setting.ts (trimmed)

async setContentTypes(uids) {
  const saved = await writes.setContentTypes(strapi, uids);
  await syncTrackingRecords(strapi); // so a new type shows its existing entries at once
  return presentSettings(strapi, saved);
},
2. Defining Platforms and Mapping Their Fields
Each platform is described by a plain object that lists the fields it expects and which kinds of Strapi field can fill each one:
// server/src/platforms/devto.ts (trimmed)
const devTo: Platform = {
  key: 'devTo',
  label: 'Dev.to',
  envVars: ['DEVTO_API_KEY'],
  fields: [
    { key: 'title', label: 'Title', required: true, accepts: ['string', 'text'] },
    {
      key: 'body_markdown',
      label: 'Content',
      required: true,
      accepts: ['string', 'text', 'richtext'],
    },
    { key: 'main_image', label: 'Cover image', required: false, accepts: ['media'] },
    // … canonical_url, tags, description
  ],
};
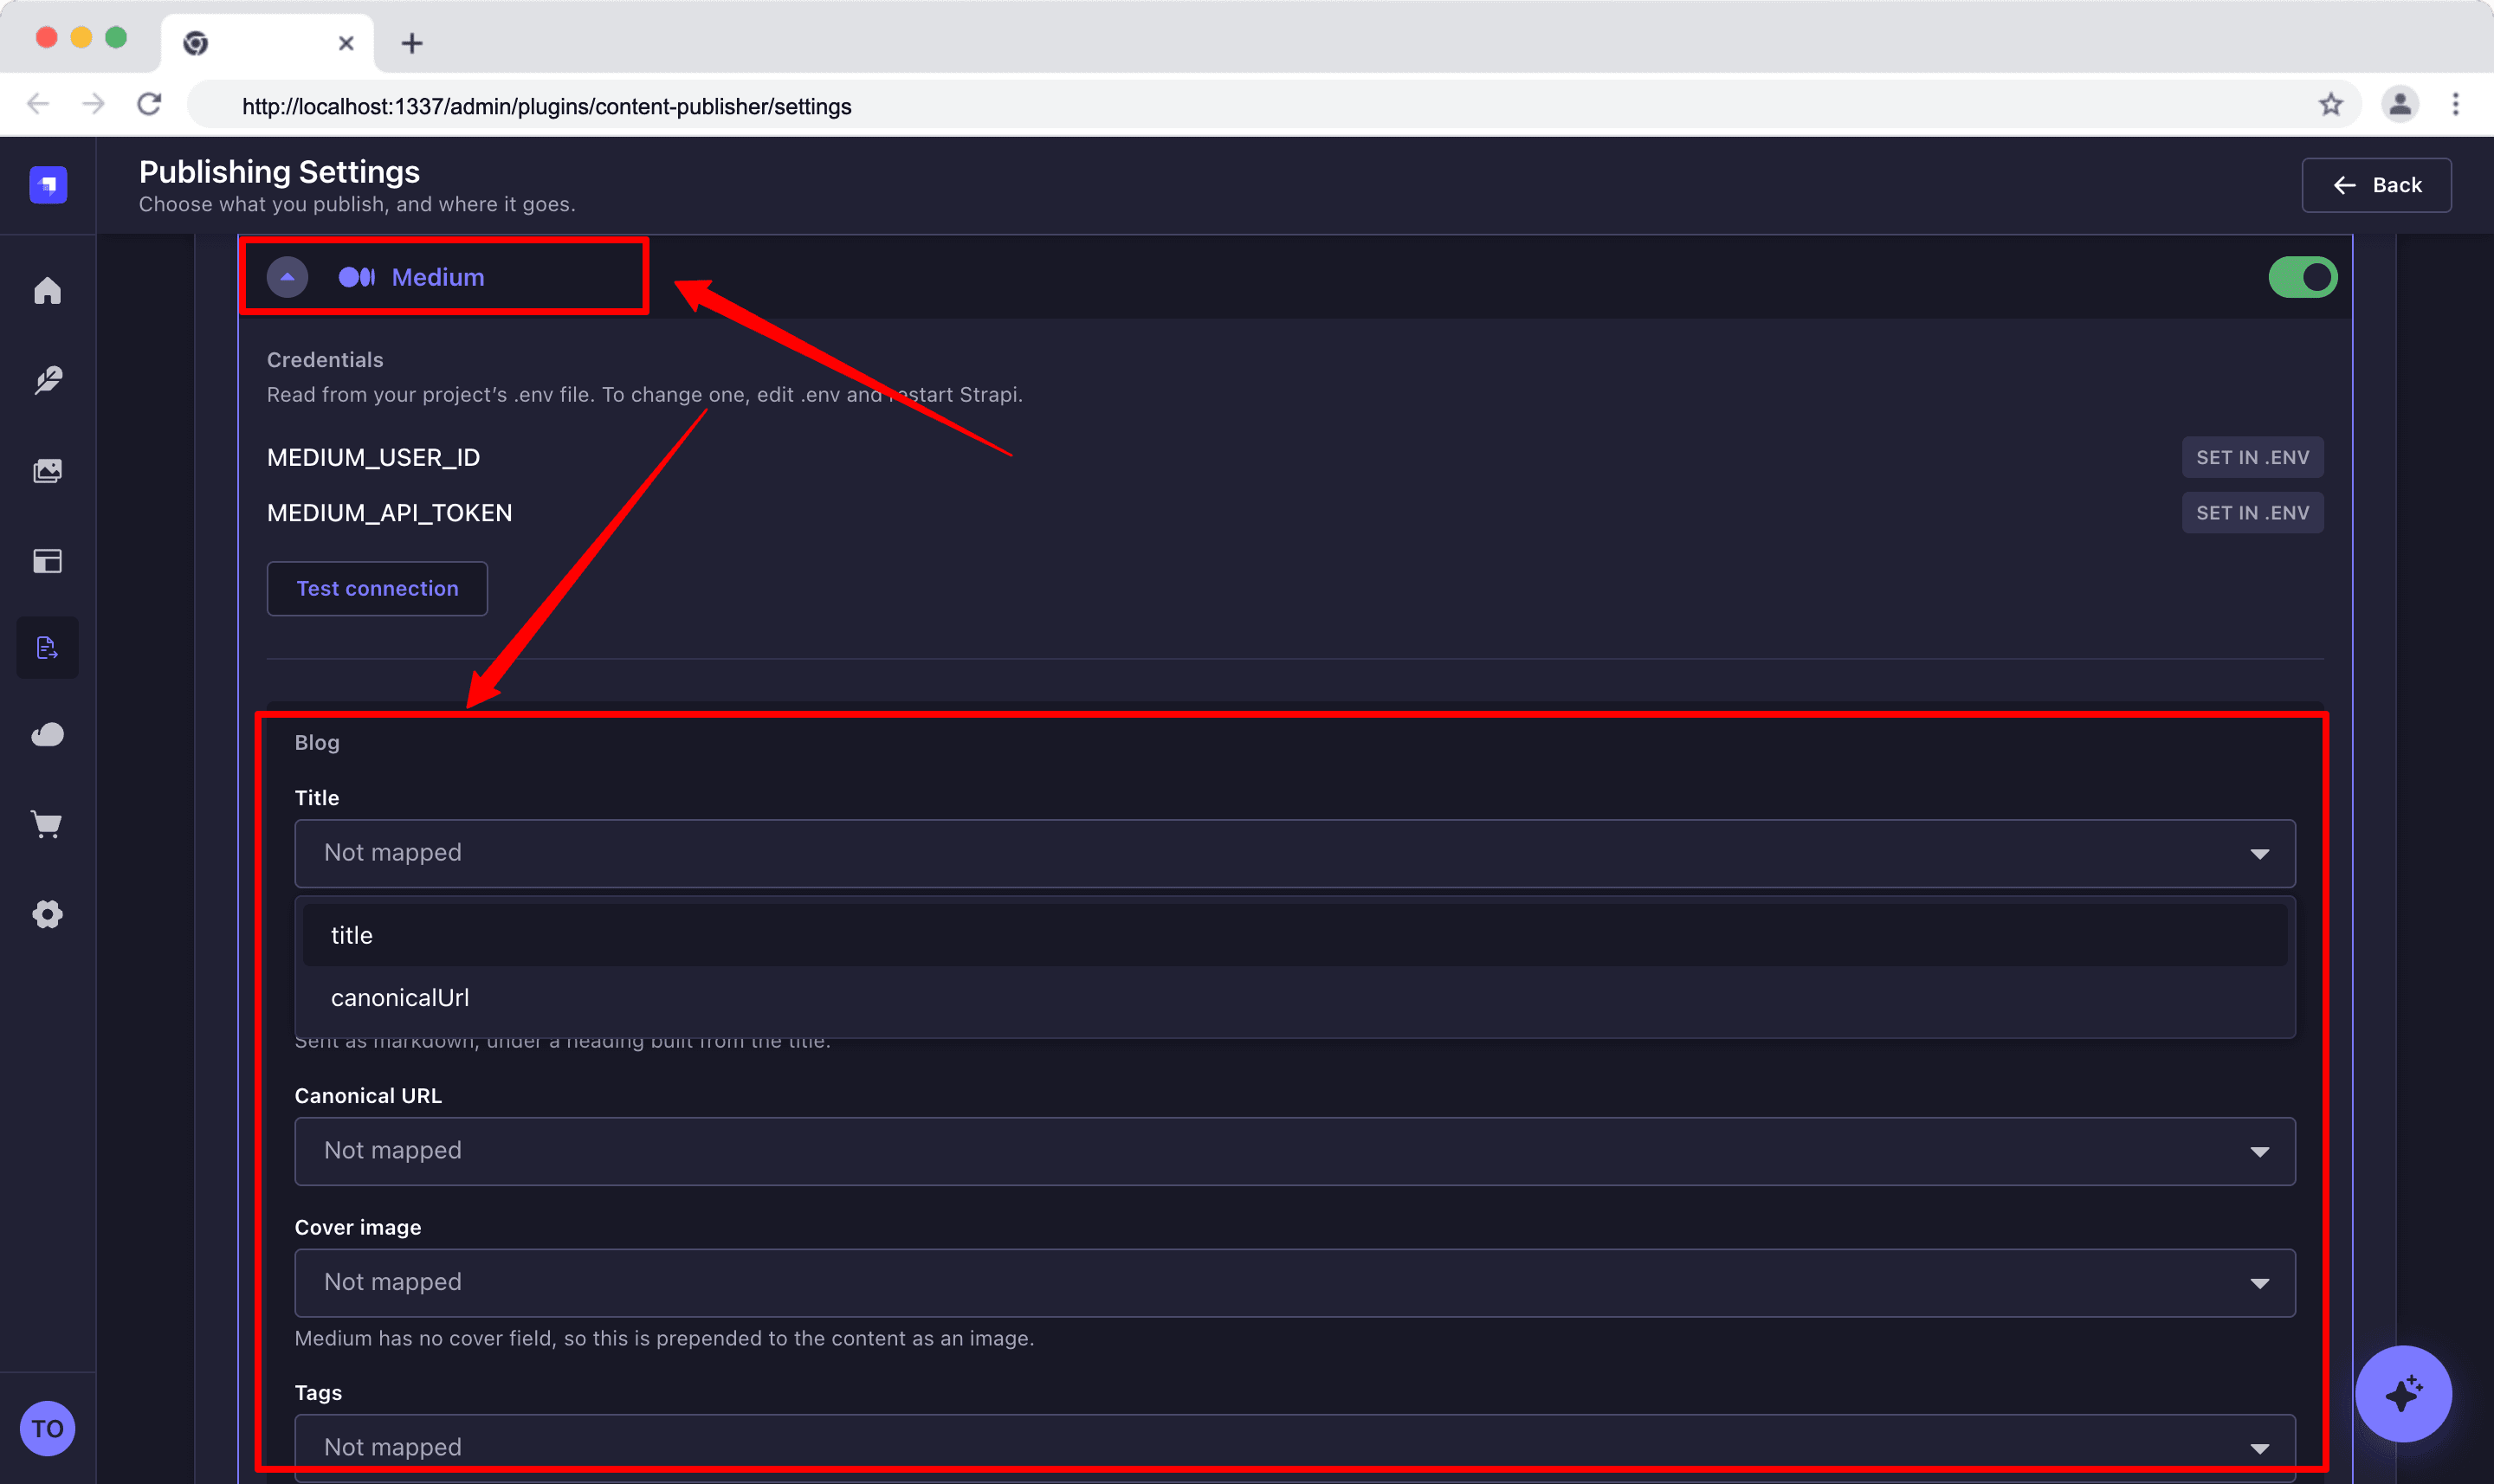
For every field a platform expects, the settings page shows a dropdown of your own fields of a matching type, so you choose where each value comes from.
For example, Title comes from headline and Cover image from coverImage. The choices are checked before they're saved.
Adding a new platform means writing one object like this and the function that sends the post.
3. Storing Credentials and Connecting LinkedIn and Facebook with OAuth
API keys for Dev.to and Medium live only in the project's .env. The same applies to Bluesky identifier and password. The settings page shows whether each one is set, but never its value.
LinkedIn and Facebook use OAuth instead of a key. The admin clicks Connect, signs in at LinkedIn or Facebook in a popup, and the provider sends them back to the plugin's callback route. That's the only route with auth: false, because the provider's redirect carries no admin token:
// server/src/routes/connections.ts (trimmed)
{
  method: 'GET',
  path: '/connect/:platform/callback',
  handler: 'connection.callback',
  config: { auth: false, policies: [], middlewares },
},
To keep that open route safe, the plugin gives each sign-in a one-time state that expires after ten minutes, and only accepts callbacks that bring it back. The token it receives is encrypted with admin::encryption before it's saved.
To create the apps and get their id and secret, follow LinkedIn's authorization code flow and Facebook's manual login flow. Add http://localhost:1337/content-publisher/connect/linkedIn/callback (or facebook) as the redirect URL.
Step 10: Enabling the Strapi MCP Server and Adding Custom Tools
Strapi's MCP server is off unless you turn it on. This line turns it on, and setting MCP_ENABLED=false turns it off again in a given environment:
// config/server.ts (trimmed)
mcp: { enabled: env.bool('MCP_ENABLED', true) },
Out of the box, the MCP server only gives AI clients basic create, read, update and delete tools for your content.
However, the plugin here adds its own tools, so an AI client can also list posts, see which platforms are set up and publish. Here's the publish tool:
// server/src/mcp/publish-post.ts (trimmed)
export default ai.mcp.defineTool({
  name: 'content_publisher_publish_post',
  title: 'Publish a post to a platform',
  description:
    'Publishes one post (by postId from content_publisher_list_posts) to one platform. ' +
    'This is public and cannot be undone, so only call it when the editor has asked ' +
    'for that exact post and platform.',
  auth: authFor(TOOL_PUBLISH_POST),
  resolveInputSchema: () =>
    z.object({
      postId: z.string().describe('postId from content_publisher_list_posts'),
      platform: z.enum(PLATFORM_KEYS).describe('Platform key'),
    }),
  resolveOutputSchema: () => z.object({ platform: z.string(), url: z.string() }),
  createHandler: (strapi) => async ({ args }) => {
    try {
      const { url, title } = await pluginService(strapi, 'service').publish(
        args.platform,
        args.postId
      );
      return ok(`Published "${title}" to ${args.platform}: ${url}`, {
        platform: args.platform,
        url: String(url),
      });
    } catch (error) {
      return failed(error?.message ?? `Could not publish to ${args.platform}.`);
    }
  },
});
The description is the model's only guide to when to call the tool, so it says where postId comes from and that publishing can't be undone. Errors are returned with failed(), not thrown, so the model can tell the editor "that post is a draft".
The ok() helper in mcp/shared.ts puts the data in the text content as JSON, as well as in structuredContent. The Vercel AI SDK client gives the model only the text, and without the JSON the model saw "11 post(s)." and no ids.
The tools are registered from the plugin's register():
// server/src/mcp/index.ts (trimmed)
export const registerMcpTools = (strapi) => {
  const mcp = strapi.ai?.mcp;
  if (!mcp?.isEnabled?.()) return;
  TOOLS.forEach((tool) => mcp.registerTool(tool));
};
According to the docs, a plugin can register tools in register() or bootstrap().
Step 11: Registering Tool Permissions and Testing Them with an Admin Token
Each tool's auth points at its own action, added to the same ACTIONS list under an "AI tools" heading:
// server/src/permissions.ts (trimmed)
action('tool.list-posts', 'List posts', 'AI tools'),
action('tool.list-platforms', 'List platforms', 'AI tools'),
action('tool.publish-post', 'Publish a post', 'AI tools'),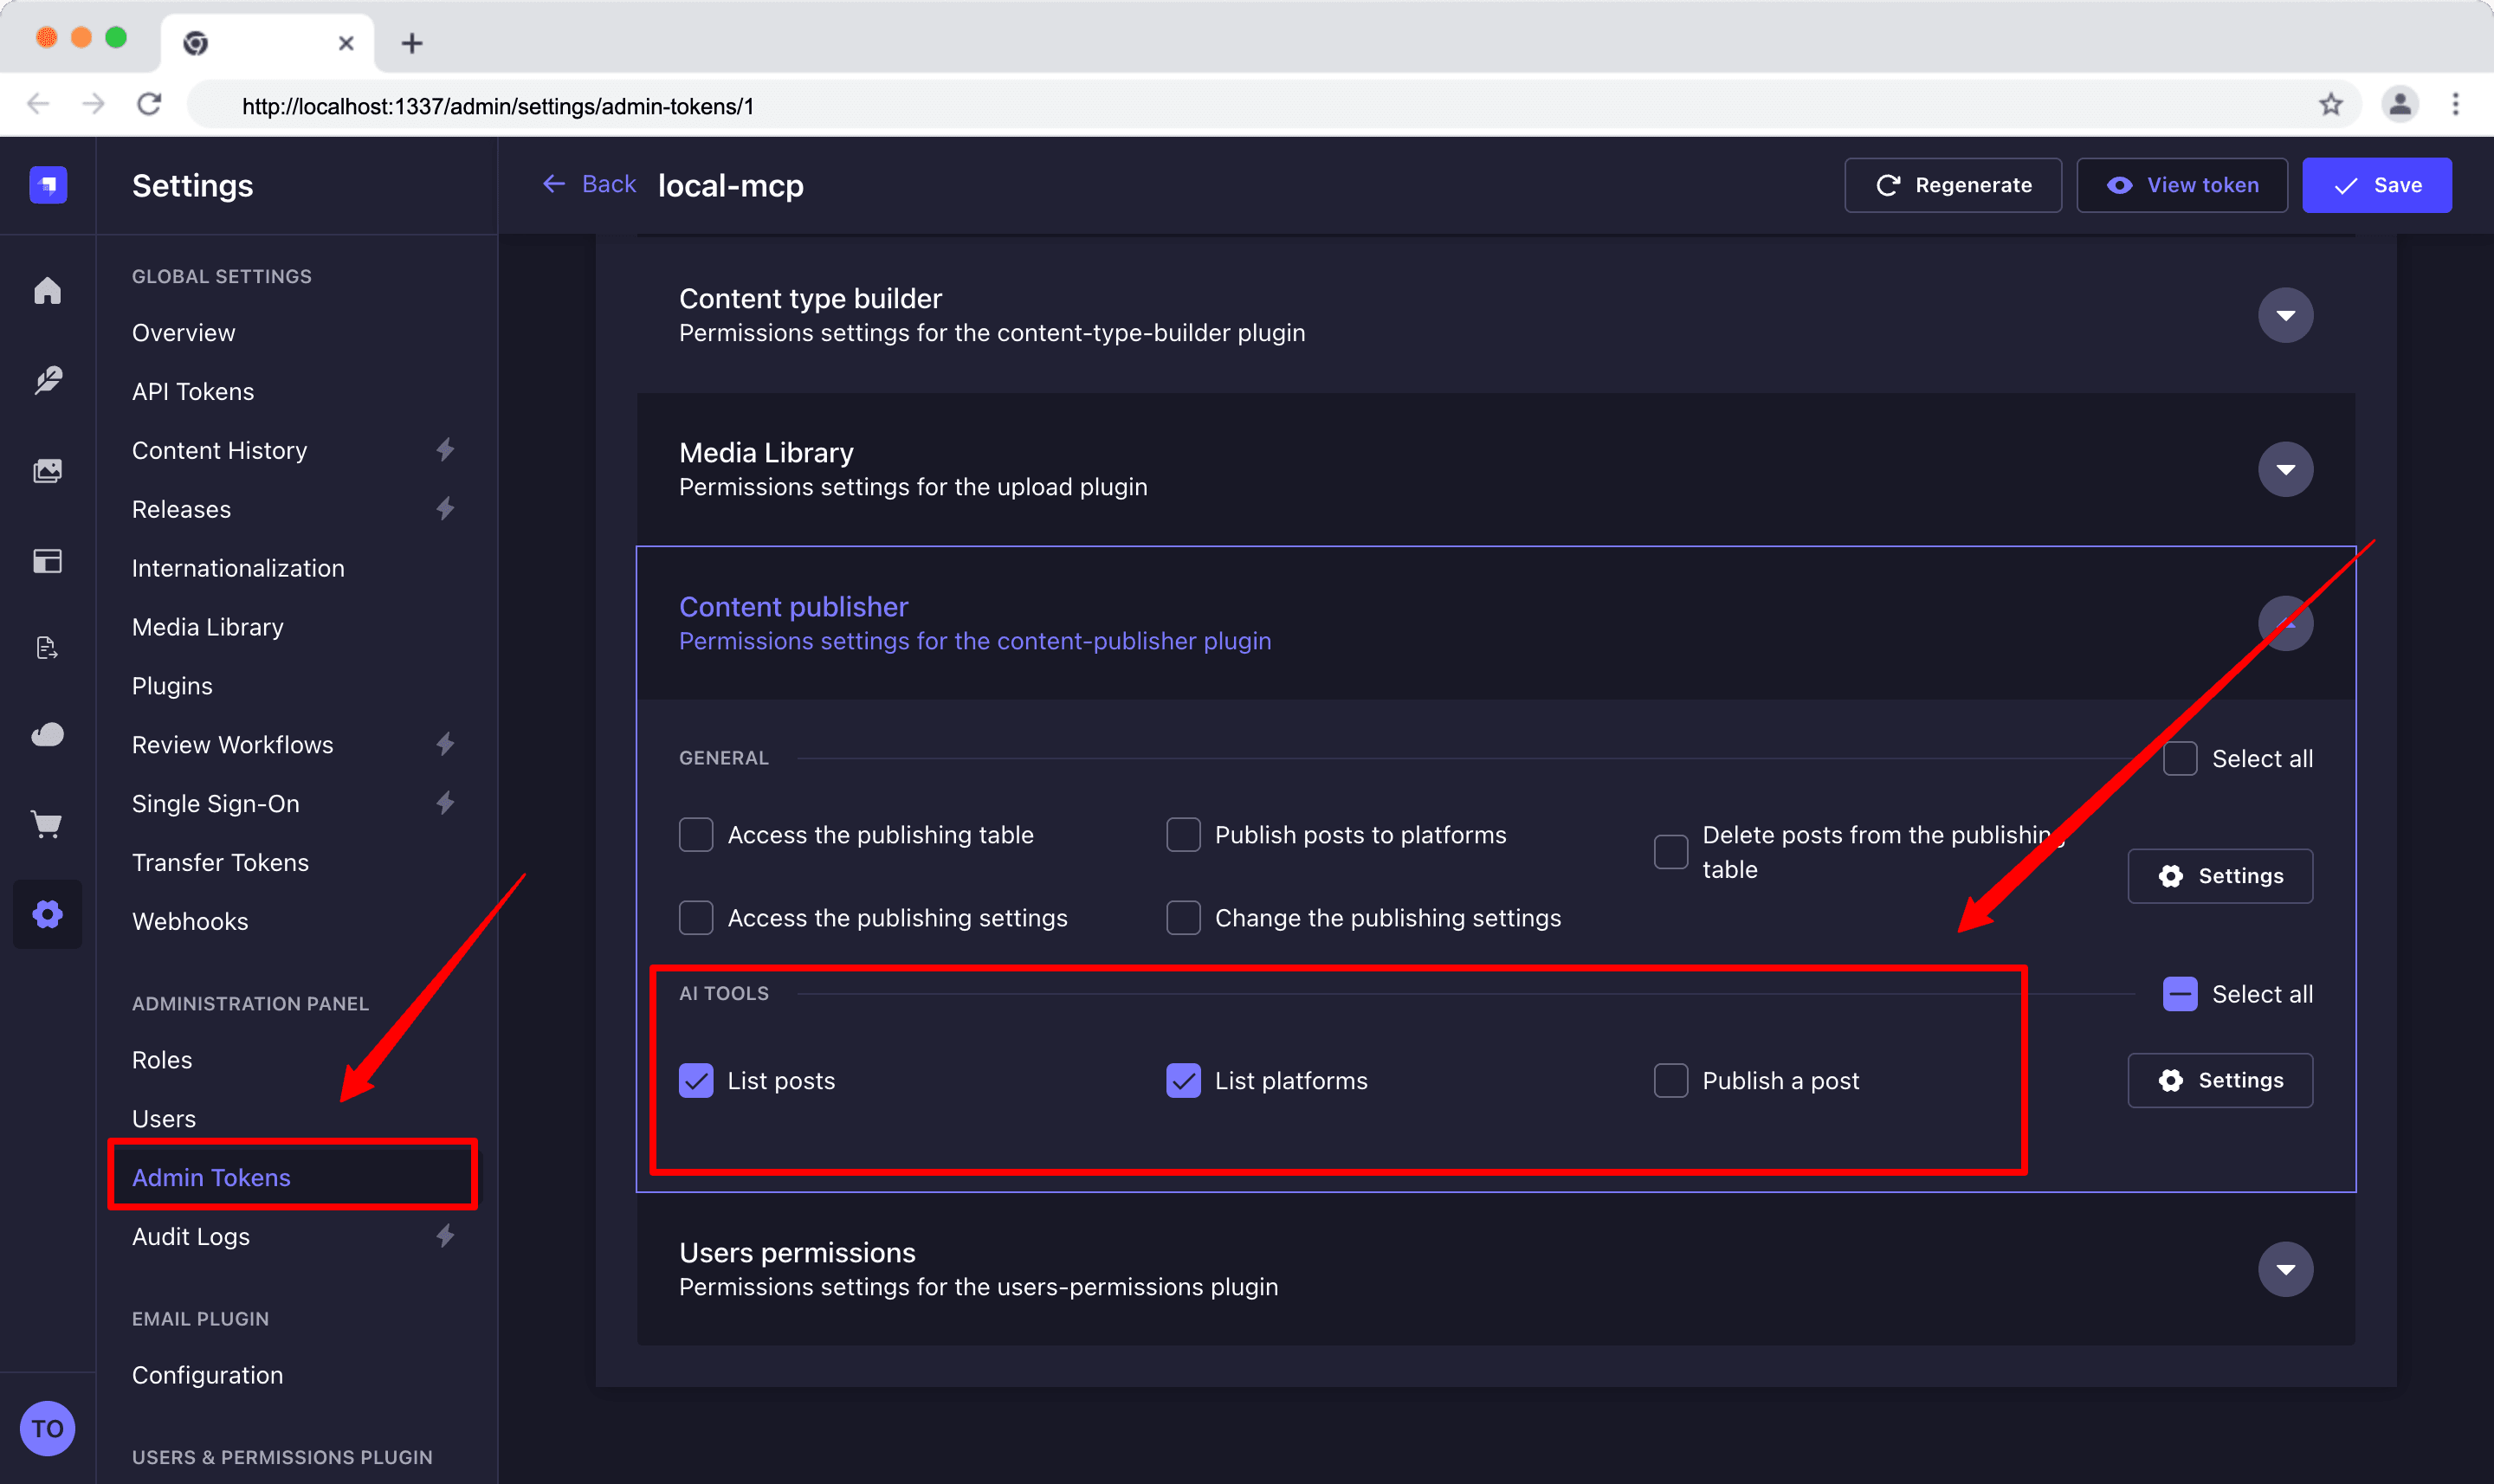
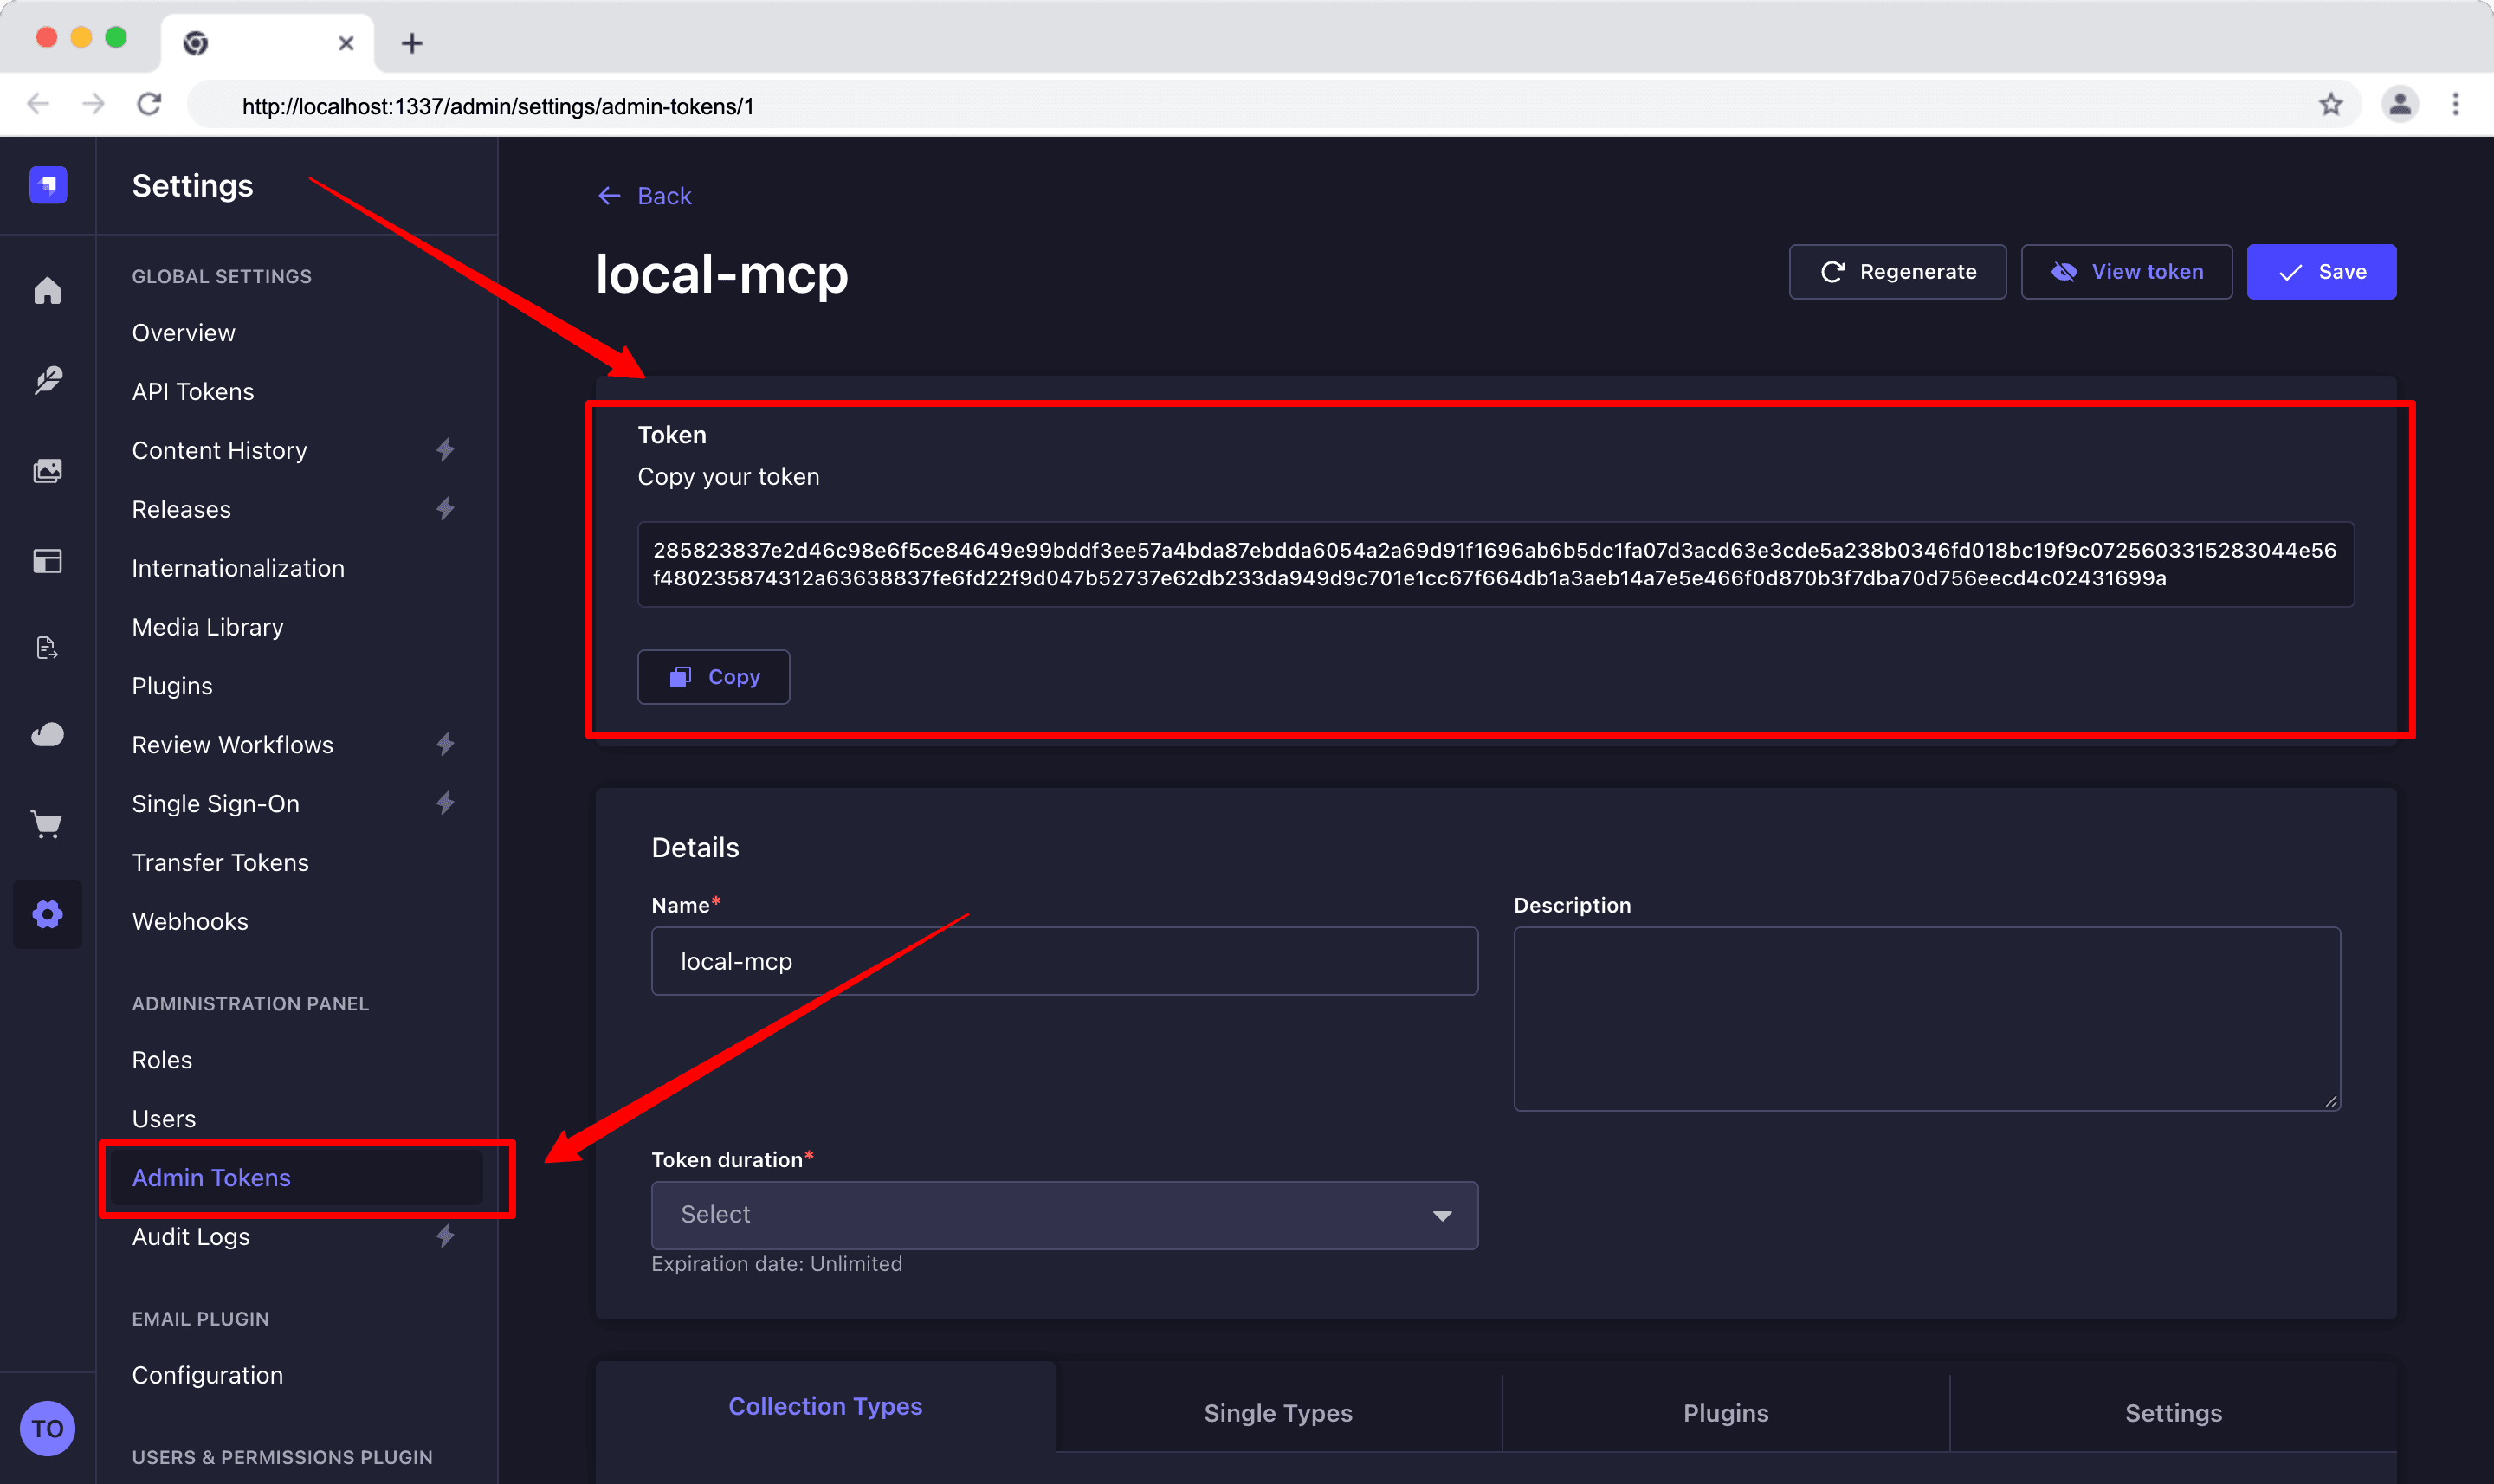
The MCP server only accepts admin tokens, and a token only sees the tools it has permission for. A missing permission doesn't produce an error; the tool just isn't in the list. Create a token under Settings → Administration Panel → Admin Tokens, open Plugins → Content Publisher, and tick what the client needs under AI tools.
Point a client at Strapi without committing the token:
{
  "mcpServers": {
    "strapi": {
      "type": "http",
      "url": "http://localhost:1337/mcp",
      "headers": { "Authorization": "Bearer ${STRAPI_MCP_TOKEN}" }
    }
  }
}
To check the permission works, untick "Publish a post" on the token and reconnect. content_publisher_publish_post should disappear from the client's tool list while the two list tools stay.
One warning about this design: renaming a permission uid is a breaking change. When the tools moved from a shared permission to one each, every existing token lost them until the new boxes were ticked.
Step 12: Adding the AI Chat with Approval Before Publishing
The chat lets editors ask in plain English what has been published where, and publish posts by asking. It's built with the Vercel AI SDK:
npm install ai @ai-sdk/anthropic @ai-sdk/mcp @ai-sdk/reactIt works in 3 parts: it only gets the tools the editor's role allows, it asks before every publish, and the chat window shows that question as a card.
1. Only the tools the editor's role allows
The chat connects to Strapi's MCP server with one shared admin token, so the plugin checks the logged-in editor's role first and removes every tool that role isn't allowed to use:
// server/src/services/chat/read-access.ts (trimmed)
export const isAllowed = (name: string, access: ChatAccess) => {
  if (name === PUBLISH_TOOL) return access.canPublish && access.pluginTools.includes(name);
  if (name in PLUGIN_TOOLS) return access.pluginTools.includes(name);
  const slug = name.match(/^(list|get)_(.+)$/)?.[2]; // "list_blog" → "blog"
  return Boolean(slug) && access.readable.includes(slug);
};
For example, an editor who can read Blogs but not Tutorials gets list_blog, but not list_tutorial.
2. Asking before every publish
The agent pauses before calling the publish tool and waits for the editor's answer:
// server/src/services/chat/agent.ts (trimmed)
const agent = new ToolLoopAgent({
  model: anthropic(model),
  tools,
  toolApproval: { content_publisher_publish_post: 'user-approval' },
  // signs approval requests so the browser can't forge an "approved" answer
  experimental_toolApprovalSecret: String(strapi.config.get('admin.auth.secret')),
});
3. The chat window
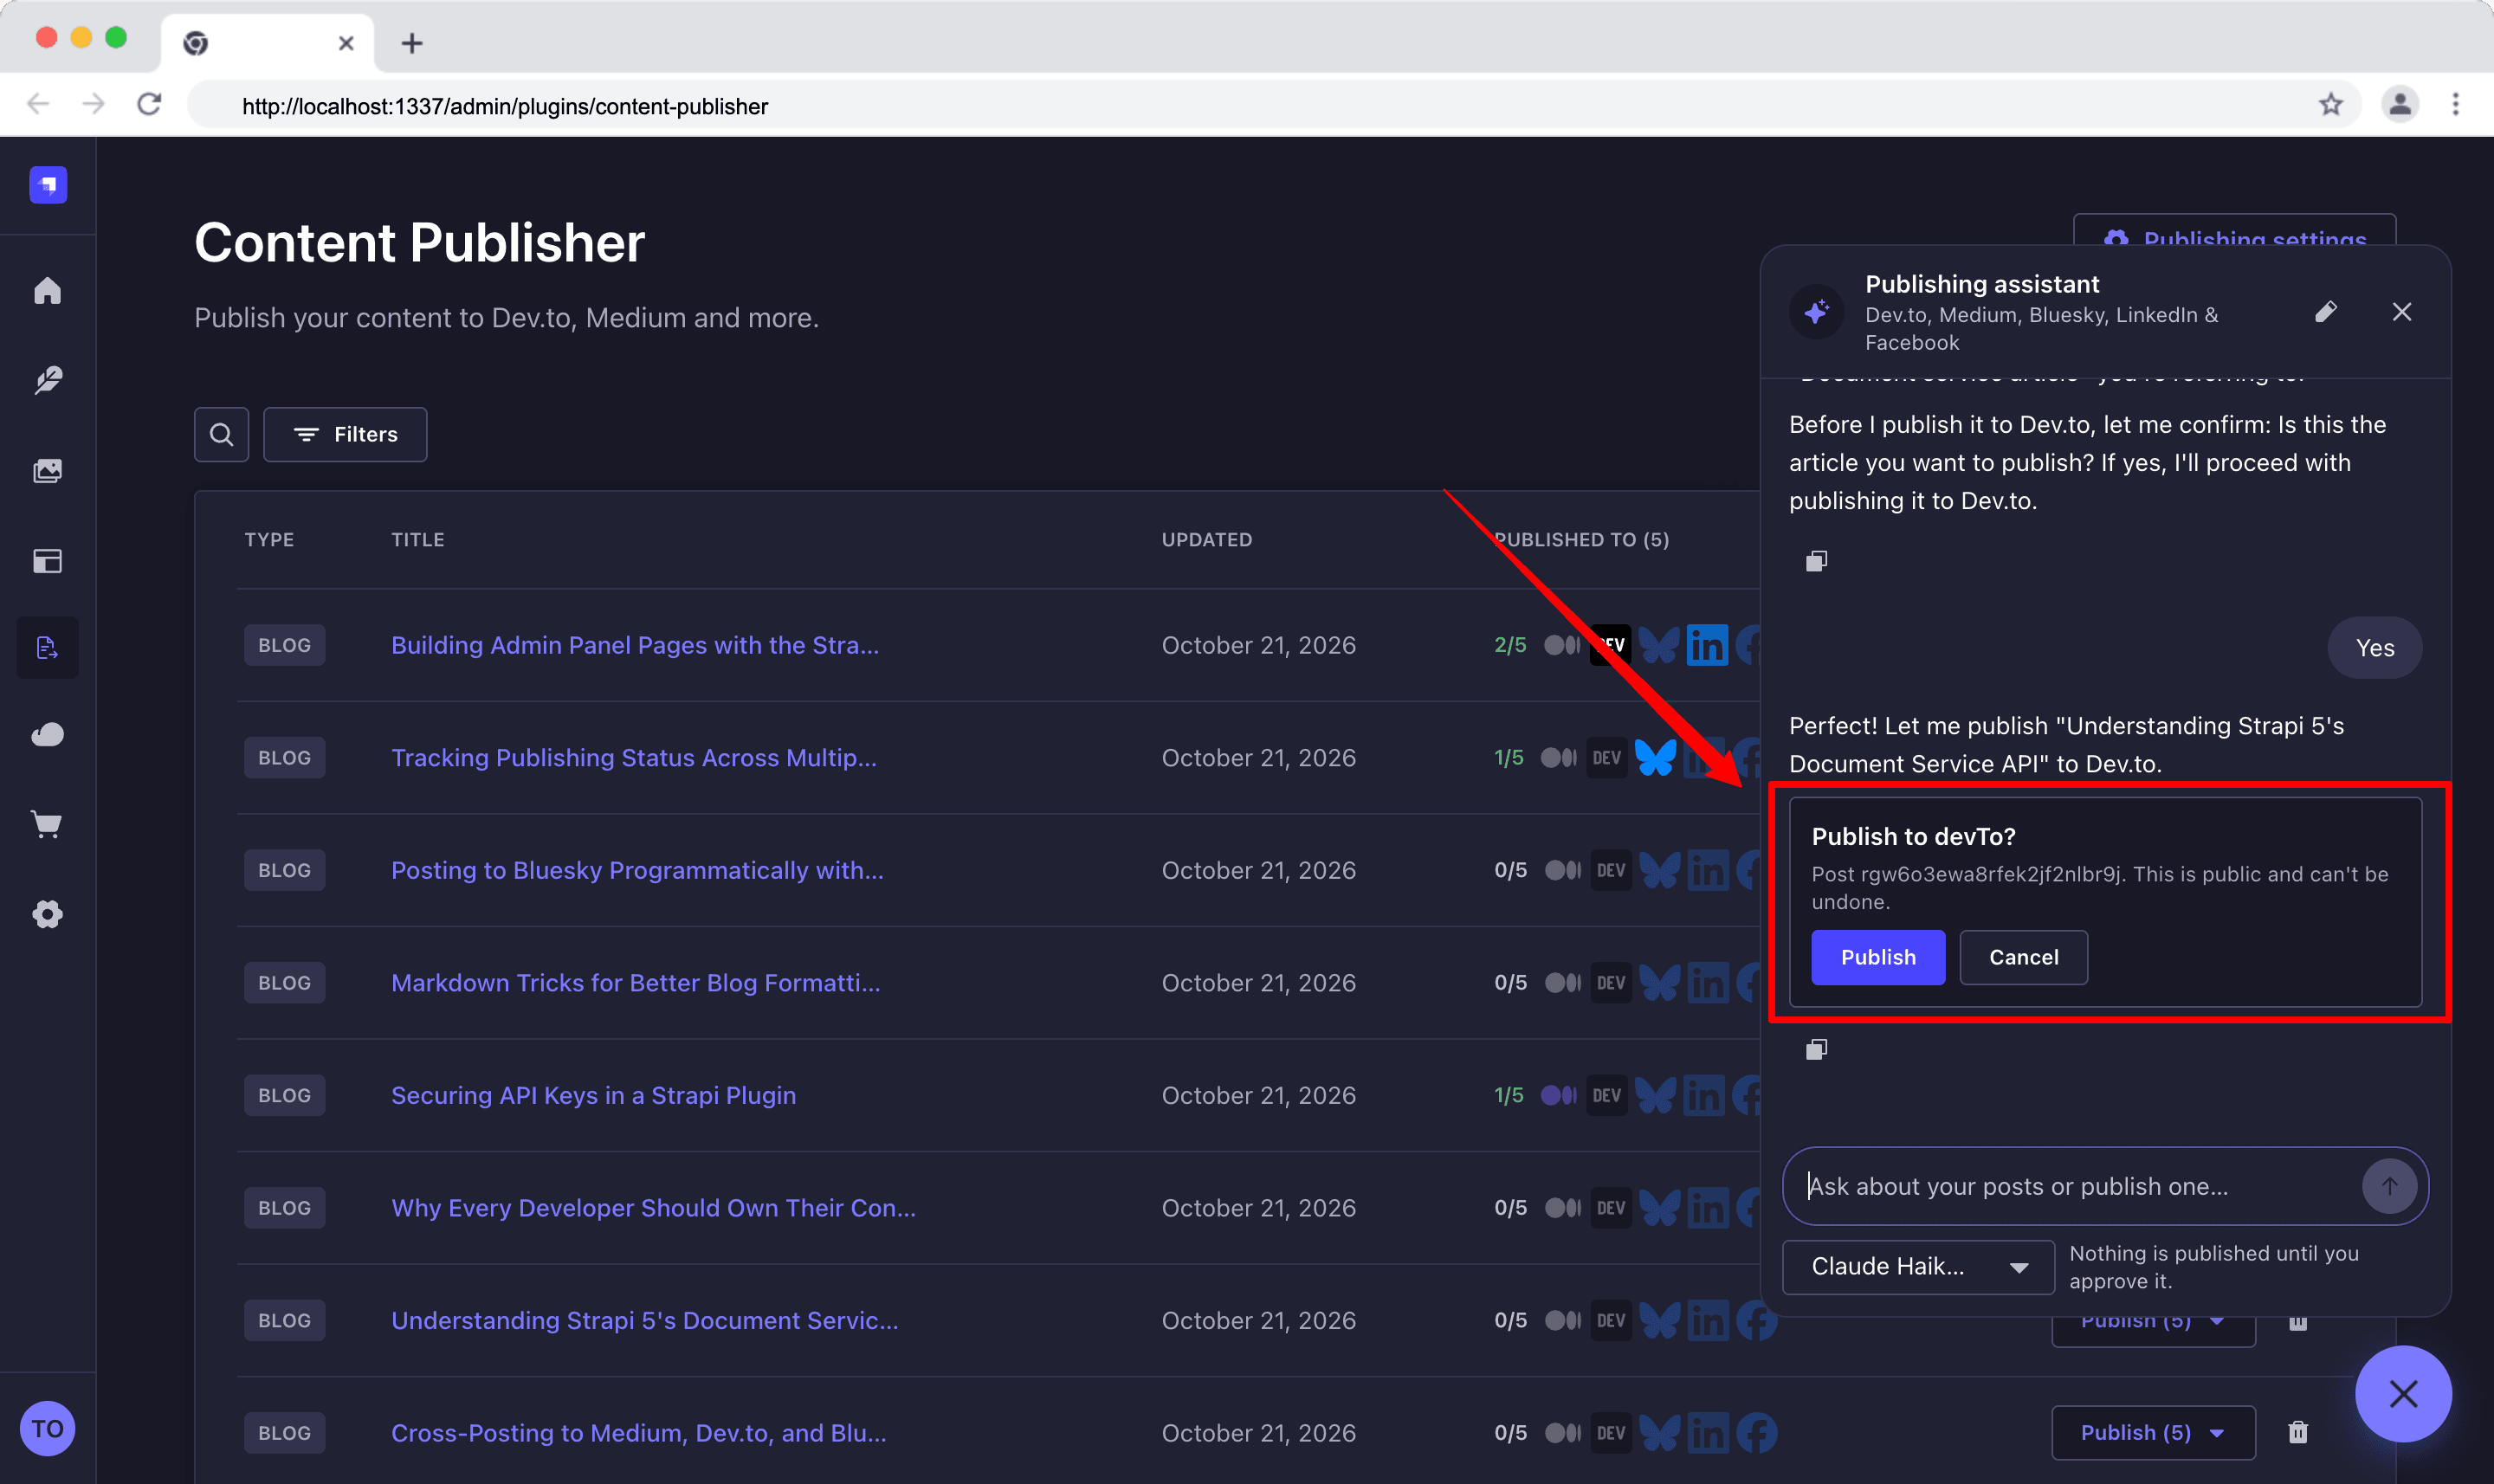
In the admin, useChat sends each message to the plugin's /chat route with the editor's login token. When the AI wants to publish, the chat shows a card with two buttons:
// admin/src/components/chat/ToolCall.tsx (trimmed)
<Typography>{`Publish to ${part.input?.platform}?`}</Typography>
<Button onClick={() => onRespond(part.approval.id, true)}>Publish</Button>
<Button onClick={() => onRespond(part.approval.id, false)}>Cancel</Button>
Clicking a button sends the answer back to the server, which publishes or stops.
App Demo and Test
Testing Connection
Publishing to Dev.to
Publishing to Bluesky
Publishing via Chat
Publishing using Injected Component
1. Publishing to Medium
2. Publishing to LinkedIn
Other Testing
- A restricted role. Give a role only "Access the publishing table". It should see the table with no Publish menu or Delete button, and a direct
POST /content-publisher/posts/:id/publish/devToshould get a 403. - A draft. Drafts never appear in the table. Open one in the Content Manager, and the panel should say "Publish this entry first". Ask the chat to publish it, and the tool should come back with "Publish it in Strapi first."
- Admin token scope. Untick each AI tools permission and confirm its tool disappears.
- The chat's approval. Ask it to publish and check nothing goes out until you click Publish.
- Images. With local uploads, image URLs point at
localhost, which Dev.to can't fetch. That's why a Dev.to post can end up without its cover image. Use an upload provider with public URLs before you publish images.
Conclusion
In this article, you learned how to build a Strapi 5 plugin that publishes content to other platforms. Along the way, you saw how to:
- Track entries with a hidden content type and keep it in sync with lifecycles
- Keep all the publishing logic in one service that every part of the plugin calls
- Protect routes, buttons and AI tools with RBAC permissions
- Add a panel to the Content Manager with an injection zone
- Add custom tools to Strapi's MCP server
- Build an AI chat that follows the editor's role and asks before it publishes The same ideas work for any plugin you build, with or without AI.