Introduction
Marketing teams ship a lot of pages that share the same structure but differ in content and section order (for example, a hero, feature grid, rich text, etc.). Hard-coding each layout works until editors want to rearrange things, and then every change becomes a developer ticket.
Dynamic Zones in Strapi solve this by giving editors a block composer, but the obvious implementation renders each block as a client component that fetches its own data, creating a request waterfall before anything paints.
React Server Components give you a way out. This guide walks through building a Dynamic Zone with Strapi 5 and Next.js 16 that streams content progressively, with no client-side requests to the CMS.
In brief:
- Dynamic Zones in Strapi 5 let editors compose pages from reusable blocks, but rendering them as client components creates request waterfalls that delay first paint.
- React Server Components fix this by moving every CMS fetch to the server, so skeleton HTML streams to the browser before any Strapi data resolves.
- Strapi 5 removed the shared population strategy. You must declare population per block type with
onfragments, becausepopulate=*returnsnullfor nested media. - This guide walks through building a Dynamic Zone with Strapi 5 and Next.js 16 that streams content progressively, with no client-side requests to the CMS.
By the end, you will model the content schema in Strapi, set up a two-phase fetch so skeletons appear before any block data resolves, wire each block to its own async Server Component, and add draft preview using Strapi 5's status parameter.
Tutorial Outline
- Part 1: Modeling Content and Building a Streaming-Ready Fetch Layer
- Part 2: Rendering Blocks with Suspense, Caching, and Draft Preview
Prerequisites
To follow along in this guide, you will need the following:
- Node.js 22 or later
The waterfall problem
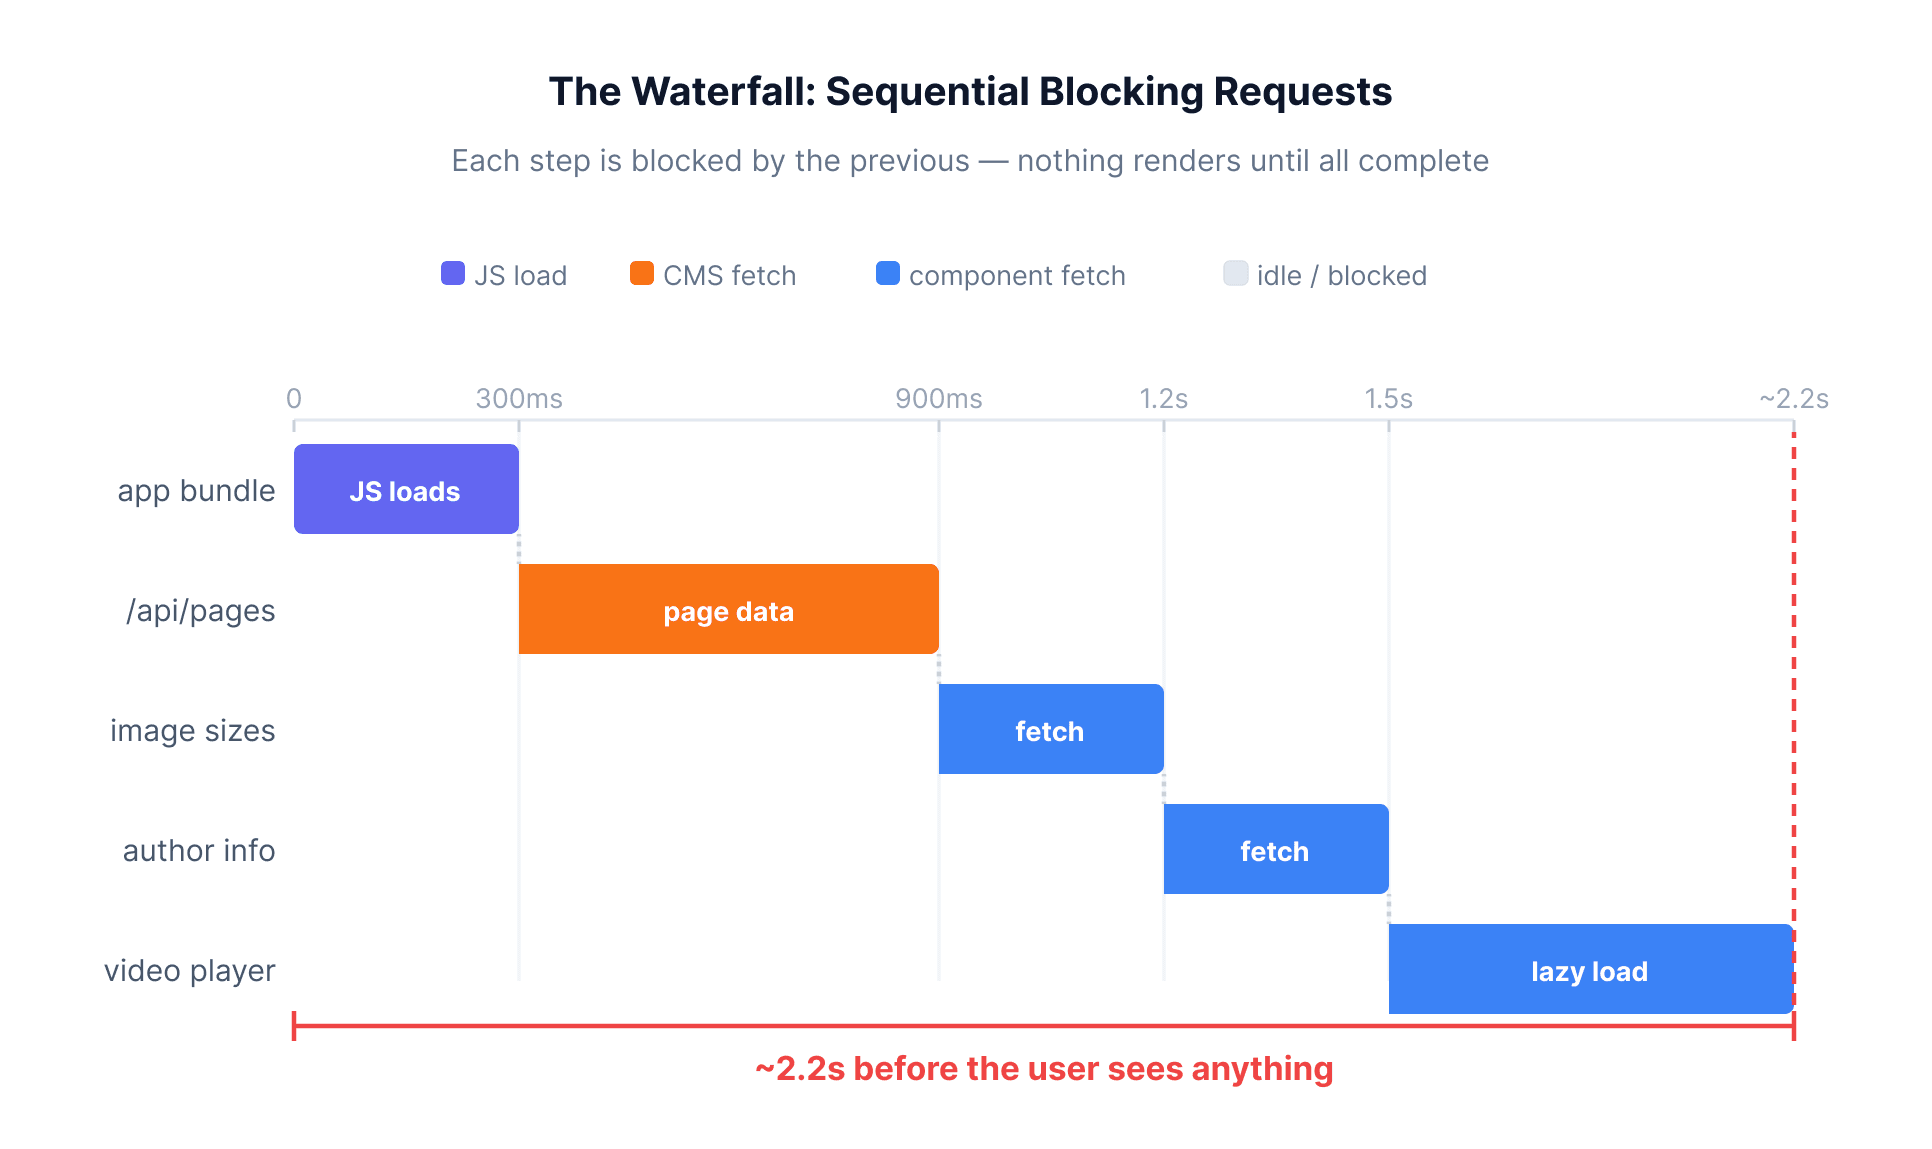
Let's start by looking at a common pattern found in early attempts to build dynamic, CMS-driven pages:
- When a visitor arrives, the web application running in their browser kicks off a request to fetch the content for a specific page from the backend API (for example:
/api/pages?filters[slug][$eq]=home). - Once the page data arrives, the application loops through a list of content blocks (for things like hero banners, testimonials, or videos) and renders each one using a component responsible for that type of block.
- But many of these components then trigger their own additional data requests. For example, an image block fetches different image sizes, a testimonial grid goes and loads author info, or a video block lazy-loads the video player.
This approach creates a chain of delays. Nothing on the page can be displayed until all the supporting JavaScript code has loaded, the initial data has been fetched, and each of these nested requests has also completed. The end result is that users have to wait longer to see the content, especially for marketing sites powered by a CMS.
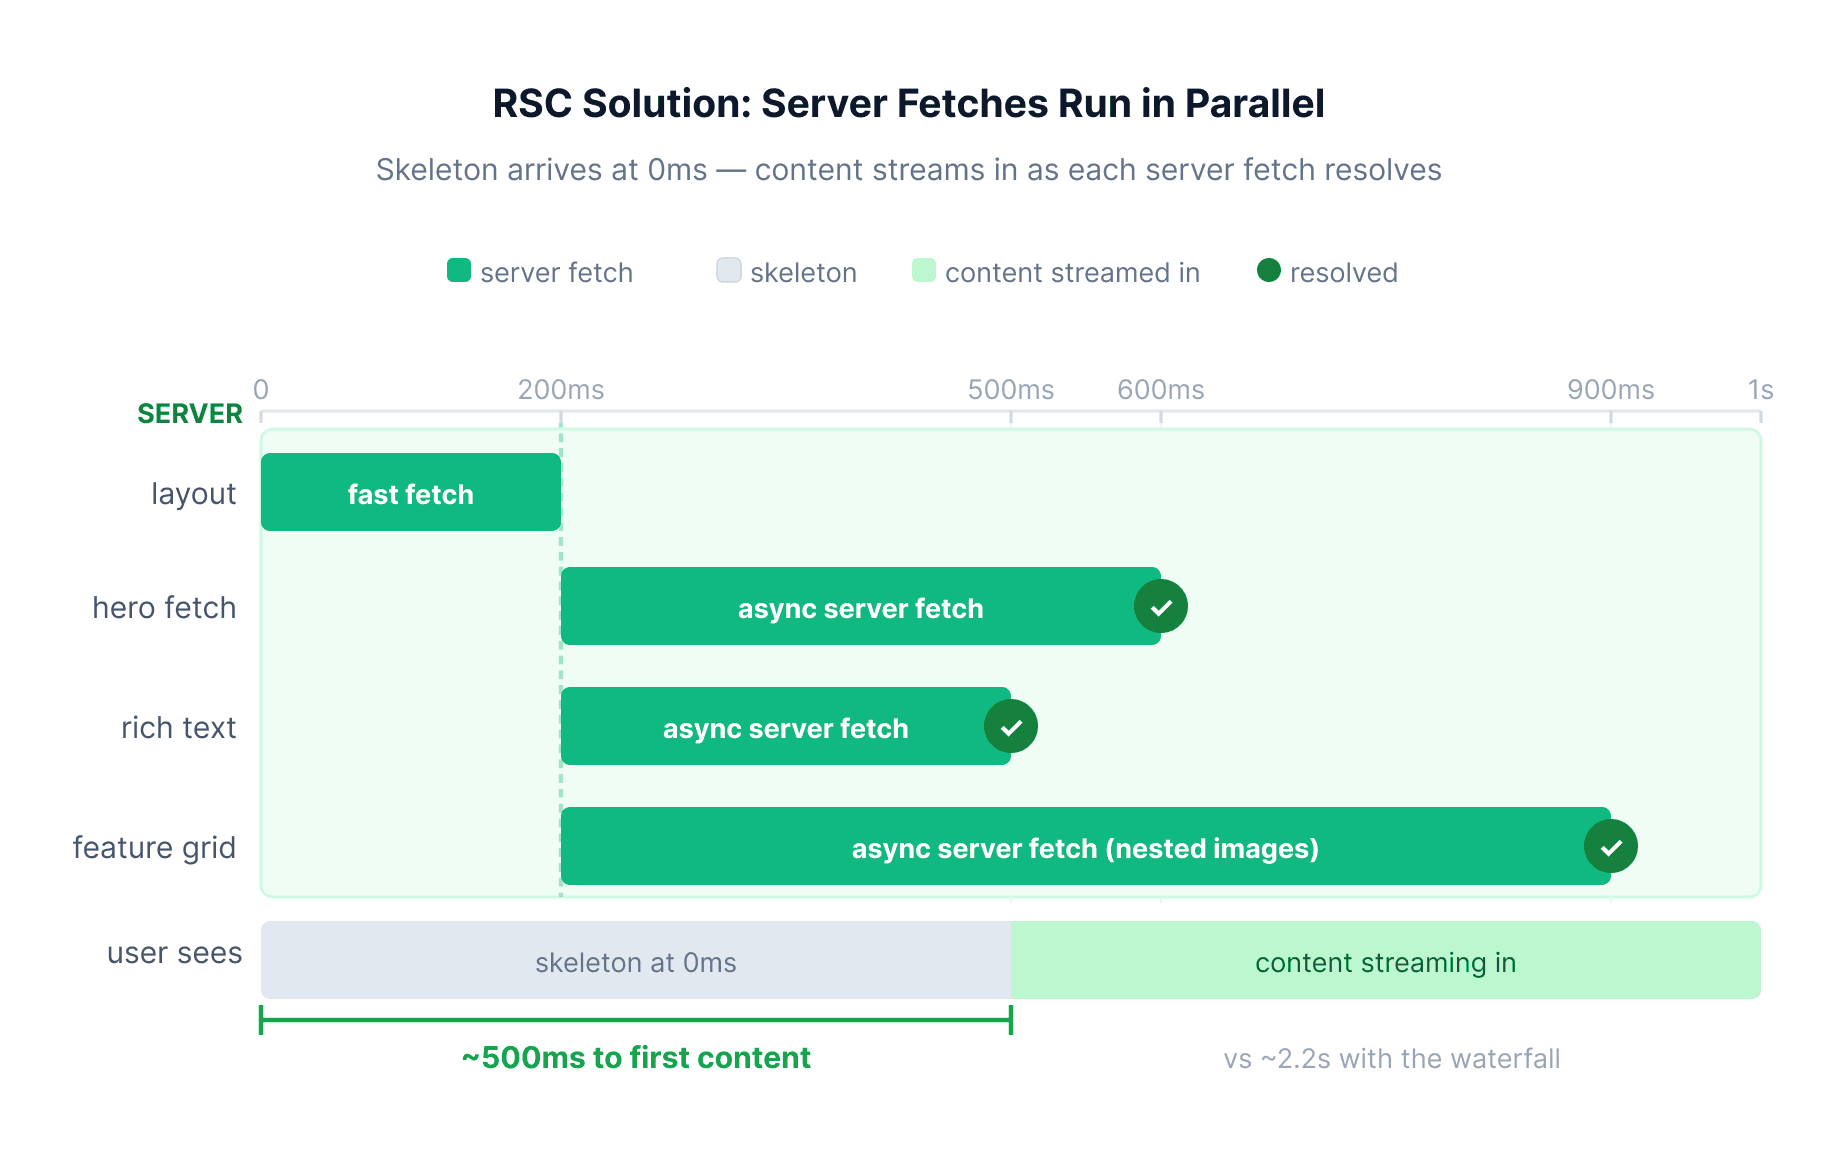
The better solution is to move these data fetches to the server, so the HTML can start arriving and rendering immediately (even before all data is resolved), making for a much faster and more user-friendly experience.
React Server Components give us that flexibility:
| Anti-pattern | RSC-friendly approach |
|---|---|
useEffect + fetch per block on the client | Per-block fetch in async Server Components, wrapped in Suspense |
Entire page marked 'use client' | Default to Server Components (all blocks stay on the server) |
| One giant loading spinner | loading.tsx + page-level skeleton + per-block skeleton fallbacks |
populate=* on every request | Explicit on fragments per block type |
Awaiting Strapi in page.tsx before any HTML | Return <Suspense> immediately & fetch layout inside an async child |
The sections that follow put this into practice. You will start with the Strapi content model, then configure population strategies, build the two-phase fetch, wire each block to its own async Server Component, and finally add draft preview.
Demo
Before diving into the code, here is the finished result in action. The skeleton appears instantly on navigation, and each block's content streams in as its server fetch resolves, with no client-side request to Strapi at all:
Target architecture
Before writing any code, it helps to understand the full request path. The diagram below maps what happens from the moment a visitor opens /home to each block's content streaming in through its own Suspense boundary.
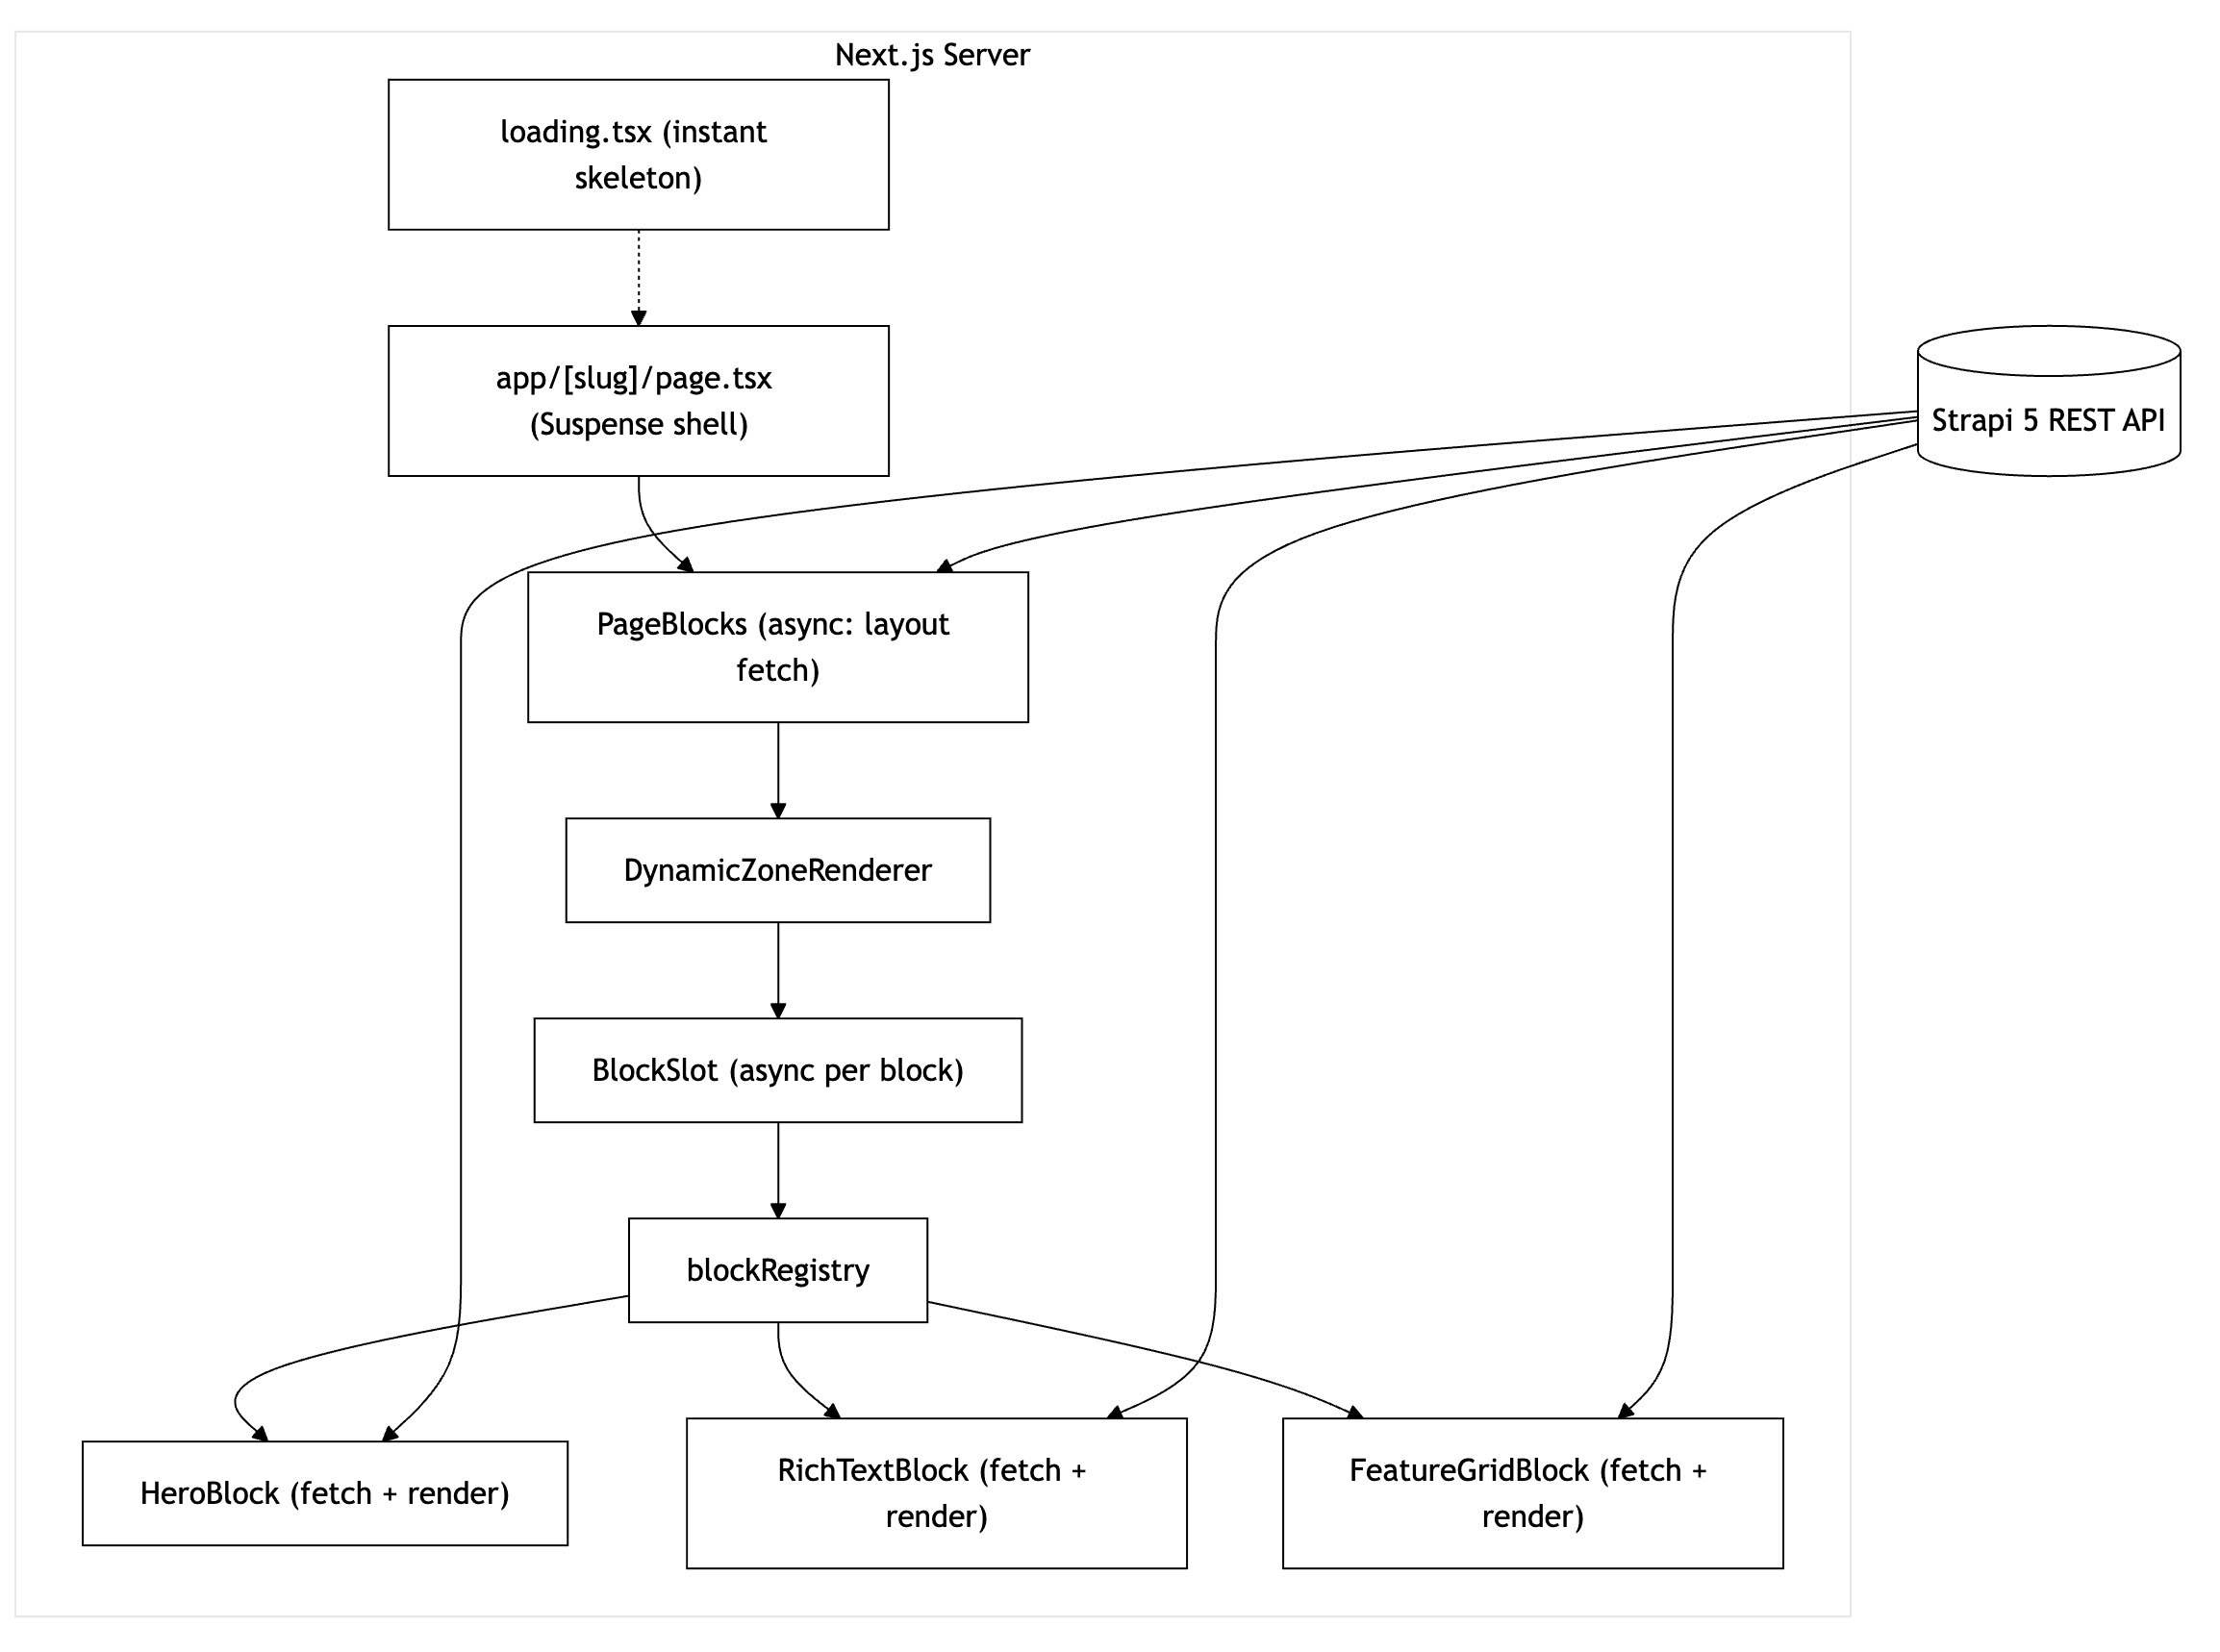
The architecture follows five rules that keep every data fetch on the server and every block independently streamable:
| Rule | What it means |
|---|---|
| Page owns the shell, not the data | page.tsx returns <main> and a Suspense boundary immediately. It does not await Strapi. |
| Layout fetch is small and fast | PageBlocks fetches only block id + __component values to learn page structure. |
| Blocks own their data | Each async block calls fetchBlockById on the server with on fragments scoped to that component. |
| Registry owns the mapping | __component maps to a React component. |
| Every block streams | Each block gets its own Suspense fallback so fast blocks paint before slow ones finish. |
Create the content model in Strapi
Let's start in Strapi by modeling the pages that editors will fill in. The goal is a Page collection type with a blocks Dynamic Zone containing three reusable components (a hero, a rich-text block, and a feature grid) that editors can arrange in any order. The table below summarises the full schema, and the step-by-step walkthrough that follows shows every click.
| Collection type | Fields |
|---|---|
| Page | title (Text), slug (Text), blocks (Dynamic Zone) |
| Component UID | Fields | Notes |
|---|---|---|
hero.hero | heading, subheading, ctaLabel, ctaUrl, image | Single media |
rich-text.rich-text | content | Rich text (Markdown) |
feature-grid.feature-grid | title, feature (repeatable → features.features) | Nested component |
features.features | heading, subtext, image | Single media |
Upload a sample image to the Media Library
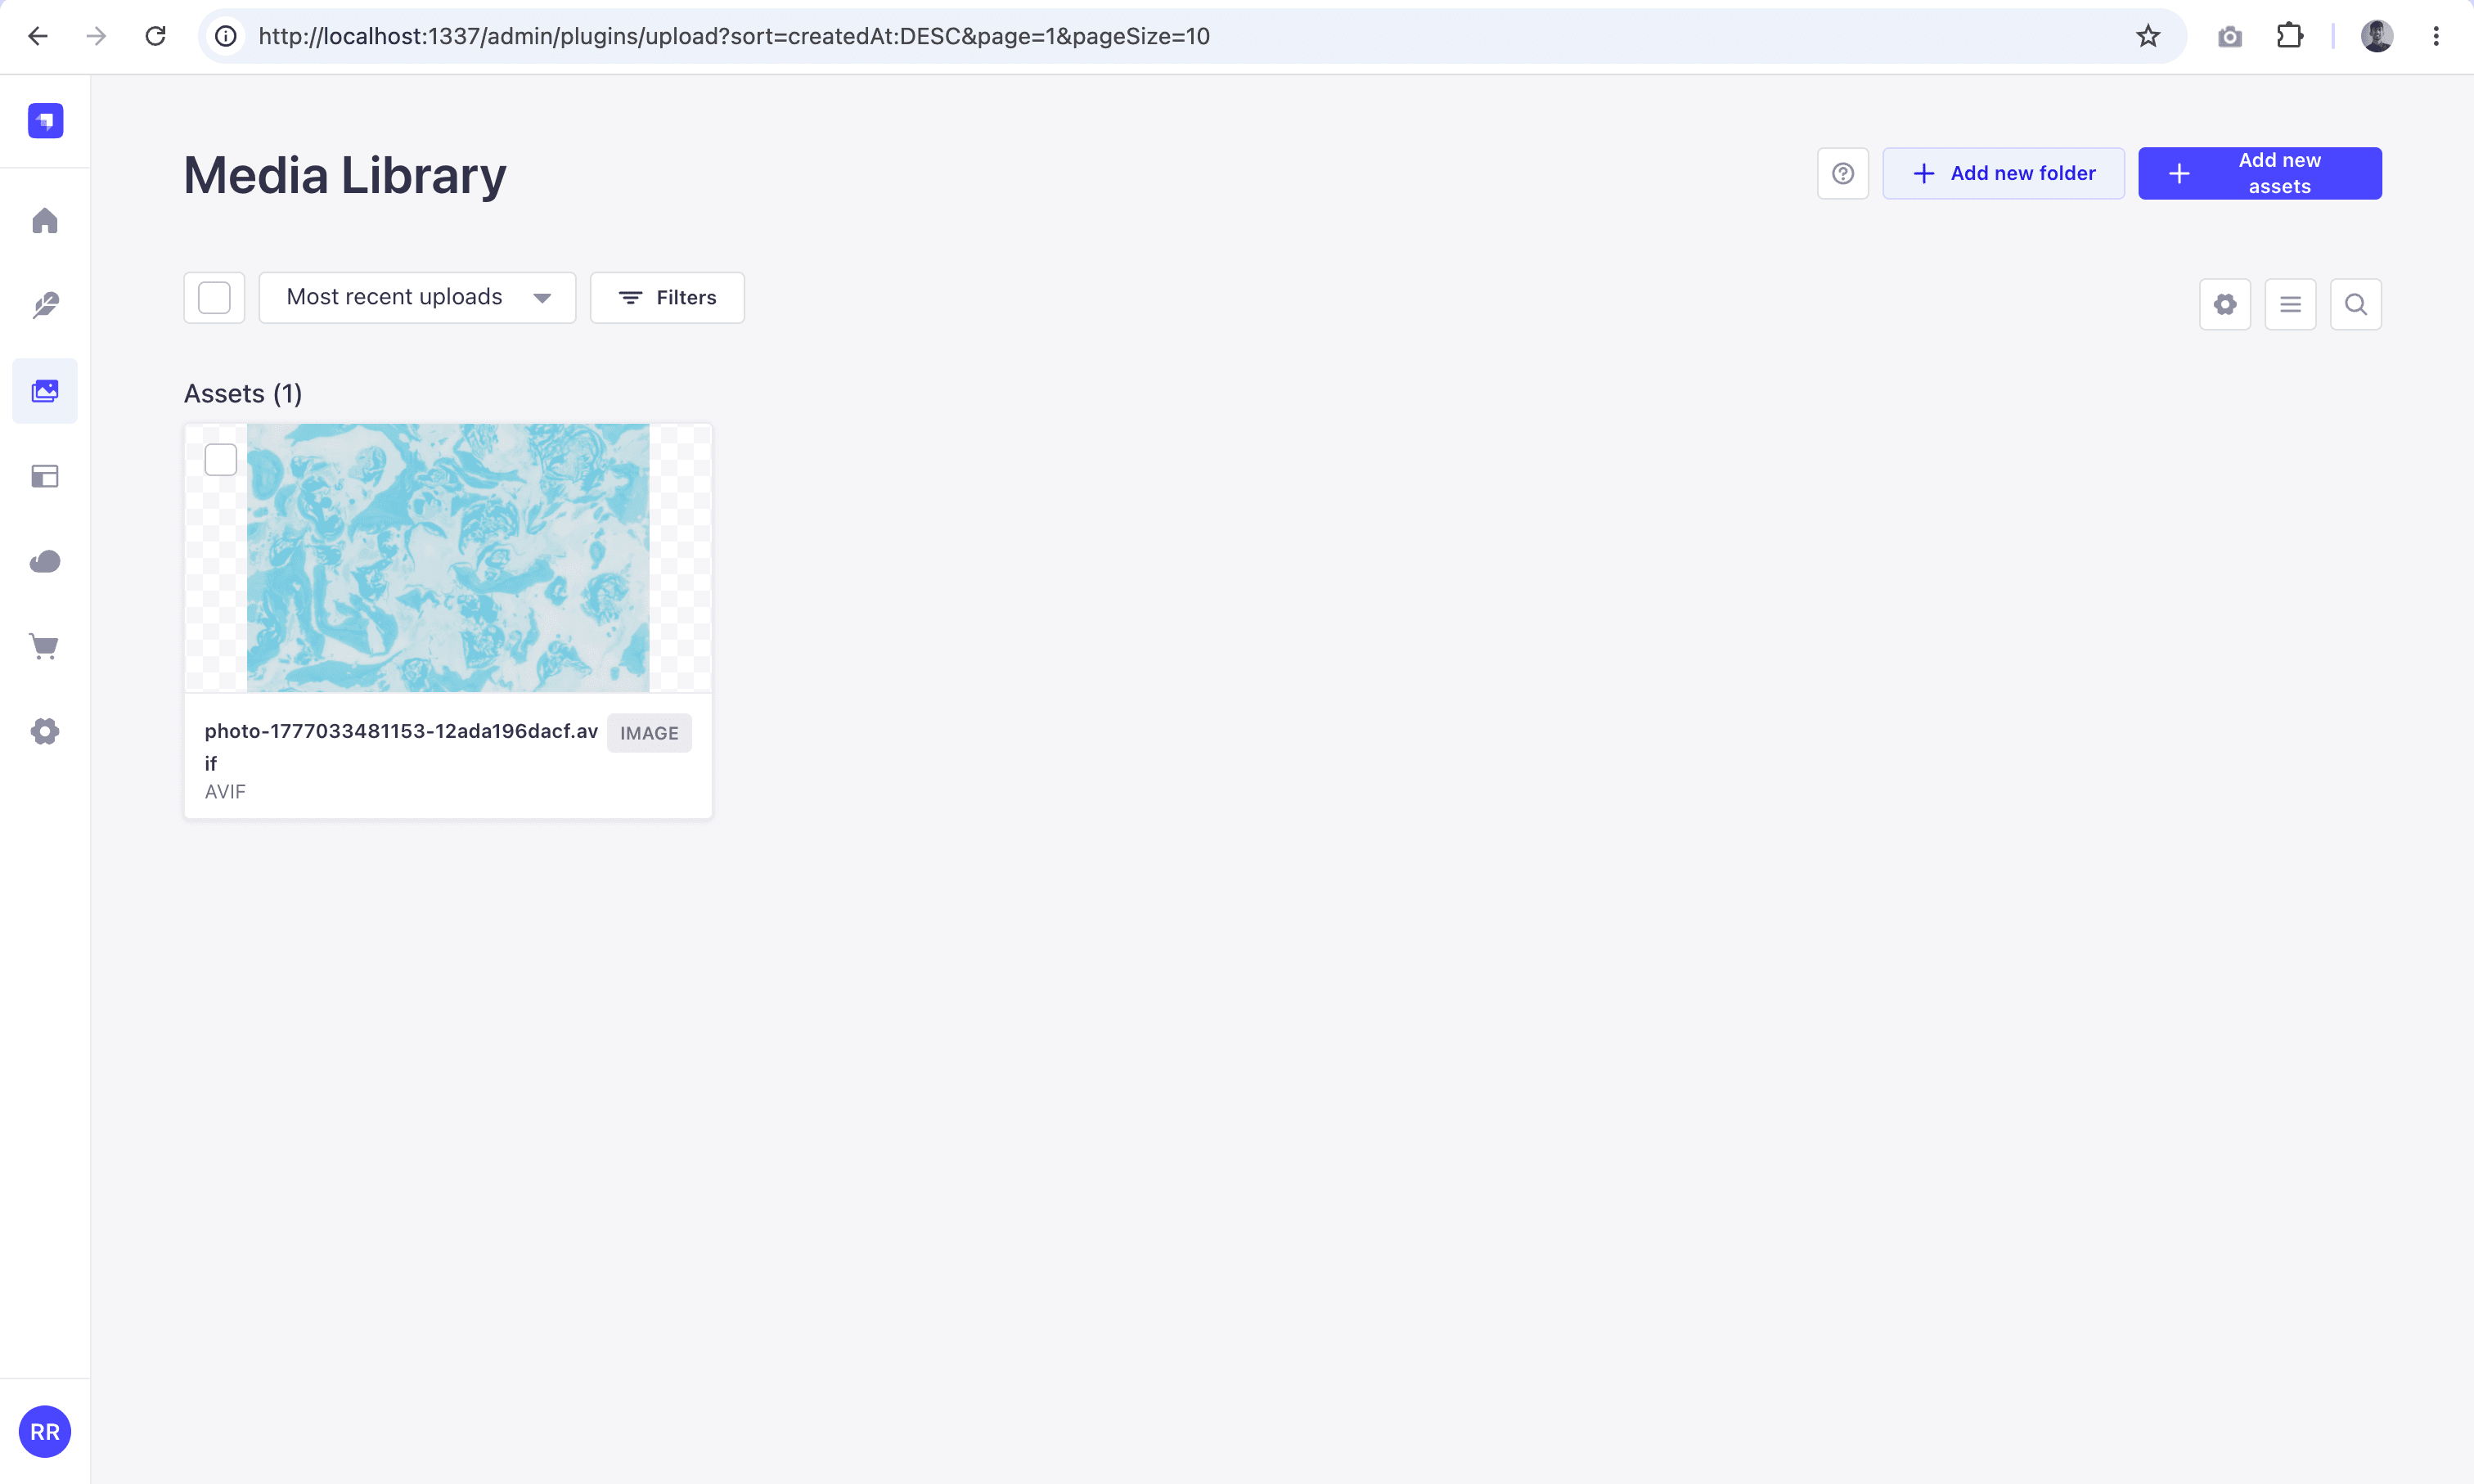
Before building any schema, upload a placeholder image so you can link it to the hero and each feature card as you fill in the example page. Open Media Library from the left nav, click Add new assets, and upload any image (AVIF, JPEG, PNG, or WebP).
Create the Page collection type
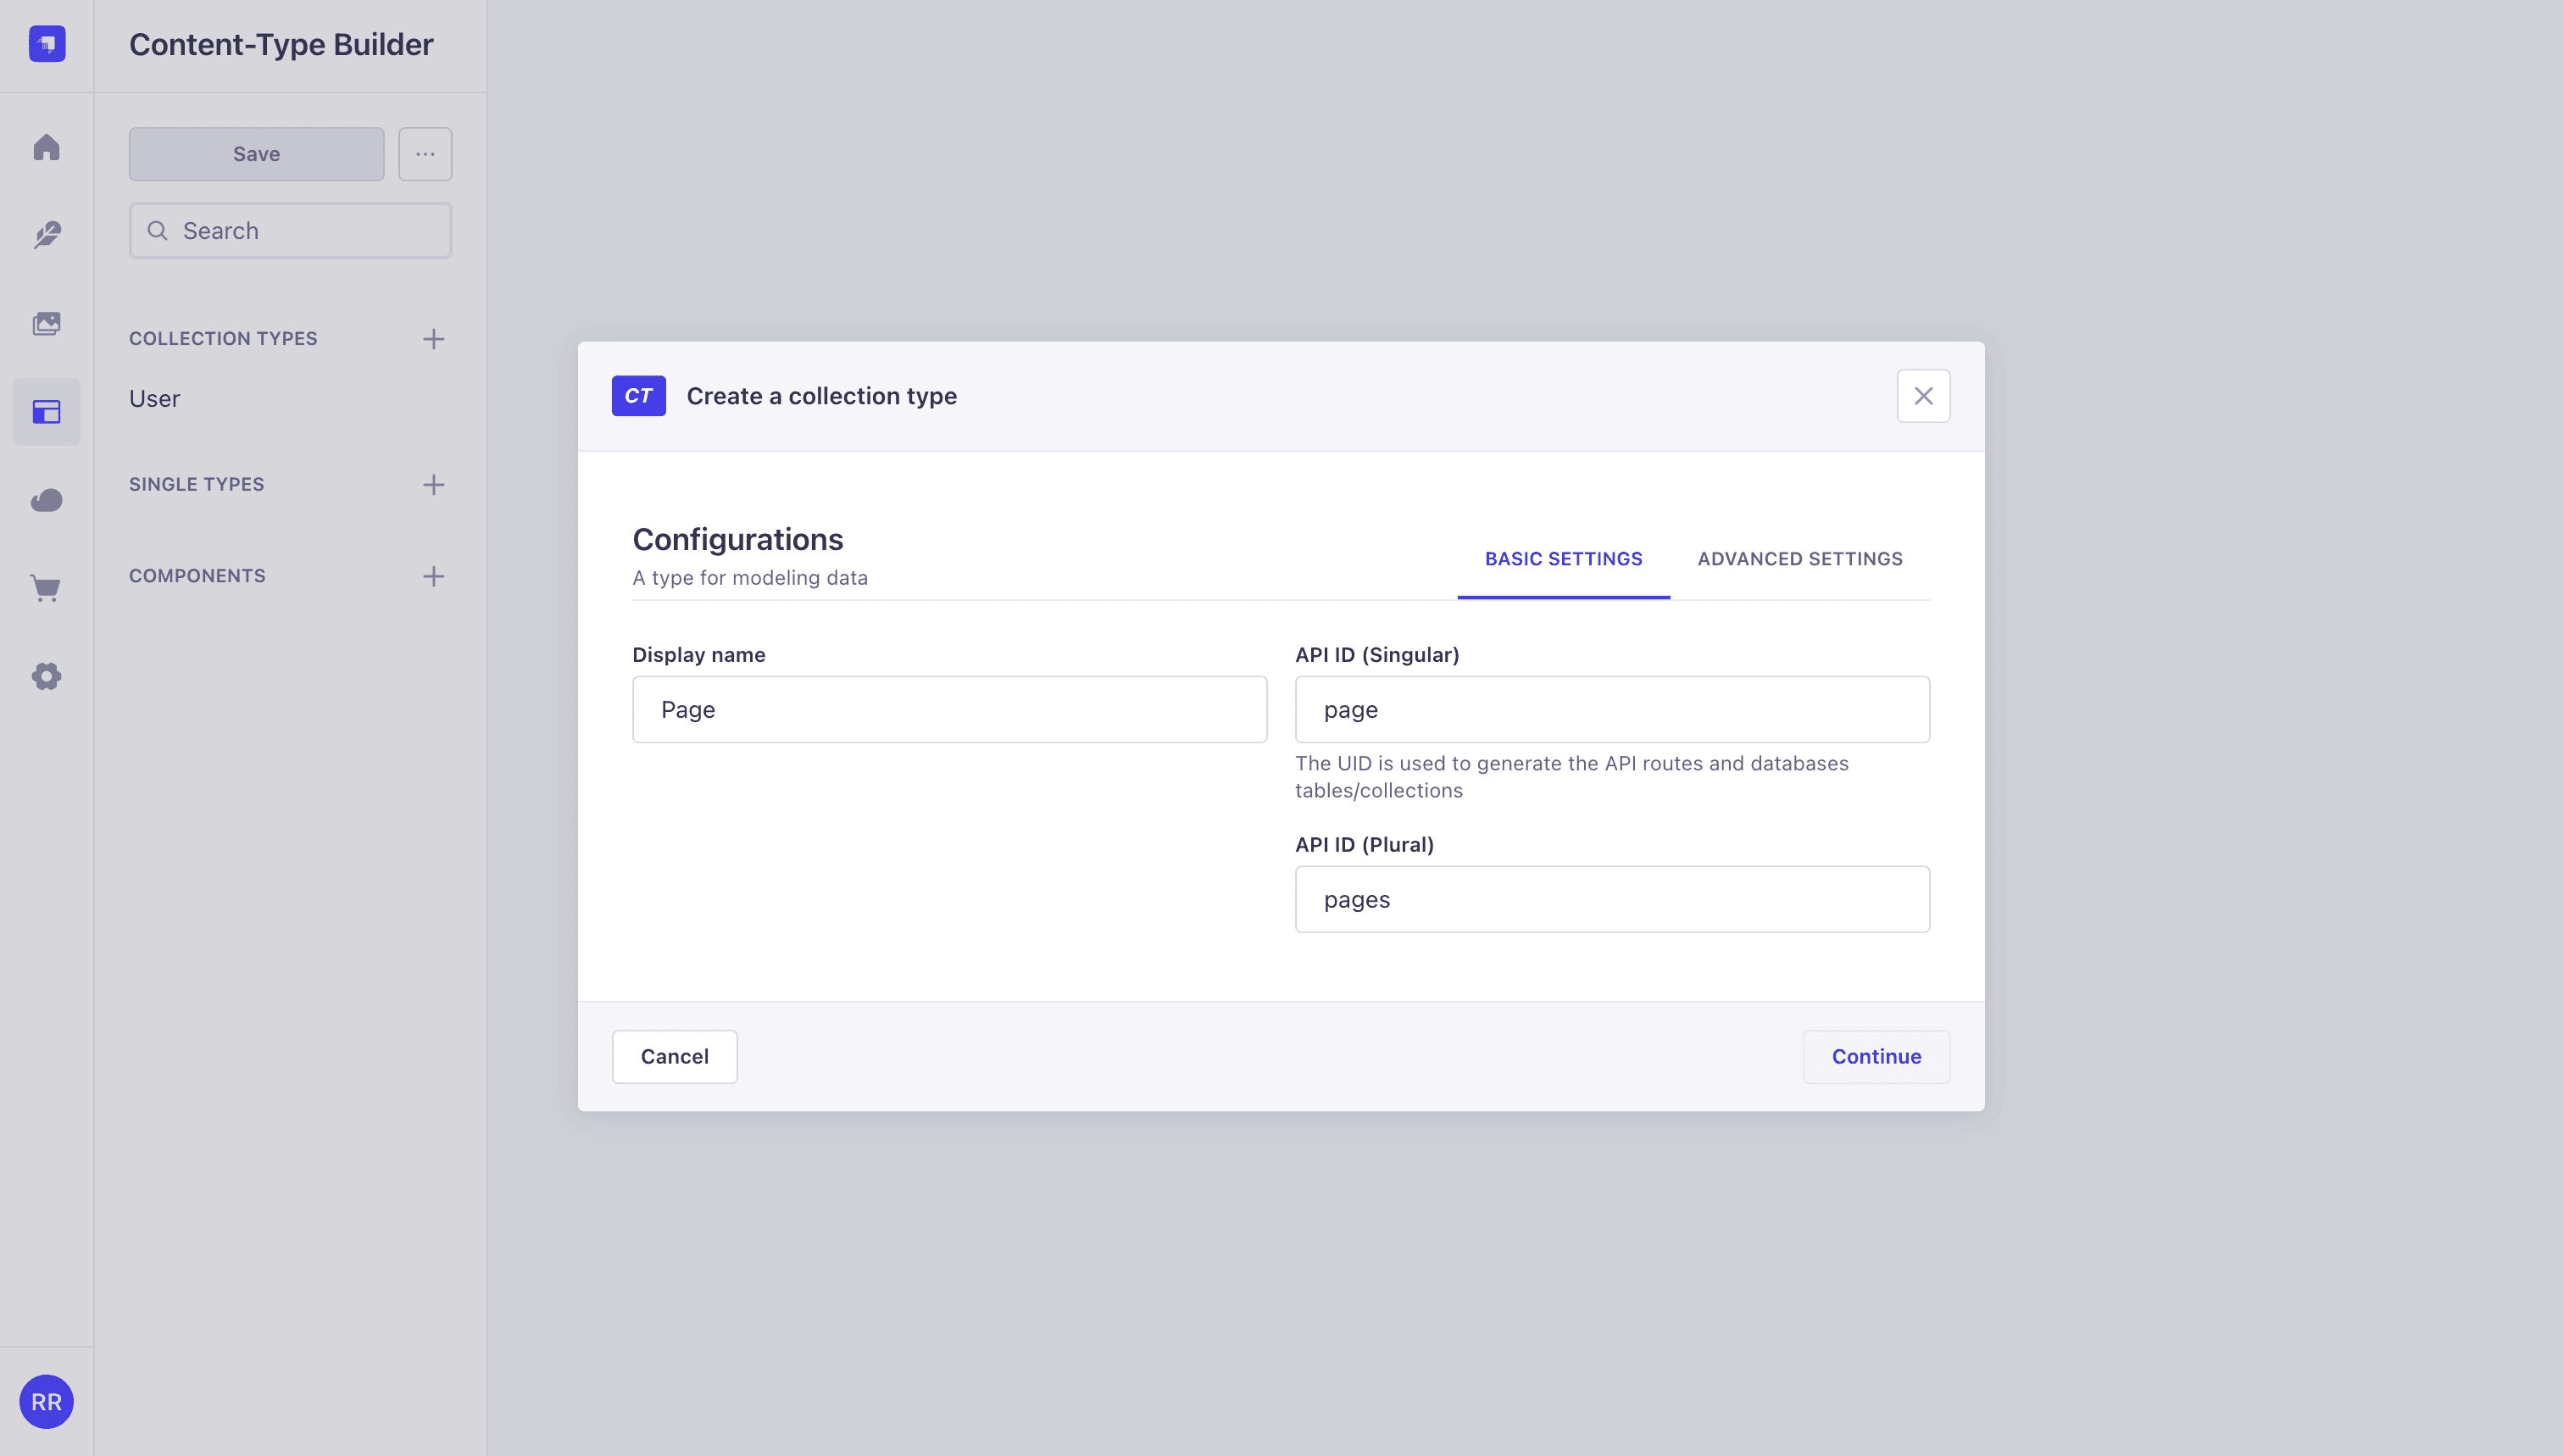
Open Content-Type Builder and click + next to Collection Types. Set the display name to Page. Strapi auto-fills the singular API ID (page) and the plural (pages).
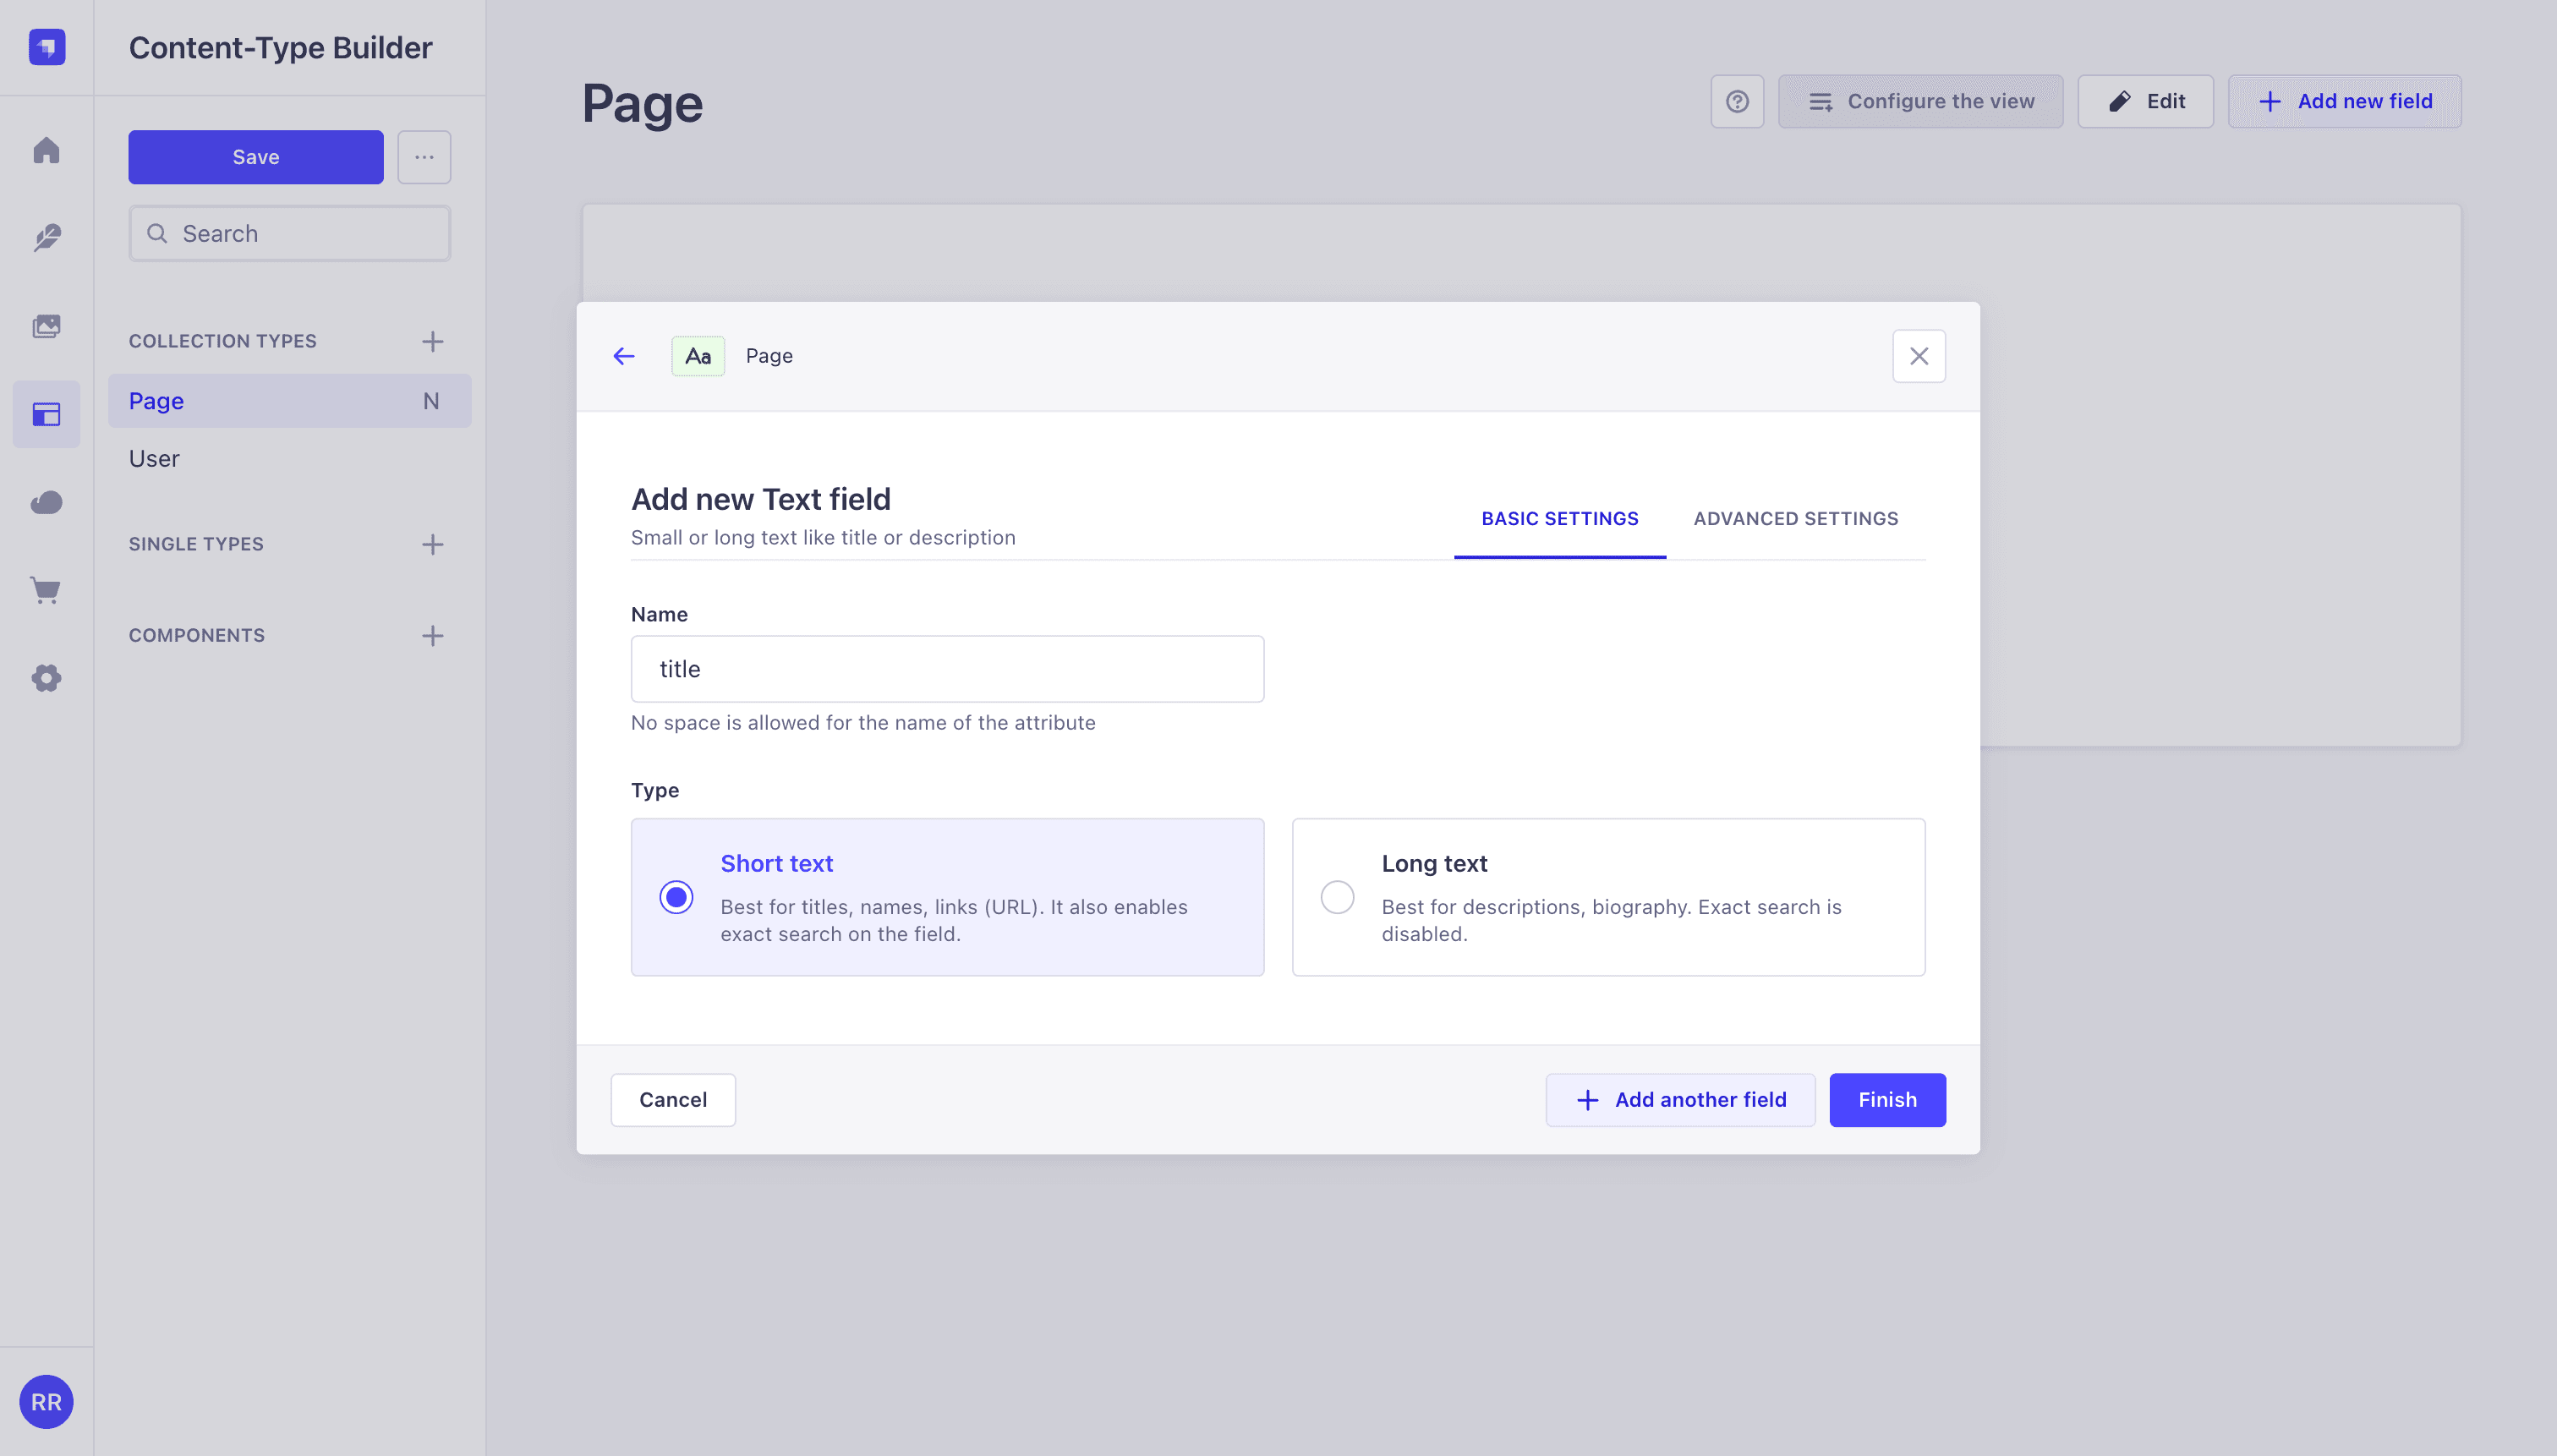
Click Continue. On the next screen, add a Text field (Short text) named title. Click Add another fieldand add a second Text field named slug.
Add the Dynamic Zone field
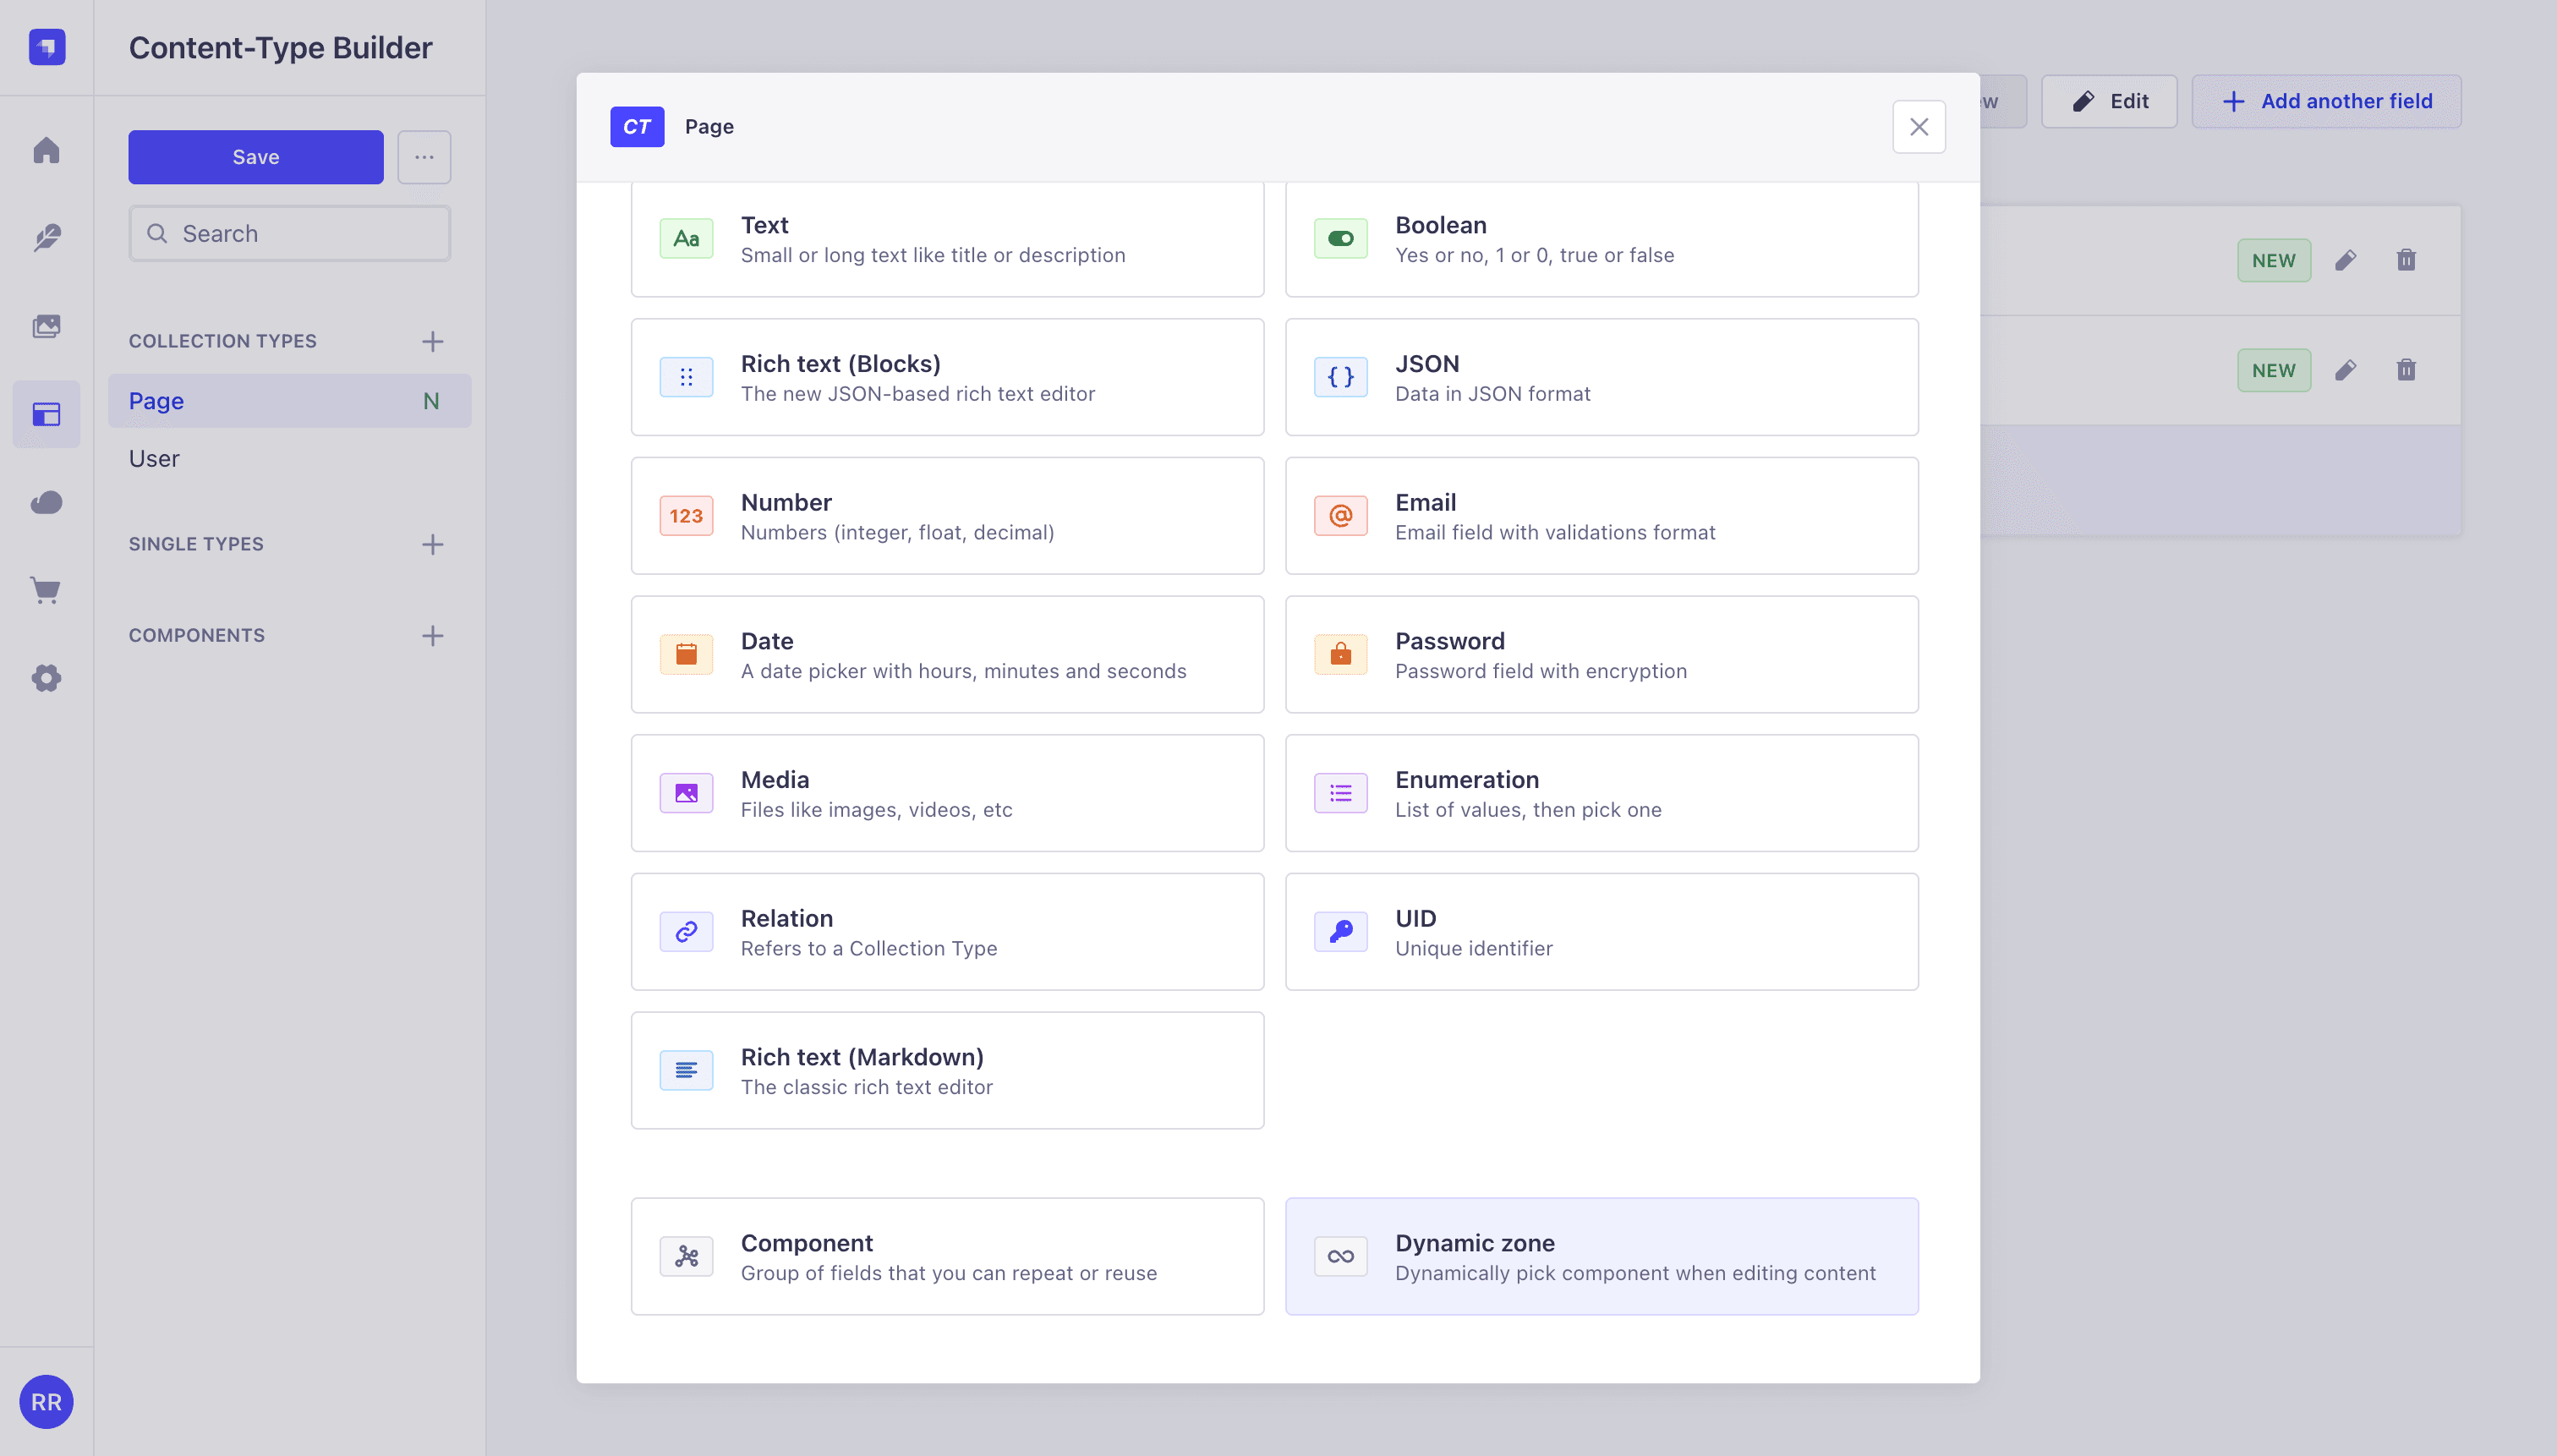
With title and slug in place, click Add new field again. When the full field-type picker appears, choose Dynamic zone at the bottom right.
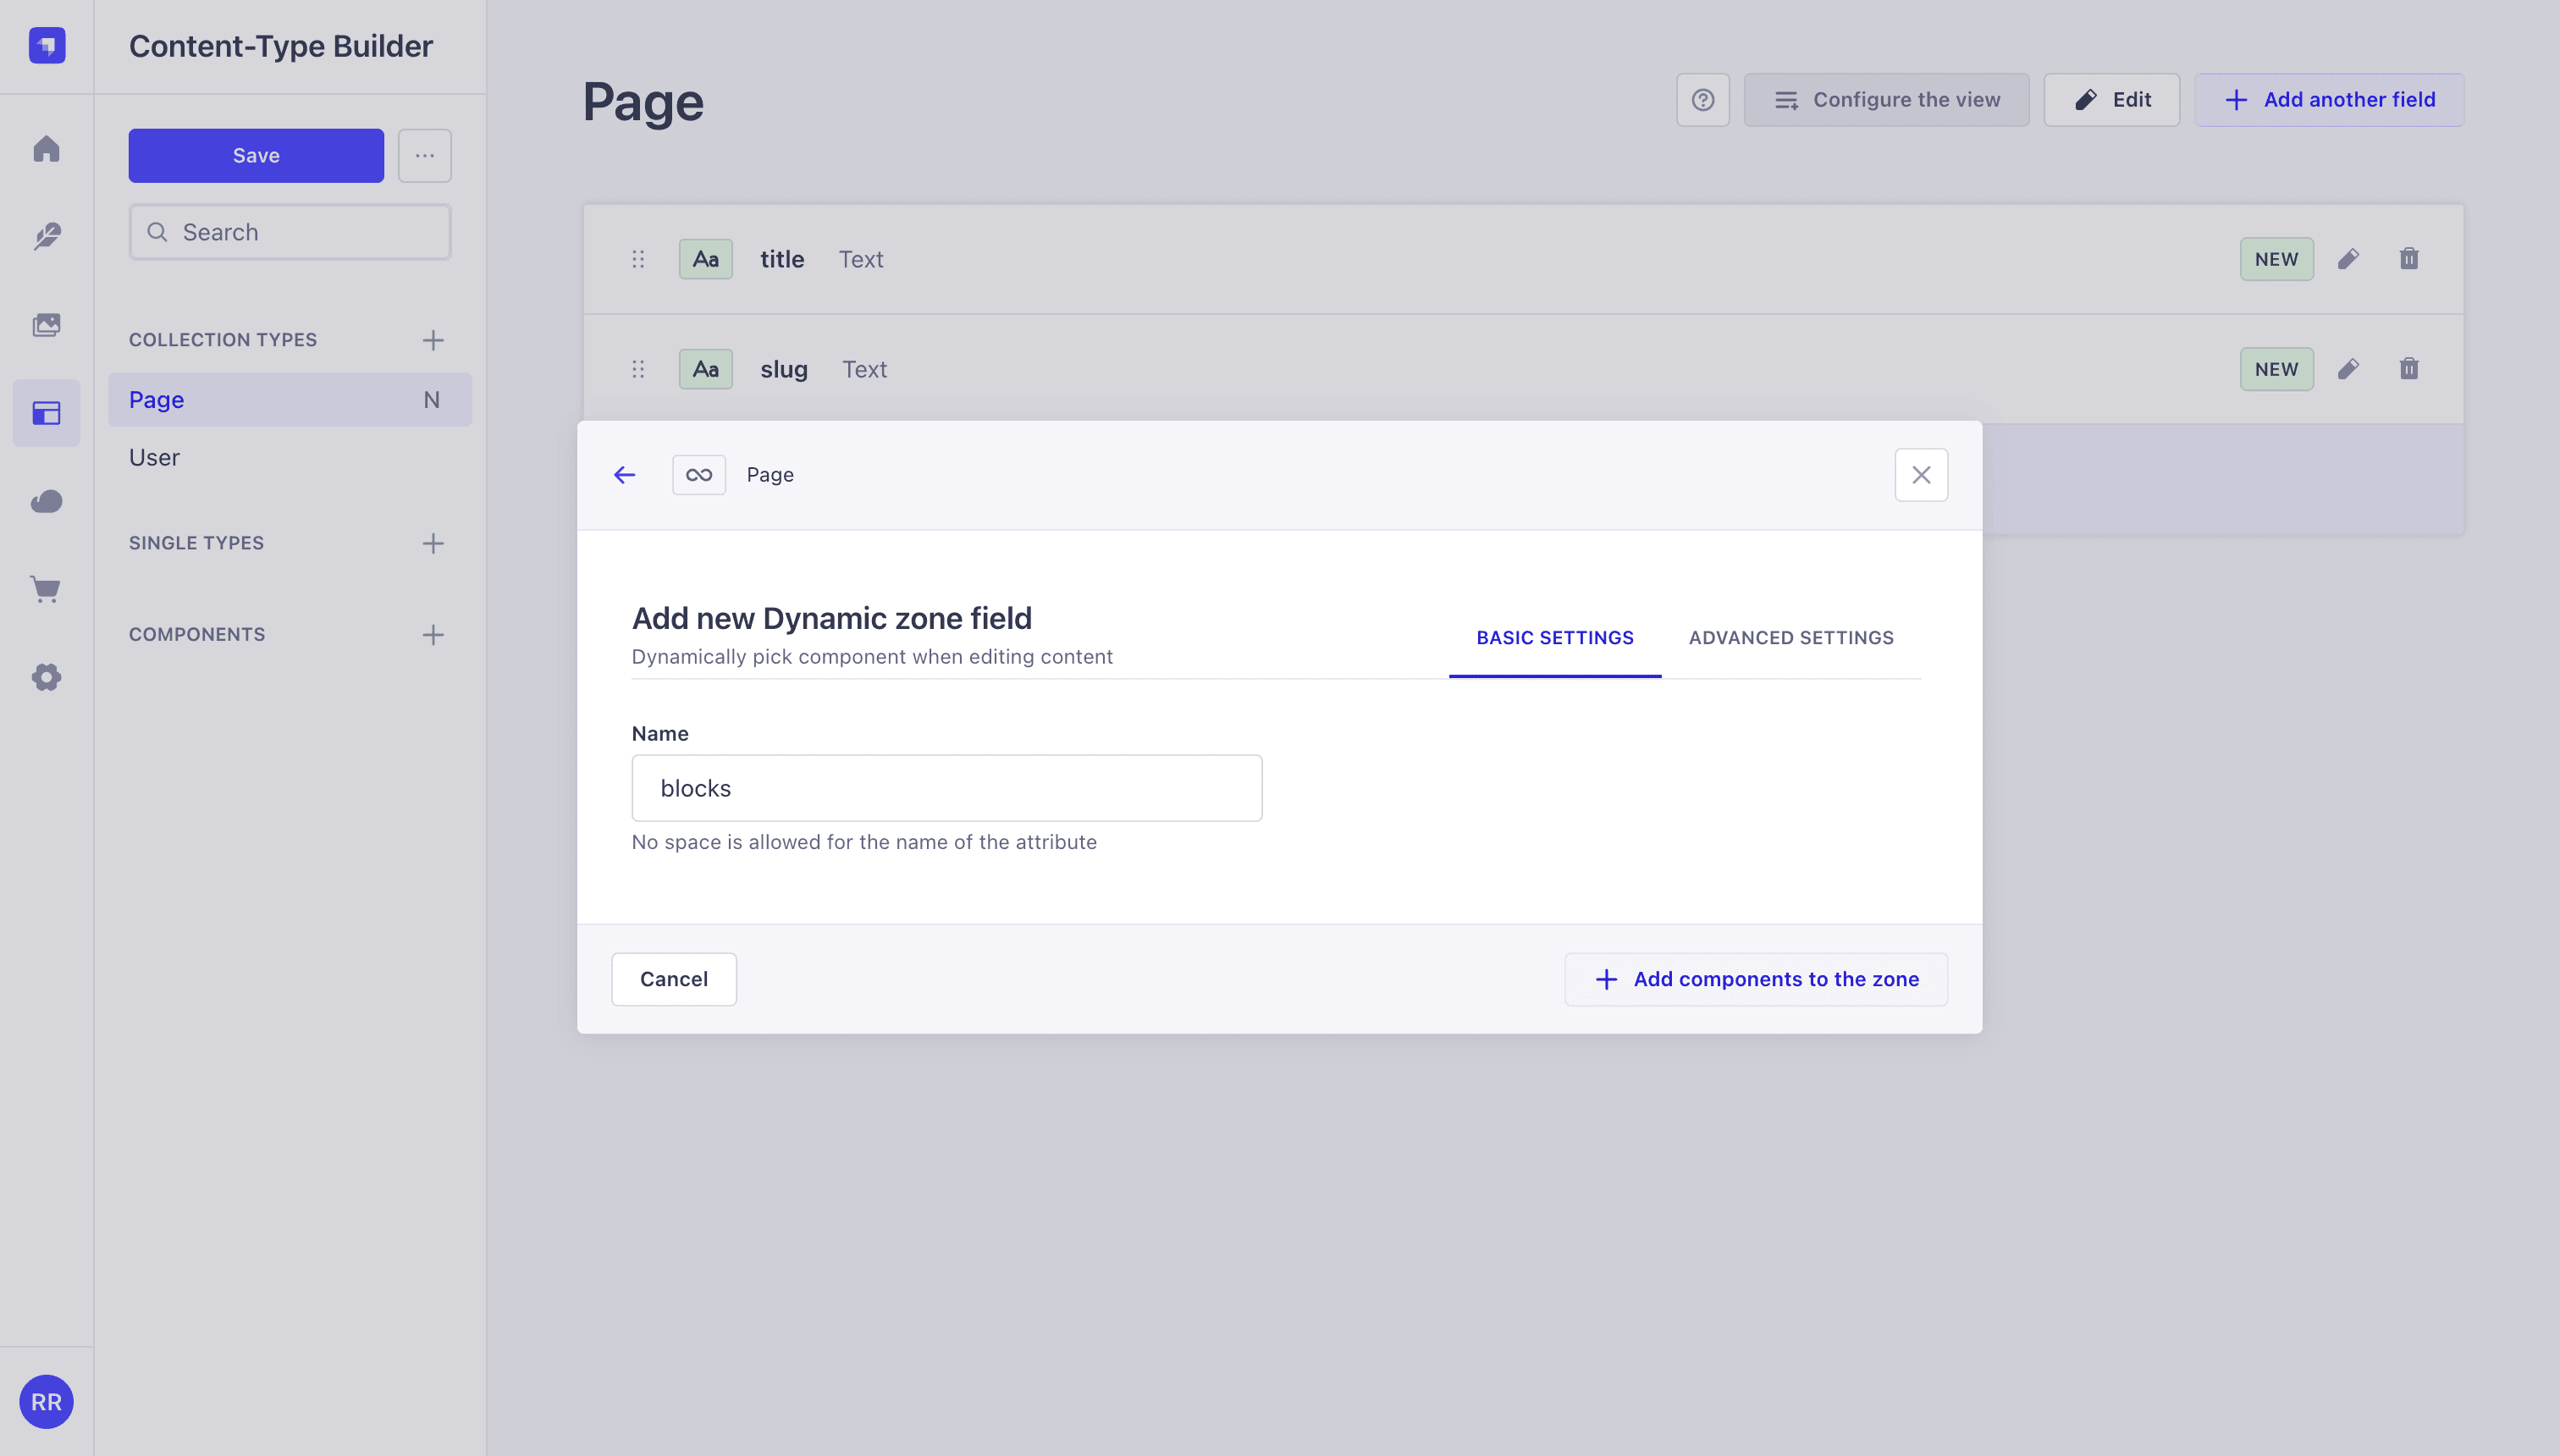
Name the field blocks. Before clicking Add components to the zone, open the Advanced settings tab and make sure Draft & Publish is enabled if you plan to use preview mode later. Then click Add components to the zone.
Create the Hero component (hero.hero)
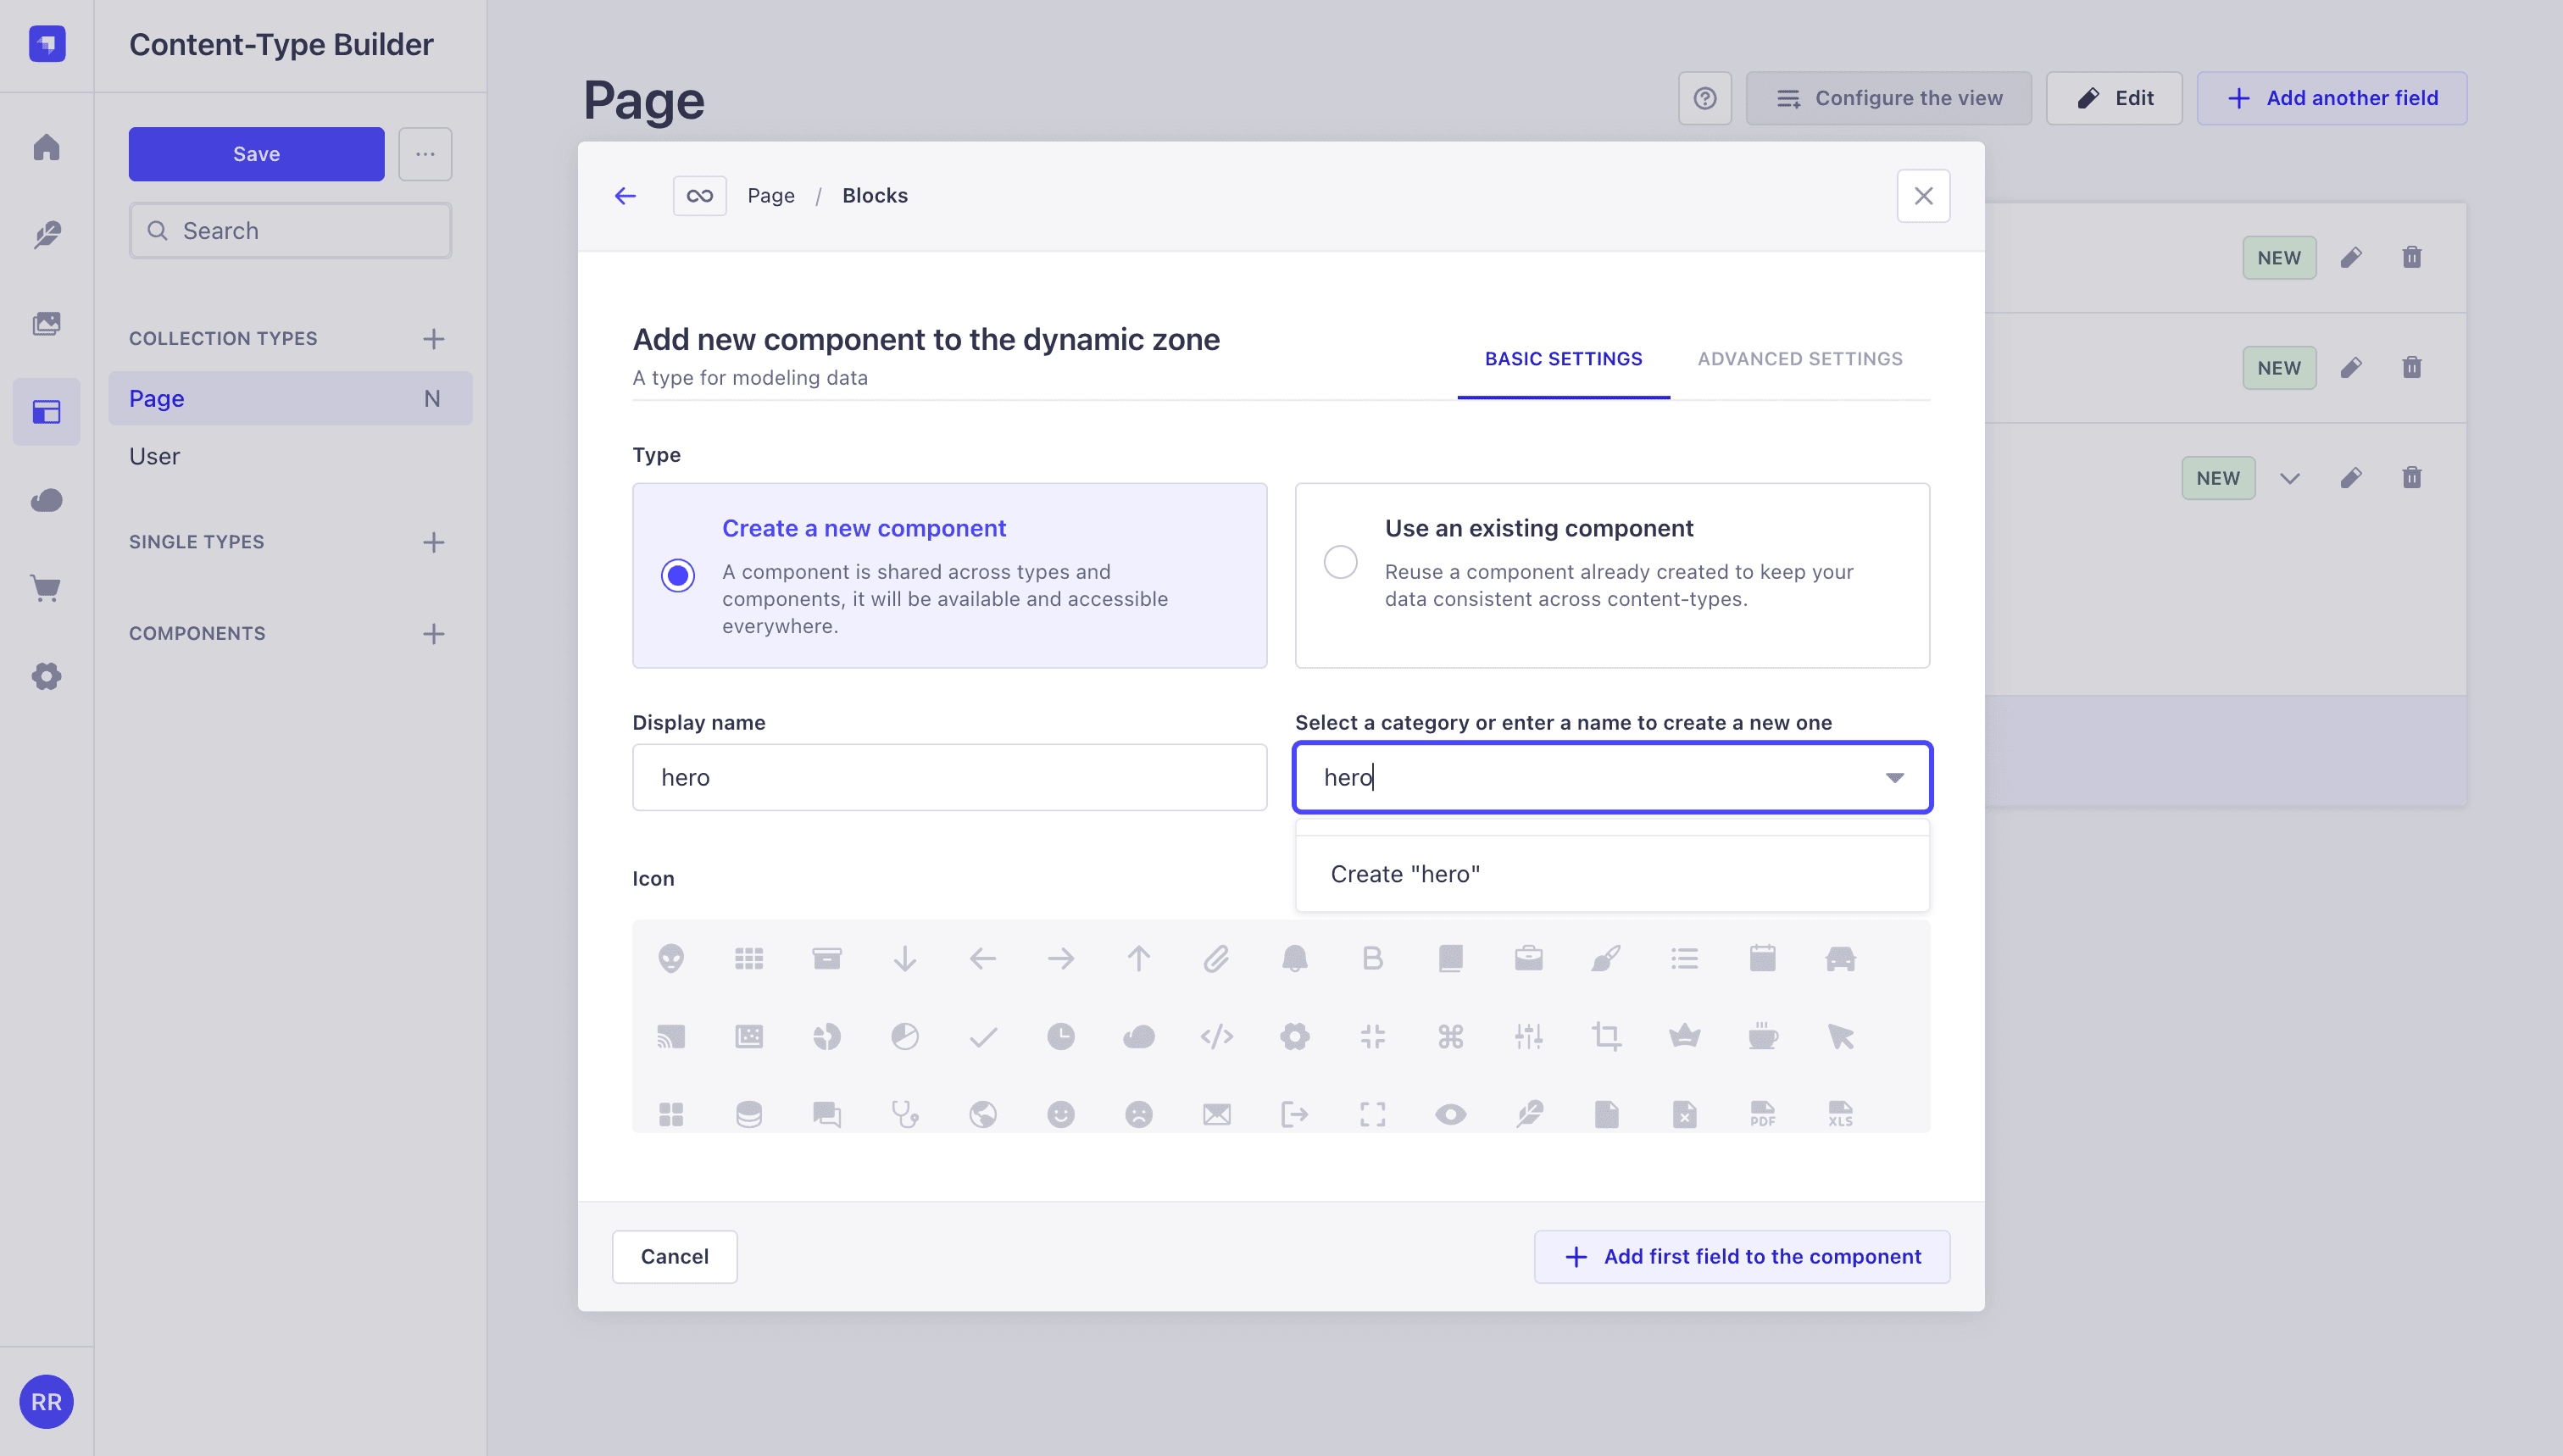
In the "Add new component to the dynamic zone" modal, select Create a new component. Set the display name to hero and type hero as the category. Strapi creates the hero.hero UID from these two values.
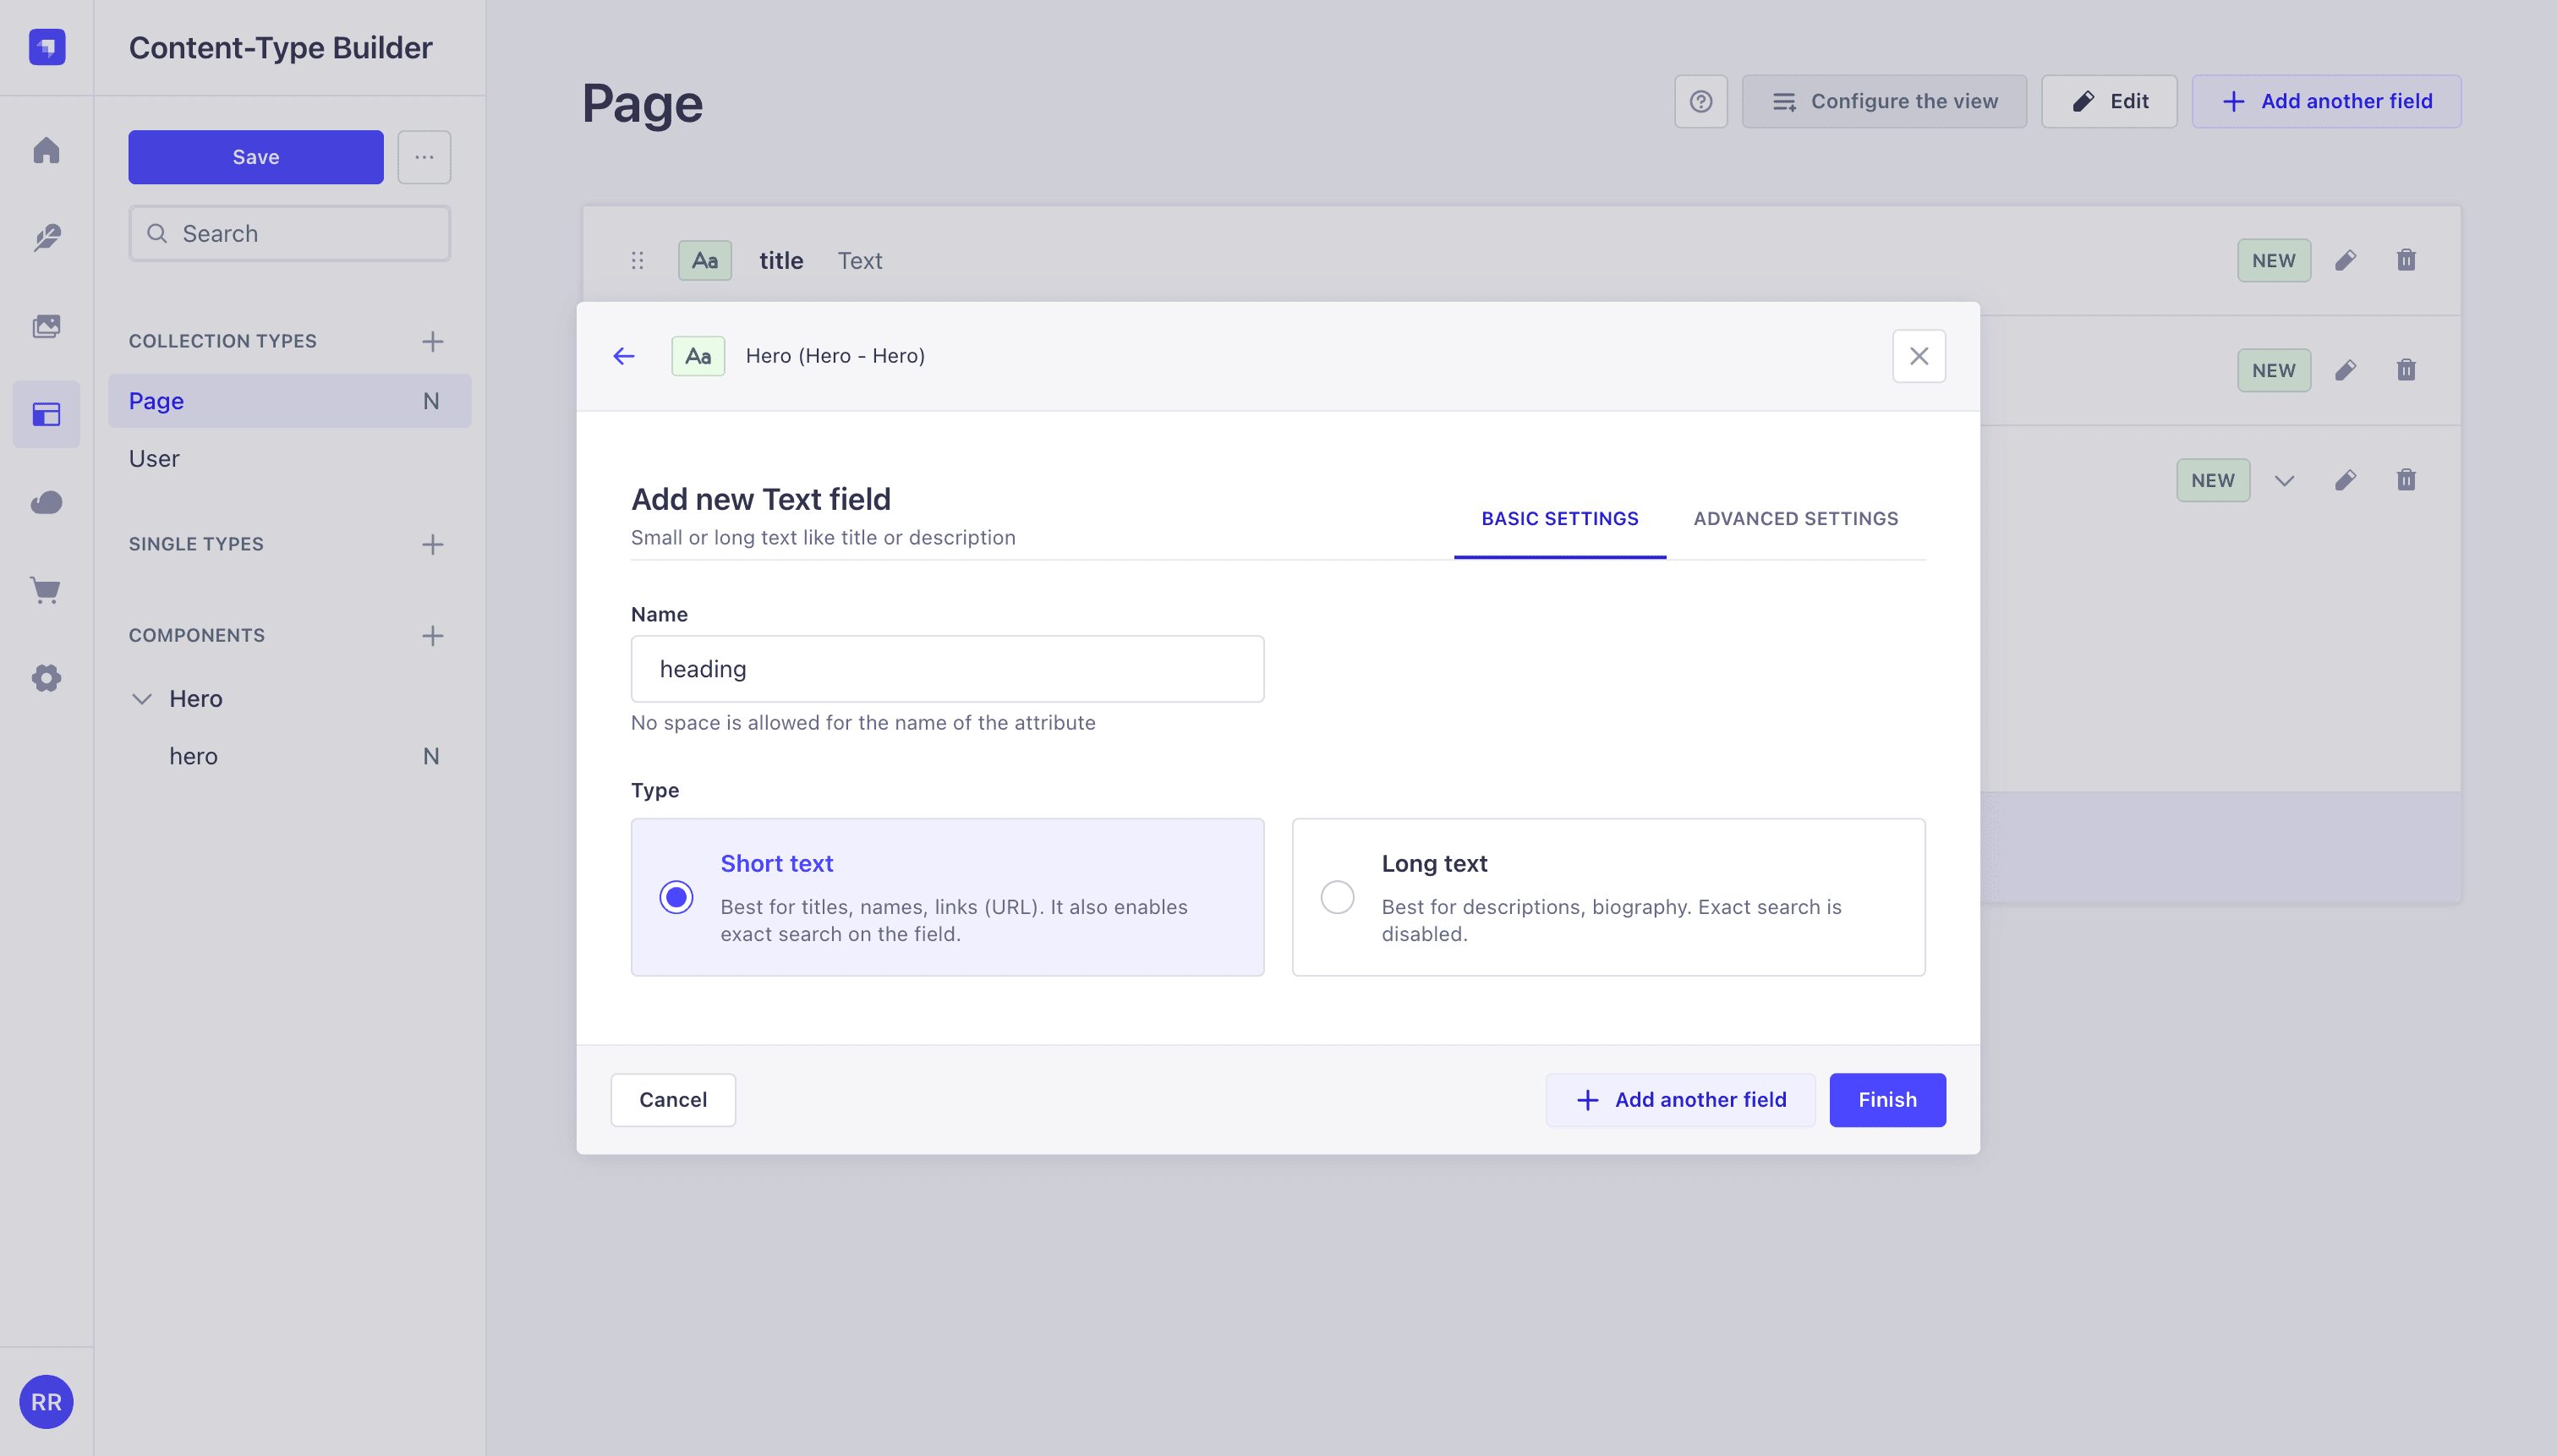
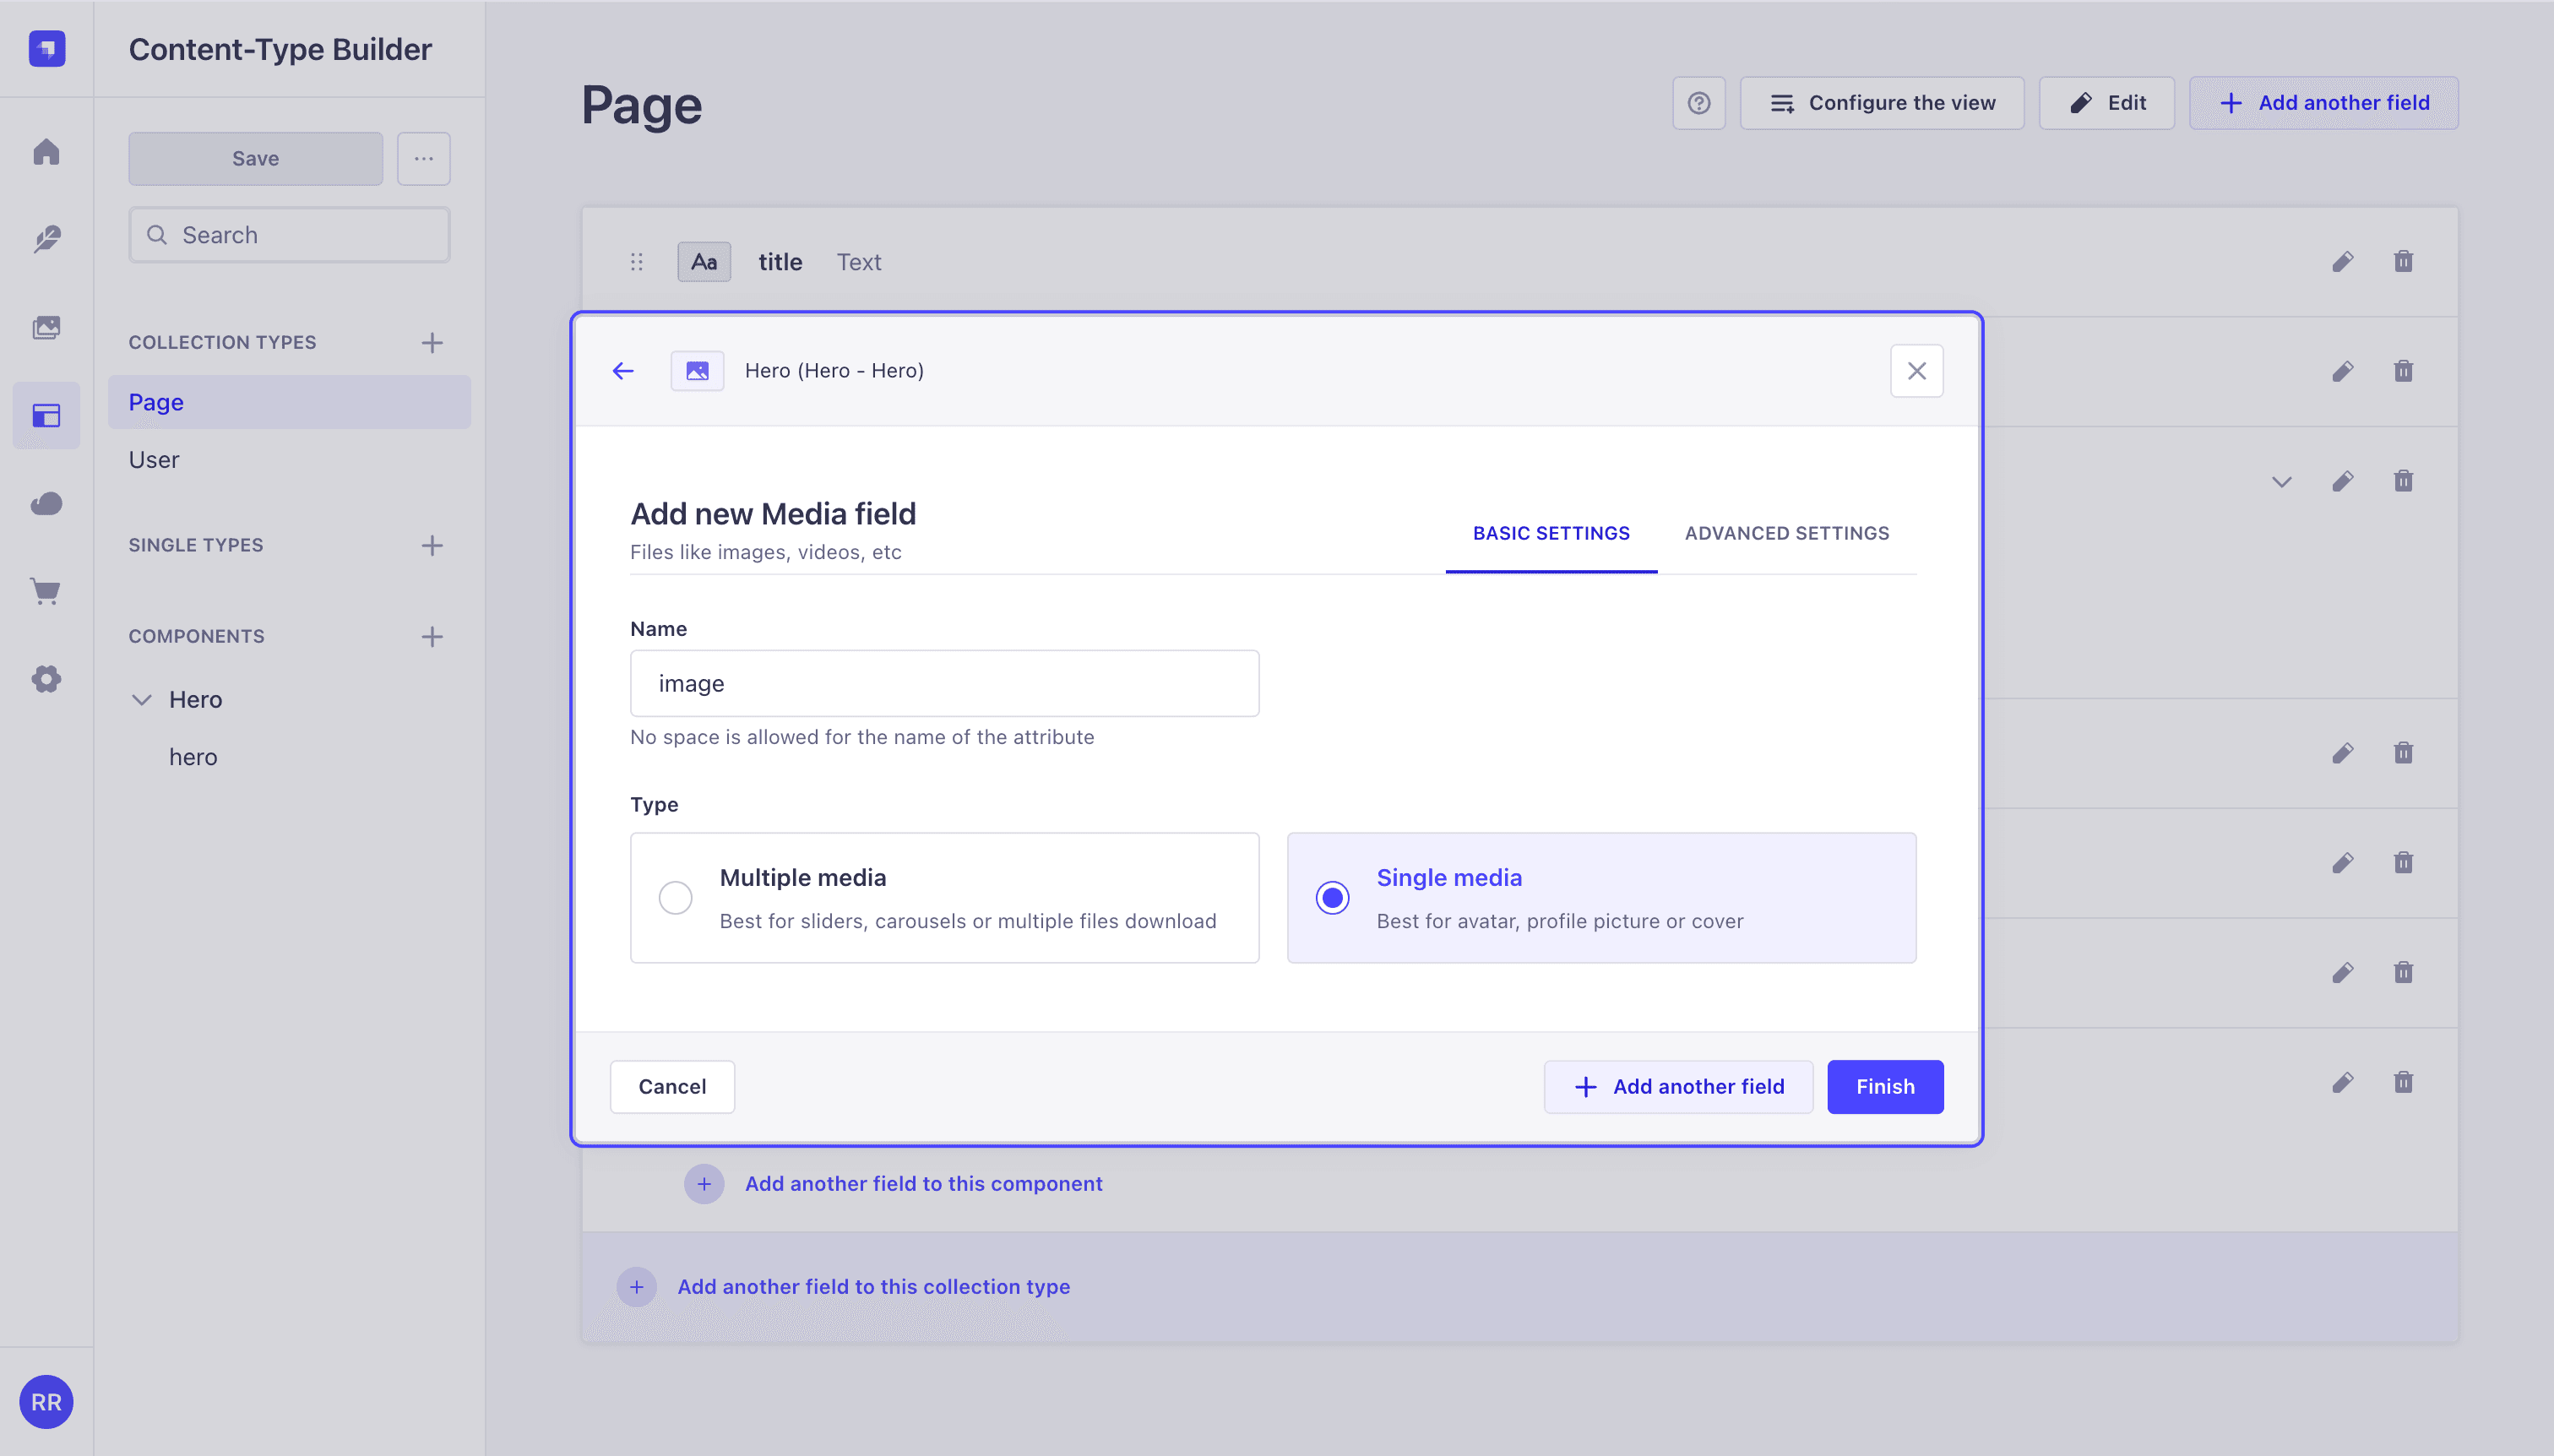
Click Add first field to the component and add the following Text (Short text) fields one after the other: heading, subheading, ctaLabel, ctaUrl. The screenshot shows the heading field being added.
After the four text fields, add one more field: Media → Single media, named image. This is the hero background or foreground image.
Click Finish.
Create the Rich-text component (rich-text.rich-text)
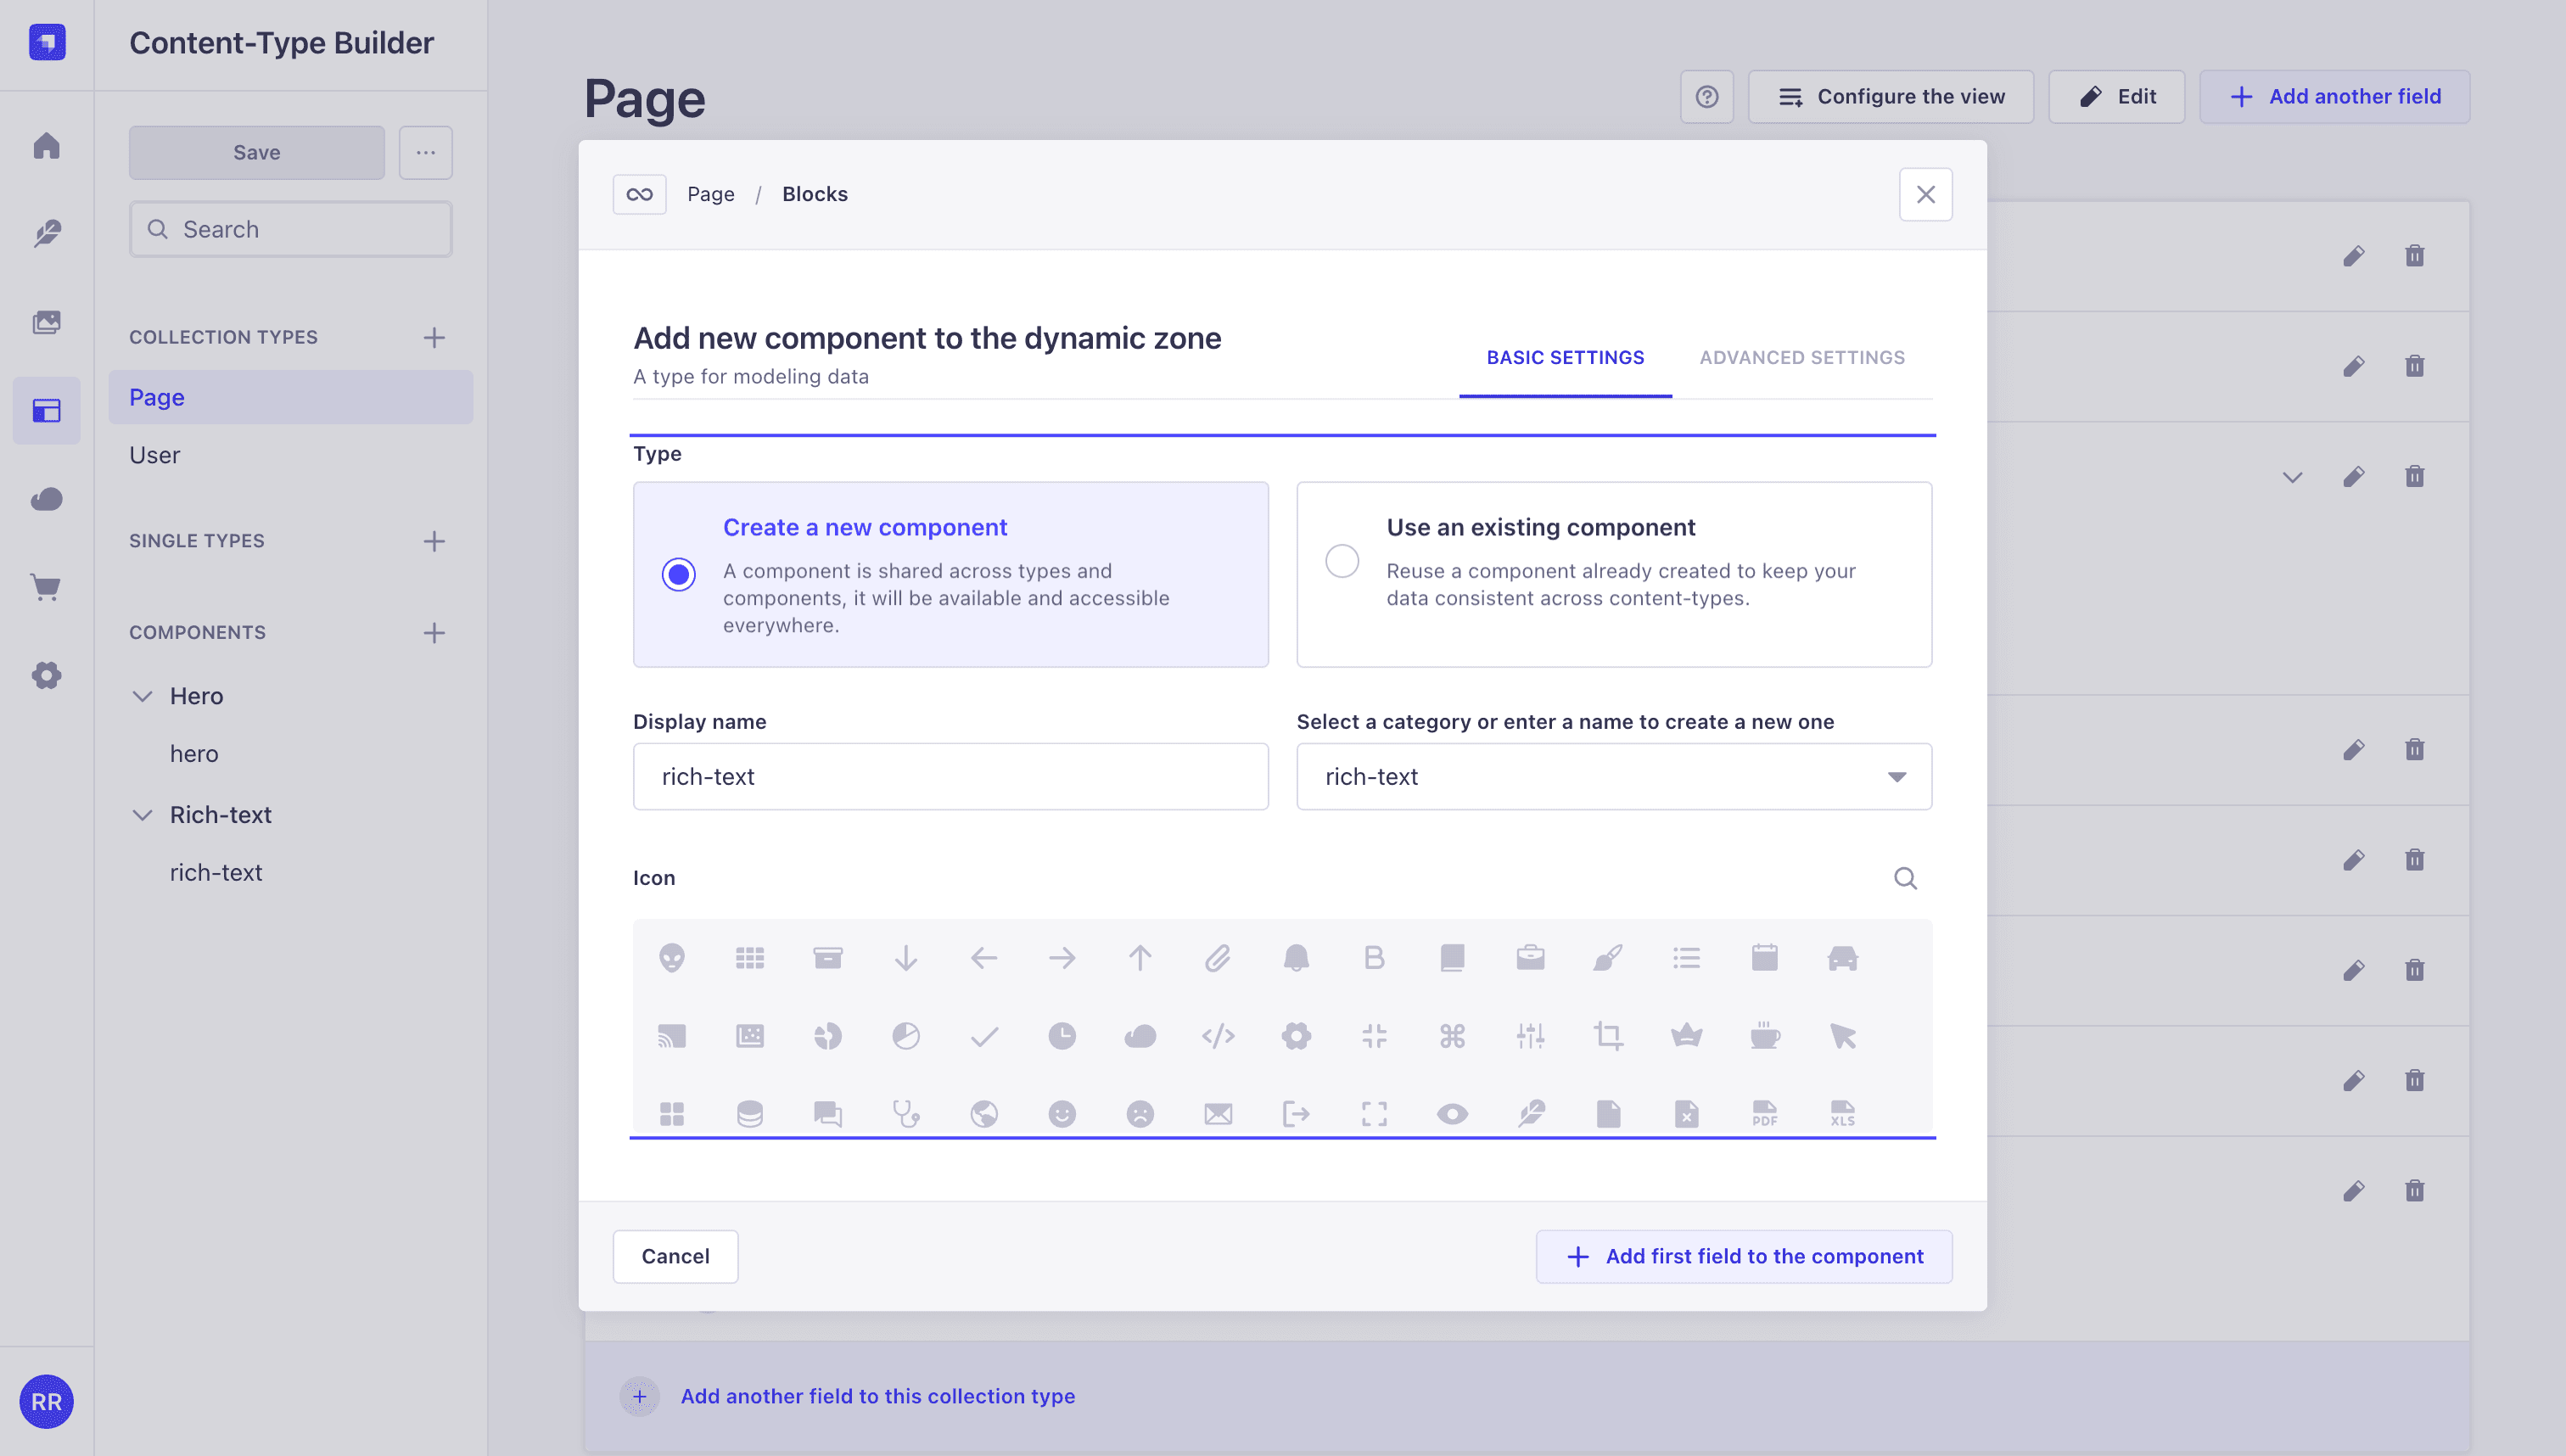
Back in the dynamic zone modal, add another new component. Name it rich-text with category rich-text to produce the rich-text.rich-text UID.
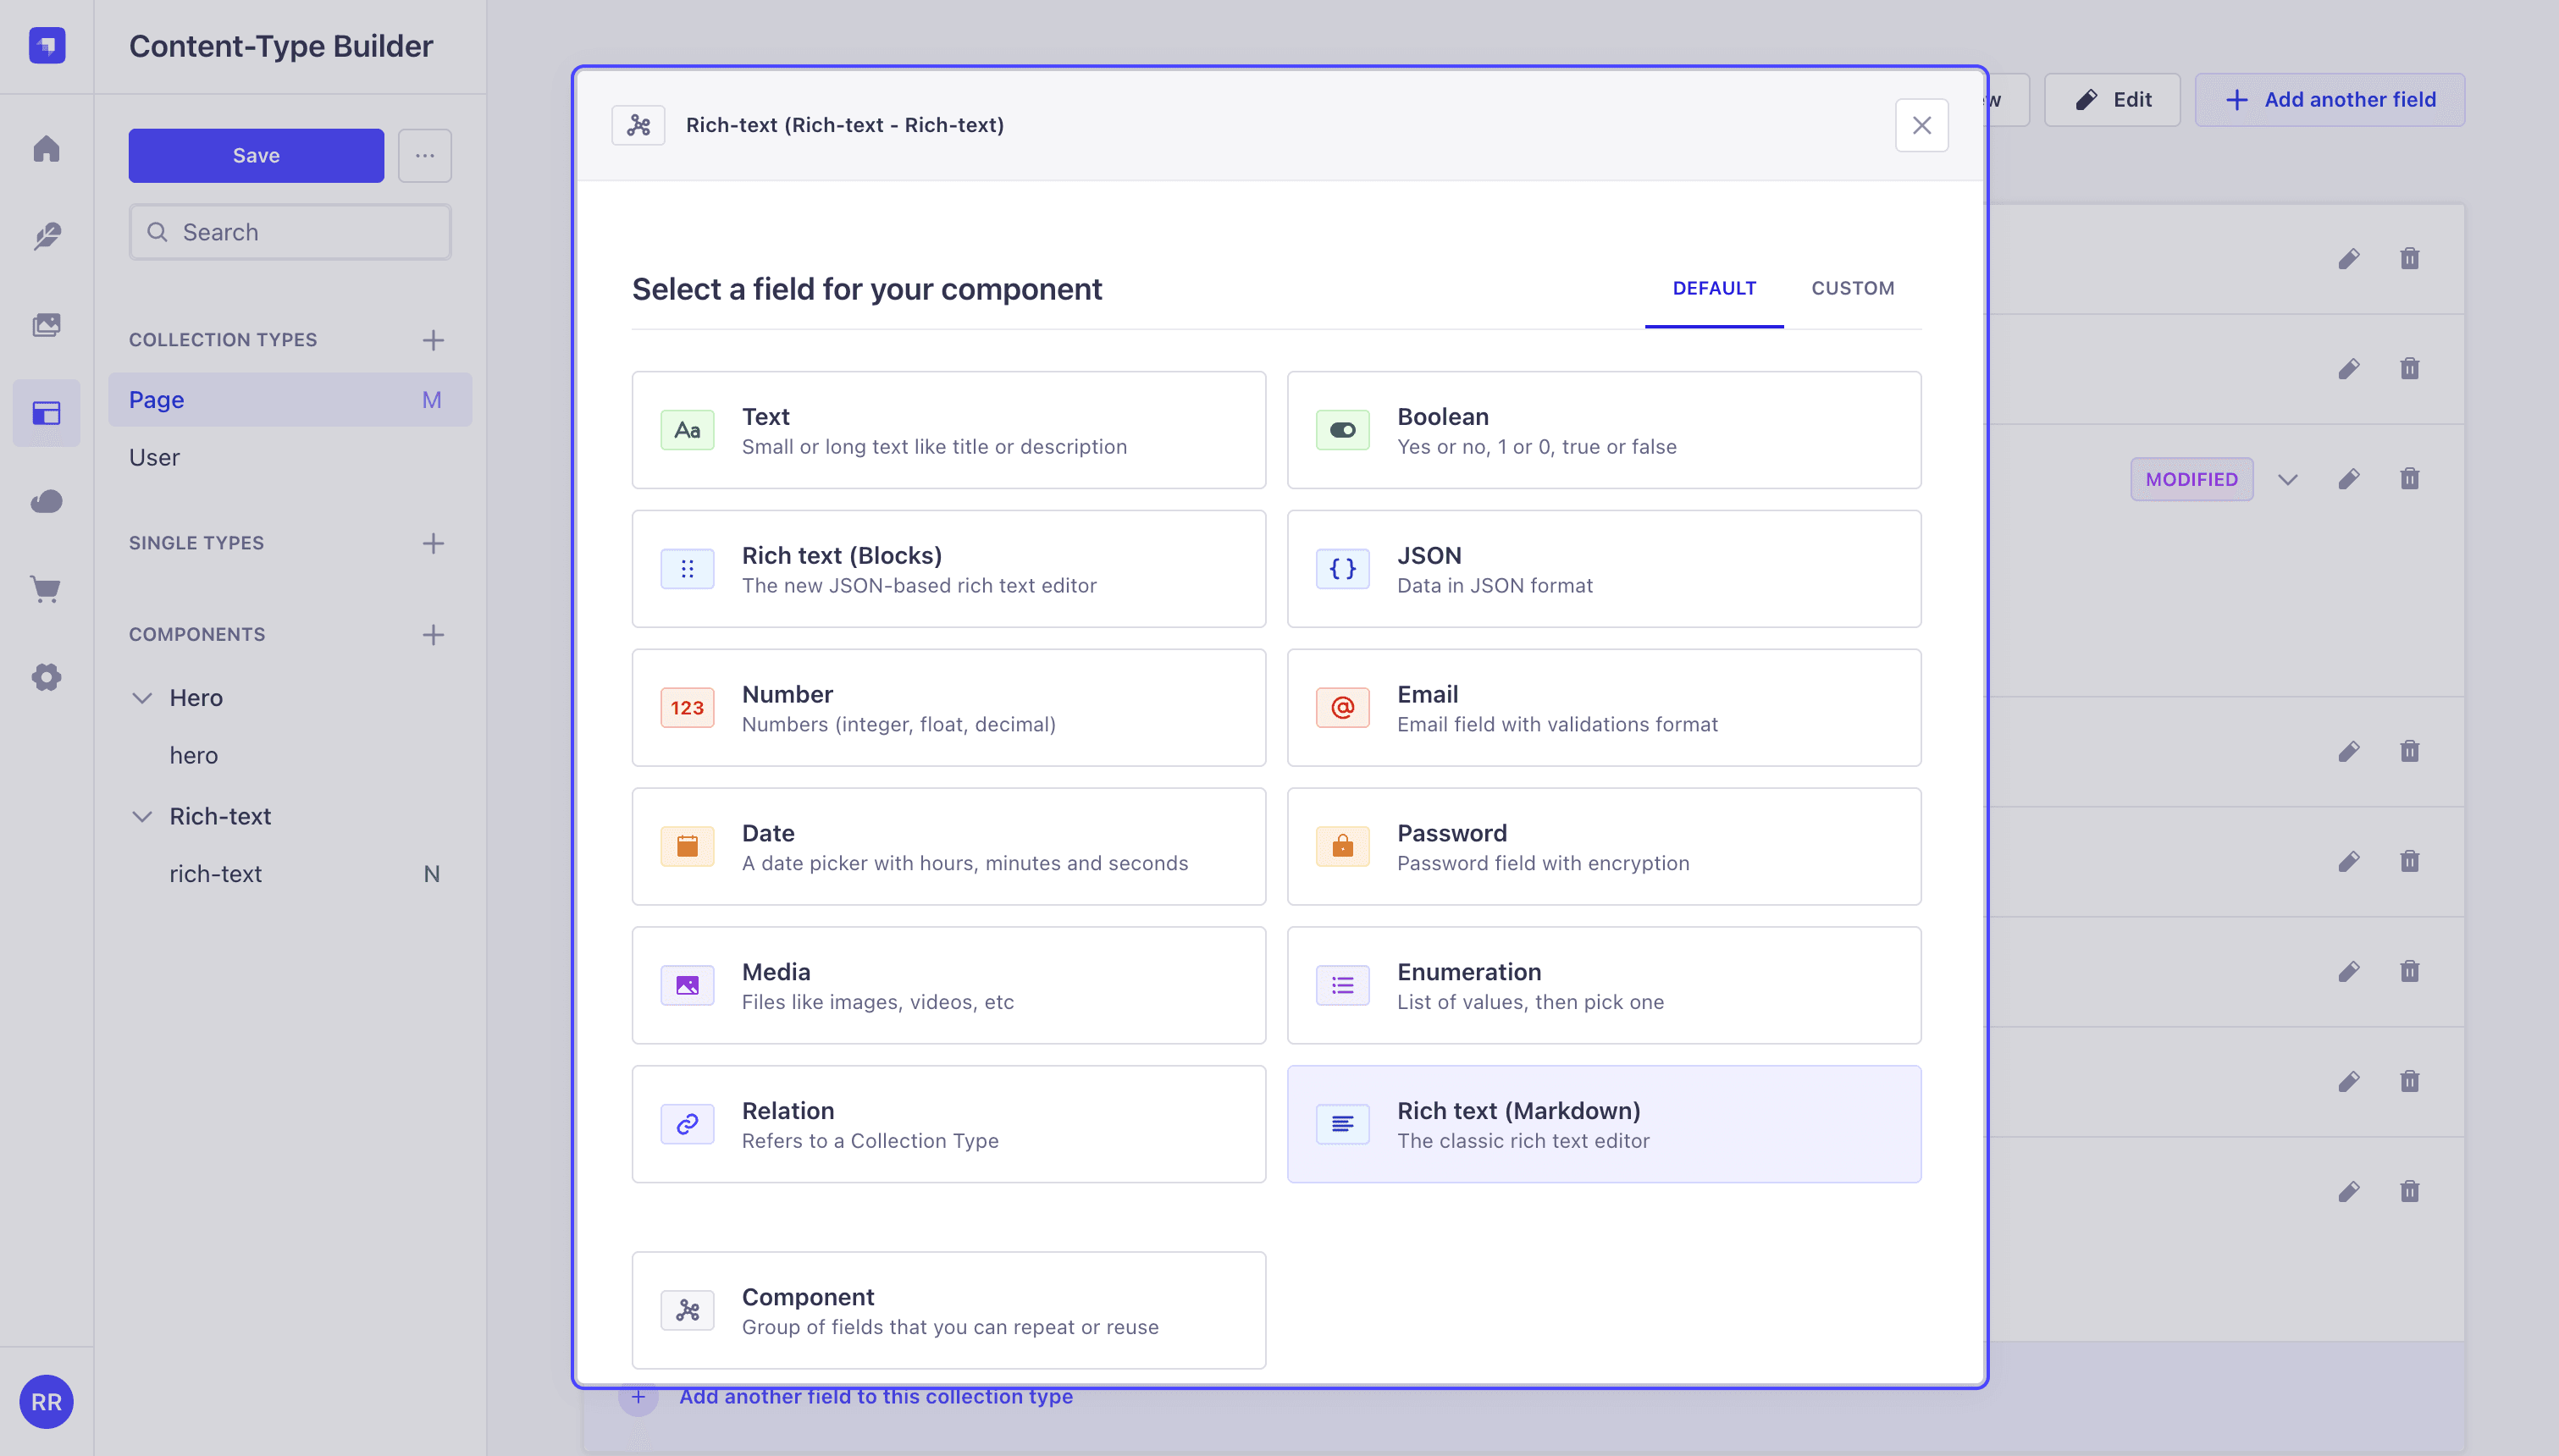
Click Add first field to the component. Select Rich text (Markdown), the classic plain-text Markdown editor, rather than Rich text (Blocks), which uses Strapi's JSON-based Lexical editor. This guide's isRichTextHtml() helper and ReactMarkdown renderer are tuned for plain-text Markdown output.
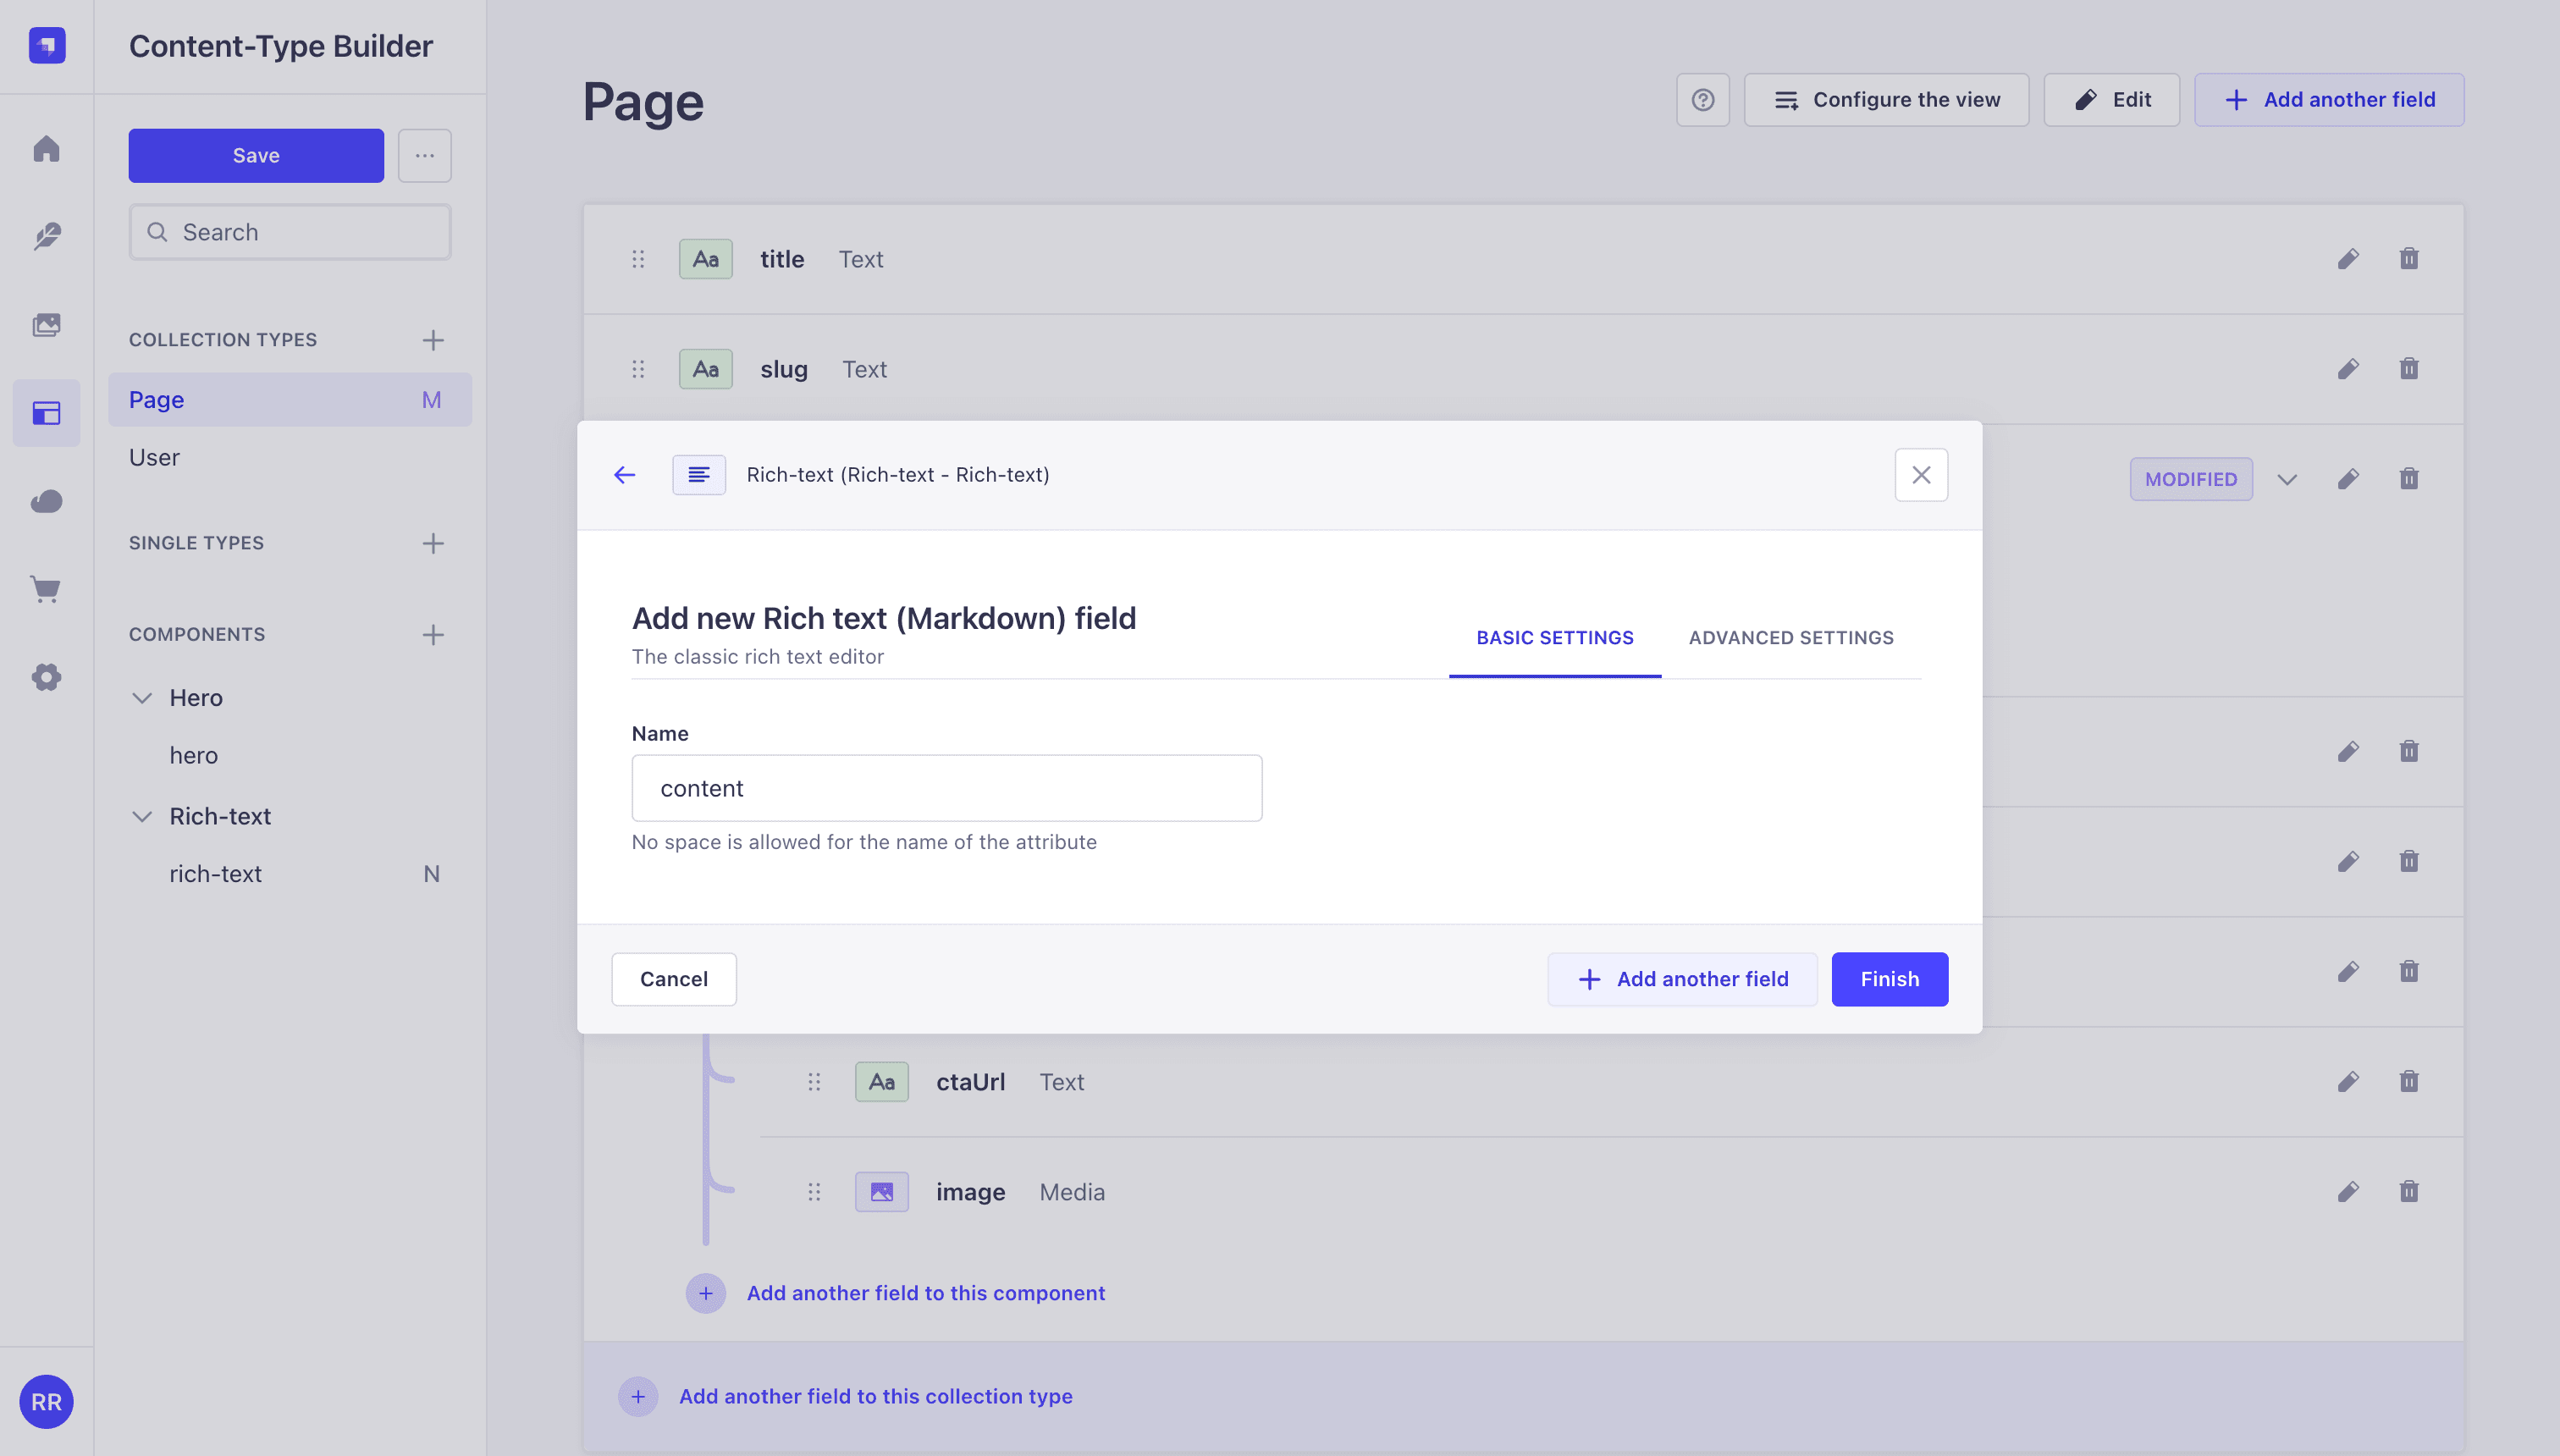
Name the field content and click Finish.
Create the Feature-grid component (feature-grid.feature-grid)
Add the third component to the dynamic zone. Name it feature-grid with category feature-grid to produce the feature-grid.feature-grid UID.
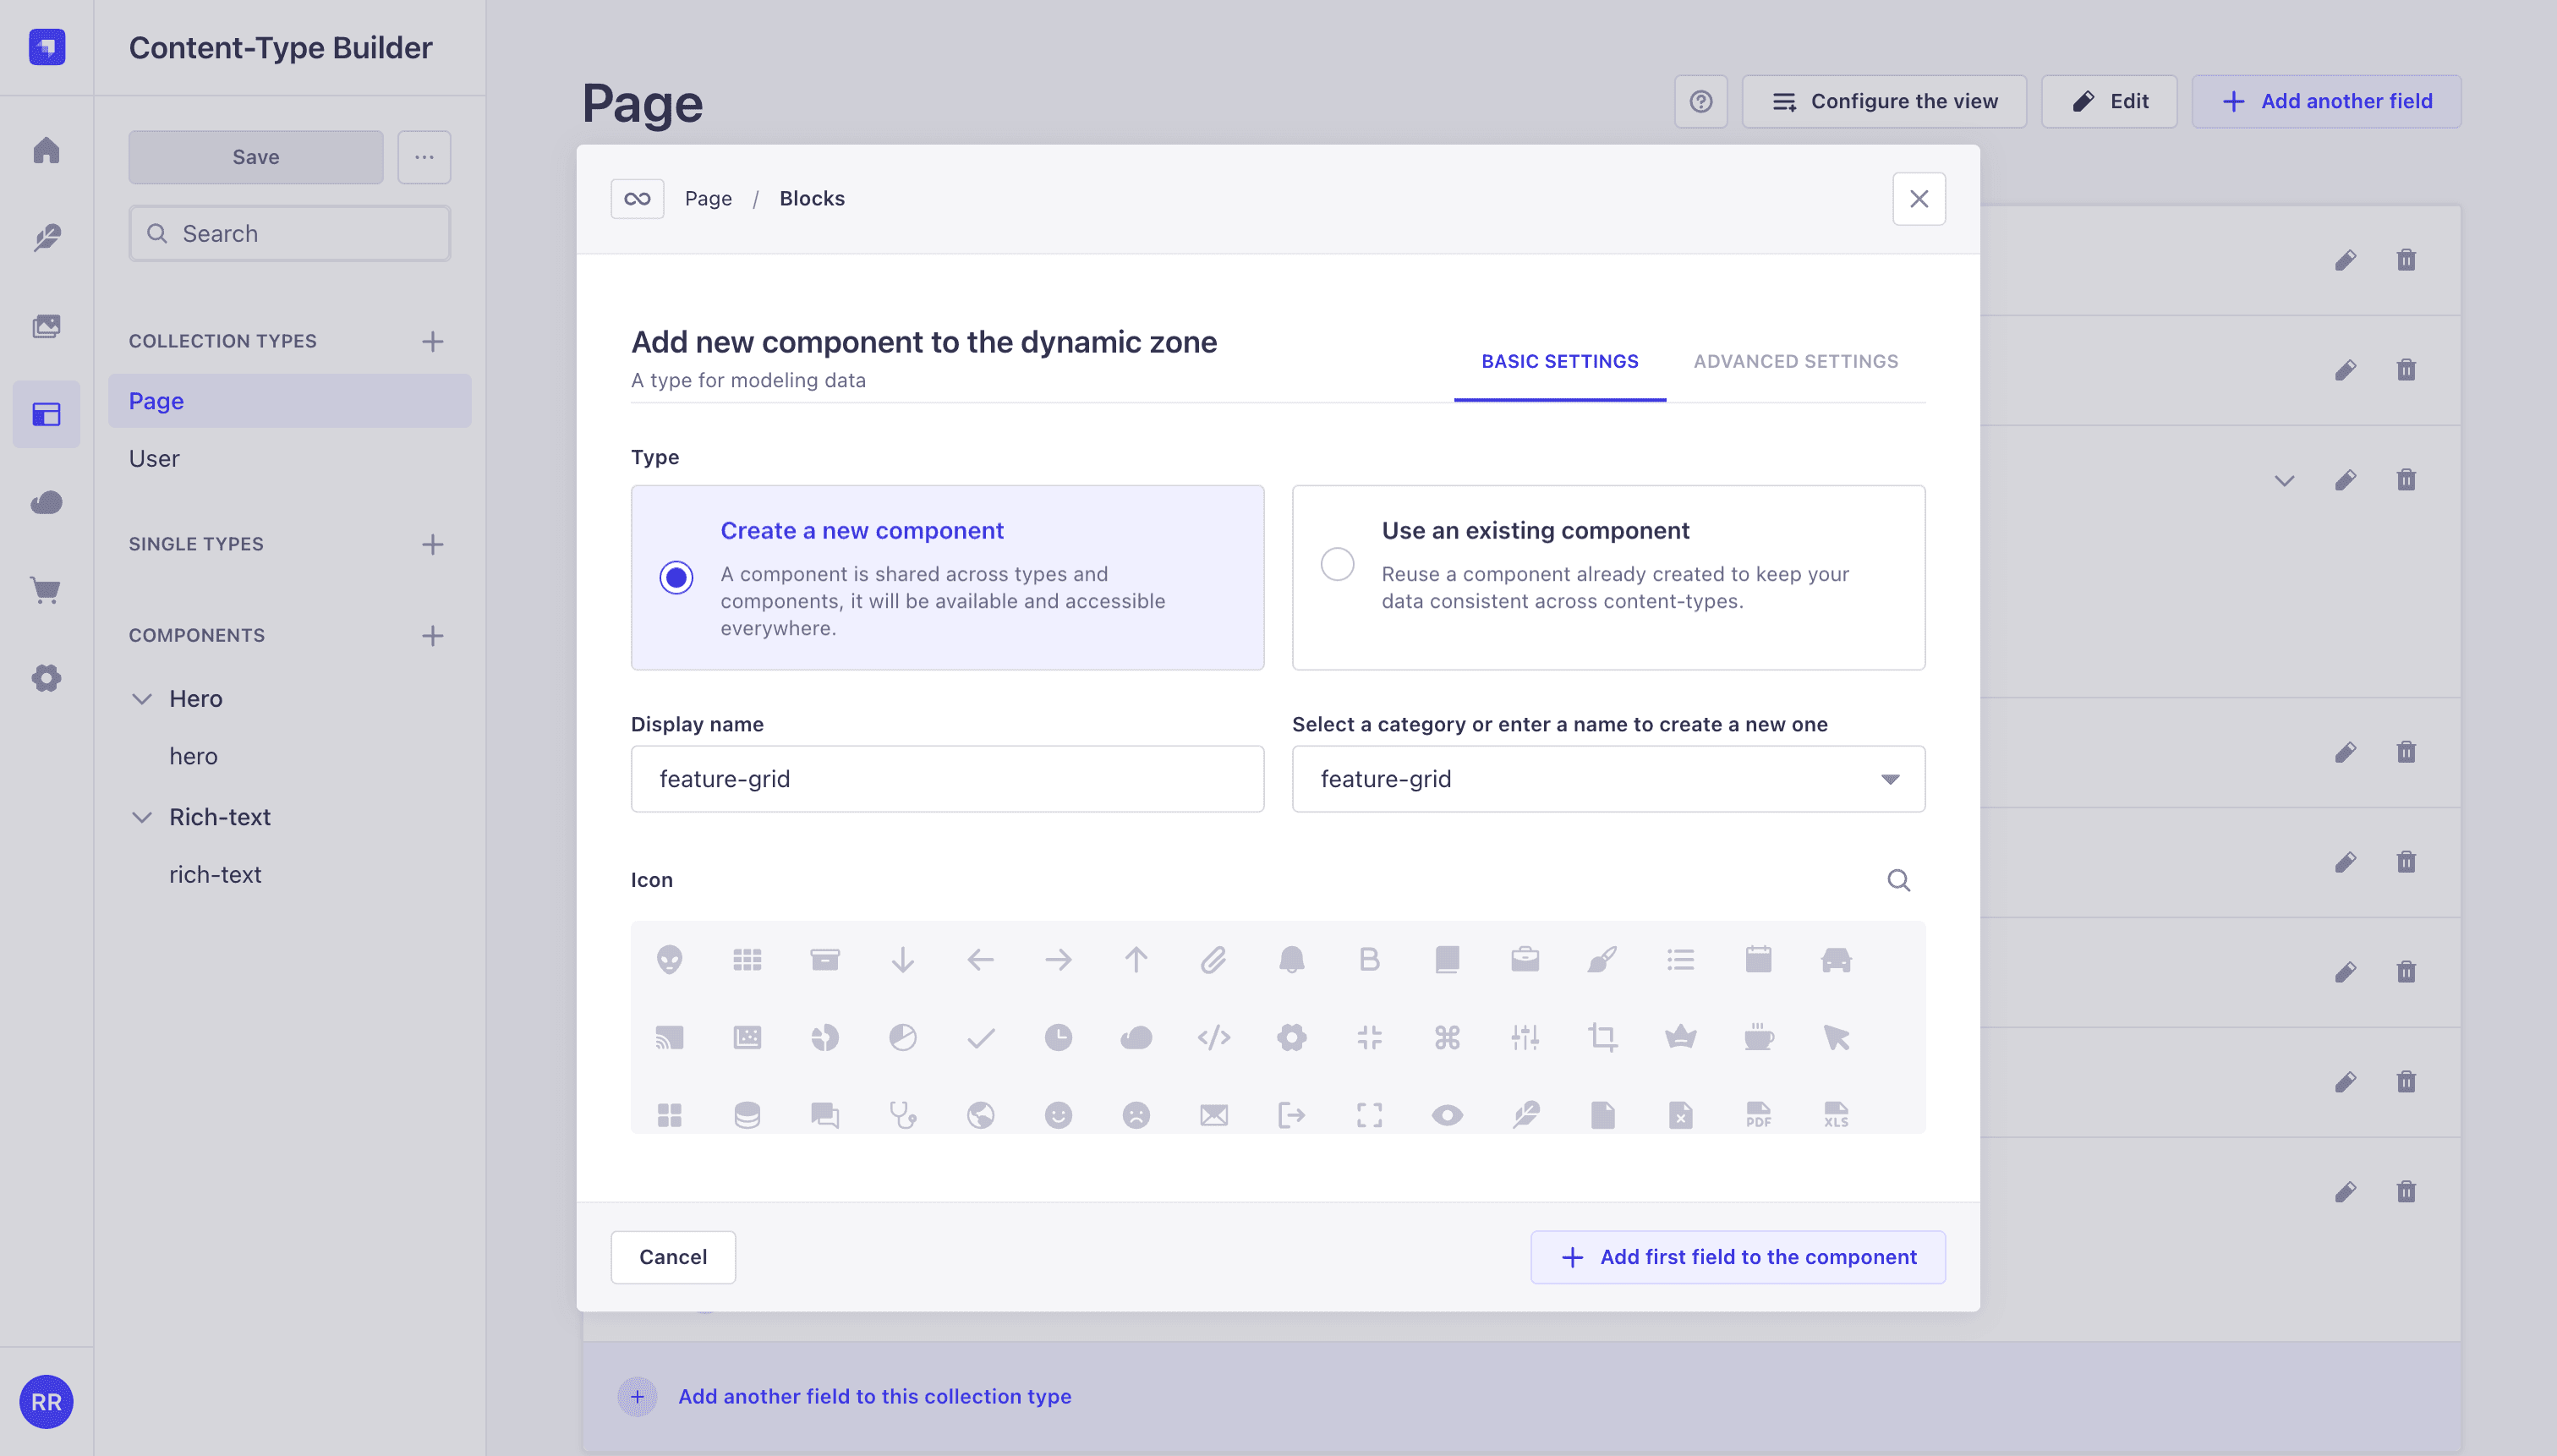
First, add a Text (Short text) field named title, which is the optional section heading that appears above the card grid.
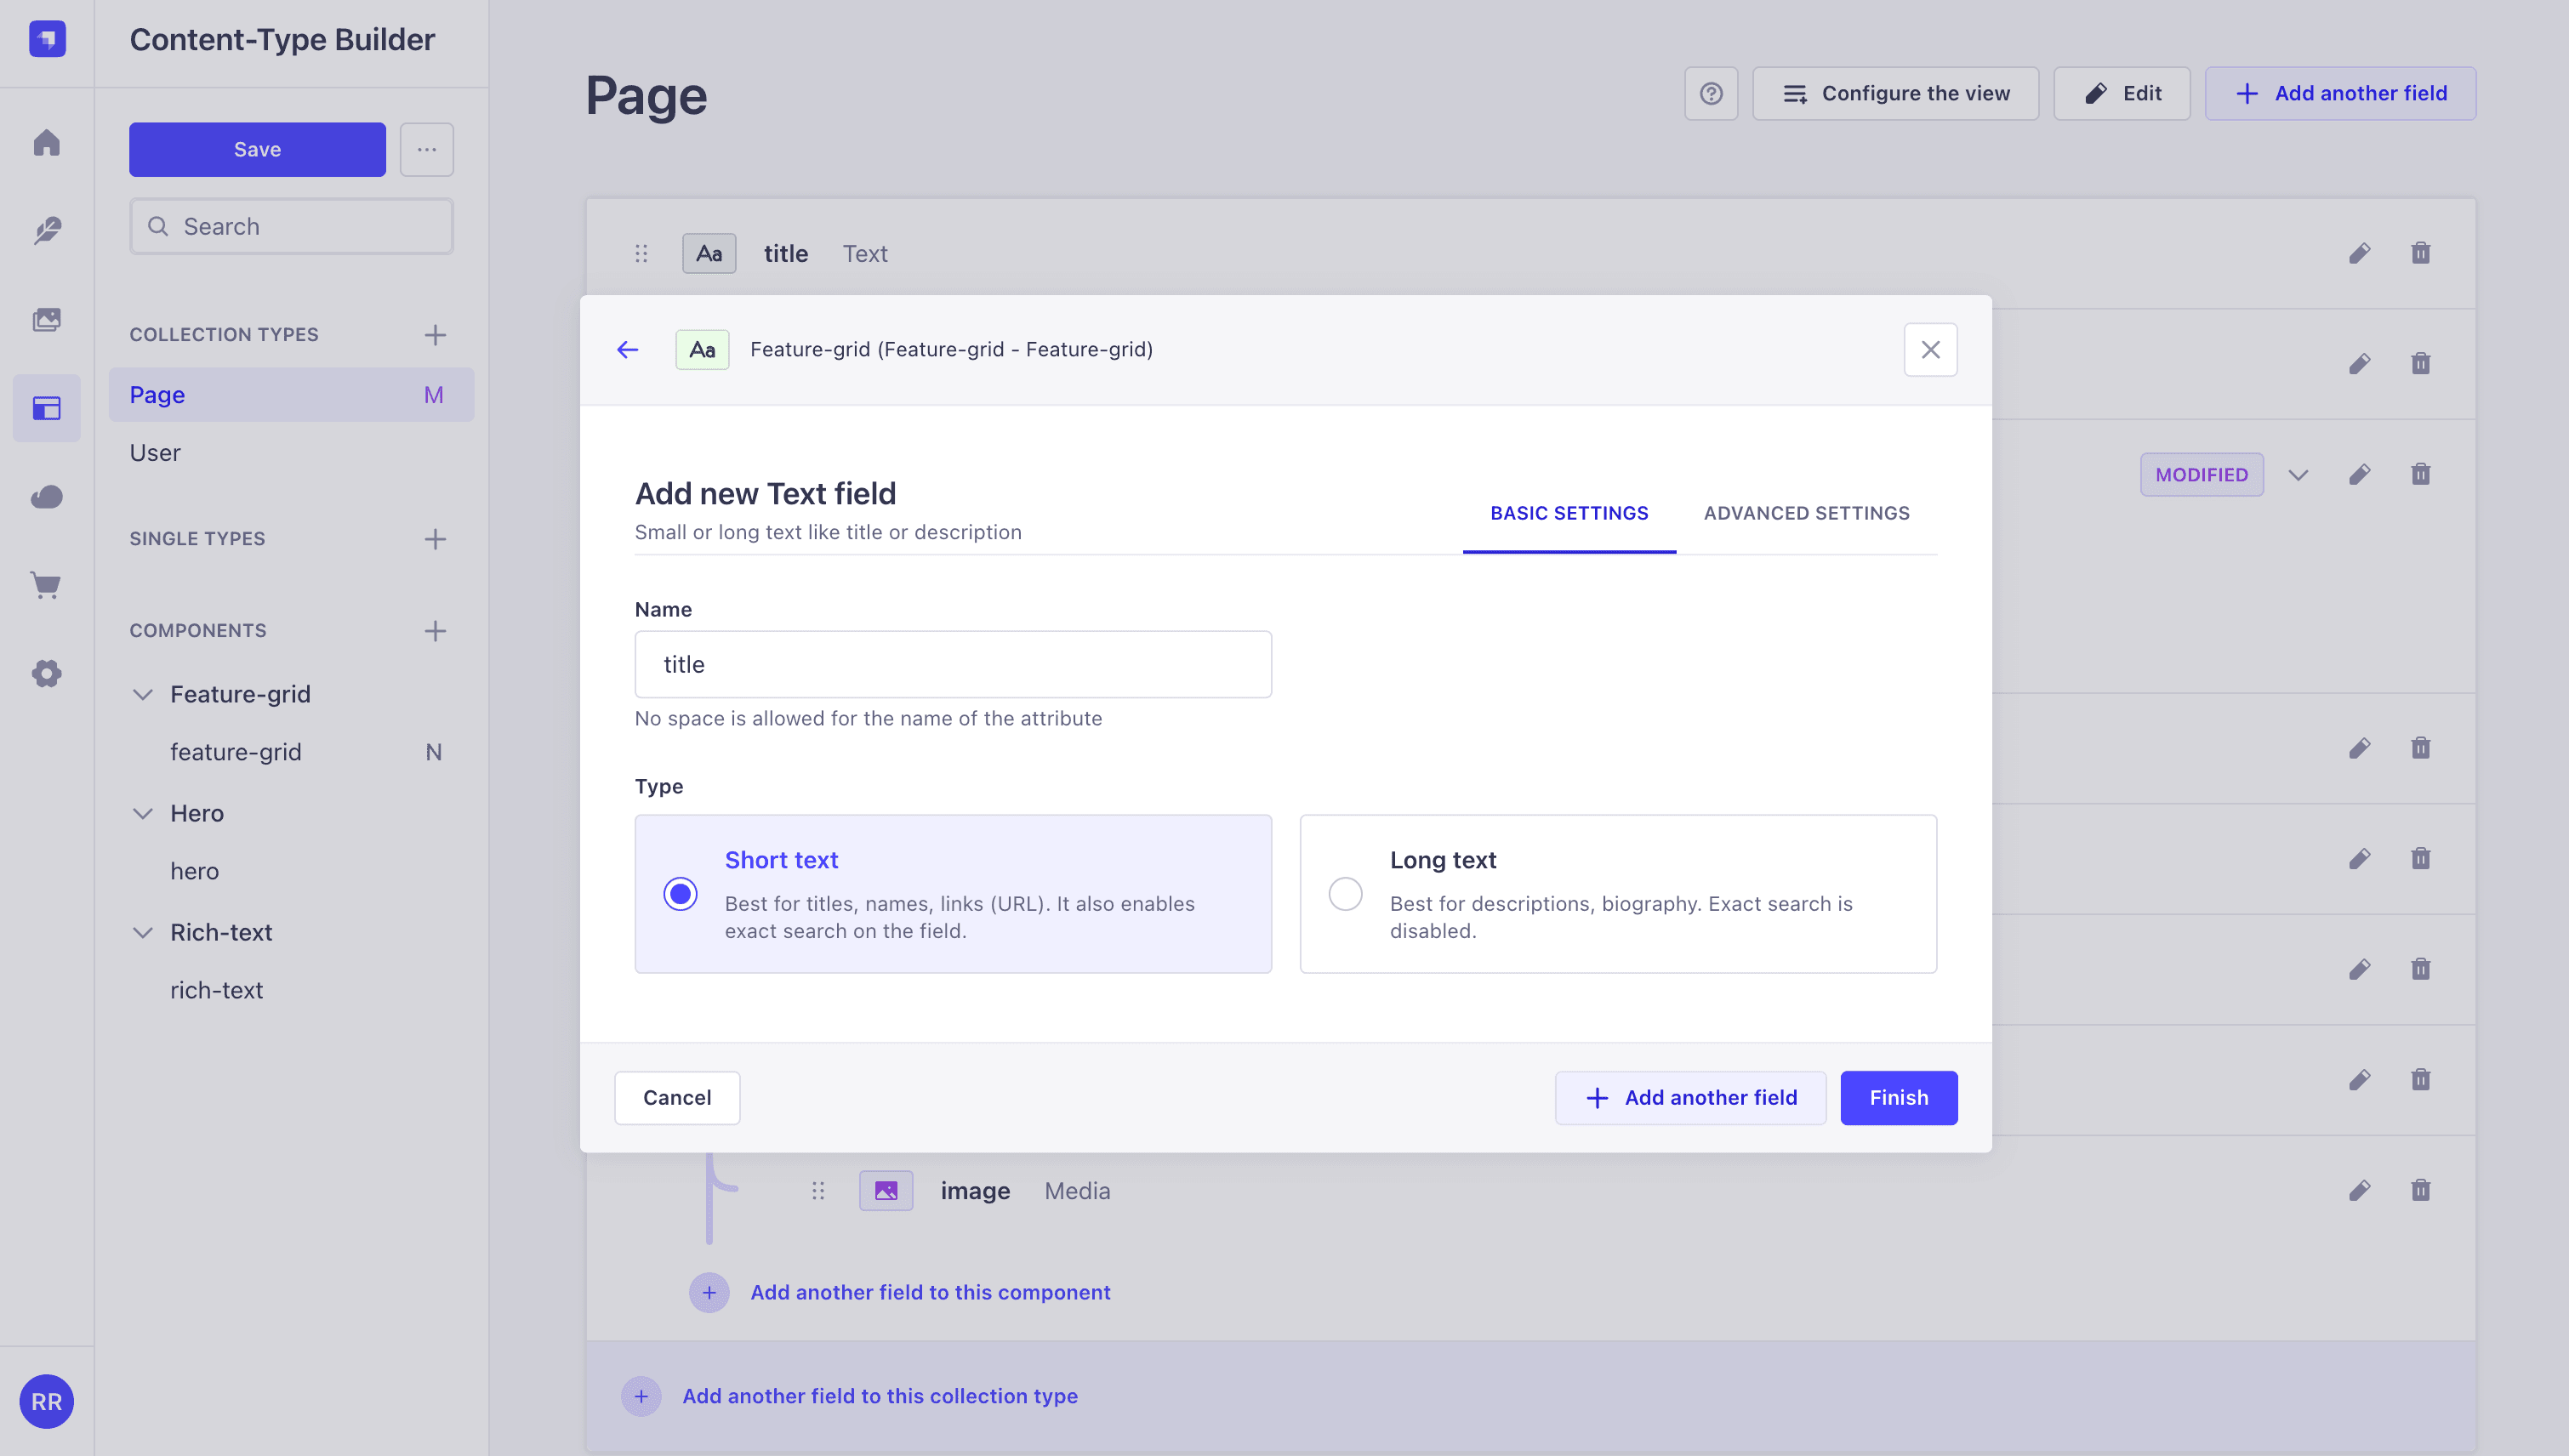
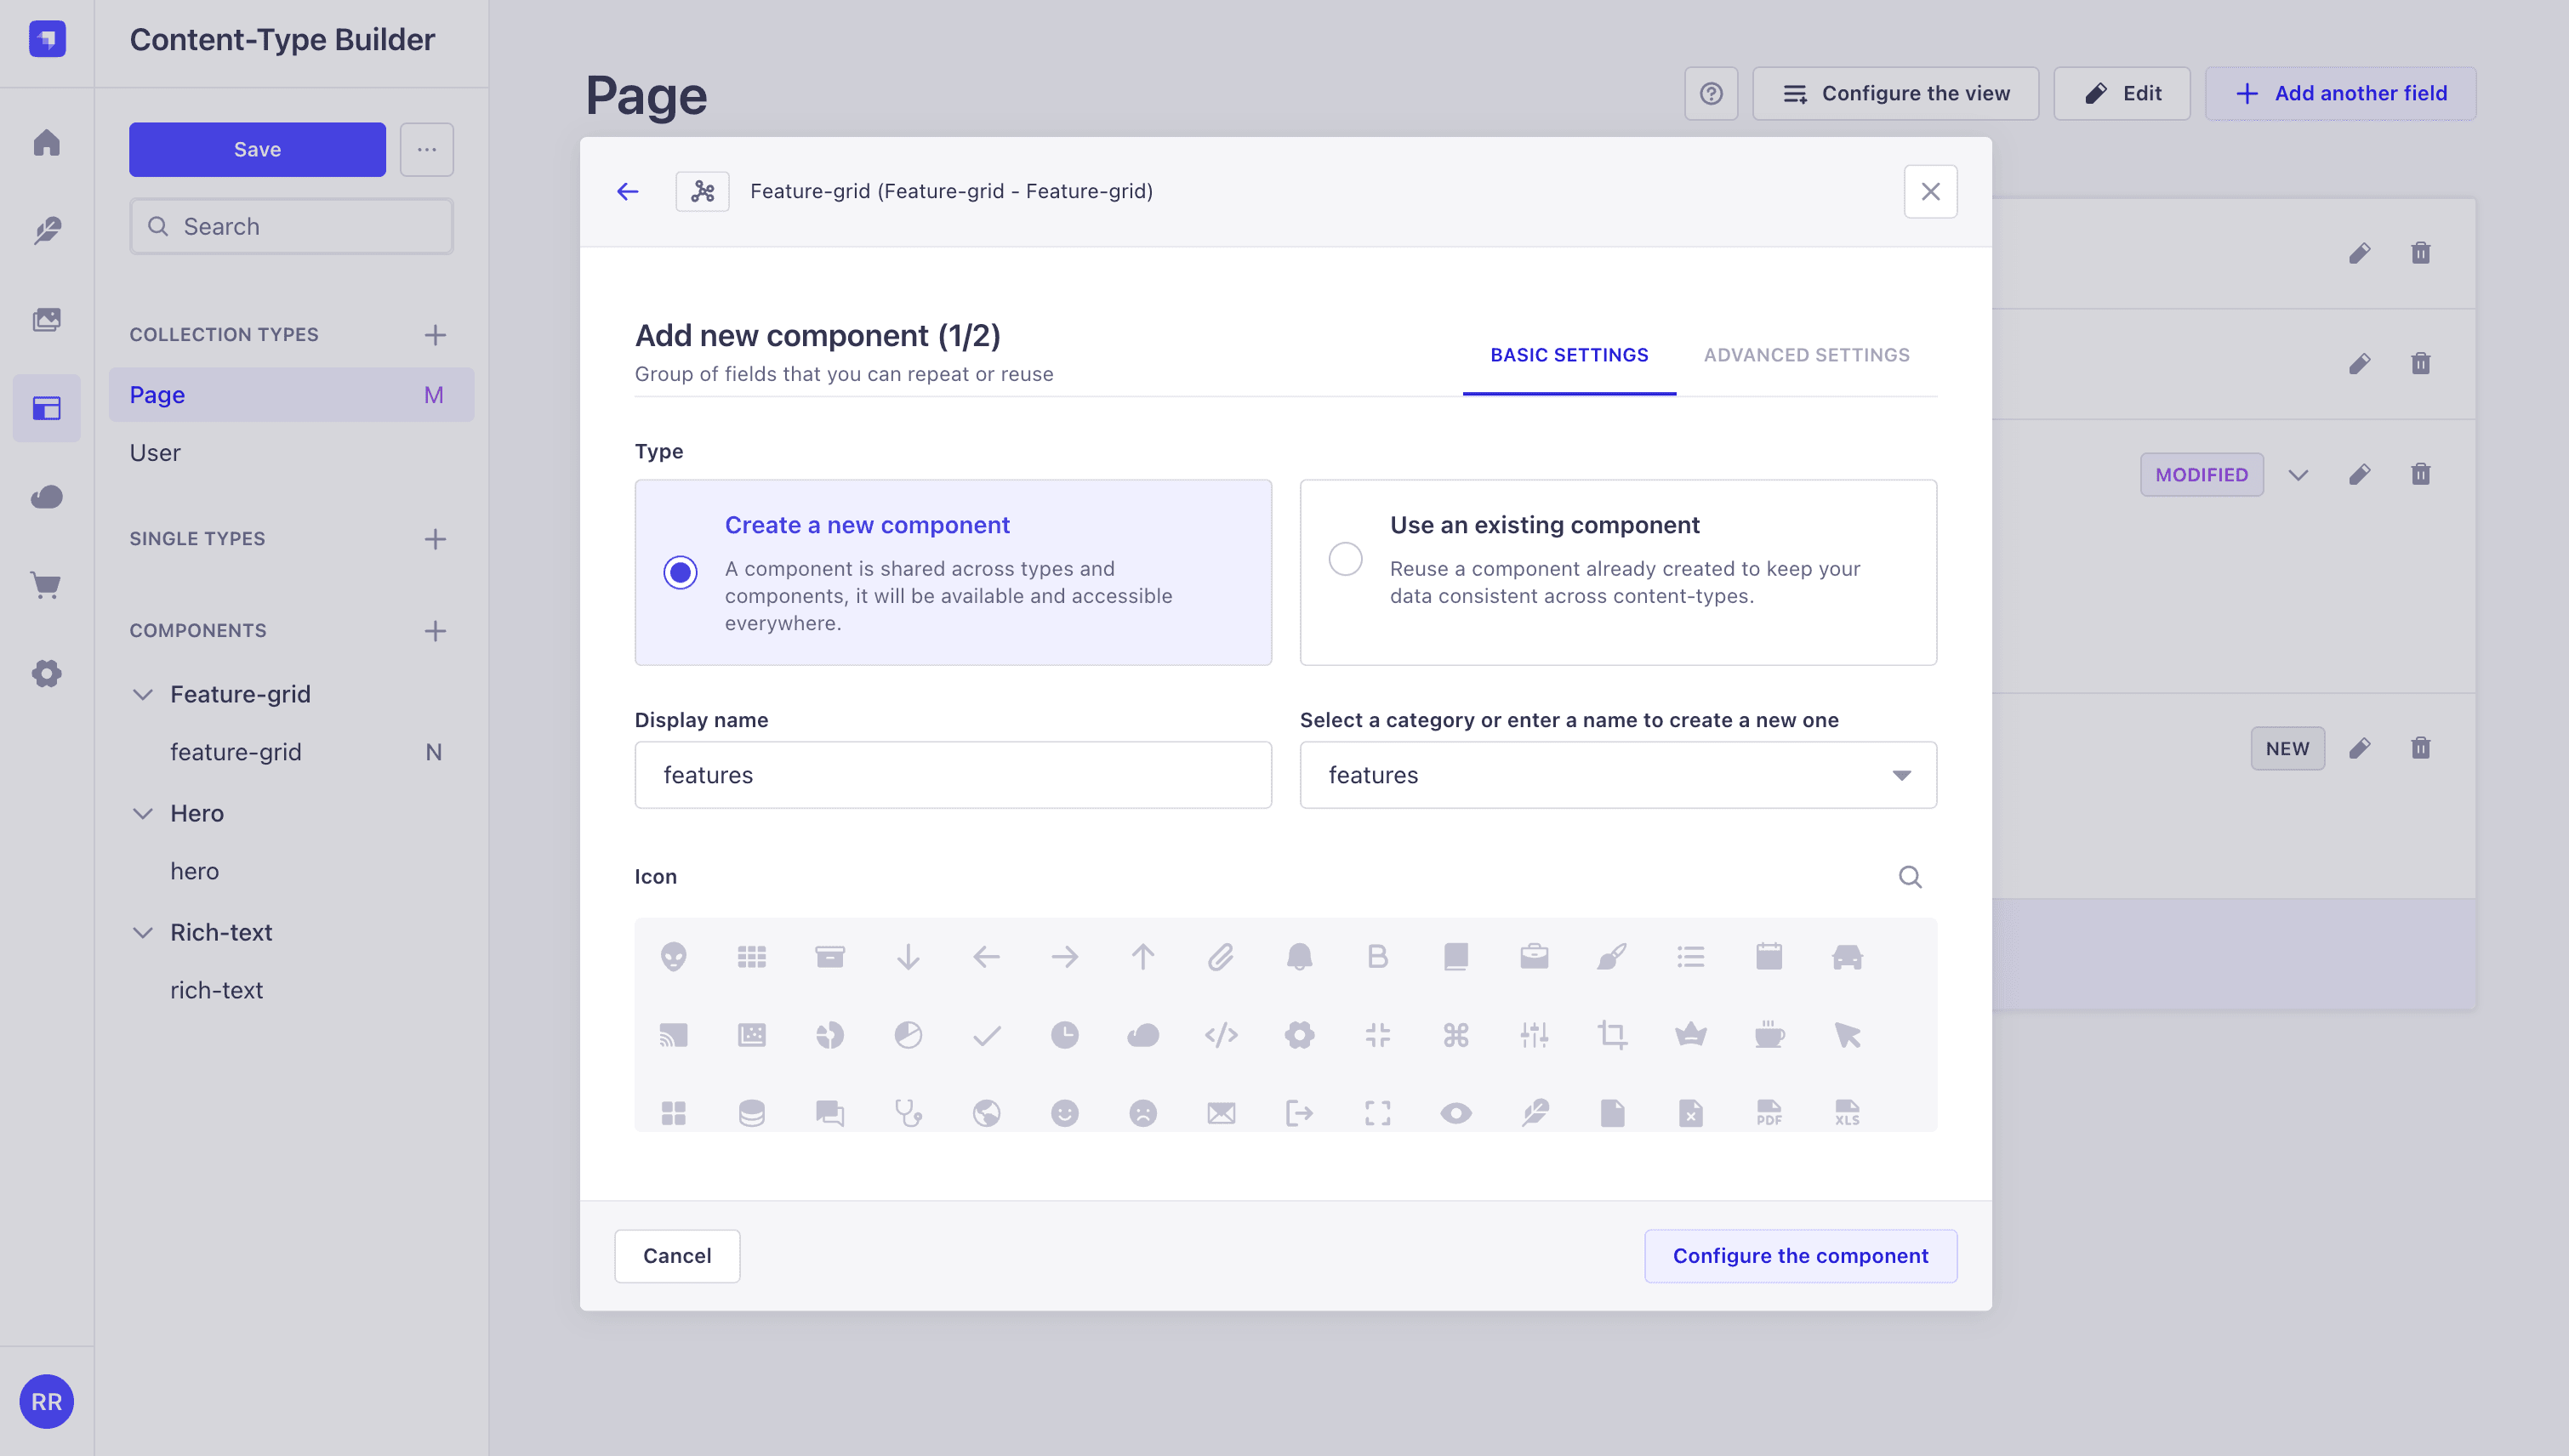
Next, add a Component field. In step 1 of 2, set the display name to features and the category to features. Strapi creates the nested features.features component.
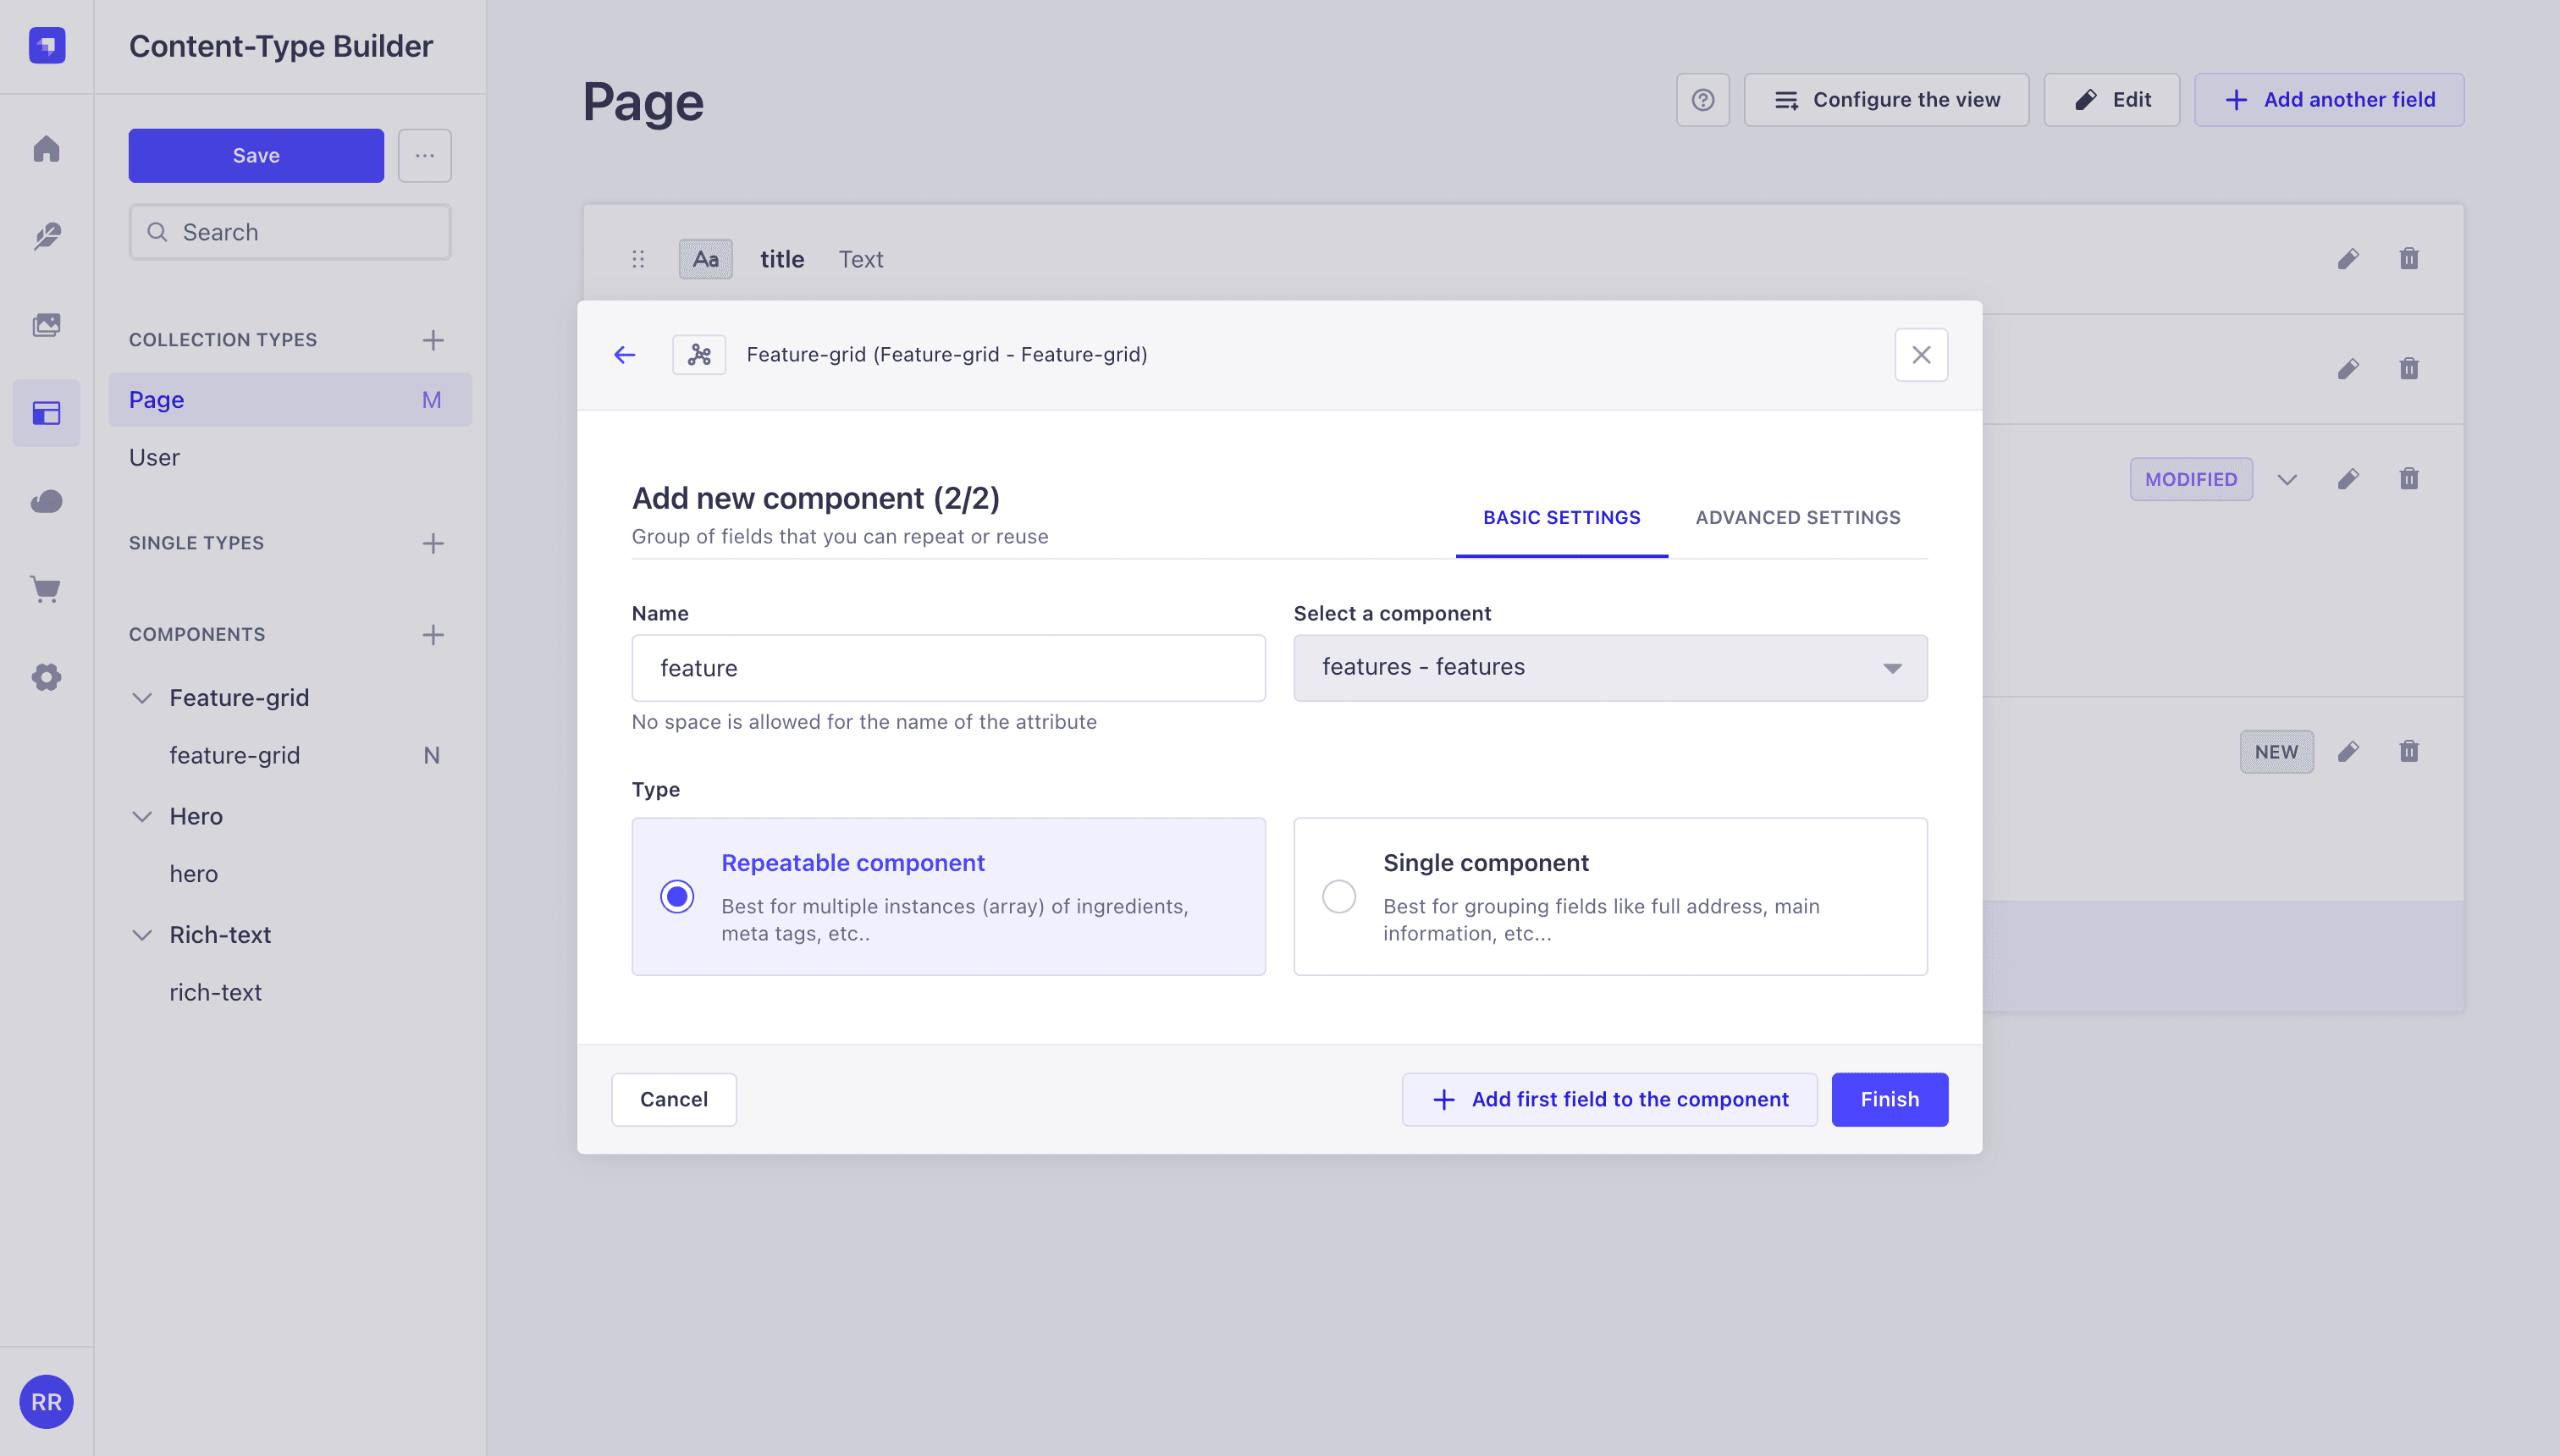
In step 2 of 2, name the field feature (singular, since the code references block.feature), select features - features as the component, and choose Repeatable component. This lets editors add as many feature cards as they like.
Add fields to the nested Features component (features.features)
Click Add first field to the component to open the features.features editor. Add a Text (Short text) field named heading.
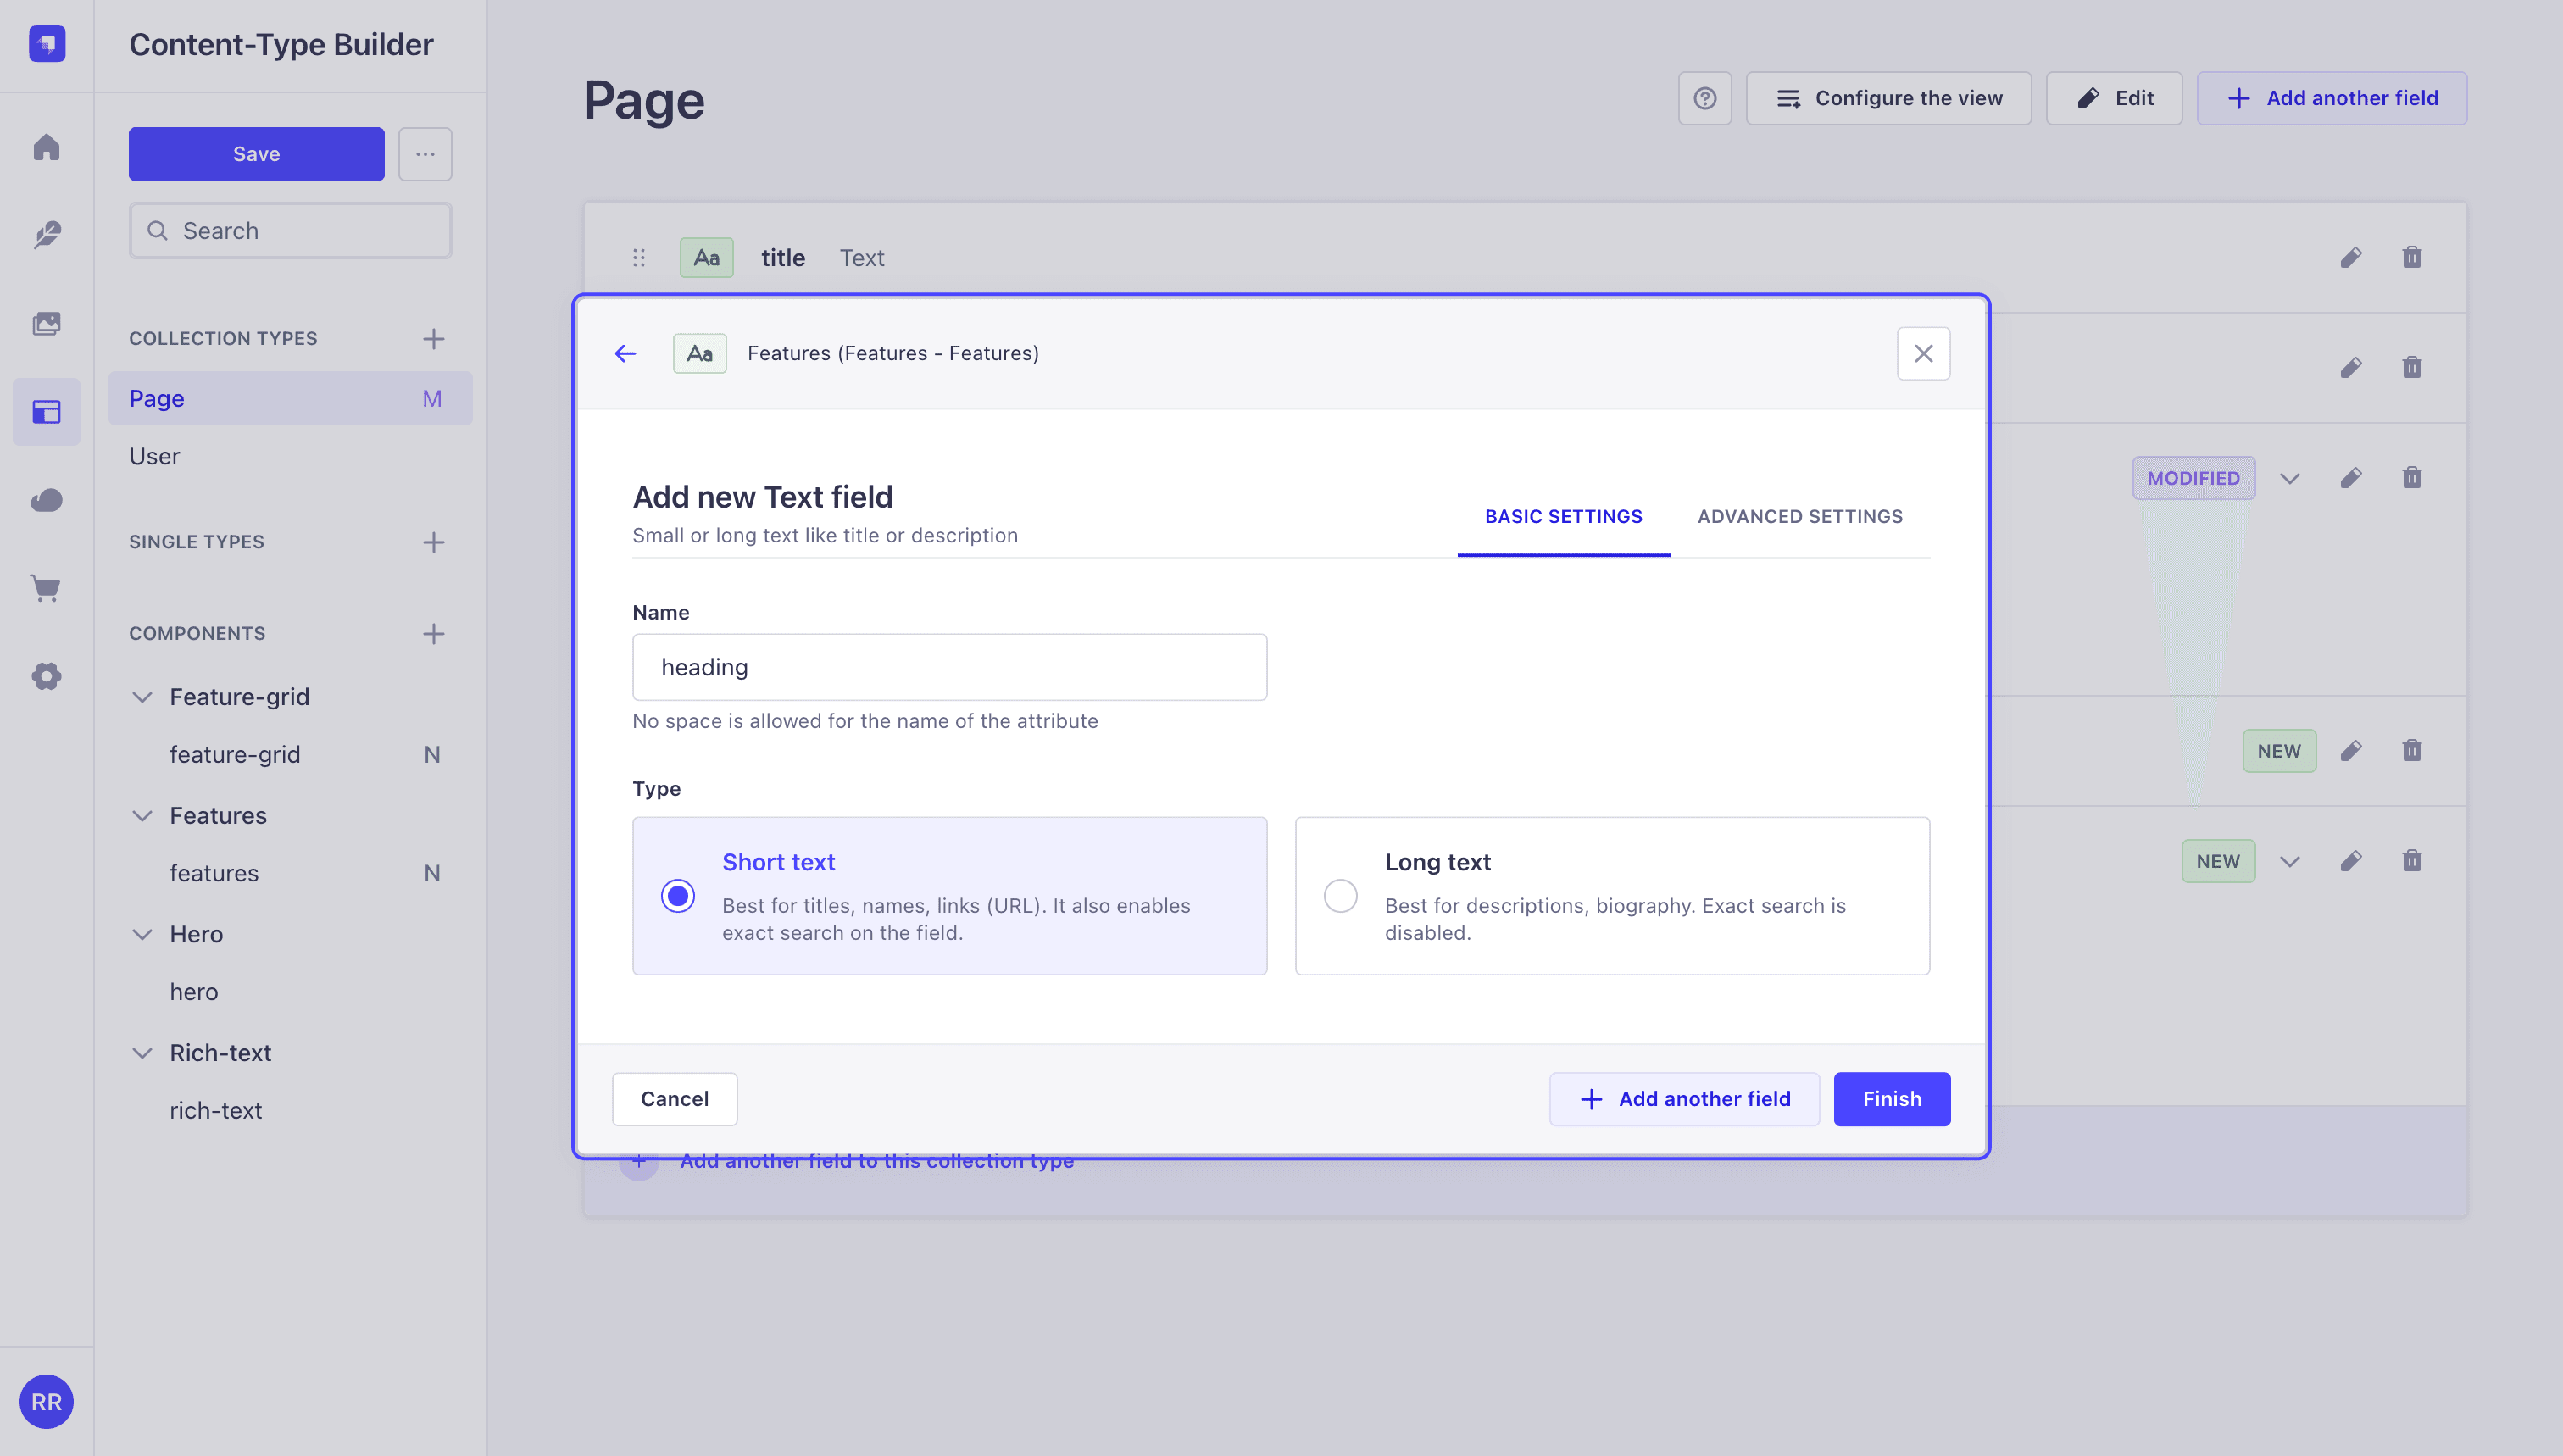
Then add another Text (Short text) field named subtext, followed by Media → Single media named image. Each feature card will render a heading, subtext, and an image.
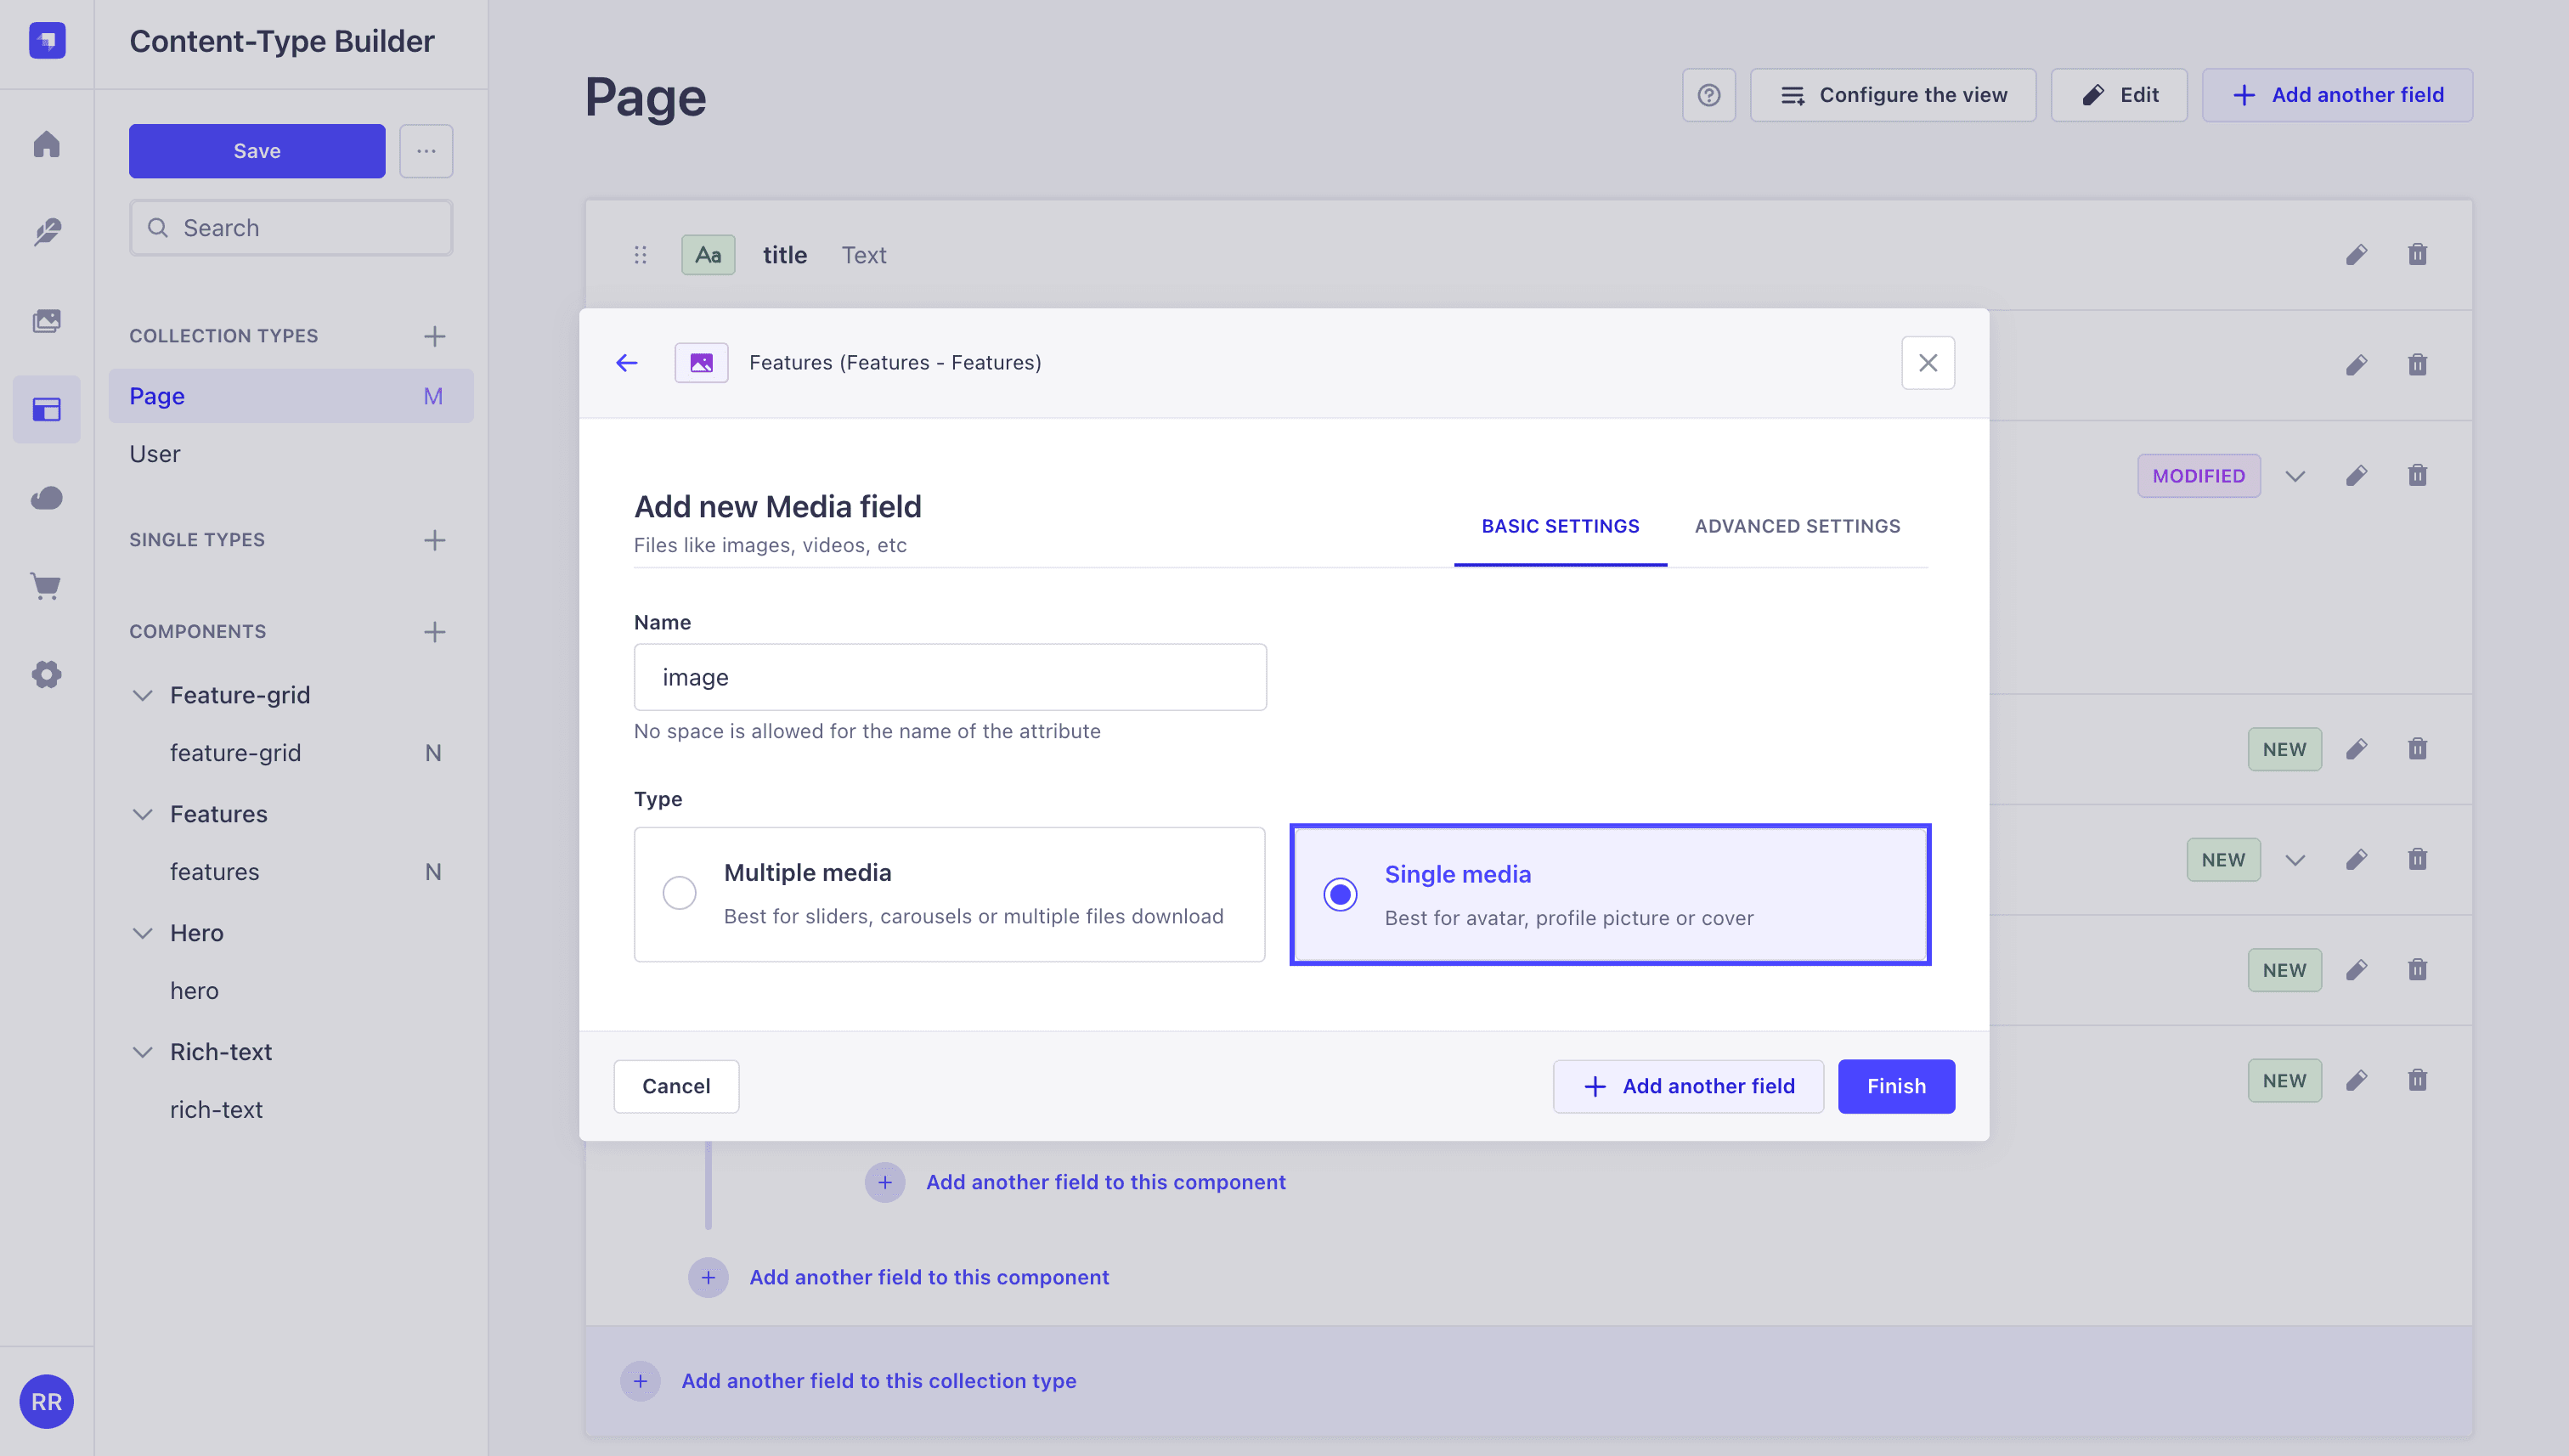
Click Finish, then click Save in the Content-Type Builder toolbar to apply all schema changes.
Create a home page entry and publish it
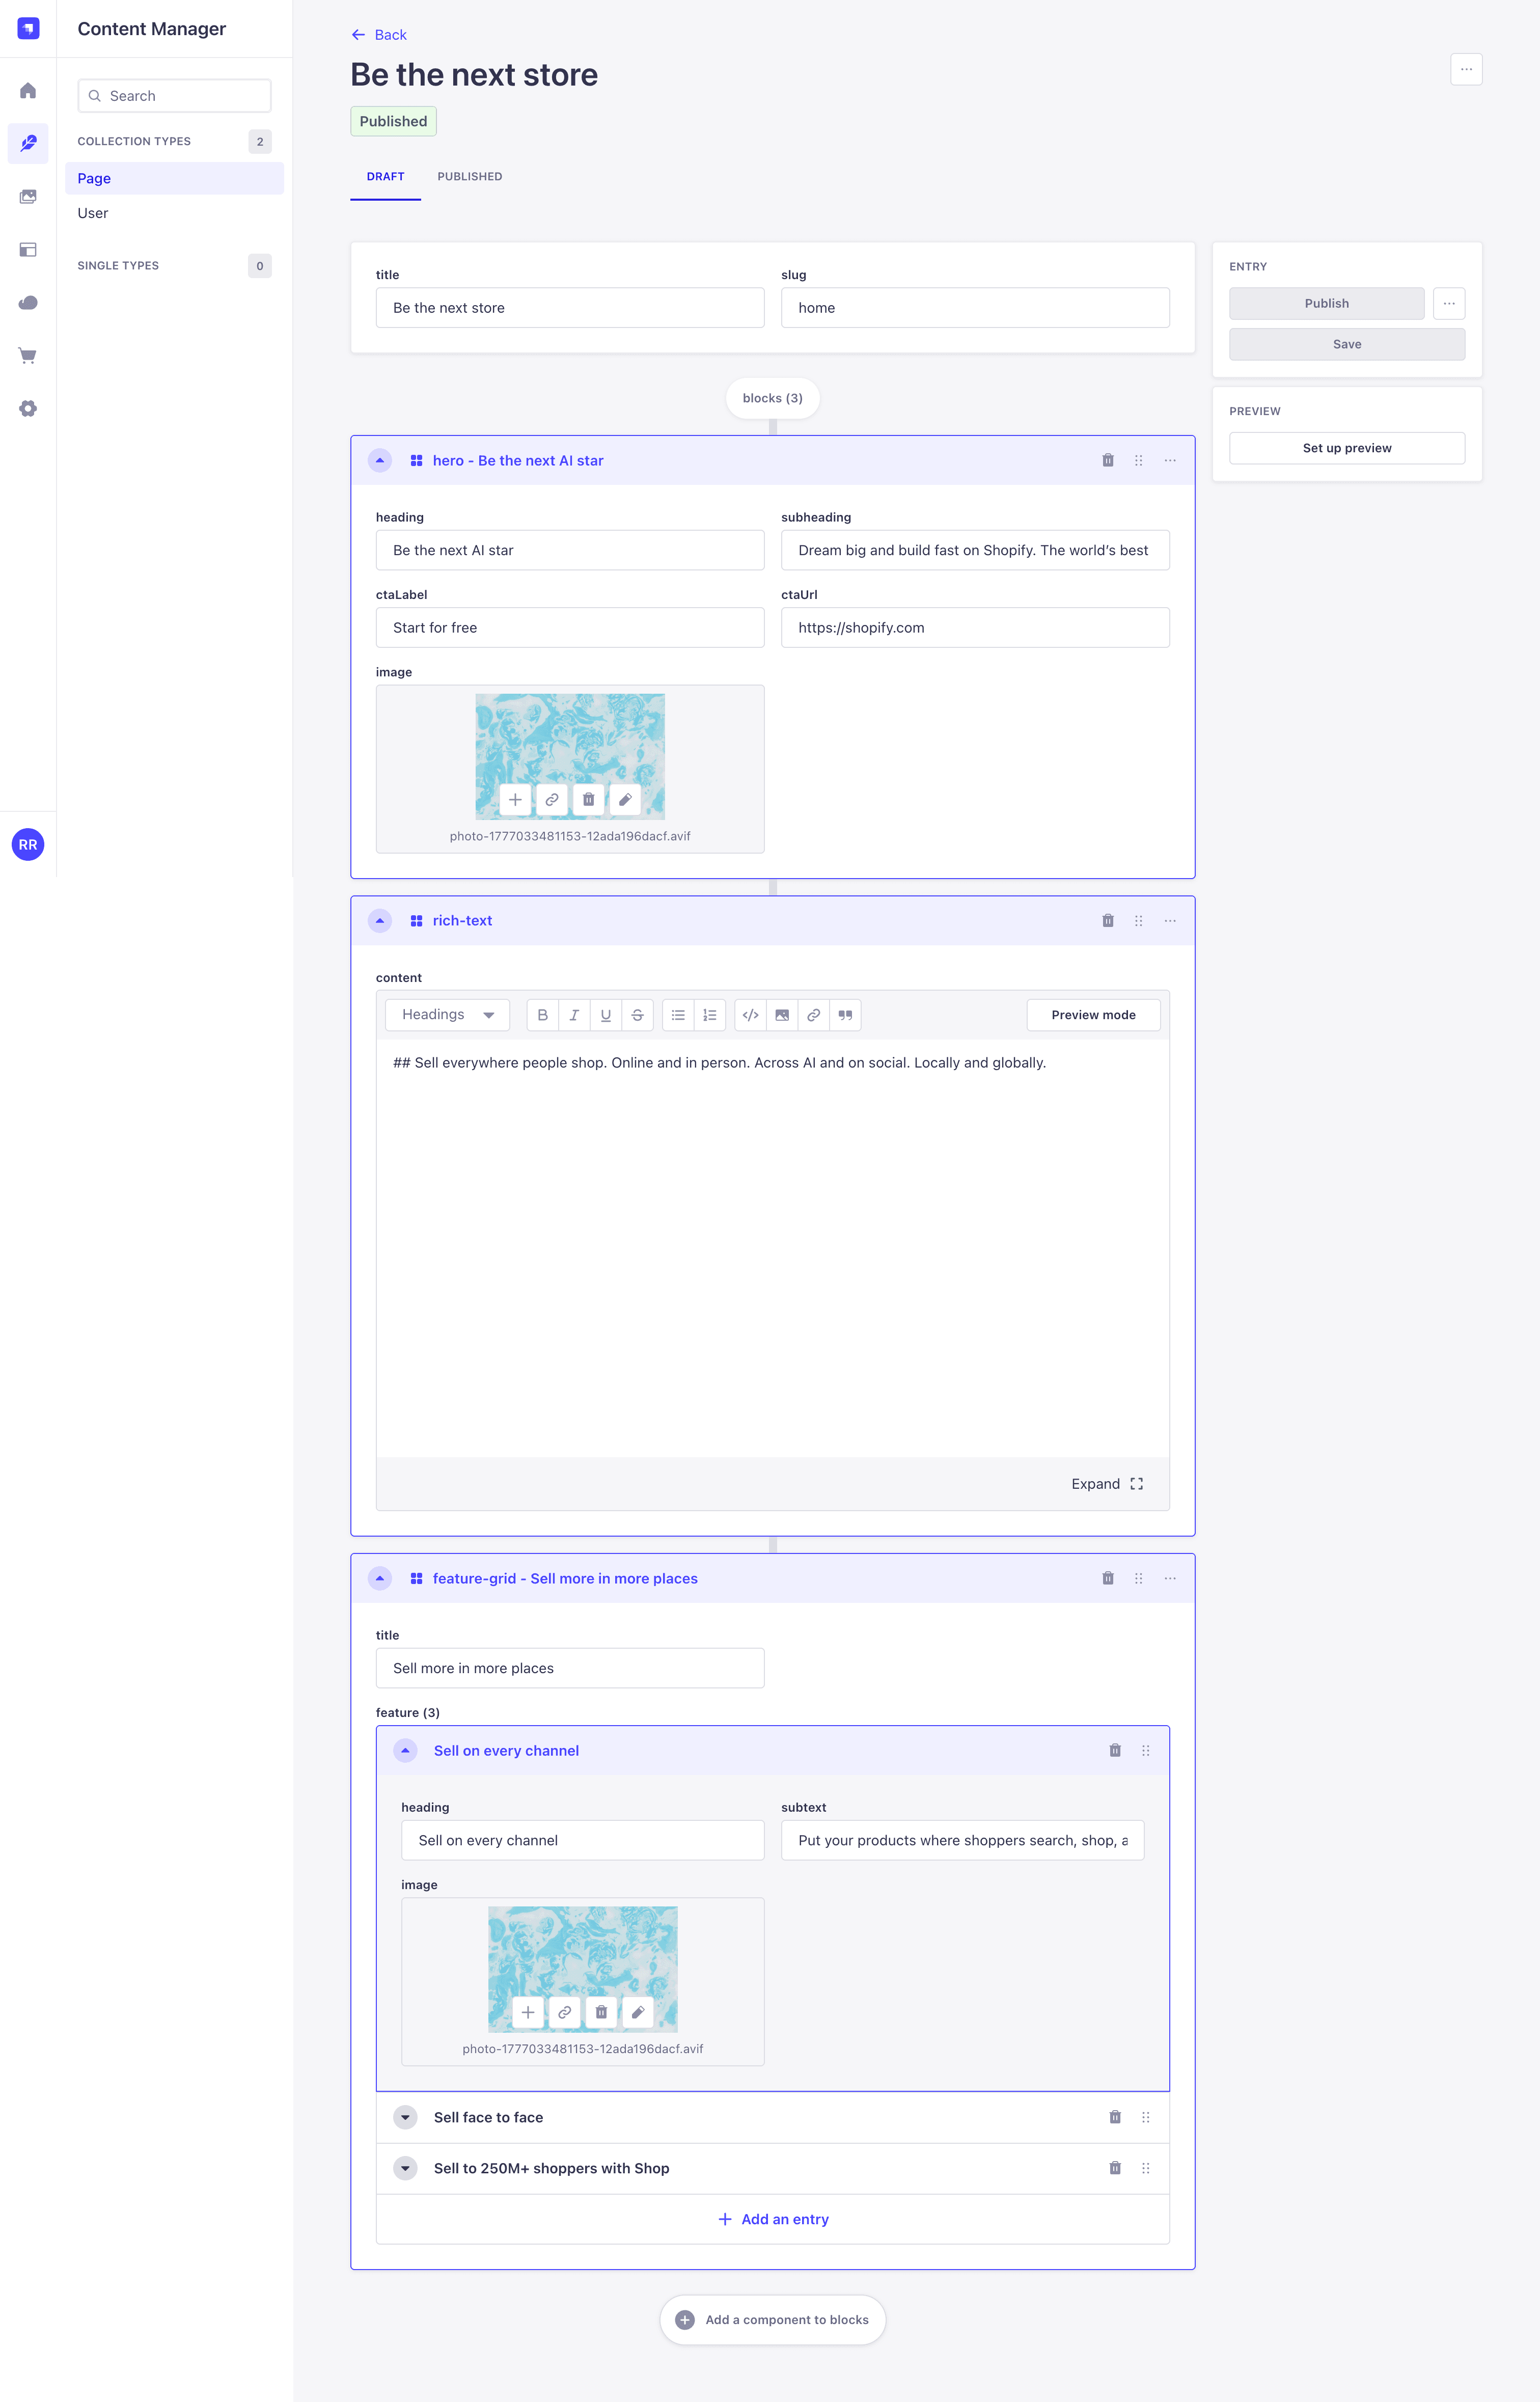
Open Content Manager → Page and click Create new entry. Fill in:
- title: anything (for example
Be the next store) - slug:
home
Click Add a component to blocks and add all three block types. In the hero image field and each feature image field, link the sample image you uploaded in the first step. Click Save → Publish.
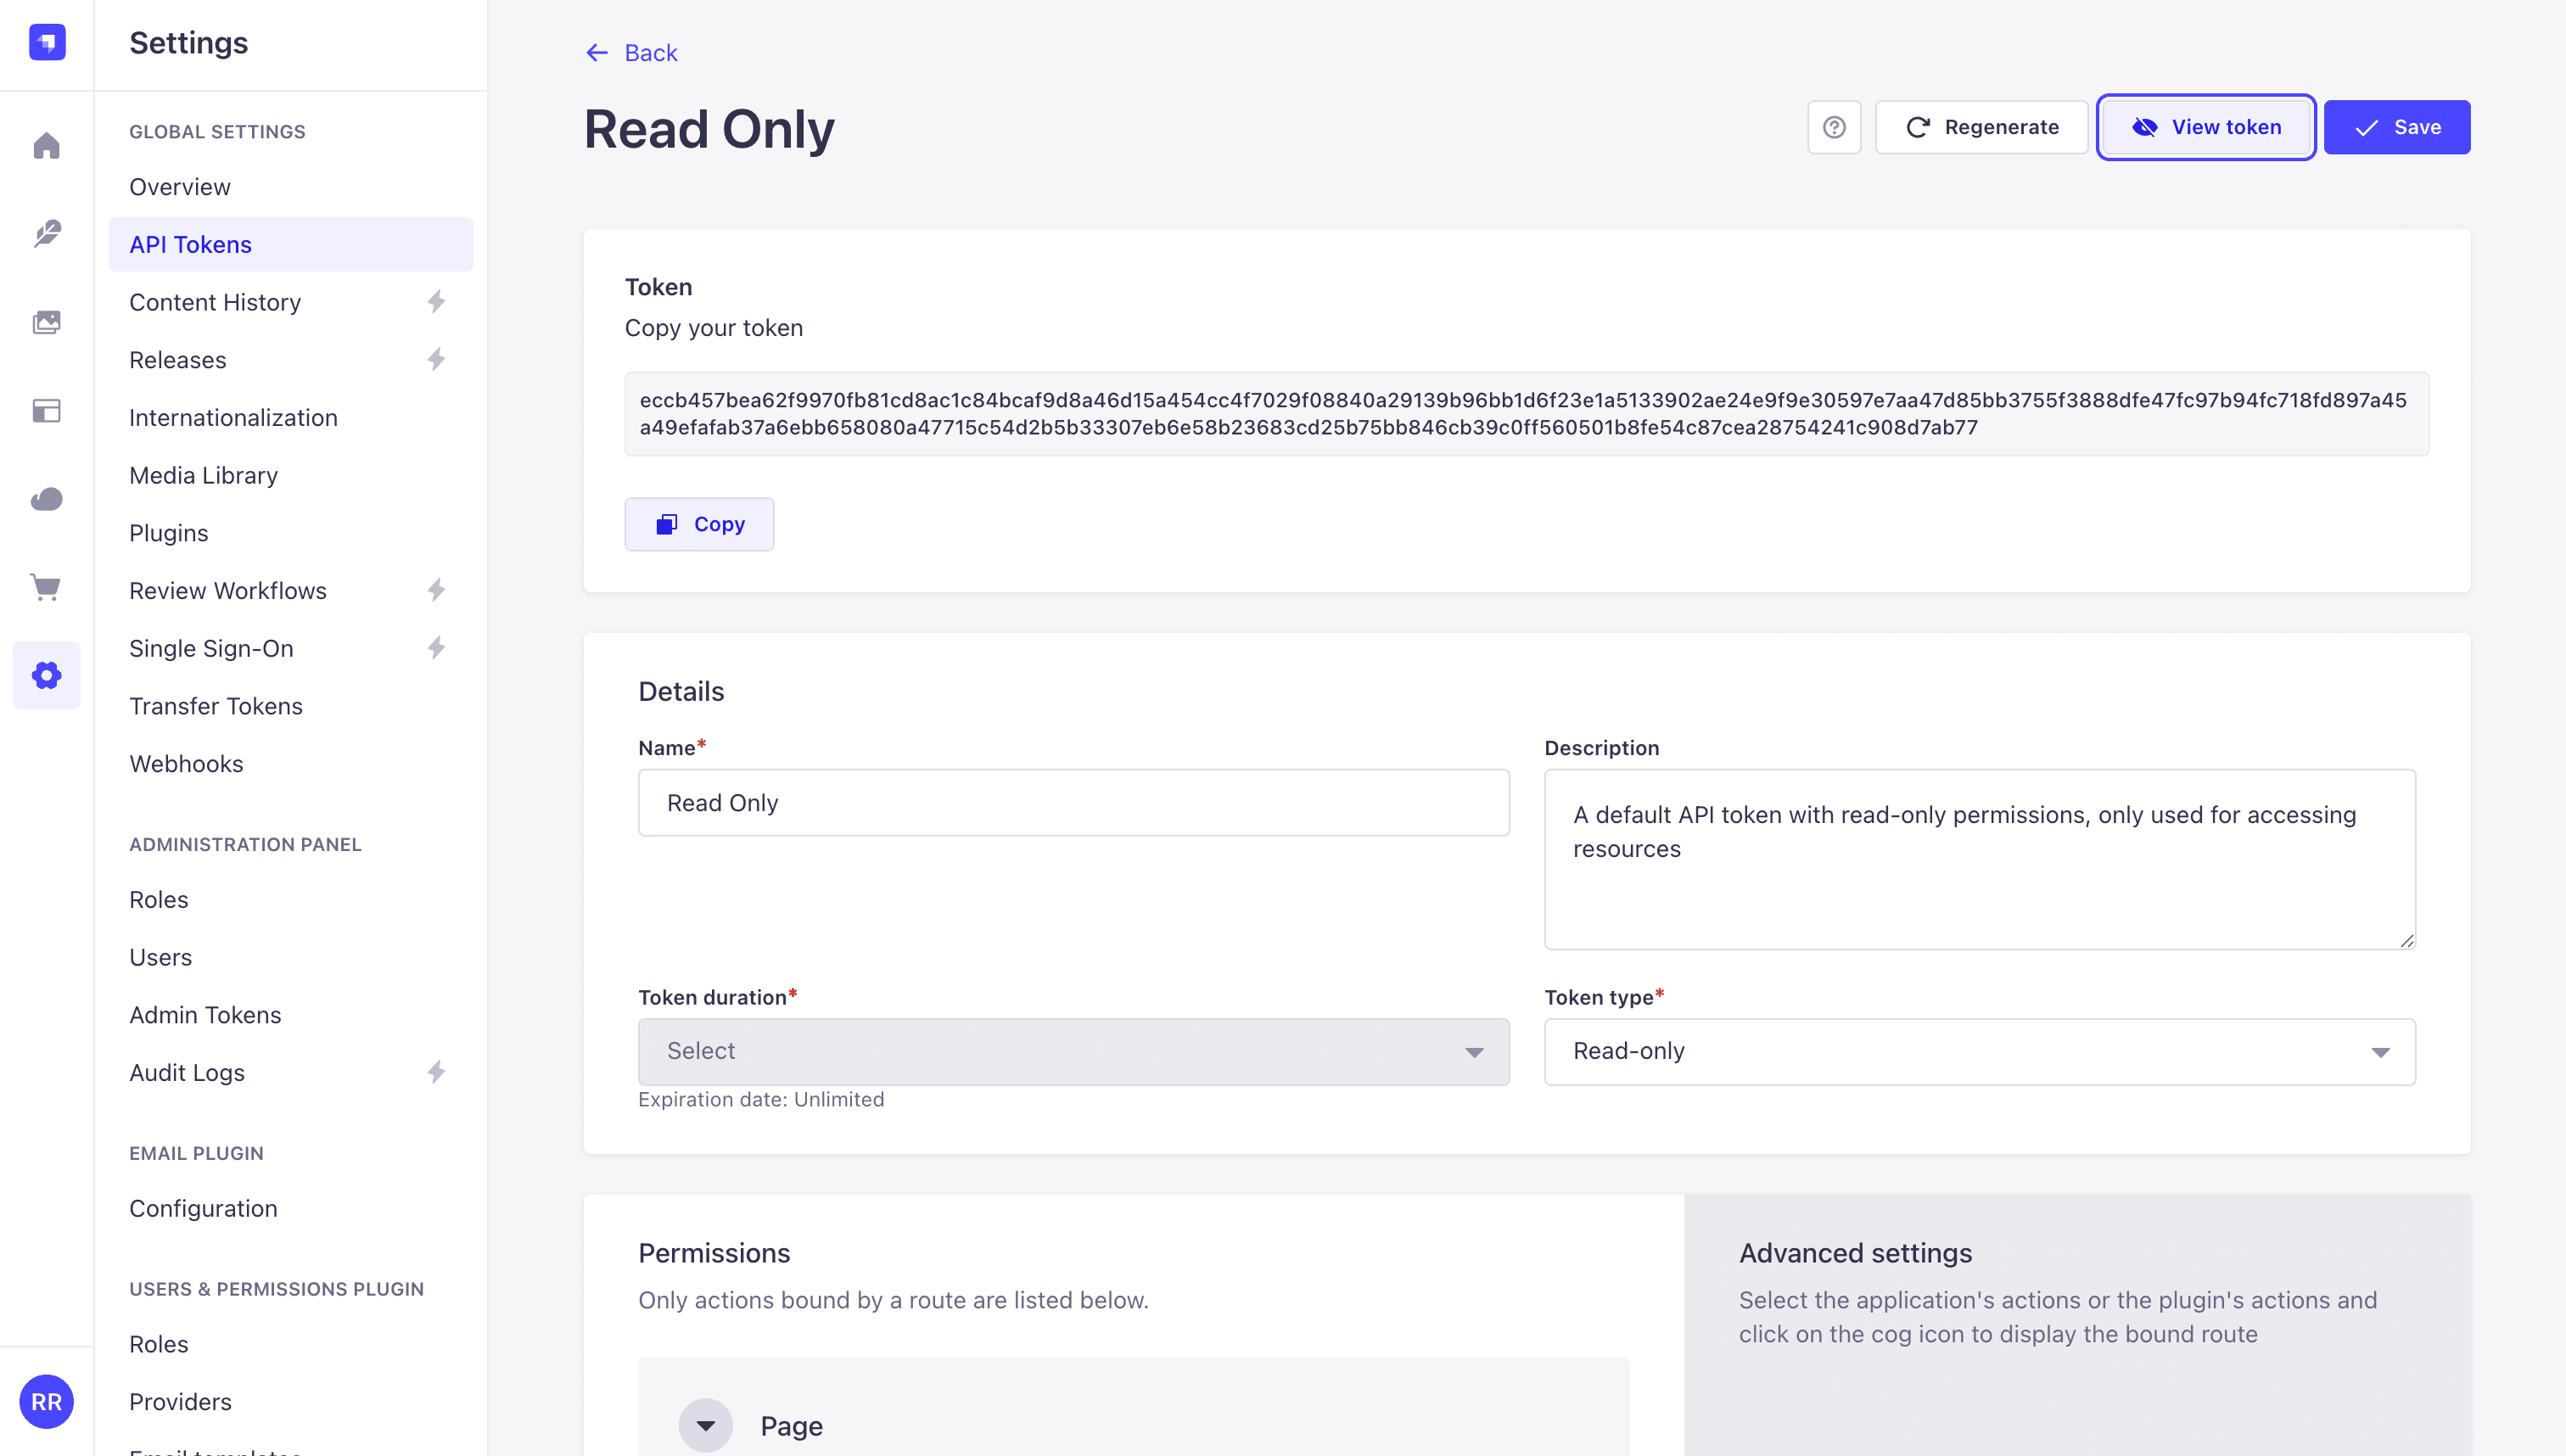
Before moving on to the frontend, create an API token so Next.js can read data from Strapi without using admin credentials. Go to Settings → API Tokens, copy the auto-generated Read Only token, and keep it somewhere safe, because you will paste it into your .env.local file in the next step.
Create the Next.js frontend
Let's get started by creating a new Next.js project. Open your terminal and run the following command:
# Create a new Next.js project
npx create-next-app@latest strapi-frontend --ts --app --eslint --tailwind --src-dir
cd strapi-frontend

# Install required dependencies
npm install qs react-markdown remark-gfm
npm install -D @tailwindcss/typography @types/qs
The packages above install the following:
- qs: builds the nested query strings that Strapi's REST API requires for filters, population, and status parameters.
- react-markdown & remark-gfm: renders markdown stored in Strapi richtext fields as HTML, with GitHub Flavored Markdown support (tables, strikethrough, task lists).
- @tailwindcss/typography: the
proseutility class for styling rendered rich text without writing custom CSS.
Next, create a .env.local file at the project root. STRAPI_API_TOKEN is the read-only token you just copied from Strapi. For PREVIEW_SECRET and REVALIDATE_SECRET, generate a random 32-byte hex string for each one by running the command below and pasting the output.
# Generate a 32 character secret
openssl rand -hex 32
# File: .env.local
NEXT_PUBLIC_STRAPI_URL=http://localhost:1337
STRAPI_API_TOKEN=your_token_here
PREVIEW_SECRET=<output of openssl rand -hex 32>
REVALIDATE_SECRET=<output of openssl rand -hex 32>Now, before you proceed to the next step, here is the folder structure you will end up with by the end of this guide:
strapi-frontend/
├── src/
│   ├── app/
│   │   ├── [slug]/
│   │   │   ├── page.tsx              # Suspense shell, no Strapi await here
│   │   │   └── loading.tsx           # Instant skeleton on navigation
│   │   ├── page.tsx                  # Redirects / → /home
│   │   ├── globals.css               # Tailwind v4 + design tokens
│   │   ├── api/
│   │   │   ├── preview/route.ts      # Strapi preview → Draft Mode
│   │   │   └── revalidate/route.ts   # Strapi webhook → revalidateTag
│   │   └── layout.tsx
│   ├── components/
│   │   ├── blocks/
│   │   │   ├── HeroBlock.tsx         # async server: fetch + view
│   │   │   ├── RichTextBlock.tsx
│   │   │   └── FeatureGridBlock.tsx
│   │   ├── dynamic-zone/
│   │   │   ├── DynamicZoneRenderer.tsx
│   │   │   ├── PageBlocks.tsx        # async: layout fetch
│   │   │   ├── PageLayoutSkeleton.tsx
│   │   │   ├── BlockRenderer.tsx     # optional helper for unknown blocks
│   │   │   └── BlockSkeleton.tsx
│   │   └── StrapiImage.tsx
│   ├── lib/
│   │   ├── strapi/
│   │   │   ├── client.ts
│   │   │   ├── populate.ts           # on fragments per block
│   │   │   └── types.ts
│   │   ├── feature-grid.ts           # normalize items + responsive grid classes
│   │   ├── richtext.ts               # HTML detection + prose classes
│   │   ├── ui.ts                     # shared section/CTA class names
│   │   └── utils.ts
│   └── blocks/
│       └── registry.ts
└── next.config.ts
With the project scaffolded and your environment variables set, you can now create the shared CSS and utility files that all block components will import.
Set up Tailwind CSS v4 (and design tokens)
Open src/app/globals.css and replace its contents with the following code to integrate Tailwind CSS, the typography plugin, and the shared design tokens used across all blocks:
/* File: src/app/globals.css */
@import "tailwindcss";
@plugin "@tailwindcss/typography";

:root {
  --brand: #008060;
  --brand-hover: #006e52;
  --muted: #6b7177;
  --border: #e1e3e5;
  --surface: #f6f6f7;
}

@theme inline {
  --color-brand: var(--brand);
  --color-brand-hover: var(--brand-hover);
  --color-muted: var(--muted);
  --color-border: var(--border);
  --color-surface: var(--surface);
}
Then, create a src/lib/ui.ts file with the shared layout class names that every block imports:
// File: src/lib/ui.ts
export const sectionClassName = "mx-auto w-full max-w-7xl px-6 sm:px-8 lg:px-12";

export const ctaClassName =
  "inline-flex items-center justify-center rounded-full bg-brand px-6 py-3 text-sm font-semibold text-white transition hover:bg-brand-hover";
With the design tokens and layout helpers in place, you can now configure how Strapi data is populated for each block type.
Configure Dynamic Zone population
In Strapi 5, the shared population strategy for components and Dynamic Zones was removed. You must use on fragments to declare population per component type (docs).
Create the src/lib/strapi/populate.ts file with two population strategies: one that fetches only block IDs for the layout phase, and one that fetches full block content per component type:
// File: src/lib/strapi/populate.ts
import qs from "qs";
import type { BlockComponentUid } from "./types";

/** Full population per block type, used when a block fetches its own data. */
export const blockPopulateByComponent = {
  "hero.hero": {
    populate: {
      image: {
        fields: ["url", "alternativeText", "width", "height"],
      },
    },
  },
  "rich-text.rich-text": true,
  "feature-grid.feature-grid": {
    populate: {
      feature: {
        populate: {
          image: {
            fields: ["url", "alternativeText", "width", "height"],
          },
        },
      },
    },
  },
} as const;

/** Layout-only population: block ids and types, no nested media. */
export const pageLayoutPopulate = {
  blocks: {
    on: {
      "hero.hero": { fields: ["id"] },
      "rich-text.rich-text": { fields: ["id"] },
      "feature-grid.feature-grid": { fields: ["id"] },
    },
  },
} as const;

export function buildLayoutQuery(params: {
  slug: string;
  status: "draft" | "published";
  locale?: string;
}) {
  return qs.stringify(
    {
      filters: { slug: { $eq: params.slug } },
      status: params.status,
      locale: params.locale,
      fields: ["title", "slug"],
      populate: pageLayoutPopulate,
    },
    { encodeValuesOnly: true }
  );
}

export function buildBlockQuery(params: {
  slug: string;
  status: "draft" | "published";
  component: BlockComponentUid;
  locale?: string;
}) {
  return qs.stringify(
    {
      filters: { slug: { $eq: params.slug } },
      status: params.status,
      locale: params.locale,
      populate: {
        blocks: {
          on: {
            [params.component]: blockPopulateByComponent[params.component],
          },
        },
      },
    },
    { encodeValuesOnly: true }
  );
}
In the code above:
blockPopulateByComponentdefines the full population for each block type. Hero fetches image fields, and the feature grid populates nested feature images. This is used when each async block calls Strapi for its own content.pageLayoutPopulatefetches only theidfor each block type. This keeps the initial layout request small: it returns enough to know the page structure without pulling any media or nested data.buildLayoutQueryandbuildBlockQueryuseqsto serialize these objects into the nested query string format Strapi's REST API expects.
Note that populate=* only goes one level deep, so hero images and nested features.features images inside the feature grid will come back null in production. Explicit on rules keep payloads small and responses complete. See the populate docs for more details.
One thing to watch out for: the feature grid's feature field is a repeatable component (features.features) that contains media. You must nest populate.image under feature, not just set feature: true, otherwise the images will not come through.
With both population strategies defined, you are ready to build the fetch functions that use them.
Layout fetch and per-block streaming
This guide uses a two-phase fetch so the browser gets skeleton HTML immediately, then real content streams in as each Strapi call resolves.
| Phase | Function | What it fetches | When it runs |
|---|---|---|---|
| Layout phase | fetchPageLayoutBySlug | Block id + __component only | Inside PageBlocks (async child of Suspense) |
| Content phase | fetchBlockById | Full block payload per component | Inside each async block (HeroBlock, etc.) |
For mostly static marketing pages, a single fully-populated fetch in page.tsx results in fewer HTTP round-trips and is often the simpler default. The two-phase pattern here trades that simplicity for streaming UX: skeletons appear first, block content streams in parallel, and all CMS fetches stay on the server.
Create the Strapi client
Create src/lib/strapi/client.ts with the following code to isolate and reuse Strapi API fetch logic across your application:
// File: src/lib/strapi/client.ts
import { buildBlockQuery, buildLayoutQuery } from "./populate";
import type {
  BlockComponentUid,
  DynamicZoneBlock,
  FetchOptions,
  Page,
  PageLayout,
} from "./types";

const STRAPI_URL = (
  process.env.NEXT_PUBLIC_STRAPI_URL ?? "http://localhost:1337"
).replace(/"/g, "");

function strapiHeaders() {
  return {
    "Content-Type": "application/json",
    ...(process.env.STRAPI_API_TOKEN && {
      Authorization: `Bearer ${process.env.STRAPI_API_TOKEN}`,
    }),
  };
}

/** Fetches page layout only: block ids and component types, no block content. */
export async function fetchPageLayoutBySlug({
  slug,
  status,
  locale,
  cache = "force-cache",
  tags = ["strapi-pages"],
}: FetchOptions): Promise<PageLayout | null> {
  const query = buildLayoutQuery({ slug, status, locale });
  const url = `${STRAPI_URL}/api/pages?${query}`;

  const res = await fetch(url, {
    headers: strapiHeaders(),
    cache,
    next: { tags: [...tags, `page:${slug}`] },
  });

  if (!res.ok) {
    throw new Error(`Strapi request failed: ${res.status} ${res.statusText}`);
  }

  const json = await res.json();
  return (json.data?.[0] as PageLayout | undefined) ?? null;
}

/** Each block calls Strapi independently with population tuned to that component. */
export async function fetchBlockById<C extends BlockComponentUid>({
  slug,
  blockId,
  component,
  status,
  locale,
  cache = "force-cache",
}: {
  slug: string;
  blockId: number;
  component: C;
  status: "draft" | "published";
  locale?: string;
  cache?: RequestCache;
}): Promise<Extract<DynamicZoneBlock, { __component: C }> | null> {
  const query = buildBlockQuery({ slug, status, component, locale });
  const url = `${STRAPI_URL}/api/pages?${query}`;

  const res = await fetch(url, {
    headers: strapiHeaders(),
    cache,
    next: { tags: [`block:${slug}:${blockId}`, `page:${slug}`] },
  });

  if (!res.ok) {
    throw new Error(`Strapi request failed: ${res.status} ${res.statusText}`);
  }

  const json = await res.json();
  const page = json.data?.[0] as Page | undefined;
  const block = page?.blocks?.find(
    (entry): entry is Extract<DynamicZoneBlock, { __component: C }> =>
      entry.id === blockId && entry.__component === component
  );

  return block ?? null;
}
In the code above:
fetchPageLayoutBySlugfetches only the blockidand__componentvalues. It never pulls media or nested content, so the layout request stays fast regardless of how many blocks the page has.fetchBlockByIdhits/api/pageswith anonfragment scoped to a single component type, then finds the matching entry byid. Each block calls this independently, so their fetches run in parallel.- Cache tags (
block:${slug}:${blockId}) let you revalidate individual blocks from a Strapi webhook without invalidating the whole page.
Define the TypeScript types
Create src/lib/strapi/types.ts with the following code that defines every Strapi content type, the DynamicZoneBlock discriminated union, and the shared layout helpers:
// File: src/lib/strapi/types.ts
// ── Strapi media ──────────────────────────────────────────────────────────────
export interface StrapiMedia {
  url: string;
  alternativeText?: string | null;
  width?: number | null;
  height?: number | null;
}

// ── Block content types (populated Strapi payloads) ───────────────────────────
export interface HeroBlock {
  id: number;
  __component: "hero.hero";
  heading?: string | null;
  subheading?: string | null;
  ctaLabel?: string | null;
  ctaUrl?: string | null;
  image?: StrapiMedia | null;
}

export interface RichTextBlock {
  id: number;
  __component: "rich-text.rich-text";
  content?: string | null;
}

export interface FeatureItem {
  id: number;
  heading?: string | null;
  subtext?: string | null;
  image?: StrapiMedia | null;
}

export interface FeatureGridBlock {
  id: number;
  __component: "feature-grid.feature-grid";
  title?: string | null;
  feature?: FeatureItem[] | null;
}

export type DynamicZoneBlock =
  | HeroBlock
  | RichTextBlock
  | FeatureGridBlock;

export type BlockComponentUid = DynamicZoneBlock["__component"];

// ── Layout types (block ids only, no content) ────────────────────────────────
export type BlockLayout = {
  id: number;
  __component: BlockComponentUid;
};

export type BlockShellProps = BlockLayout & {
  slug: string;
  status: "draft" | "published";
};

export interface FetchOptions {
  slug: string;
  status: "draft" | "published";
  locale?: string;
  cache?: RequestCache;
  tags?: string[];
}

export interface PageLayout {
  documentId: string;
  title?: string | null;
  slug?: string | null;
  blocks?: BlockLayout[] | null;
}

/** Used inside fetchBlockById to locate a block in the populated page response. */
export interface Page {
  blocks?: DynamicZoneBlock[] | null;
}
In the code above:
BlockLayoutis what the layout fetch returns: justidand__component. This is whatDynamicZoneRendererreceives and passes to eachBlockSlot.BlockShellPropsextendsBlockLayoutwithslugandstatus, giving each async block everything it needs to callfetchBlockById.- Full block interfaces (
HeroBlock,FeatureGridBlock, etc.) describe the populated Strapi payload, not the layout shell. They are used only inside each block's view component.
With the client and types in place, you can now build the page route and its async child components.
GitHub Repositories
The complete code for the frontend and backend of this project can be found below.
Conclusion: Wrapping up Part 1
You now have the complete data layer for a streaming Dynamic Zone: a composable Page content model, explicit on population fragments, and a typed two-phase fetch client that separates page structure from block content.
Nothing renders yet; that's for Part 2. There, you will build the Suspense shell, the block registry, the async block components, cache revalidation, and draft preview.
See you in Part 2, where the skeletons come to life.