
In Part 1, we laid the foundation by extending Strapi 5’s built-in cron jobs into a persistent, database-backed, and fully manageable background job system.
We created custom content types for cron jobs and their logs, built an execution and error handling mechanism, exposed APIs for triggering jobs, and for viewing their status.
With the backend in place, it’s time to build the frontend to manage the Strapi cron jobs. In this part, we’ll focus on building a Next.js Dashboard that connects to the Strapi APIs we implemented, to control cron jobs.
Tutorial Roadmap
This tutorial is divided into two sections.
- Part 1: Setting up Strapi and Extending Strapi Cron Jobs
- Part 2: Building the Next.js Dashboard for Managing Cron Jobs
Tutorial Objectives
By the end of this tutorial, you will learn to:
- Fetch and display cron jobs and their status in a Next.js application.
- View cron job execution history with pagination.
- Trigger cron jobs and reschedule them from the UI.
- Update cron job settings and toggle their enabled state.
- Build a clean, approachable, and maintainable cron job management interface.
Install Next.js
Create a new Next.js app with App Router and TypeScript enabled:
npx create-next-app@latest strapi-cron-job-front --use-npm # or --use-yarnCreate a Next.js API Route For Cron Job List
Let's create an API route that fetches cron jobs from Strapi and makes them available to our Next.js app.
Create a new file named ./app/api/jobs/route.ts and add the following:
// Path: ./app/api/jobs/route.ts
import { NextResponse } from "next/server";

export async function GET() {
  const res = await fetch("http://localhost:1337/api/cron-jobs");
  const json = await res.json();

  const jobs = json.map((job: any) => ({
    ...job,
    id: job.documentId,
    isRunning: job.job_logs?.length > 0,
  }));

  return NextResponse.json(jobs);
}
We define a GET request handler API route that fetches a list of cron jobs from the Strapi backend http://localhost:1337/api/cron-jobs, which then processes the results to make them more usable for the frontend application.
For each cron job, it adds an id, taken from its documentId, and an isRunning status that is set to true if the job has any associated job_logs with status set to running. Finally, it returns the transformed list of jobs as a JSON response.
Define Typescript Interfaces for Cron Job and Logs
Let's define the type structures for the job and log data we’ll be working with, to give us reliable typing, improved code readability, and helpful autocomplete support.
Create a file at: ./app/components/types.ts, and add the following:
// Path: ./app/components/types.ts

export interface JobSummary {
  id: string;
  documentId: string;
  name: string;
  displayName: string;
  description: string;
  schedule: string;
  enabled: boolean;
  isRunning: boolean;
  runCount: number;
  lastRunAt: string;
  nextRunAt: string;
}

export interface JobDetail extends JobSummary {
  timeZone?: string;
  tags?: string[];
  options: any;
}

export interface JobLog {
  id: string;
  documentId: string;
  startedAt: string;
  endedAt?: string;
  durationMs: number;
  message: string;
  manualTrigger: boolean;
  jobStatus: string;
  executionId: string;
  errorStack?: string;
}
Each of these interfaces gives structure and clarity to the data used in our frontend app:
JobSummary: Describes the basic information we show in job listings, like the cron job name, schedule, status flags, and key timestamps, like lastRunAt and nextRunAt.JobDetail: ExtendsJobSummaryto include additional details such as the job time zone, tags, and full configuration options.JobLog: Represents a single job execution record, including when it started and ended, how long it ran, its status, any error message, and whether it was manually triggered.
List Cron Jobs in Next.js Dashboard
Create JobList Component
To display jobs on the Next.js frontend, we’ll create a JobList component and hook it into our main page.
This component will fetch the job summary data from our Strapi backend, update itself on a timer, and render a card for each job with its key details and status.
Create a new file at ./app/components/JobList.tsx and add the code:
// Path: ./app/components/JobList.tsx

"use client";

import { useEffect, useState } from "react";
import { useRouter } from "next/navigation";
import { JobSummary } from "./types";

async function fetchJobs(): Promise<JobSummary[]> {
  const res = await fetch("/api/jobs");
  if (!res.ok) throw new Error("Failed to fetch jobs");
  return res.json();
}

export function JobList() {
  const [jobs, setJobs] = useState<JobSummary[]>([]);
  const [loading, setLoading] = useState(true);
  const router = useRouter();

  useEffect(() => {
    let interval: NodeJS.Timeout;

    async function loadJobs() {
      try {
        const jobData = await fetchJobs();
        setJobs(jobData);
      } catch (error) {
        console.error("Error loading jobs:", error);
      } finally {
        setLoading(false);
      }
    }

    loadJobs();
    interval = setInterval(loadJobs, 10000);

    return () => clearInterval(interval);
  }, []);

  if (loading) return <p>Loading jobs...</p>;

  return (
    <div className="grid grid-cols-1 md:grid-cols-2 lg:grid-cols-3 gap-6">
      {jobs.map((job) => (
        <div
          key={job.id}
          className="bg-white shadow-md rounded-xl p-5 border border-gray-200"
        >
          <div className="mb-3">
            <h2 className="text-xl font-semibold">{job.displayName}</h2>
            <p className="text-sm text-gray-500">{job.description}</p>
          </div>

          <div className="mb-4 text-sm text-gray-700 space-y-1">
            <p>
              <span className="font-medium">Name:</span> {job.name}
            </p>
            <p>
              <span className="font-medium">Schedule:</span> {job.schedule}
            </p>
            <p>
              <span className="font-medium">Status:</span>{" "}
              <span className={job.enabled ? "text-green-600" : "text-red-600"}>
                {job.enabled ? "Enabled" : "Disabled"}
              </span>
            </p>
            <p>
              <span className="font-medium">Run Count:</span> {job.runCount}
            </p>
            <p>
              <span className="font-medium">Last Run:</span>{" "}
              {job.lastRunAt
                ? new Date(job.lastRunAt).toLocaleString()
                : "Never"}
            </p>
            <p>
              <span className="font-medium">Next Run:</span>{" "}
              {job.nextRunAt
                ? new Date(job.nextRunAt).toLocaleString()
                : "Never"}
            </p>
            <p>
              <span className="font-medium">Running:</span>{" "}
              <span
                className={job.isRunning ? "text-blue-600" : "text-gray-500"}
              >
                {job.isRunning ? "Yes" : "No"}
              </span>
            </p>
          </div>

          <div className="mt-3">
            <button
              type="button"
              className="w-full px-4 py-2 text-white rounded-lg bg-gray-700 hover:bg-gray-800 transition"
              onClick={() => router.push(`/jobs/${job.id}`)}
            >
              View Details
            </button>
          </div>
        </div>
      ))}
    </div>
  );
}
Here is what the code above does:
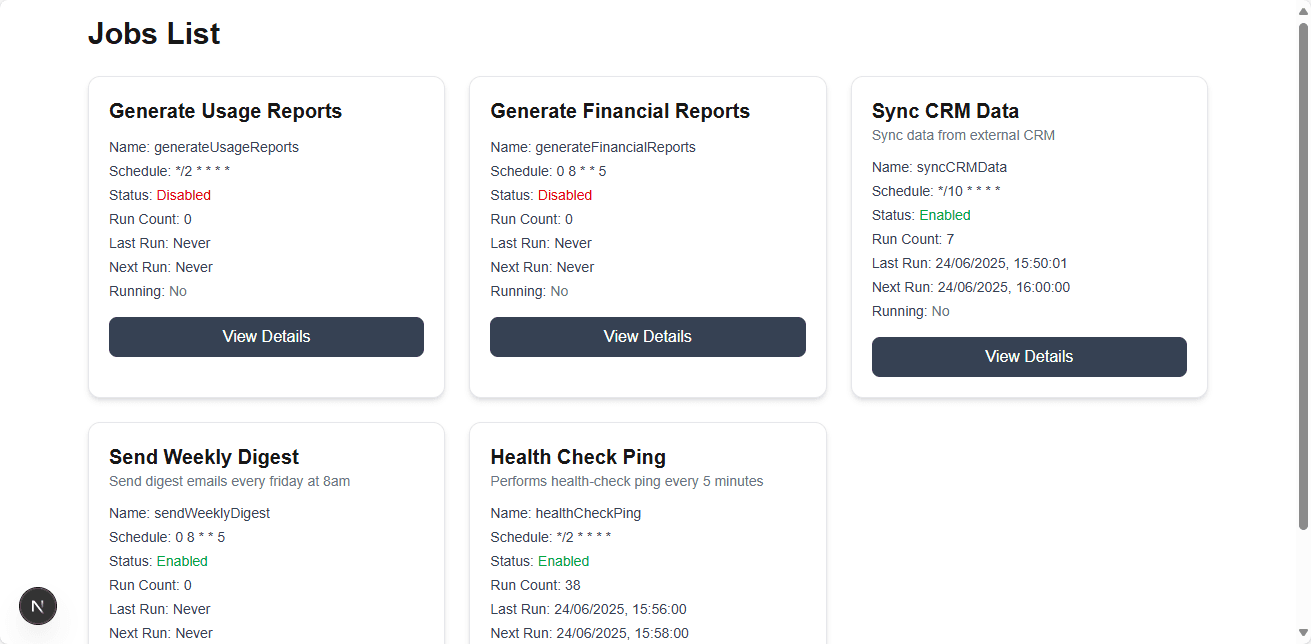
- The
JobListcomponent fetches cron jobs from the/api/jobsendpoint and displays them as cards. - After fetching the cron jobs, it refreshes every 10 seconds, so we always see the latest status, including which jobs are currently running.
- Each card shows key details like the job’s name, schedule, run count, next and last run times, and status. We can also click View Details to open the job detail page, which we'll add later in this article.
Add JobList Component to the Homepage
Next, let's modify the home page ./app/page.tsx to render the job list with the following code:
// Path: ./app/page.tsx
import { JobList } from "./components/JobList";

export default function JobsPage() {
  return (
    <div className="max-w-6xl mx-auto p-4">
      <h1 className="text-3xl font-bold mb-6">Jobs List</h1>
      <JobList />
    </div>
  );
}
Running the application, the job listing page should look like this:
View and Manage Cron Jobs and Logs
In this section, we'll build a fully-functional page that allows us to view job details, manage jobs, enable/disable, reschedule, edit, delete, and review the logs generated for a job.
We'll also build a set of reusable components (JobHeader, JobInfo, JobActions, and JobLogs) that work together to make jobs manageable and give a quick view of their status and history.
We’ll create the following components:
JobHeader: A Header component with navigation and a refresh button.JobInfo: An Info component to display details like the job’s name, schedule, status, and statistics.JobActions: An Actions component that provides buttons for running, toggling, editing, rescheduling, and deleting jobs.JobLogs: A Logs component that displays execution history, including status, timestamps, and error messages.
A page that brings all of these together.
Create the JobHeader Component
Create a new file ./app/components/JobHeader.tsx and add the following code:
// Path: ./app/components/JobHeader.tsx

import Link from "next/link";

export default function JobHeader({
  onRefresh,
  refreshing,
}: {
  onRefresh: () => void;
  refreshing: boolean;
}) {
  return (
    <>
      <div className="flex justify-between items-center">
        <h1 className="text-3xl font-bold">Job Detail</h1>
        <Link href="/" className="text-blue-600 hover:underline">
          Back to Jobs
        </Link>
      </div>
      <div className="flex justify-end">
        <button
          onClick={onRefresh}
          className="px-3 py-2 text-sm bg-gray-100 border rounded hover:bg-gray-200"
          disabled={refreshing}
        >
          {refreshing ? "Refreshing..." : "Refresh"}
        </button>
      </div>
    </>
  );
}
The JobHeader component provides an easy way to navigate back to the listing page or refresh the page data.
Create the JobInfo Component
Create a new file ./app/components/JobInfo.tsx and add the following code:
// Path ./app/components/JobInfo.tsx

import { JobDetail } from "./types";

export default function JobInfo({ job }: { job: JobDetail }) {
  return (
    <div className="bg-white p-6 rounded-xl shadow border">
      <div className="mb-4 space-y-1">
        <h2 className="text-2xl font-semibold">{job?.displayName}</h2>
        <p className="text-gray-500">{job.description}</p>
        <div className="text-sm text-gray-700 space-y-1">
          <p>
            <strong>Name:</strong> {job.name}
          </p>
          <p>
            <strong>Schedule:</strong> {job.schedule}
          </p>
          <p>
            <strong>Time Zone:</strong> {job.timeZone}
          </p>
          <p>
            <strong>Tags:</strong> {job.tags?.join(", ")}
          </p>
          <p>
            <strong>Status:</strong>{" "}
            <span className={job.enabled ? "text-green-600" : "text-red-600"}>
              {job.enabled ? "Enabled" : "Disabled"}
            </span>
          </p>
          <p>
            <strong>Running:</strong>{" "}
            <span
              className={job.isRunning ? "text-yellow-600" : "text-gray-600"}
            >
              {job.isRunning ? "Yes" : "No"}
            </span>
          </p>
          <p>
            <strong>Run Count:</strong> {job.runCount}
          </p>
          <p>
            <strong>Last Run:</strong>{" "}
            {job.lastRunAt ? new Date(job.lastRunAt).toLocaleString() : "Never"}
          </p>
          <p>
            <strong>Next Run:</strong>{" "}
            {job.nextRunAt
              ? new Date(job.nextRunAt).toLocaleString()
              : "Not scheduled"}
          </p>
        </div>
      </div>
    </div>
  );
}
The JobInfo component above displays key information about the job, such as name, status, run counts, and scheduling details.
Create the JobActions Component
Create a new file ./app/components/JobActions.tsx and add the following code:
// Path: ./app/components/JobActions.tsx

import { useState } from "react";
import type { JobDetail } from "./types";

type JobActionsProps = {
  job: JobDetail;
  onRun: () => void;
  onToggle: () => void;
  onDelete: () => void;
  onReschedule: (newSchedule: string) => void;
  onEdit: (updates: { displayName?: string; description?: string }) => void;
};

export default function JobActions({
  job,
  onRun,
  onToggle,
  onDelete,
  onReschedule,
  onEdit,
}: JobActionsProps) {
  const [showRescheduleInput, setShowRescheduleInput] = useState(false);
  const [newSchedule, setNewSchedule] = useState(job?.schedule || "");

  const [showEditInput, setShowEditInput] = useState(false);
  const [newDisplayName, setNewDisplayName] = useState(job?.displayName || "");
  const [newDescription, setNewDescription] = useState(job?.description || "");

  const handleReschedule = () => {
    if (newSchedule.trim()) {
      onReschedule(newSchedule);
      setNewSchedule("");
      setShowRescheduleInput(false);
    }
  };

  const handleEdit = () => {
    onEdit({
      displayName: newDisplayName.trim(),
      description: newDescription.trim(),
    });
    setShowEditInput(false);
  };

  return (
    <div className="space-y-4 mt-6">
      {showRescheduleInput && (
        <div className="flex gap-2 items-center">
          <input
            type="text"
            value={newSchedule}
            onChange={(e) => setNewSchedule(e.target.value)}
            placeholder="Enter new CRON schedule"
            className="border rounded p-2 w-full"
          />
          <button
            onClick={handleReschedule}
            className="bg-green-600 text-white px-3 py-2 rounded hover:bg-green-700"
          >
            Save
          </button>
          <button
            onClick={() => {
              setShowRescheduleInput(false);
              setNewSchedule(job?.schedule || "");
            }}
            className="text-gray-500 px-3 py-2"
          >
            Cancel
          </button>
        </div>
      )}

      {showEditInput && (
        <div className="grid gap-2">
          <input
            type="text"
            value={newDisplayName}
            onChange={(e) => setNewDisplayName(e.target.value)}
            placeholder="Display name"
            className="border rounded p-2"
          />
          <input
            type="text"
            value={newDescription}
            onChange={(e) => setNewDescription(e.target.value)}
            placeholder="Job description"
            className="border rounded p-2"
          />
          <div className="flex gap-2">
            <button
              onClick={handleEdit}
              className="bg-blue-600 text-white px-3 py-2 rounded hover:bg-blue-700"
              disabled={!job.enabled}
            >
              Save
            </button>
            <button
              onClick={() => setShowEditInput(false)}
              className="text-gray-500 px-3 py-2"
            >
              Cancel
            </button>
          </div>
        </div>
      )}

      <div className="flex gap-2 flex-wrap">
        <button
          onClick={onRun}
          disabled={!job.enabled}
          className="px-4 py-2 bg-blue-700 text-white rounded hover:bg-blue-800 disabled:opacity-50"
        >
          Run Now
        </button>

        <button
          onClick={onToggle}
          className="bg-yellow-500 text-white px-4 py-2 rounded hover:bg-yellow-600"
        >
          {job.enabled ? "Disable" : "Enable"}
        </button>

        <button
          onClick={() => setShowRescheduleInput((prev) => !prev)}
          disabled={!job.enabled}
          className="px-4 py-2 bg-green-700 text-white rounded hover:bg-green-800 disabled:opacity-50"
        >
          {showRescheduleInput ? "Hide Reschedule" : "Reschedule"}
        </button>

        <button
          onClick={() => setShowEditInput((prev) => !prev)}
          className="bg-indigo-600 text-white px-4 py-2 rounded hover:bg-indigo-700 disabled:opacity-50"
          disabled={!job.enabled}
        >
          {showEditInput ? "Hide Edit" : "Edit"}
        </button>

        <button
          onClick={onDelete}
          className="bg-red-600 text-white px-4 py-2 rounded hover:bg-red-700"
        >
          Delete
        </button>
      </div>
    </div>
  );
}
The JobActions component provides the actual cron job controls:
- Triggers a cron job
- Toggles its enabled state
- Reschedules a cron job
- Edits the name and description of a cron job
- Deletes a cron job
Create the JobLogs Component
Create a new file ./app/components/JobLogs.tsx and add the following code:
// Path: ./app/components/JobLogs.tsx

import type { JobLog } from "./types";

type Props = {
  logs: JobLog[];
  loading: boolean;
  page: number;
  setPage: (page: number) => void;
};

export default function JobLogs({ logs, loading, page, setPage }: Props) {
  return (
    <div>
      <h2 className="text-lg font-semibold mb-3">Job Logs</h2>

      {loading ? (
        <p>Loading logs...</p>
      ) : logs.length === 0 ? (
        <p className="text-gray-500">No logs available.</p>
      ) : (
        <div className="space-y-4">
          {logs.map((log) => {
            const startedAt = new Date(log.startedAt).toLocaleString();
            const endedAt = log.endedAt
              ? new Date(log.endedAt).toLocaleString()
              : "—";

            const statusColor =
              log.jobStatus === "success"
                ? "text-green-700 bg-green-100"
                : log.jobStatus === "failed"
                ? "text-red-700 bg-red-100"
                : "text-gray-700 bg-gray-100";

            return (
              <div
                key={log.id}
                className="p-4 rounded-xl border shadow-sm bg-white space-y-2"
              >
                <div className="flex justify-between items-center">
                  <div className="text-sm text-gray-500">
                    Started: {startedAt}
                  </div>
                  <div
                    className={`text-xs font-semibold px-2 py-1 rounded ${statusColor}`}
                  >
                    {log.jobStatus}
                  </div>
                </div>

                <div className="text-sm text-gray-500">Ended: {endedAt}</div>

                <div className="text-sm text-gray-700">
                  Duration:{" "}
                  <span className="font-medium">{log.durationMs}ms</span>
                </div>

                <div className="text-sm text-gray-800 whitespace-pre-wrap">
                  {log.message || "No message provided."}
                </div>

                {log.errorStack && (
                  <details className="text-sm text-red-700 bg-red-50 border-l-4 border-red-400 p-2 rounded">
                    <summary className="cursor-pointer font-semibold">
                      View Error Stack
                    </summary>
                    <pre className="whitespace-pre-wrap mt-2 text-xs">
                      {log.errorStack}
                    </pre>
                  </details>
                )}

                <div className="text-xs text-gray-500 italic">
                  Triggered: {log.manualTrigger ? "Manually" : "Automatically"}{" "}
                  | Execution ID:{" "}
                  <span className="font-mono">{log.executionId}</span>
                </div>
              </div>
            );
          })}
        </div>
      )}

      {/* Pagination Controls */}
      <div className="flex justify-between items-center mt-4">
        <button
          disabled={page === 1}
          onClick={() => setPage(page - 1)}
          className="px-3 py-1 rounded bg-gray-200 disabled:opacity-50"
        >
          Previous
        </button>
        <span className="text-sm text-gray-600">Page {page}</span>
        <button
          onClick={() => setPage(page + 1)}
          className="px-3 py-1 rounded bg-gray-200"
        >
          Next
        </button>
      </div>
    </div>
  );
}
The JobLogs component displays a list of execution logs for a specific job. It gives us a quick, clean view of when the job started and ended, how long it took, its status, any messages, and error details, if any. It also allows us to move between pages of logs with pagination controls.
Putting It All Together: The Job Detail Page
In this final code section of the article, we’ll combine all the components we’ve built so far, the Header, Info, Actions, and Logs, into a single cohesive page. This dynamic route page ./app/jobs/[id]/page.tsx is the core of the job manager. It lets us view detailed information about a specific job, manage its status and settings, and track its execution logs.
Create a new file: ./app/jobs/[id]/page.tsx.
Here’s the complete page:
// Path: ./app/jobs/[id]/page.tsx

"use client";

import { useEffect, useState } from "react";
import { useParams, useRouter } from "next/navigation";
import JobHeader from "@/app/components/JobHeader";
import JobInfo from "@/app/components/JobInfo";
import JobActions from "@/app/components/JobActions";
import JobLogs from "@/app/components/JobLogs";

import type { JobDetail, JobLog } from "@/app/components/types";

const endpoint = "http://localhost:1337/api";

export default function JobDetailPage() {
  const { id: jobId } = useParams();
  const [job, setJob] = useState<JobDetail | null>(null);
  const [logs, setLogs] = useState<JobLog[]>([]);
  const [page, setPage] = useState(1);
  const [pageSize] = useState(10);
  const [loadingJob, setLoadingJob] = useState(true);
  const [loadingLogs, setLoadingLogs] = useState(true);
  const [refreshing, setRefreshing] = useState(false);
  const router = useRouter();

  const fetchJob = async () => {
    setLoadingJob(true);
    const res = await fetch(`${endpoint}/cron-jobs/${jobId}`);
    const data = await res.json();
    setJob(data);
    setLoadingJob(false);
  };

  const fetchLogs = async (pg = 1) => {
    setLoadingLogs(true);
    const res = await fetch(
      `${endpoint}/job-logs/by-job?jobId=${jobId}&page=${pg}&pageSize=${pageSize}`
    );
    const data = await res.json();
    setLogs(data);
    setLoadingLogs(false);
  };

  const refreshAll = async () => {
    setRefreshing(true);
    await fetchJob();
    await fetchLogs(page);
    setRefreshing(false);
  };

  useEffect(() => {
    refreshAll();
  }, [page]);

  const handleRun = async () => {
    const res = await fetch(`${endpoint}/cron-jobs/trigger/${job?.name}`, {
      method: "POST",
      headers: {
        "Content-Type": "application/json",
      },
    });

    if (!res.ok) {
      throw new Error(`Failed to run job: ${res.statusText}`);
    }

    const result = await res.json();
    // console.log("Job triggered:", result);

    await refreshAll();
  };

  const handleReschedule = async (newSchedule: string) => {
    await fetch(`${endpoint}/cron-jobs/reschedule`, {
      method: "POST",
      headers: { "Content-Type": "application/json" },
      body: JSON.stringify({ schedule: newSchedule, name: job?.name }),
    });

    await refreshAll();
  };

  const handleEdit = async (payload: any) => {
    await fetch(`${endpoint}/cron-jobs/update`, {
      method: "PUT",
      headers: { "Content-Type": "application/json" },
      body: JSON.stringify({ ...payload, name: job?.name }),
    });

    await refreshAll();
  };

  const handleToggleEnabled = async () => {
    await fetch(`${endpoint}/cron-jobs/toggle-enabled/${job?.name}`, {
      method: "POST",
      headers: { "Content-Type": "application/json" },
      body: JSON.stringify({ enabled: !job!.enabled }),
    });

    await refreshAll();
  };

  const handleDelete = async () => {
    console.log("job", job);
    const res = await fetch(`${endpoint}/cron-jobs/${job?.documentId}`, {
      method: "DELETE",
      headers: { "Content-Type": "application/json" },
    });

    console.log("res", await res.status);

    if (res.ok) await router.push("/");
  };

  return (
    <div className="max-w-4xl mx-auto p-4 space-y-6">
      <JobHeader onRefresh={refreshAll} refreshing={refreshing} />
      {loadingJob ? (
        <p>Loading job details...</p>
      ) : job ? (
        <>
          <JobInfo job={job} />
          <JobActions
            job={job}
            onRun={handleRun}
            onToggle={handleToggleEnabled}
            onReschedule={handleReschedule}
            onEdit={handleEdit}
            onDelete={handleDelete}
          />
        </>
      ) : (
        <p>Job not found.</p>
      )}
      <JobLogs
        logs={logs}
        loading={loadingLogs}
        page={page}
        setPage={setPage}
      />
    </div>
  );
}
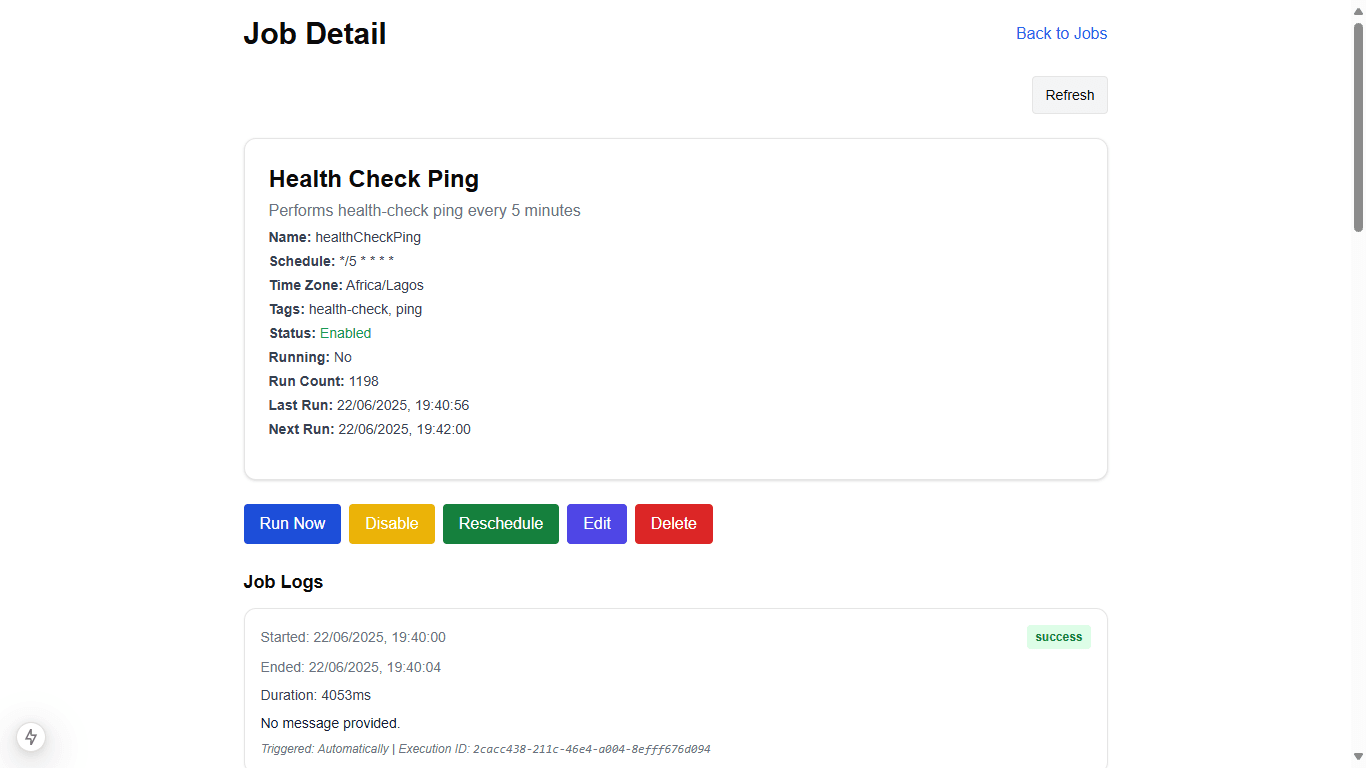
When the page loads, it fetches both the job details and its execution logs from the backend. It displays important info like the job’s schedule, whether it’s enabled, and when it last ran. We get buttons to manually run the job, toggle its enabled state, reschedule it, edit its details, or delete it.
The logs section shows the history of job runs with pagination controls, so we can browse through past executions and see success or failure details.
After performing any action, the page refreshes automatically to keep the information up to date without needing a manual reload.
Here's what the final result of the job page is:
Github Source Code
The complete code for this tutorial can be found on GitHub:
Conclusion
In this article, we built a persistent and fully manageable background job system, combining a Strapi backend with a Next.js frontend for a complete solution.
On the backend, we:
- Created custom content types to save job definitions and execution logs in the database.
- Added utility services and lifecycle hooks to automatically register or clean up jobs when the server starts, ensuring job state stays in sync.
- Implemented error logging so failures are tracked with clear messages and stack traces.
- Built APIs that let external apps or dashboards trigger, enable/disable, reschedule, or delete jobs.
On the frontend, we:
- Built a simple, user-friendly dashboard that shows job statuses, schedules, and run history.
- Added controls to trigger jobs manually, edit settings, toggle status, reschedule, or delete jobs, all from the UI.
- Included pagination, polling, and status indicators for real-time job visibility.
Together, this system gives us full control over our background jobs, persistent, and easy to manage.