
Introduction to Persistent Cron Jobs in Strapi
Strapi provides built-in cron job support for scheduled tasks.
Jobs are registered in memory and lost on restarts. For some production-grade task scheduling applications, especially those that require visibility, persistence, and manual control, we need a more robust approach.
In this 2-part tutorial series, we will focus on building a job system that does the following:
- Logs executions
- Allows manual triggering
- Persists job definitions in the database
- Integrates with a Next.js UI frontend.
Here is a demo of the final application we'll be building:
Tutorial Roadmap: What You’ll Learn
This tutorial is divided into two sections.
- Part 1: Setting up Strapi and Extending Strapi Cron Jobs
- Part 2: Building the Next.js Dashboard for Managing Cron Jobs
Cron Jobs in Strapi Explained
A cron job in Strapi is a scheduled task that allows you to execute arbitrary functions at specific dates and times, with optional recurrence rules.
Cron jobs can be used for tasks such as sending emails, for example, once a month cron job for emails, creating backups, or any other automated process you want to run on a schedule.
You can learn more from the Strapi documentation page.
Real-World Use Cases of Strapi Cron Jobs
Here are some real-world examples of when a persistent, managed cron job system is essential:
- Order Processing in E-commerce: Send order confirmation emails and schedule shipment updates. If anything fails, the admin can re-trigger cron jobs.
- Marketing Campaigns: Manage emails such as once a month cron job for emails or SMS campaign schedules, pause/resume cron jobs, and analyze failures.
- Automated Cleanup: Schedule database cleanups or report generations with tracking and retries if jobs fail.
Prerequisites
- Familiarity with Strapi 5
- Familiarity with Strapi 5 Cron jobs
- Node.js (LTS version 20++) and a package manager like npm or yarn
Setting up Strapi and Strapi Content Types
Step 1: Create Strapi 5 Project
Create a new Strapi project by running the command below:
npx create-strapi@latest strapi-cron-job-back --quickstartIn the command above, the name of the Strapi project is strapi-cron-job-back. Feel free to give yours any name you want.
Once the server starts, open the admin panel and set up your first user.
Step 2: Define Content Types
Before we can build a persistent and manageable background cron job system, we need to define content types that will store cron job configurations and execution logs in the database.
These content types form the foundation of our system, ensure jobs persist across server restarts, and provide the data structure we need to track, manage, and interact with jobs through both APIs and the frontend.
Let’s start by defining content types.
We’ll create two content types:
- cron-job: Stores job data
- job-log: Stores execution results for each job
To create the necessary content types, we’ll use the Strapi CLI. This will scaffold the cron-job and job-log content types for us.
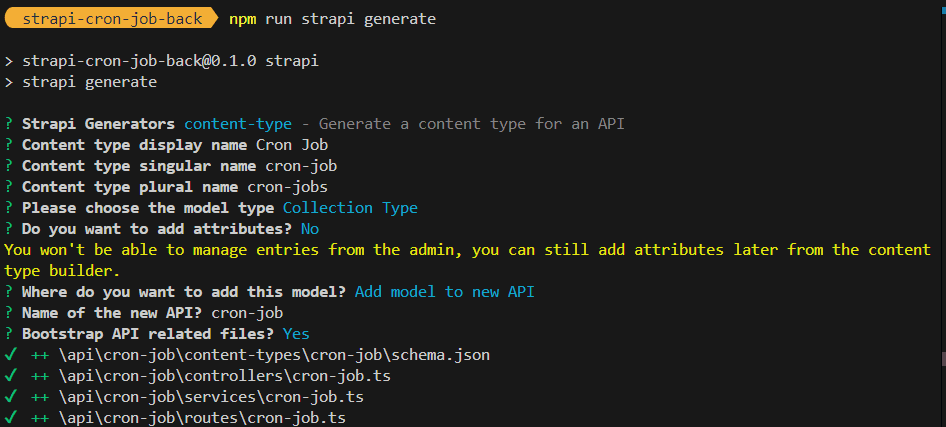
Step 3: Generate the cron-job Content Type
Open a terminal in the root directory of the Strapi project and run:
npm run strapi generateThis will launch an interactive prompt where we can define fields for the cron-job content type. We'll skip adding fields at this point, as we’ll paste the full schema in a later step.
Use the image as a guide for the prompts:
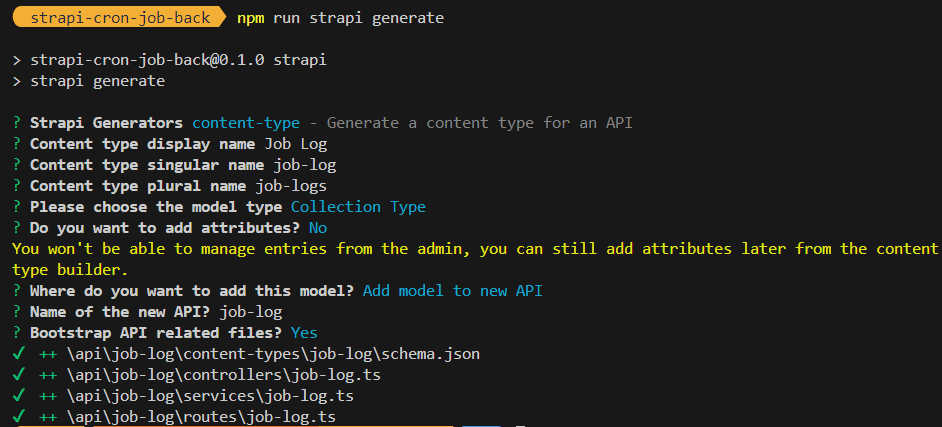
Step 4: Generate the job-log Content Type
Next, run:
npm run strapi generateSame as before, we'll skip adding fields in the interactive prompt. We’ll replace the generated schema files with the fully configured JSON definitions.
Here's the guide for the prompt:
Updating Strapi Cron Job Schemas
Update the cron-job Schema
After generating the content type, open the schema file for the cron-job collection type:
src/api/cron-job/content-types/cron-job/schema.jsonReplace its contents with the following:
{
  "kind": "collectionType",
  "collectionName": "cron_jobs",
  "info": {
    "singularName": "cron-job",
    "pluralName": "cron-jobs",
    "displayName": "Cron Job",
    "description": ""
  },
  "options": {
    "draftAndPublish": false
  },
  "attributes": {
    "name": {
      "type": "string",
      "required": true,
      "unique": true
    },
    "description": {
      "type": "text"
    },
    "schedule": {
      "type": "string",
      "required": true
    },
    "enabled": {
      "type": "boolean",
      "default": true
    },
    "lastRunAt": {
      "type": "datetime"
    },
    "nextRunAt": {
      "type": "datetime"
    },
    "runCount": {
      "default": 0,
      "type": "integer"
    },
    "job_logs": {
      "type": "relation",
      "relation": "oneToMany",
      "target": "api::job-log.job-log",
      "mappedBy": "cron_job"
    },
    "IsDeleted": {
      "type": "boolean",
      "default": false
    },
    "displayName": {
      "type": "string",
      "required": true
    },
    "timeZone": {
      "type": "string"
    },
    "tags": {
      "type": "json"
    },
    "options": {
      "type": "json",
      "required": true
    }
  }
}
The cron-job schema defines the configuration needed for jobs, which makes it the central point for creating, updating, deleting, or triggering cron jobs.
Here are some of the fields and schema changes we created above:
name: The unique identifier for the job (e.g., send-order-confirmation).displayName: A human-readable name used in the admin or frontend.description: Provides a brief description of what the job does.- schedule: The actual cron syntax (e.g., 0 9 * * 1-5) that determines when the job will run.
enabled: A boolean to enable or disable the job at runtime.lastRunAt: Records the timestamp of the last successful execution.nextRunAt: Shows when the job is scheduled to run next.runCount: A counter for how many times this job has run.options: A JSON object for passing arbitrary configuration or parameters to the job.tags: An optional JSON array for categorization or easy filtering (e.g., ["email", "campaign"]).IsDeleted: Enables soft deletion, making jobs disappear from active listings while preserving history.job_logs: Defines a one-to-many relation with thejob-logcontent type, making it easy to trace execution history.
Update the job-log Schema
Next, open src/api/job-log/content-types/job-log/schema.json and replace its contents with the following:
{
  "kind": "collectionType",
  "collectionName": "job_logs",
  "info": {
    "singularName": "job-log",
    "pluralName": "job-logs",
    "displayName": "Job Log",
    "description": ""
  },
  "options": {
    "draftAndPublish": false
  },
  "attributes": {
    "startedAt": {
      "type": "datetime",
      "required": true
    },
    "endedAt": {
      "type": "datetime",
      "required": false
    },
    "durationMs": {
      "type": "biginteger"
    },
    "message": {
      "type": "text"
    },
    "manualTrigger": {
      "type": "boolean",
      "default": false
    },
    "cron_job": {
      "type": "relation",
      "relation": "manyToOne",
      "target": "api::cron-job.cron-job",
      "inversedBy": "job_logs"
    },
    "jobStatus": {
      "type": "enumeration",
      "enum": [
        "success",
        "error",
        "skipped",
        "running",
        "canceled"
      ],
      "default": "running",
      "required": true
    },
    "executionId": {
      "type": "uid",
      "required": true
    },
    "errorStack": {
      "type": "text"
    }
  }
}
The job-log schema allows administrators to track every execution attempt and makes it easy to review status, review error details, and investigate failures.
Here are some of the fields and schema changes we created above:
startedAt: The date and time when the job started.endedAt: The date and time when the job finished.durationMs: The total time it took for the job to run, in milliseconds.message: A human-readable message about the result, status, or error.manualTrigger: A boolean that flags if this run was triggered manually (e.g., from the frontend).jobStatus: An enumeration for status (success, error, skipped, running, canceled), making it easy to filter and review jobs.executionId: A unique identifier for this specific run, making it traceable across logs.errorStack: Captures the error traceback if an error occurs.cron_job: Defines the link between this log entry and its parent job.
Creating Cron Job and Log Services in Strapi
With cron jobs and logging schema in place, the next piece of the architecture is creating services that will operate on these database collections.
These services contain common operations such as creating jobs, finding jobs by name, recording run instances, and updating status information.
Create Strapi Cron Job Service
The cron job service is where we define how jobs are saved and retrieved from the database.
This service makes sure that every job has a corresponding record in the database, and it handles both looking up existing jobs and creating new ones as needed.
To set this up, open the file src/api/cron-job/services/cron-job.ts and update the code:
import { factories } from "@strapi/strapi";
import { camelToTitle, CRON_JOB_UID } from "../../../utils/helpers";

const jobDoc = () => strapi.documents(CRON_JOB_UID);

export default factories.createCoreService(
  "api::cron-job.cron-job",
  ({ strapi }) => ({
    async findJob(name: string) {
      let response = await jobDoc().findFirst({
        filters: { name: name },
      });

      return response;
    },

    async createJob(job: any) {
      const opts = job.options;
      const meta = opts.meta;

      const result = await jobDoc().create({
        data: {
          name: job.name,
          displayName: meta.displayName ?? camelToTitle(job.name),
          schedule: opts.rule,
          timeZone: opts.tz,
          description: meta.description,
          enabled: meta.enabled ?? true,
          tags: JSON.stringify(meta.tags ?? []),
          options: JSON.stringify(opts),
        },
      });

      return result;
    },
  })
);
The findJob function searches the database for a job that matches a given name. We will use this function to ensure that the system doesn’t accidentally create duplicates or lose track of jobs that were previously registered.
The createJob function handles adding a new job to the database. It reads the job’s options and metadata, like the job’s name, schedule rule, time zone, display name, description, tags, and whether the job is enabled.
If certain values aren’t provided, for example, if no display name is specified, it applies sensible defaults by converting the job’s name into a more readable format.
Create Strapi Cron Job Log Service
The cron job log Service is responsible for recording every run of a job, when it starts, when it finishes, and whether it succeeded or failed.
This is where the job’s execution status and history get stored, to make them easy to review and track their behavior over time.
To set this up, open the src/api/job-log/services/job-log.ts file and modify the file:
// Path: ./src/api/job-log/services/job-log.ts

import { factories } from "@strapi/strapi";
import { CRON_JOB_UID, JOB_LOG_UID } from "../../../utils/helpers";

const logDoc = () => strapi.documents(JOB_LOG_UID);
const jobDoc = () => strapi.documents(CRON_JOB_UID);

export default factories.createCoreService(
  "api::job-log.job-log",
  ({ strapi }) => ({
    async createRunLog(job: any) {
      const now = new Date();
      const jobId = job.options.meta.jobId;
      const manualTrigger = job.options.meta?.manualTrigger ?? false;

      await strapi.db.transaction(async ({ trx }) => {
        await strapi.db
          .connection("cron_jobs")
          .transacting(trx)
          .where("document_id", jobId)
          .update({
            last_run_at: new Date(),
          })
          .increment("run_count", 1);

        const log = await strapi.documents(JOB_LOG_UID).create({
          data: {
            cron_job: jobId,
            startedAt: now,
            manualTrigger,
            jobStatus: "running",
            executionId: job.options.meta.executionId,
          },
        });

        job.options.meta.logId = log.documentId;
        job.options.meta.startedAt = now;
      });
    },

    async jobSuccessLog(job: any) {
      const now = new Date();
      const logId = job.options.meta.logId;

      await strapi.db.transaction(async () => {
        await logDoc().update({
          documentId: logId,
          data: {
            endedAt: now,
            durationMs: now.getTime() - job.options.meta.startedAt.getTime(),
            jobStatus: "success",
          },
        });

        await updateJob(job);
      });
    },

    async jobErrorLog(job: any, error: Error) {
      const now = new Date();
      const logId = job.options.meta.logId;

      await strapi.db.transaction(async () => {
        await logDoc().update({
          documentId: logId,
          data: {
            endedAt: now,
            durationMs: now.getTime() - job.options.meta.startedAt.getTime(),
            jobStatus: "error",
            message: error?.message,
            errorStack: error?.stack,
          },
        });

        await updateJob(job);
      });
    },
  })
);

async function updateJob(job: any) {
  await jobDoc().update({
    documentId: job.options.meta.jobId,
    data: {
      nextRunAt: job?.job?.nextInvocation().toISOString(),
    },
  });
}
In the code above, when a job starts, it creates a run log entry, marks the job as running, and increments its run counter.
When the job finishes, it captures the end time and duration, marking the status as either success or error, along with any error messages and traceback information.
It also updates the parent job with its next scheduled run time.
Creating Strapi Utility Helpers for Running Cron Jobs
Before we move on to creating and registering jobs in Strapi, we'll need to set up a few utilities that will make the job execution process cleaner and more maintainable.
These helpers will contain common logic like generating delays, converting names, finding jobs, and invoking jobs reliably.
Create the file: src/utils/helpers.ts, and add this code:
Step 1. Create Helper Functions
// Path: ./src/utils/helpers.ts

export function randomDelay(minMs = 2000, maxMs = 10000): Promise<void> {
  const delayTime = Math.floor(Math.random() * (maxMs - minMs + 1)) + minMs;
  return new Promise((resolve) => setTimeout(resolve, delayTime));
}

export function camelToTitle(text: string): string {
  return text
    .replace(/([A-Z])/g, " $1")
    .replace(/^./, (char) => char.toUpperCase())
    .trim();
}

export const findStrapiJob = (jobName: string) =>
  strapi.cron.jobs.find((job) => job.name === jobName);

export const CRON_JOB_UID = "api::cron-job.cron-job";
export const JOB_LOG_UID = "api::job-log.job-log";
In the code above, we have the following:
randomDelay: Simulates delays for testing or throttling jobs.camelToTitle: Transforms camelCase names (e.g., sendEmailJob) into readable titles (e.g., Send Email Job).findStrapiJob: Finds a registered job in Strapi.CRON_JOB_UIDandJOB_LOG_UID: Provide static identifiers for working with the job and job log collections.
Step 2: Create Task Handler Helper Function
Next, create the file: src/utils/task-handler.ts and add this code:
import type { Core } from "@strapi/strapi";
import { findStrapiJob, JOB_LOG_UID } from "./helpers";
import { randomUUID } from "node:crypto";

type TaskFn = (context: {
  strapi: Core.Strapi;
  runtimeOptions?: Record<string, any>;
}) => Promise<unknown>;

interface TaskConfig {
  taskName: string;
  fn: TaskFn;
}

export default function taskHandler({ taskName, fn }: TaskConfig) {
  return async function task(runtimeOptions?: { manualTrigger?: boolean }) {
    const job = findStrapiJob(taskName);
    const manualTrigger = runtimeOptions?.manualTrigger ?? false;

    job.options.meta.executionId = randomUUID();
    job.options.meta.manualTrigger = manualTrigger;

    await strapi.service(JOB_LOG_UID).createRunLog(job);

    try {
      const result = await fn({ strapi, runtimeOptions });
      await strapi.service(JOB_LOG_UID).jobSuccessLog(job);

      return result;
    } catch (err) {
      await strapi.service(JOB_LOG_UID).jobErrorLog(job, err);
    }
  };
}
The taskHandler serves as the unified execution entry point for jobs, which makes it the central piece of our background job system.
Here’s how the taskHandler function above operates:
- It looks up the running job using its name by calling the
findStrapiJobfunction. - A unique
executionIdis generated for every run usingrandomUUID(), to allow us to track each execution in the logs. - The
manualTriggerstatus is captured fromruntimeOptions. This enables us to differentiate automated versus manual triggers. - Before invoking the actual job handler (
fn), it logs the start of the run by callingstrapi.service(JOB_LOG_UID).createRunLog. - Upon successful execution of the job, it logs the success by calling
jobSuccessLog. - If any error occurs during the execution, it captures the error and its traceback by invoking
jobErrorLog, which stores the debug information. - Every job we define is wrapped in a consistent lifecycle, which makes it predictable, trackable, and manageable.
Step 3: Create Task Runner Function
Finally, create the file: src/task-runner.ts and add this code:
import tasks from "../../config/cron-tasks";

export async function runTaskByName(
  taskName: string,
  runtimeOptions?: Record<string, any>
) {
  const taskEntry = tasks[taskName];
  if (!taskEntry) {
    throw new Error(`Task "${taskName}" not found.`);
  }
  await taskEntry.task(runtimeOptions);
}
The runTaskByName() function provides a convenient way to trigger any registered job by name. We will use this function to trigger jobs manually through the frontend.
Creating and Registering Strapi Cron Jobs on Server Boot
At this stage, we’ve defined our content types and set up utilities to support job execution.
Now we need to define actual cron jobs and ensure that these jobs are dynamically registered every time Strapi starts up.
In this step, we will:
- Define cron job configurations
- Enable Strapi’s cron engine
- Register and synchronize jobs with the database at runtime, to enable persistence across restarts
Step 1: Define Tasks for Strapi Cron Jobs
Navigate to the /config directory and create a new file named cron-tasks.ts. Add the following task definition codes:
import type { Core } from "@strapi/strapi";
import { randomDelay } from "../src/utils/helpers";
import taskHandler from "../src/utils/task-handler";

export default {
  healthCheckPing: {
    task: taskHandler({
      taskName: "healthCheckPing",
      fn: async ({ strapi }: { strapi: Core.Strapi }) => {
        if (Math.random() < 0.5) {
          throw new Error("Something went wrong!");
        } else {
          await randomDelay(1000);
          strapi.log.info("Pinging health-check...");
        }
      },
    }),
    options: {
      rule: "*/2 * * * *",
      tz: "Africa/Lagos",
      meta: {
        displayName: "Health Check Ping",
        description: "Performs health-check ping every 5 minutes",
        tags: ["health-check", "ping"],
        enabled: true,
      },
    },
  },

  sendWeeklyDigest: {
    task: taskHandler({
      taskName: "sendWeeklyDigest",
      fn: async ({ strapi }) => {
        await randomDelay();
        strapi.log.info("Sending weekly digest email...");
      },
    }),
    options: {
      rule: "0 8 * * 5",
      meta: {
        displayName: "Send Weekly Digest",
        description: "Send digest emails every friday at 8am",
        tags: ["digest", "weekly"],
        enabled: true,
      },
    },
  },

  syncCRMData: {
    task: taskHandler({
      taskName: "syncCRMData",
      fn: async ({ strapi }) => {
        await randomDelay();
        strapi.log.info("Syncing CRM data...");
      },
    }),
    options: {
      rule: "*/10 * * * *",
      tz: "Africa/Lagos",
      meta: {
        displayName: "Sync CRM Data",
        description: "Sync data from external CRM",
        tags: ["crm", "sync"],
        enabled: true,
      },
    },
  },

  generateFinancialReports: {
    task: taskHandler({
      taskName: "generateFinancialReports",
      fn: async ({ strapi }) => {
        await randomDelay();
        strapi.log.info("Generating financial reports...");
      },
    }),
    options: {
      rule: "0 8 * * 5",
      meta: {
        tags: ["finance", "sync"],
        enabled: false,
      },
    },
  },

  generateUsageReports: {
    task: taskHandler({
      taskName: "generateUsageReports",
      fn: async ({ strapi }) => {
        await randomDelay();
        strapi.log.info("Generating usage reports...");
      },
    }),
    options: {
      rule: "*/2 * * * *",
      meta: {
        tags: ["crm", "sync"],
        enabled: false,
      },
    },
  },
};
The code above defines several demo tasks, like sending a weekly digest or syncing CRM data, with a random delay added to simulate actual operation time.
While the exact work each task does isn’t the focus here, what is important is how we describe and manage these tasks using the meta object inside their options.
The meta object is a custom property where we store useful information about the task; it also serves as a marker for manageable tasks. It holds details such as:
displayName: A human-friendly name for the task, for example "Health Check Ping". This makes it easier to identify the task when managing or displaying it on the UI.description: A short summary of what the task does.tags: Keywords or categories related to the task. These can help with filtering or organizing tasks in a UI.enabled: A flag (trueorfalse) that indicates whether the task is currently active or not.
The meta object is a flexible way to enrich task definitions with data that supports both management features and operational logic, with the ability to shape it further as our needs grow.
Step 2: Enable Strapi Cron Jobs
Open the config/server.ts file in the Strapi project and add the cron object like the following:
import cronTasks from "./cron-tasks";

export default ({ env }) => ({
  host: env("HOST", "0.0.0.0"),
  port: env.int("PORT", 1337),
  app: {
    keys: env.array("APP_KEYS"),
  },
  cron: {
    enabled: true,
    tasks: cronTasks,
  },
});
This configuration enables Strapi’s built-in cron job system and tells Strapi to automatically load and run the tasks we defined in the cron-tasks.ts file.
It hooks our task definitions into the Strapi app so they can run on the schedule we’ve set.
Step 3: Register and Maintain Strapi Cron Jobs with Strapi Lifecycle Functions
In this step, we will configure how jobs are registered and kept in sync every time the server starts using the bootstrap Strapi lifecycle function.
We will make sure that any jobs we’ve defined in config/cron-tasks.ts are automatically added, updated, or removed based on their status in the database.
Open the src/index.ts file and modify it as below:
import type { Core } from "@strapi/strapi";
import { CRON_JOB_UID, findStrapiJob } from "./utils/helpers";
import cronTasks from "../config/cron-tasks";

export default {
  register(/* { strapi }: { strapi: Core.Strapi } */) {},

  async bootstrap({ strapi }: { strapi: Core.Strapi }) {
    const jobService = strapi.service(CRON_JOB_UID);

    const tasks = cronTasks;

    for (const taskName of Object.keys(tasks)) {
      const job = findStrapiJob(taskName);

      if (!job.options.meta) continue;

      await processJob(job, jobService);
    }
  },
};

async function processJob(job, jobService: Core.Service) {
  if (!job.options.meta) return false;

  let existingJob = await jobService.findJob(job.name);

  if (!existingJob) {
    existingJob = await jobService.createJob(job);
  }

  if (existingJob.isDeleted) {
    strapi.cron.remove(job.name);
    return false;
  }

  if (!existingJob.enabled) {
    strapi.cron.remove(job.name);
    return false;
  }

  job.options = JSON.parse(JSON.stringify(existingJob.options));
  job.options.meta.jobId = existingJob.documentId;

  return true;
}
Here is what we did above:
- The
bootstrapfunction is where all our jobs come to life when the server starts. We make sure that every job we’ve defined inconfig/cron-tasks.tsis properly registered, kept in sync with the database, and configured for how it should run. - When the server boots, the code goes through each of the jobs defined in
config/cron-tasks.tsand finds their corresponding database entries. If a job doesn’t already exist in the database, it creates one. This means we can add new jobs simply by adding them to theconfig/cron-tasks.tsfile, and the server will take care of persisting them automatically. - At the same time, the process is smart enough to respect jobs that have been deleted or intentionally disabled in the database. If a job has been marked as deleted or disabled, it’s removed from the scheduler.
- Each job is linked to its database entry through a
jobIdin themetaobject, to make it possible to track its status, run it manually, or build more advanced scheduling and monitoring features if we need to.
Creating Strapi Cron Job Log Controllers, and Routes
With the job definitions, services, and bootstrapping now in place, the next step is to make these jobs and their logs available through Strapi’s REST API.
In this section, we’ll create custom controllers and routes for both jobs and job logs. These will form the bridge between the backend services and the Next.js client application we'll build later.
Step 1: Creating the Strapi Cron Job Controller
The Strapi cron job controller is where we define the REST endpoints for managing jobs. From triggering them manually to updating, deleting, toggling, or rescheduling them.
To set this up, open the following file:src/api/cron-job/controllers/cron-job.ts and update the code with this:
import { factories } from "@strapi/strapi";
import { CRON_JOB_UID, findStrapiJob } from "../../../utils/helpers";
import { runTaskByName } from "../../../utils/task-runner";
import cronTasks from "../../../../config/cron-tasks";

export default factories.createCoreController(
  "api::cron-job.cron-job",
  ({ strapi }) => ({
    async triggerJob(ctx) {
      const { name } = ctx.params;
      const task = findStrapiJob(name);

      await runTaskByName(name, { manualTrigger: true });

      return ctx.send({ name: task.name, success: true });
    },

    async update(ctx) {
      const { name, displayName, description } = ctx.request.body.data;
      const task = findStrapiJob(name);

      task.options.meta.displayName = displayName;
      task.options.meta.description = description;

      await strapi.documents(CRON_JOB_UID).update({
        documentId: task.options.meta.jobId,
        data: {
          displayName,
          description,
        },
      });

      return ctx.send({ name: task.name, success: true });
    },

    async delete(ctx) {
      const { id } = ctx.params;

      const jobDoc = await strapi.documents(CRON_JOB_UID).findOne({
        documentId: id,
      });

      const task = findStrapiJob(jobDoc.name);

      if (task) strapi.cron.remove(task.name);

      const job = await strapi.documents(CRON_JOB_UID).update({
        documentId: id,
        data: {
          IsDeleted: true,
        },
      });

      return ctx.send(job);
    },

    async toggleJobEnabled(ctx) {
      const { name } = ctx.params;
      const { enabled: value } = ctx.request.body;

      let job = await strapi.documents(CRON_JOB_UID).findFirst({
        filters: {
          name,
        },
      });

      if (!value) {
        strapi.cron.remove(job.name);
      } else {
        const task = cronTasks[name];
        task.options = JSON.parse(JSON.stringify(job.options));
        task.options.meta.jobId = job.documentId;
        strapi.cron.add({ [name]: task });
      }

      job = await strapi.documents(CRON_JOB_UID).update({
        documentId: job.documentId,
        data: {
          enabled: value,
        },
      });

      return ctx.send(job);
    },

    async reschedule(ctx) {
      const { name, schedule } = ctx.request.body;
      const task = findStrapiJob(name);

      try {
        const success = await task.job?.reschedule(schedule);

        if (success) {
          await strapi.documents(CRON_JOB_UID).update({
            documentId: task.options.meta.jobId,
            data: {
              schedule,
              nextRunAt: task.job?.nextInvocation().toISOString(),
            },
          });

          return ctx.send({ message: "Job rescheduled", success });
        }

        ctx.send({ message: "Failed to reschedule job", success });
      } catch (err) {
        strapi.log.error("Failed to reschedule job", err);
        return ctx.internalServerError("Could not reschedule job");
      }
    },

    async findOne(ctx) {
      const { id } = ctx.params;

      const entity = await strapi.documents(CRON_JOB_UID).findOne({
        documentId: id,
        filters: {
          IsDeleted: false,
        },
      });

      return ctx.send(entity);
    },

    async find(ctx) {
      const sanitizedQueryParams = await this.sanitizeQuery(ctx);

      const jobs = await strapi.documents(CRON_JOB_UID).findMany({
        populate: {
          job_logs: {
            fields: ["jobStatus"],
            filters: {
              jobStatus: "running",
            },
          },
        },
        filters: {
          IsDeleted: false,
        },
        sort: { createdAt: "desc" },
        ...sanitizedQueryParams,
      });

      return ctx.send(jobs);
    },
  })
);
This controller is the core interface between our job scheduler and our frontend application.
Here is what the controller above does:
- It lets us manually trigger a job using the
triggerJobmethod. We will use this endpoint to run a task on demand without waiting for its scheduled time. When a job is triggered manually, the system logs whether it succeeded or failed, just like a scheduled run. - The
updatemethod allows us to change a job’s display name or description. These updates are stored in the database and reflected in the job’s metadata. - The
deletemethod marks a job as deleted in the database and removes it from the scheduler. The job remains in the records for reference, but it no longer runs. - The
toggleJobEnabledmethod makes it easy to enable or disable a job. If we disable a job, it is removed from the scheduler and won’t run again until it is re-enabled. If we enable it, the scheduler picks it back up using the stored job definition. - The
reschedulemethod lets us update a job’s schedule. It reschedules the job on the fly and updates the database with the new schedule and next run time. - Finally, the
findOneandfindmethods let us fetch job information. We can retrieve details about a single job or a list of all jobs, including their statuses and recent logs.
Step 2: Creating the Strapi Cron Job Log Controller
The cron job log Controller provides an API endpoint that allows our frontend app to fetch the logs for a specific job. This is key for monitoring job activity, as it lets us view the history of each job’s runs, including their statuses and timestamps.
Open: src/api/job-log/controllers/job-log.ts and update the code as follows:
import { factories } from "@strapi/strapi";
import { JOB_LOG_UID } from "../../../utils/helpers";

export default factories.createCoreController(
  "api::job-log.job-log",
  ({ strapi }) => ({
    async findByJob(ctx) {
      try {
        const { jobId, page = 1, pageSize = 10 } = ctx.query;

        if (!jobId) {
          return ctx.badRequest("Missing jobId parameter");
        }

        const logs = await strapi.documents(JOB_LOG_UID).findMany({
          filters: {
            cron_job: {
              documentId: jobId,
            },
          },
          sort: { createdAt: "desc" },
          start: Number(page),
          limit: Number(pageSize),
        });

        return ctx.send(logs);
      } catch (error) {
        console.error("Error fetching job logs:", error);
        return ctx.internalServerError("Failed to fetch job logs");
      }
    },
  })
);
The findByJob action gives our application a way to request a paginated list of job logs for any specific job.
Step 3: Adding Custom Routes
To connect our custom job and log controllers to the outside world, we will define specific REST API routes. These routes will make it possible for our frontend application to interact with the Strapi backend.
1. Cron Job Routes
First, create the custom.ts file for the cron jobs:
src/api/cron-job/routes/custom.ts
Add the following code:
export default {
  routes: [
    {
      method: "POST",
      path: "/cron-jobs/trigger/:name",
      handler: "api::cron-job.cron-job.triggerJob",
    },
    {
      method: "POST",
      path: "/cron-jobs/toggle-enabled/:name",
      handler: "api::cron-job.cron-job.toggleJobEnabled",
    },
    {
      method: "POST",
      path: "/cron-jobs/reschedule",
      handler: "api::cron-job.cron-job.reschedule",
    },
  ],
};
These routes provide endpoints for triggering jobs manually, enabling or disabling them, and updating their schedules.
2. Job Log Routes
Create the file: src/api/job-log/routes/custom.ts and add:
export default {
  routes: [
    {
      method: "GET",
      path: "/job-logs/by-job",
      handler: "api::job-log.job-log.findByJob",
    },
  ],
};
This route lets clients request the logs for a specific job.
Enabling Endpoints for Public Access
By default, Strapi protects its endpoints by allowing only authorized access. To make the job and log endpoints available publicly for our Next.js app to call them, we’ll need to configure their permissions in the Strapi admin panel.
1. Open the Strapi Admin Panel
Go to http://localhost:1337/admin and log in with an admin account.
2. Navigate to Roles & Permissions
In the sidebar, click Settings > Users & Permissions > Roles. Here you’ll see available roles like Authenticated and Public.
3. Edit the Public Role
Click on the Public role to open its permission settings.
4. Enable the Desired Endpoints
Scroll down to locate the sections for:
- Cron Job
- Job Log
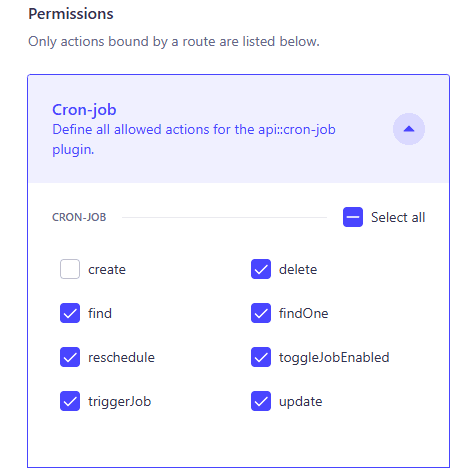
Expand Cron Job and enable the endpoints for the following to make them publicly available:
findfindOnetriggerJobtoggleJobEnabledrescheduledelete
Check the boxes next to the methods in the list above to expose them.
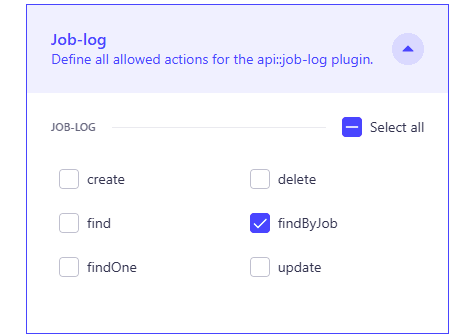
Expand the Job Log permission and enable the following:
findByJob
5. Save Changes
After selecting the endpoints, click Save to apply the changes.
The endpoint should look like this:
Github Source Code
The complete code for this tutorial can be found on GitHub:
Final Thoughts: Persistent Job Scheduling in Strapi
We’ve laid the foundation for a fully persistent, runtime-managed background job system in Strapi 5. In this first part of the series, we’ve learned how to:
- Create content types to store jobs and their run history
- Build helpers to manage job execution and handle errors
- Automatically register and manage cron jobs when the server starts
- Set up services to create jobs and log their status
- Add controller methods to trigger, pause, reschedule, and monitor cron jobs
In the next article, we’ll shift focus to the frontend. We’ll learn how to build a Next.js Dashboard that:
- Displays available jobs and their status
- Shows execution logs, including error messages and timings
- Enables manual triggering, toggling, and rescheduling jobs from a friendly interface
See you in the Part 2 of this tutorial!