

Introduction
Before modern web apps, software ran as standalone programs on personal computers or Local Area Networks (LANs).
These software programs were built for tasks like accounting or inventory management. These programs served small, controlled groups, such as IT staff or specific employees. Because they were isolated from the internet, security was straightforward: shared passwords or basic permissions sufficed. Physical access mattered more than digital threats.
Today, web applications reach millions, demanding robust security measures. Role-based access control (RBAC) meets this need, assigning permissions based on user roles to protect resources like content and features. In a connected world, RBAC is a must-have.
Prerequisites
To follow along in this article, one should have a basic understanding of the following:
- Familiarity with Strapi CMS(Content Management System).
- Basic understanding of Software Development and web applications.
What you will Learn in this Article
This article is written to provide basic to deep insights into role-based access control. By the end of this article, you would have understood the following;
- The meaning of RBAC (Role Based Access Control) generally and in context to software applications.
- How RBAC works in a CMS like Strapi.
- How to manage custom conditions for roles in the Strapi Admin Panel.
- How to manage end user accounts in client applications.
- The importance of RBAC in applications, Strapi in particular.
What is Role Based Access Control (RBAC)
Role-based access control (RBAC) is an access control method that assigns permissions to users in a system based on their roles rather than specifying benefits individually.
Understanding RBAC in Web Applications
In RBAC, permissions to access resources are based on job responsibilities, and users are assigned to these roles. With this assignment, permissions are thereby attached to the roles.
RBAC can be applied not just in software but even in organizations(e.g., banks) where only authorized staff can access the bank vault at certain intervals.
These real-world applications mirror how RBAC works in software, where roles like “Admin,” “Editor,” and “Viewer” define access levels. In software applications, RBAC provides security and efficiency by enabling centralized permission management.
Instead of assigning permissions to individual users, changes are made at the role level, instantly affecting all users assigned to that role. This makes software systems easier when scaling or performing security audits in organizations.
For this article, we will focus on how role-based access control can be implemented in software applications to enhance security and simplify user management.
Benefits of Strapi Role-Based Access Control
Role-based Access Control presents multiple benefits for all users(admins, end-users) of an application, due to its specific nature. Strapi RBAC presents more benefits, especially due to the granular control it grants administrators; below are some of these benefits explained.
- Ease of Administrative Workloads: Strapi RBAC simplifies administrative workload, admins can easily create, add and switch roles across the application without any downtime or delays.
- Compliance: RBAC improves privacy and confidentiality in applications by managing access to data and its usage.
- Team Efficiency: Clearly defining permissions for roles improves efficiency by enabling specialists to handle particular tasks.
- Granular Control: Strapi enables admins specify permissions for CRUD(create, read, update, delete) actions content types or API endpoints.
- Security: By ensuring users only have access to the resources required for their role, Strapi RBAC reduces the risk of security data breaches in organizations and public user data.
- Customization: Admins can create custom conditions for roles in an application, allowing for flexibility without the need for technical knowledge.
- Collaboration: Teams with different member responsibilities (e.g., developers and content creators) can work in harmony without interfering with each other's tasks.
- Scalability: Appropriately defined permissions for roles simplify scalability as organizations grow with responsibilities.
- Ease of Development: Access control management from the admin panel reduces the need for custom control logic from the backend.
How Users Interact with Systems Based on Roles.
Users interact with software systems by performing 4 main actions, create, read, update, delete. To explain this properly, we would take an individual who signed up on a task management application for example.
- Create: This refers to any operation that creates an entry on the software. For this user, it includes creating an account or creating a task for the day. It adds a record/store to the database, which can then be read, updated or deleted later.
- Read: A read operation means retrieving data from where it is stored. For this user, it would mean viewing the daily tasks that are already set. The data read could be created by that same user or another.
- Update: This enables an application user modify an entry already created in a software or system. In the task management application, it could mean changing the task name, or time which it is due etc.
- Delete: This is a very powerful operation that should always be treated with caution as most times it cannot be reversed. On the task management application it would mean deleting a completed task or deleting the users account from the platform.
RBAC Example
To effectively implement RBAC in software, it is important to analyze the actions to be performed by your users. This way you can assign roles accurately based on organizational hierarchy.
A good example can be seen in the illustration below, and the following points need to be understood.
- The Administrator is the principal and has all privileges.
- There are three other user roles; Author, Editor, and Reader with their privileges listed just below.
- Users are then assigned to roles with privileges required by their job.
- Each role can have multiple users assigned to it.
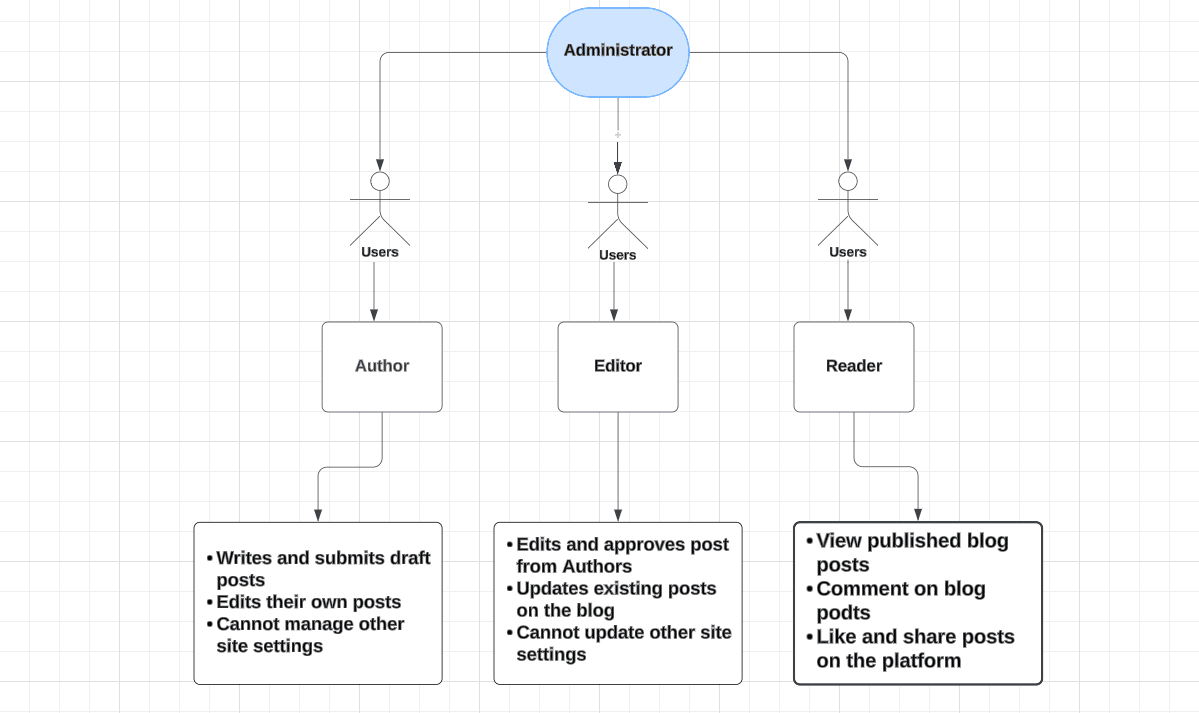
The above illustration seeks to demonstrate RBAC in the context of a blog platform, The Author has the permissions to write blog posts and edit only his blog posts. The Editor approves, publishes and can also edit blogs too. A reader has permission to view and like posts only.
In a real-life example of a blogging platform like Hashnode or Dev.to, for example, they have very robust RBAC systems.
On blogs written by others, you have the role of a reader who can only like posts and comment meanwhile on your blog posts you have permissions to create, read, update and delete posts.
Only the site administrators have the ability to modify site settings which affect the entire platform. We have thoroughly explained RBAC in concept, let us now focus how it works in Strapi.
How RBAC Works and Default Roles in Strapi CMS
Strapi is a headless CMS used for building modern web applications which can be accessed by millions of individuals, as a result it offers in-built tools and techniques for implementing role based access control as this ensures application security, consistency and end user satisfaction.
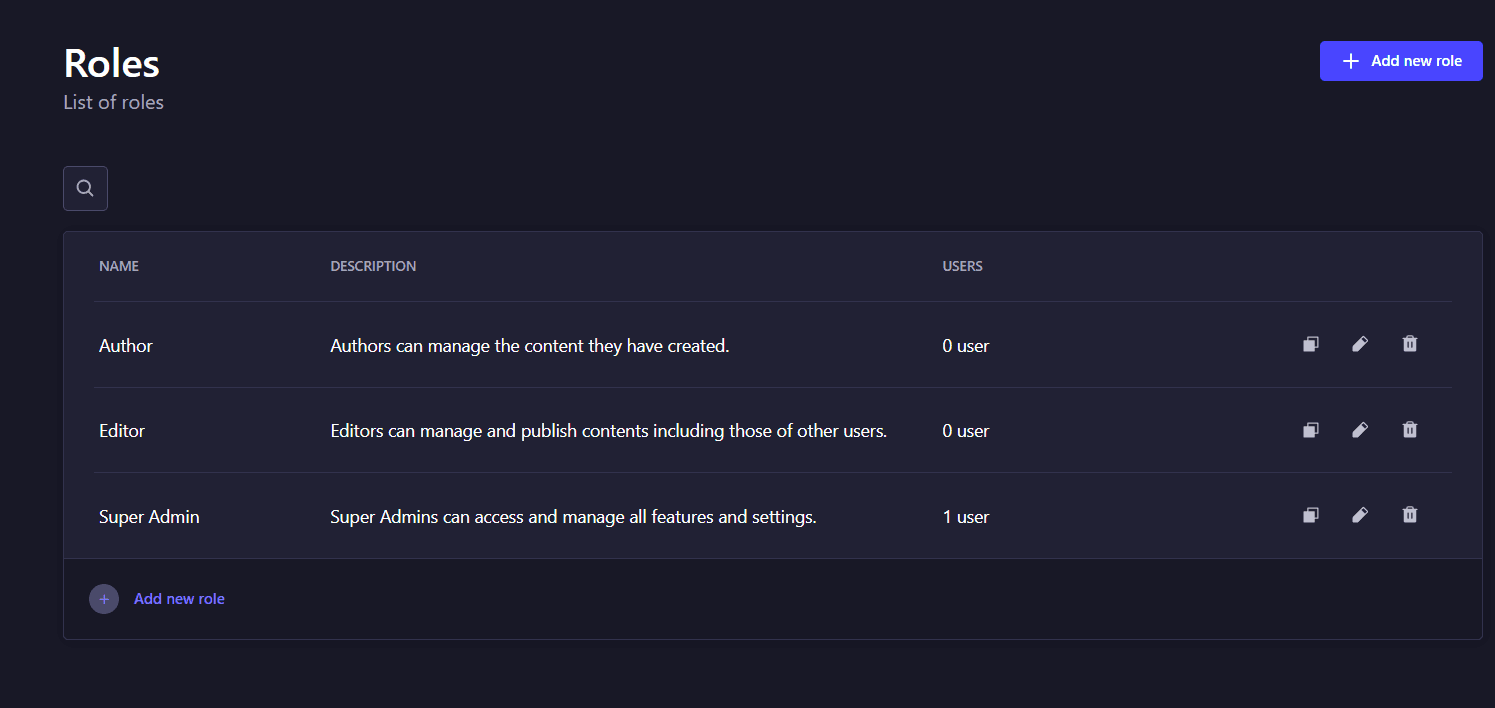
In Strapi, there are 3 roles by default in a new application.
- Super Admin: Users assigned to this role can access and manage all features/settings of the application.
- Editor: An editor is allowed to proofread and publish content, including those of other users.
- Author: Can manage the content they have created only.
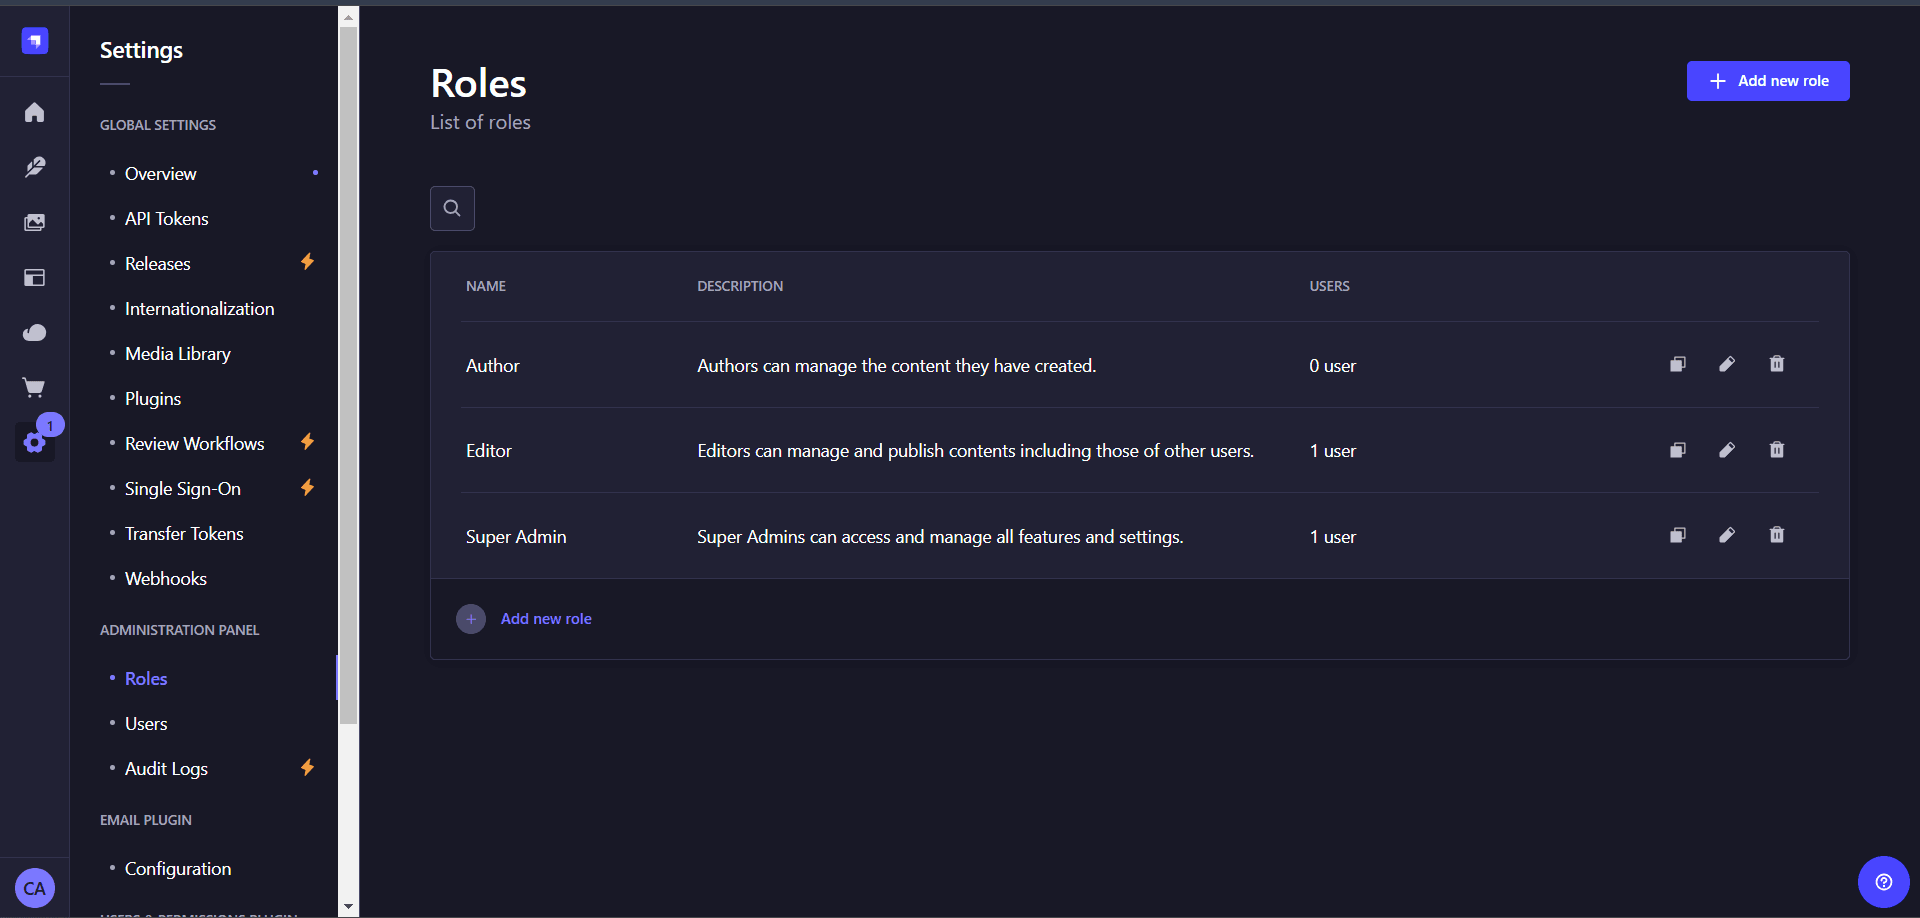
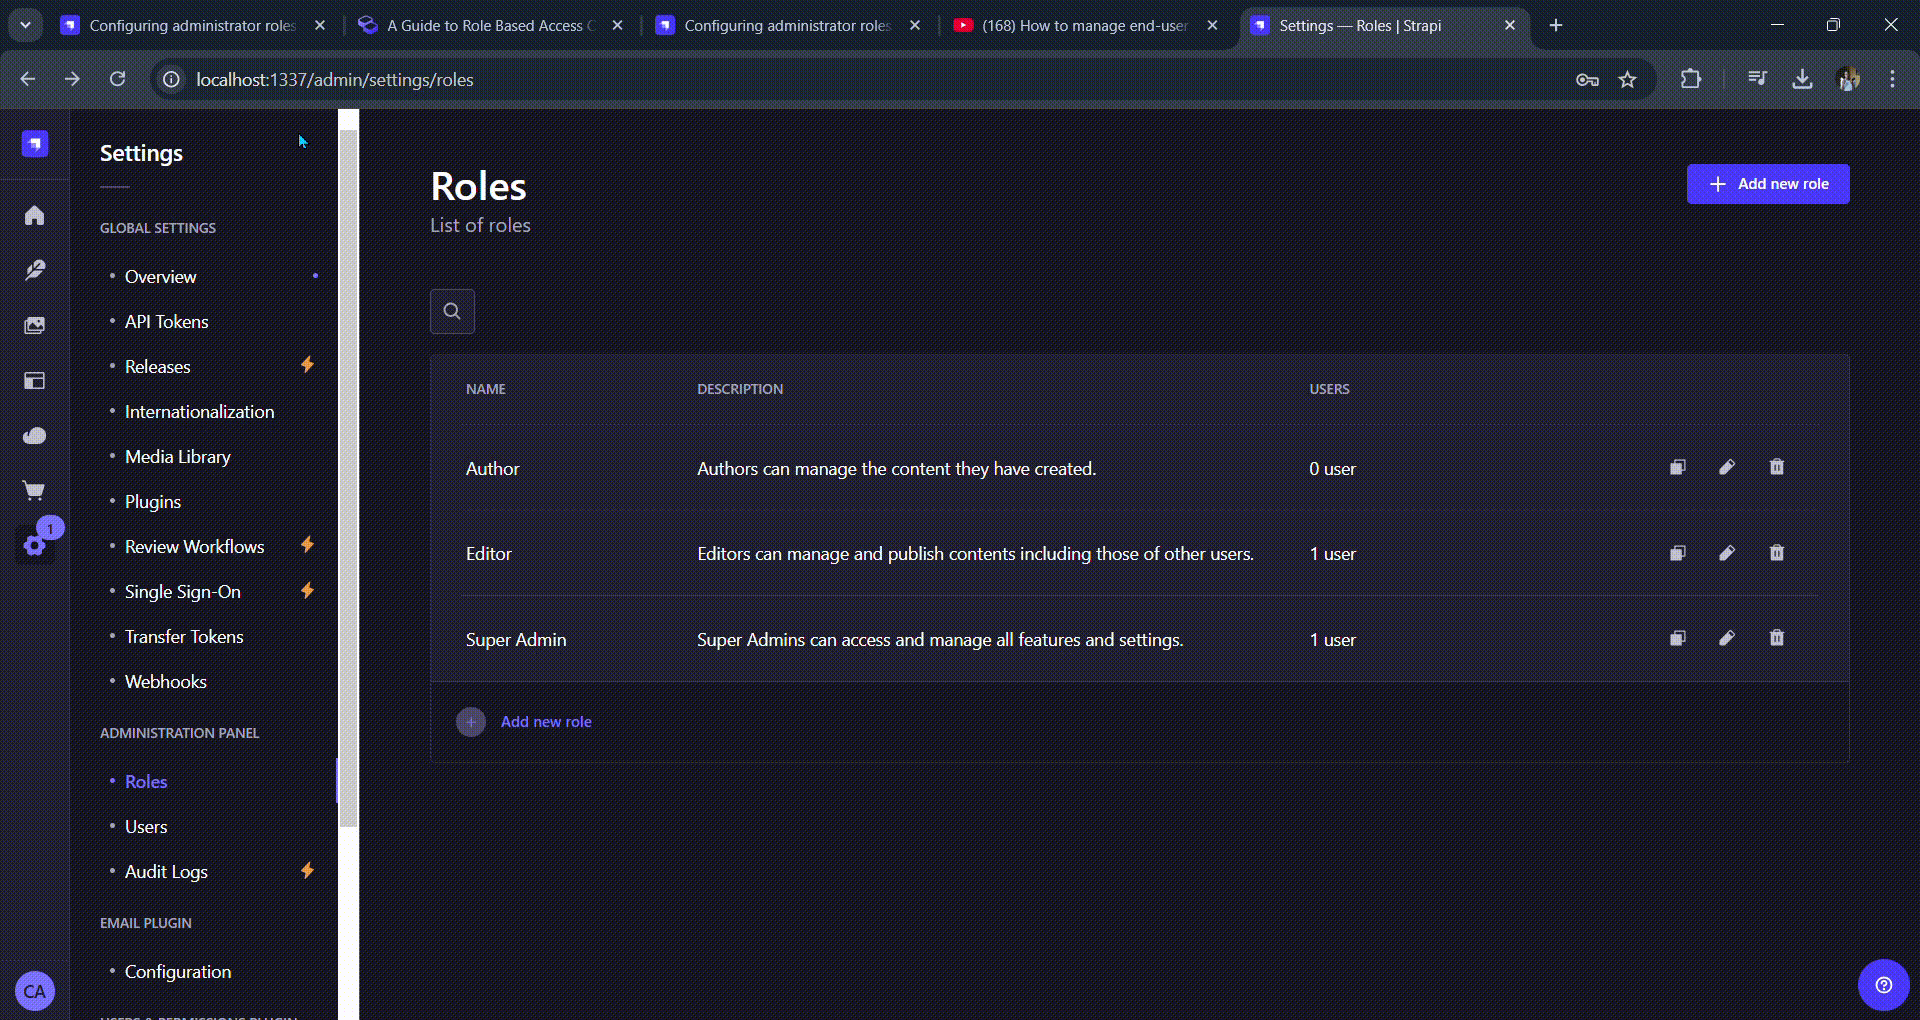
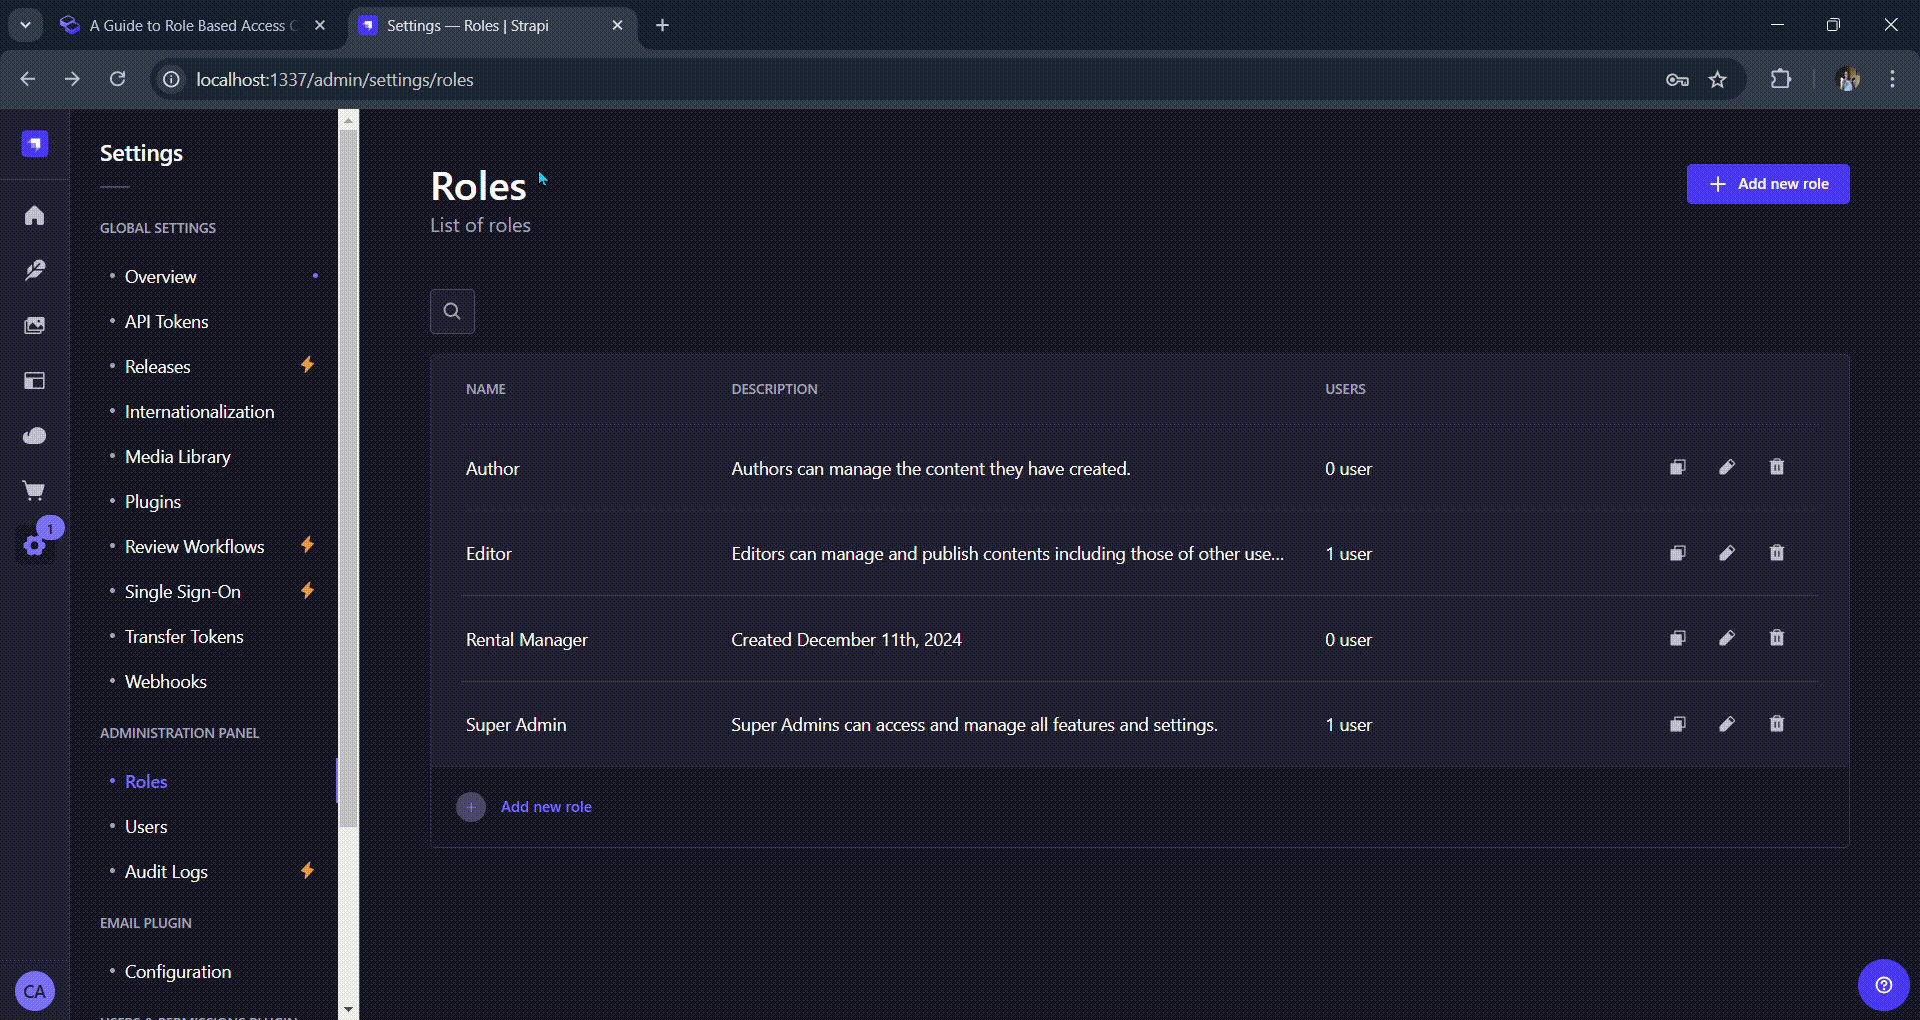
You can manage roles in Strapi CMS from your admin dashboard in the Administration Panel under the Roles sub-section as seen below.
In your admin panel, navigate using the address below.
Setings > Administration panel > Roles
Managing Content Types for User Roles in Strapi
A Content Type in Strapi is like a template for the information to be managed on a software application powered by a CMS (content management system) like Strapi. Content types define the structure of your application's data.
Strapi offers two main types of collection types:
- Single Types: This content type can manage only one entry and is used to model unique content that exists only once in a platform such as 'Homepage', 'About Us' etc.
- Collection Types: A collection type is ideal for repeatable data, it supports multiple entries such as 'Blog Posts', 'Users', 'Equipment' etc.
Each type can be customized with fields like text, media, and numbers with the ability to add relations to each other. They are managed in the Content-type builder of the Strapi administration panel. The content type builder is the core plugin of Strapi and offers features for robust content management. You can read more about the Content-type builder here.
Enabling Collection Types Permissions for Default Roles
To truly gain an understanding, it often helps to use relatable examples of a real-life application of the software. For this section of the article, we will be using the context of an inventory application in use by an equipment rental company using an inventory application.
To enable content type permissions, navigate to the roles sub-section of the admin panel.
On the page above, we can observe the following Super Admin has control over all site settings and Collection Types.
Let us take a look. In your roles sub-section, click the Super Admin role.
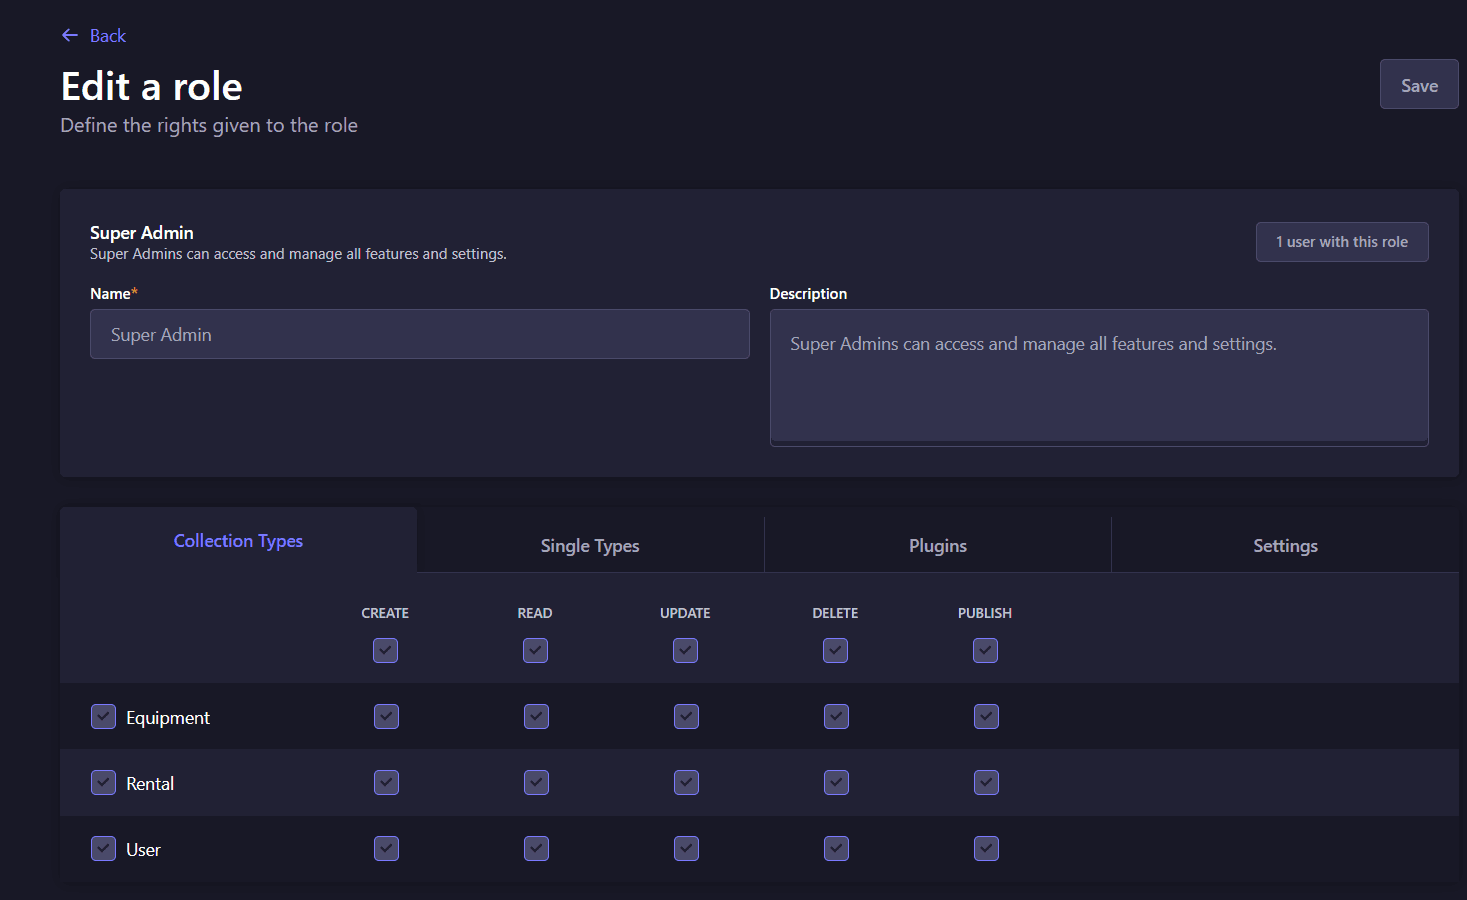
The image above shows that the Create, Read, Update, and Delete actions for all collection types are allowed for the Super Admin and cannot be changed by default.
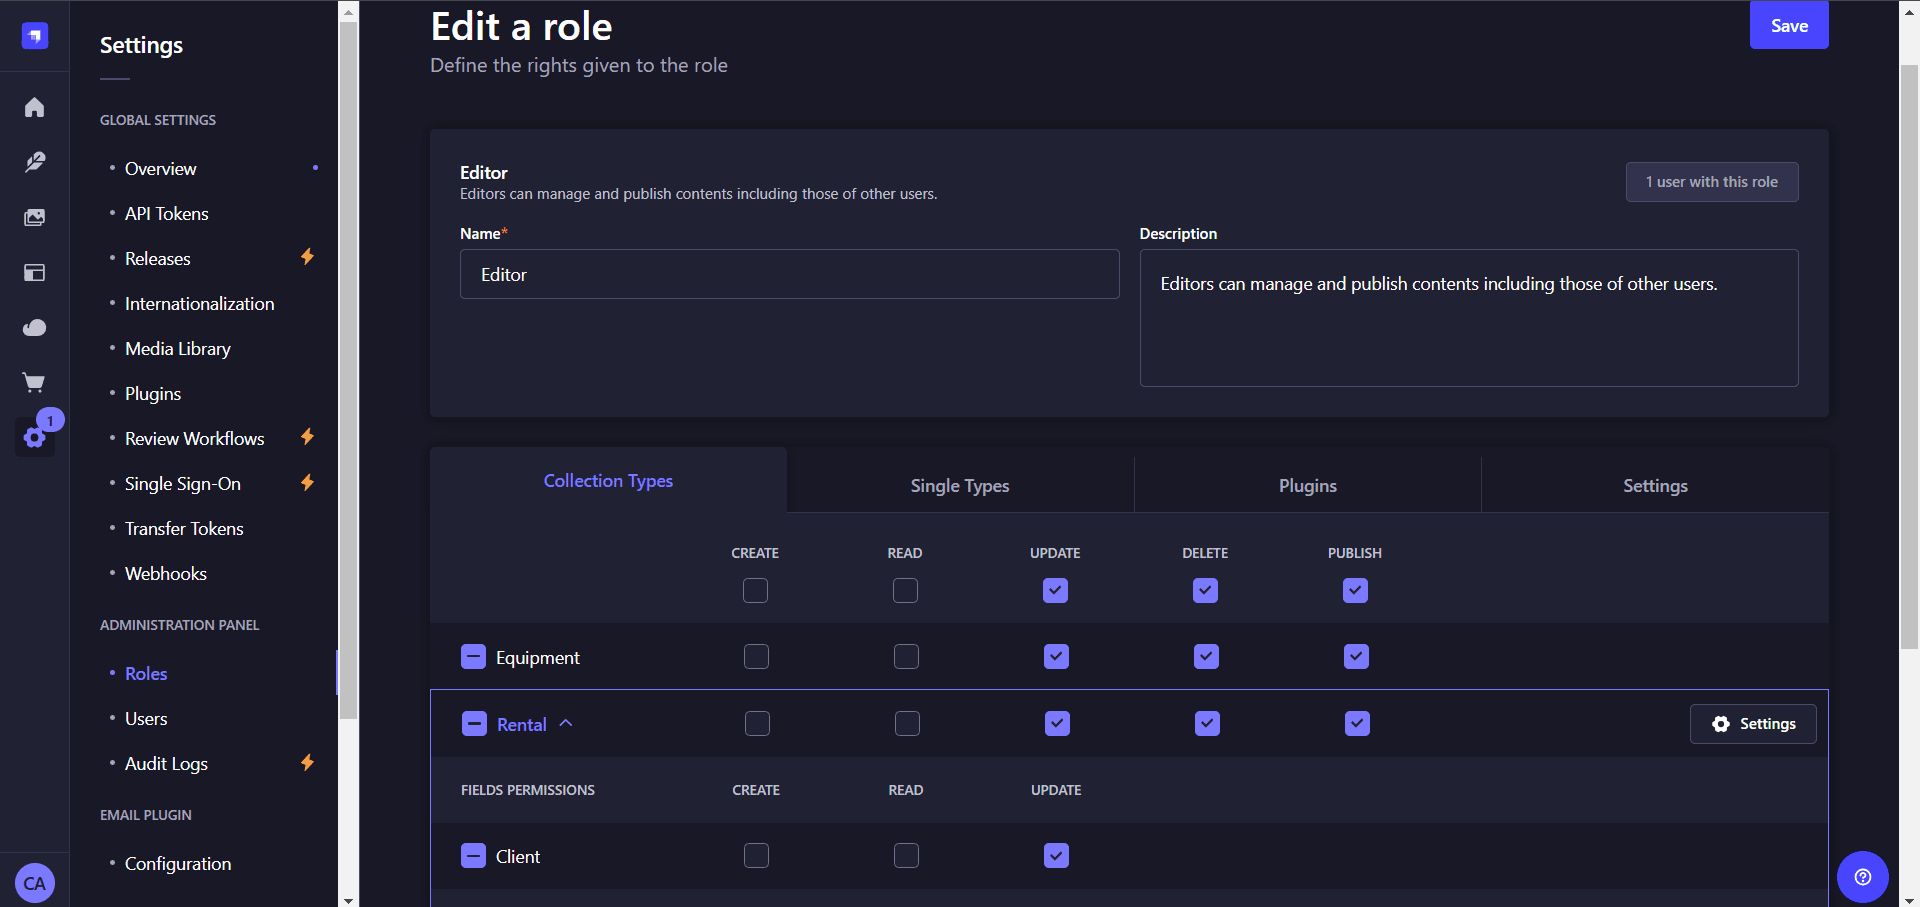
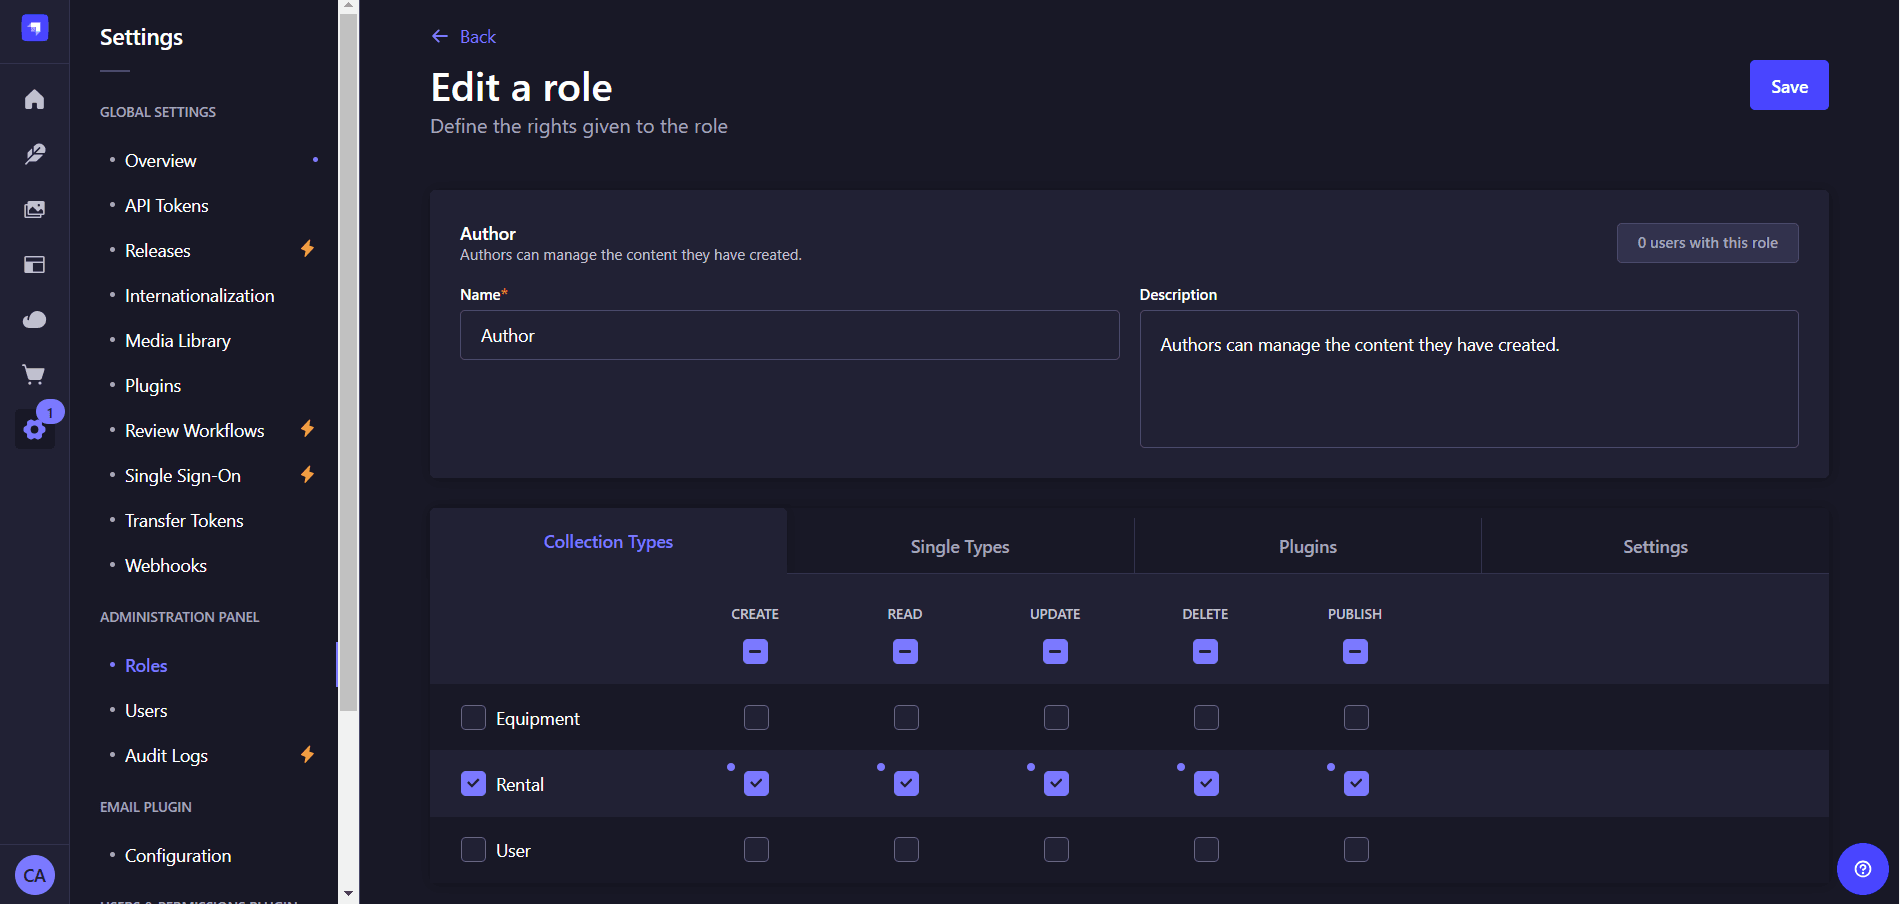
In Strapi, other roles except the Super Admin can be reassigned to new users in the users sub-section of your administration panel. This can be to enable a user perform certain actions that are not allowed on the current role. Take a look at the demonstration below.
In the above image, we edited a users role from Author to Editor. Now we can assign the permission for the Editor to perform Update, Delete and Publish actions on all Collection Types.
Now, the user only has the permissions specified for the Editor role in the roles sub-section of the admin panel.
As you can see below, only the edit function is available for the Equipment, Rental and User content types.
These default roles can be modified and made to fit any permission specification according to the Collection Types of your application needs.
Creating Custom Roles in Strapi Admin Panel
You can create custom roles to be assigned to admin users of the Strapi admin panel. This is most advisable in scenarios where total uniqueness is needed, thus requiring designated names and custom permissions other than the default.
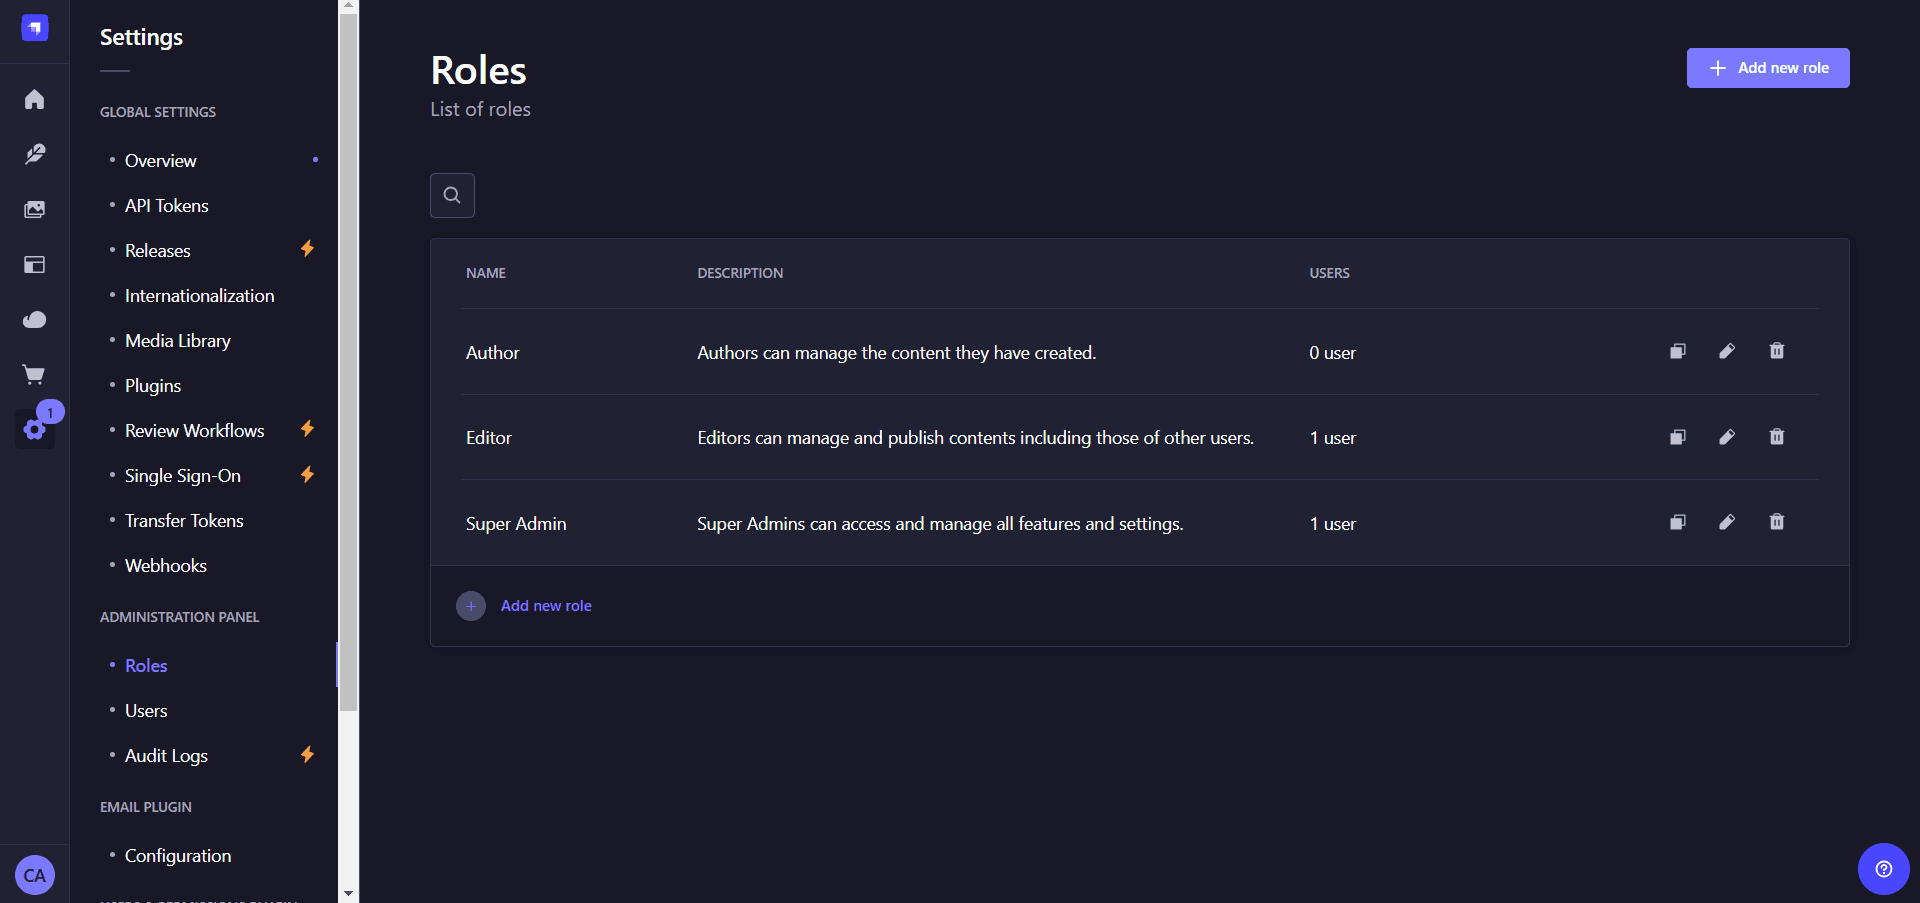
All roles, both default and custom, can be managed in the roles sub-section of the Administration panel.
The example below would explain through the example of an inventory application as mentioned before. We will continue to the relate the concepts to the inventory application as we have been doing earlier on in this article.
Example
Let us assume a custom role "Rental Manager" is needed, apart from the admin this role alone would have permissions to the rentals collection type to manage the delivery of newly rented equipment and already active rentals.
This will enable specialization thus improving efficiency in the organization. The following steps can be taken to achieve this goal.
- Head over to the roles sub-section of the administration panel and click "Add new role".
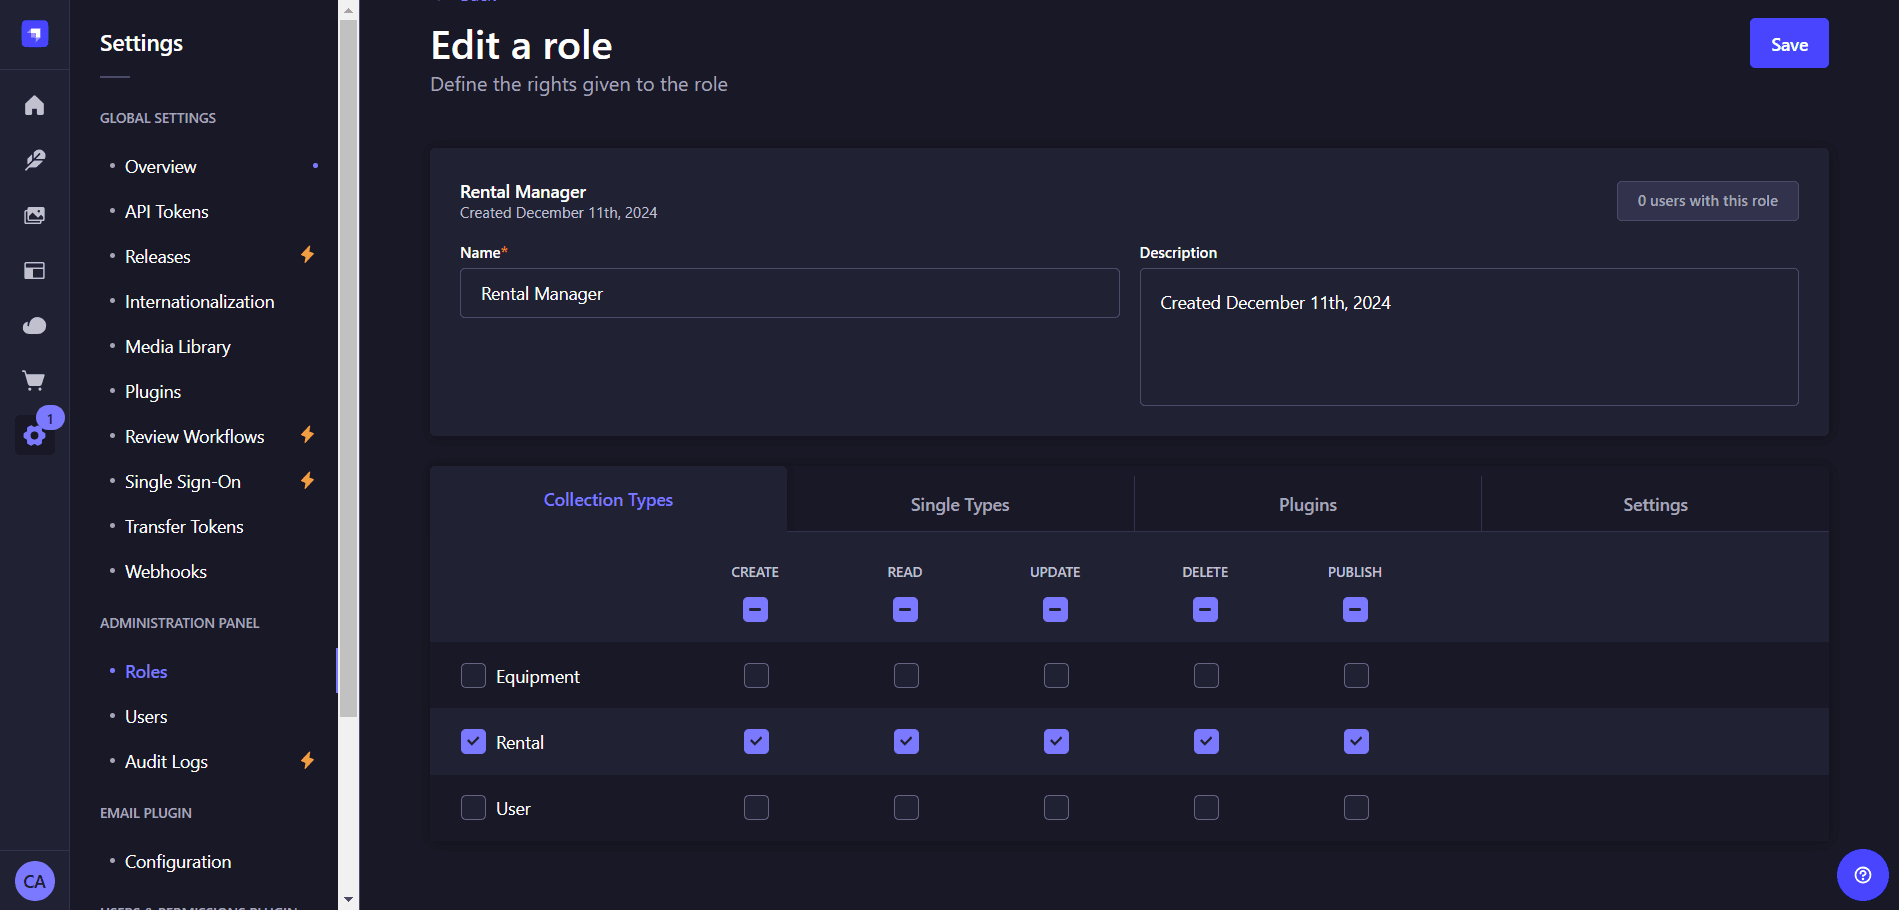 2. Input the role name "Rental Manager" and enable CRUD operations for the Rental Collection type only.
4. Click the save button at the top-right corner of the page.
2. Input the role name "Rental Manager" and enable CRUD operations for the Rental Collection type only.
4. Click the save button at the top-right corner of the page.
The flexibility of Strapi RBAC is what makes it one of the best, ensuring that only a user of the admin panel assigned to the "Rental Manager" role has access to the rental collection type on the admin panel and is responsible for its management alone.
Creating Custom Conditions for Roles
When building applications from scratch, most developers make use of custom middleware and policies to ensure custom conditions are met before certain permissions are assigned to user roles.
With Strapi, you can create these same custom conditions with ease in the admin panel or through code. Assume that in the inventory software both company staff and customers can login.
To create custom conditions in Strapi, you would have to observe certain procedures accurately.
- Declare New Condition: A new condition is declared as an object, it can have five possible properties such as:
displayName,name,category,plugin,handler. A code sample illustrates the explained below.
{
  displayName: 'rental page access',
  name: 'rental-page-access',
  async handler(user) {
    return user.email.endsWith('@inventory.com');
},- Use a condition handler: A handler is used to verify the condition; it is a function that returns a query object or a boolean value (true/false). It is very useful when performing checks in custom conditions.
//handler to return a query object
async handler(user) {
    return { price: { $gt: 50 } };
  },


 //handler to return a boolean value
 handler: () => {
 new Date().getHours() === 17;
 }
The examples below will shed more light and detail on these concepts as they might seem abstract at once.
- Register the Condition: To enable availability in the administration panel, conditions should be declared and registered in the
index.ts/jsfile in thesrcfolder of your Strapi project. Both single and multiple conditions can be registered.
export default async () => {
  await strapi.admin.services.permission.conditionProvider.register(condition);
};
The code block above shows the register method being exported. "Read in detail" the example below for understanding.
Example:
Imagine you want to write a custom condition that enables only company staff with emails that end in "@inventory.com" to access the rentals and statistics page of the application, and then end-users with other emails are restricted to the equipment availability page.
This would enable the company keep its data private while enabling end users still hire equipment all on the same application.
 A sample statistics page restricted to "Staff Only"
You would achieve this custom condition in the index.js(or index.ts) file of your Strapi application.
const condition = {
  displayName: 'rental page access',
  name: 'rental-page-access',
  async handler(user) {
  // the company email domain is specified here'inventory.com'
    return user.email.endsWith('@inventory.com');
  },
};

//this code below registers the condition in Strapi
export default async () => {
  await strapi.admin.services.permission.conditionProvider.register(condition);
};
You can see that the above code block contains all steps mentioned above, a new condition object with a handler plus the conditionProviderregister() used in the export function last.
If you want to explicitly associate this custom condition with a plugin in the admin panel, you could also add the plugin property in the condition object.
plugin: "admin"You can also go further to say restrict access to a particular equipment on the application once the available quantity is less than "10". In a company setting, this would be to reduce the risk of processing orders on equipment not currently available.
For a scenario like this, a condition handler that returns a can be used; this returns a boolean value (true or false) The code block below can be applied.
export default async () => {
  await strapi.admin.services.permission.conditionProvider.register({
    displayName: 'Equipment Quantity under 10',
    name: 'equipment-quantity-under-10',
    plugin: 'admin',
    handler: { amount: { $lt: 10 } },
  });
};
You will notice that the plugin property was included in the code block above to associate the custom condition with the admin plugin in the Strapi panel.
Let's say for instance that you have multiple custom conditions, you can pass them as an array of objects and then register the condition using the conditionProvider.registerMany() method instead of the conditionProvider.register() method used for single conditions.
const conditions = [
  {
    displayName: "rental page access",
    name: "rental-page-access",
    async handler(user) {
      // the company email domain is specified here'inventory.com'
      return user.email.endsWith("@inventory.com");
    },
  },
  {
    displayName: "Equipment Quantity under 10",
    name: "equipment-quantity-under-10",
    plugin: "admin",
    handler: { amount: { $lt: 10 } },
  },
];

export default async () => {
  await strapi.admin.services.permission.conditionProvider.registerMany(
    conditions,
  );
};NOTE: Custom conditions for collection types can be set in the admin panel user interface too.
For example, in the illustration below, enable the Author role for some custom conditions.
To enable these custom conditions, click on the settings button to the right of that particular content type. A modal will pop-up enabling you to update, delete and publish content since this is for the editor role.
From the above illustration, you can see that the Author can update, delete and publish when he has the same role as the creator. A custom role like this one has benefits in an organization ensuring that the user can update, delete and publish as long his/her role is the same with the original creator while maintaining clear distinct permissions.
Managing End-User Accounts in Strapi RBAC
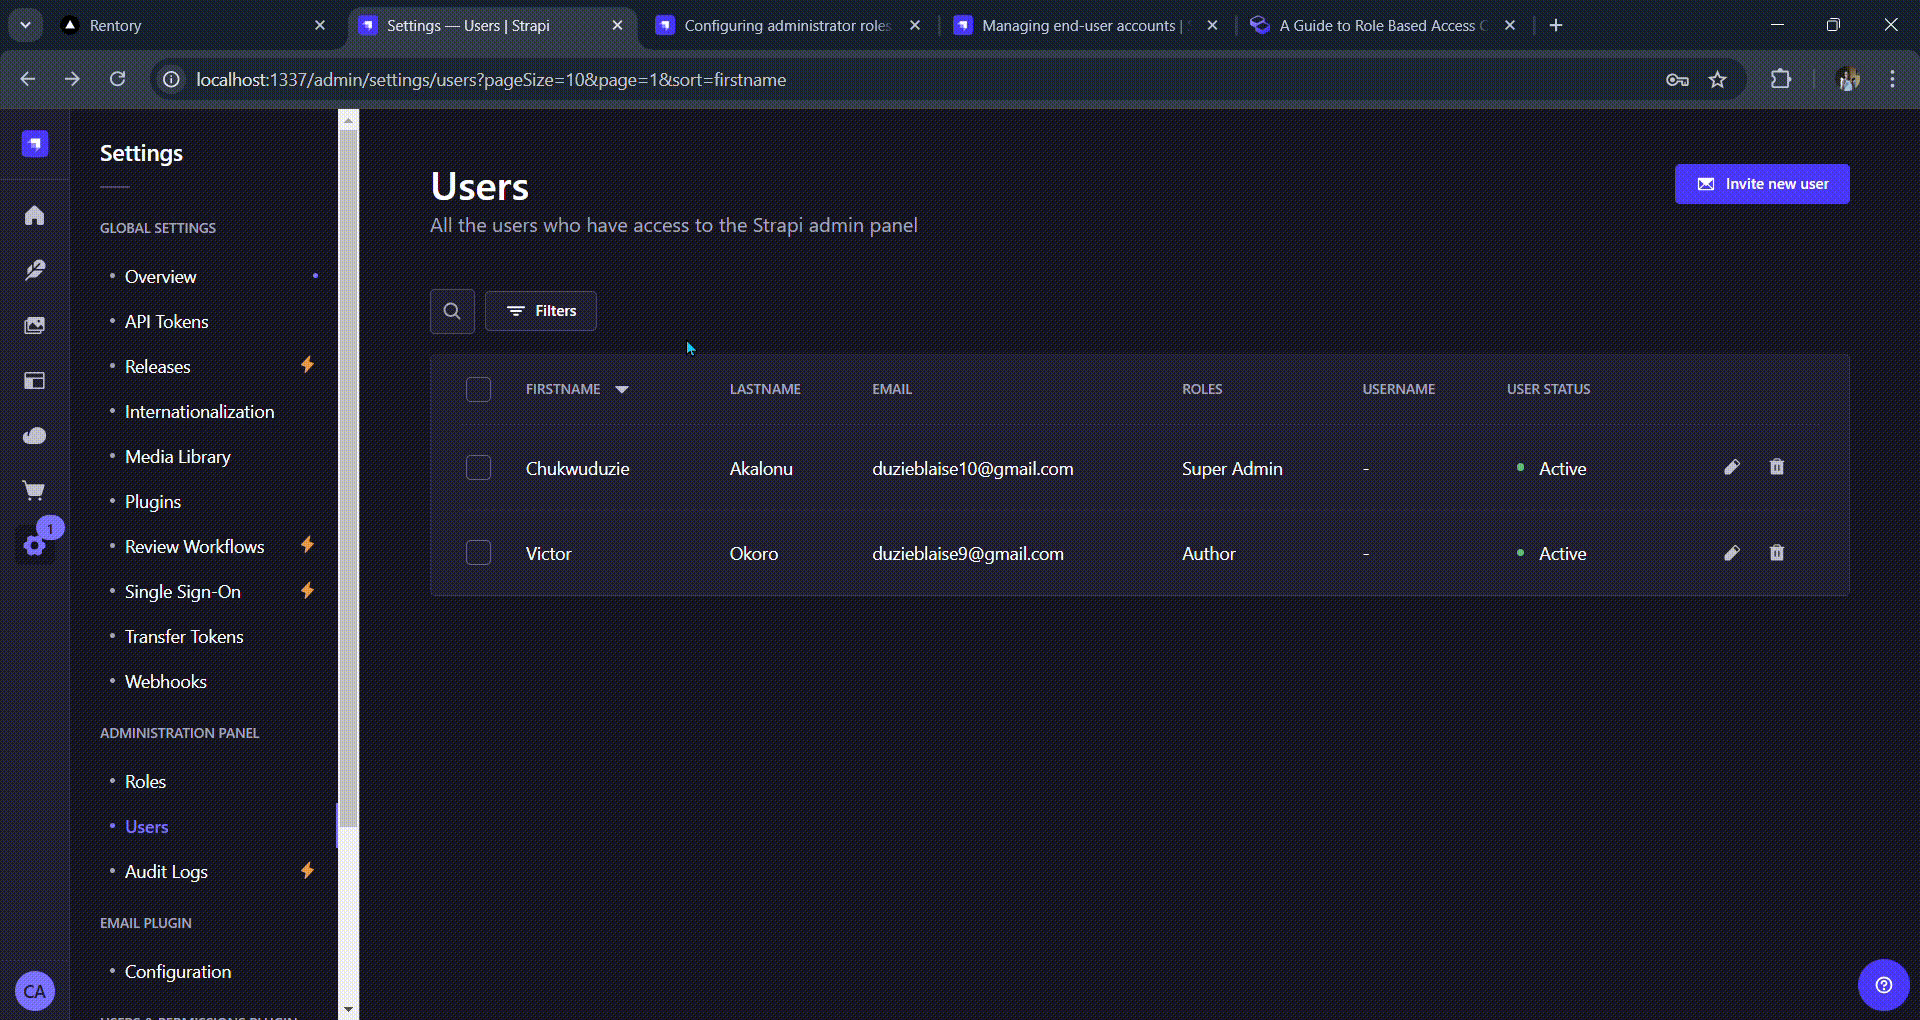
One of the features that grants Strapi admins granular control over users is the Users & Permissions Plugin. It grants full access to tools and functionlaity to manage users on the client applications built on Strapi.
The Users & Permissions Plugin enables admins manage users as a Collection type in the Strapi admin panel.
The image below shows how end-users are managed as a collection type.
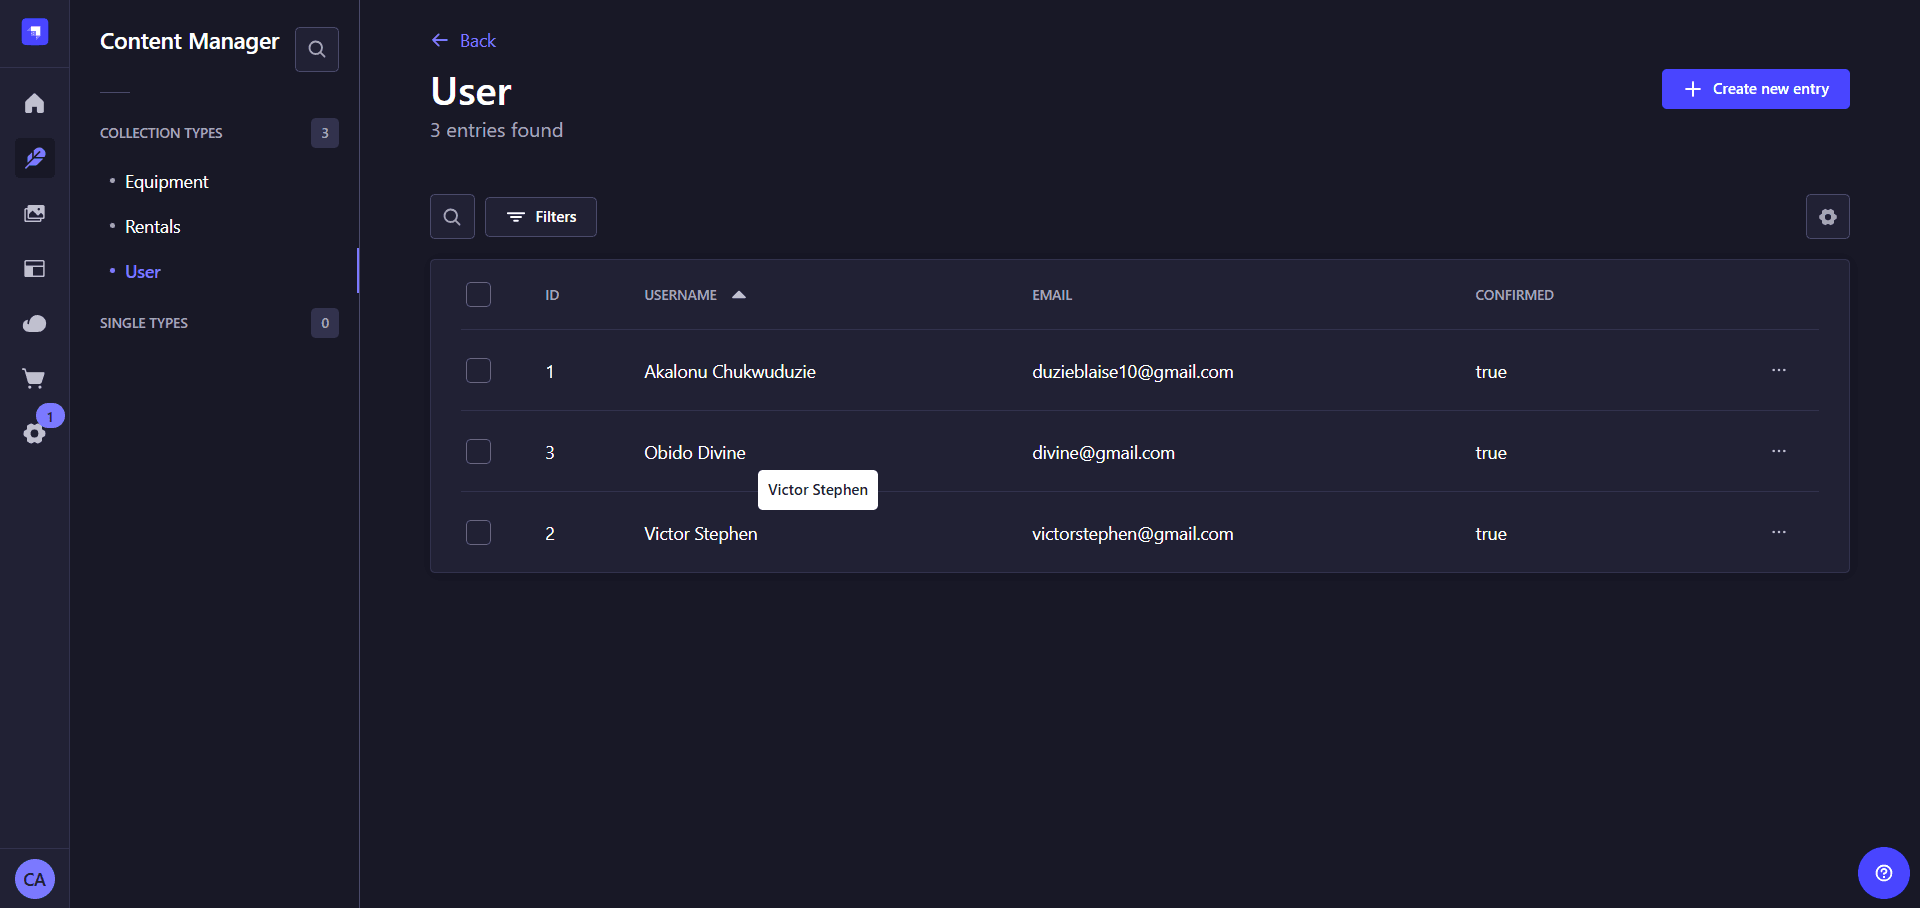
Already registered end-users are displayed under the User collection type, which is powered by the "Users and permissions" plugin. The image above is an accurate example.
Creating an End-user in Strapi
These can be done through two different methods:
- Through the Admin Panel.
- By making a POST request through the Strapi content API.
Through The Admin Panel
In the user section of the Collection Types, click the "create new entry" button at the top right of the page.
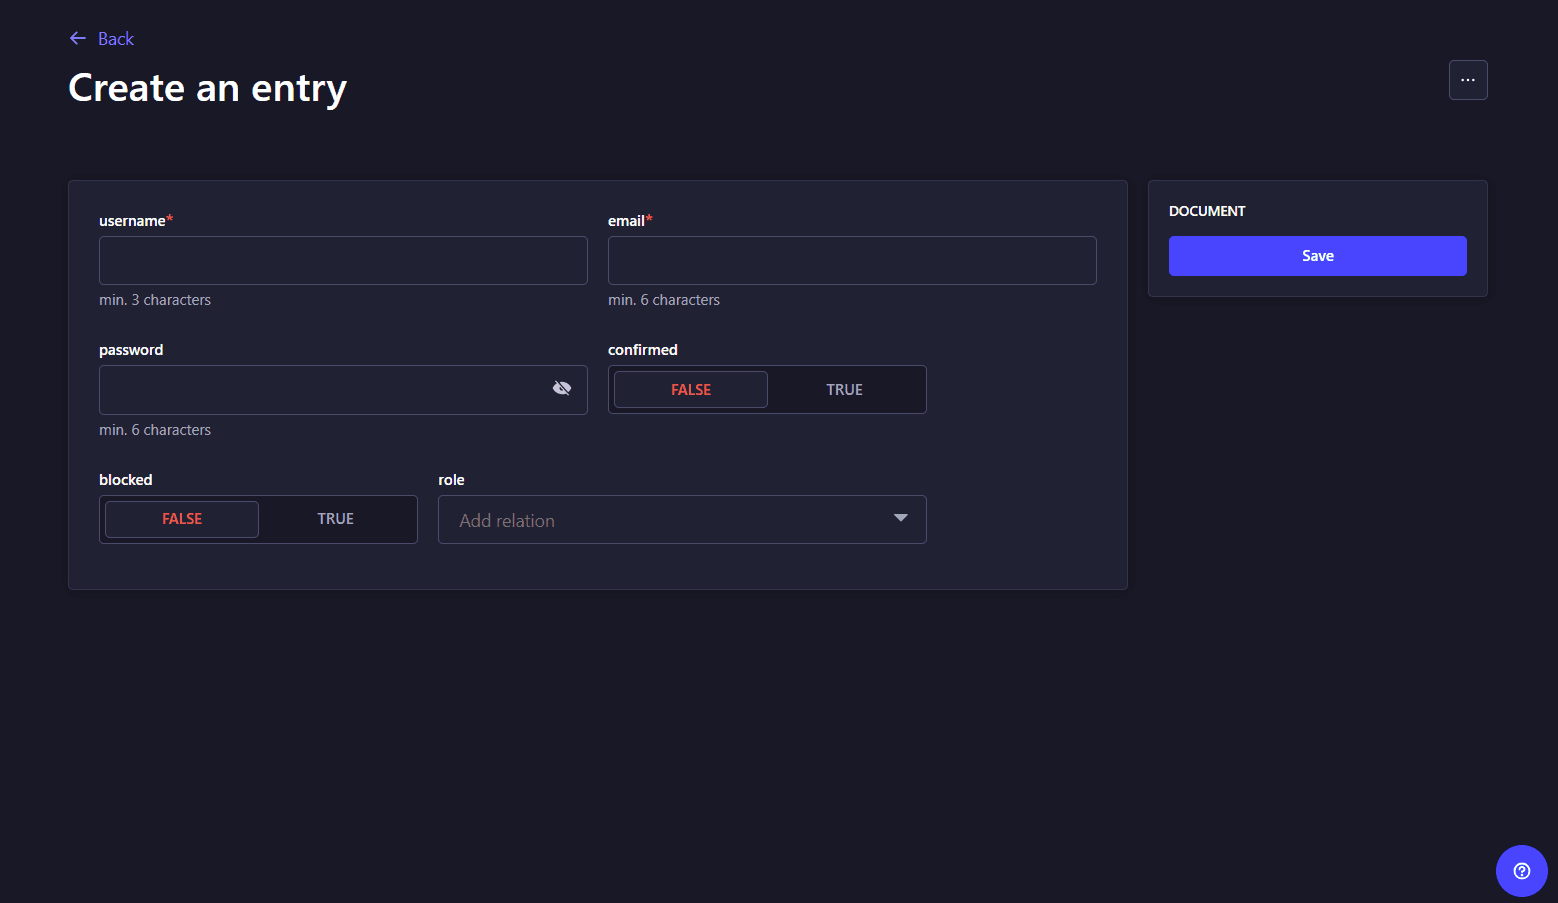
You will be required to fill in the appropriate information and then save the information for the User Collection type.
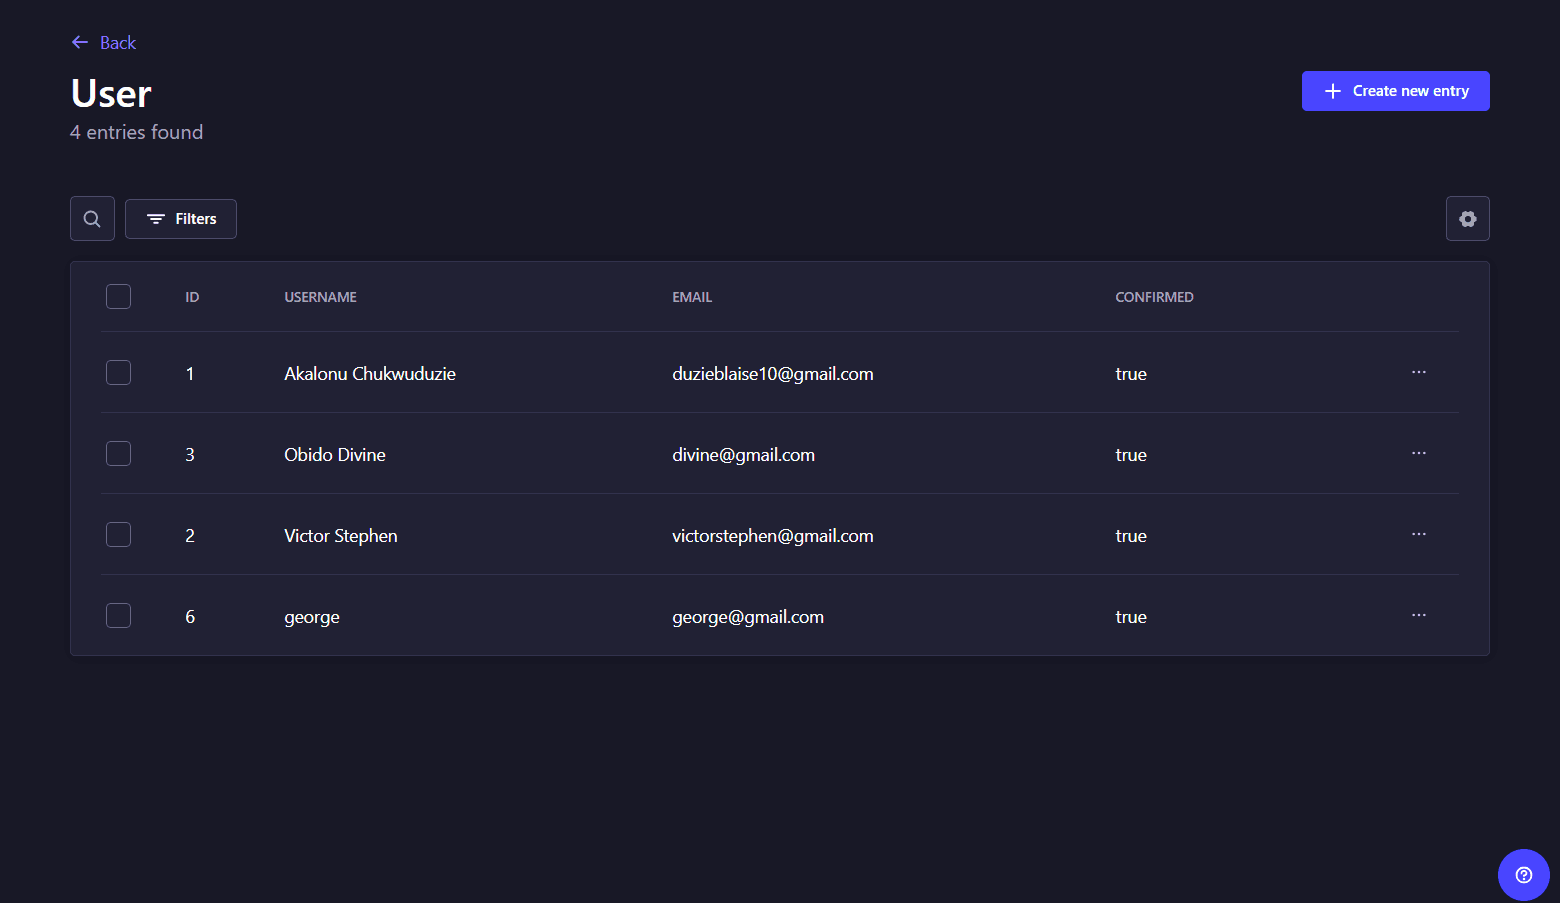
Taking a look at the User Collection type, we can see that a new user has been added below.
Managing end-user roles is an integral part of role-based access control in Strapi, the Users & Permissions plugin enables admins easily manage them the right way.
Creating End-Users through the API Endpoint
Creating new end-users can also be done programmatically by making post requests to the appropriate endpoint. This is more convinient when enabling users register through a frontend application built on-top of Strapi.
- In your Strapi admin panel, open the roles sub-section under the Users & Permissions Plugin, you would see the page below display.
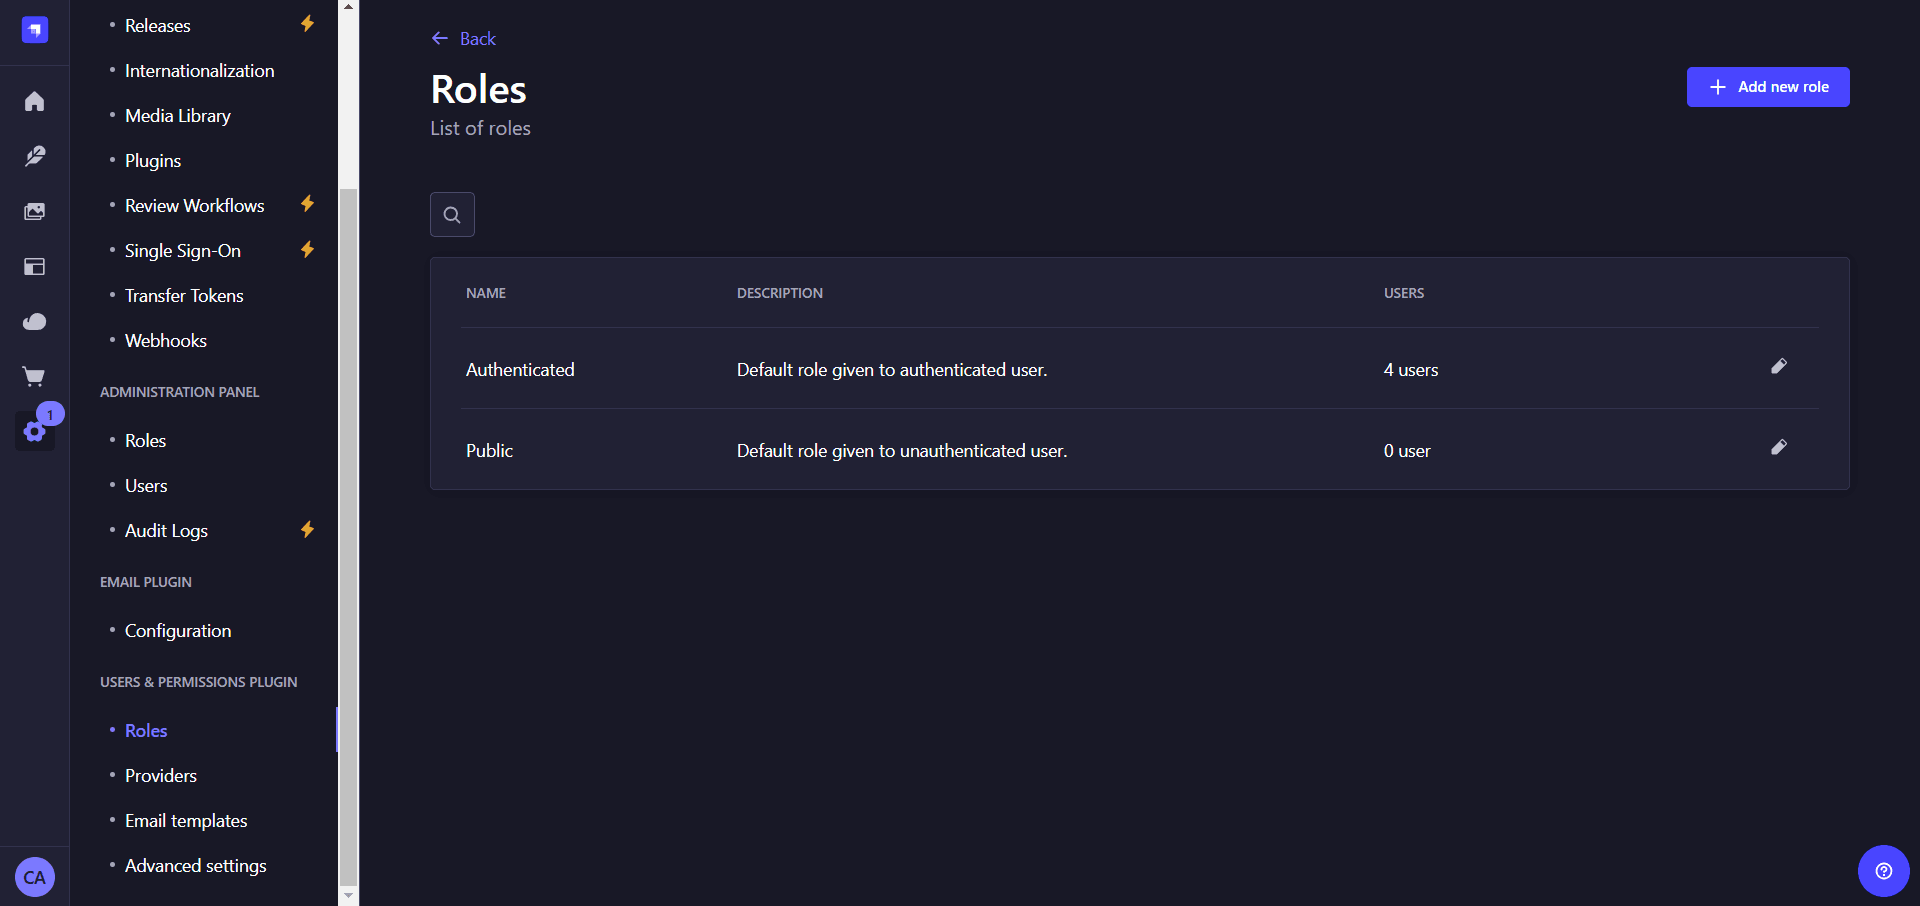
- Select the Authenticated option as seen below, scroll to the Users-permissions option and enable the "select all" option under the user section.

- With this step done, you can make POST requests in your application to create new users through your frontend application.
An example from a Next.js application is shown below.
const sendDetails = async () => {
  try {
    const response = await fetch(
      "http://localhost:1337/api/auth/local/register",
      {
        method: "POST",
        headers: {
          "Content-Type": "application/json",
        },
        body: JSON.stringify(user),
      },
    );
    const data = await response.json();
    if (response.ok) {
      setNotification({
        message: "User registered successfully, redirecting to dashboard",
        type: "success",
      });
      // to delay the re-routing by 3 seconds
      setTimeout(() => {
        router.push("/overview");
      }, 3000);
    } else {
      //display notifications if registration is not successful
      setNotification({
        message: "An error occured, please try again!",
        type: "error",
      });
    }
    console.log(data);
  } catch (error) {
    console.error("Error registering user:", error);
    console.log(error);
  }
};

sendDetails();
Conclusion
RBAC is one of the unarguably one of the most important concepts in this era of modern applications with complexity and high user interaction. With Strapi, Role-based access control is efficiently executed as it offers just the same benefits with flexibility with an "ease of execution" design.
When building applications, it is important to carefully map the responsibilities and activities that would to be performed on a routine basis for the application. You can then create roles and assign these responsibilities in your application while observing hierarchy and lastly assign users to the roles according to job responsibilities. This ensures application stability, privacy, and security, thus increasing the ability to scale if need be.
Want to learn more about Aministrator roles RBAC in Strapi? Click here!