Part 1 of a 4-part series on building with GraphQL, Strapi v5, and Next.js 16. Each part builds directly on the project from the previous post, so keep an eye out as we release them:
- Part 1 (this post), GraphQL basics with Strapi v5. Fresh install, a full Shadow CRUD tour, and your first custom resolvers.
- Part 2, Advanced backend customization. A
Note+Tagmodel, middlewares and policies, Shadow CRUD restrictions, custom queries, and custom mutations. - Part 3, Next.js 16 frontend. Apollo Client on the App Router: Server Component reads, Server Action writes, typed operations via codegen.
- Part 4, Users and per-user content. Authentication, an ownership model, and two-layer authorization (read middlewares, write policies).
New to Strapi or GraphQL? Start here. Already have Strapi and the GraphQL plugin running? Skim Part 1, then jump to Part 2.
TL;DR
- This post builds a fresh Strapi v5 project from zero with the built-in example data (Article, Author, Category), installs
@strapi/plugin-graphql, and walks through every auto-generated query and mutation the plugin exposes for those content types in the Apollo Sandbox. - It then introduces the customization APIs through three hands-on examples: production-grade plugin configuration (
depthLimit,maxLimit,defaultLimit,landingPage, introspection), a computedwordCountfield onArticlevianexus.extendType, and a custom top-levelsearchArticlesquery. All three use the same extension-service and aggregator pattern the rest of the series builds on. - Along the way you set up the
src/extensions/graphql/folder structure (aggregator,computed-fields.ts,queries.ts) used by every subsequent post in the series, so Part 2 only adds files, it does not refactor any you wrote here. - By the end you have a working Strapi project serving a customized GraphQL schema at
http://localhost:1337/graphql, an Apollo Sandbox for testing, and the first two custom resolvers in your codebase. - Target audience: developers comfortable with Node and TypeScript who have not used Strapi before, or who have used Strapi's REST API but not its GraphQL plugin.
What is GraphQL?
GraphQL is a query language and runtime for APIs. Facebook built it in 2012 and open-sourced it in 2015. The original problem: mobile clients needed different slices of the same data, and each new screen meant either adding another REST endpoint or fetching more data than the screen would display. GraphQL flips this around. The client says exactly which fields and relations it wants, and the server returns exactly that, validated against a published schema.
A GraphQL server has one endpoint, usually /graphql. It also has a schema that lists every type, field, argument, and relation. The client sends a query that picks fields from that schema. The server checks the query against the schema and returns a response that matches the query, field for field.
Strapi's REST API already lets the client pick fields, populate relations, filter, sort, and paginate. The Strapi v5 REST parameters reference lists seven query-string parameters that work on any collection or single-type endpoint:
populate, controls which relations, components, or dynamic zones come back.fields, restricts which scalar attributes appear in the response.filters, narrows results with operators like$eq,$ne,$contains,$in, and the same logical operators you will see in GraphQL.sort, orders results by one or more attributes.pagination, page-based or offset-based paging.locale, selects which locale's content is returned.status, draft or published.
You can try populate and fields from a terminal against the project you will build in this post:
# No relations in the response (the default).
curl 'http://localhost:1337/api/articles'

# `populate=category` brings the category relation back for every article.
curl 'http://localhost:1337/api/articles?populate=category'

# `fields` restricts which scalar attributes are returned.
curl 'http://localhost:1337/api/articles?populate=category&fields[0]=title'
The Strapi docs cover both:
With those parameters, GET /api/articles?populate=category&fields[0]=title&fields[1]=description returns articles with their category, only the title and description fields, in one request. So why use GraphQL at all if REST can already do this?
In most cases, you do not need to. Strapi's REST API combined with qs on the client, or the official @strapi/client SDK, is enough for most projects built on Strapi:
// With qs
import qs from 'qs';
const query = qs.stringify(
  { populate: ['category', 'author'], fields: ['title'] },
  { encodeValuesOnly: true },
);
// → "populate[0]=category&populate[1]=author&fields[0]=title"

// With the Strapi client SDK
import { strapi } from '@strapi/client';
const client = strapi({ baseURL: 'http://localhost:1337/api' });
const articles = await client.collection('articles').find({
  populate: ['category', 'author'],
  fields: ['title'],
});
Between those two, you get field selection, relation population, filtering, sorting, pagination, draft/publish handling, and locale selection without touching GraphQL. Plenty of production Strapi deployments, small and large, ship on REST alone.
GraphQL is a better fit when your needs go past what REST gives you out of the box. Specifically:
- Aggregations and custom response payloads. Counting entries, grouping by a relation, or returning a payload that combines several content types means writing a new REST controller for each one. In GraphQL, a custom resolver lives next to the auto-generated schema and returns whatever the client asks for. This post adds
searchArticles; Part 2 goes further with anoteStatsaggregate that totals notes by tag. - Multiple clients, each asking for a different subset of fields. A web app, a mobile app, and a third-party integration all talk to the same backend but each wants different fields and relations. With GraphQL each client writes its own query and gets back exactly those fields. With REST, the server has to either expose enough endpoints to cover every client's needs or return a superset that overserves some of them.
- Tools that read the schema directly. Apollo Sandbox, IDE plugins, and code generators all work against the live schema with no extra setup. There is no separate API reference document to keep in sync.
- Per-query TypeScript types from a code generator. GraphQL Code Generator reads every query and mutation in your client code and produces a TypeScript type for each one that matches the exact fields you selected. Add a field to the query, the generated type updates, and every place that reads the result gets type-checked.
@strapi/clientis written in TypeScript and its method signatures are typed, but it does not generate types from your specific content types. The returneddatais typed generically, so you cast or annotate at the call site. GraphQL plus a code generator gets you project-specific types without writing them by hand.
None of this depends on project size. Use REST if your clients all need similar fields and you want the simplest possible client code. Use GraphQL if you are already writing aggregations, supporting multiple client types, or planning custom resolvers. The rest of this post is about the GraphQL side: what Strapi gives you, and how to extend it.
The same "articles with their author and category" request, written as a GraphQL query, looks like this:
query {
  articles {
    title
    description
    author {
      name
    }
    category {
      name
    }
  }
}
And the response:
{
  "data": {
    "articles": [
      {
        "title": "First article",
        "description": "...",
        "author": { "name": "Ada Lovelace" },
        "category": { "name": "news" }
      },
      {
        "title": "Second article",
        "description": "...",
        "author": { "name": "Grace Hopper" },
        "category": { "name": "tutorials" }
      }
    ]
  }
}
No second request for the related category or author. No over-fetching of fields the UI never displays. No bracket-indexed populate keys to build by hand.
Three terms to know
GraphQL has a small vocabulary. You will see all three throughout this post:
- Schema, the catalogue of everything the server can return: every type, every field, every argument. It is a typed API contract. Strapi generates this automatically from your content types.
- Query, a read operation. "Give me this data, with these fields." Queries do not change anything on the server.
- Mutation, a write operation. "Create / update / delete this." Mutations change server state.
There are a few more terms (resolvers, subscriptions, fragments) but you will not need them until later.
Why GraphQL over REST
Four practical reasons, in summary:
- The client picks the fields. Different screens can ask for different fields without the backend changing.
- Related data comes back in one request. Nested fields like
articles → authorare fetched in the same round trip. - The schema is self-describing. Apollo Sandbox and similar tools read the schema and give you autocompletion, inline documentation, and validation. There is no separate API reference to keep in sync.
- Errors come back early. Misspelled fields, wrong argument types, and missing required values are rejected before any business logic runs.
The tradeoff: writing a GraphQL server by hand is a lot of work. Every type, resolver, filter, mutation, and input type has to be written out. The Strapi GraphQL plugin does this part for you.
Why this post exists
Strapi is a headless CMS. Install the GraphQL plugin and it generates a full GraphQL schema from your content types, with no extra code. This feature is called Shadow CRUD. Every customization later in this series sits on top of it.
Before reading deep-dives on custom resolvers, middlewares, policies, and computed fields, it helps to see what Shadow CRUD gives you for free. This post does that. It builds a small but complete Strapi + GraphQL project, runs every CRUD operation against it, and walks through the three most common customizations so the advanced material later feels familiar.
This is not only a Shadow CRUD tour. By the end of the post you will have added three customizations to the schema: plugin-level safety limits (depthLimit, maxLimit, defaultLimit, plus the landingPage and introspection flags for production), a computed wordCount field on Article using nexus.extendType, and a custom top-level searchArticles query wired up through the same extension service and aggregator pattern Part 2 uses. Skip Part 1 and you miss the customization basics the rest of the series builds on.
You can skip this post if all of the following are true:
- you already have a Strapi v5 project with
@strapi/plugin-graphqlinstalled and running; - you are comfortable running the auto-generated queries and mutations in the Apollo Sandbox;
- you have written at least one
nexus.extendTypefactory and registered it through the extension service.
If any of those are new to you, start here.
Prerequisites
- Node.js v20, v22, or v24. Strapi only supports even-numbered LTS releases; odd-numbered current releases (v21, v23, v25) are not supported.
- A terminal and a code editor
- Basic TypeScript familiarity
You do not need prior Strapi experience.
Step 1: Create a new Strapi project
In an empty directory, run the Strapi scaffold command:
npx create-strapi@latest server
 Strapi   v5.42.1 🚀 Let's create your new project


🚀 Welcome to Strapi! Ready to bring your project to life?

Create a free account and get:
30 days of access to the Growth plan, which includes:
✨ Strapi AI: content-type builder, media library and translations
✅ Live Preview
✅ Single Sign-On (SSO) login
✅ Content History
✅ Releases

? Please log in or sign up.
  Login/Sign up
❯ Skip
The CLI will ask a series of questions. Reasonable answers for this tutorial:
| Prompt | Answer |
|---|---|
| "Do you want to use the default database (SQLite)?" | Yes |
| "Start with an example structure & data?" | Yes |
| "Use TypeScript?" | Yes |
| "Install dependencies with npm?" | Yes |
| "Would you like to initialize a git repository?" | Yes |
The installer takes a few minutes. When it finishes, move into the project directory:
cd serverStep 2: Run Strapi and create an admin user
Start the development server:
npm run developIf the server exits immediately with SqliteError: unable to open database file, open .env and either delete the line DATABASE_FILENAME= or set it to a path like DATABASE_FILENAME=.tmp/data.db. The blank value causes Strapi to resolve the SQLite path to a directory rather than a file. Re-run npm run develop after the fix.
Strapi compiles the project, migrates the SQLite database, and prints a banner when it is ready. It serves two things at http://localhost:1337:
/admin, the admin UI for editing content types and entries/api, the REST API (we will not use this)
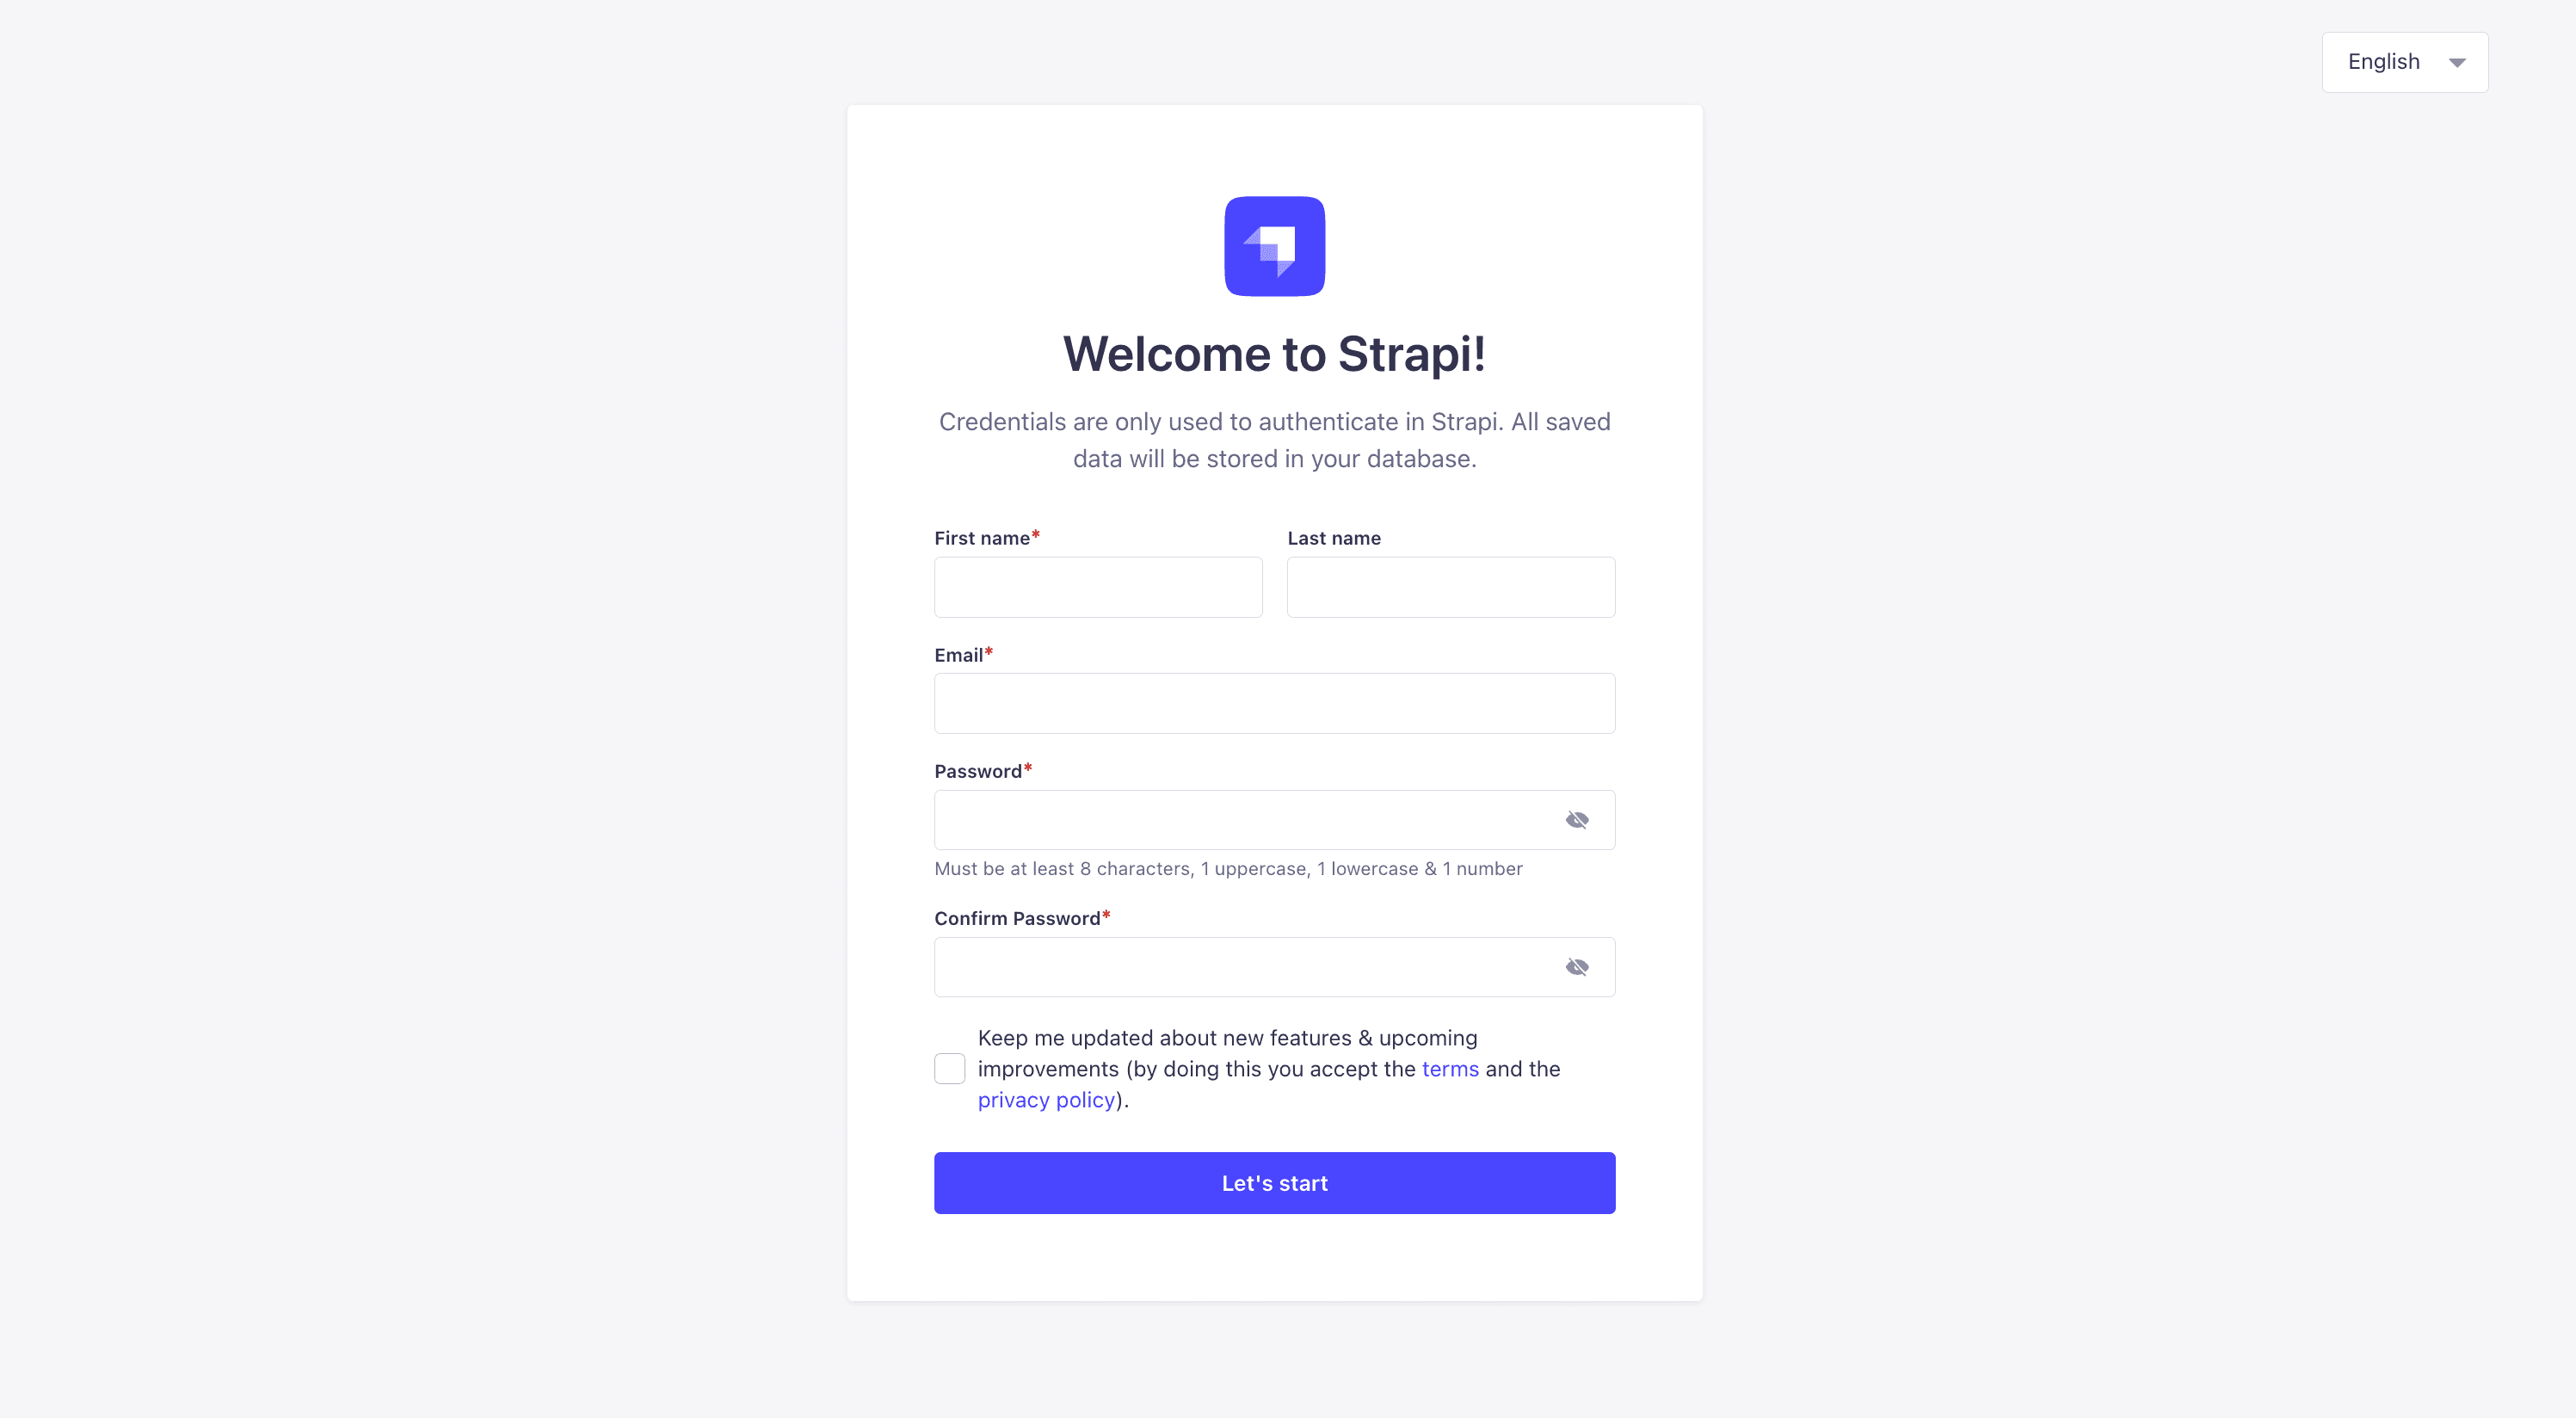
Open http://localhost:1337/admin in a browser. Fill in the one-time registration form to create your first admin user. This account only exists locally and is not connected to any Strapi cloud service.
Step 3: Install the GraphQL plugin
Stop the dev server with Ctrl+C, then install the GraphQL plugin:
npm install @strapi/plugin-graphqlStrapi picks up the plugin at boot; no configuration file edit is required. Start the server again:
npm run developOpen http://localhost:1337/graphql in a browser. You should see the Apollo Sandbox, an interactive UI for writing GraphQL queries against your Strapi server. Leave the tab open; every query and mutation in this post is run here.
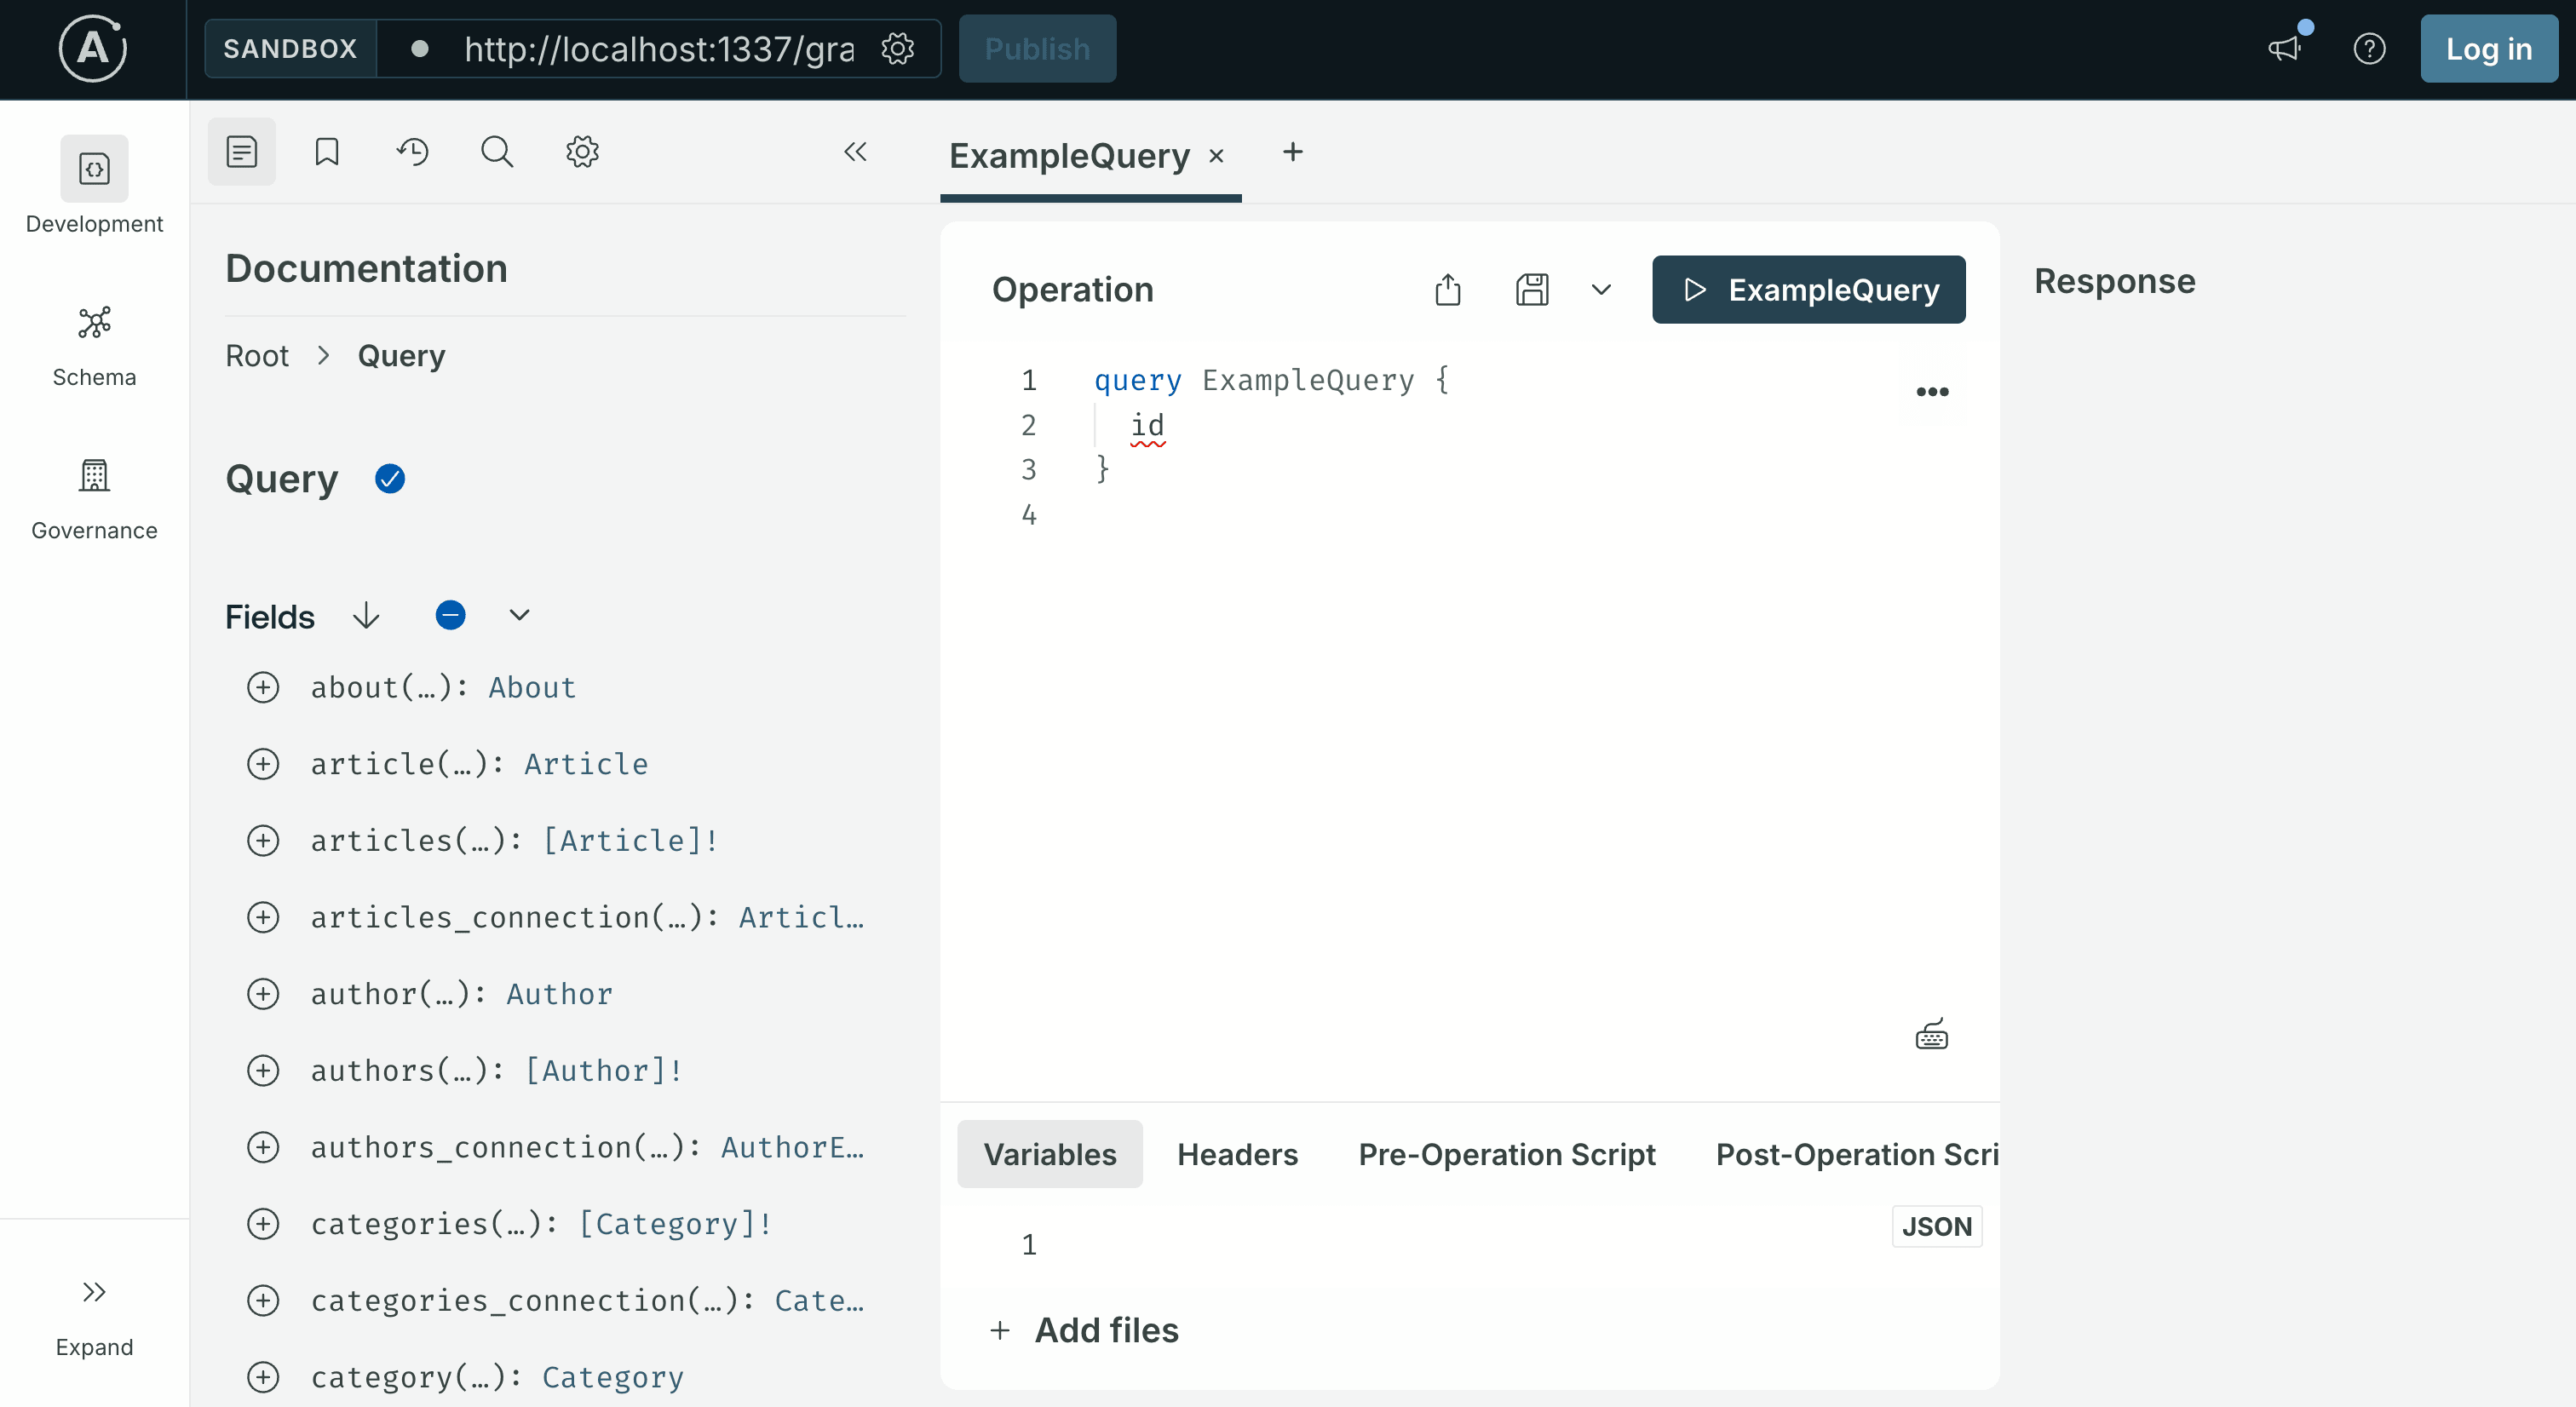
Because you chose to start with example data in Step 1, the Sandbox's left-hand Schema panel already shows a full GraphQL schema, queries and mutations for every seeded content type. The next step walks through what is there.
Step 4: The content types you got for free
Because you answered Yes to "Start with an example structure & data?", Strapi generated a small blog-style content model and seeded it with entries. The files live under src/api/ and src/components/shared/.
Three collection types:
- Article,
title,description(short text, max 80 chars),slug,cover(media),blocks(dynamic zone of rich-text / media / quote / slider), plusmanyToOnerelations to Author and Category.draftAndPublishis enabled, which matters in the next step. - Author,
name,email,avatar, and aoneToManyback-relation toarticles. - Category,
name,slug,description, and aoneToManyback-relation toarticles.
Two single types:
- About,
titleand ablocksdynamic zone. - Global,
siteName,siteDescription,favicon, and adefaultSeocomponent.
The Article schema is the one this post focuses on. It lives at src/api/article/content-types/article/schema.json, open it to see the exact attribute definitions. The interesting fields for GraphQL purposes:
title(string),description(text),slug(uid), simple scalars you can query and filter on.authorandcategory, relations you can traverse in a single GraphQL query.blocks, a dynamic zone. It holds an ordered list of components (rich-text, media, quote, slider). Dynamic zones show up in GraphQL as a union of component types and are more complex to query. This post skips them; the advanced tutorial covers blocks-style content in detail.
As soon as Strapi boots, the GraphQL plugin generates queries, mutations, and input types for Article, Author, and Category. The Sandbox's Schema panel on the left shows them all.
Step 5: Publish the seeded articles
The example data ships with draftAndPublish enabled on Article, which means every seeded article starts as a draft. Strapi's GraphQL plugin only returns published entries to public queries, so querying articles at this point returns an empty list.
Publish the seeded entries:
- In the admin UI, click Content Manager in the left sidebar and select Article under Collection Types. The seeded articles appear in the list, each showing a Draft status.
- Tick the checkbox in the header row of the table to select every article at once. A bulk-action bar becomes available above the list.
- Click Publish in the bulk-action bar. A Publish entries modal opens showing a preview: how many are Ready to publish, how many are Already published, and a per-row list with each article's
documentId, name, current status, and publication state. - Confirm each row is checked in the modal and click the Publish button in the bottom-right corner.
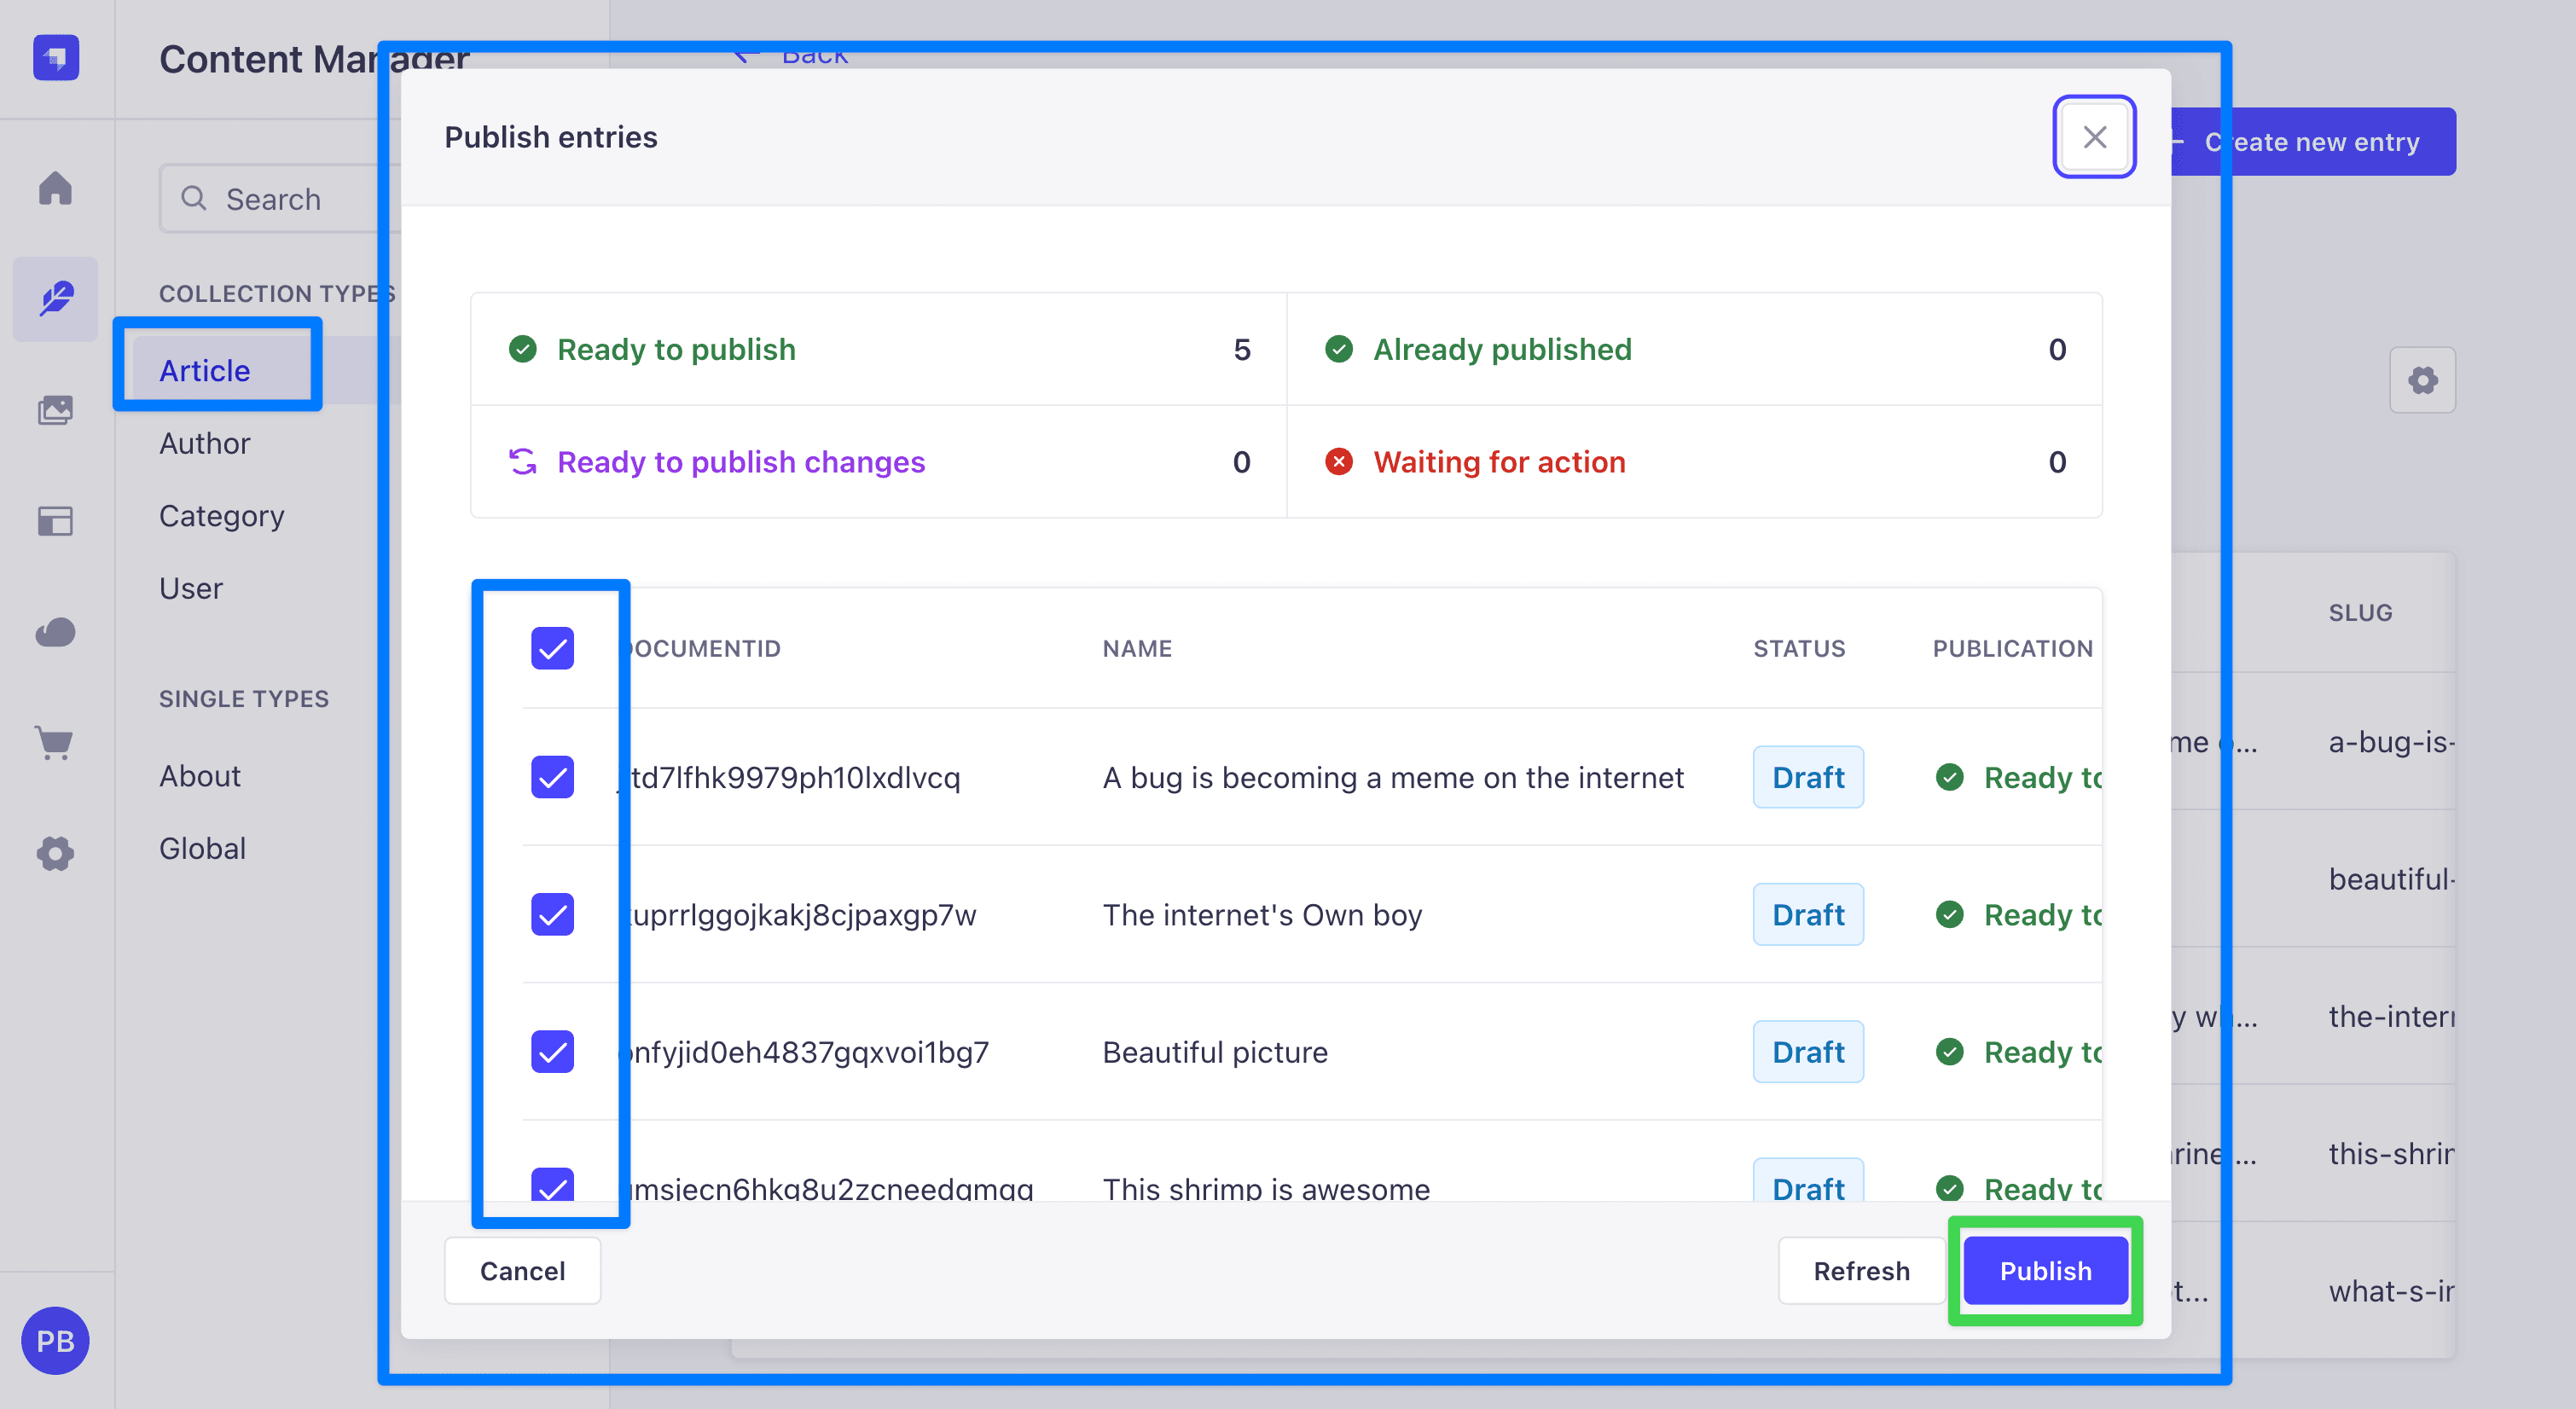
Every article now shows a Published status in the list and becomes visible to the public GraphQL API.
Author and Category do not have draftAndPublish enabled, so their entries are queryable immediately and do not require this step.
Step 6: Grant public permissions
By default, every API is locked down. To let the Apollo Sandbox query the seeded content without authentication, grant the public role access:
- In the admin UI, open Settings (the gear icon at the bottom of the left sidebar).
- Under Users & Permissions Plugin, click Roles.
- Click Public.
- Expand Article and check
find,findOne,create,update, anddelete. - Repeat for Author and Category, check all five actions for each.
- Click Save in the top right.
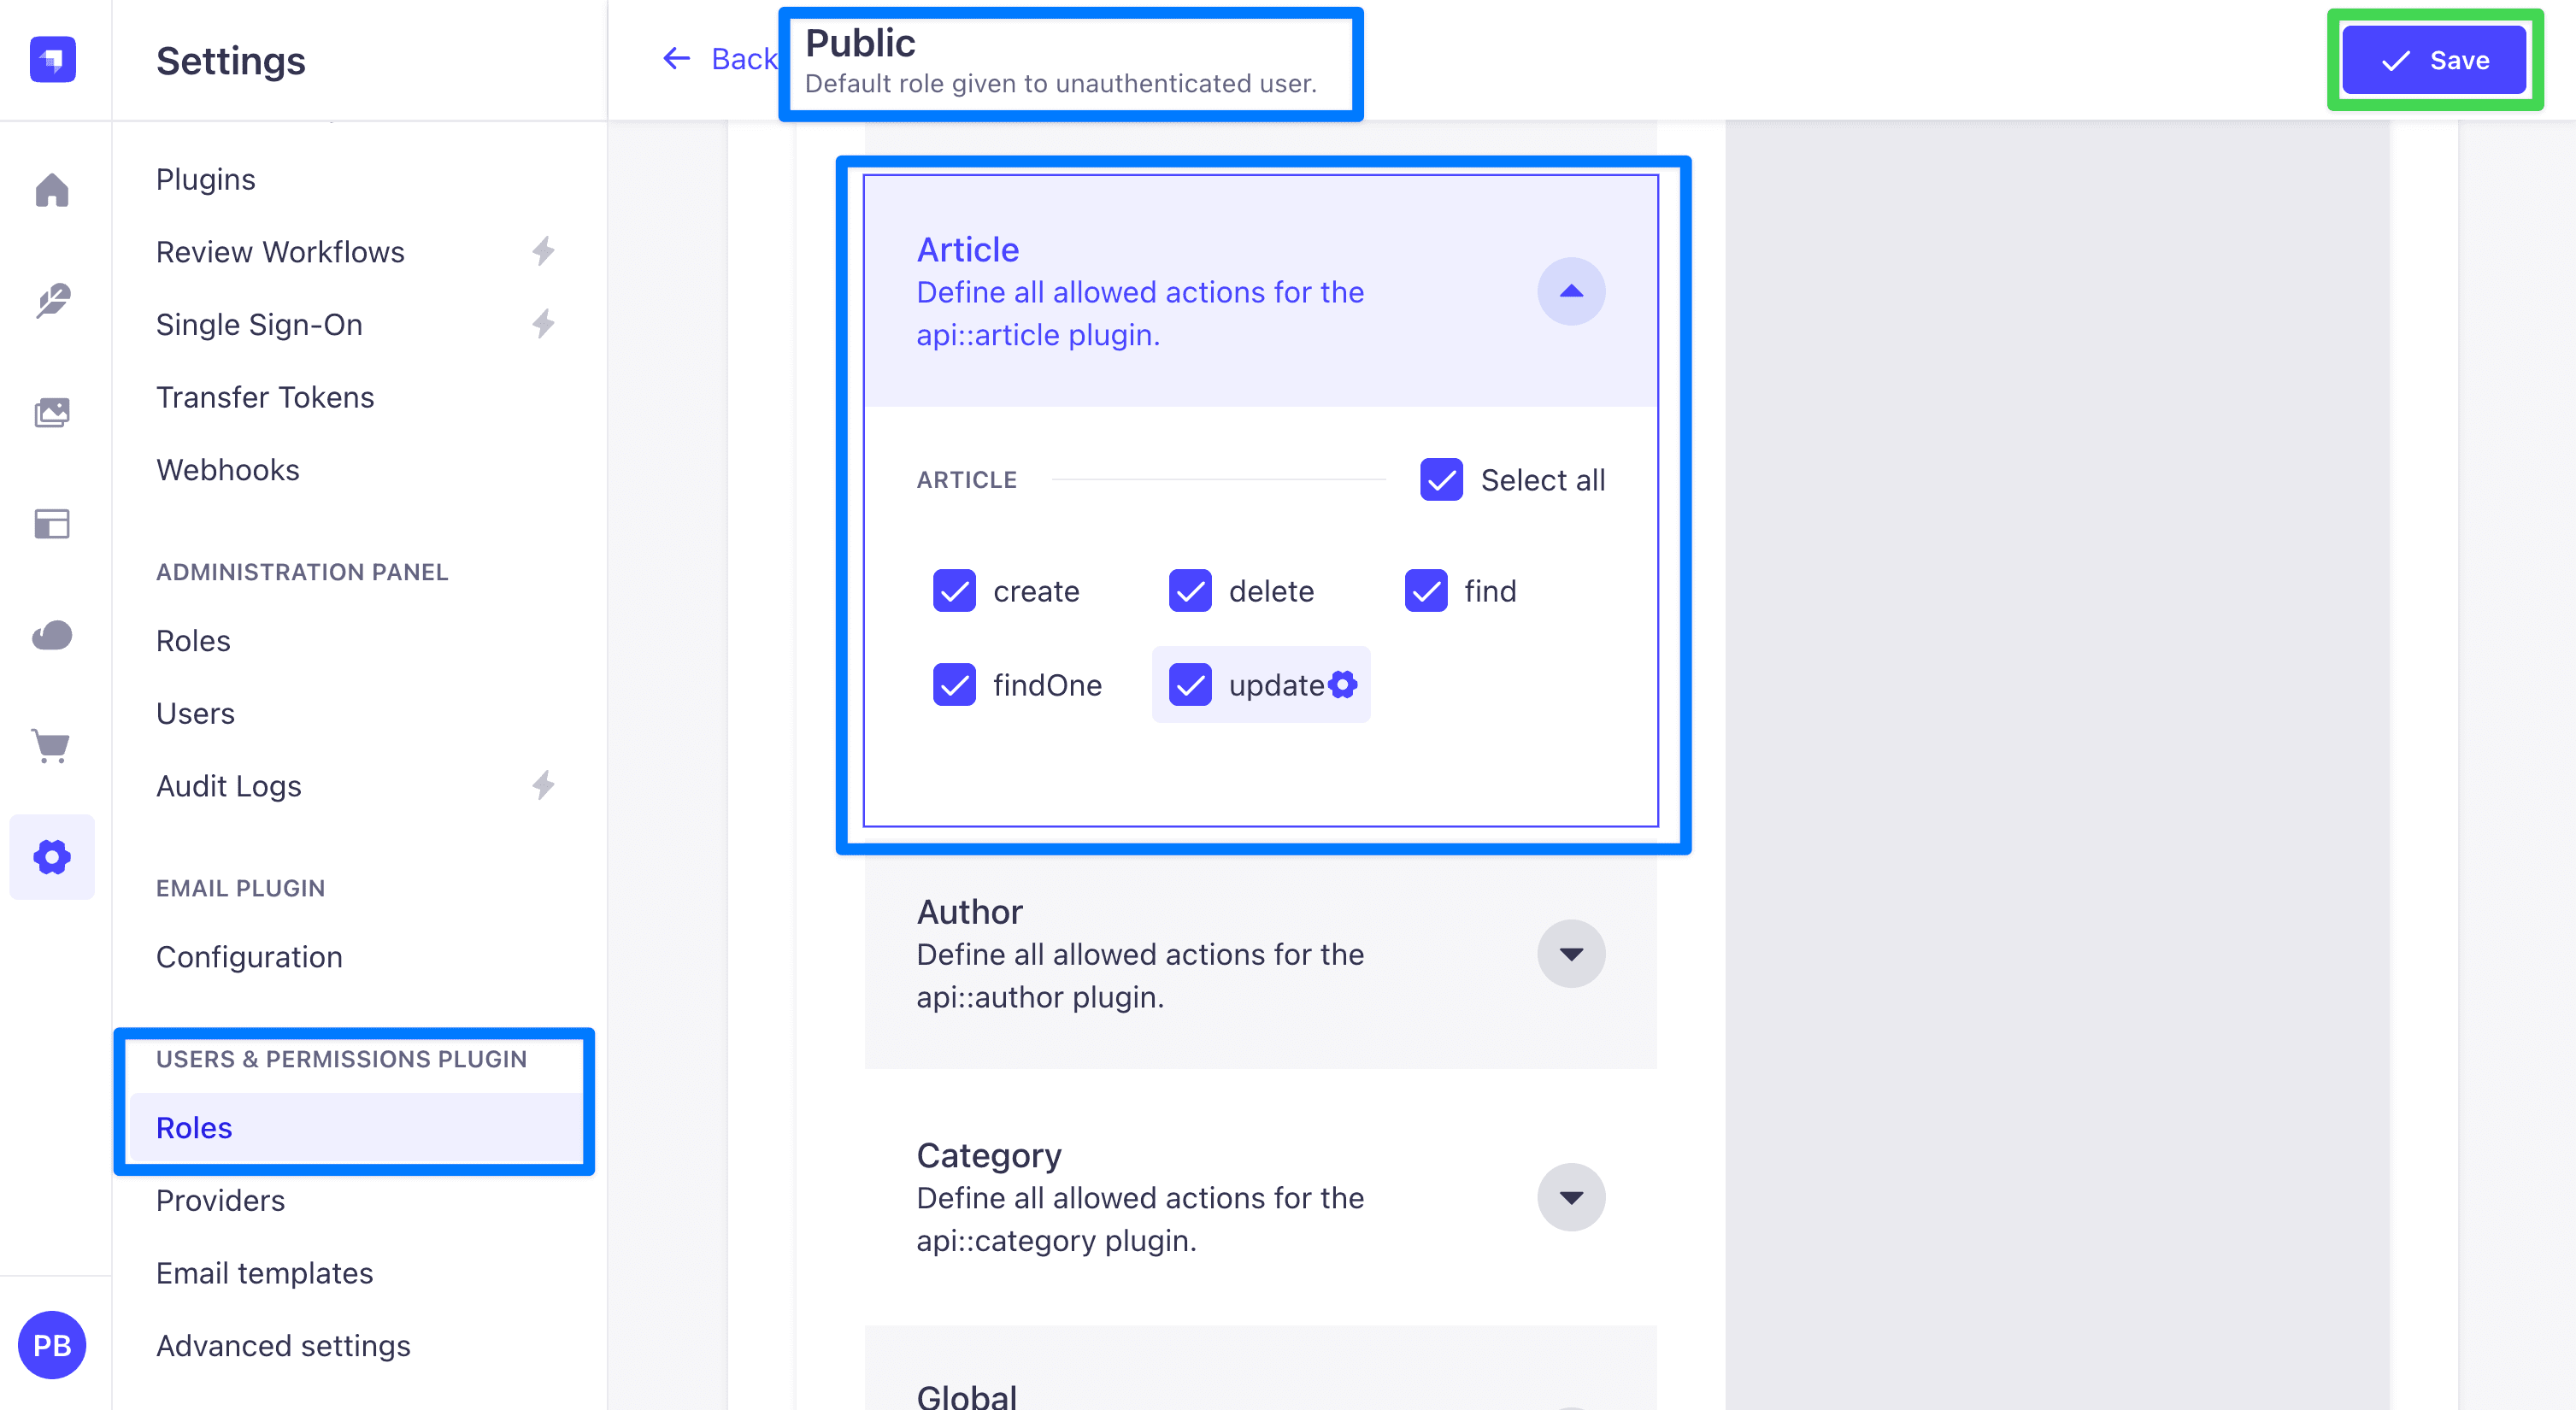 This is only for development. Real deployments use API tokens or the
 users-permissions login flow to authorize requests.
With Article, Author, and Category permissions enabled, public GraphQL queries can now reach the seeded data. The Sandbox tour in the next step doubles as the verification that Steps 5 and 6 took effect.
Step 7: Explore the auto-generated queries
Switch to the Apollo Sandbox at http://localhost:1337/graphql. The queries below are ready to paste into the Operation editor.
List all published articles
query Articles {
articles {
documentId
title
description
slug
publishedAt
}
}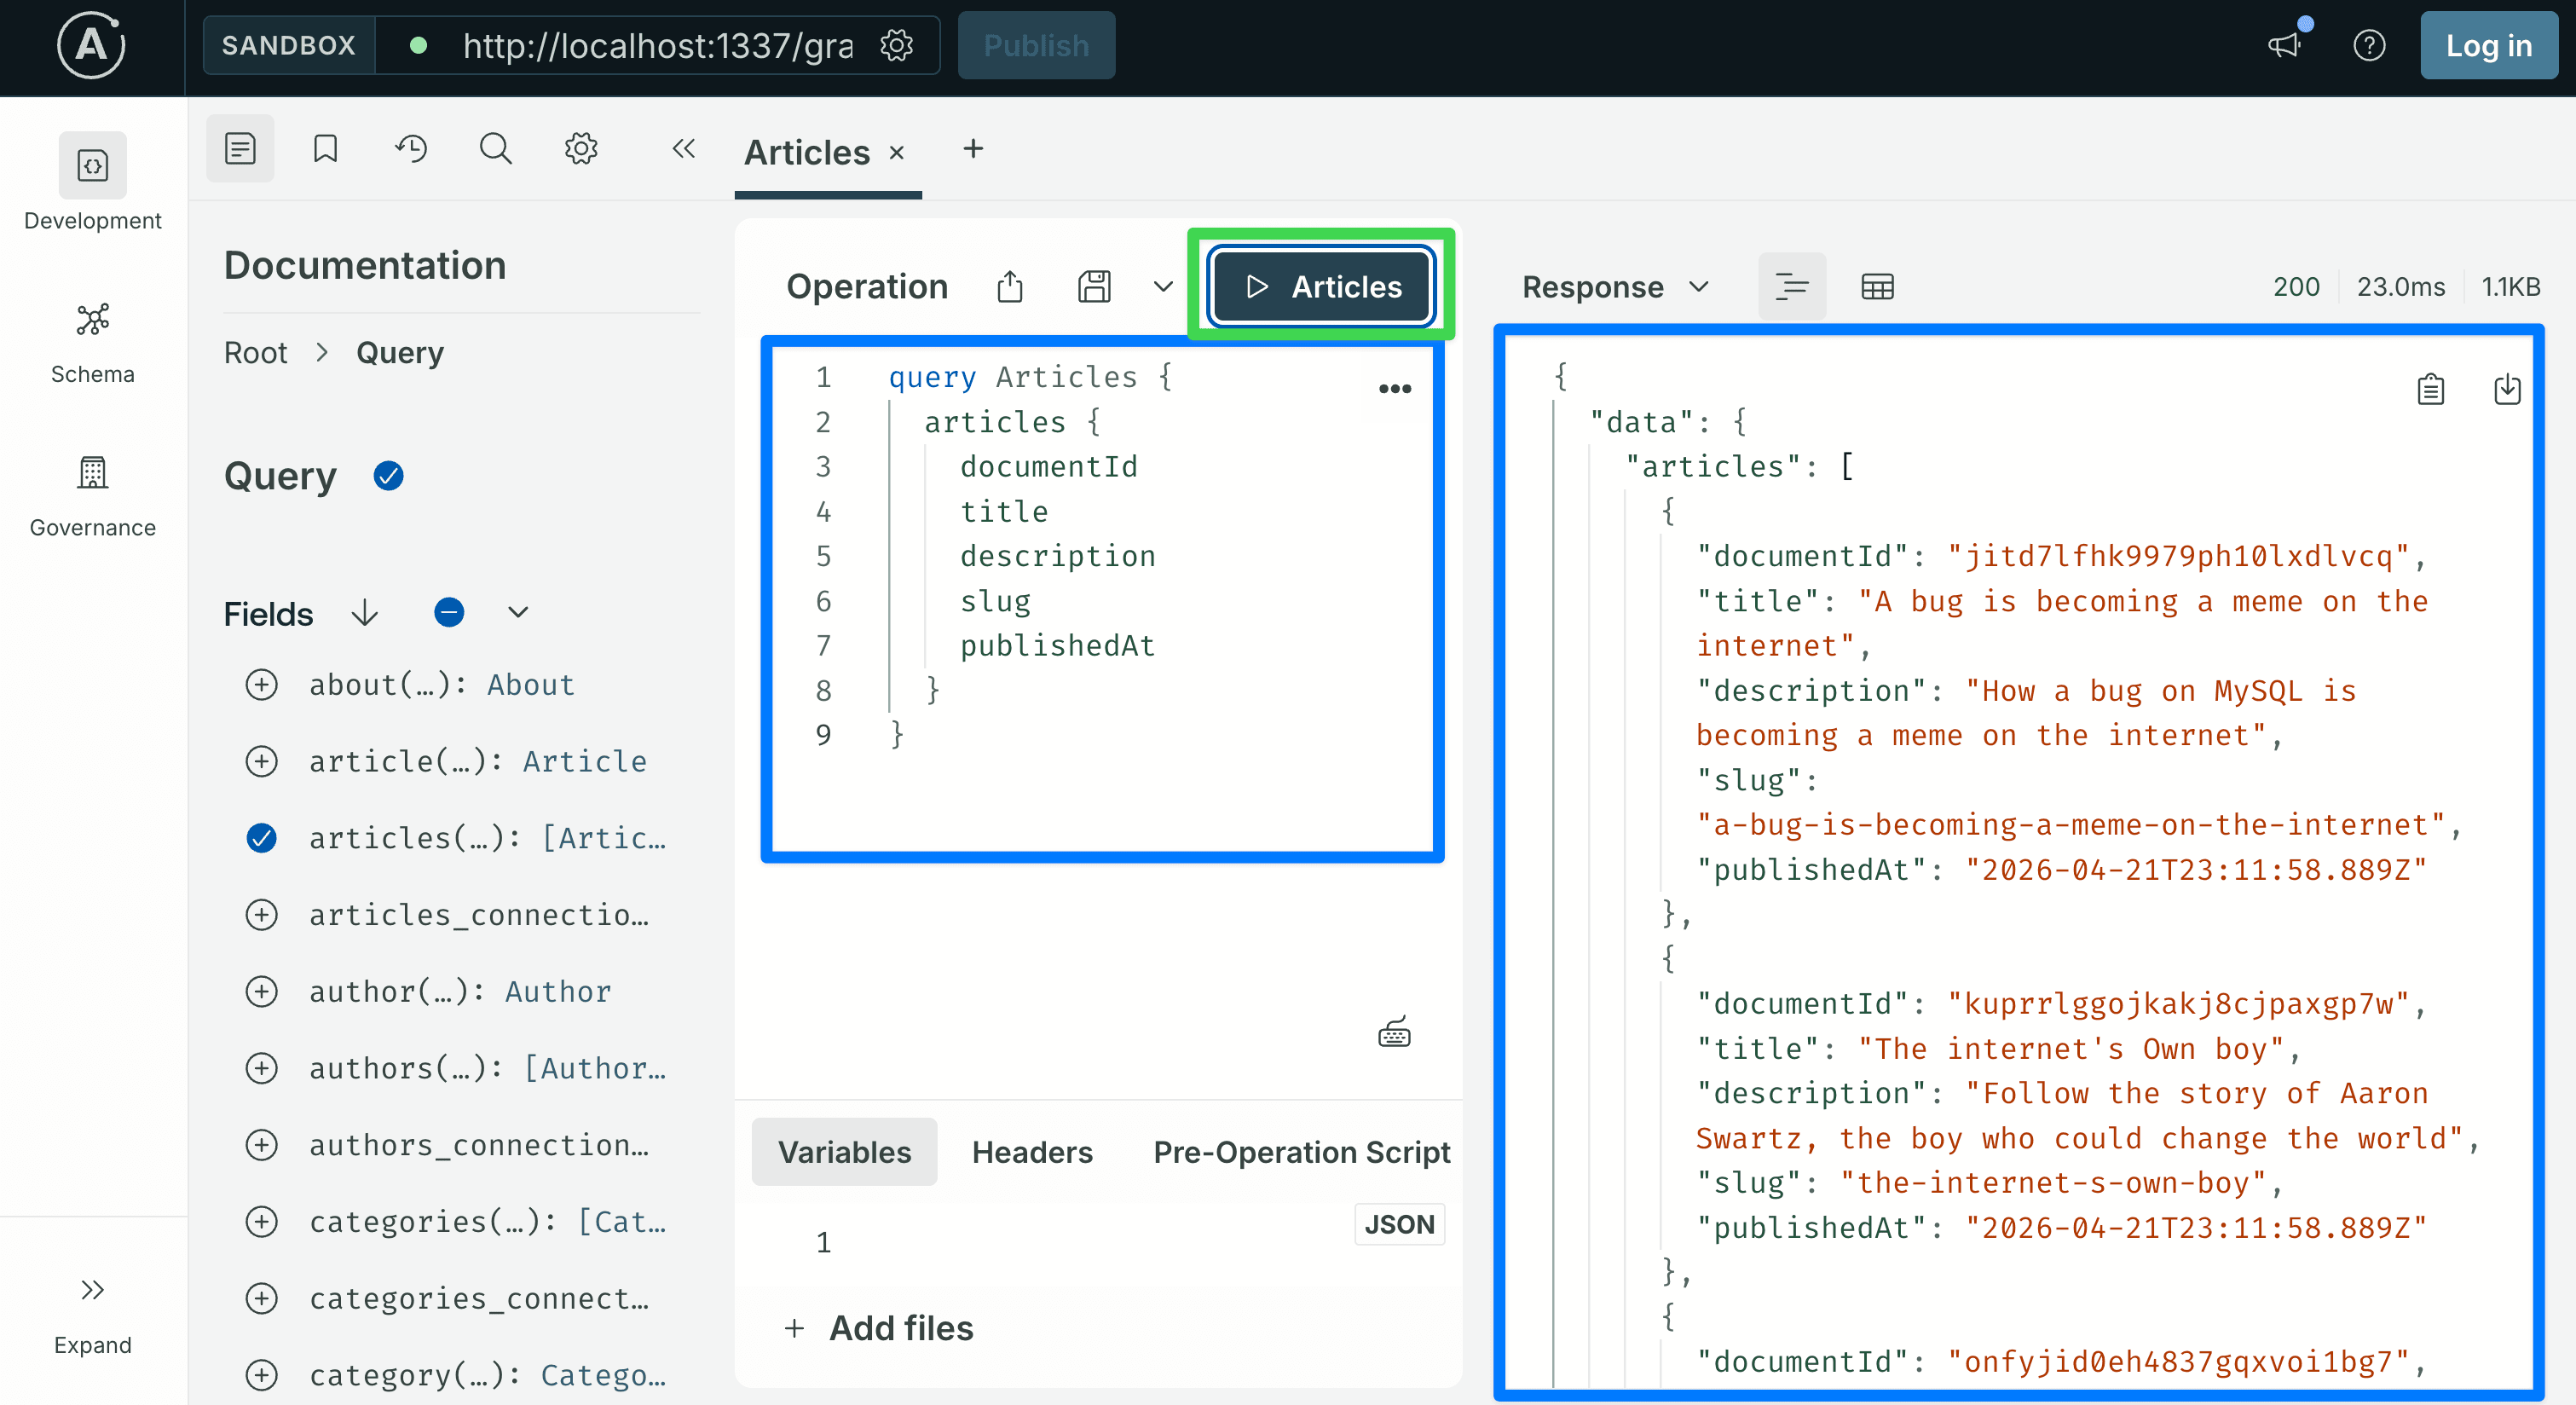 This returns every published Article. The
 documentId is Strapi v5's stable identifier for an entry; use it anywhere you need to refer to a specific article.
If the response comes back as an empty list, the permission grant or the draft-to-published step did not take effect. Revisit Step 5 (publish the seeded articles) and Step 6 (grant public permissions) before moving on.
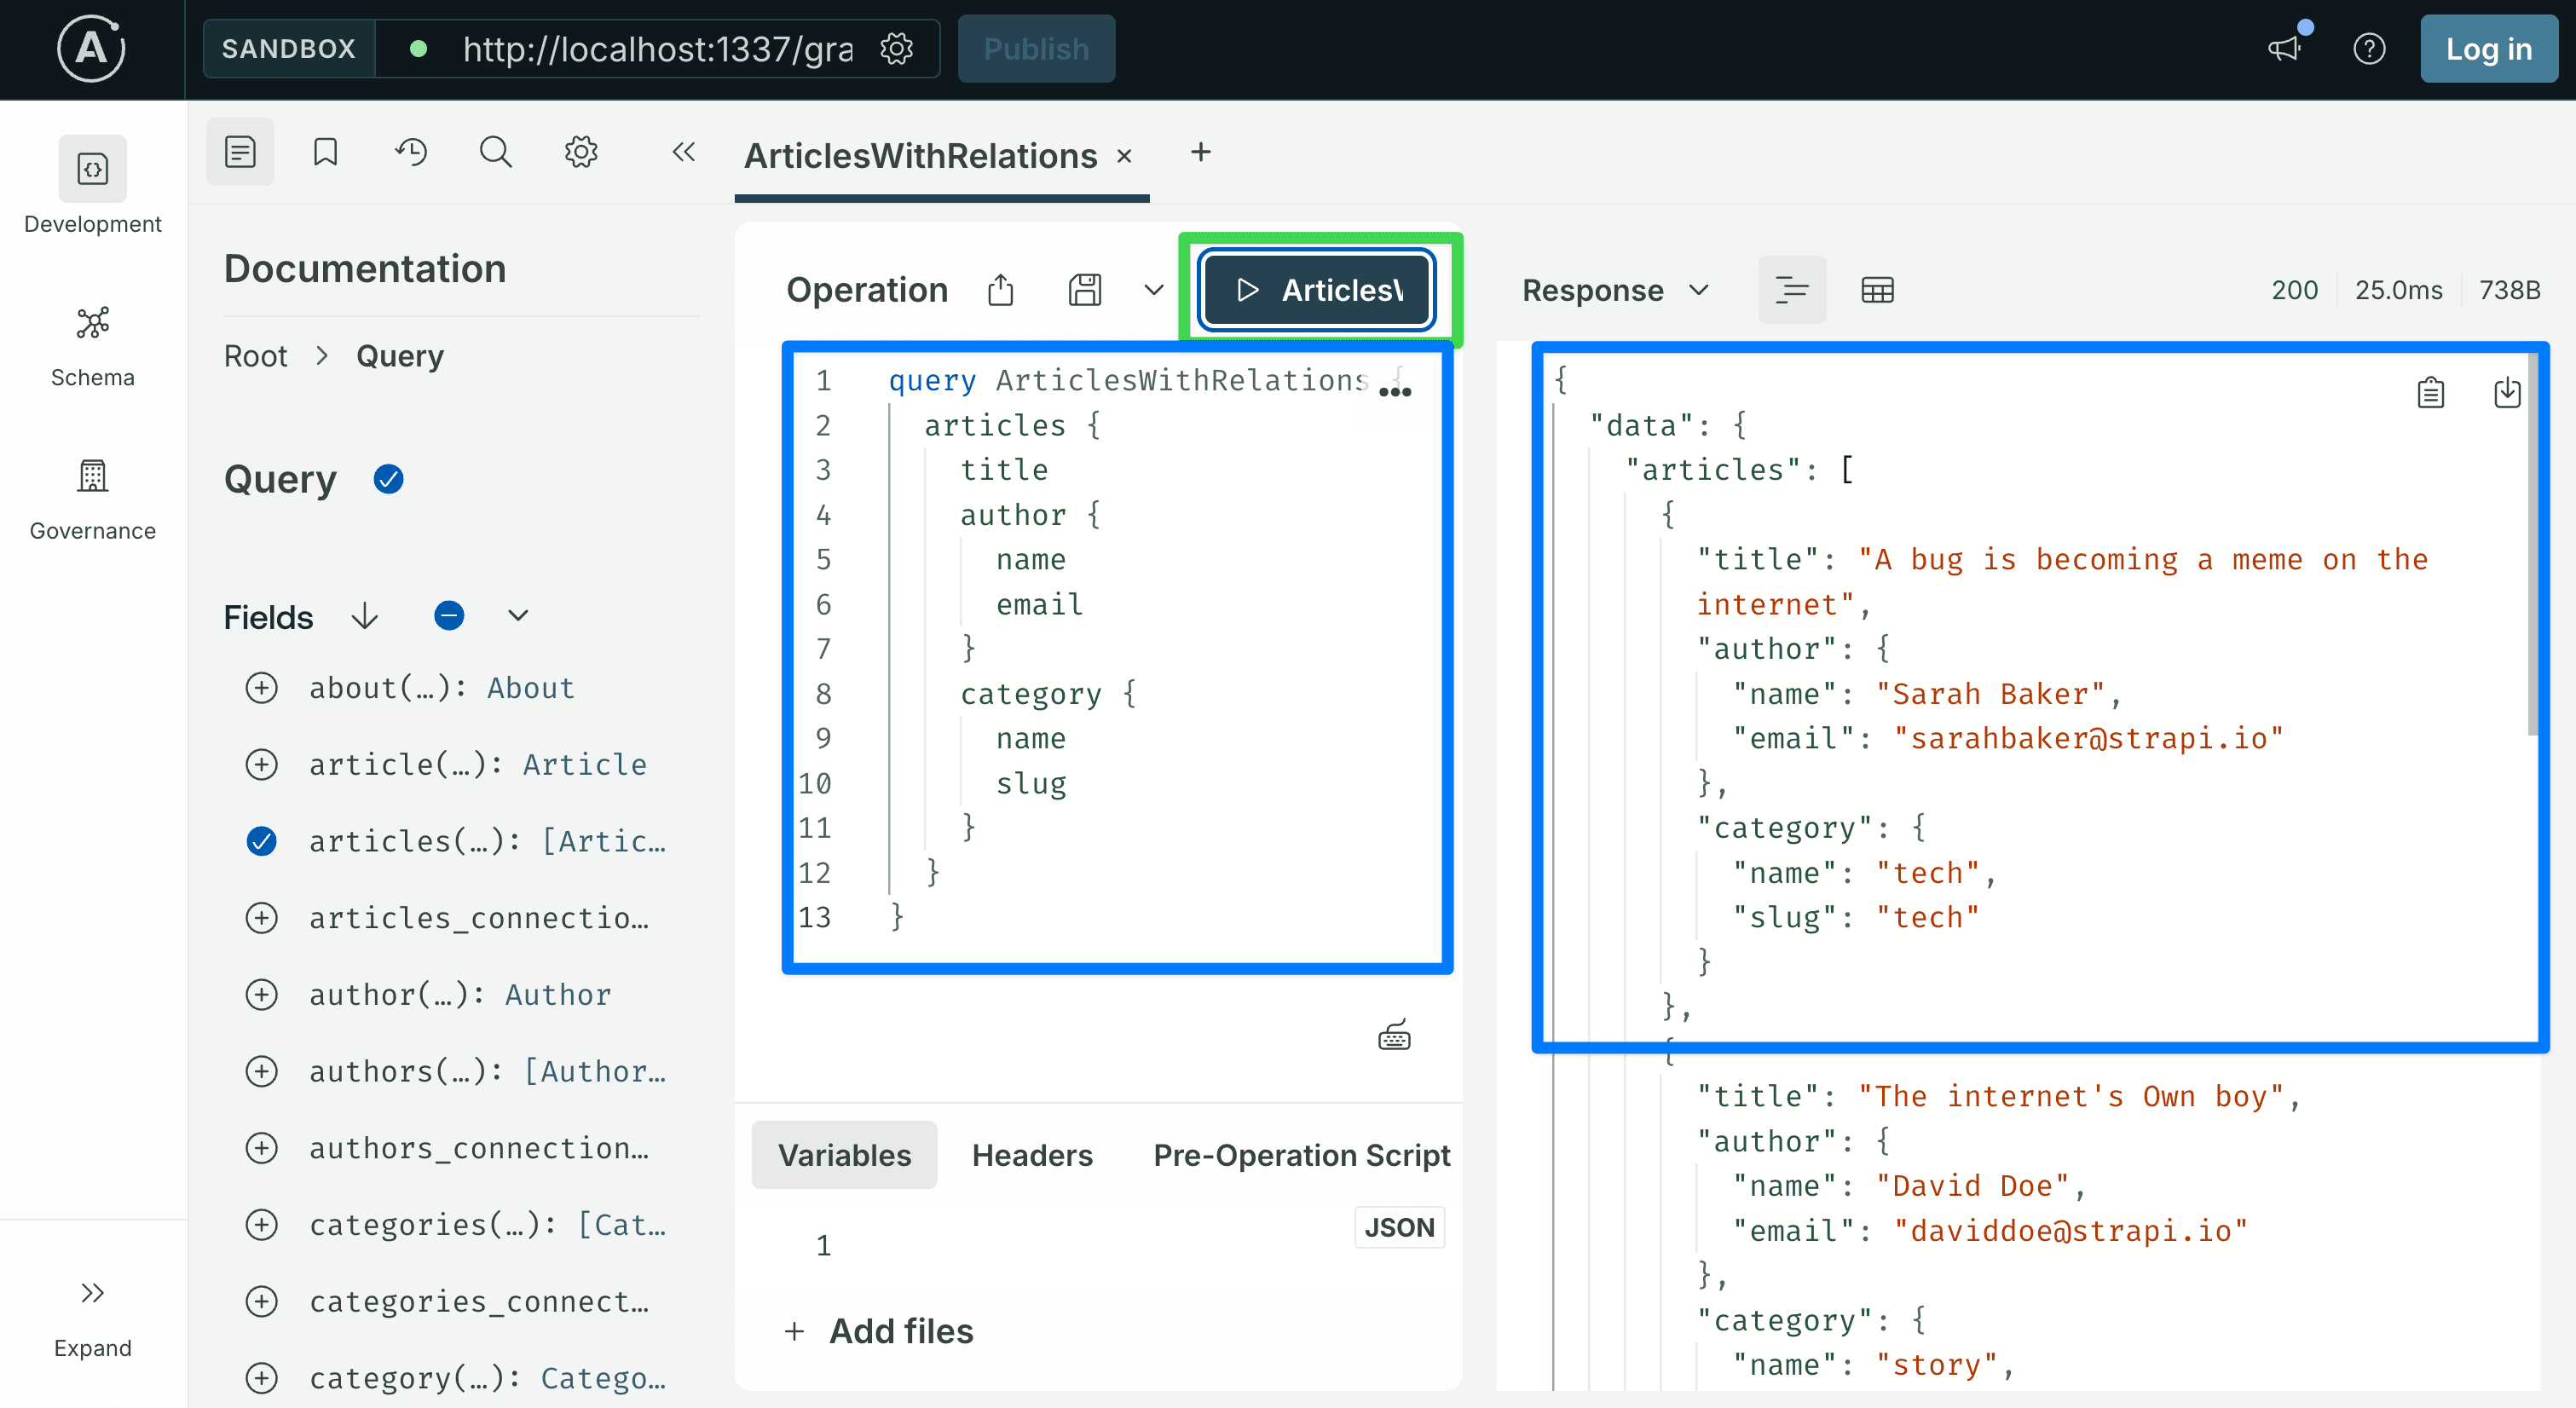
Traverse relations in one query
One of GraphQL's main advantages: relations come back in the same request. The seeded Article relates to Author and Category, so you can select fields from both without extra round trips:
query ArticlesWithRelations {
  articles {
    title
    author {
      name
      email
    }
    category {
      name
      slug
    }
  }
}
Filter articles
query FilteredArticles {
  articles(filters: { title: { containsi: "internet" } }) {
    documentId
    title
  }
}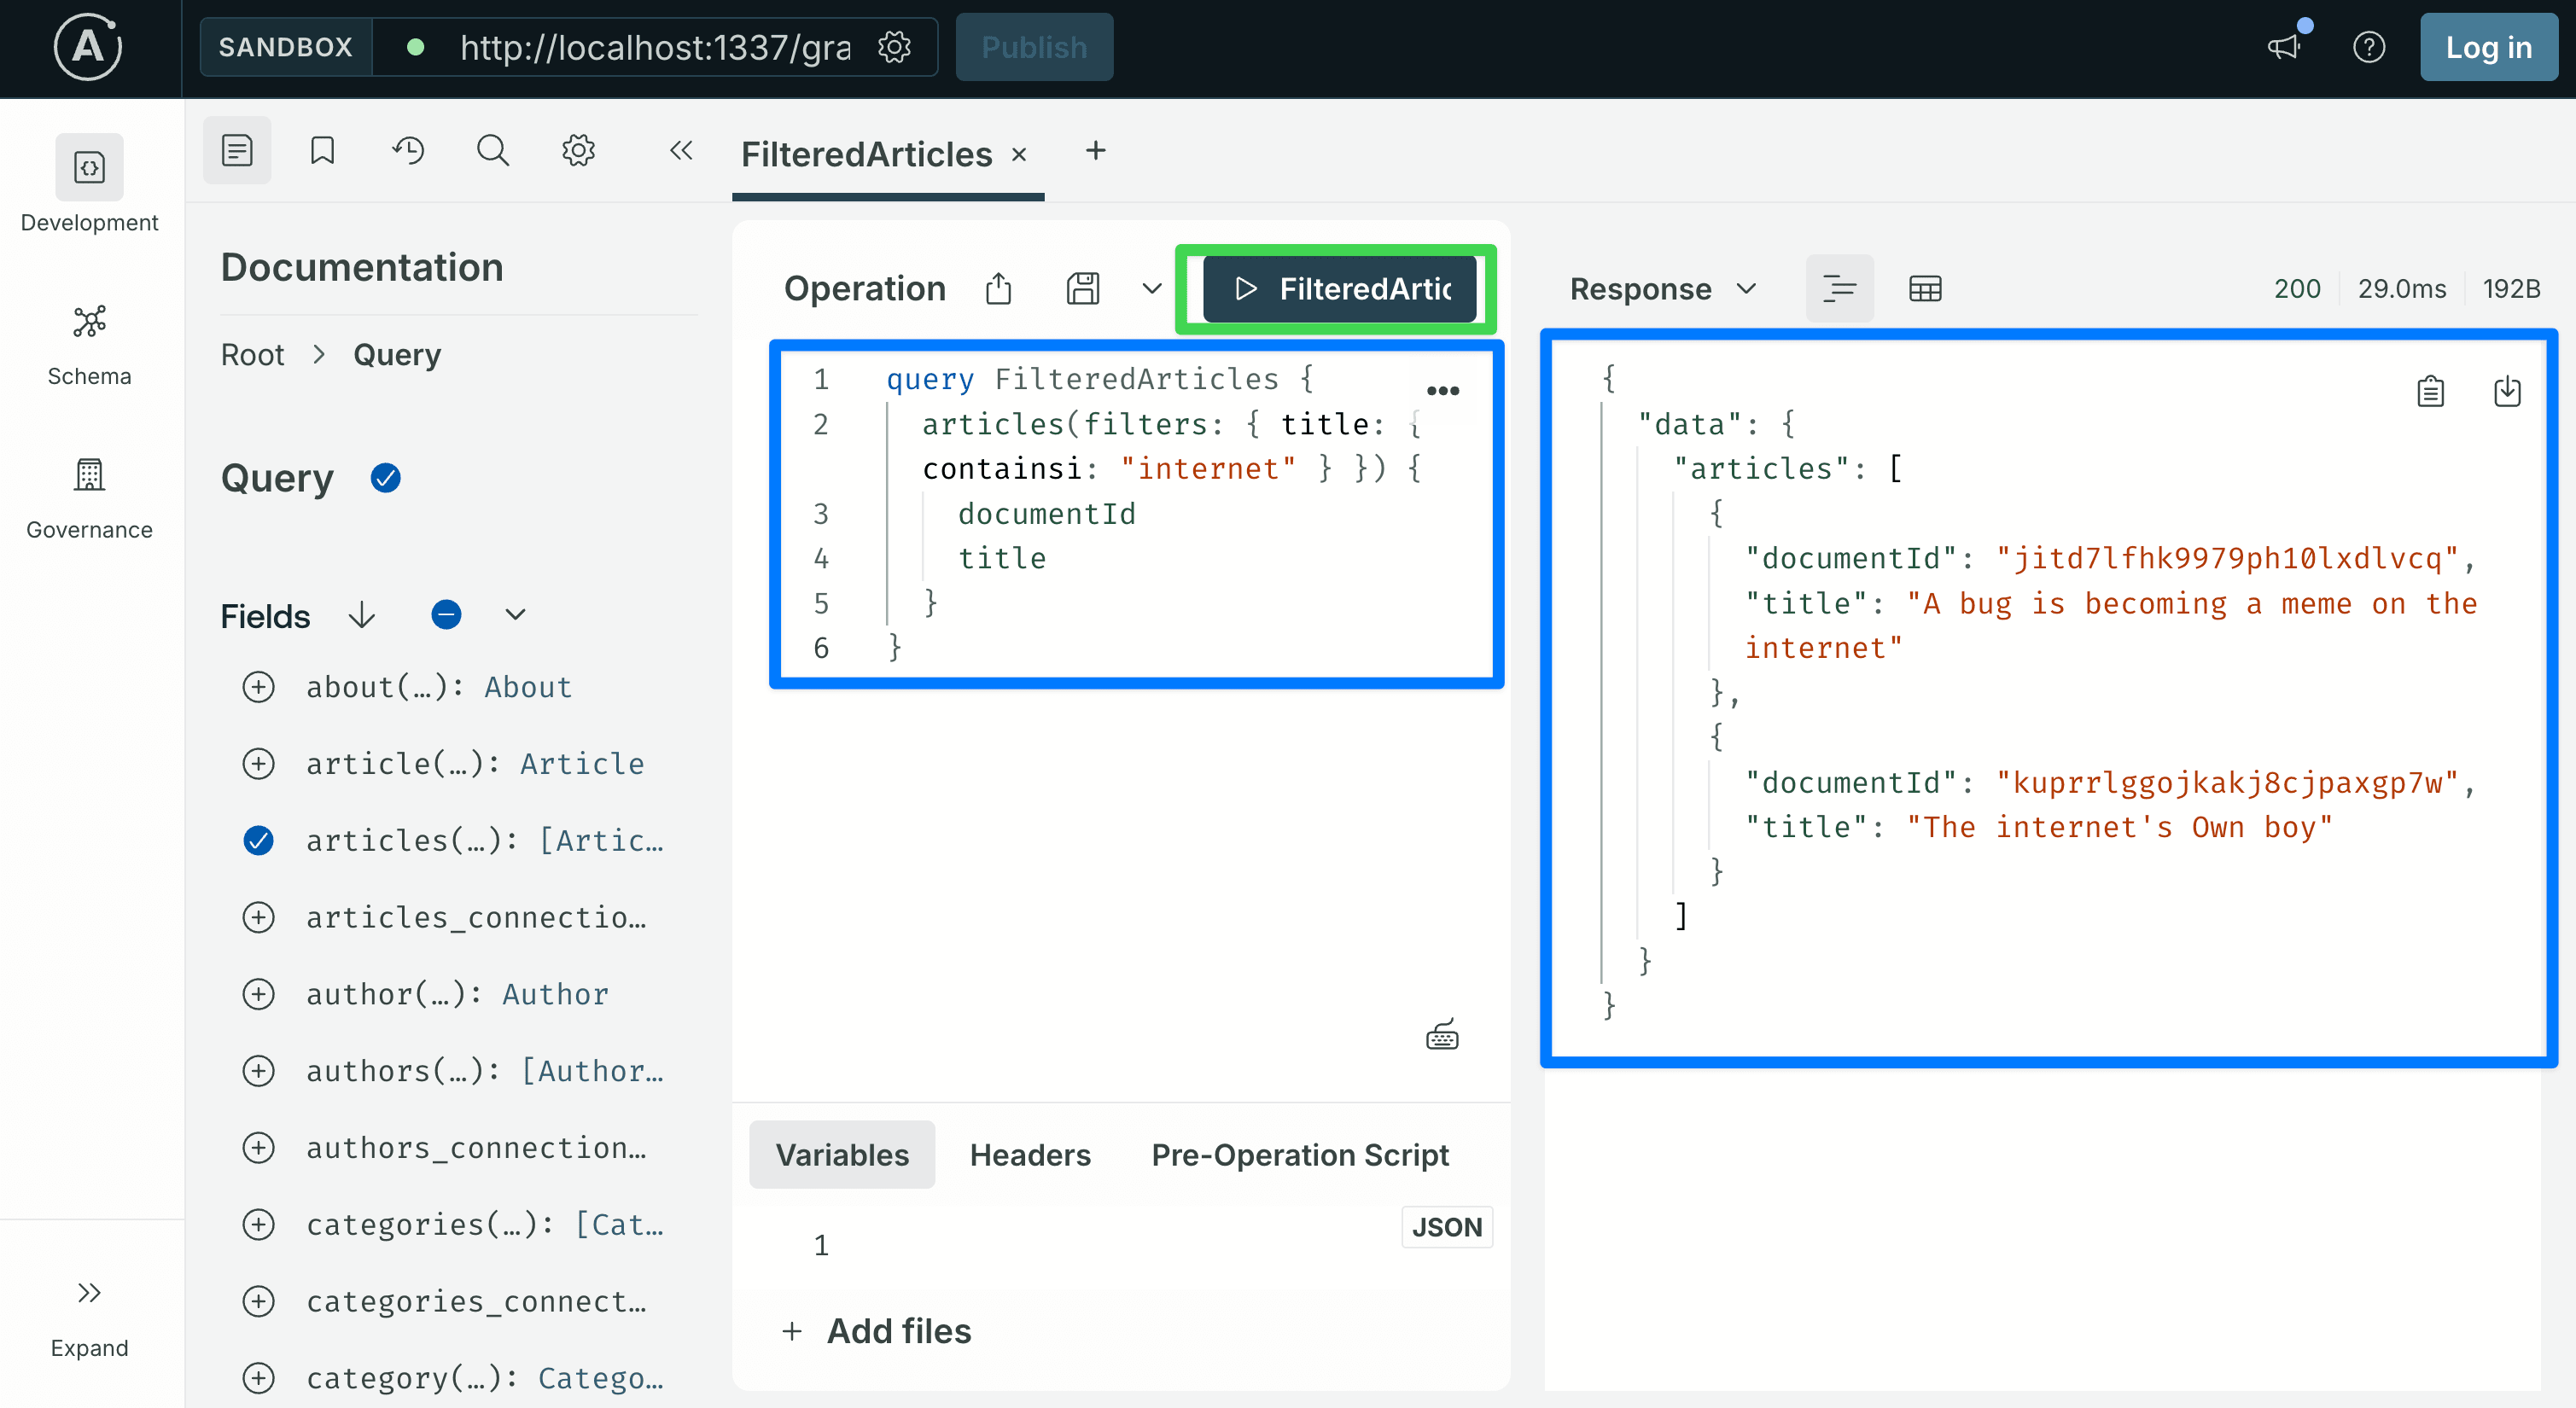
filters is a generated input type with one field per attribute. Each attribute accepts operators like eq, ne, contains, containsi, startsWith, lt, gt, in, and the logical operators and / or / not.
The word "internet" is used here because it appears in at least one of the titles seeded by the example data. If your database does not return a match, open the Content Manager, pick a word from any published article's title, and substitute it.
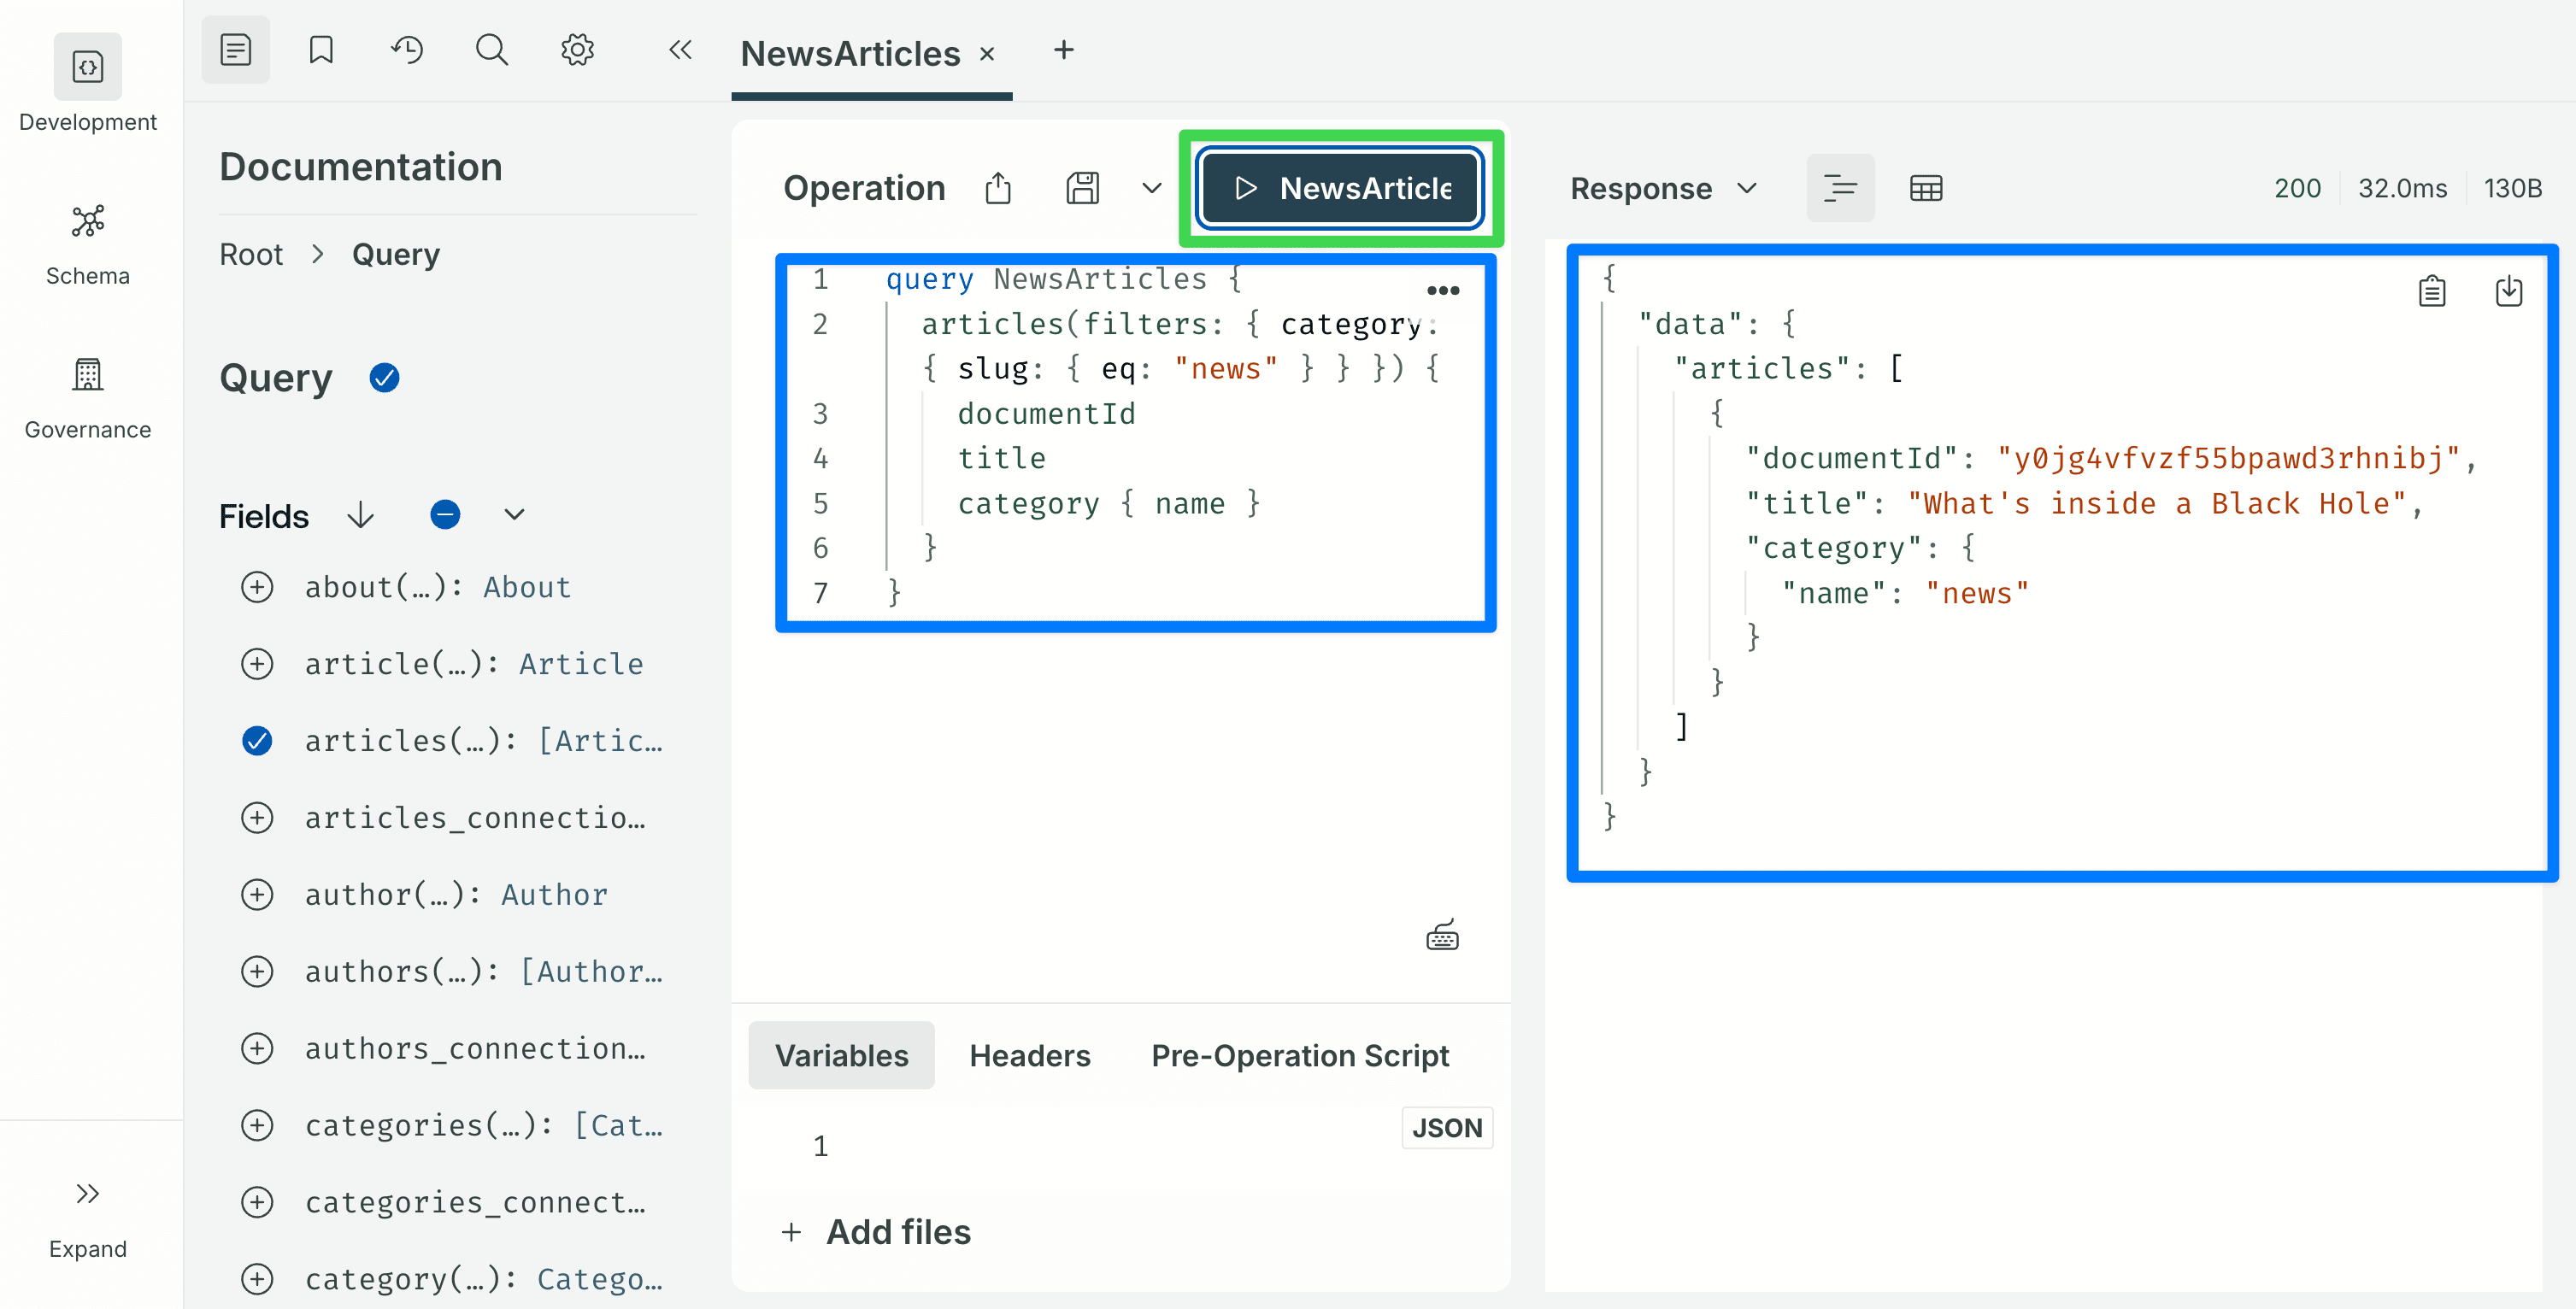
Filters on relations are nested. To find articles whose category has a given slug:
query NewsArticles {
  articles(filters: { category: { slug: { eq: "news" } } }) {
    documentId
    title
    category { name }
  }
}
Sort and paginate
query PagedArticles {
  articles(sort: "title:asc", pagination: { page: 1, pageSize: 10 }) {
    documentId
    title
  }
}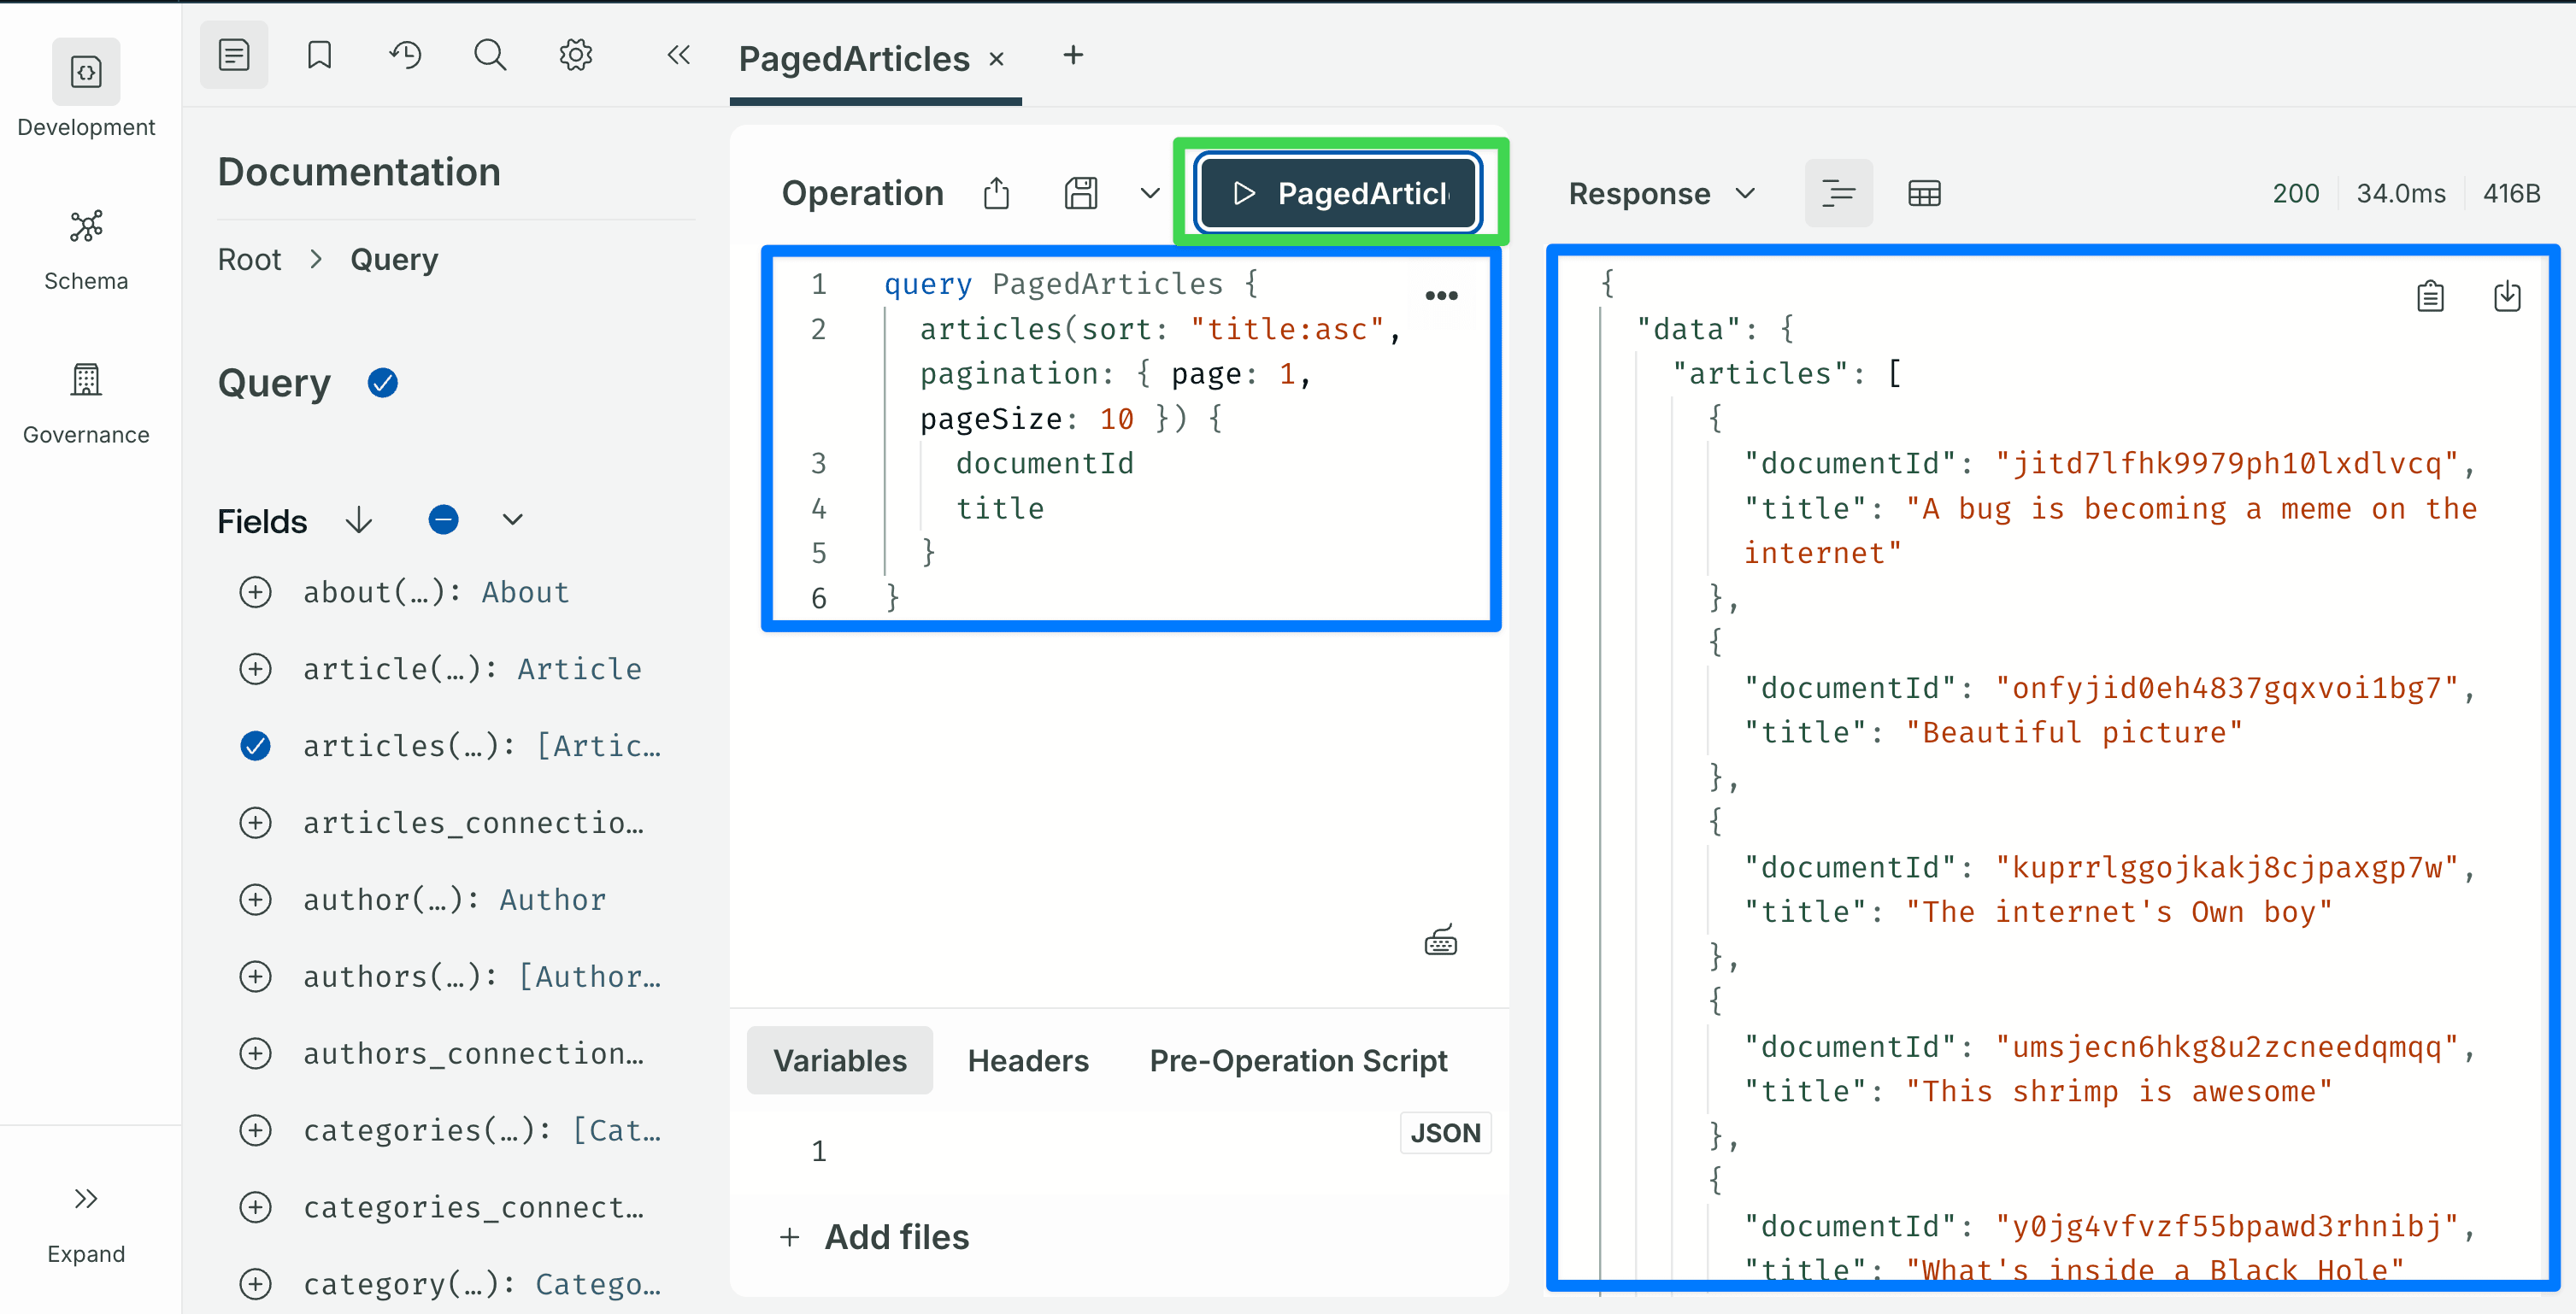
sort takes a single string or an array of strings of the form field:asc / field:desc. pagination accepts either { page, pageSize } or { start, limit }.
Fetch a single article
Grab a documentId from any of the responses above and paste it into the Variables tab:
query Article($documentId: ID!) {
  article(documentId: $documentId) {
    documentId
    title
    description
    slug
    author { name }
    category { name }
  }
}
Variables:
{ "documentId": "paste-a-real-documentId-here" }About the Variables panel. The Variables tab at the bottom of the Operation editor expects a complete JSON object, the outer { ... } braces are part of the payload, not decoration. Copy the entire code block above, braces included. If the Sandbox responds with Expected variables json to be an object, it means the outer braces were left out. This applies to every variables block in the rest of this post, including the mutations in the next step.
 That covers what Shadow CRUD generates for reading data: list, traverse relations, filter (including filters on relations), sort, paginate, and fetch by id. All of it comes from your content types with no resolver code.
Step 8: Explore the auto-generated mutations
Create an article
mutation CreateArticle($data: ArticleInput!) {
  createArticle(data: $data) {
    documentId
    title
  }
}
Variables:
{
"data": {
"title": "Hello from Apollo Sandbox",
"description": "A short article created via GraphQL.",
"slug": "hello-from-apollo-sandbox"
}
}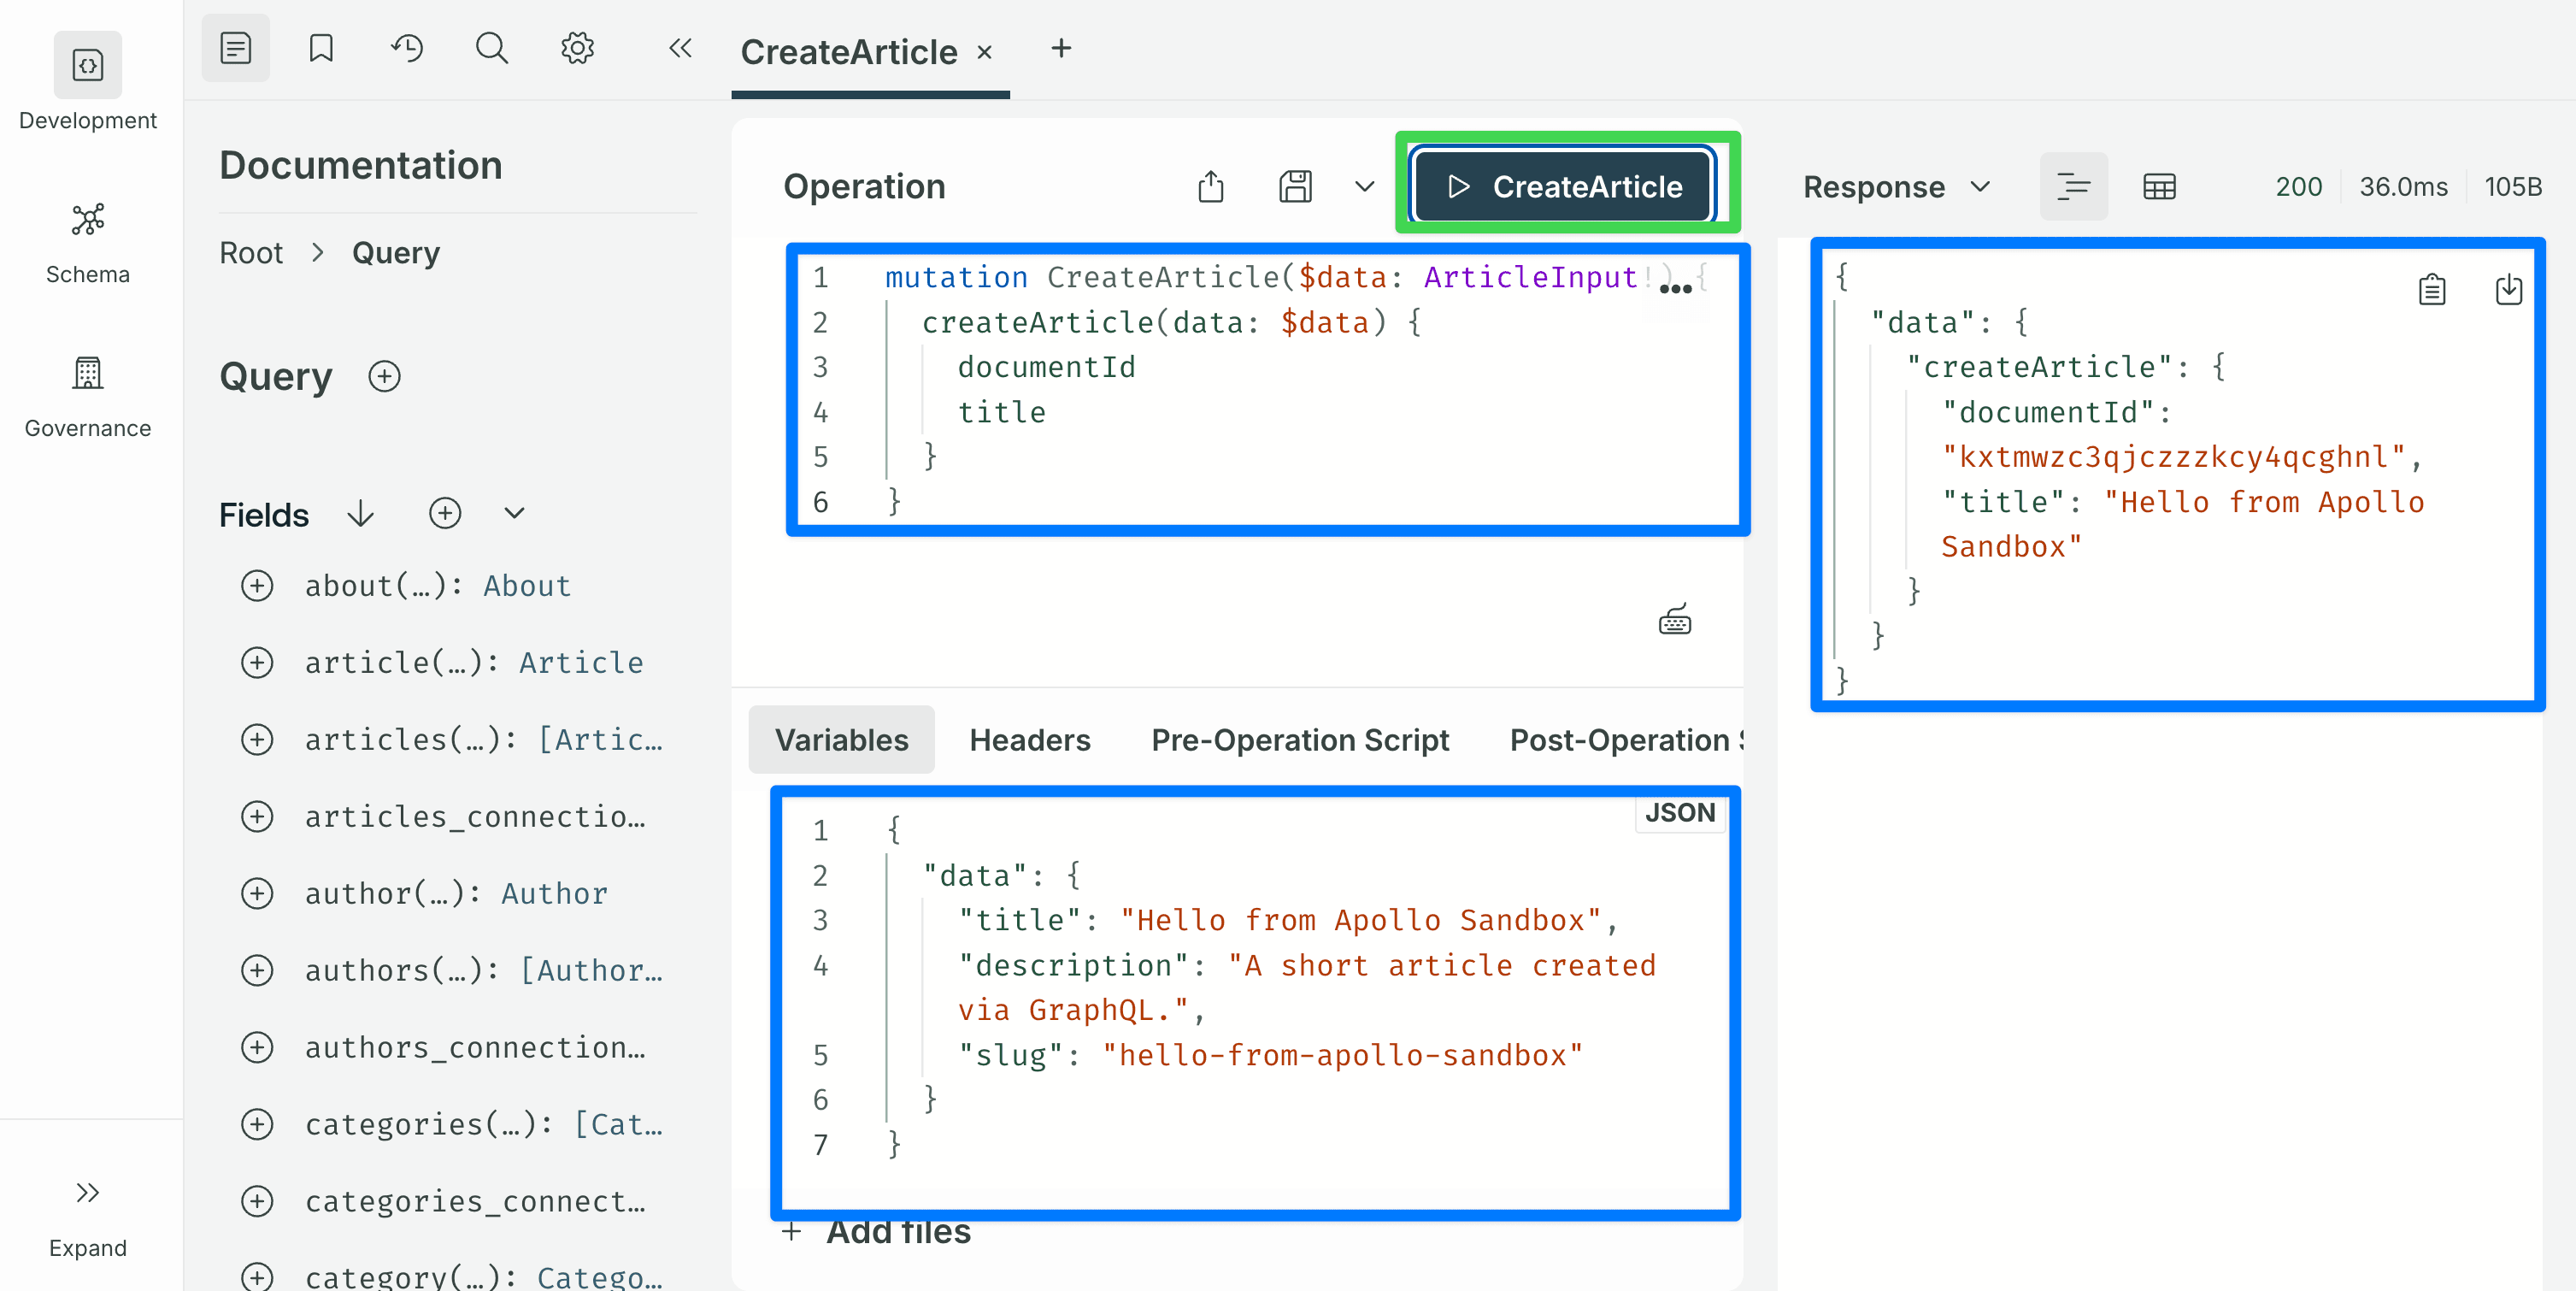 The
The ArticleInput type is generated from the content type. Every scalar attribute that is not a relation can be set directly. Relations are referenced by documentId (for example, author: "<documentId>", category: "<documentId>"). The blocks dynamic zone is accepted, but each component type has its own input format and this post does not cover that.
Update an article
mutation UpdateArticle($documentId: ID!, $data: ArticleInput!) {
  updateArticle(documentId: $documentId, data: $data) {
    documentId
    title
  }
}
Variables:
{
  "documentId": "paste-a-real-documentId-here",
  "data": { "title": "Edited title" }
}
Only the fields included in data are changed; everything else is left alone.
Delete an article
mutation DeleteArticle($documentId: ID!) {
  deleteArticle(documentId: $documentId) {
    documentId
  }
}
Variables:
{ "documentId": "paste-a-real-documentId-here" }At this point the schema is complete for standard CRUD. You can build a reasonable blog reader on top of this with no further server-side work.
Step 9: First customization, plugin limits
Before writing any custom code, add a few configuration values that every production Strapi + GraphQL setup should have. Create or edit config/plugins.ts:
// config/plugins.ts
import type { Core } from "@strapi/strapi";

const config = ({
  env,
}: Core.Config.Shared.ConfigParams): Core.Config.Plugin => ({
  graphql: {
    config: {
      endpoint: "/graphql",
      shadowCRUD: true,
      depthLimit: 10,
      defaultLimit: 25,
      maxLimit: 100,
      landingPage: env("NODE_ENV") !== "production",
      apolloServer: {
        introspection: env("NODE_ENV") !== "production",
      },
    },
  },
});

export default config;depthLimitcaps how deeply a query can nest. Without it, a query likearticles { author { articles { author { ... } } } }can hammer the database with one join after another.defaultLimitsets the page size used when the client does not passpagination. This keeps a query likearticlesfrom returning every row in the table when the client forgets to paginate.maxLimitcaps how many entries any single resolver returns, no matter what the client asks for. Without it, a client can request an unbounded number of rows in one query.landingPagecontrols whether the Apollo Sandbox is served at/graphql. Keep it on in development. Turn it off in production so visitors who hit/graphqlin a browser do not get a schema explorer.apolloServer.introspectioncontrols whether the server answers introspection queries (the queries Apollo Sandbox and code generators send to learn the schema). Turn it off in production for the same reason aslandingPage.
Restart the dev server to pick up the change. The Sandbox still works in development; a production deployment no longer exposes it.
Step 10: Set up the customization folder structure
Before writing any custom resolver, establish the folder structure you will keep using as the project grows. Customizations can technically all live inside src/index.ts, but that file becomes hard to read as soon as you have more than one.
The convention used here, one file per concept under src/extensions/graphql/, wired together by an aggregator, is the same structure used by the advanced tutorial, so moving from this post to the next requires adding files, not refactoring the ones you already have.
The structure you will end up with by the end of this post:
src/
├── index.ts                              # calls the aggregator
└── extensions/
    └── graphql/
        ├── index.ts                      # aggregator
        ├── computed-fields.ts            # Step 11: Article.wordCount
        └── queries.ts                    # Step 12: Query.searchArticles
Each file under src/extensions/graphql/ exports a factory function. The aggregator imports every factory and registers it with the plugin's extension service. src/index.ts then calls the aggregator from inside Strapi's register() function, which Strapi runs once at startup. New customization files (middlewares, policies, mutations, Shadow CRUD restrictions) drop into the same folder later, with no edits to the ones from this post.
Start by replacing the contents of src/index.ts:
// src/index.ts
import type { Core } from "@strapi/strapi";
import registerGraphQLExtensions from "./extensions/graphql";

export default {
  register({ strapi }: { strapi: Core.Strapi }) {
    registerGraphQLExtensions(strapi);
  },

  bootstrap() {},
};
Expect a temporary TypeScript error here. Your editor will flag the import registerGraphQLExtensions from "./extensions/graphql" line with Cannot find module './extensions/graphql' or its corresponding type declarations., and Strapi will fail to compile for the same reason. That is expected, the target file does not exist yet. The error resolves as soon as you create the aggregator file in the next code block.
Create the aggregator at src/extensions/graphql/index.ts. It will be empty initially. Steps 11 and 12 fill it in:
// src/extensions/graphql/index.ts
import type { Core } from "@strapi/strapi";

export default function registerGraphQLExtensions(strapi: Core.Strapi) {
  const extensionService = strapi.plugin("graphql").service("extension");
  // Customization factories will be registered here in Step 11 and Step 12.
}
Expect a second temporary warning here. Your editor will flag 'extensionService' is declared but its value is never read. on the const extensionService = … line. This is also expected, no factories are registered yet, so the reference is unused until Step 11 adds the first extensionService.use(...) call. The warning goes away as soon as that line is added in the next step.
Restart the dev server. Nothing has changed in the schema yet, the aggregator is a no-op, but the wiring is in place.
A brief introduction to Nexus
The next two steps call a function called nexus.extendType. A short detour on what Nexus is will save you a lot of guessing.
Nexus is the library Strapi's GraphQL plugin uses under the hood to build its schema. It is a small JavaScript/TypeScript library that describes GraphQL types in code. At boot, Shadow CRUD uses Nexus to generate Article, ArticleInput, ArticleFiltersInput, and every other type for each content type. When you add your own fields or queries, you use Nexus too. The plugin hands your factory function a nexus reference so your types end up in the same schema as the auto-generated ones.
You only need to know three things about Nexus to follow this post:
-
nexus.extendType({ type: 'Article', definition(t) { ... } }), adds new fields to an existing type. You will use this in Step 11 to addwordCounttoArticle. -
nexus.extendType({ type: 'Query', definition(t) { ... } }), adds new top-level queries. You will use this in Step 12 to addsearchArticles. (QueryandMutationare themselves types, so adding custom queries is just a specific use ofextendType.) -
Field types are chained. Inside
definition(t), you call methods ontto declare each field. The chain reads almost like the GraphQL type it produces:Nexus call GraphQL type produced t.string('title')title: Stringt.nonNull.string('title')title: String!t.list.string('tags')tags: [String]t.nonNull.int('wordCount')wordCount: Int!
That is enough to read every Nexus example in this post. The Nexus documentation covers the rest for when you need it.
Step 11: First customization, a computed field
Computed fields are fields that do not exist in the database but are derived at query time. They are the simplest introduction to the GraphQL plugin's extension API.
The example we will add: wordCount on Article, computed from the description field. (The Article's main body lives in the blocks dynamic zone, which requires walking the component tree, a pattern the advanced tutorial covers in detail. description is a plain text field and works well for a beginner example.)
Create the file src/extensions/graphql/computed-fields.ts:
// src/extensions/graphql/computed-fields.ts
export default function computedFields({
  nexus,
}: {
  nexus: typeof import("nexus");
}) {
  return {
    types: [
      nexus.extendType({
        type: "Article",
        definition(t) {
          t.nonNull.int("wordCount", {
            description: "Word count of the article description.",
            resolve(parent: { description?: string | null }) {
              const text = (parent?.description ?? "").trim();
              return text ? text.split(/\s+/).length : 0;
            },
          });
        },
      }),
    ],
    resolversConfig: {
      "Article.wordCount": { auth: false },
    },
  };
}
What is happening:
- The file exports a named
computedFieldsfunction that takes{ nexus }and returns an extension object. Naming the function (instead of using an anonymous arrow function) gives you a readable name in error stack traces. nexus.extendType({ type: 'Article', definition })adds a new field to the auto-generatedArticletype. It does not replace or wrap the type; it adds onto it. The plugin hands the factory anexusreference, so the new field lives in the same schema as the generated types.- The
resolve(parent, args, context)callback receives the Article row asparentand returns the value for the field. Here it splits the description on whitespace and returns the count as an integer. resolversConfigwithauth: falsetells the Users & Permissions plugin to let unauthenticated requests read this field.
Register the factory in the aggregator:
// src/extensions/graphql/index.ts
import type { Core } from "@strapi/strapi";
import computedFields from "./computed-fields";

export default function registerGraphQLExtensions(strapi: Core.Strapi) {
  const extensionService = strapi.plugin("graphql").service("extension");

  extensionService.use(computedFields);
}
Restart the dev server. In the Sandbox, the Article type should now show a wordCount: Int! field, and this query should return word counts for every article:
query ArticlesWithWordCount {
  articles {
    title
    description
    wordCount
  }
}
Step 12: Second customization, a custom query
The same nexus.extendType pattern extends Query to define brand-new top-level queries. A small example: return only articles whose title contains a substring.
Create src/extensions/graphql/queries.ts:
// src/extensions/graphql/queries.ts
import type { Core } from "@strapi/strapi";

export default function queries({
  nexus,
  strapi,
}: {
  nexus: typeof import("nexus");
  strapi: Core.Strapi;
}) {
  return {
    types: [
      nexus.extendType({
        type: "Query",
        definition(t) {
          t.list.field("searchArticles", {
            type: nexus.nonNull("Article"),
            args: { q: nexus.nonNull(nexus.stringArg()) },
            async resolve(_parent: unknown, args: { q: string }) {
              return strapi.documents("api::article.article").findMany({
                filters: { title: { $containsi: args.q } },
                sort: ["publishedAt:desc"],
                status: "published",
              });
            },
          });
        },
      }),
    ],
    resolversConfig: {
      "Query.searchArticles": { auth: false },
    },
  };
}
Key points:
nexus.extendType({ type: 'Query', ... })adds a field to the top-levelQuerytype. That field becomes a new top-level GraphQL query:searchArticles(q: String!): [Article!].- The resolver calls
strapi.documents('api::article.article').findMany(...). This is the Document Service API, Strapi v5's recommended way to read and write content entries. $containsiis a case-insensitive substring filter. The full set of operators is the same set the Shadow CRUD filters accept.status: "published"is passed explicitly. The Document Service returns the draft version by default. The auto-generatedarticlesquery hides drafts from public requests on its own; a custom resolver does not, so you have to ask for the published version yourself.- The
queriesfactory takes{ nexus, strapi }because it needs thestrapiinstance to call the Document Service.computedFieldsonly needed{ nexus }because its resolver only reads the row passed in (theparentargument).
Register it in the aggregator. Because queries needs strapi, wrap it in a named inner function rather than passing it directly:
// src/extensions/graphql/index.ts
import type { Core } from "@strapi/strapi";
import computedFields from "./computed-fields";
import queries from "./queries";

export default function registerGraphQLExtensions(strapi: Core.Strapi) {
  const extensionService = strapi.plugin("graphql").service("extension");

  extensionService.use(computedFields);
  extensionService.use(function extendQueries({ nexus }: any) {
    return queries({ nexus, strapi });
  });
}
Restart. In the Sandbox:
query SearchArticles($q: String!) {
  searchArticles(q: $q) {
    documentId
    title
    wordCount
  }
}
Variables:
{ "q": "internet" } Every Article whose title contains "internet" (case-insensitive) should come back, with their word counts. The seeded example data includes titles like "A bug is becoming a meme on the internet" and "The internet's Own boy", so the word matches. Swap in a different word if your seeded titles differ.
What you just built
- A Strapi v5 project with the GraphQL plugin installed and the seeded blog-style content model (Article, Author, Category, About, Global).
- Every Shadow CRUD operation on
Articleworking in the Sandbox: list, traverse relations, filter (including filters that cross relations), sort, paginate, create, update, delete. - A customization folder under
src/extensions/graphql/with an aggregator, a computed-fields factory, and a custom-queries factory, the same layout the advanced tutorial uses. - Plugin limits configured in
config/plugins.ts.
The final file layout:
src/
├── index.ts                              # calls registerGraphQLExtensions
└── extensions/
    └── graphql/
        ├── index.ts                      # aggregator
        ├── computed-fields.ts            # Article.wordCount
        └── queries.ts                    # Query.searchArticles
That covers how Strapi's GraphQL customization works: the extension service registers your factories, nexus.extendType adds fields and top-level queries, and one file per concept under src/extensions/graphql/ keeps the code readable as the project grows.
What's next
This is Part 1 of a four-part series. Each part adds to the same src/extensions/graphql/ folder you just created:
-
Part 2: advanced backend customization. Takes the same Strapi project and covers the rest of the customization story:
resolversConfigmiddlewares and named policies, selectively disabling parts of Shadow CRUD (hiding fields, removing filters, removing mutations), custom object types for aggregate responses, and several new custom queries and mutations on a note-taking content model. Everything lives insrc/extensions/graphql/, new files only, no refactoring of what you wrote here. -
Part 3: using the schema from a Next.js frontend. Wires the backend up to a Next.js 16 App Router application using Apollo Client. Covers reads from React Server Components, writes through Server Actions, sharing field selections with fragments, writing filters on the client, and the create / update / inline-action flows for mutations.
-
Part 4: users, permissions, and per-user content. Adds login through Strapi's users-permissions plugin and an ownership model so each user only reads and modifies their own data. Uses cookie-stored JWTs on the Next.js side. On the backend it adds two new files in the same extensions folder,
ownership-middlewares.tsfor read access andownership-policies.tsfor writes.
Each part can be read on its own if you already have a project at the right state, but they are written to be followed in order.
Citations
- Strapi. GraphQL plugin: https://docs.strapi.io/cms/plugins/graphql
- Strapi. Document Service API: https://docs.strapi.io/cms/api/document-service
- Strapi. Content-Type Builder: https://docs.strapi.io/cms/features/content-type-builder
- Nexus schema documentation: https://nexusjs.org/