Introduction
Real-time communication has become a core feature in modern applications, enabling users to connect instantly through voice, video, or text across different devices and locations.
In this article, you'll learn how to build a real-time voice chat application using Strapi 5, Vue.js, and WebRTC.
Strapi 5 will be used for the back-end CMS, Vue.js will handle the user interface and layout, and WebRTC will be used for real-time communication. Specifically, we'll use PeerJS, a library that simplifies the process of setting up WebRTC peer-to-peer connections.
Tutorial Objective
By the end of this tutorial, you will have achieved the following:
- Learn how to build a fully functional real-time voice chat application
- Understand the differences between WebRTC and WebSockets.
- Implement event broadcasting using WebSockets.
- Use WebRTC for main real-time chat.
- Utilize Strapi lifecycle functions.
Let's get started!
Prerequisites
Before you dive into the article, make sure you have the following:
- Node.js(v18 or later) and Npm installed
- Basic understanding of JavaScript and Vue.js
- Knowledge of WebSockets
- A code editor
- Firefox browser installed
Understanding WebRTC
What is WebRTC?
WebRTC (Web Real-Time Communication) is an open-source technology that enables real-time communication between devices and browsers. It supports real-time audio and video communication, file sharing, and more.
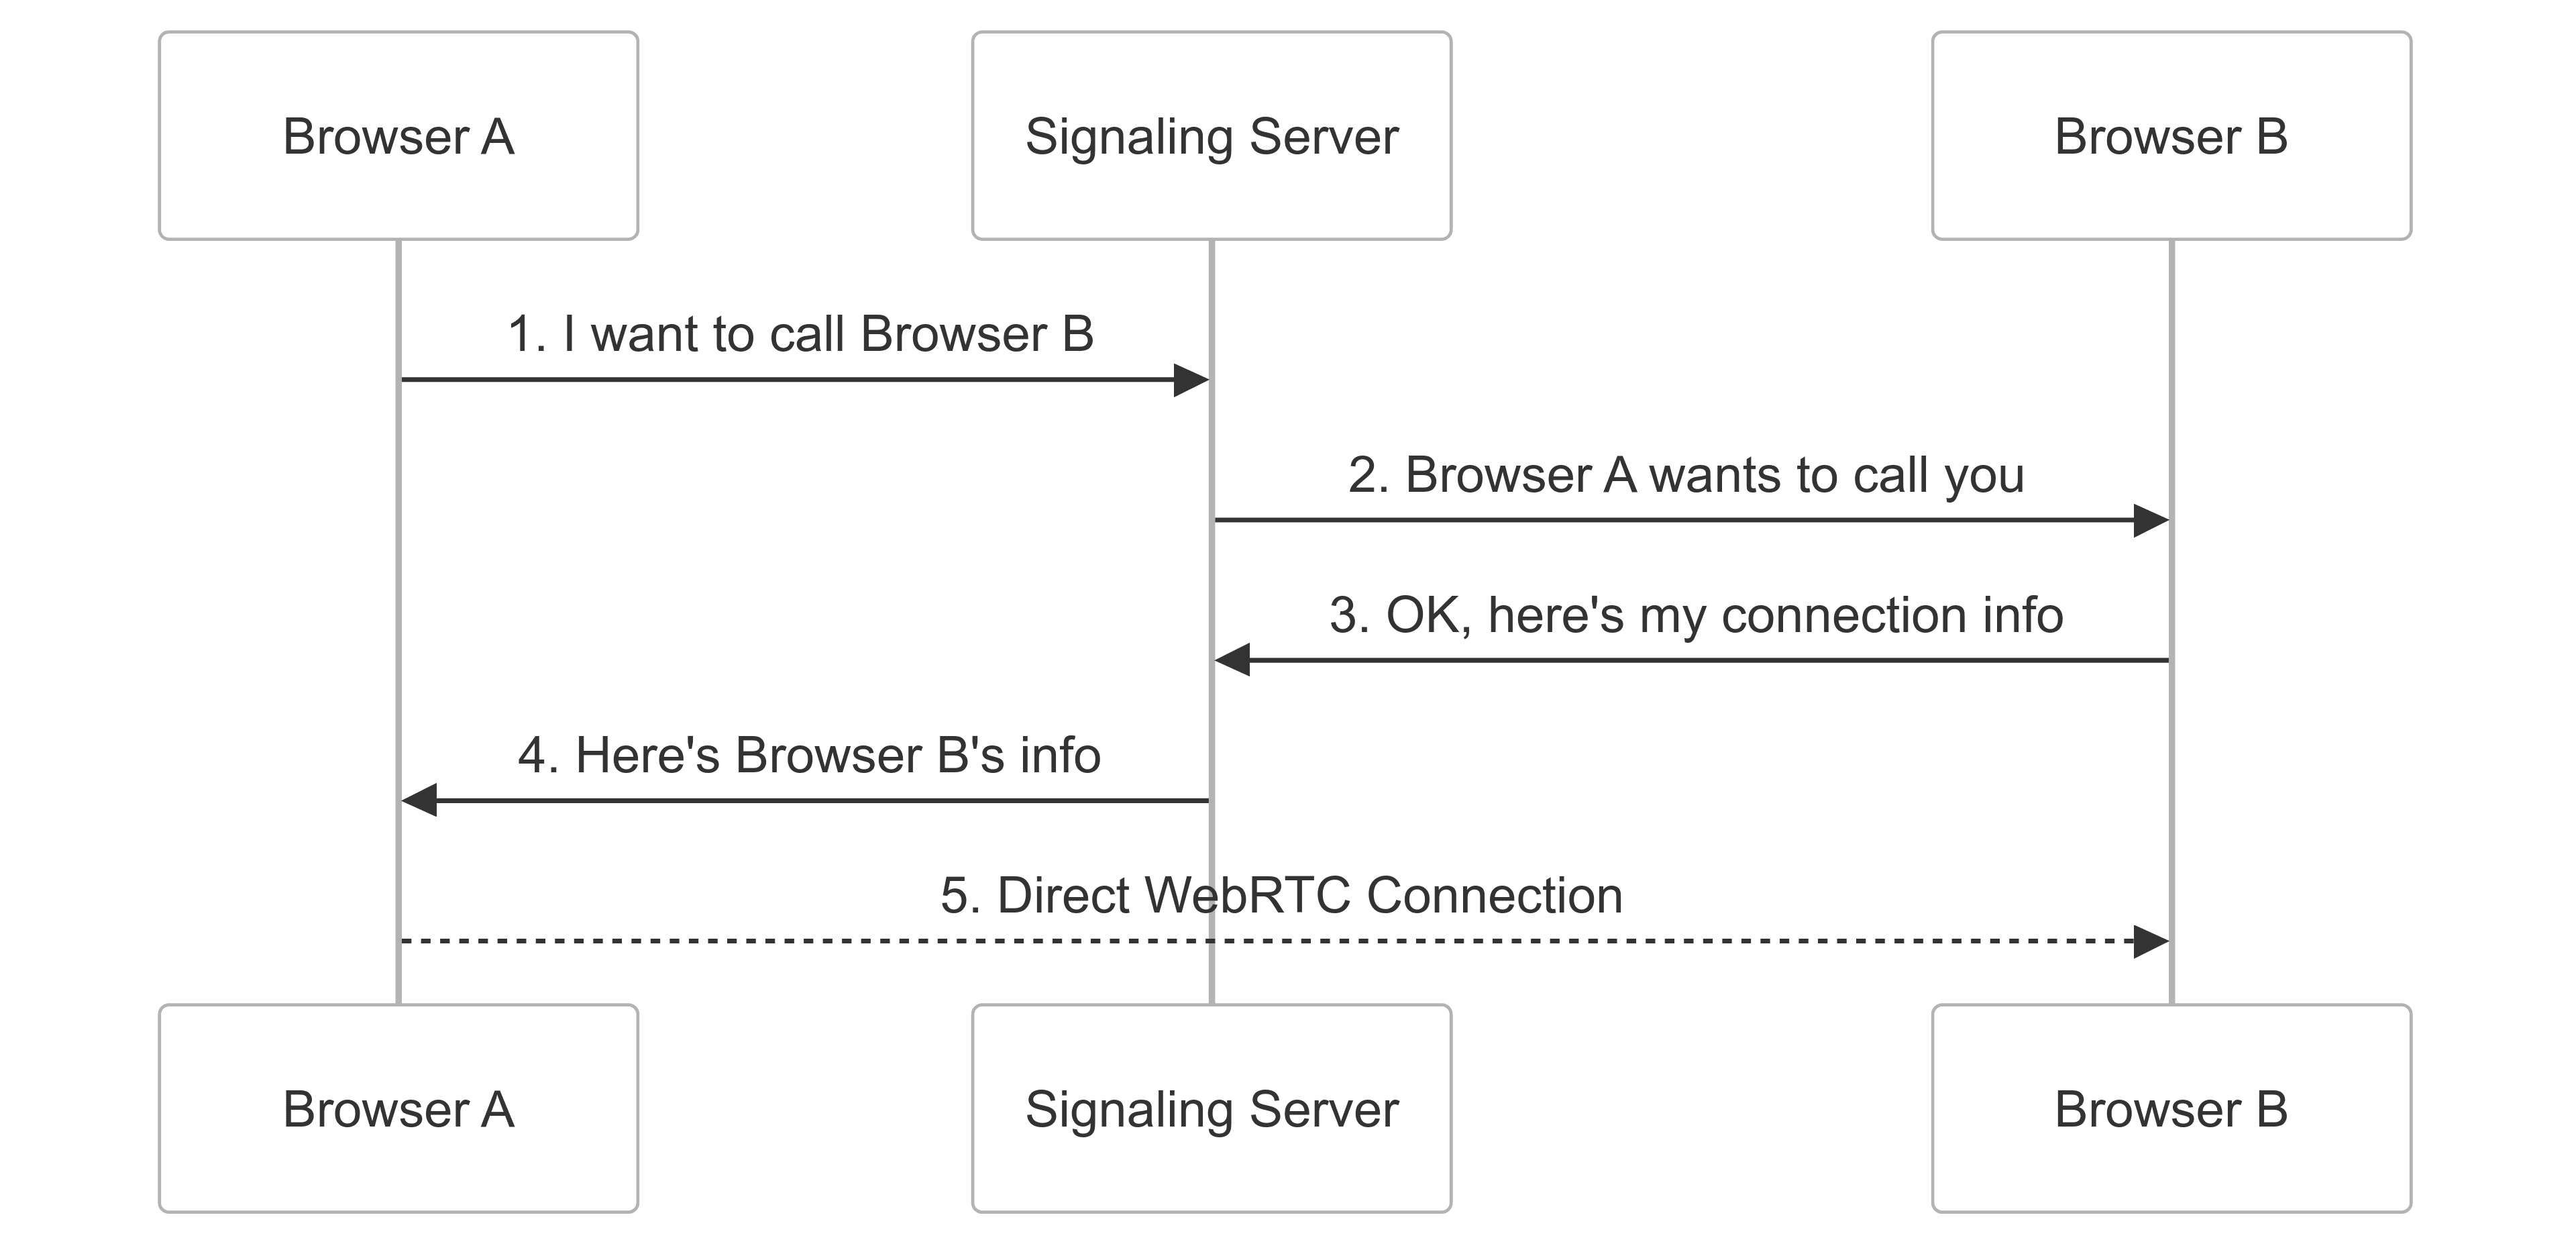
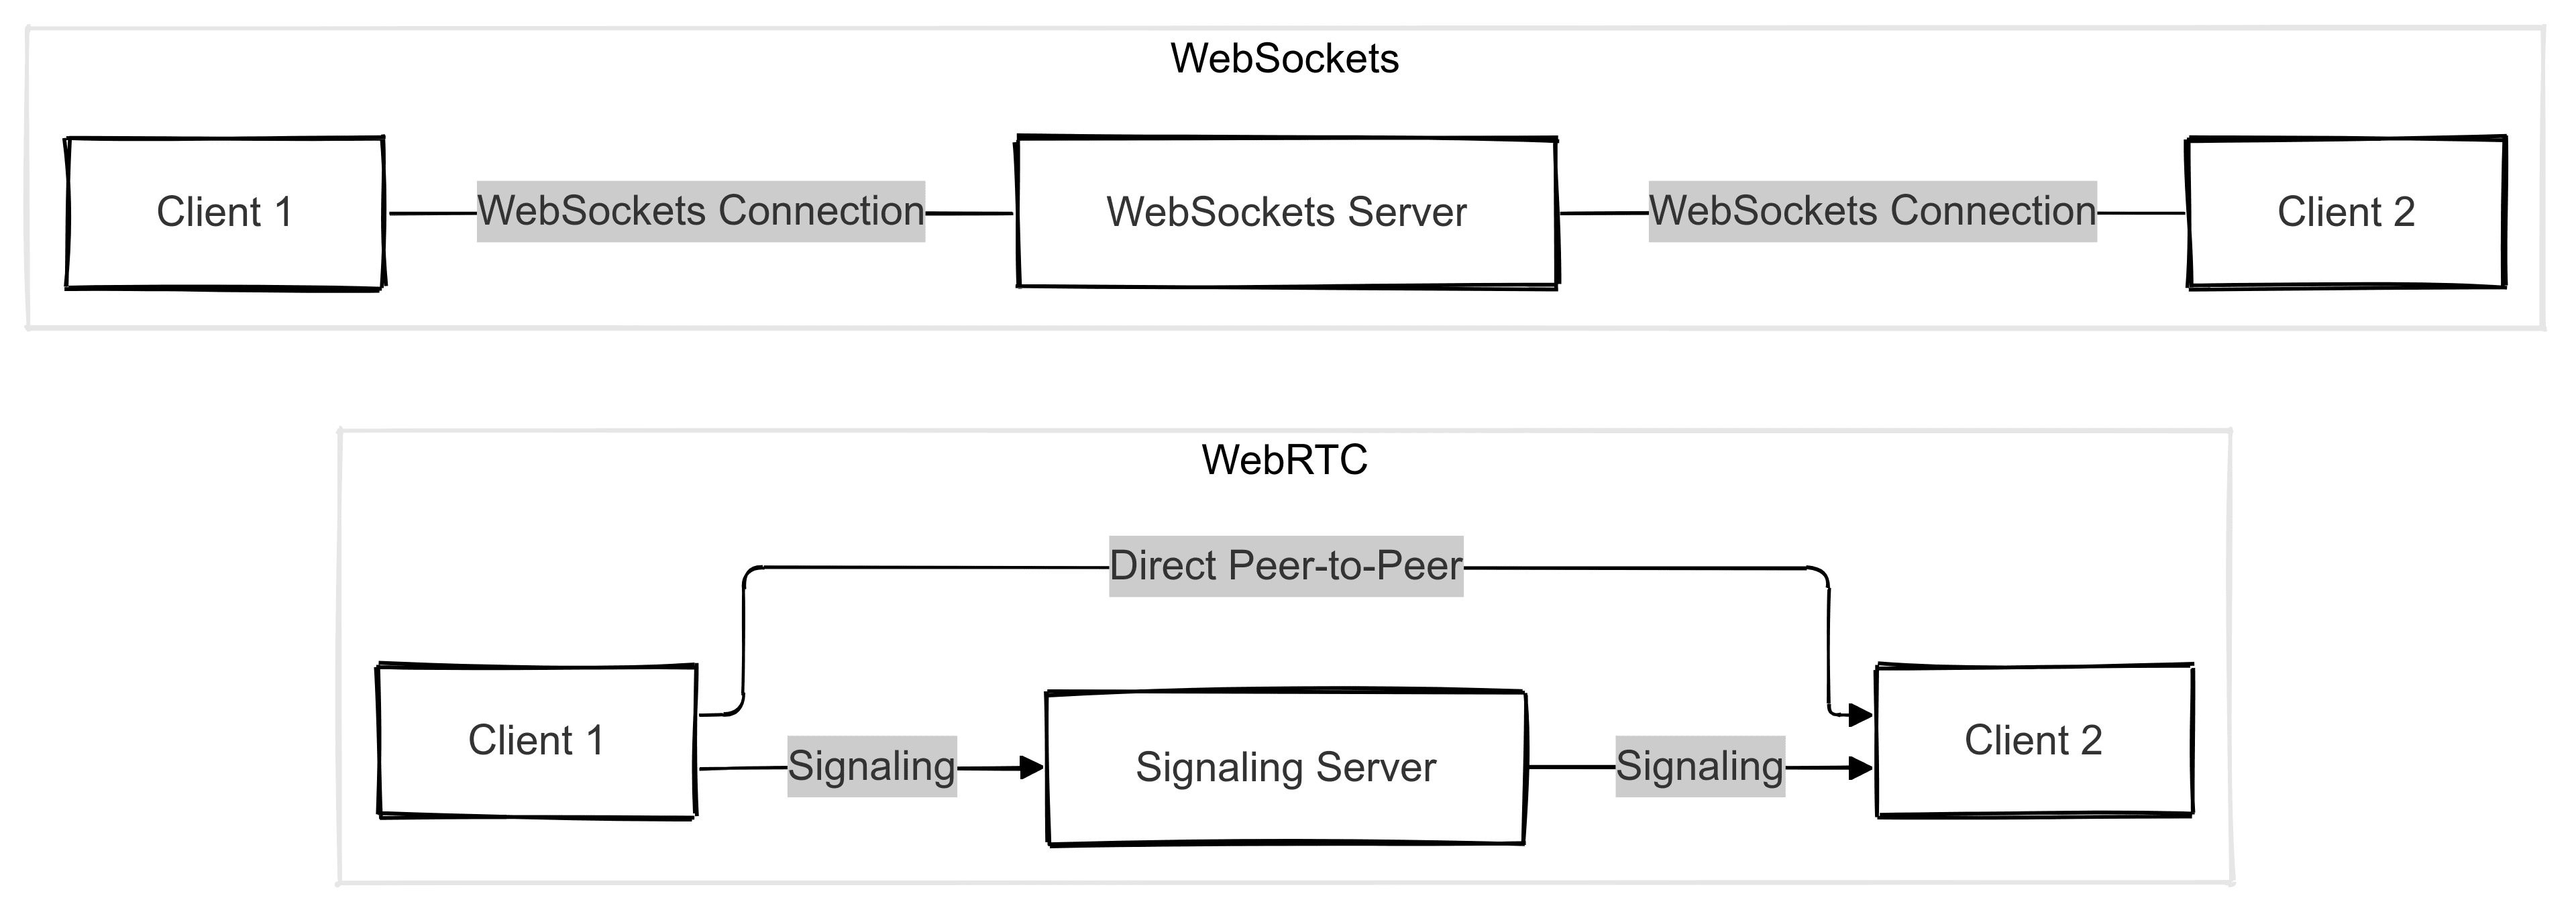
WebRTC establishes connections between devices using a process called signalling. The signalling process involves exchanging information, such as network details and capabilities, between clients before establishing the direct WebRTC connection. A signalling server acts as an intermediary to relay this information between clients.
Once signalling is complete, the media data (audio, video, files) flows directly between clients without passing through the signalling server. The diagram below illustrates this concept.
WebRTC vs WebSockets
While both WebRTC and WebSockets enable real-time communication, they use different approaches.
WebRTC is designed for direct, peer-to-peer communication between clients without requiring an intermediary server. It establishes a direct connection between participating clients, allowing them to exchange data, audio, and video directly.
In contrast, WebSockets rely on a central server for communication. Clients connect to the WebSocket server and exchange messages bidirectionally through this server. All data must pass through the server, which can introduce latency. The difference is shown in the image below.
Setting up the Backend with Strapi 5
Create a new Strapi 5 Project
First, open a new terminal instance. Navigate to a preferred directory and run the following command to create a new Strapi 5 project.
mkdir voice-chat-application
cd voice-chat-application
npx create-strapi@latest voice-chat-api --quickstart
This command creates a new Strapi 5 folder voice-chat-api in the voice-chat-application folder.
After installation completes, your browser will open a page prompting you to create an admin account, as shown below:
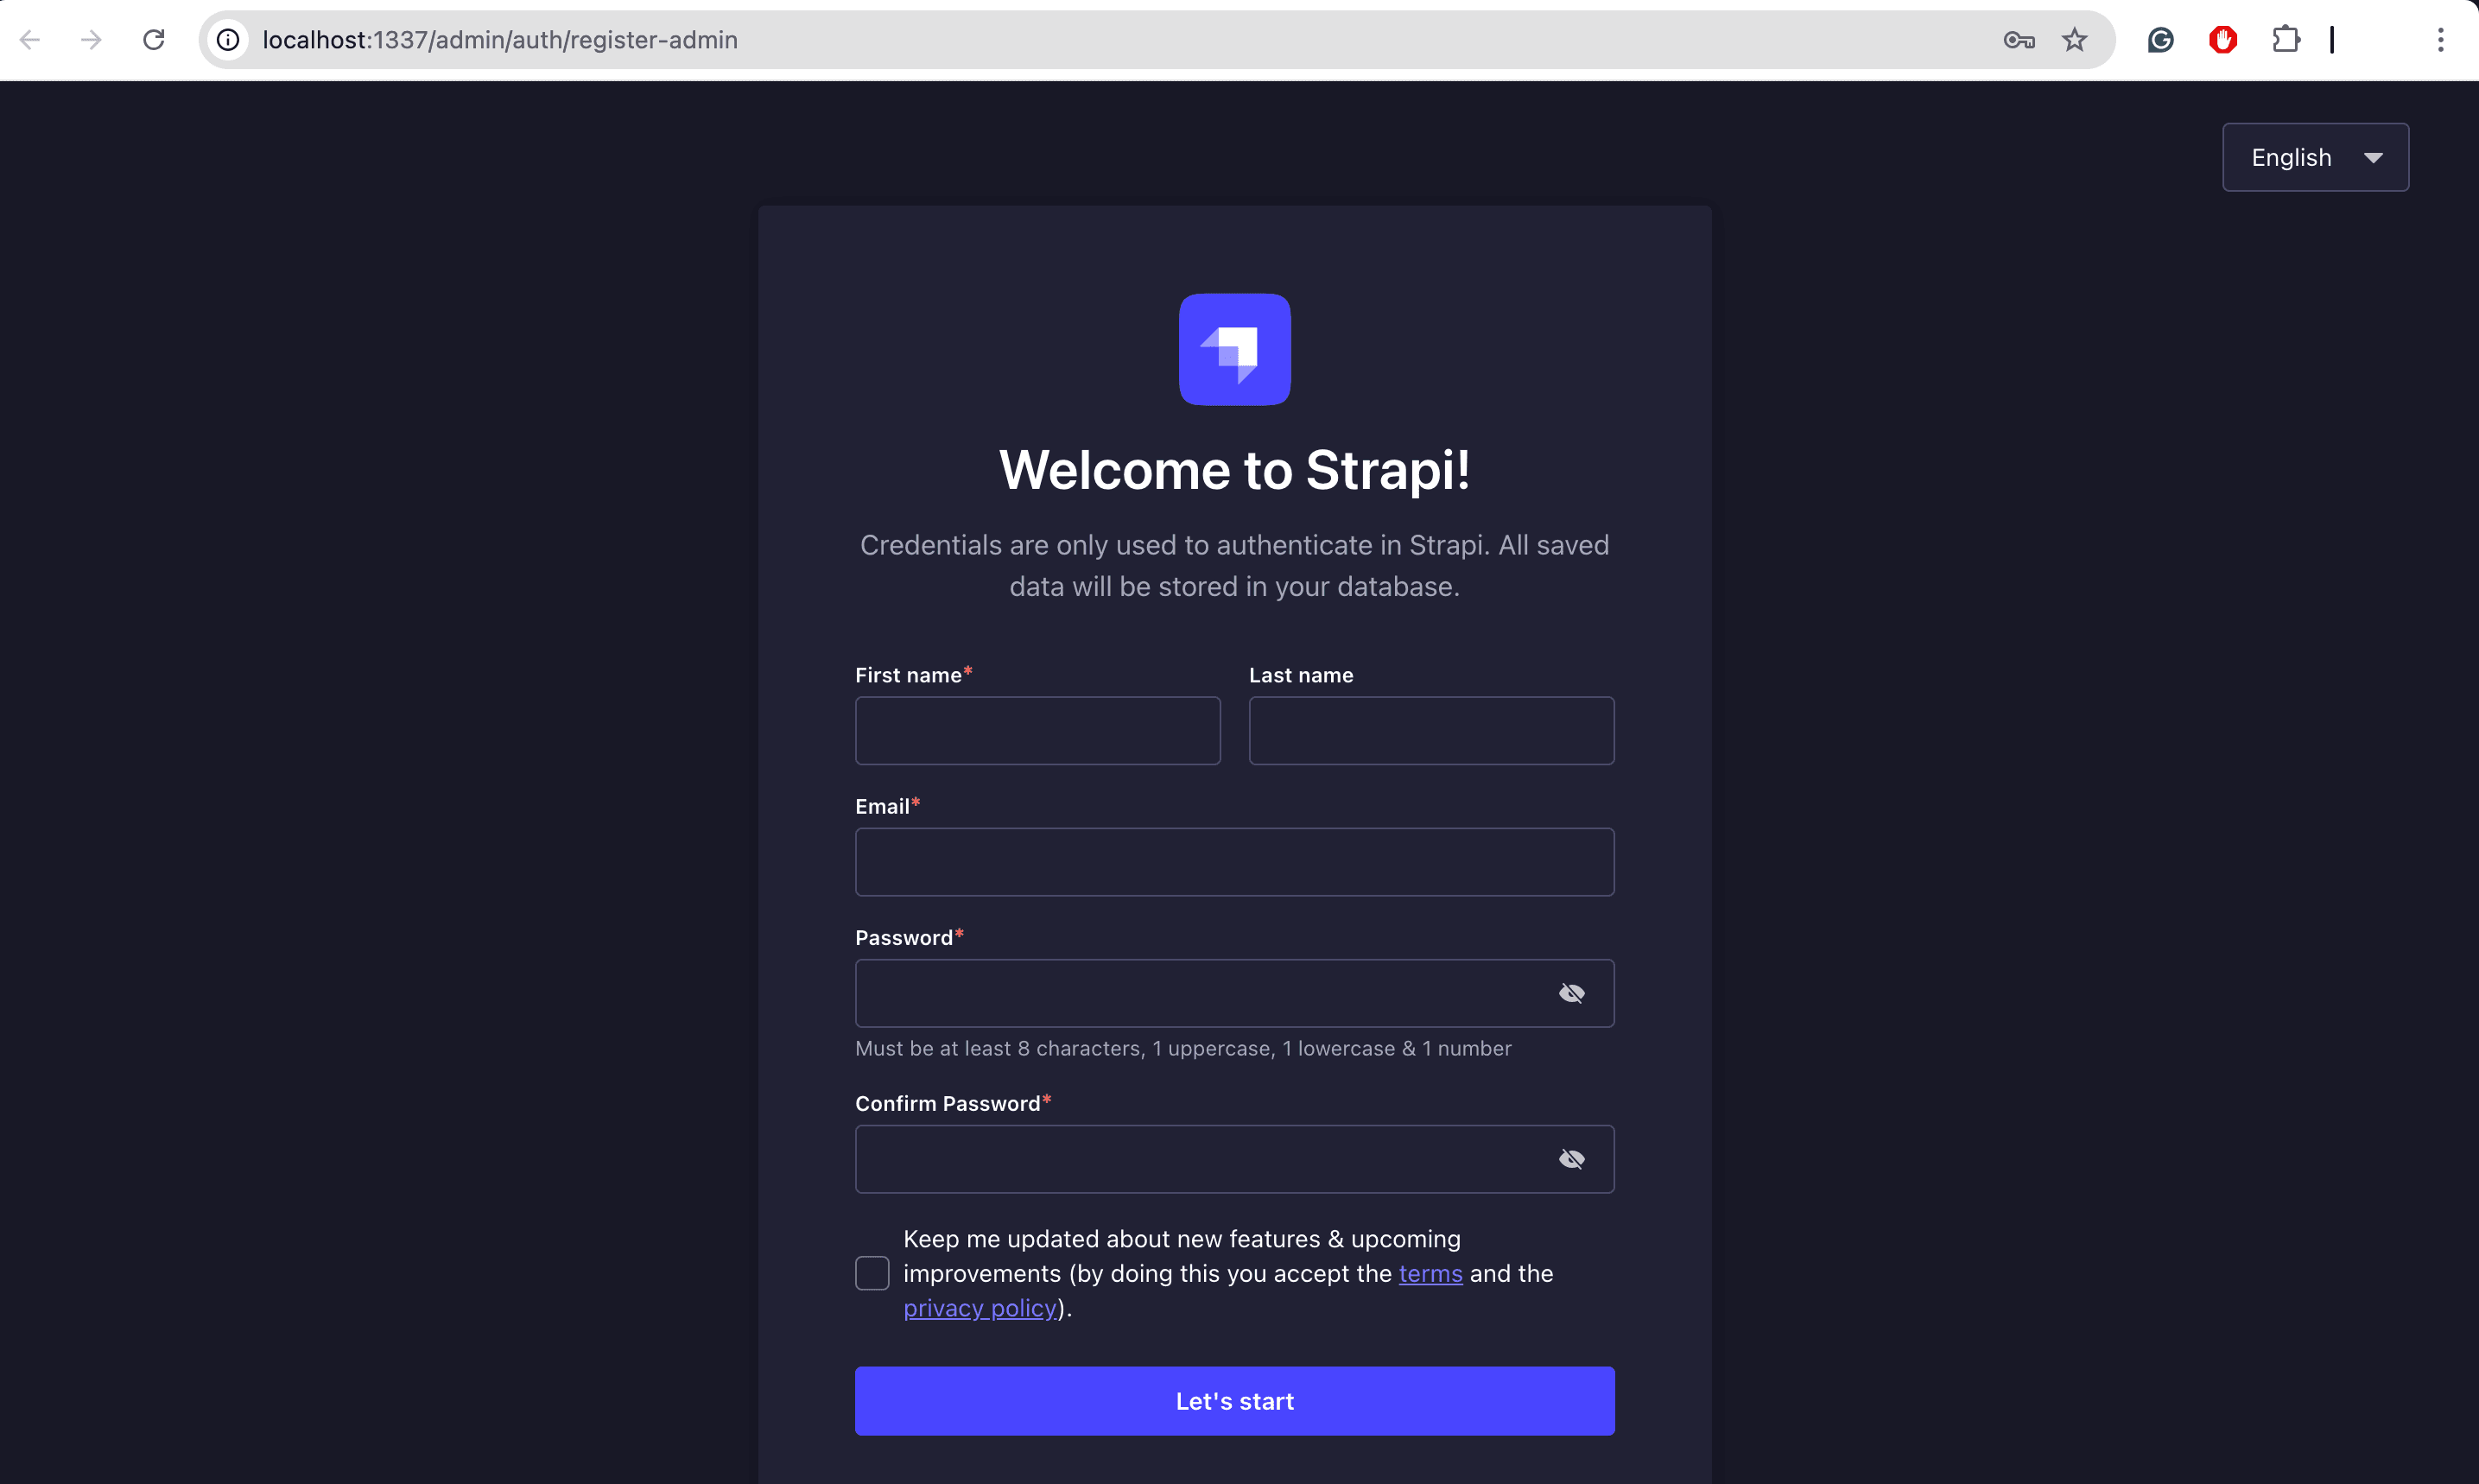
Enter your details in the form to access the admin dashboard:
In the next section, you'll create test users that you'll use to test your application later on.
Create User Entries
With the server running, create test users for the application.
Navigate to the Content Manager section in the admin dashboard and select Create New Entry as shown here:
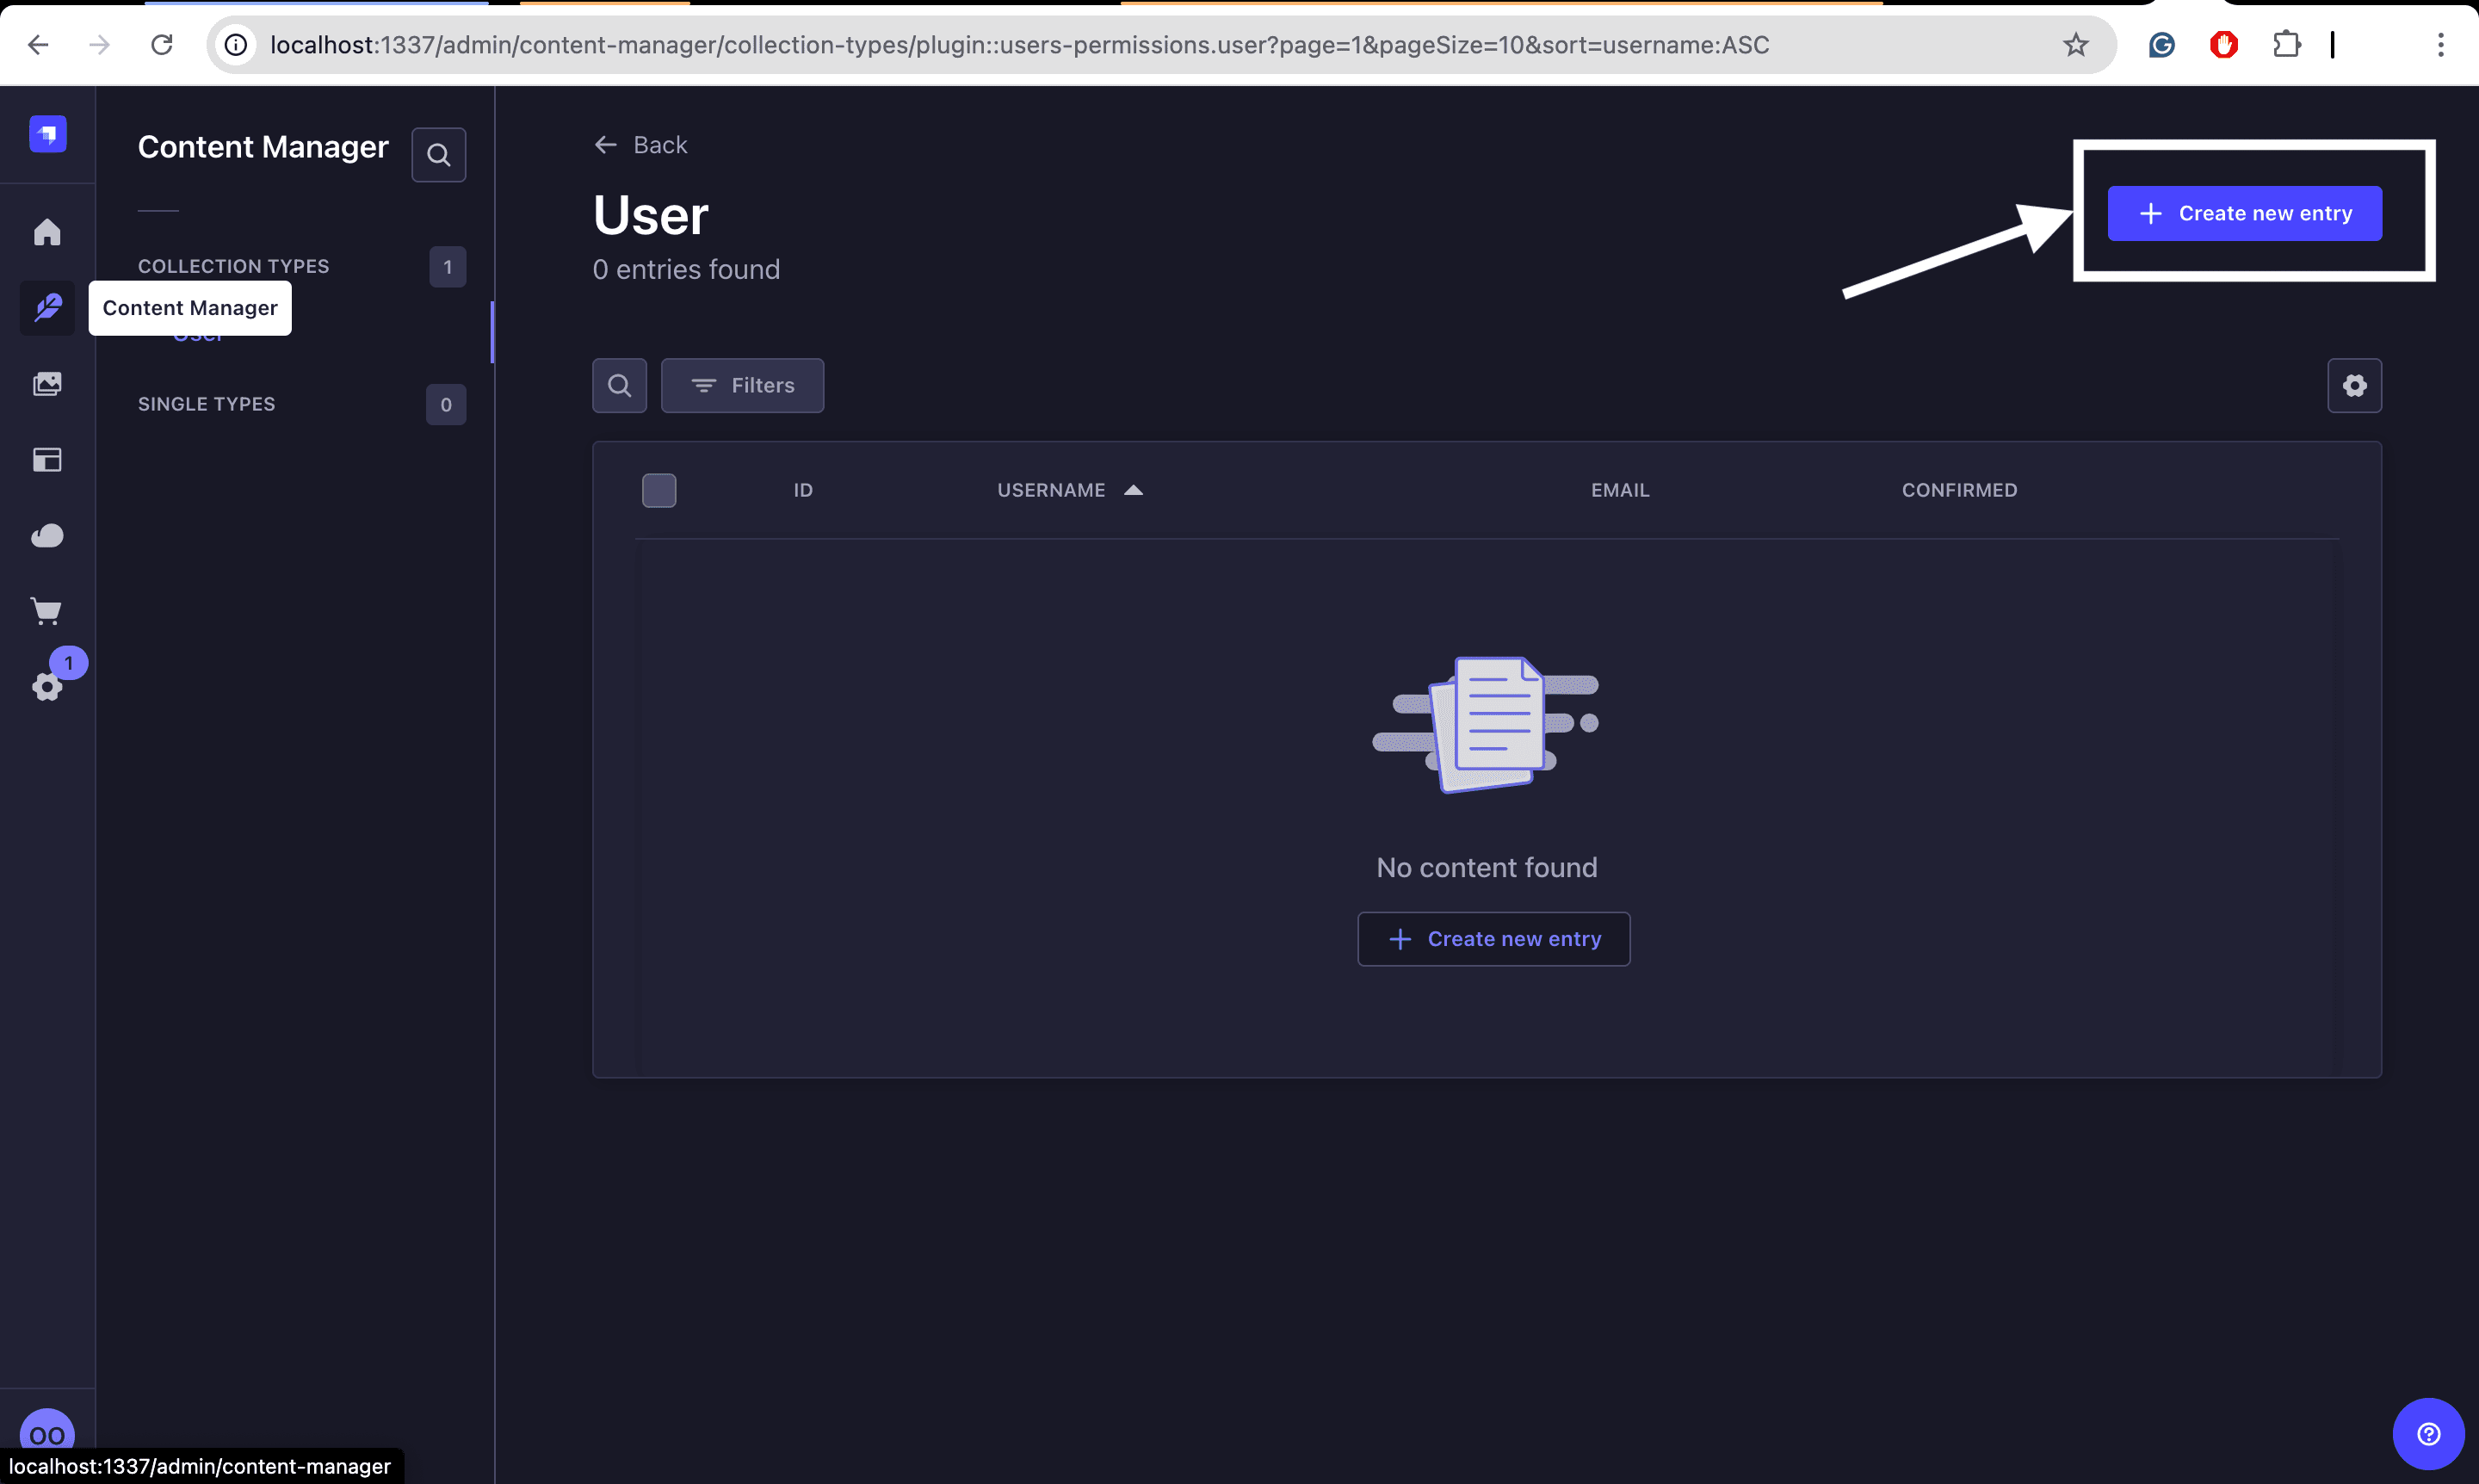
Fill in the user details and click save:

Repeat this process once more to create a second test user.
Now that the Strapi server is set up and you have test users, you can proceed with integrating WebSockets using Socket.IO. Open the project in your preferred IDE or text editor.
Integrate WebSockets with Strapi
WebSockets will be used for two key purposes in this application:
- Managing user presence by tracking which users are currently online.
- Handling call signalling by broadcasting events between users when:
- A user initiates a call
- A user accepts a call
- A user rejects a call
To integrate WebSockets into your Strapi 5 backend, you'll need to install Socket.IO. In a new terminal instance, navigate to your chosen directory and run the following command:
npm install socket.io @types/socket.io After installation is done, navigate to src/index.ts. Import and declare the Socket.IO module with the following lines of code.
import { Server } from "socket.io";
import type { Core } from "@strapi/strapi";

declare module "socket.io" {
  interface Socket {
    userId?: number;
    username?: string;
  }
}
Next, create a new Socket.IO connection by updating the bootstrap method in the index.ts file.
export default {
  register() {},

  async bootstrap({ strapi }: { strapi: Core.Strapi }) {
    const io = new Server(strapi.server.httpServer, {
      cors: {
        origin: ["http://localhost:8080"],
        methods: ["GET", "POST"],
        credentials: true,
      },
      path: "/ws",
    });
The code snippet above uses Strapi's bootstrap lifecycle function to create a new Socket.IO server instance and configure the path and origin for the frontend application.
Handle WebSocket Events on Strapi Server
After creating a new instance of the Socket.IO server, the next step is to add a setup for listening to events. Update your src/index.ts file with the code snippet below.
const onlineUsers: Record<number, string> = {};

    io.on("connection", (socket) => {

        //Events for when a
      socket.on("userConnected", ({ userId, username }) => {
        socket.userId = userId;
        socket.username = username;
        socket.join(userId.toString());
        onlineUsers[userId] = username;
        io.emit("updateOnlineUsers", onlineUsers);
        console.log(`User ${username} connected and joined room ${userId}`);
      });

      socket.on("disconnect", () => {
        if (!socket.userId) return;
        delete onlineUsers[socket.userId];
        io.emit("updateOnlineUsers", onlineUsers);
        console.log(`User ${socket.username} disconnected`);
      });

      socket.on("initiateCall", ({ callerId, callerUsername, calleeId }) => {
        console.log(`Initiating call from ${callerId} to ${calleeId}`);
        const calleeRoom = calleeId.toString();
        if (!io.sockets.adapter.rooms.has(calleeRoom)) {
          console.log(`Room for calleeId ${calleeId} does not exist. Cannot emit incoming call.`);
          return;
        }
        io.to(calleeRoom).emit("incomingCall", {
          from: callerId,
          username: callerUsername,
        });
        console.log(`Incoming call event emitted to user ${calleeId} in room ${calleeRoom}`);
      });

      socket.on("callRejected", ({ callerId, message }) => {
        const callerSocketId = onlineUsers[callerId];
        if (!callerSocketId) {
          console.log(`Caller with user ID ${callerId} is not online`);
          return;
        }
        io.to(callerSocketId).emit("callRejected", { message });
        console.log("callRejected sent to socket:", callerSocketId);
      });

      socket.on("acceptCall", ({ callerId, calleeId, calleeUsername }) => {
        io.to(callerId).emit("callAccepted", {
          by: calleeId,
          username: calleeUsername,
       });
      });
    });
  },
};
The code snippet above first initializes a variable named onlineUsers. It then defines five events that dispatch on specified conditions:
userConnected: Fired when a user connects. Saves the user’s details, joins a room, and updates the list of online users.disconnect: Fired when a user disconnects. Removes the user from the online users list and notifies others.initiateCall: Fired when a user initiates a call. Checks if the callee is online and sends an "incomingCall" event to their room.callRejected: Fired when a call is rejected. Notifies the caller with a rejection message.acceptCall: Fired when a call is accepted. Notifies the caller that the call was accepted.
Configure WebRTC Signaling Server with PeerJS
PeerJS is a library that simplifies peer-to-peer communication. It acts as a wrapper around the browser's WebRTC implementation to provide an easy way of implementing WebRTC in applications.
To set up the WebRTC signalling server, install the Peer server globally by running this command:
npm install peer -gAfter a successful installation, start the signalling server with this command:
peerjs --port 9000 --key peerjs --path /myappNOTE: The command above can be run from anywhere in your terminal. This is because we installed the
peerpackage globally.
The command above starts the PeerJS signaling server, configuring it to run on port 9000, with an authentication key of 'peerjs', and listening on the /myapp path.
With your signalling server setup, you can now proceed with building the user interface of the chat application.
Setting up the Frontend with Vue.js
Now that the backend part of the voice chat application is fully set up, it’s time to build the user interface of the application.
Create a new Vue.js Project
Navigate to the project folder created earlier and create a new Vue.js project using this command:
cd voice-chat-application
npx @vue/cli create voice-chat-frontend
When prompted, select the Vue 3 default option.
Vue CLI v5.0.8
? Please pick a preset: (Use arrow keys)
❯ Default ([Vue 3] babel, eslint)
  Default ([Vue 2] babel, eslint)
  Manually select features
Install Necessary Dependencies
After creating the new project, install all the dependencies needed for the Vue.js app's real-time functionality. Run this command in your terminal:
cd voice-chat-frontend
npm install axios socket.io-client vuex vue-router peerjs
The following packages will be installed:
- axios: For making HTTP requests to the Strapi 5 server
- socket.io-client: For receiving and emitting events to and from the Socket.IO server
- vuex: For managing state throughout the application
- vue-router: For handling routing
- peerjs: For connecting browsers for real-time voice chat functionality using WebRTC
Set Up Vuex for State Management
After installing the necessary dependencies, set up the store for user state management.
In the src/ folder, create two new folders named router and store. Then create a file named index.js in each folder.
Navigate to src/store/index.js and add the code for the Vuex store.
import { createStore } from "vuex";
import axios from "axios";
import io from "socket.io-client";

export default createStore({
  state: {
    user: JSON.parse(localStorage.getItem("user")) || null,
    token: localStorage.getItem("token") || null,
    socket: null,
  },
  mutations: {
    setUser(state, user) {
      state.user = user;
      localStorage.setItem("user", JSON.stringify(user));
    },
    setToken(state, token) {
      state.token = token;
      localStorage.setItem("token", token);
    },
    setSocket(state, socket) {
      state.socket = socket;
    },
  },
  actions: {
    async login({ commit, dispatch }, { identifier, password }) {
      try {
        const response = await axios.post(
          "http://localhost:1337/api/auth/local", // Strapi login endpoint
          {
            identifier,
            password,
          }
        );
        const { user, jwt } = response.data;
        commit("setUser", user);
        commit("setToken", jwt);

        // Initialize socket after login
        await dispatch("initializeSocket");
      } catch (error) {
        console.error("Login failed:", error);
        throw error;
      }
    },

    async initializeSocket({ commit, state }) {
      if (!state.user) return; // Ensure user is logged in before connecting

      // Initialize socket connection
      const socket = io("http://localhost:1337", {
        transports: ["websocket"],
        path: "/ws",
        reconnection: true,
        reconnectionDelay: 1000,
        reconnectionDelayMax: 5000,
        reconnectionAttempts: 5,
      });

      socket.on("connect", () => {
        console.log("Connected to WebSocket server");
        socket.emit("userConnected", { userId: state.user.id, username: state.user.username });
      });


      socket.on("disconnect", () => {
        console.log("Disconnected from server");
        // socket.emit("userDisconnected", { userId: state.user.id });
      });

      // Store socket instance in state
      commit("setSocket", socket);
    },

    logout({ commit, state }) {
      // Remove user data from local storage
      localStorage.removeItem("user");
      localStorage.removeItem("token");

      // Disconnect socket if it exists
      if (state.socket) {
        state.socket.emit("userDisconnected", { userId: state.user.id });
        state.socket.disconnect();
      }

      // Clear state
      commit("setUser", null);
      commit("setToken", null);
      commit("setSocket", null);
    },
  },
});
In the code above, the Vuex store manages user authentication, state persistence, and real-time communication. It tracks the user's information, authentication token, and WebSocket instance in the state. The mutations section modifies the user, token, and socket instance in both the state and localStorage while actions handle tasks like logging in (storing user data and token), initializing the WebSocket connection, and logging out.
Set up Vue Router
Next, set up Vue Router to handle navigation between different views in the application. Add the routing configuration to src/router/index.js.
import { createRouter, createWebHistory } from "vue-router";
import LoginView from "../components/LoginView.vue";
import DashboardView from "../components/DashboardView.vue";
import CallView from "../components/CallView.vue";
import store from "../store";

const routes = [
  { path: "/", redirect: "/login" },
  { path: "/login", component: LoginView },
  {
    path: "/dashboard",
    name: "dashboard",
    component: DashboardView,
    meta: { requiresAuth: true },
  },
  {
    path: "/call/:userId/:username",
    name: "call",
    component: CallView,
    props: true,
    meta: { requiresAuth: true },
  },
];

const router = createRouter({
  history: createWebHistory(),
  routes,
});

// Navigation guard
router.beforeEach((to, from, next) => {
  const isAuthenticated = store.state.user || localStorage.getItem("user");

  if (to.meta.requiresAuth && !isAuthenticated) {
    next("/login");
  } else {
    next();
  }
});

export default router;
In the code above, a Vue Router instance is configured to handle navigation in the voice chat application. Routes are set up for authentication, and specific views are provided for the dashboard and calling functionality.
The router.beforeEach navigation guard checks if the user is authenticated before allowing access to routes with requiresAuth.
Update App.vue and main.js Files
To set up the basic structure and style for your Vue.js application, update the App.vue and main.js files. These files create the main layout and initialize the app.
Navigate to src/App.vue and update it with the following lines of code.
<template>
  <div id="app">
    <h1>Voice Chat App</h1>
    <router-view></router-view>
  </div>
</template>

<script>
export default {
  name: 'App'
}
</script>

<style>
#app {
  font-family: Arial, sans-serif;
  max-width: 400px;
  margin: 0 auto;
  padding: 20px;
}

h1 {
  text-align: center;
  color: #333;
}

.login-form, .call-interface {
  display: flex;
  flex-direction: column;
  gap: 10px;
}

input, button {
  padding: 10px;
  font-size: 16px;
}

button {
  background-color: #4CAF50;
  color: white;
  border: none;
  cursor: pointer;
  transition: background-color 0.3s;
}

button:hover {
  background-color: #45a049;
}
</style>
Next, navigate to src/main.js and update it with this code:
import { createApp } from "vue";
import App from "./App.vue";
import router from "./router";
import store from "./store";

createApp(App).use(router).use(store).mount("#app");
The App.vue file serves as the main layout for your app. Inside the <template> section, you have a container <div id="app"> that houses a title <h1>Voice Chat App</h1> and a <router-view> element that dynamically loads different components according to the route as users navigate through the app. Additionally styling for the application is defined here.
The main.js file serves as the entry point for your Vue application. It imports required modules, creates a Vue instance with createApp(App), adds router and store plugins, and mounts the application to the HTML element with ID #app. With the front-end setup complete, you can now create the components.
Building Vue.js Components
Create three new components to handle user login, dashboard display, and the main call interface.
Navigate to src/components and create three new files titled LoginView.vue, DashboardView.vue and finally CallView.vue.
The LoginView will be the login UI, while the DashboardView will display the logged-in user. Finally, the CallView will show the Real-Time call.
LoginView.vueOpen theLoginView.vuefile and add the following code.
<template>
  <div class="login-form">
    <h2>Login</h2>
    <input v-model="identifier" placeholder="Username or Email" />
    <input v-model="password" type="password" placeholder="Password" />
    <button @click="handleLogin">Login</button>
  </div>
</template>

<script setup>
import { ref } from 'vue'
import { useStore } from 'vuex'
import { useRouter } from 'vue-router'

const store = useStore()
const router = useRouter()

// State
const identifier = ref('')
const password = ref('')

// Methods
async function handleLogin() {
  try {
    await store.dispatch('login', {
      identifier: identifier.value,
      password: password.value
    })
    router.push('/dashboard')
  } catch (error) {
    console.error('Login failed:', error)
  }
}
</script>
This component above allows users to log in to the application. Upon successful login, they’ll be redirected to the dashboard view where they'll be able to see a list of active users.
DashBoardView.vue
Next, set up the DashboardView.vue component. This component lists online users and allows users to initiate or receive calls from active users. Update the DashboardView.vue component with the following code.
<template>
  <div class="dashboard">
    <h2>Welcome, {{ user.username }}</h2>
    <h3>Online Users</h3>
    <ul class="online-users">
      <li v-for="onlineUser in onlineUsers" :key="onlineUser.id" @click="initiateCall(onlineUser)" class="user-item">
        {{ onlineUser.username }}
        <span class="status-dot online"></span>
      </li>
    </ul>

    <!-- Incoming Call Modal -->
    <div v-if="incomingCall" class="call-modal">
      <h3>Incoming Call from {{ incomingCall.username }}</h3>
      <button @click="acceptCall">Accept</button>
      <button @click="rejectCall">Reject</button>
    </div>

    <div v-if="rejectionMessage" class="rejection-notification">
      {{ rejectionMessage }}
    </div>

  </div>
</template>
The code above sets up the view interface to display the online users. It also allows the user to initiate and reject calls. Next, add a setup for listening to sending and listening to events from the Strapi backend.
Next, add setup for WebSocket. Update your DashboardView.vue file with the following lines of code.
// previous code goes here
<script setup>
import { ref, computed, onMounted, onBeforeUnmount } from 'vue'
import { useStore } from 'vuex'
import { useRouter } from 'vue-router'

const store = useStore()
const router = useRouter()

// State
const onlineUsers = ref([])
const socket = ref(null)
const incomingCall = ref(null)
const callRejected = ref(null)
const rejectionMessage = ref(null);

// Computed
const user = computed(() => store.state.user)

// Lifecycle hooks
onMounted(() => {
  connectSocket()
})

onBeforeUnmount(() => {
  if (socket.value) {
    socket.value.disconnect()
  }
})

// Methods
function connectSocket() {
  if (store.state.socket) {
    // Use the existing socket connection
    socket.value = store.state.socket;
  } else {
    // Initialize socket if not already connected
    store.dispatch('initializeSocket');
    socket.value = store.state.socket;
  }

  socket.value.on('updateOnlineUsers', (users) => {
    onlineUsers.value = Object.entries(users)
      .map(([userId, username]) => ({ userId: Number(userId), username }))
      .filter((u) => u.userId !== user.value.id);
  });

  socket.value.on('incomingCall', (data) => {
    incomingCall.value = data;
  });

  socket.value.on('callRejected', (data) => {
    rejectionMessage.value = data.message;
    setTimeout(() => {
      rejectionMessage.value = null;
      router.push({ name: 'dashboard' });
    }, 2000);
  });
}
The code snippet above defines the function connectSocket on the onMounted lifecycle method of the view. The method is responsible for listening to the events broadcasted by the backend.
Now, add functions to initiate, accept or reject calls. Update your DashboardView.view file with the below code snippet.
//previous code goe shere
function initiateCall(callUser) {
  socket.value.emit('initiateCall', {
    callerId: user.value.id,
    callerUsername: user.value.username,
    calleeId: callUser.userId,
  })
  if (!callRejected.value) {
    router.push({
      name: 'call',
      params: {
        userId: callUser.userId,
        username: callUser.username,
      },
    })
  }

}

function acceptCall() {
  if (incomingCall.value) {
    callRejected.value = false
    socket.value.emit('acceptCall', {
      callerId: incomingCall.value.from,
      calleeId: user.value.id,
      calleeUsername: user.value.username,
    })
    router.push({
      name: 'call',
      params: {
        userId: incomingCall.value.from,
        username: incomingCall.value.username,
      },
      query: {
        accepted: 'true'
      }
    })
    store.commit('setSocket', socket.value)
    incomingCall.value = null
  }
}

function rejectCall() {
  callRejected.value = true;
  socket.value.emit('callRejected', {
    callerId: incomingCall.value.from,
    message: 'Your call was rejected by the callee.',
  });
  incomingCall.value = null
}

</script>

<style scoped>
.user-item {
  display: flex;
  align-items: center;
  padding: 10px;
  cursor: pointer;
}

.status-dot {
  width: 8px;
  height: 8px;
  border-radius: 50%;
  margin-left: 10px;
}

.online {
  background-color: #4CAF50;
}

.call-modal {
  position: fixed;
  top: 50%;
  left: 50%;
  transform: translate(-50%, -50%);
  background: white;
  padding: 20px;
  border-radius: 8px;
  box-shadow: 0 2px 10px rgba(0, 0, 0, 0.1);
}

.rejection-notification {
  position: fixed;
  top: 20px;
  left: 50%;
  transform: translateX(-50%);
  background-color: #ff4d4f;
  color: white;
  padding: 10px 20px;
  border-radius: 4px;
  box-shadow: 0px 2px 8px rgba(0, 0, 0, 0.2);
  z-index: 1000;
}
</style>
In the code above, three functions are initateCall, acceptCall and rejectCall.
initateCall: This method is triggered upon click of the online user displayed and it emits an event to the backend which then broadcasts the method to the user intended to be called.acceptCall: This method is fired when the callee(the user being called) accepts an incoming call and it redirects the user to the call view which we will build next.rejectCall: This method is fired when the user chooses to reject an incoming call.
Integrating WebRTC for Real-Time Voice Chat
After creating the login and dashboard view. The next step in building our voice chat application is to implement the real time voice chat functionality. Update your CallView.vue file with the below code snippet.
<template>
  <div class="call-interface">
    <h2>Call with {{ callee.username }}</h2>
    <div v-if="connectionStatus" class="status-message">
      {{ connectionStatus }}
    </div>
    <div v-if="connectionError" class="error-message">
      {{ connectionError }}
    </div>
    <button @click="endCall" v-else>End Call</button>
    <audio ref="remoteAudio" autoplay playsinline></audio>
  </div>
</template>
The code above defines the user interface for the call view with an audio tag to play the stream audio. The next step is to initialize a new peer instance for peer-to-peer connection. Update the CallView.vue file with the following.
//previous code goes here
<script setup>
import { ref, onMounted, onUnmounted, computed } from 'vue'
import { useRoute, useRouter } from 'vue-router'
import { useStore } from 'vuex'
import Peer from 'peerjs'

const route = useRoute()
const router = useRouter()
const store = useStore()

// Core refs
const peer = ref(null)
const call = ref(null)
const remoteAudio = ref(null)
const localStream = ref(null)

// UI state
const callActive = ref(false)
const isPeerConnected = ref(false)
const isConnecting = ref(false)
const connectionStatus = ref('')
const connectionError = ref('')

// User data
const callee = ref({ id: null, username: '' })
const currentUser = computed(() => store.state.user)

onMounted(async () => {
  const userId = route.params.userId
  const username = route.params.username
  const callAccepted = route.query.accepted

  if (!userId || !username) {
    console.error("Missing userId or username in route parameters")
    router.push('/dashboard')
    return
  }

  callee.value = { id: Number(userId), username }

  try {
    await initializePeer()
    if (callAccepted === 'true') {
      await startCall()
    }
  } catch (error) {
    connectionError.value = `Failed to initialize: ${error.message}`
  }
})

onUnmounted(() => {
  cleanup()
})

async function initializePeer() {
  try {
    connectionStatus.value = 'Initializing connection...'

    // Create a single peer for the current user
    peer.value = new Peer(currentUser.value.id.toString(), {
      host: 'localhost',
      port: 9000,
      path: '/myapp',
      debug: 3,
      config: {
        iceServers: [
          { urls: 'stun:stun.l.google.com:19302' },
          { urls: 'stun:stun1.l.google.com:19302' }
        ]
      }
    })

    // Set up event handlers for this peer
    peer.value.on('open', () => {
      isPeerConnected.value = true
      connectionStatus.value = 'Connected to server'
    })

    peer.value.on('call', handleIncomingCall)

    peer.value.on('error', (error) => {
      connectionError.value = `Connection error: ${error.message}`
      cleanup()
    })

    peer.value.on('disconnected', () => {
      connectionStatus.value = 'Disconnected, attempting to reconnect...'
      isPeerConnected.value = false
      peer.value?.reconnect()
    })

    peer.value.on('close', () => {
      cleanup()
    })

  } catch (error) {
    console.error('Peer initialization error:', error)
    throw error
  }
}
In the code above, an initializePeer method is defined in the onMounted lifecycle method to create a new peer instance for each user. The method configures a new PeerJS instance with the user ID as the identifier. It then connects to a local PeerJS at localhost/myapp, /myapp here represents a dedicated path which the signalling server listens on. The configuration includes Google's STUN servers for NAT traversal (stun.l.google.com:19302 and stun1.l.google.com:19302) and sets debug level 3 for detailed connection logging.
Also, the peer event listeners are set up to listen for various events that would be emitted by the other party.
Next, add methods to handle calls on both sides(caller and callee).
// previous code goes here
async function startCall() {
  try {
    isConnecting.value = true
    connectionError.value = ''
    connectionStatus.value = 'Getting audio access...'

    // Get local audio stream
    localStream.value = await navigator.mediaDevices.getUserMedia({ video: false, audio: true })

    // Initiate call to the other user
    connectionStatus.value = 'Calling...'
    call.value = peer.value.call(callee.value.id.toString(), localStream.value)

    if (!call.value) {
      throw new Error('Failed to initiate call')
    }

    setupCallHandlers(call.value)

  } catch (error) {
    console.error('Call failed:', error)
    connectionError.value = `Call failed: ${error.message}`
    cleanup()
  } finally {
    isConnecting.value = false
  }
}

async function handleIncomingCall(incomingCall) {
  try {
    connectionStatus.value = 'Incoming call...'

    // Get local audio stream if we don't have it yet
    if (!localStream.value) {
      localStream.value = await navigator.mediaDevices.getUserMedia({ video: false, audio: true })
    }

    // Answer the call with our audio stream
    incomingCall.answer(localStream.value)
    setupCallHandlers(incomingCall)

  } catch (error) {
    console.error('Failed to handle incoming call:', error)
    connectionError.value = `Failed to answer: ${error.message}`
    incomingCall.close()
  }
}

function setupCallHandlers(currentCall) {
  currentCall.on('stream', (remoteStream) => {

    if (remoteAudio.value) {
      // Ensure the remote stream has audio tracks
      const audioTracks = remoteStream.getAudioTracks()

      if (audioTracks.length > 0) {
        audioTracks.forEach(track => {
          track.enabled = true
        })
      } else {
        console.warn("No audio tracks in remote stream")
        return
      }

      try {
        // Set the remote stream and attempt playback
        remoteAudio.value.srcObject = remoteStream
        const playPromise = remoteAudio.value.play()

        if (playPromise !== undefined) {
          playPromise
            .then(() => {
              // Only set call as active if audio is playing
              callActive.value = true
              connectionStatus.value = 'Call connected'
              connectionError.value = ''
            })
            .catch(error => {
              console.error("Audio playback failed:", error)
              connectionError.value = 'Audio playback failed'
            })
        }
      } catch (error) {
        console.error("Error setting up audio:", error)
        connectionError.value = 'Failed to setup audio'
      }
    }
  })

  currentCall.on('close', () => {
    cleanup()
  })

  currentCall.on('error', (error) => {
    connectionError.value = `Call error: ${error.message}`
    cleanup()
  })
}

function cleanup() {
  // Stop all audio tracks
  if (localStream.value) {
    localStream.value.getTracks().forEach(track => track.stop())
    localStream.value = null
  }

  // Close the call
  if (call.value) {
    call.value.close()
    call.value = null
  }

  // Destroy the peer connection
  if (peer.value) {
    peer.value.destroy()
    peer.value = null
  }

  // Reset all state
  callActive.value = false
  isPeerConnected.value = false
  isConnecting.value = false
  connectionStatus.value = ''
  connectionError.value = ''
}

function endCall() {
  cleanup()
}
</script>
The code above defines 4 functions, let's go over each one.
startCall: This method is fired when a callee accepts a call. First, it prompts the user to give microphone permissions. Then the peerjs call method is to establish a peer to peer communication with the other user.handleIncomingCall: This method is fired when a user receives a call event(remember we defined it earlier). It prompts the user for microphone permissions and uses the answer method from peerjs to connect the the caller.setupCallhandlers: This method gets the remote stream i.e. the audio coming from the caller and connects it to the local stream(the callee audio) using track.enabled to unmute the remote audio.cleanUp: This function closes the connections and cleans up the remote audio whenever a user ends the call or if an error occurs.
Testing Voice Chat App
It's time to finally see our voice chat application in action.
Start your vue.js server by running the command below in your terminal.
npm run serveOnce the server is running, open the Firefox browser and navigate to the frontend URL shown in the terminal.
Log in as one user in a regular browser tab and as another user in an incognito tab. Call one user from a tab click accept on the other tab and start interacting in real time.
Below is a video demonstration of the chat application(audio silenced).
Github Code
Conclusion
In this article, you learnt how to build a real-time voice chat application with Strapi 5, Vue.js and WebRTC. This article provided a solid foundation for creating communication applications powered by WebRTC. With the skills you've learned, you can now build more sophisticated real-time applications.
Cheers to more learning!