Introduction
E-commerce websites have become increasingly popular due to their convenience and accessibility. They allow users to buy goods over the internet and have them delivered. In this tutorial, you will learn how to build an e-commerce website using SvelteKit and Strapi CMS.
Prerequisites
To follow along with this tutorial, ensure you meet the following criteria:
- Node installed on your computer
- Basic knowledge of working with SvelteKit.
Create a new Strapi project
To get started, let’s create a new Strapi project that will serve as the application backend. To do that, open your terminal, navigate to the directory where you want to install the project and run the command below.
npx create-strapi-app@latest my-project --quickstartAfter the project installation is completed, the application development server will start automatically. When you open the application in your browser, you will be required to create a new account.
After creating a new Strapi application account, you will be redirected to the application dashboard, as shown in the screenshot below.

Create Strapi Collection Types
Now, let’s create the Collection Types that define how the application's data is structured and managed. We will create the Product and cartItem collection types by following the steps below.
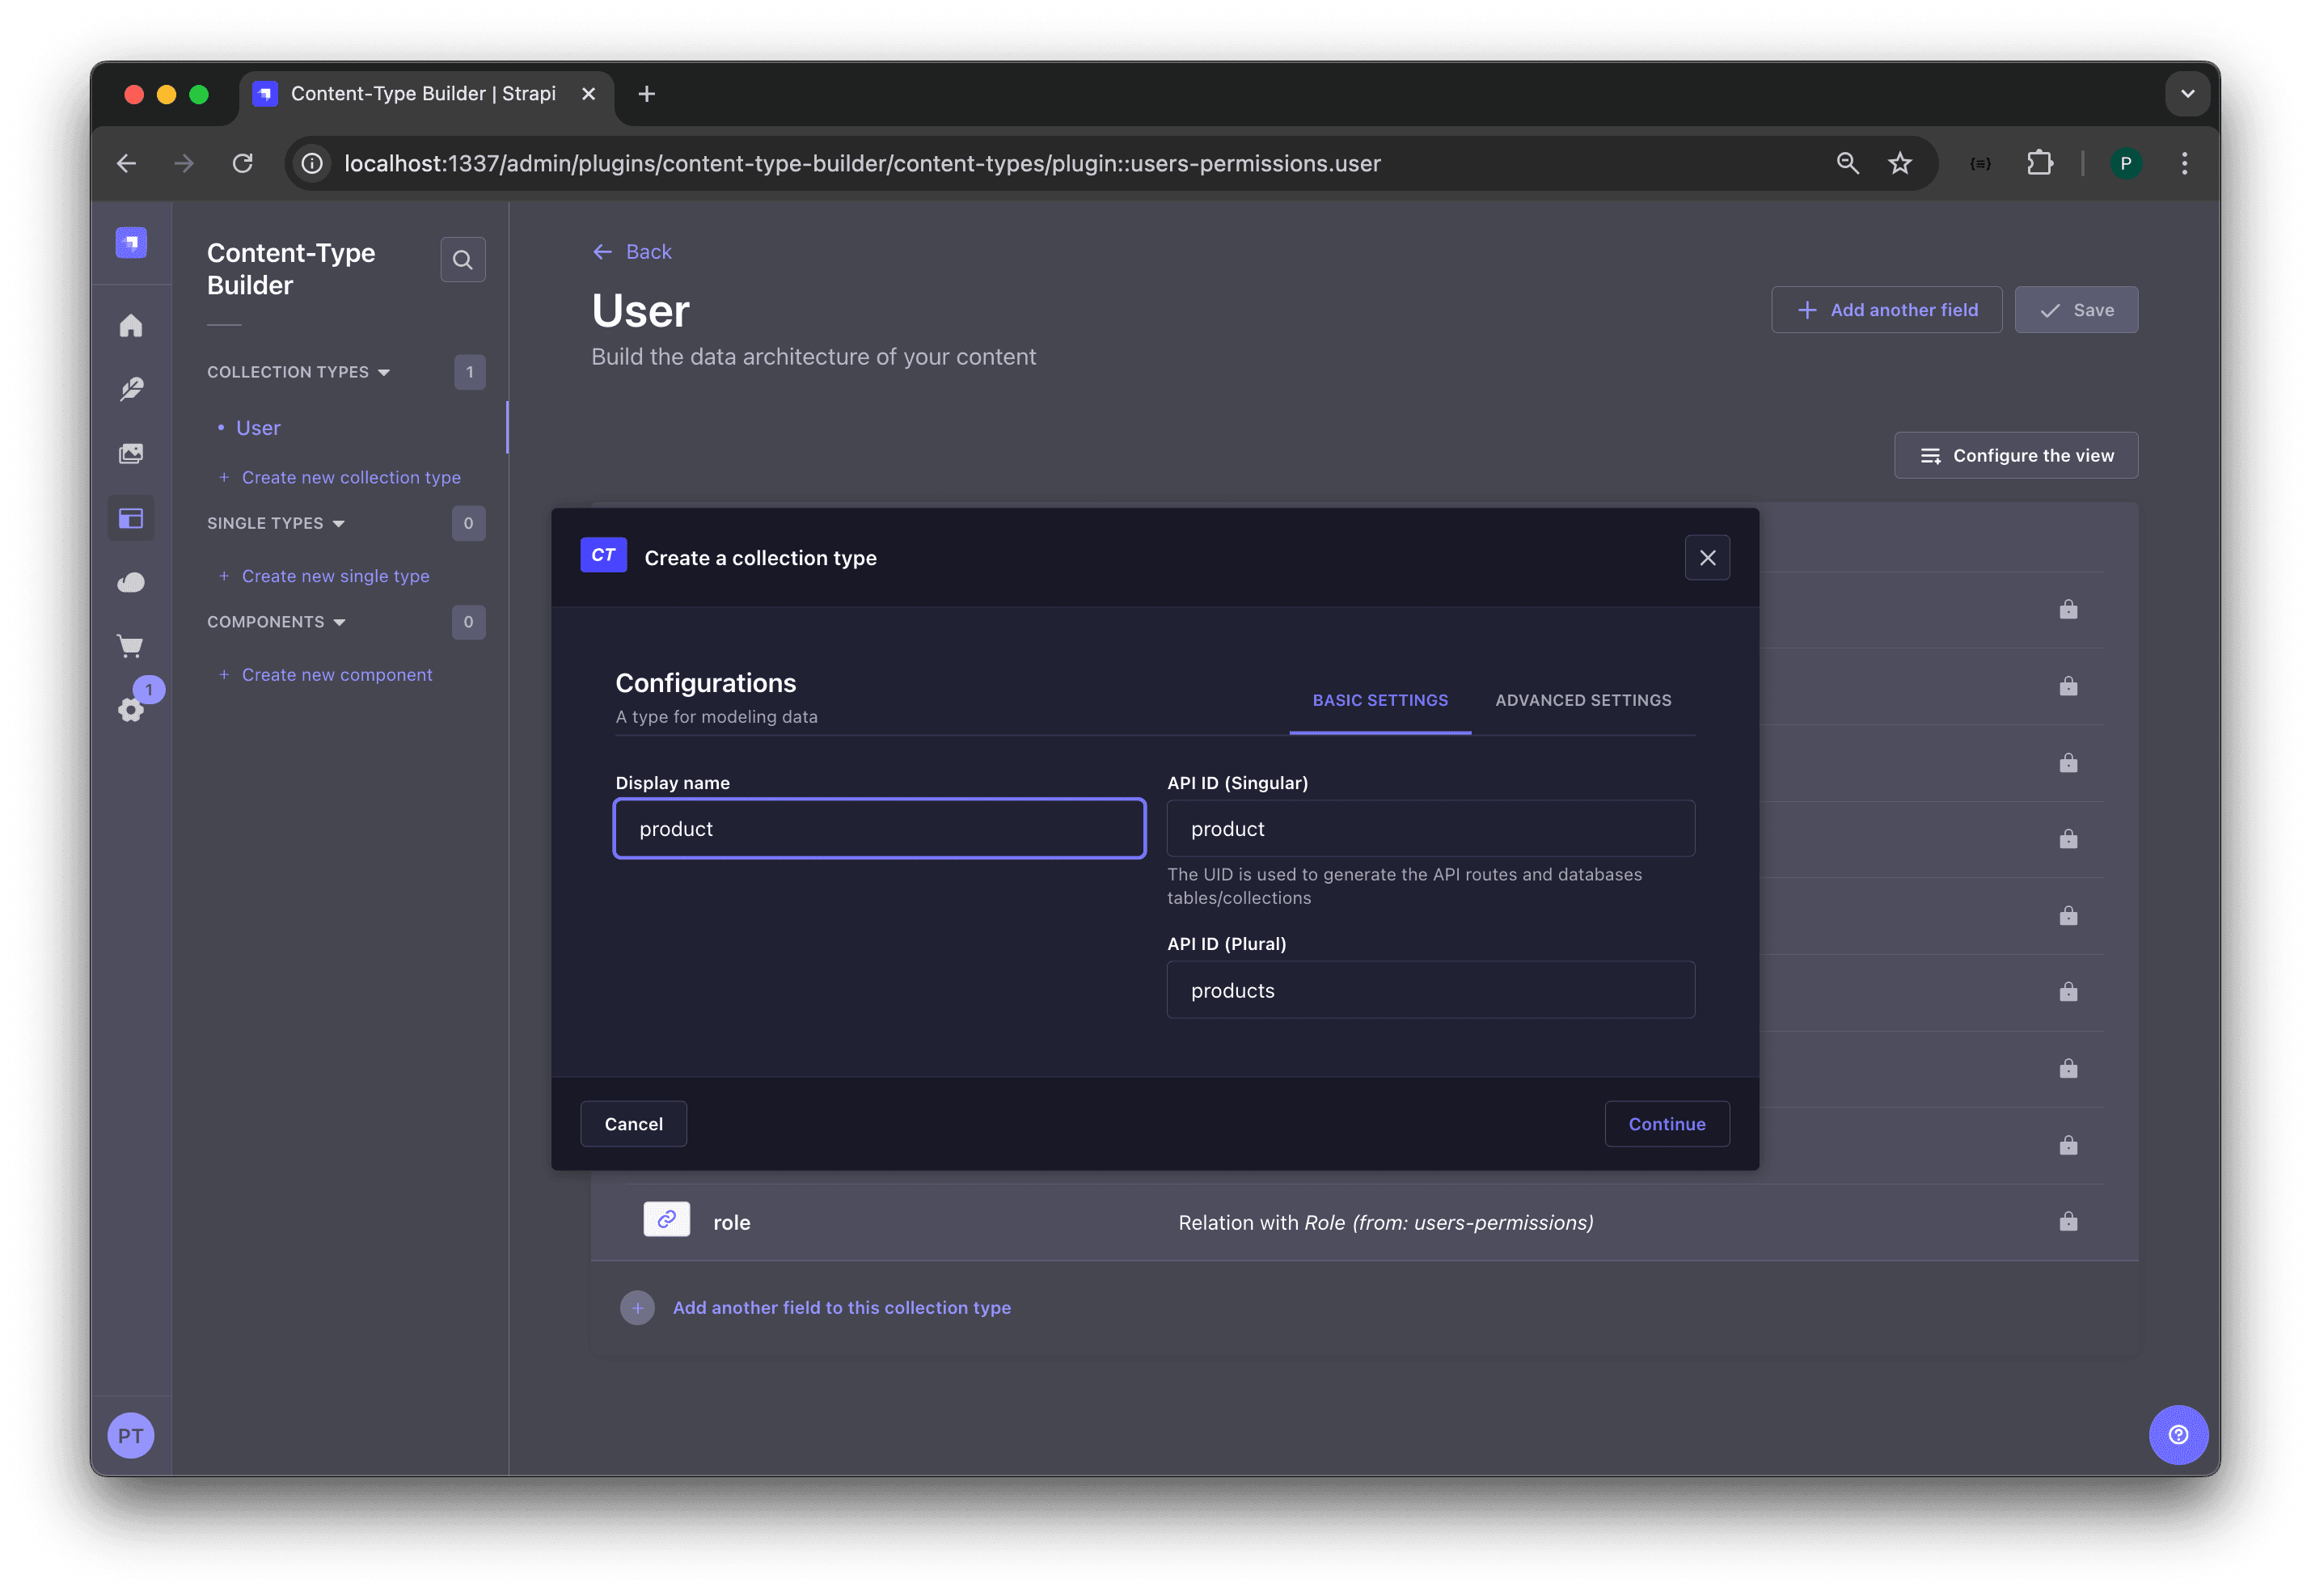
Step1: Create Product Collection Type
- From the Strapi dashboard side menu, click on Content-Type Builder under the PLUGINS section
- Then click on Create New Collection Type under the Collection Types section.
- a modal form will pop up to enter the Collection Type name, enter
productas the display name, and click on the "continue" button as shown in the screenshot below.
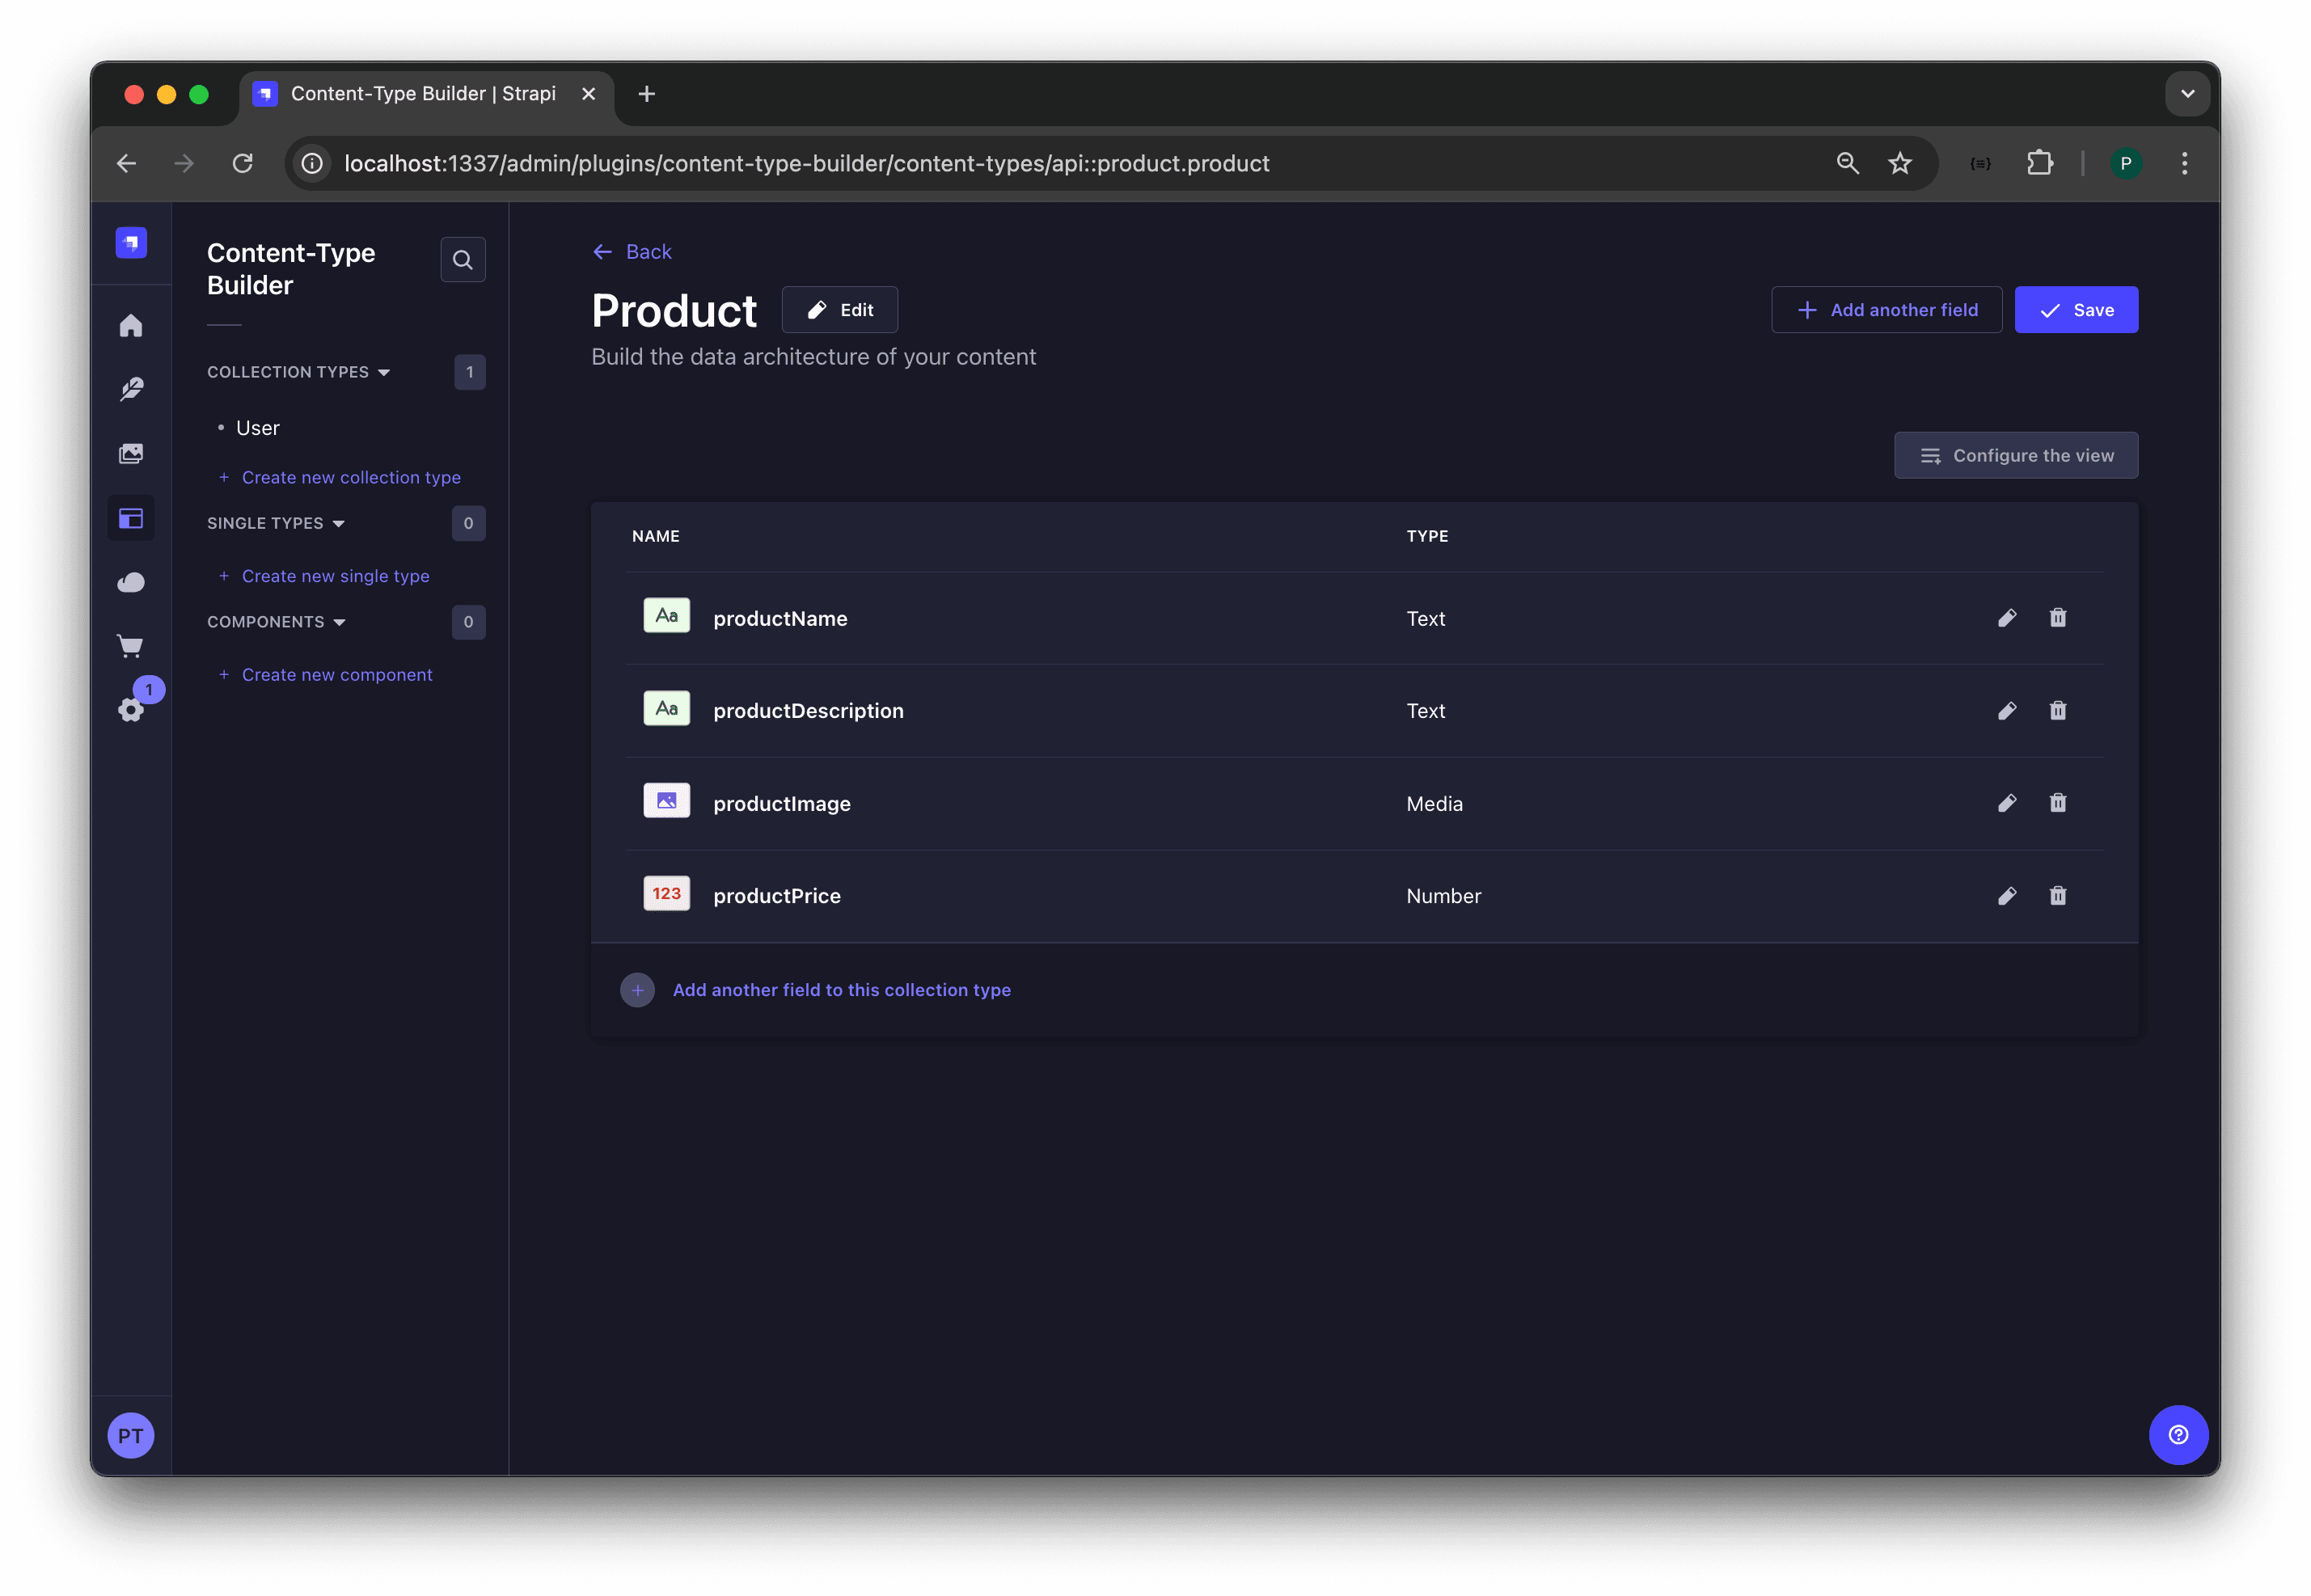
Step 2: Adding Fields to the project Collection Type
Next, let’s structure how data will be managed in the product collection type by adding the following fields:
productName: type→textproductDescription: type→textproductImage: type→ multiple mediaproductPrice: type→number
After adding the fields above, click the "Save" button, as shown in the screenshot below.
Repeat the above steps to create the collection type below.
CartItem collection type
Create a collection type named cartItem and add the following fields:
userID: type→numberproductID: type→text
Enable Strapi API Public Access
We need to enable public access for each to interact with the created collection types via an API call. To do this, navigate to Settings → Roles → Public from your Strapi side menu and select all operations for each collection type.

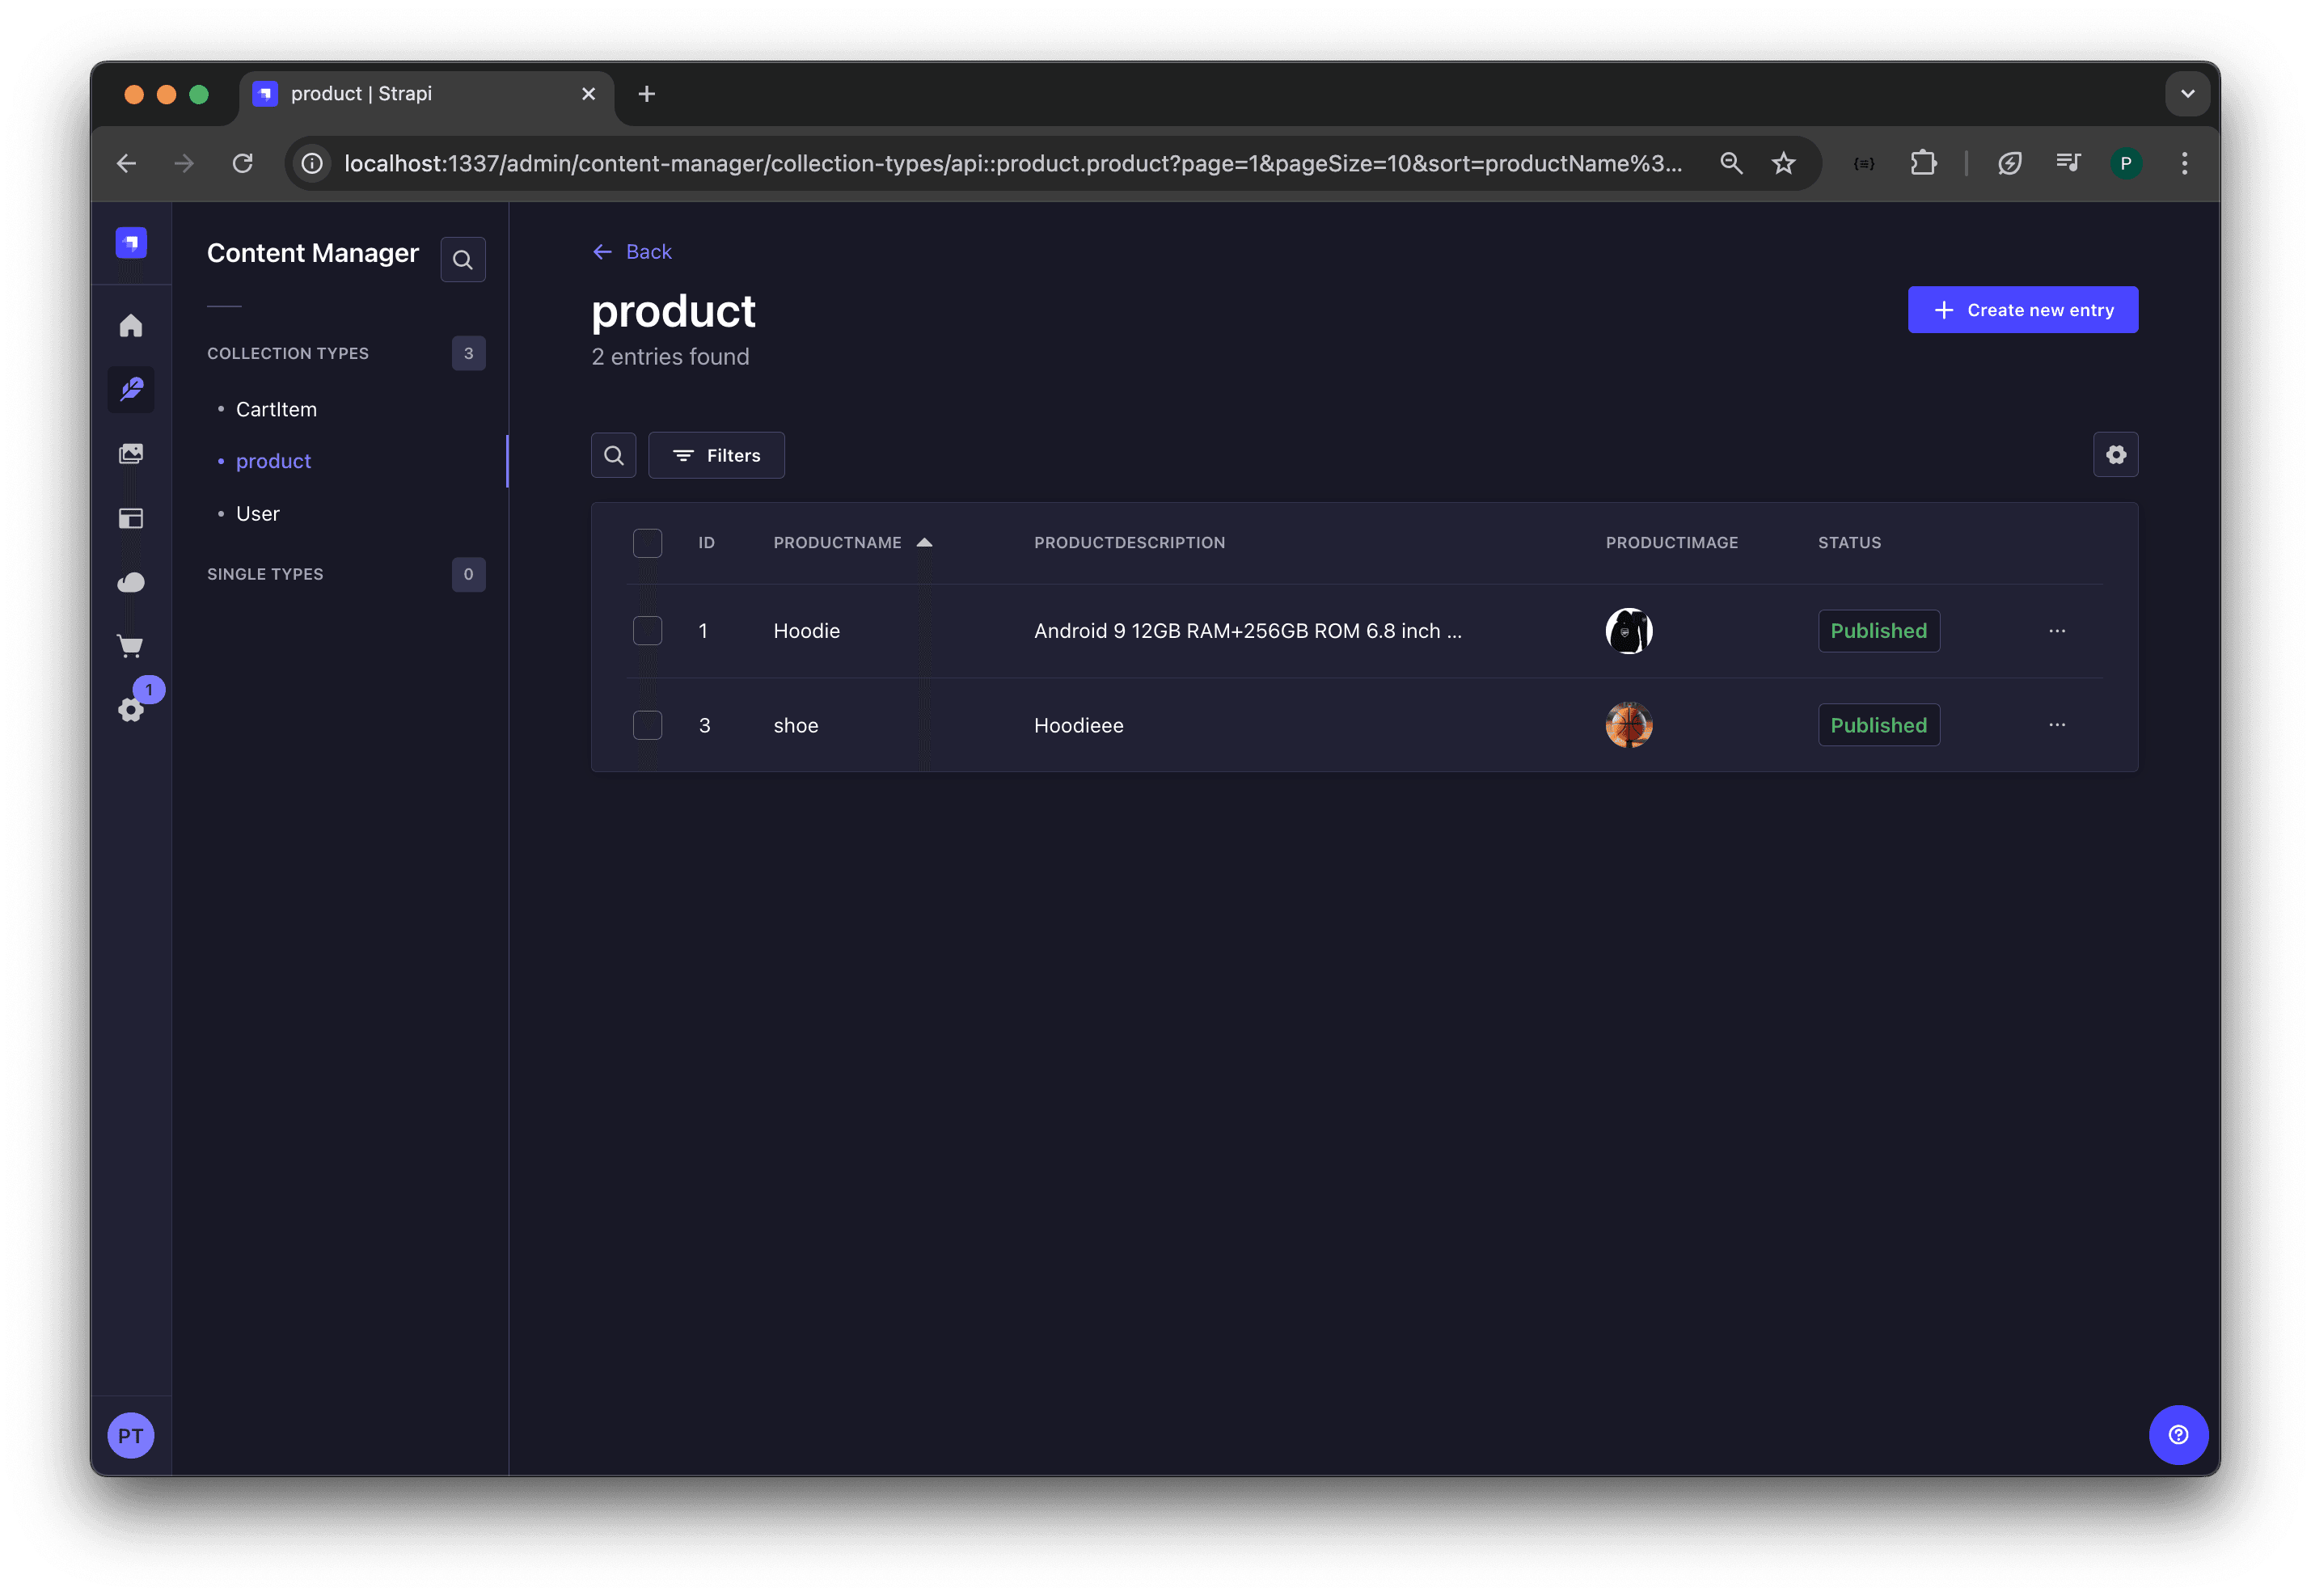
Create Entries in Strapi
Now, let’s add items to the Product collection type. To do this, navigate to the Content Manager from the side menu and click on the Product collection type. Then, add as many products as you like, as shown in the screenshot below.
Install strapi GraphQL plugin
In this project, we'll use the Strapi GraphQL plugin for user authentication. To install it, open a terminal in your project folder and run the following command.
npm install @strapi/plugin-graphqlCreate a new SvelteKit project
Now, let’s start creating the application frontend using SvelteKit. To scaffold a new SvelteKit project, run the command below.
npx degit sveltejs/template my-ecommerce-app
cd my-ecommerce-app
npm install
Install Svelte-routing
In this tutorial, we will use the Svelte-routing library to handle the application's page navigation. To install the library, run the command below:
npm install svelte-routingAfter the installation, open the project in your preferred code editor or IDE.
Creating SvelteKit Application UI
Now, let’s start creating the application functionalities and UI, such as the user authentication page, home page, and cart page. To create the application, follow the steps below.
Create SvelteKit Home page
The application's home page will display a list of all available products in the store for users to browse. To create this home page, navigate to the src folder in your project's root directory and create a new folder named Components to store the application’s component files. Inside the Components folder, create a file named Home.svelte and add the following code:
<!-- Home.svelte -->
<script>
import { onMount } from "svelte";
import { Link } from "svelte-routing";
import Navbar from "./Navbar.svelte";

let products = [];

onMount(async () => {
  try {
    const response = await fetch(
      "http://localhost:1337/api/products?populate=*",
    );
    const data = await response.json();
    products = data.data.map((item) => {
      const productImage = item.productImage[0]; // Access the first image
      const imageUrl = productImage.formats?.large?.url || productImage.url; // Use large format if available
      return {
        id: item.documentId,
        name: item.productName,
        description: item.productDescription,
        price: parseFloat(item.productPrice),
        imageUrl: imageUrl,
      };
    });
  } catch (error) {
    console.error("Error fetching products:", error);
  }
});
</script>

<Navbar />

<main>
      <h1>Main Store</h1>
      <div class="products">
        {#each products as product}
          <div class="product-card">
            <img
              src={`http://localhost:1337${product.imageUrl}`}
              alt={product.name}
            />
            <div class="details">
              <h2>{product.name}</h2>
              <p>{product.description}</p>
              <p class="price">${product.price.toFixed(2)}</p>
              <Link to={`/product/${product.id}`}>
                <button>View Product</button>
              </Link>
            </div>
          </div>
        {/each}
      </div>
    </main>

<style>
html,
body {
  margin: 0;
  padding: 0;
  width: 100%;
  height: 100%;
  overflow-x: hidden;
}

body {
  font-family: Arial, sans-serif;
  display: flex;
  flex-direction: column;
}

nav {
  background-color: #71b3bf;
  color: white;
  padding: 1em 0;
  width: 100%;
  box-sizing: border-box;
}

.nav-container {
  display: flex;
  justify-content: space-between;
  align-items: center;
  padding: 0 2em;
  max-width: 1200px;
  margin: 0 auto;
}

.nav-brand a {
  color: white;
  text-decoration: none;
  font-size: 1.5em;
  font-weight: bold;
}

.nav-links {
  display: flex;
  gap: 1em;
}

.nav-links a {
  color: white;
  text-decoration: none;
  font-size: 1em;
}

.nav-links a:hover {
  text-decoration: underline;
}

main {
  padding: 2em;
  width: 100%;
  box-sizing: border-box;
  flex: 1;
}

h1 {
  color: #ff3e00;
  text-transform: uppercase;
  font-size: 2.5em;
  font-weight: 300;
  margin-bottom: 1em;
}

.products {
  display: flex;
  flex-wrap: wrap;
  gap: 2em;
  justify-content: center;
}

.product-card {
  background: #fff;
  border: 1px solid #ddd;
  border-radius: 10px;
  box-shadow: 0 4px 6px rgba(0, 0, 0, 0.1);
  overflow: hidden;
  flex: 1 1 calc(33.333% - 2em);
  max-width: calc(33.333% - 2em);
  transition: transform 0.2s;
  box-sizing: border-box;
}

.product-card:hover {
  transform: scale(1.05);
}

.product-card img {
  width: 100%;
  height: 200px;
  object-fit: cover;
}

.details {
  padding: 1em;
  text-align: left;
}

.details h2 {
  margin: 0 0 0.5em;
  font-size: 1.5em;
  color: #333;
}

.details p {
  margin: 0;
  color: #666;
}

.price {
  margin-top: 0.5em;
  font-size: 1.2em;
  font-weight: bold;
  color: #ff3e00;
  padding-top: 10px;
}
button {
  background-color: transparent;
  color: #71b3bf;
  border: 1px solid #71b3bf;
  padding: 0.75em 1.5em;
  border-radius: 5px;
  cursor: pointer;
  font-size: 1em;
  transition: background-color 0.3s;
  margin-left: 30%;
  margin-top: 25px;
}

button:hover {
  background-color: #71b3bf;
  color: white;
  border: none;
}

@media (max-width: 768px) {
  .product-card {
    flex: 1 1 calc(50% - 2em);
    max-width: calc(50% - 2em);
  }
}

@media (max-width: 480px) {
  .product-card {
    flex: 1 1 100%;
    max-width: 100%;
  }
}
</style>
In the above code, the onMount method fetches all the available products from the backend by making a GET request to http://localhost:1337/api/products?populate=*. The products are then rendered in the user interface inside the main component.
Here is what the home page looks like:

Create SvelteKit Registration page
To create the registration page, in the src/Components directory, create a file named Register.svelte and add the following code to it:
<!-- Register.svelte -->
<script>
import { createEventDispatcher } from "svelte";
import { navigate } from "svelte-routing";
let email = "";
let username = "";
let password = "";
const dispatch = createEventDispatcher();
const handleRegister = async () => {
try {
const response = await fetch("http://localhost:1337/graphql", {
method: "POST",
headers: {
"Content-Type": "application/json",
},
body: JSON.stringify({
query: `
mutation {
register(input: {
username: "${username}",
email: "${email}",
password: "${password}"
}) {
jwt
user {
id
username
email
}
}
}
`,
}),
});
const responseData = await response.json();
if (responseData.errors) {
let errorMsg = "Registration failed";
if (responseData.errors[0]?.message) {
errorMsg = responseData.errors[0].message;
}
throw new Error(errorMsg);
}
alert(`Registered successfully.`);
navigate(`/login`);
} catch (error) {
alert(`Error: ${error.message}`);
}
};
const handleLoginLinkClick = () => {
navigate(`/login`);
};
</script>
<main>
<h1>Register</h1>
<form on:submit|preventDefault={handleRegister}>
<label>
Username:
<input type="text" bind:value={username} required>
</label>
<label>
Email:
<input type="email" bind:value={email} required>
</label>
<label>
Password:
<input type="password" bind:value={password} required>
</label>
<button type="submit">Register</button>
</form>
<p>Already have an account? <a href="login" on:click|preventDefault={handleLoginLinkClick}>Login</a></p>
</main>
<style>
main {
text-align: center;
padding: 1em;
max-width: 240px;
margin: 0 auto;
}
h1 {
color: #ff3e00;
text-transform: uppercase;
font-size: 2em;
font-weight: 100;
}
label {
display: block;
margin: 0.5em 0;
}
input {
width: 100%;
padding: 0.5em;
margin: 0.5em 0;
}
button {
padding: 0.5em 1em;
background-color: #ff3e00;
color: white;
border: none;
cursor: pointer;
}
button:hover {
background-color: #e63600;
}
p {
margin-top: 1em;
}
a {
color: #ff3e00;
text-decoration: none;
}
a:hover {
text-decoration: underline;
}
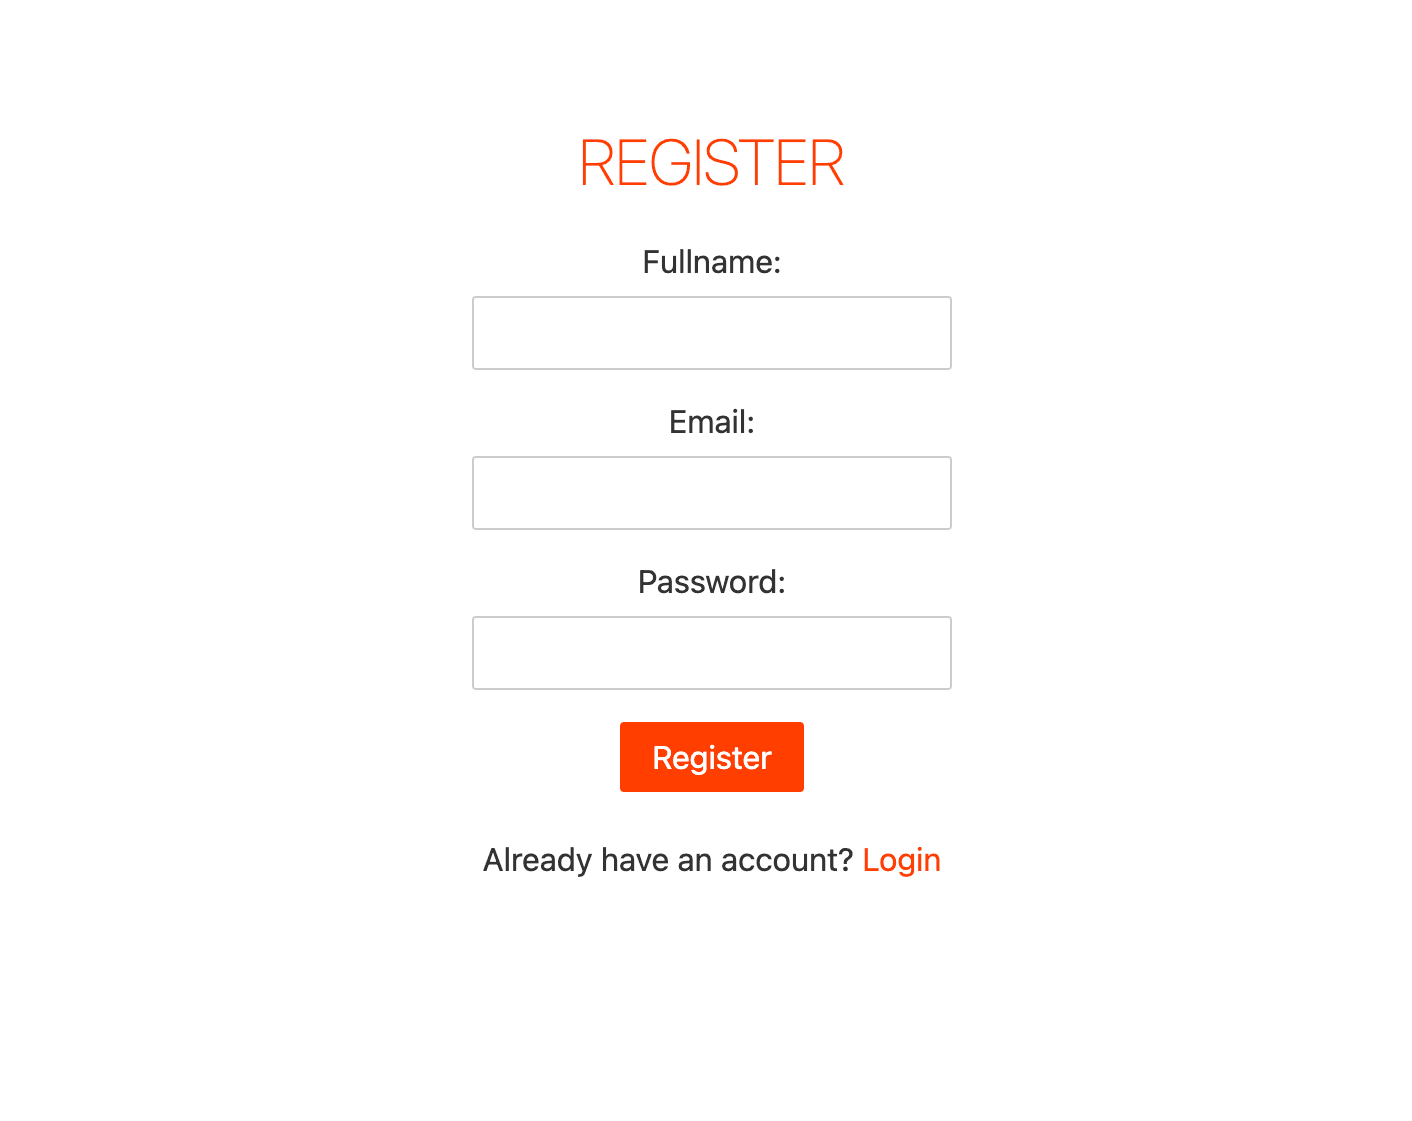
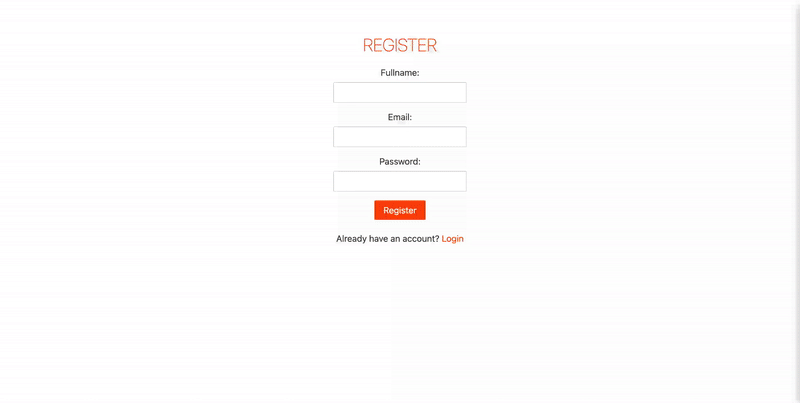
</style>From the code above, we create a registration form that accepts the user's information as input and stores it in the Strapi backend via an API call. Once the registration is successful, the user is redirected to the login page.
Below is what the registration page looks like:
Create SvelteKit Login Page
To create the login page, create a file named Login.svelte inside the Components folder and add the following code:
<!-- Login.svelte -->
<script>
import { createEventDispatcher } from "svelte";
import { navigate } from "svelte-routing";
let email = "";
let password = "";
const dispatch = createEventDispatcher();
const handleLogin = async () => {
try {
const response = await fetch("http://localhost:1337/graphql", {
method: "POST",
headers: {
"Content-Type": "application/json",
},
body: JSON.stringify({
query: `
mutation {
login(input: { identifier: "${email}", password: "${password}" }) {
jwt
user {
id
username
email
}
}
}
`,
}),
});
const responseData = await response.json();
if (responseData.errors) {
let errorMsg = "Login failed";
if (responseData.errors[0]?.message) {
errorMsg = responseData.errors[0].message;
}
throw new Error(errorMsg);
}
const user = responseData.data.login.user;
alert(`Logged in successfully`);
navigate(`/`);
// Set cookies for user data
document.cookie = `email=${user.email}; path=/; max-age=${7 * 24 * 60 * 60}`;
document.cookie = `username=${user.username}; path=/; max-age=${7 * 24 * 60 * 60}`;
document.cookie = `userId=${user.id}; path=/; max-age=${7 * 24 * 60 * 60}`;
} catch (error) {
alert(`Error: ${error.message}`);
}
};
const handleRegisterLinkClick = () => {
navigate(`/register`);
};
</script>
<main>
<h1>Login</h1>
<form on:submit|preventDefault={handleLogin}>
<label>
Email:
<input type="email" bind:value={email} required>
</label>
<label>
Password:
<input type="password" bind:value={password} required>
</label>
<button type="submit">Login</button>
</form>
<p>Don't have an account? <a href="#" on:click={handleRegisterLinkClick}>Register</a></p>
</main>
<style>
main {
text-align: center;
padding: 1em;
max-width: 240px;
margin: 0 auto;
}
h1 {
color: #ff3e00;
text-transform: uppercase;
font-size: 2em;
font-weight: 100;
}
label {
display: block;
margin: 0.5em 0;
}
input {
width: 100%;
padding: 0.5em;
margin: 0.5em 0;
}
button {
padding: 0.5em 1em;
background-color: #ff3e00;
color: white;
border: none;
cursor: pointer;
}
button:hover {
background-color: #e63600;
}
p {
margin-top: 1em;
}
a {
color: #ff3e00;
text-decoration: none;
}
a:hover {
text-decoration: underline;
}
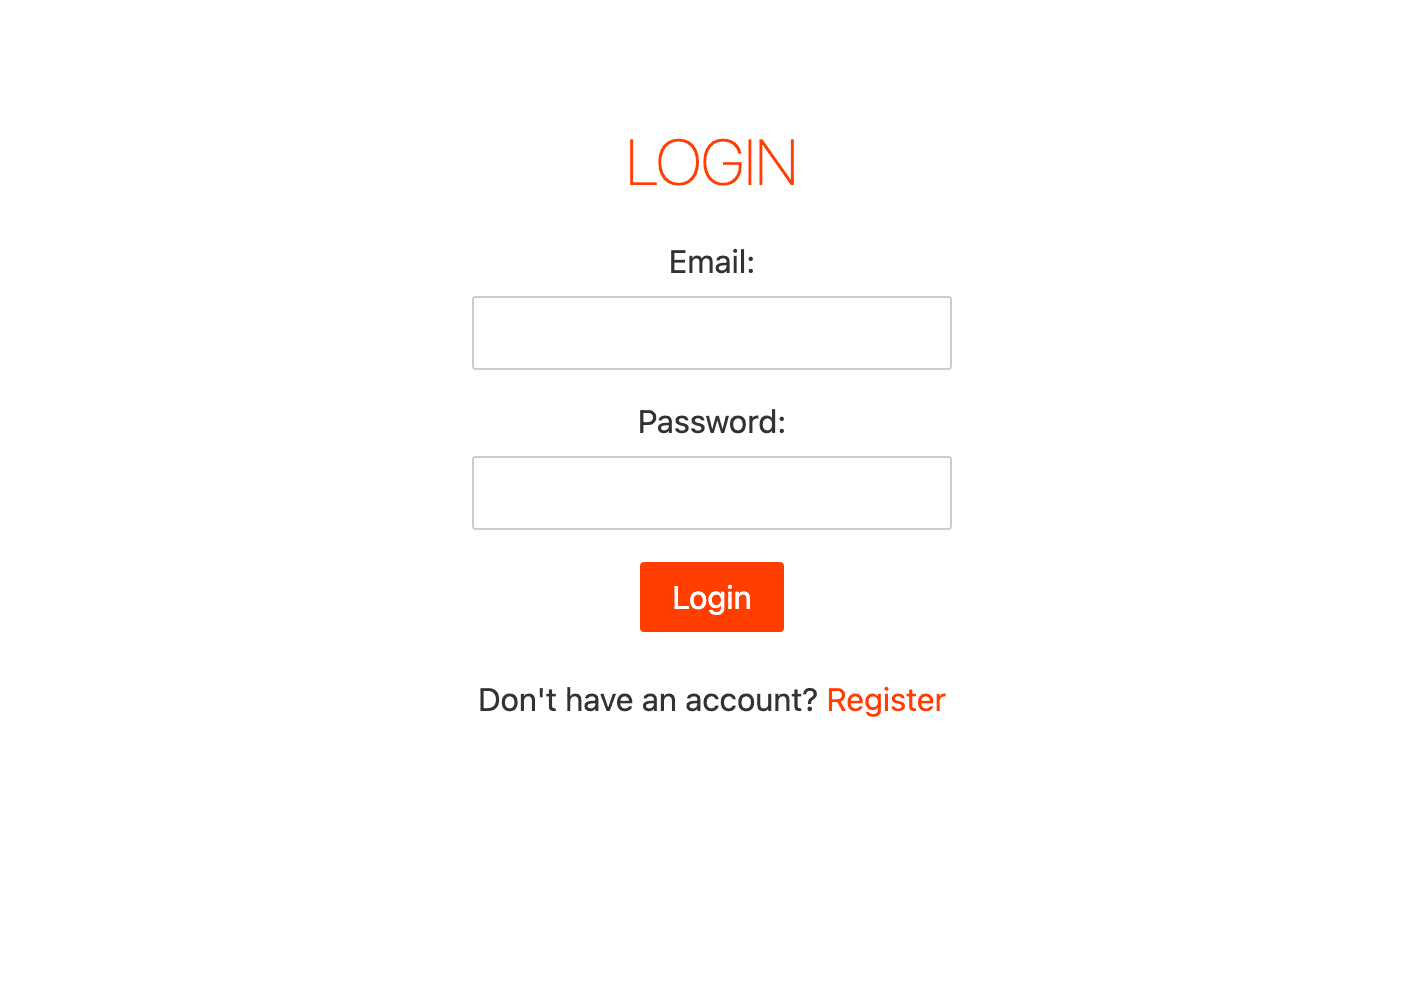
</style>In the code above, we create a login form that accepts the user's email and password as input. If the login details are correct, the user's details are stored in cookies; otherwise, a login error is displayed for the user.
Here is what the login page looks like:
Create SvelteKit Product Preview Page
Now, let’s create the product preview page showing more details about each product. To do this, create a file named Product.svelte inside the Components folder and add the following code:
<script>
import { onMount } from "svelte";
import { Link, navigate } from "svelte-routing";
import Navbar from "./Navbar.svelte";
export let id;
let product = null;
let userId = getCookie("userId");
let successMessage = "";
let errorMessage = "";
function getCookie(name) {
const value = `; ${document.cookie}`;
const parts = value.split(`; ${name}=`);
if (parts.length === 2) return parts.pop().split(";").shift();
}
onMount(async () => {
if (!userId) {
navigate("/login");
} else {
try {
const response = await fetch(
`http://localhost:1337/api/products/${id}?populate=*`,
);
if (!response.ok) throw new Error("Failed to fetch product");
const data = await response.json();
const attributes = data.data;
const productImage =
attributes.productImage[0]?.formats?.large?.url ||
attributes.productImage[0]?.url;
product = {
id: attributes.id,
name: attributes.productName,
description: attributes.productDescription,
price: parseFloat(attributes.productPrice),
imageUrl: productImage ? `http://localhost:1337${productImage}` : null,
};
} catch (error) {
errorMessage = "Error fetching product details.";
console.error("Error fetching product:", error);
}
}
});
const addToCart = async () => {
try {
const response = await fetch(`http://localhost:1337/api/cart-items`, {
method: "POST",
headers: {
"Content-Type": "application/json",
},
body: JSON.stringify({
data: {
userID: userId,
productID: id,
},
}),
});
if (!response.ok) {
throw new Error("Error adding product to cart.");
}
successMessage = "Product added to cart successfully!";
setTimeout(() => (successMessage = ""), 3000); // Clear message after 3 seconds
} catch (error) {
console.error("Error adding product to cart:", error);
errorMessage = "Failed to add product to cart.";
}
};
</script>
<Navbar />
<main>
{#if errorMessage}
<p class="error-message">{errorMessage}</p>
{/if}
{#if product}
<div class="product-container">
{#if product.imageUrl}
<img src={product.imageUrl} alt={product.name} />
{/if}
<div class="product-details">
<h1>{product.name}</h1>
<p>{product.description}</p>
<p class="price">${product.price.toFixed(2)}</p>
<button on:click={addToCart}>Add to Cart{userId}</button>
{#if successMessage}
<p class="success-message">{successMessage}</p>
<p><Link to="/cart/">View Cart</Link></p>
{/if}
<p><Link to="/">Back to Home</Link></p>
</div>
</div>
{:else}
<p>Product not found</p>
{/if}
</main>
<style>
html,
body {
margin: 0;
padding: 0;
width: 100%;
height: 100%;
overflow-x: hidden;
font-family: Arial, sans-serif;
}
body {
display: flex;
flex-direction: column;
align-items: center;
justify-content: center;
}
main {
display: flex;
justify-content: center;
align-items: center;
width: 100%;
height: 100%;
box-sizing: border-box;
padding: 2em;
background-color: #f9f9f9;
}
.product-container {
display: flex;
flex-direction: column;
align-items: center;
background: #fff;
border: 1px solid #ddd;
border-radius: 10px;
box-shadow: 0 4px 6px rgba(0, 0, 0, 0.1);
overflow: hidden;
max-width: 600px;
width: 100%;
box-sizing: border-box;
padding: 2em;
}
.product-container img {
width: 50%;
height: auto;
border-bottom: 1px solid #ddd;
margin-bottom: 1em;
}
.product-details {
text-align: center;
}
h1 {
color: #ff3e00;
text-transform: uppercase;
font-size: 2em;
font-weight: 300;
margin: 0 0 1em;
}
p {
font-size: 1em;
color: #666;
margin: 0 0 1em;
}
.price {
font-size: 1.5em;
font-weight: bold;
color: #ff3e00;
margin: 0.5em 0;
}
button {
background-color: #ff3e00;
color: white;
border: none;
padding: 0.75em 1.5em;
border-radius: 5px;
cursor: pointer;
font-size: 1em;
transition: background-color 0.3s;
}
button:hover {
background-color: #e03500;
}
.success-message {
color: green;
font-weight: bold;
margin-top: 1em;
}
a {
color: #ff3e00;
text-decoration: none;
font-size: 1em;
}
a:hover {
text-decoration: underline;
}
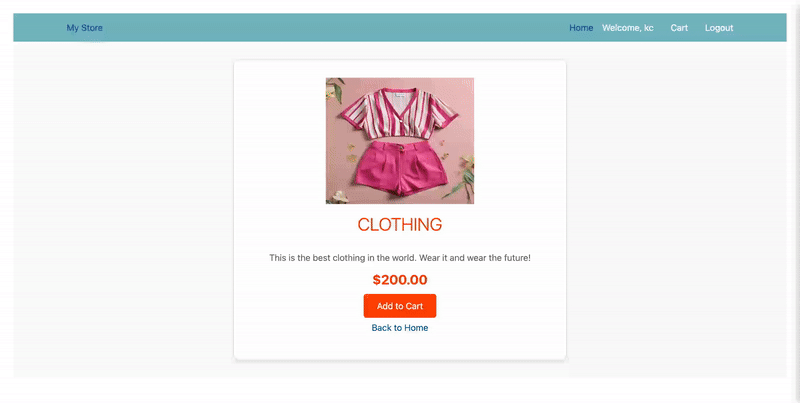
</style>From the code above, we fetch the details of a product from the Strapi endpoint using the product ID and render the product details, allowing the user to add the product to the cart.
From the image below, we can see the details of a product.

Create SvelteKit Cart Page
To create the cart page, create a file named Cart.svelte and add the following code to it:
<script>
import { onMount } from "svelte";
import { navigate } from "svelte-routing";
import { Link } from "svelte-routing";
import Navbar from "./Navbar.svelte";

// Helper function to get cookie values
function getCookie(name) {
  const value = `; ${document.cookie}`;
  const parts = value.split(`; ${name}=`);
  if (parts.length === 2) return parts.pop().split(";").shift();
}

let userId = getCookie("userId");
let cart = [];
let message = "";

// Fetch cart items for the logged-in user
const fetchCartItems = async () => {
  try {
    const cartResponse = await fetch(`http://localhost:1337/api/cart-items`);
    const cartData = await cartResponse.json();
    // Filter cart items based on the user's ID
    const userCartItems = cartData.data.filter((item) => item.userID == userId);

    // Fetch product details for each cart item
    const products = await Promise.all(
      userCartItems.map(async (item) => {
        const productResponse = await fetch(
          `http://localhost:1337/api/products/${item.productID}?populate=*`,
        );
        const productData = await productResponse.json();
        const attributes = productData.data;

        // Fetch appropriate image URL (large, medium, or fallback to default URL)
        const imageUrl =
          attributes.productImage[0]?.formats?.large?.url ||
          attributes.productImage[0]?.url;

        return {
          id: attributes.documentId, // Using documentId from the product data
          item_id: item.documentId, // Item documentId from the cart item
          name: attributes.productName,
          description: attributes.productDescription,
          price: parseFloat(attributes.productPrice),
          imageUrl: `http://localhost:1337${imageUrl}`, // Construct full image URL
        };
      }),
    );
    cart = products;
  } catch (error) {
    console.error("Error fetching cart items:", error);
  }
};

// Function to delete an item from the cart
const deleteItem = async (cartItemId) => {
  try {
    const response = await fetch(
      `http://localhost:1337/api/cart-items/${cartItemId}`,
      {
        method: "DELETE",
      },
    );
    if (response.ok) {
      console.log(`Item ${cartItemId} deleted successfully.`);
      cart = cart.filter((product) => product.item_id !== cartItemId); // Update cart locally
      message = "Item removed successfully!";
      setTimeout(() => (message = ""), 3000);
    } else {
      console.error(`Failed to delete item ${cartItemId}.`);
      message = "Failed to remove item.";
      setTimeout(() => (message = ""), 3000);
    }
  } catch (error) {
    console.error("Error deleting item:", error);
    message = "Error removing item.";
    setTimeout(() => (message = ""), 3000);
  }
};

// onMount function to fetch cart items when the component is mounted
onMount(() => {
  if (!userId) {
    navigate("/login"); // Redirect to login if userId is not found
  } else {
    fetchCartItems();
  }
});

// Handle purchase logic
const handlePurchase = () => {
  alert("You will be redirected to a payment gateway");
  navigate("/");
};

// Calculate total price of items in the cart
$: totalPrice = cart
  .reduce((total, product) => total + product.price, 0)
  .toFixed(2);
</script>

<Navbar />
<main>
  {#if cart.length > 0}
    <div class="checkout-container">
      <h1>Cart</h1>
      <ul class="product-list">
        {#if message}
          <div class="message">{message}</div>
        {/if}
        {#each cart as product}
          <li class="product-item">
            <img src={product.imageUrl} alt={product.name} />
            <div class="product-details">
              <p><strong>{product.name}</strong></p>
              <p>{product.description}</p>
              <p>Price: ${product.price.toFixed(2)}</p>
            </div>
            <button
              class="delete-button"
              on:click={() => deleteItem(product.item_id)}>Remove</button
            >
          </li>
        {/each}
      </ul>
      <div class="total-price">
        <p><strong>Total Price: ${totalPrice}</strong></p>
      </div>
      <button on:click={handlePurchase}>Check Out</button>
      <p><Link to="/">Back to Home</Link></p>
    </div>
  {:else}
    <p>Your cart is empty</p>
  {/if}
</main>

<style>
html,
body {
  margin: 0;
  padding: 0;
  width: 100%;
  height: 100%;
  overflow-x: hidden;
  font-family: Arial, sans-serif;
}

body {
  display: flex;
  flex-direction: column;
  align-items: center;
  justify-content: center;
}

main {
  display: flex;
  justify-content: center;
  align-items: center;
  width: 100%;
  height: 100%;
  box-sizing: border-box;
  padding: 2em;
  background-color: #f9f9f9;
}

.checkout-container {
  display: flex;
  flex-direction: column;
  align-items: center;
  background: #fff;
  border: 1px solid #ddd;
  border-radius: 10px;
  box-shadow: 0 4px 6px rgba(0, 0, 0, 0.1);
  padding: 2em;
  max-width: 600px;
  width: 100%;
  box-sizing: border-box;
}

.checkout-container h1 {
  color: #ff3e00;
  text-transform: uppercase;
  font-size: 2em;
  font-weight: 300;
  margin: 0 0 1em;
}

.product-list {
  list-style: none;
  padding: 0;
  margin: 0 0 2em;
  width: 100%;
}

.product-item {
  display: flex;
  align-items: center;
  border-bottom: 1px solid #ddd;
  padding: 1em 0;
}

.product-item img {
  width: 150px;
  height: auto;
  margin-right: 1em;
  border-radius: 5px;
}

.product-details {
  flex-grow: 1;
}

.product-details p {
  margin: 0.5em 0;
  font-size: 1em;
  color: #666;
}

.total-price {
  font-size: 1.2em;
  font-weight: bold;
  margin-bottom: 1em;
}

button {
  background-color: #ff3e00;
  color: white;
  border: none;
  padding: 0.75em 1.5em;
  border-radius: 5px;
  cursor: pointer;
  font-size: 1em;
  transition: background-color 0.3s;
  margin-bottom: 1em;
}

button:hover {
  background-color: #e03500;
}

a {
  color: #ff3e00;
  text-decoration: none;
  font-size: 1em;
}

a:hover {
  text-decoration: underline;
}

.delete-button {
  background-color: #e03500;
  color: white;
  border: none;
  padding: 0.5em 1em;
  border-radius: 5px;
  cursor: pointer;
  font-size: 0.9em;
  transition: background-color 0.3s;
  margin-left: 1em;
}

.delete-button:hover {
  background-color: #d02e00;
}

.message {
  background-color: #dff0d8;
  color: #3c763d;
  padding: 1em;
  border-radius: 5px;
  margin-bottom: 1em;
  font-size: 1em;
  text-align: center;
  width: 100%;
  max-width: 600px;
}
</style>
From the code above, we fetch all the products in the cart and display them on the page. We also calculate the total price by summing up the prices of all the products in the cart.
Here is a demo of how the cart functionality works.
Wrapping up
To wrap up the application, let’s create the application navbar component. Inside the Components folder, create a file named Navbar.svelte and add the following code to it:
<script>
import { Link, navigate } from "svelte-routing";

function getCookie(name) {
  const value = `; ${document.cookie}`;
  const parts = value.split(`; ${name}=`);
  if (parts.length === 2) return parts.pop().split(";").shift();
}

const email = getCookie("email");
const username = getCookie("username");
const userId = getCookie("userId");

const handleLogout = () => {
  document.cookie = "email=; path=/; max-age=0";
  document.cookie = "username=; path=/; max-age=0";
  document.cookie = "userId=; path=/; max-age=0";
  navigate("/login");
};
</script>

<nav>
        <div class="nav-container">
            <div class="nav-brand">
                <Link to="/">My Store</Link>
            </div>
            <div class="nav-links">
                <Link to="/">Home</Link>
                {#if email}
                    <span>Welcome, {username}</span>
                    <Link to="/cart/w"><span class="meun">Cart</span></Link>
                    <a href="#" on:click|preventDefault={handleLogout}>Logout</a>
                {:else}
                    <Link to="/login">Login</Link>
                    <Link to="/register">Register</Link>
                {/if}
            </div>
        </div>
      </nav>

<style>
nav {
  background-color: #71b3bf;
  color: white;
  padding: 1em 0;
  width: 100%;
  box-sizing: border-box;
}

.nav-container {
  display: flex;
  justify-content: space-between;
  align-items: center;
  padding: 0 2em;
  max-width: 1200px;
  margin: 0 auto;
}

.nav-brand a {
  color: white;
  text-decoration: none;
  font-size: 1.5em;
  font-weight: bold;
}

.nav-links {
  display: flex;
  gap: 1em;
}

.nav-links a,
.nav-links span {
  color: white;
  text-decoration: none;
  font-size: 1em;
}

.nav-links span {
  font-size: 1em;
}
.meun {
  padding: 15px;
}
.meun:hover {
  background-color: #71b3bf;
}
</style>
Here is a demo of our Cart functionality.
Configure SvelteKit Application Route
Next, let’s configure the application route. Inside the src folder, open the App.svelte file and replace its code with the following:
<!-- App.svelte -->
<script>
import { Router, Link, Route } from "svelte-routing";
import Home from "./Components/Home.svelte";
import Login from "./Components/Login.svelte";
import Register from "./Components/Register.svelte";
import Product from "./Components/Product.svelte";
import Cart from "./Components/Cart.svelte";
</script>

<main>
		<Router>
		  <Route path="/" component="{Home}" />
		  <Route path="login" component="{Login}" />
		  <Route path="register" component="{Register}" />
		  <Route path="product/:id" component="{Product}" />
		  <Route path="cart/:id" component="{Cart}" />
		</Router>
	  </main>

<style>
main {
  text-align: center;
  padding: 1em;
  max-width: 100%;
  margin: 0 auto;
}
</style>
Test the application
Start the Svelte development server by running the command below in your terminal to test the application.
npm run devNext, open your browser and go to http://localhost:8080. You should see the application functioning as shown in the GIF image below.
Conclusion
In this tutorial, we learned the complete process, from setting up the backend with Strapi to developing the frontend with SvelteKit to create an e-commerce website.
Building an e-commerce website with SvelteKit and Strapi CMS offers a powerful and flexible solution for creating dynamic and responsive online stores.