

Introduction
Security is one of the most important things web applications and APIs have to address. API security encompasses quite an array of tactics, one of which includes rate limiting. In this article, you will learn how to set rate limits in Strapi 5, a headless CMS that is both flexible and open-source.
Rate limiting is simply the process of controlling the number of requests a specific client can make to your API within a given time period. This is important to the security of your API, especially in the following aspects:
- Protection against abuse
- Fairness
- Protection against some types of attack such as DDoS.
Strapi does not limit the choice of methods for enabling rate limits, and we will consider several ways how you can use it to your advantage.
Prerequisites
The following are required to get the best out of this tutorial:
- Node.Js installation on our local machine.
- A Good understanding of Strapi.
- A New Strapi 5 Project:
npx create-strapi-app@rc my-project --quickstart.
Understanding Rate Limiting
Rate limiting is a way of limiting how many requests a client makes to an API within a specified amount of time. For instance, you may only allow a client to make no more than 100 requests in a minute. This technique will ensure that you do not overload your API while at the same time ensuring that the server resources are shared among all the clients.
Common Use Cases for Rate Limiting
Rate limiting is necessary for several reasons. It helps prevent overuse of your API and treats users fairly in terms of access to the service. Let's look at a few use cases where rate limiting is helpful.
- It limits the number of requests a user can make within a period so as not to spam or overload your system.
- It precludes crashes on your infrastructure by preventing sudden spikes in traffic.
- It consumes your API and provides equal opportunities to each of your clients.
- Rate limiting delays and blocking malicious traffic.
Benefits of Implementing Rate Limiting
In addition to preventing abuse, rate limiting brings a few significant benefits:
- It improves the stability and availability of your API, which will make it more reliable for all users.
- Saves server costs through unwanted traffic regulation, preventing unnecessary load on your infrastructure.
- Better security against brute force and DDoS attacks are just some of the ways attacks could be performed.
Rate Limiting Methods
There are several other rate-limiting strategies, which are as follows.
- Fixed Window: Requests in a fixed period get piled up and are then cumulatively labeled as pending. Example: One hundred requests per minute.
- Sliding Window: It offers a rolling time window, It offers better tracking of the requests’ progress.
- Token Bucket: The clients are issued tokens which get refilled after sometime while each request makes one token.
- Leaky Bucket: API Calls are addressed regardless of their frequency in predetermined portions of a given period.
Approaches to Implement Rate Limiting in Strapi v5
Strapi allows for various approaches to limiting rates. All the approaches have their advantages depending on the kind of project that you are working on. Here are various ways that you can follow to implement rate limiting.
- Koa Packages Directly
- Strapi Global Middleware
- Strapi Route Middleware
- Using Strapi Policy
- Using Redis for Rate Limiting
- Using Express Limiter with Strapi
- With Third-party Services, e.g., Cloudflare for Rate Limiting in Strapi
Before you start using any of the approcahes above, create an Article content-type in your Strapi backend.
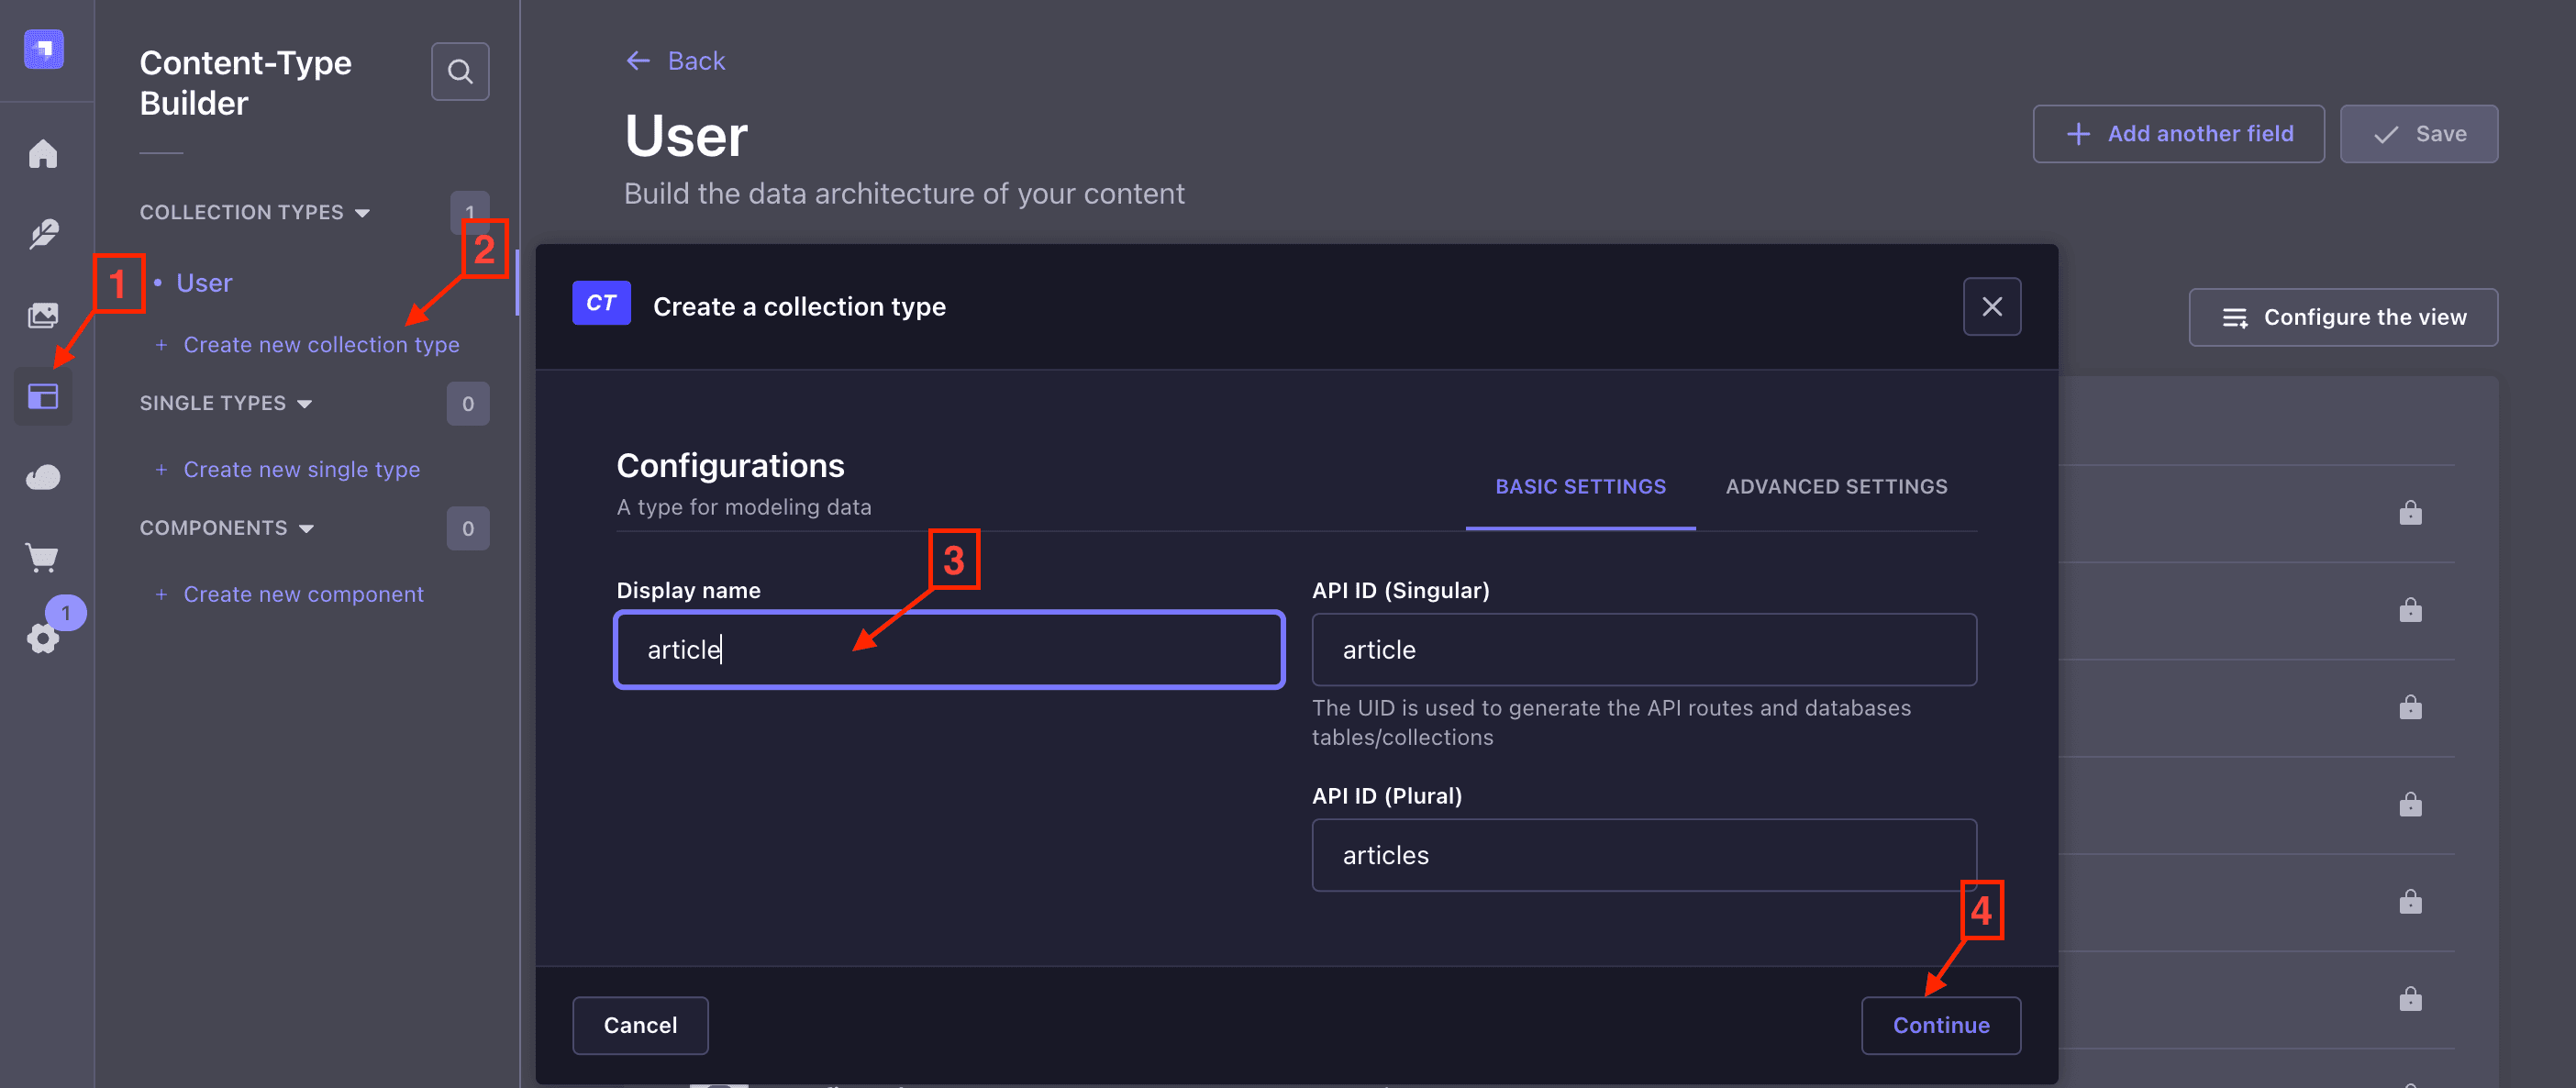
Add some fields to the Article collection and you are set. This content-type will be used for the demonstrations.
Using Koa Packages Directly
Since Strapi is built on top of Koa, the library will bring some of the optimizations and improvements of Koa to Strapi. For example, if you are using Koa, you can use Koa-specific packages for rate limiting such as koa2-ratelimit. You can set up rate limiting at the global level, meaning for your whole Strapi server application, or you can use route-level middleware to only have rate limiting enabled on the specific routes that you want.
First, navigate to your project folder on your command line and install the package with the command:
npm install koa2-ratelimitUsing Strapi Global Middleware with koa2-ratelimit
Strapi middleware intercepts requests before the request reaches the controller, making it ideal to implement rate limiting for all routes in the application. To implement rate globally, create a middlewares folder in the src folder of your application. Then create a rate-limit.ts file and add the code snippet below:
import { RateLimit } from "koa2-ratelimit";
import type { Core } from "@strapi/strapi";
import { Context, Next } from "koa";

export default (_config: any, { }: { strapi: Core.Strapi }) => {
  return async (ctx: Context, next: Next) => {
    return RateLimit.middleware({
      interval: { min: 5 }, // 5 minute
      max: 100, // limit each IP to 100 requests per minute
      message: "Too many requests, please try again later.",
      headers: true,
    })(ctx, next);
  };
};
This code used the fixed window rate Limiting method that restricts all the clients to 100 requests for every five minute for all the requests to your APIs and your Strapi admin account. By setting headers to true we are informing the clients about their remaining quota and reset time.
Now enable the rate-limiting middleware in Strapi’s configuration:
//config/middlewares.ts
export default [
"strapi::logger",
"strapi::errors",
"strapi::security",
"strapi::cors",
"strapi::poweredBy",
"strapi::query",
"strapi::body",
"strapi::session",
"strapi::favicon",
"strapi::public",
"global::rateLimit",
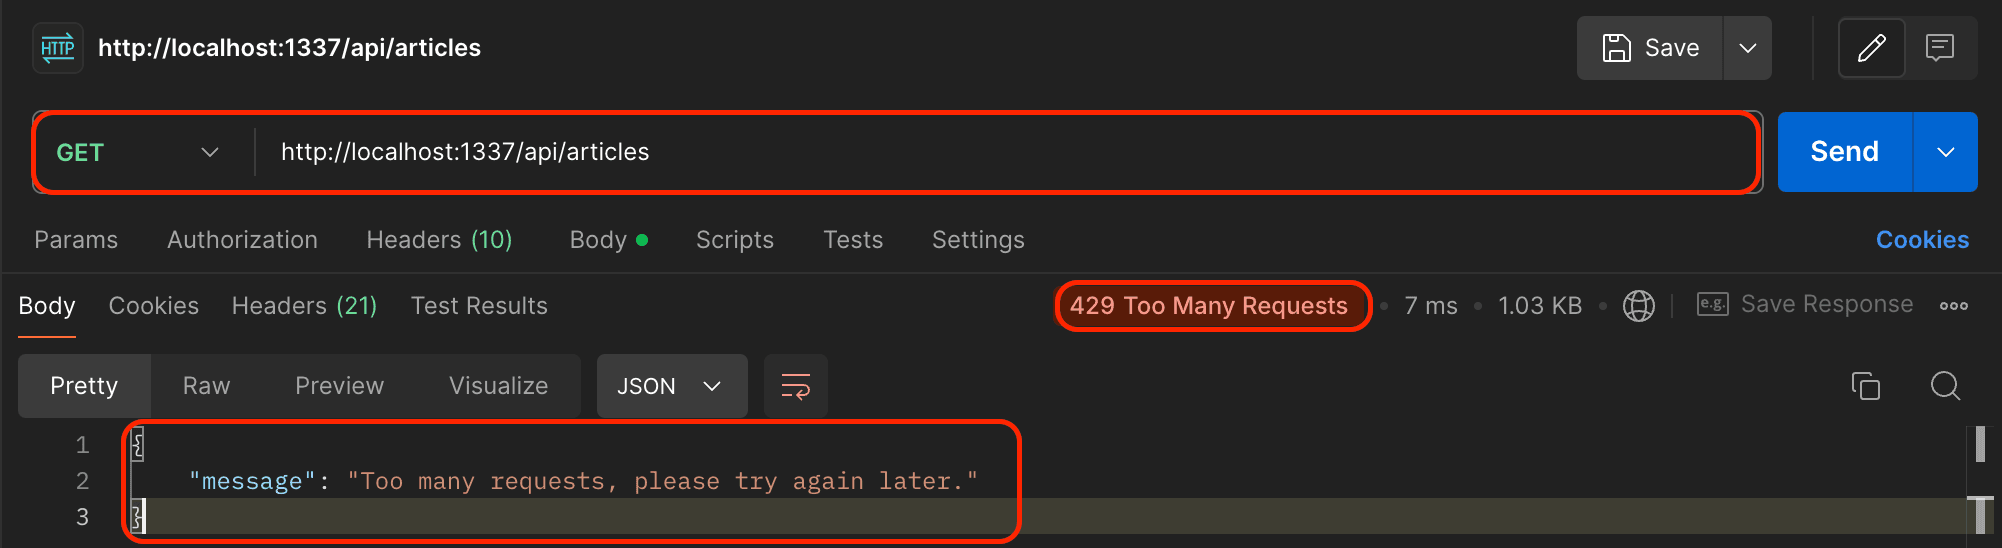
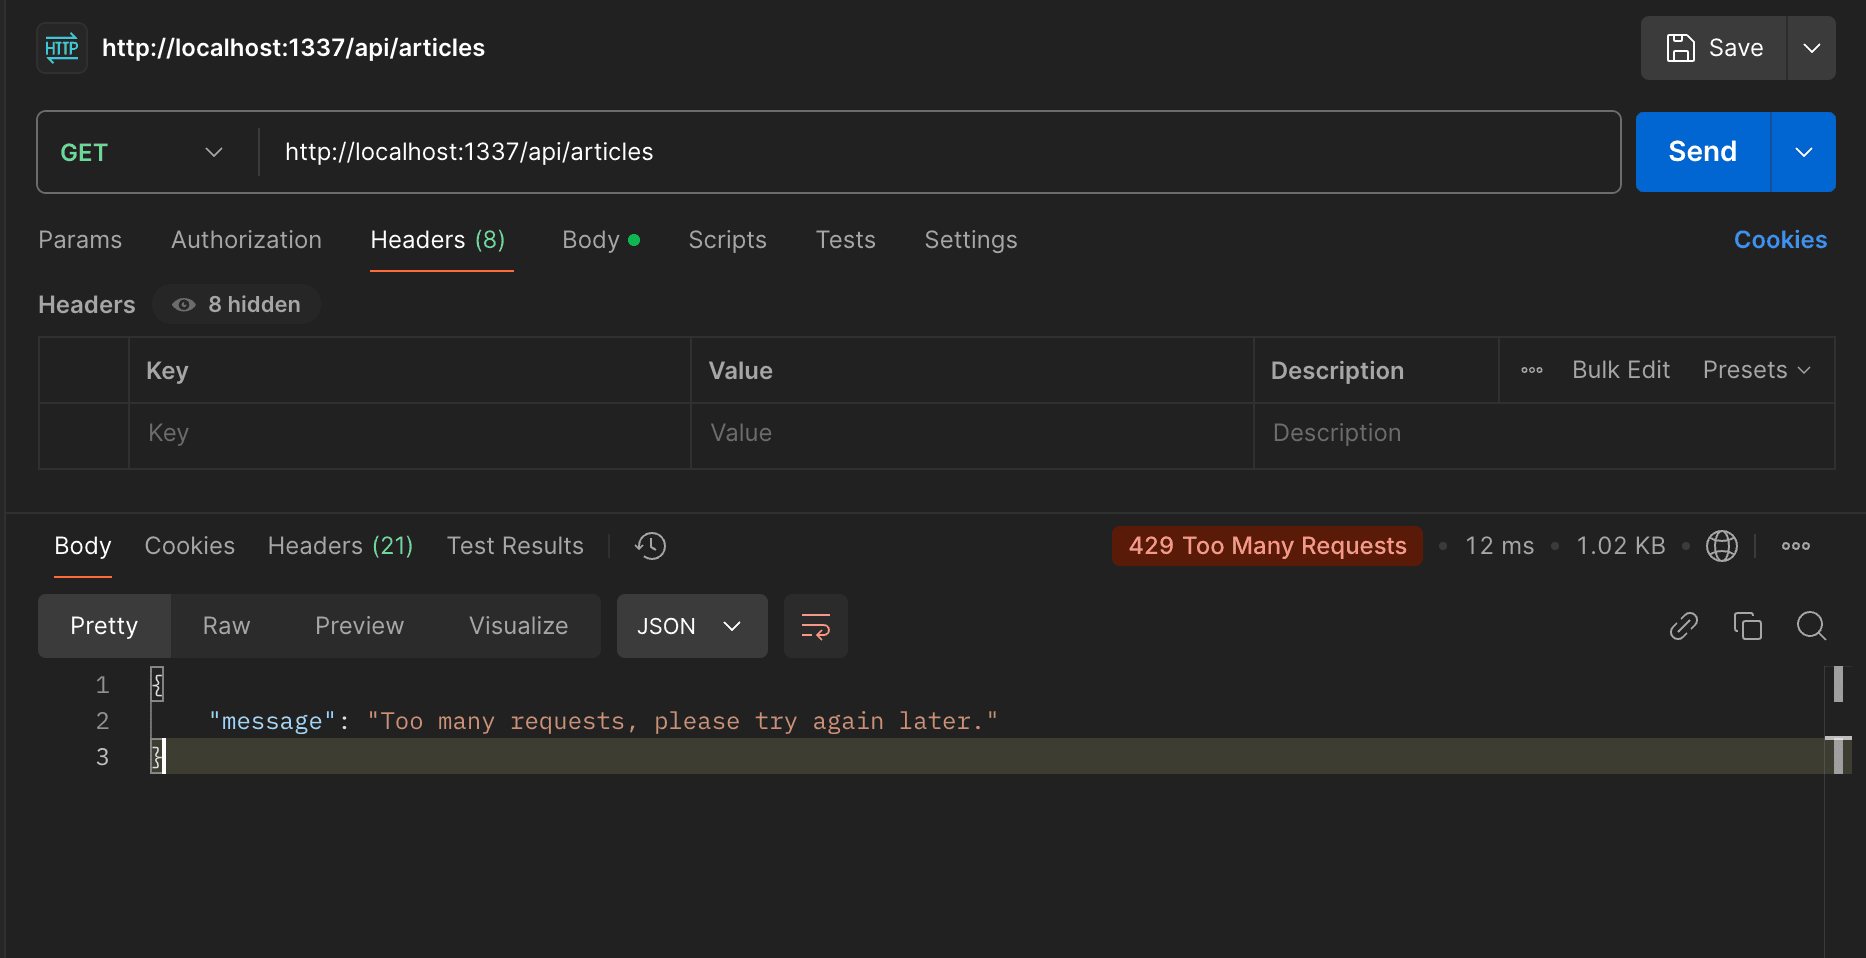
];Here are screenshots of what the output will look like when you hit the limits.
Using Strapi Route Middleware with koa2-ratelimit
You may need to have better control over which special routes are limited for a certain number of requests. It is better than applying rate limits to all the requests throughout the application, which can be unnecessary in most cases and only affects certain routes that require it, such as login routes or routes that make API calls. To do that, first, create a new middleware file for rate limiting:
npx strapi generate middleware rate-limitThen, you will be prompted to select where you want to add this middleware and which API this is for. Your selection should look at the screenshot below:

Add the following rate-limiting logic using the koa2-ratelimit package. This middleware limits requests to 100 every 15 minutes.
//src/api/article/middlewares/rate-limit.ts

/**
 * `rate-limit` middleware
 */

import { RateLimit } from "koa2-ratelimit";
import type { Core } from "@strapi/strapi";
import { Context, Next } from "koa";

export default (_config: any, { }: { strapi: Core.Strapi }) => {
  return async (ctx: Context, next: Next) => {
    return RateLimit.middleware({
      interval: { min: 15 },
      max: 100,
      message: "Too many requests, please slow down.",
      headers: true,
    })(ctx, next);
  };
};
This Strapi middleware uses a token bucket system to apply rate limiting to your API. It is configured to:
Interval: Set to 15 minutes, meaning the rate limit is applied over this time window.Max: Allows up to 100 requests per 15-minute interval.Message: Returns "Too many requests, please slow down." if the rate limit is exceeded.Headers: Includes rate limit headers in the response to inform clients about their remaining quota and reset time.
//src/api/article/routes/article.ts

/**
 * article router
 */

import { factories } from "@strapi/strapi";

export default factories.createCoreRouter("api::article.article", {
  only: ["find", "findOne", "create", "update", "delete"],
  config: {
    find: {
      middlewares: ["api::article.rate-limit"],
    },
    findOne: {
      middlewares: ["api::article.rate-limit"],
    },
    create: {
      middlewares: ["api::article.rate-limit"],
    },
    update: {
      middlewares: ["api::article.rate-limit"],
    },
    delete: {
      middlewares: ["api::article.rate-limit"],
    },
  },
});
Now the rate limiting is applied to on the articles routes. Depending on your implementation, it's important to target routes that are likely to be the most sensitive or resource-intensive when implementing rate limiting.
Implementing Rate Limit Using Strapi Policy
Aside from using middleware, you can implement rate limiting using Strapi policies.
"Policies are functions that execute specific logic on each request before it reaches the controller. They are mostly used for securing business logic."
This approach allows you to apply rate-limiting logic at a more granular level, such as specific routes or actions.
Step 1: Create a Rate Limit Policy
First, create a new policy file for rate limiting. For example, let's create a policy called rate-limit.ts inside the policies folder in the path ./src/api/article/.
import { Core } from "@strapi/strapi";
import { errors } from "@strapi/utils";

const { PolicyError } = errors;

const rateLimitMap = new Map<string, { count: number; startTime: number }>();

const RATE_LIMIT = 5; // Maximum number of requests
const TIME_WINDOW = 60000; // Time window in milliseconds (1 minute)

export default async (
  policyContext: any,
  config: any,
  { strapi }: { strapi: Core.Strapi }
) => {
  const ip = policyContext.request.ip;
  const currentTime = Date.now();

  if (!rateLimitMap.has(ip)) {
    rateLimitMap.set(ip, { count: 1, startTime: currentTime });
  } else {
    const { count, startTime } = rateLimitMap.get(ip)!;
    if (currentTime - startTime < TIME_WINDOW) {
      if (count >= RATE_LIMIT) {
        throw new PolicyError("Too many requests, please try again later.", {
          policy: "rate-limit",
        });
      }
      rateLimitMap.set(ip, { count: count + 1, startTime });
    } else {
      rateLimitMap.set(ip, { count: 1, startTime: currentTime });
    }
  }

  return true;
};
In this code, we maintain a simple in-memory map to track the number of requests from each IP address within a specified time window. If the request count exceeds the limit, a PolicyError is thrown.
Step 2: Apply the Rate Limit Policy to Routes
Next, apply this policy to the desired routes in your Strapi application. For example, you can add it to the create function of the article route configuration.
// ./src/api/article/routes/article.ts
import { factories } from "@strapi/strapi";

export default factories.createCoreRouter("api::article.article", {
  config: {
    find: {
      // policies
      policies: ["api::article.rate-limit"],
    },
    create: {
      policies: ["api::article.rate-limit"],
    },
    update: {
      policies: ["api::article.rate-limit"],
    },
    delete: {
      policies: ["api::article.rate-limit"],
    },
  },
});
By adding the rate-limit policy to specific routes, you ensure that the rate-limiting logic is applied only to those routes, providing more control over your API's behavior. Now, when you make more than 5 API requests in 1 minute to the /articles endpoint, you will get a PolicyError thrown.

Using Redis for Rate Limiting
Redis is an open-source in-memory data store that can be used as a database, cache, or message broker.
Using Redis for rate limiting brings another level of persistence and scalability into your system. Redis can help store request count across multiple servers which is useful for distributed enviroment where you would like to count requests in a consistent manner.
Firstly, if you haven’t done so already, you should install Redis on your system and then install the Redis client with the command below:
npm install ioredis
npm install --save-dev @types/node
Set up the Redis client in your Strapi project. You’ll use Redis to track request counts.
// config/middlewares/rate-limit.js or //src/api/article/middlewares/rate-limit.ts

import { RateLimit, Stores } from "koa2-ratelimit";
import Redis from "ioredis";

const redisClient = new Redis({
  host: "127.0.0.1",
  port: 6379,
  username: "YOUR_REDIS_USERNAME",
  password: "YOUR_REDIS_USERNAME",
  db: 0,
});

// Configure RateLimit with Redis store
RateLimit.defaultOptions({
  message: "Too many requests, please try again later.",
  store: new Stores.Redis({
    client: redisClient,
  }),
});

export default () => {
  return RateLimit.middleware({
    interval: { min: 15 },
    max: 100,
  });
};
This configuration ensures that rate limiting is put in place to define the maximum number of request a user is allowed to make within a given interval. It uses Redis to store and count the number of request each user makes. Redis is set with local address of 127. 0. 0. 1, port of 6379 and a selected database of 1 to allow the request counts to be available even when the server is restarted, or when there are multiple instances.
Now, when the user's requests exceed the rate limit, it will throw an error and block the user from requesting the endpoint for the specified interval.
Now, if you open your Redis CLI with the command redis-cli, or redis-cli -h <host> -p <port> if your Redis server is running on a different host or port, you can type KEYS * to list all the keys stored in your Redis database. This will allow you to see the keys used by your application to track rate limits.

Note: It is not a good practice to use
KEYS *in a production database with large dataset so you don't block server. Also check the key before your set interval expires, else it will get cleared and you won't see it.
Using Express Limiter with Strapi
Even though Strapi is built on top of Koa, you can still utilize Express tools like express-rate-limit if you are able to bridge the two frameworks. That's going to be great for developers who have experience working with Express.js because they can now use their past experience with Express tools.
To get started, you would install express-rate-limit with the command below:
npm install express-rate-limitThen, configure the rate limiter to your desired specifications.
//src/api/article/routes/article.ts

import { factories } from "@strapi/strapi";
import { rateLimit } from "express-rate-limit";
import { Context } from "koa";

// Define the rate limiter configuration
const limiter = rateLimit({
  windowMs: 3 * 60 * 1000, // 3 minutes
  max: 2, // limit each IP to 2 requests per windowMs
  handler: async () => {
    const ctx = (strapi as any).requestContext.get() as Context;
    ctx.status = 429;
    ctx.body = {
      message: "Too many requests",
      policy: "rate limit",
    };
    ctx.res.end();
  },
});

// Reusable rate-limiting middleware
const rateLimitMiddleware = async (ctx: Context, next: () => Promise<void>) => {
  await new Promise<void>((resolve, reject) => {
    // Cast req and res to IncomingMessage and ServerResponse from Node.js
    limiter(ctx.req as any, ctx.res as any, (error: any) => {
      if (error) {
        ctx.status = 429;
        ctx.body = { error: error.message };
        reject(error);
      } else {
        resolve();
      }
    });
  });
  if (ctx.status !== 429) {
    await next();
  }
};

// Apply rate-limiting middleware to all routes
export default factories.createCoreRouter("api::article.article", {
  config: {
    find: {
      middlewares: [rateLimitMiddleware],
    },
    findOne: {
      middlewares: [rateLimitMiddleware],
    },
    create: {
      middlewares: [rateLimitMiddleware],
    },
    update: {
      middlewares: [rateLimitMiddleware],
    },
    delete: {
      middlewares: [rateLimitMiddleware],
    },
  },
});
The code above specifies the policies on how frequently a user is allowed to make requests in a given period of time.
The windowMs option defines the time period in which requests are to be measured; in our case 3 minutes in milliseconds. We also limited the number of requests to 2 within that 3 minutes, which is just for the sake of this example.
The max option is the number of requests which is allowed in the given time frame. If the requests are more than this number, the ‘handler’ function is called, which returns the response with HTTP status code 429 and a message stating that the rate limit has been reached.
Using Cloudflare for Rate Limiting in Strapi
Let's move on to how you can use third-party services to limit rates. One of the most popular services we'll be looking at is Cloudflare. Cloudflare offers a comprehensive rate-limiting solution that can be easily integrated with Strapi.
Cloudflare Integration
To implement rate limiting in Strapi using Cloudflare, follow the steps below:
- Log In to Your Cloudflare dashboard and select your account.
- Add, create, or add your domain to Cloudflare.
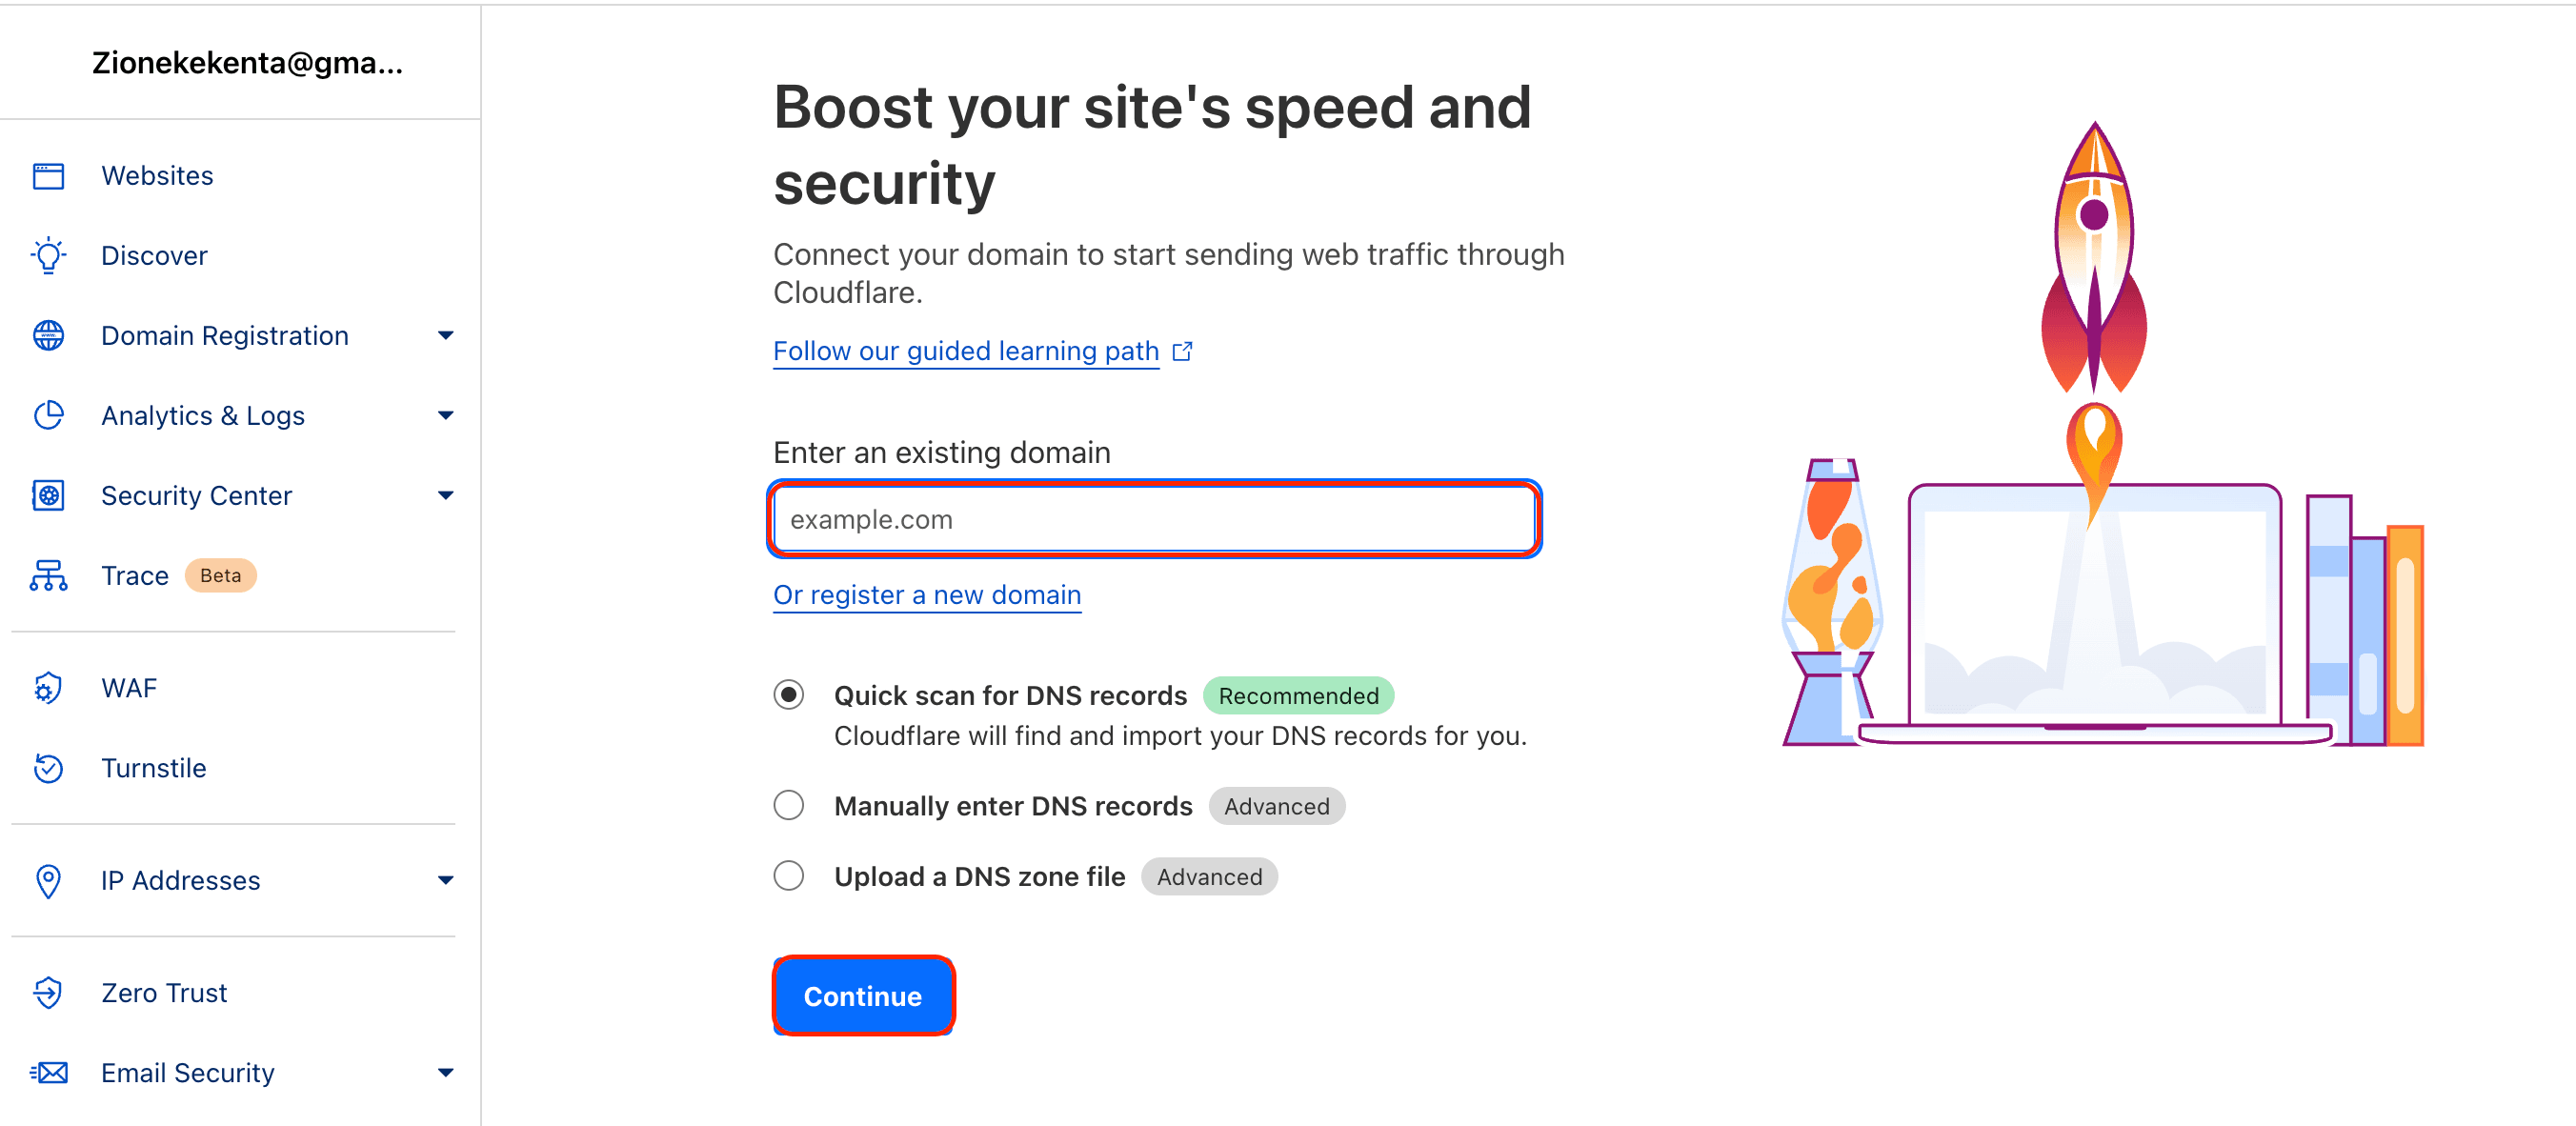
- Select your domain from the dashboard and go to Security > WAF > Custom Rules.
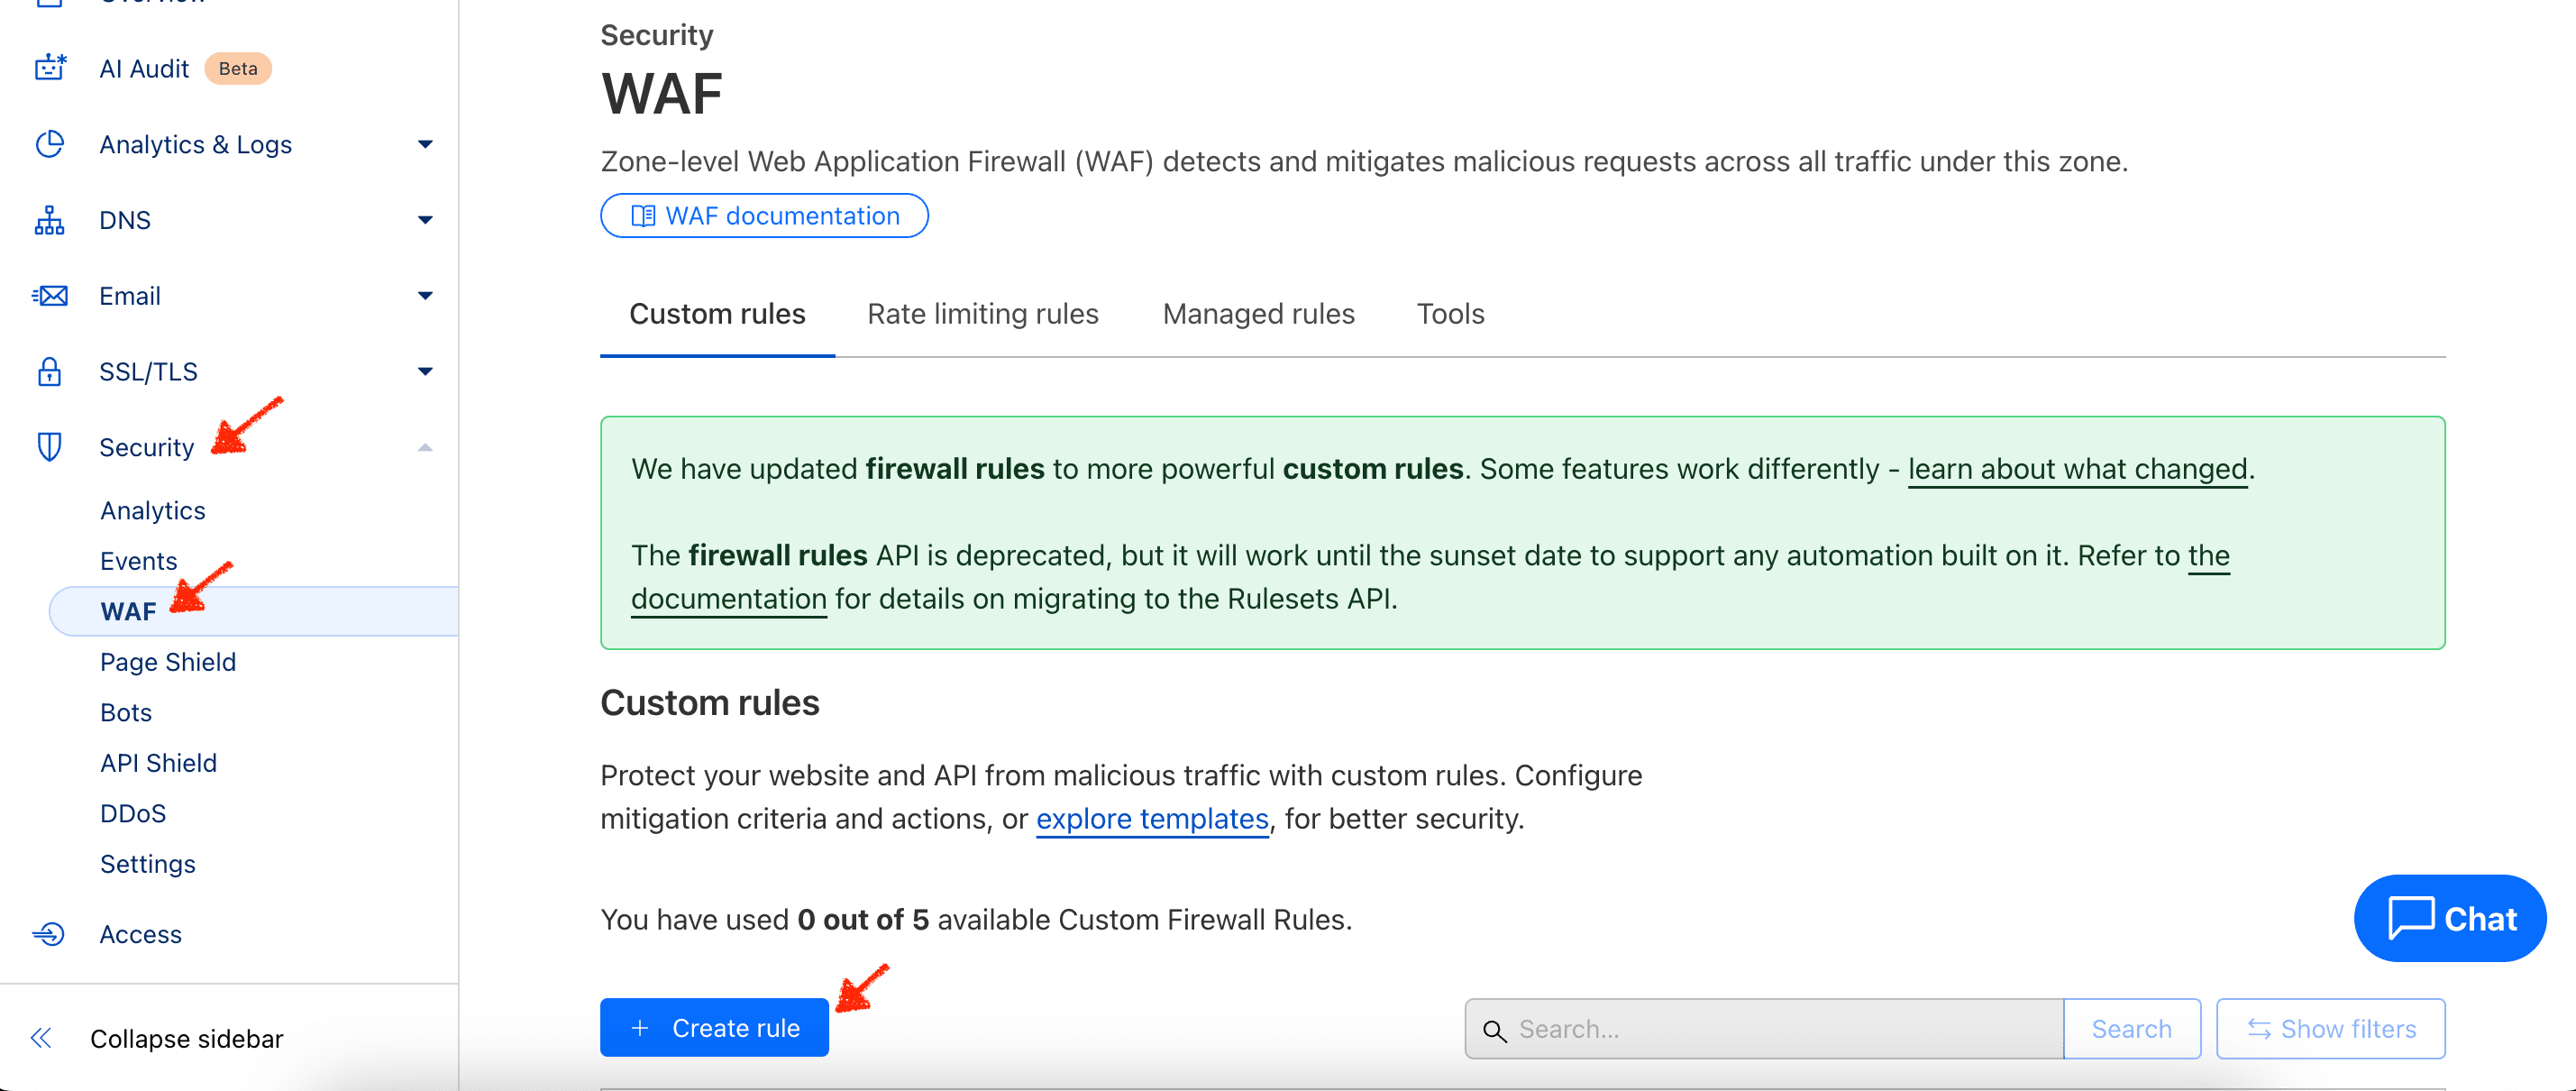
- Create a Custom Rules Tab and define the Rate Limiting Rule
-
Click on the Create rule button.
-
Enter a descriptive name for the rule.
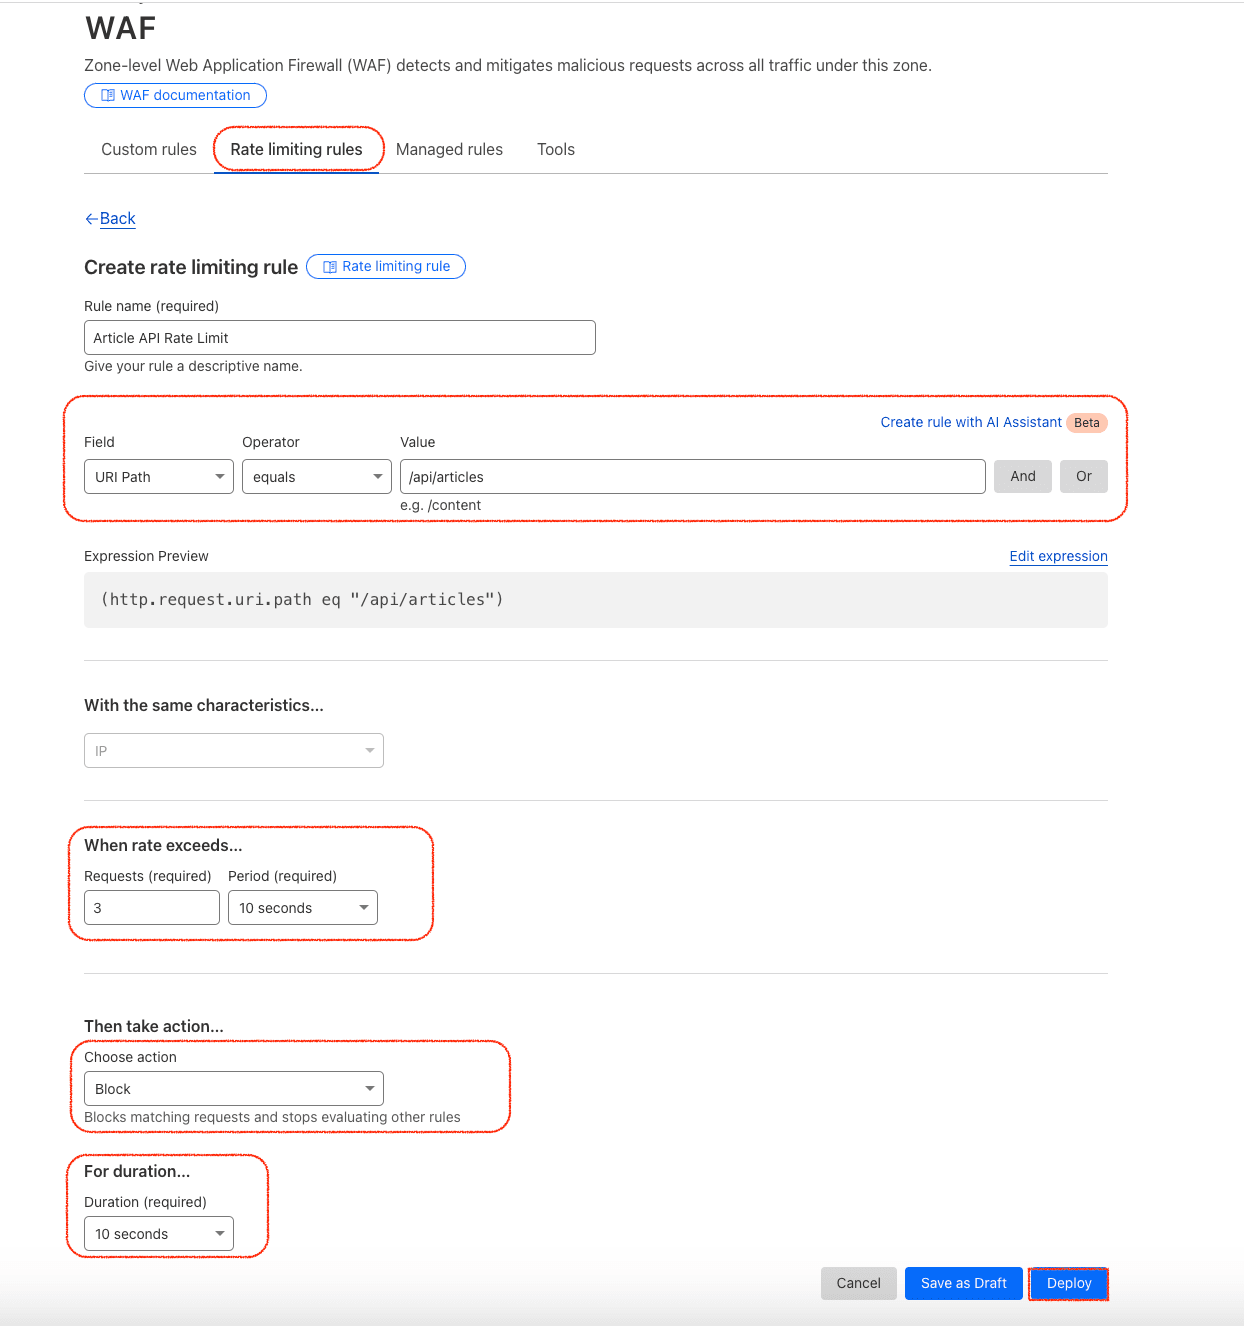
-
Choose an URL Path property from the Field drop-down list that will match incoming requests.
-
Set characteristics that define request counters. For example, any request path matching
/api/articles. -
Specify the maximum number of requests and time period under When rate exceeds.
-
Select an action (e.g., Block) under Then take action.
-
Set a mitigation timeout duration for when the action will stop.
-
Click on Deploy to activate your ruleset immediately, or select Save as Draft if you are not ready.
-
With this configuration in place, you'll need to update your Strapi configuration to work with Cloudflare:
//config/middlewares.ts
export default [
  // ... other middlewares
  "global::cloudflare-headers",
];
Then update your Strapi security settings to include the Cloudflare headers:
//config/security.ts
export default {
  cors: {
    enabled: true,
    origin: ["https://your-domain.com"],
    headers: [
      "Content-Type",
      "Authorization",
      "X-RateLimit-Limit",
      "X-RateLimit-Remaining",
    ],
  },
};
With this, you have successfully implemented rate-limiting in your Strapi project using Cloudflare.
Comparing Different Rate Limiting Approaches
Now that you’ve seen the various methods of implementing rate limiting in Strapi, here’s a breakdown of their pros and cons.
| Approach | Pros | Cons |
|---|---|---|
| Middleware | Provides global control over requests | Requires a more complex setup |
| Koa Packages | Simple to use and well-maintained | May lack options for advanced customization |
| Redis | Scalable and persists across instances | Requires Redis setup and ongoing management |
| Express Limiter | Familiar for Express.js developers | Needs a middleware bridge for Koa |
| Cloudflare | Comprehensive solution; easy to set up | Requires a Cloudflare account and configuration |
Best Practices for Rate Limiting in Strapi
To make the most of rate limiting in Strapi, follow these best practices: To make the most of rate limiting in Strapi, follow these best practices:
- It is possible to set reasonable boundaries depending on how the device is being used.
- Sliding windows should be used in order to have better control of traffic.
- Make sure that proper error responses (for example, ‘429 Too Many Requests’) are returned to the users.
- Record the violations so as to assess the possible abuse.
- Use different rate limits for users that are authenticated and those that are not.
- Integrate rate limiting with other security mechanisms such as API key and authentication.
- Definitely describe rate limits for your API users in order for them to know the number of requests they can make.
Conclusion
In this tutorial, we discussed different ways of rate limiting in Strapi v5, including middleware, Koa packages, Redis, and Express Limiter. All the approaches have their benefits and drawbacks, so it is crucial to evaluate your project’s needs to choose the right option.
Lastly, rate limiting is a vital component in the security of APIs since it helps to avoid abuse and ensure that all the clients are reasonable in their usage. Hence, it is recommended that the approach that will be most suitable for the given project be selected based on its complexity and the degree of customization required by the organization. It is, therefore, important to take the time and do this properly so as to ensure that the API does not fail or become corrupted.