


Introduction
In Strapi, you can modify and customize the code differently. One of the most common ways is to use the register and bootstrap functions.
You can learn more about them here.
However, this article will focus on the register function.
This will allow you to register and initialize the different services available in the application.
You can find it in the src/index.ts file.
// import type { Core } from '@strapi/strapi';

export default {
  /**
   * An asynchronous register function that runs before
   * your application is initialized.
   *
   * This gives you an opportunity to extend code.
   */
  register(/* { strapi }: { strapi: Core.Strapi } */) {},

  /**
   * An asynchronous bootstrap function that runs before
   * your application gets started.
   *
   * This gives you an opportunity to set up your data model,
   * run jobs, or perform some special logic.
   */
  bootstrap(/* { strapi }: { strapi: Core.Strapi } */) {},
};
The register function will be called when the application starts up.
The bootstrap function will be called when the application gets started.
Register function can be used to register routes/contentTypes/controllers/services/cronJobs/(policies/middlewares).
It takes in the strapi object as an argument, which is the main object used to access all the different functionalities of the application, including services, middleware, content types, and more.
This will allow you to modify how the services are registered and initialized, add new services, or remove existing ones.
This can also be done via a Plugin inside the server/src/register.ts file. We will look at it later in the article.
Where are all the objects located in the strapi object:
Plugin / API
Plugins: The plugins are registered and available under the strapi.plugins object. Each plugin can be accessed by its name, strapi.plugins.<pluginName>
API: The APIs are registered and available under the strapi.api object. Each plugin can be accessed by its name, strapi.api.<contentTypeName> both strapi.api and strapi.plugins objects contain child objects that provide additional functionality to the application.
These child objects include routes, controllers, services, policies, and middleware. They handle incoming HTTP requests, handle the logic, contain reusable utility functions, and are executed before or after specific routes to perform tasks such as authentication, validation, or logging.
Middlewares
Middlewares: The middlewares are registered and available under the strapi.middlewares object. Each middleware can be accessed by its name, strapi.middlewares.<middlewareName>. Middlewares can also be accessed through strapi.plugins.<pluginName>.middlewares.<middlewareName> or strapi.api.<contentTypeName>.middlewares.<middlewareName> if they are defined within that specific plugin or API.
Policies
Policies: The policies are registered and available under the strapi.policies object. Each policy can be accessed by its name, strapi.policies.<policyName>. Policies are used to set the rules and permissions for specific routes in your application; they are executed before the route's action and can be used to perform tasks such as authentication or validation. Policies can also be defined in the strapi.api.<contentTypeName>.policies.<policyName> and strapi.plugins.<pluginName>.policies.<policyName> if they are defined within a specific plugin or API.
Services
Services: The services are registered and available under the strapi.services object. Each service can be accessed by its name, strapi.services.<serviceName>. Services can also be accessed through strapi.plugins..services. or strapi.api.<contentTypeName>.services.<serviceName> if they are defined within that specific plugin or API.
Content Types
Content Types: The Types are registered and available under the strapi.contentTypes object. Each Content Type can be accessed by its name, strapi.contentTypes.<contentTypeName>. Additionally, it can also be accessed through the strapi.api.<contentTypeName>.contentTypes.<contentTypeName> or strapi.plugins.<pluginName>.contentTypes.<contentTypeName> if it is defined within a specific plugin or API.
Components
Components: The components are registered and available under the strapi.components object. Each component can be accessed by its uid, strapi.components.<componentName>.
Configurations
Configurations: The configurations are registered and available under the strapi.config object. Each configuration can be accessed by its key, strapi.config.<configKey>.
Cron Jobs
Cron Jobs: Cron jobs are stored in the config and must be enabled to work. You can navigate to the strapi.config.cron object to access them. All cron jobs are stored within this object.
You can find more details on how to create and configure cron jobs in the Strapi documentation: link to docs
Injecting a Custom Middleware via the Register Function in Strapi
1. Setup
Set up a standard strapi instance. You can do so by running npx create-strapi-app@latest my-strapi-app and following the instructions.
Once you have created the app, you can change the directory by running cd my-strapi-app and then start it by running npm run develop.
You will be asked to create your first Admin User.

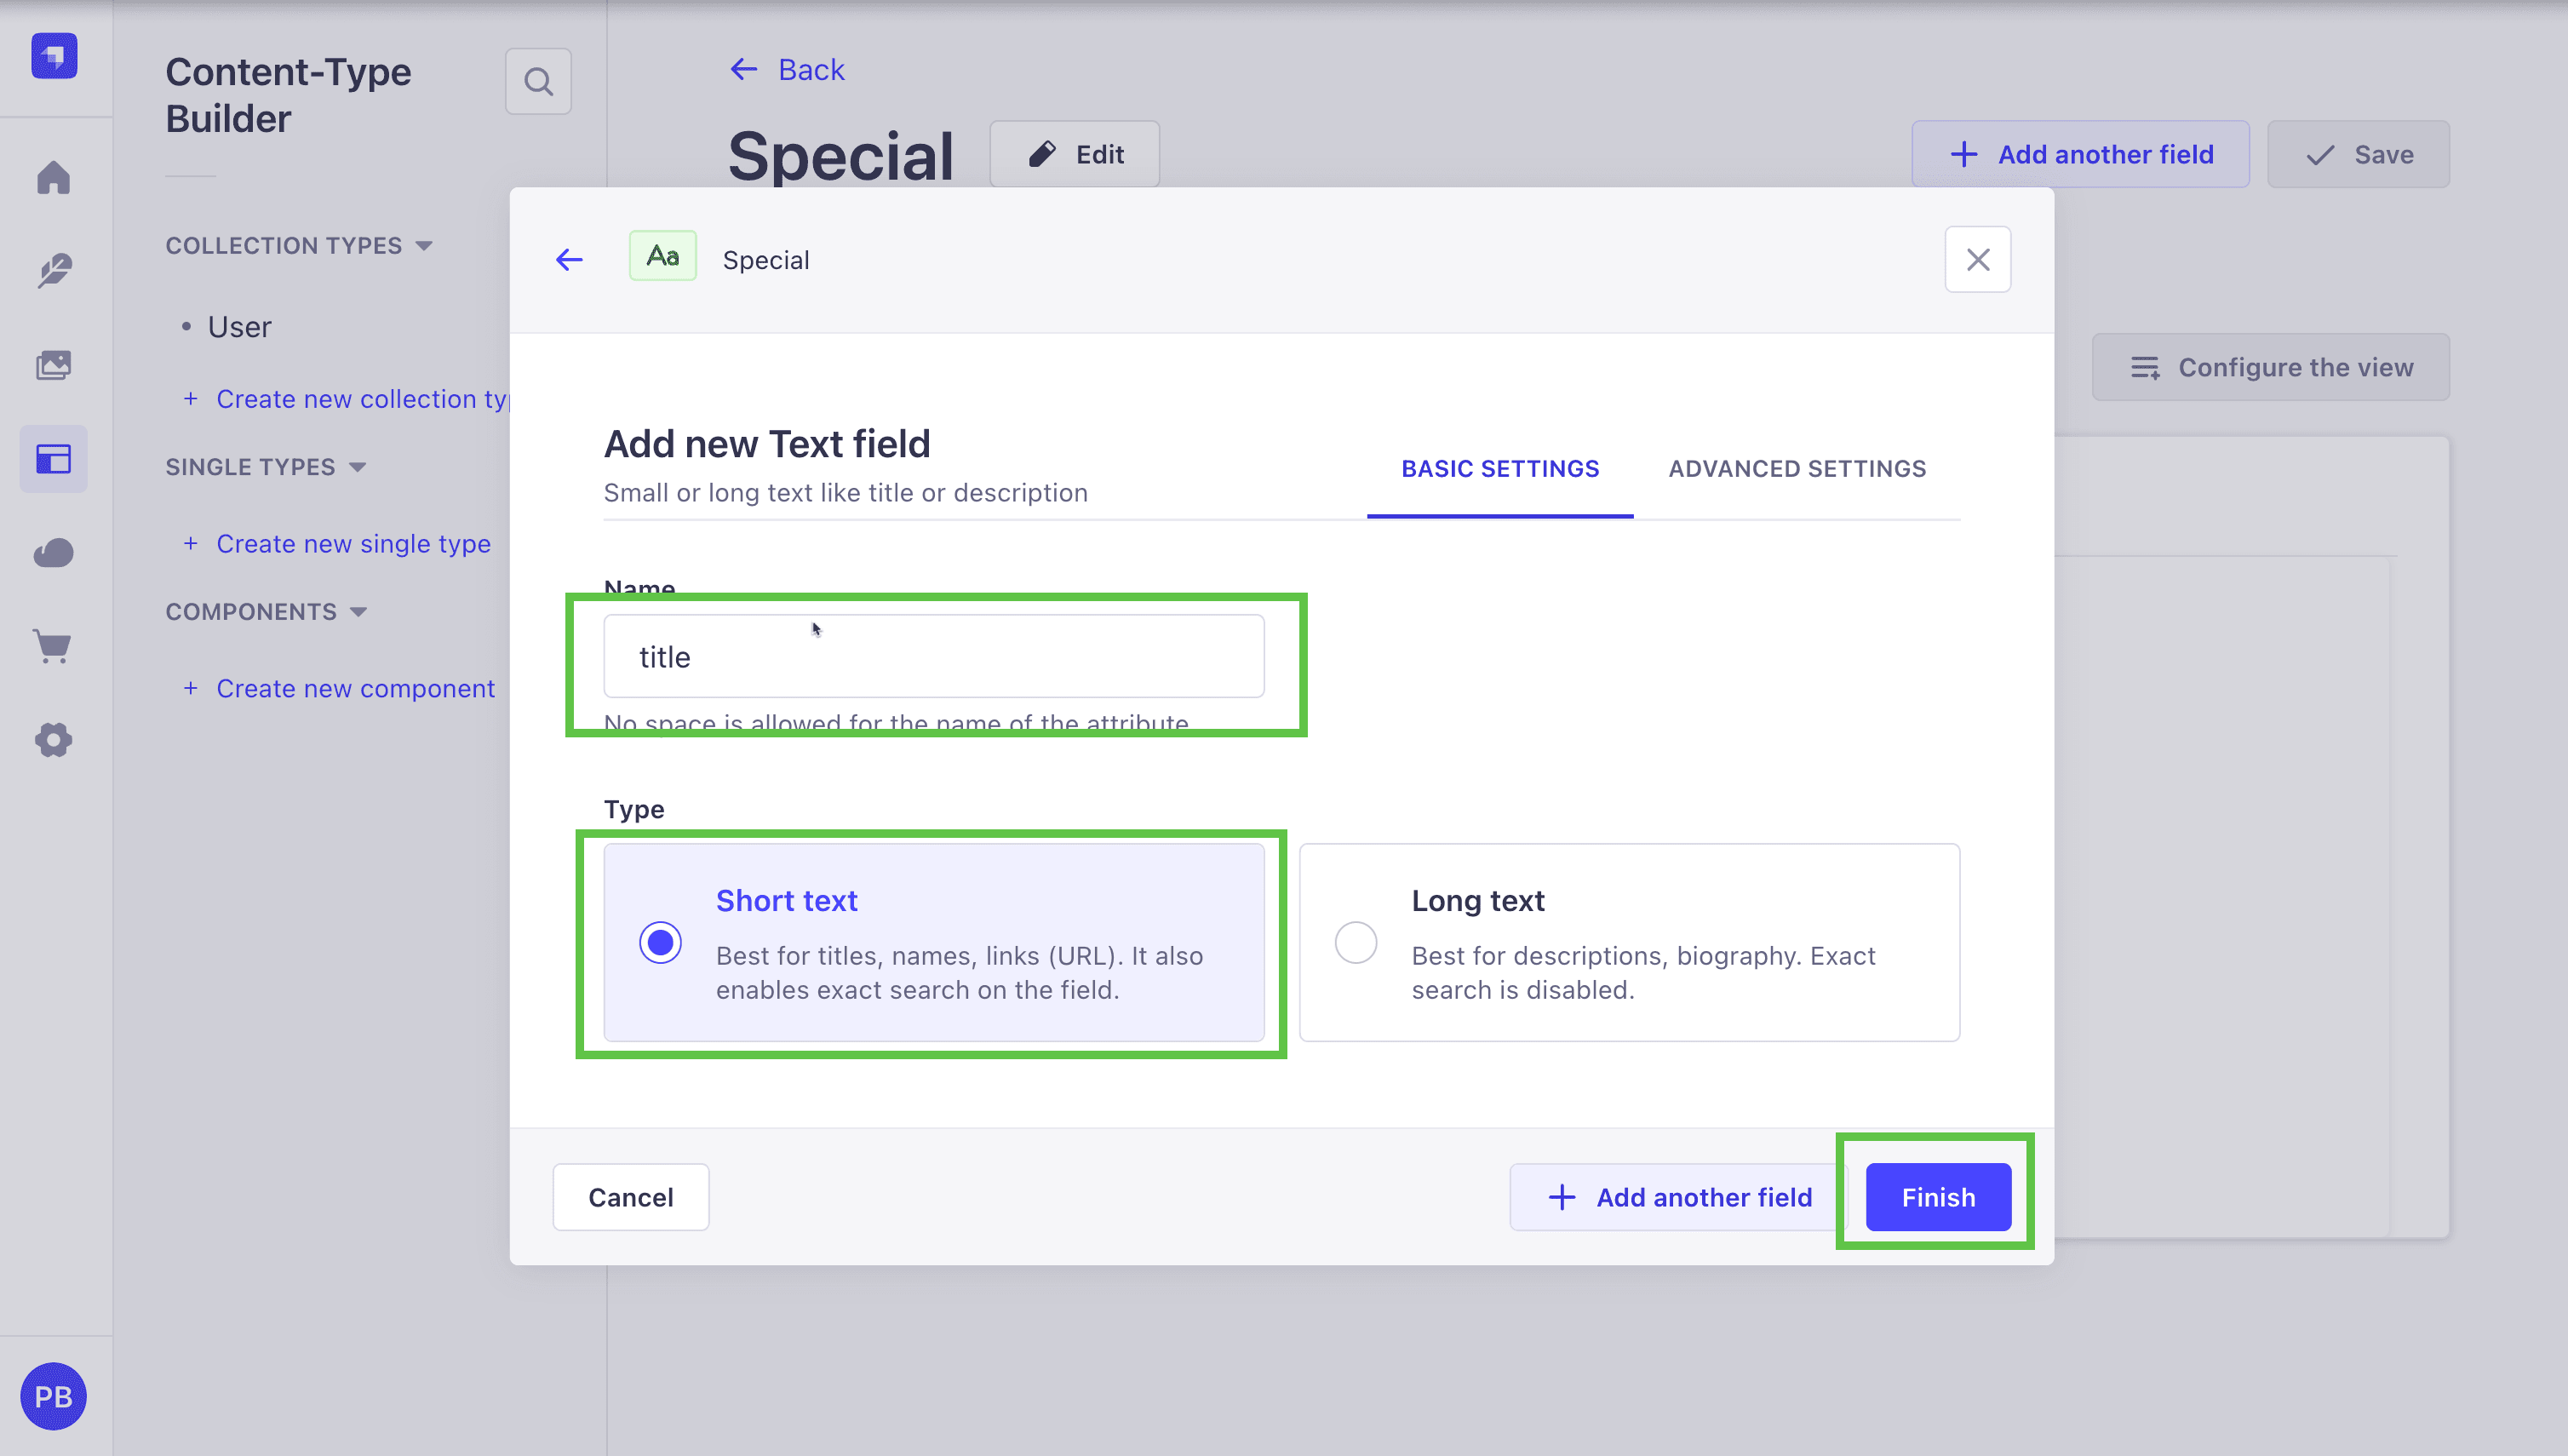
Once you have done that, go ahead and, in the content-type-builder, create a new contentType named special with the following field title, which will be a short text field.
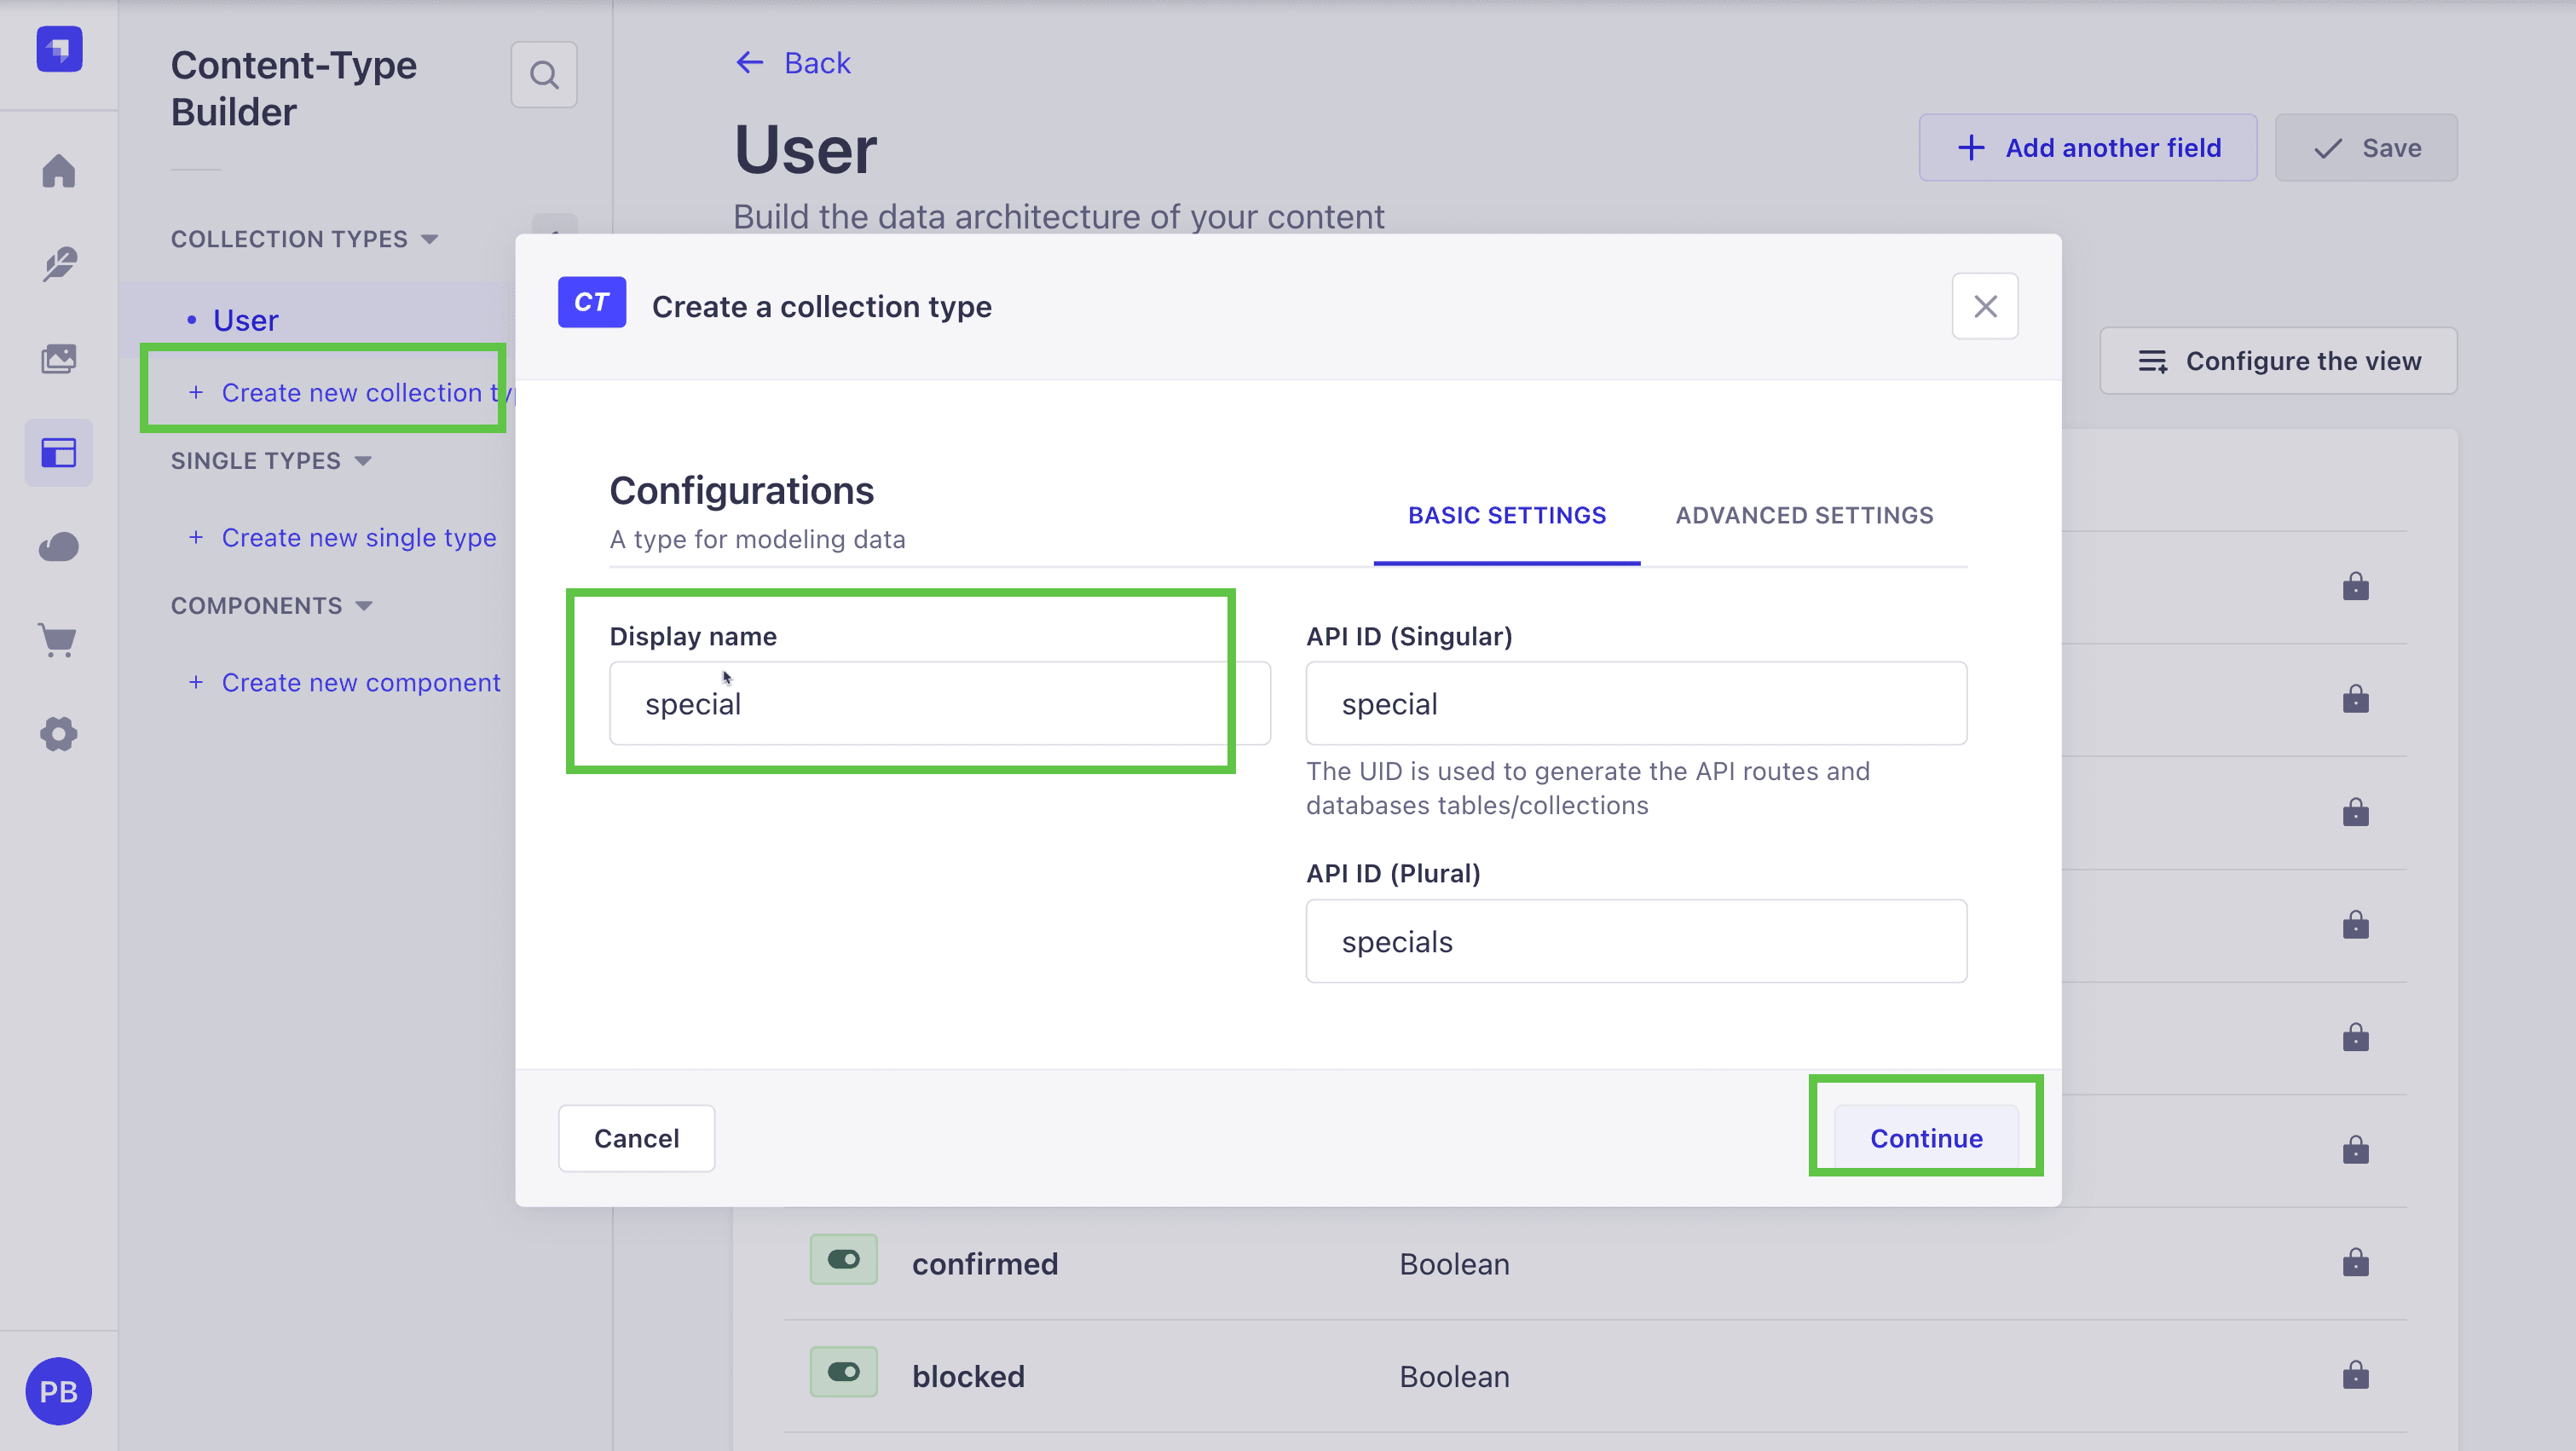
Click continue and add your first field.
Now that that is done let's look at how to inject custom middleware into a route.
2. Injecting a Custom Middleware into a Route
To inject a custom middleware into a route, you must first define your middleware and then register it within the desired route.
Here's an example of how you can achieve this:
- Define the Middleware:
Create a file named
custom-middleware.tsin yoursrc/middlewaresfolder:
export default (config, { strapi }) => {
  // Custom middleware logic
  return async (ctx, next) => {
    console.log("Custom middleware executed");
    await next();
  };
};- To test if this succeeded, we will start strapi up in console mode, aka
npm run strapi console.Then, after it is loaded, you are an interactive console version of strapi where you will type instrapi.middlewares,and you should now see in the list'global::custom-middleware': [Function (anonymous)],
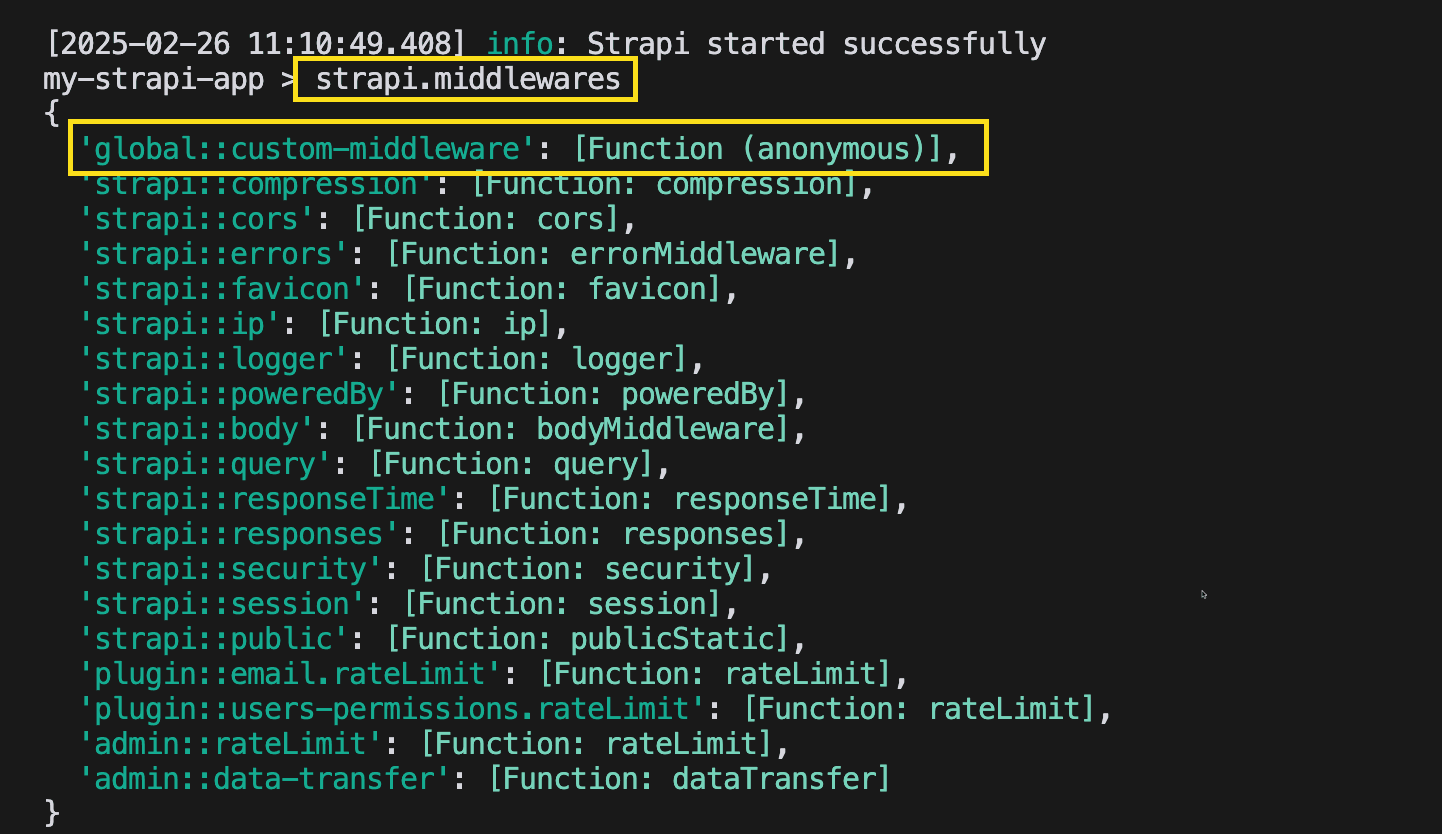
Notice that we can see our newly created middleware in the list.
- Register the Middleware:
In your
registerfunction in thesrc/index.tsfile, you can inject this middleware into a specific route:
// src/index.ts
import type { Core } from "@strapi/strapi";

export default {
  /**
   * An asynchronous register function that runs before
   * your application is initialized.
   *
   * This gives you an opportunity to extend code.
   */
  register({ strapi }: { strapi: Core.Strapi }) {
    const middleware = "global::custom-middleware";
    const routesPath = strapi.apis.special.routes.special.routes;

    console.log(routesPath, "routesPath");
    console.log(middleware, "middleware");

    const registerIndex = routesPath.findIndex(
      (route) => route.path === "/specials" && route.method === "GET"
    );

    console.log(registerIndex, "registerIndex");

    const registerRoute = routesPath[registerIndex];
    if (registerRoute.config.middlewares === undefined) {
      registerRoute.config.middlewares = [];
    }
    registerRoute.config.middlewares.push(middleware);
  },

  /**
   * An asynchronous bootstrap function that runs before
   * your application gets started.
   *
   * This gives you an opportunity to set up your data model,
   * run jobs, or perform some special logic.
   */
  bootstrap(/* { strapi }: { strapi: Core.Strapi } */) {},
};- To test if this worked as expected, make a GET request to
http://localhost:1337/api/specials. Now you should see a console.log in your strapi console.
Please set the permissions in the users-permissions plugin to public so that the route is accessible.
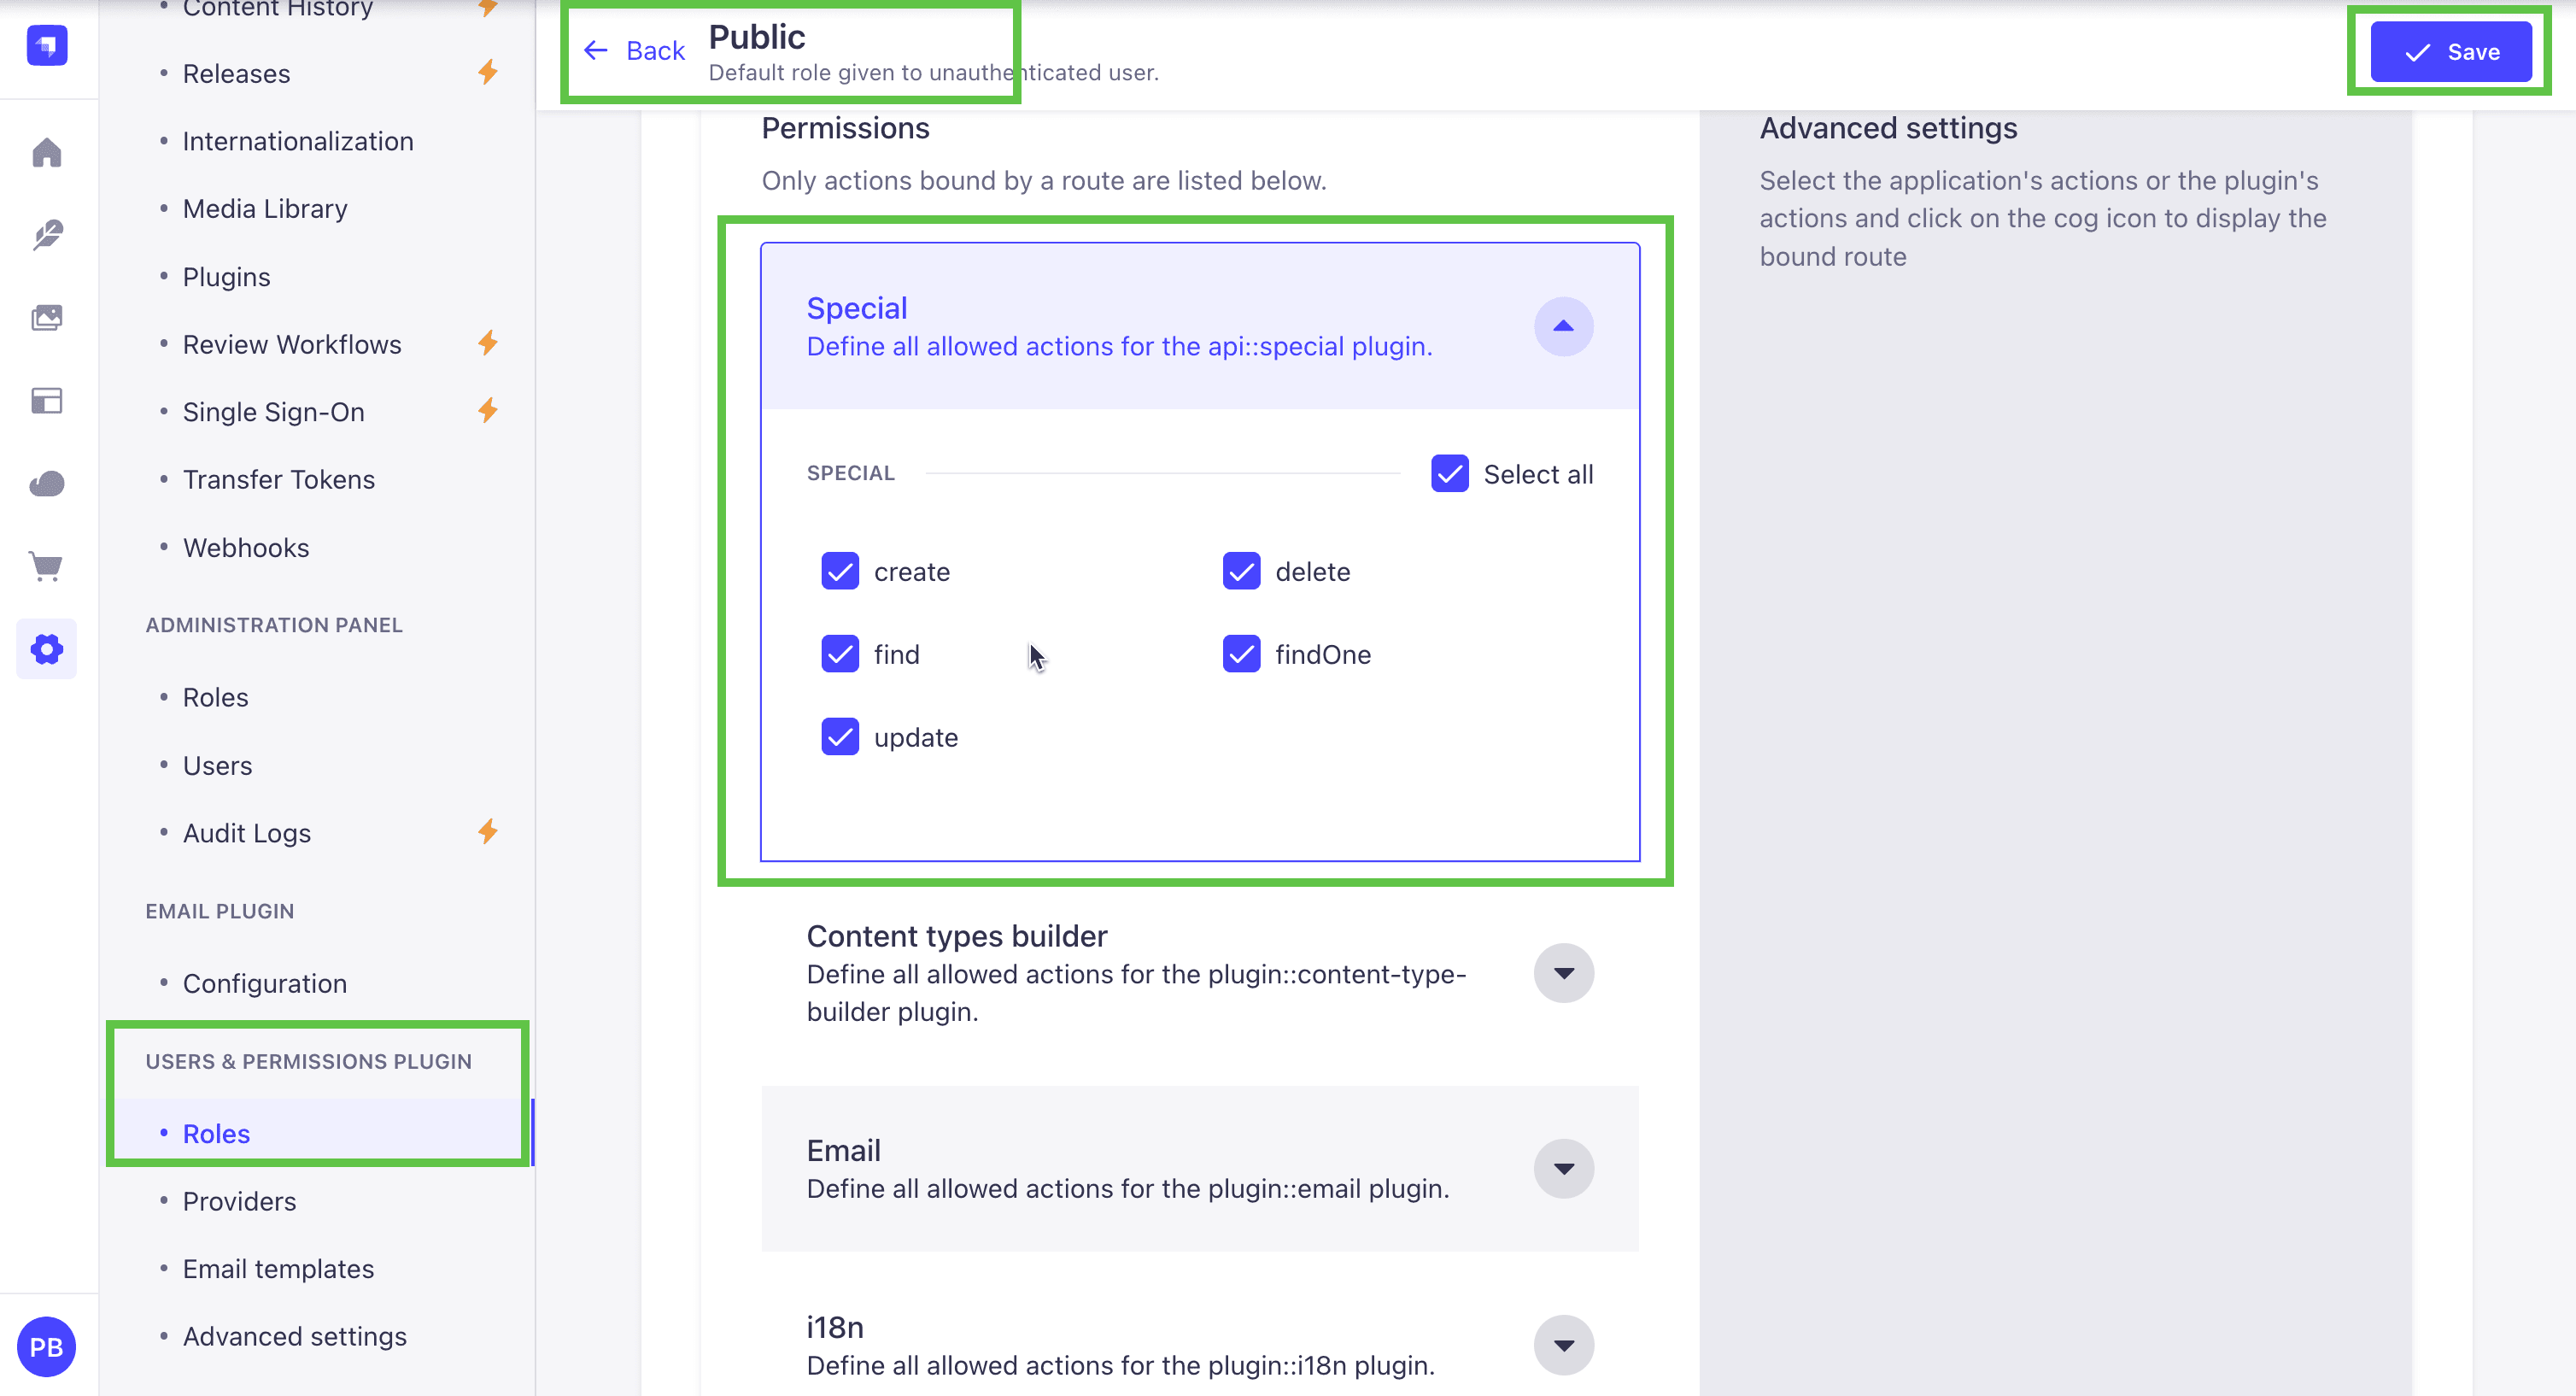
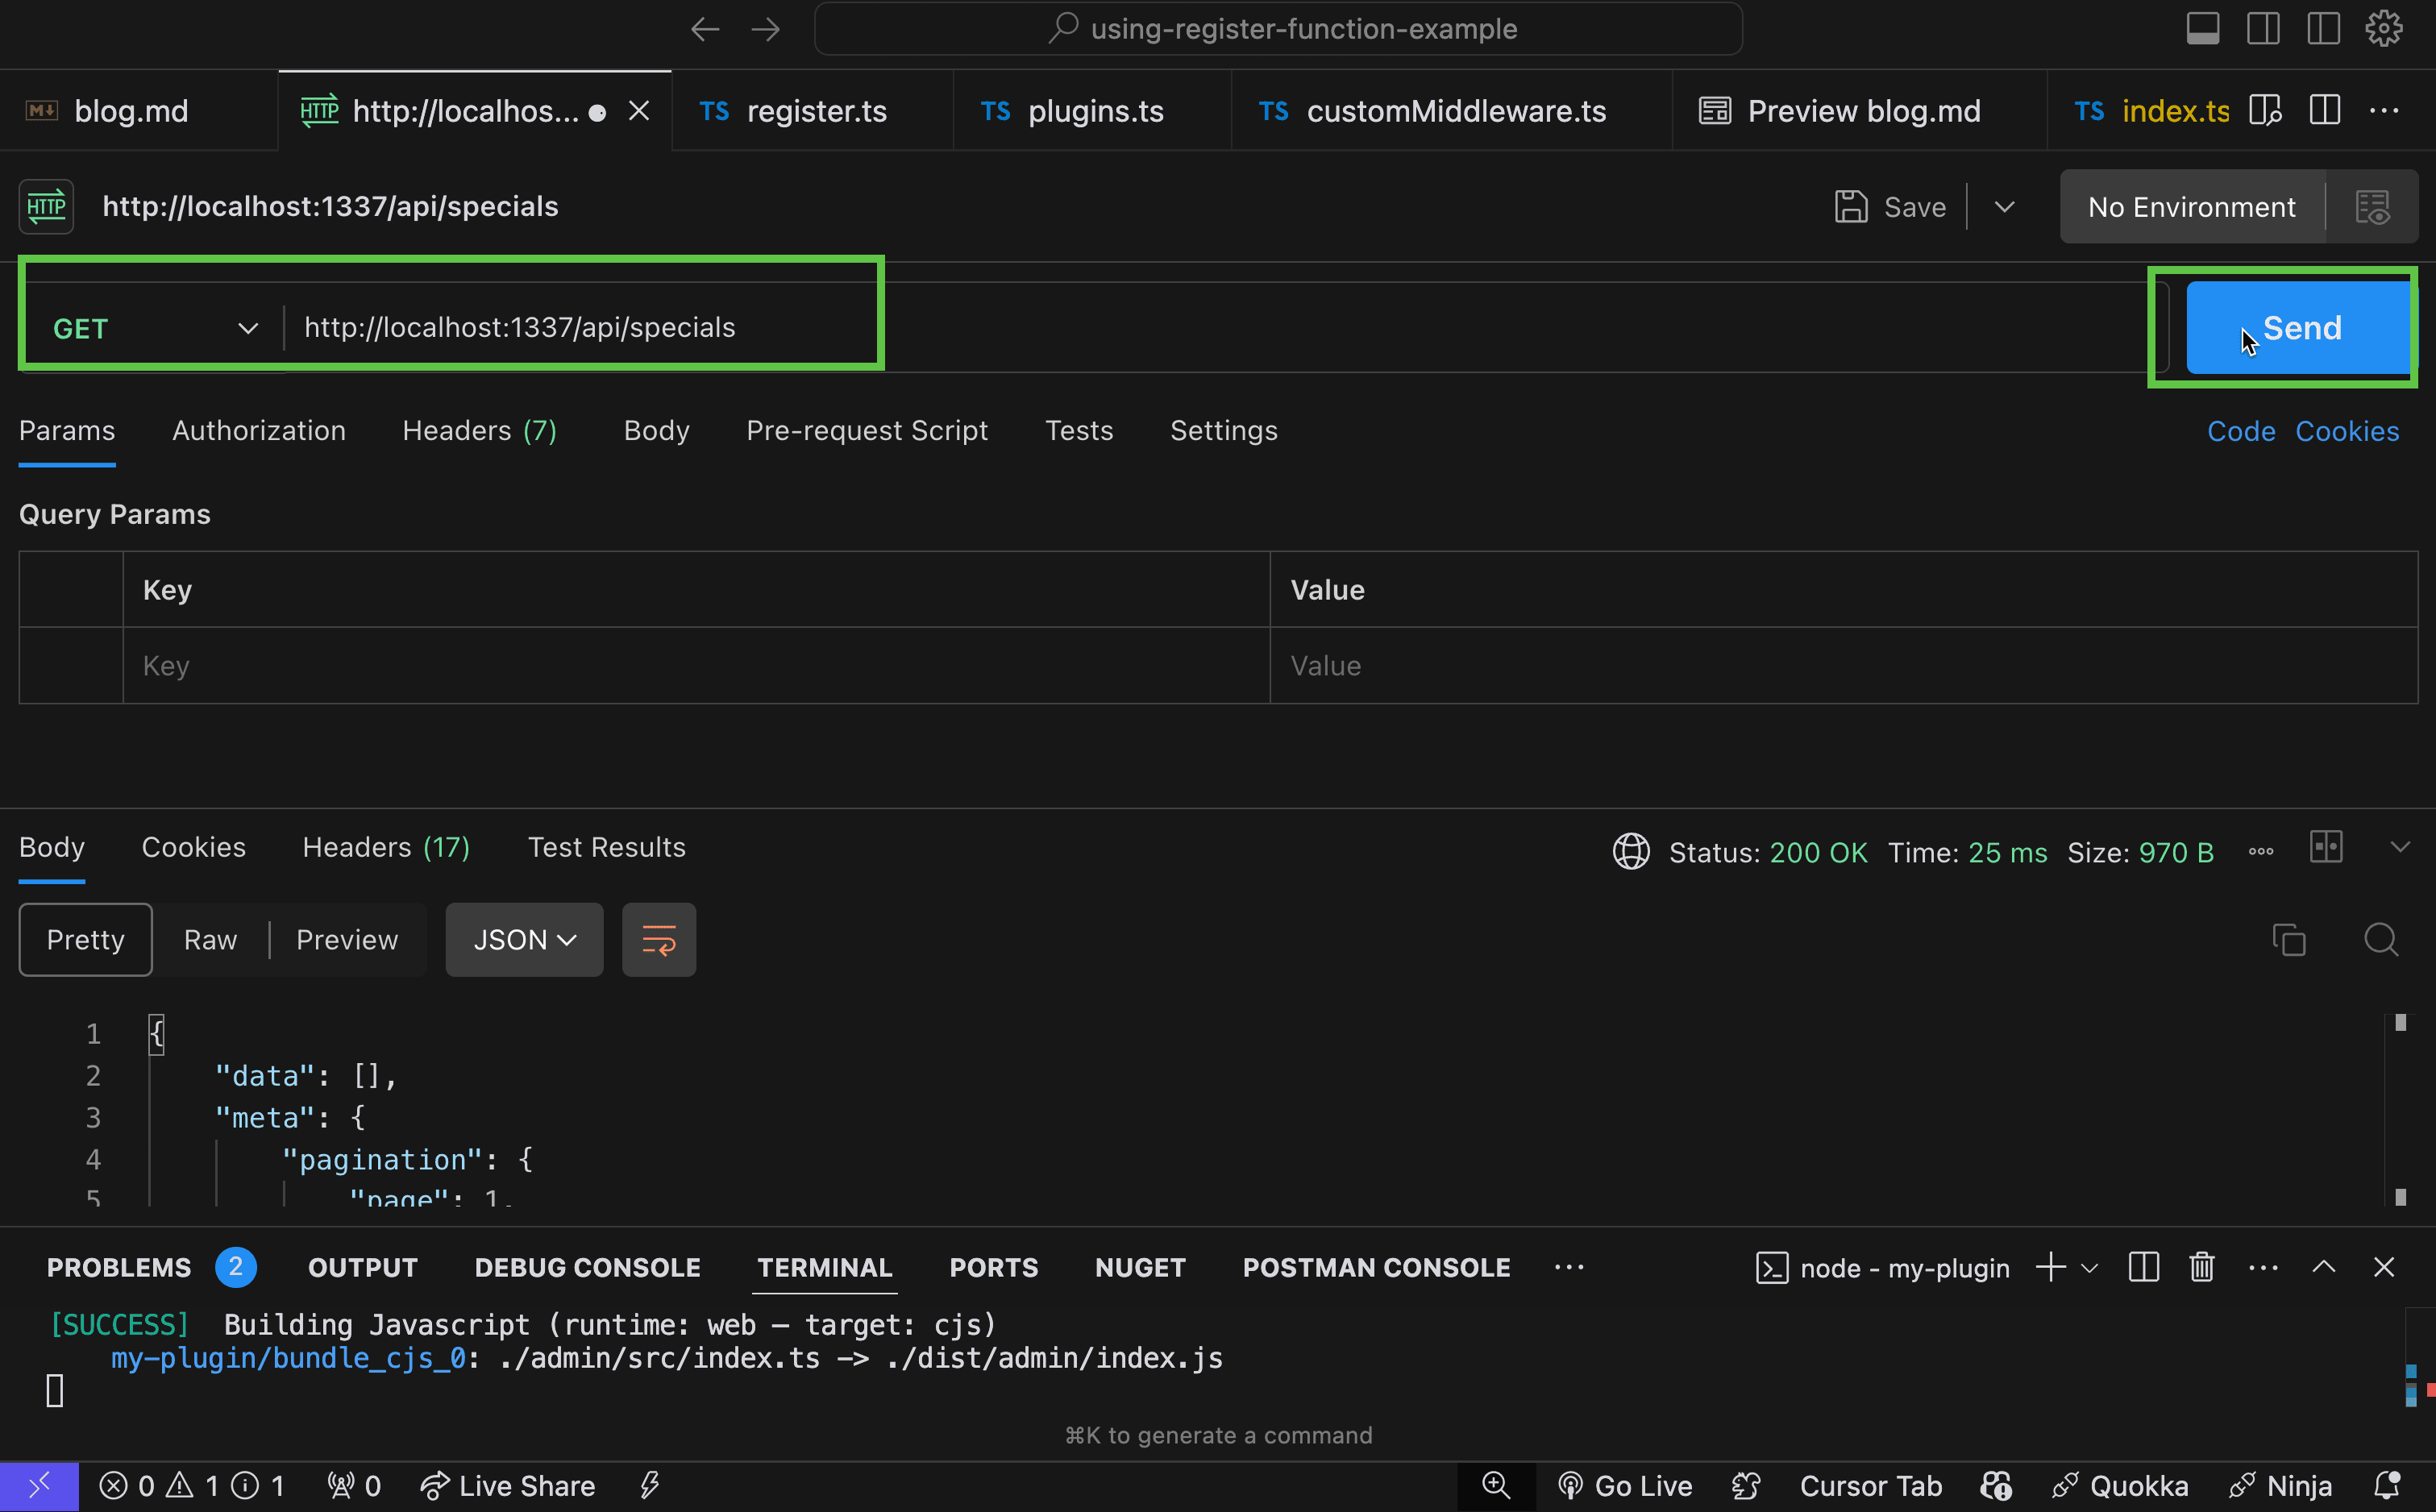
You should see the following in your strapi console:
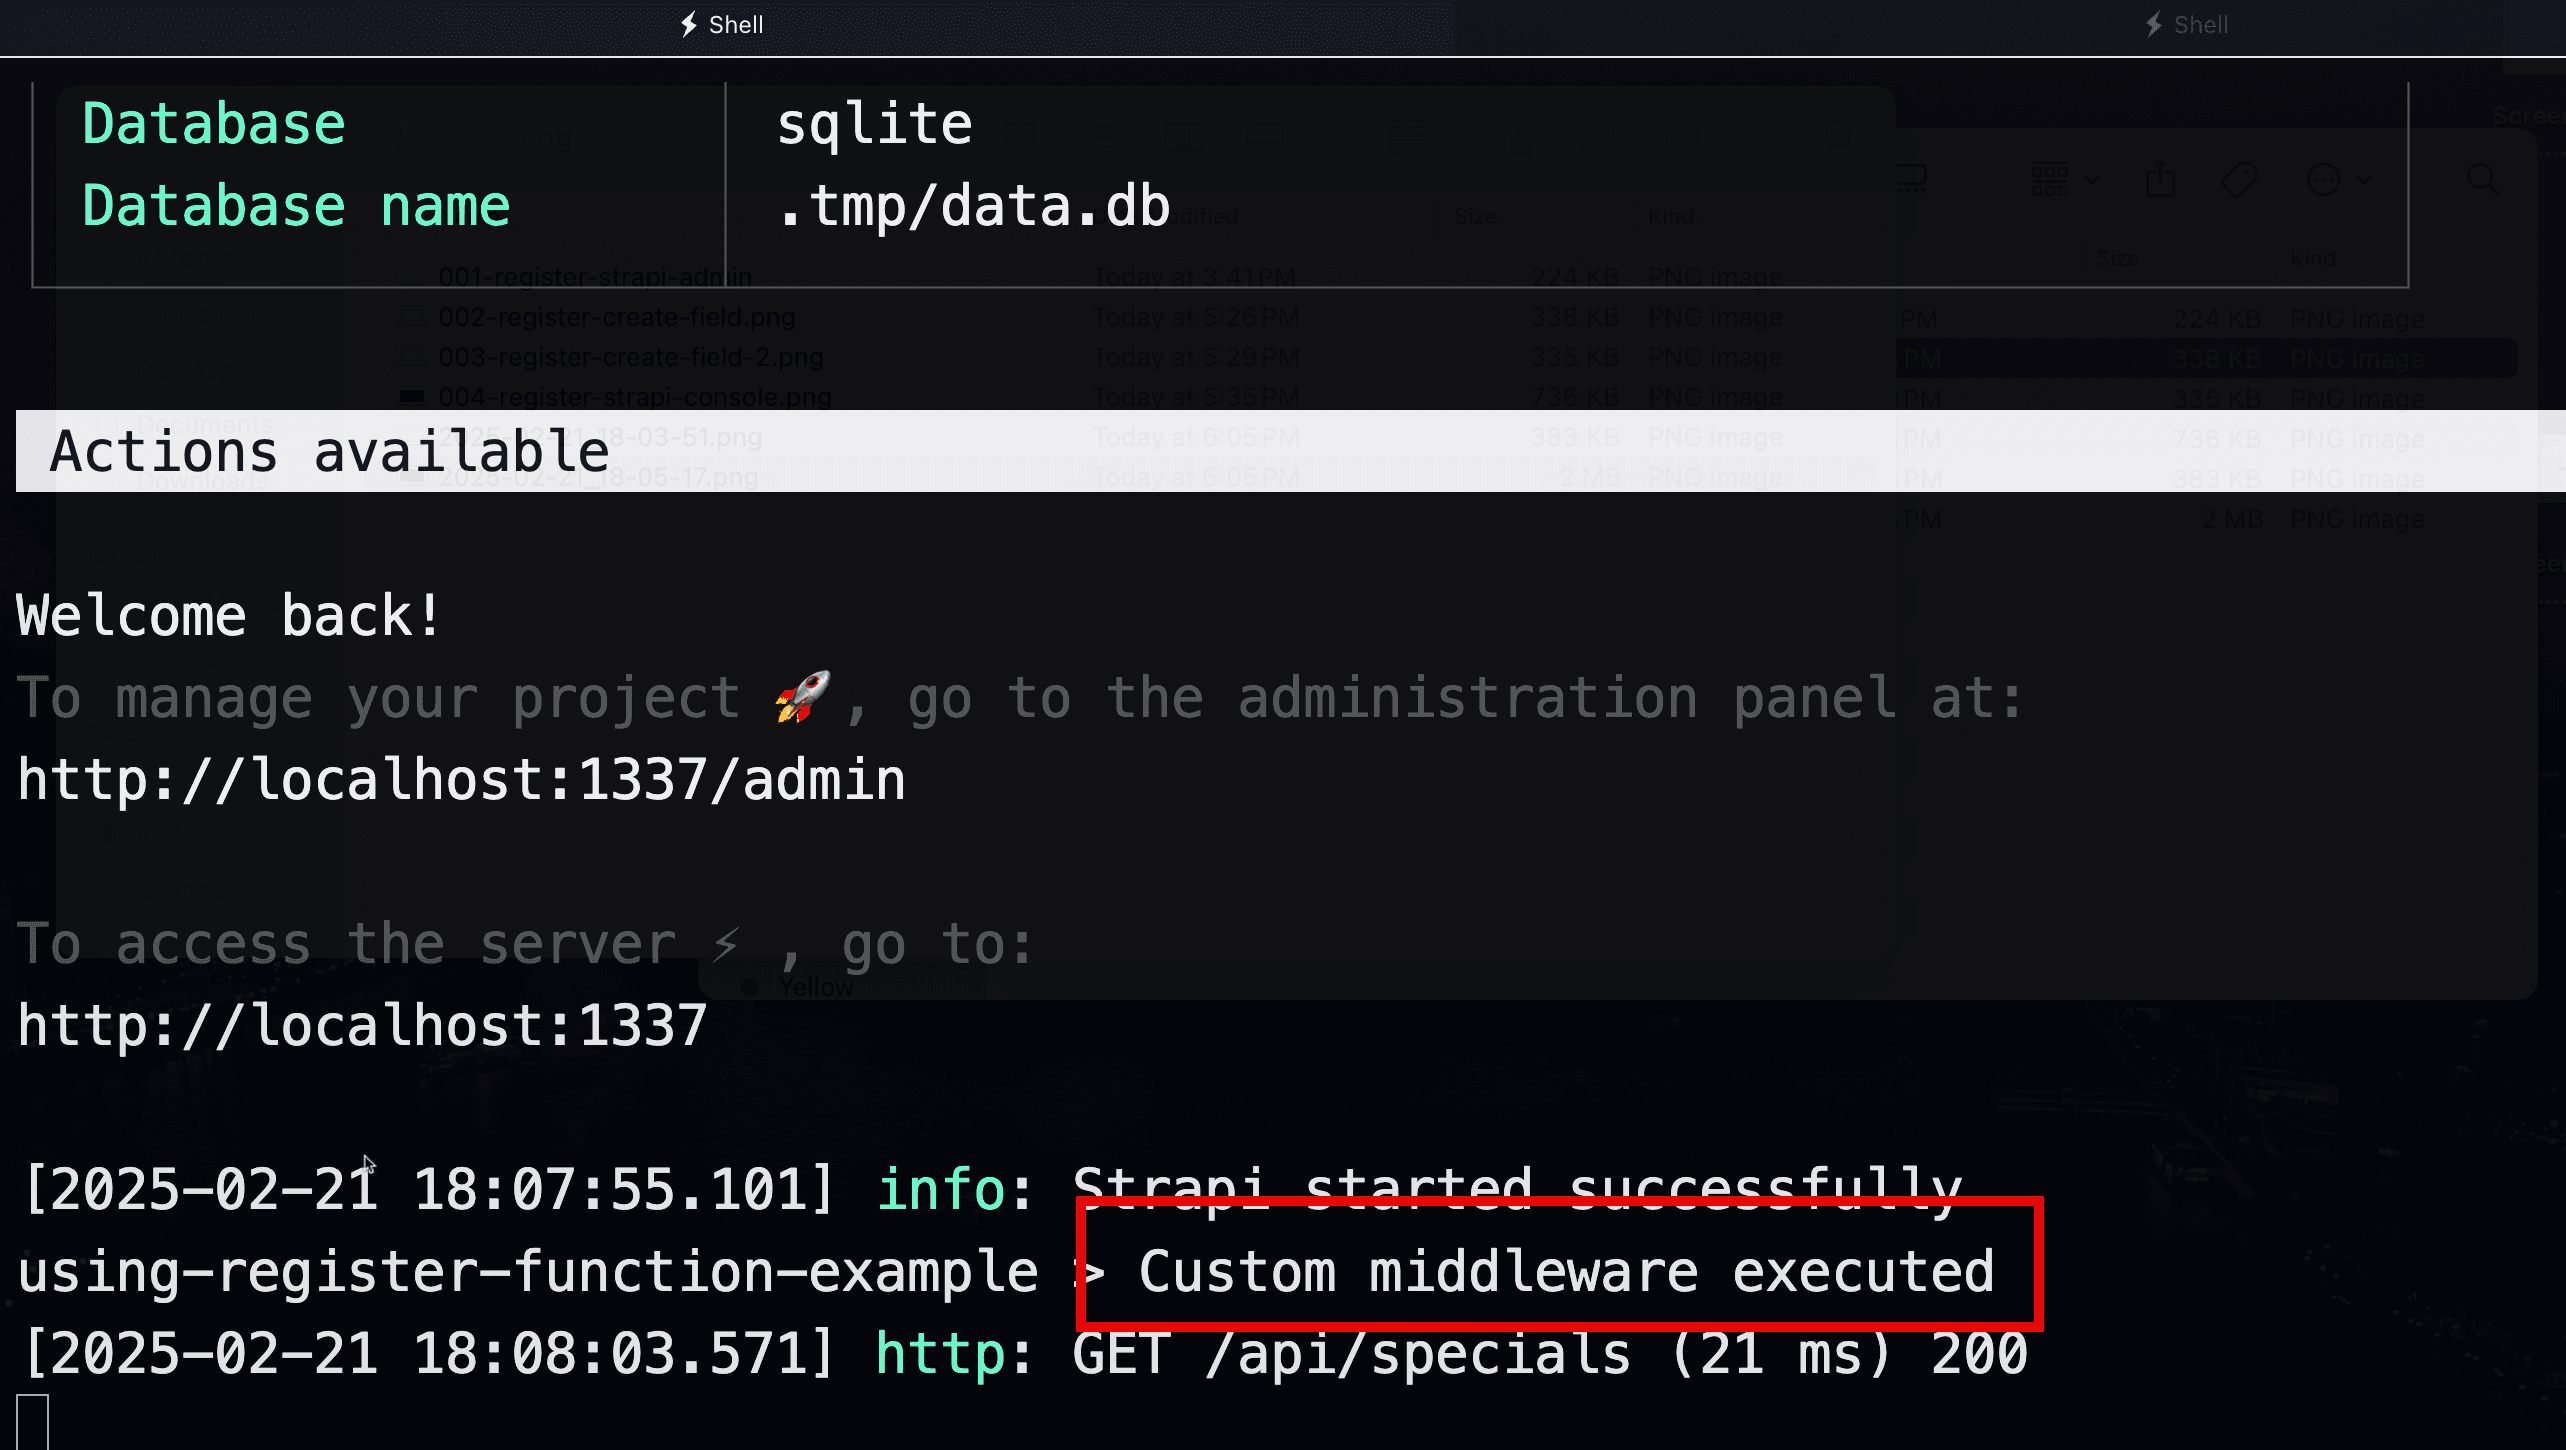
Note: you can extract the code in the src/index.ts file into a function and then call it in the register function. We will do this in the next example.
Using Register Function Inside a Plugin
Let's start by creating a simple plugin that we will use to inject middleware into a route.
We will use the Plugin CLI to create a new plugin.
We will run the following command to create a new plugin:
npx @strapi/sdk-plugin@latest init my-pluginYou will be prompted to enter the following information:
✔ plugin name … my-plugin
✔ plugin display name … My Plugin
✔ plugin description … Testing things
✔ plugin author name … Paul Brats
✔ plugin author email … paul.bratslavsky@strapi.io
✔ git url …
✔ plugin license … MIT
✔ register with the admin panel? … yes
✔ register with the server? … yes
✔ use editorconfig? … yes
✔ use eslint? … no
✔ use prettier? … yes
✔ use typescript? … yes
This will create a new plugin in the src/plugins folder.
To enable your plugin by adding the following in config/plugins.ts.
export default {
  // ...
  "my-plugin": {
    enabled: true,
    resolve: "./src/plugins/my-plugin",
  },
  // ...
};
Now that we have our plugin let's see how to inject middleware into a route.
To keep our code clean, we will create a src/plugins/my-plugin/server/src/utils folder with an index.ts file containing all the functions we will need.
But first, let's create a new middleware inside the src/plugins/my-plugin/server/src/middlewares folder called custom-plugin-middleware.ts. We will recreate the middleware example we created in the previous example.
export default (config, { strapi }) => {
  // Custom middleware logic
  return async (ctx, next) => {
    console.log("Custom Plugin Middleware Executed");
    await next();
  };
};
Remember to export the middleware from the index.ts file. This way, if we have multiple middleware, we can export them from the same file.
import customPluginMiddleware from "./custom-plugin-middleware";

export default {
  customPluginMiddleware,
};
Remember, if you need to find the middleware name, you can use the following command:
npm run strapi consolefollowed by:
strapi.middlewaresIf you don't see the middleware, you will need to rebuild the plugin by running the following:
cd src/plugins/my-plugin
npm run build
You can also run the plugin in watch mode by running:
npm run watchI will do that now, so I don't have to rebuild the plugin every time I change.
Now, let's create the src/plugins/my-plugin/server/src/utils/index.ts file and add the following function:
import type { Core } from "@strapi/strapi";

const registerDocumentMiddleware = (strapi: Core.Strapi) => {
  const middleware = "plugin::my-plugin.customPluginMiddleware";
  const routesPath = strapi.apis.special.routes.special.routes;

  const registerIndex = routesPath.findIndex(
    (route) => route.path === "/specials" && route.method === "GET"
  );

  const registerRoute = routesPath[registerIndex];

  if (registerRoute.config.middlewares === undefined) {
    registerRoute.config.middlewares = [];
  }
  registerRoute.config.middlewares.push(middleware);
};

export { registerDocumentMiddleware };
Finally, let's import our registerDocumentMiddleware function in to src/plugins/my-plugin/server/src/register.ts file.
import type { Core } from "@strapi/strapi";
import { registerDocumentMiddleware } from "./utils";

const register = ({ strapi }: { strapi: Core.Strapi }) => {
  registerDocumentMiddleware(strapi);
};

export default register;
Since we are now using our plugin to inject our middleware, let's remove the code from the src/index.ts that we used previously or just comment it out.
The file should now look like this:
import type { Core } from "@strapi/strapi";

export default {
  /**
   * An asynchronous register function that runs before
   * your application is initialized.
   *
   * This gives you an opportunity to extend code.
   */
  register({ strapi }: { strapi: Core.Strapi }) {
    // const middleware = "global::custom-middleware";
    // const routesPath = strapi.apis.special.routes.special.routes;
    // console.log(routesPath, "routesPath");
    // console.log(middleware, "middleware");
    // const registerIndex = routesPath.findIndex(
    //   (route) => route.path === "/specials" && route.method === "GET"
    // );
    // console.log(registerIndex, "registerIndex");
    // const registerRoute = routesPath[registerIndex];
    // if (registerRoute.config.middlewares === undefined) {
    //   registerRoute.config.middlewares = [];
    // }
    // registerRoute.config.middlewares.push(middleware);
  },

  /**
   * An asynchronous bootstrap function that runs before
   * your application gets started.
   *
   * This gives you an opportunity to set up your data model,
   * run jobs, or perform some special logic.
   */
  bootstrap(/* { strapi }: { strapi: Core.Strapi } */) {},
};
Now that we have commented out the code from the src/index.ts file, we can start to test if the plugin is working as expected. Don't forget to build the plugin by running npm run build and restart the strapi instance by running npm run strapi develop.
When we make a GET request to http://localhost:1337/api/specials we should see our new console.log coming from the plugin middleware.
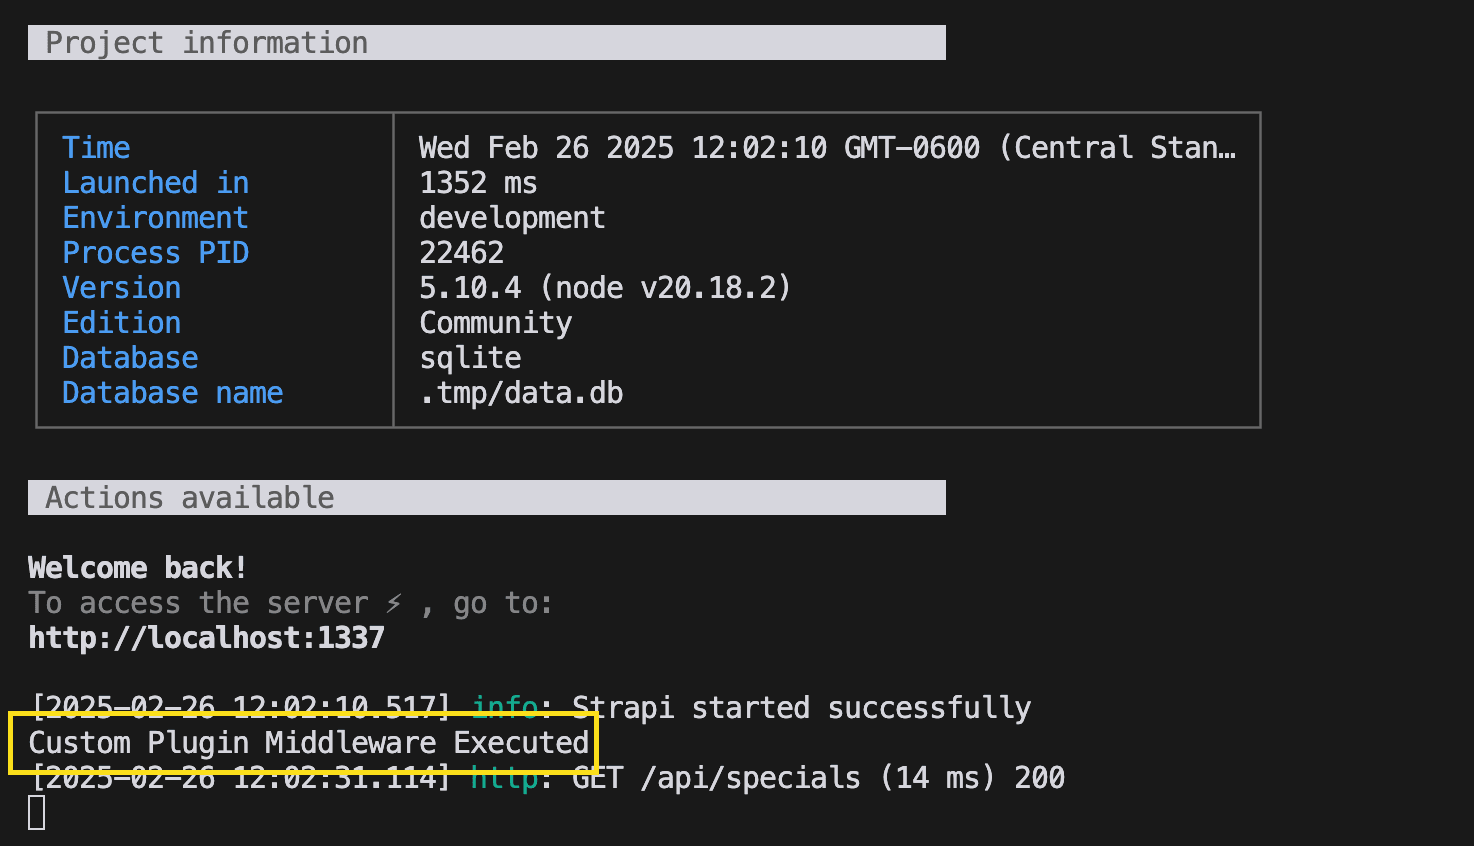
Congrats, this part is done. Now, to explain why this is useful. This means a plugin can dynamically inject middleware into your strapi instance; this is cool because it means you can have a plugin responsible for adding custom middleware to your strapi instance. You can disable/remove the plugin if you want to remove it.
This is nice because it allows you to have plugins that add custom data or functionality to requests or any custom logic, like validation or caching.
Now, let's see how we can programmatically add a component to a content type.
3. Creating a new component programmatically.
Previously, we created a content type called Special in the setup. Let's learn how to programmatically create a new component in our plugin and inject it into our existing contentType.
Step 1: Create the component.
Let's create a folder called components in the src/plugins/my-plugin/server/src folder, create a new file called quote.ts, and export it.
The code will look like this:
export const quote = {
  collectionName: "components_shared_quotes",
  info: {
    displayName: "Quote",
    icon: "indent",
  },
  options: {},
  attributes: {
    title: {
      type: "string",
    },
    body: {
      type: "text",
    },
  },
  __filename__: "quote.json",
  __schema__: {
    collectionName: "components_custom_quotes",
    info: {
      displayName: "Quote",
      icon: "indent",
    },
    options: {},
    attributes: {
      title: {
        type: "string",
      },
      body: {
        type: "text",
      },
    },
    __filename__: "quote.json",
  },
  uid: "custom.quote",
  category: "custom",
  modelType: "component",
  modelName: "quote",
  globalId: "ComponentSharedQuote",
};
Step 2: Create registerComponent function.
Inside the src/plugins/my-plugin/server/src/utils/index.ts file, let's create a new function called registerComponent by adding the following code:
import { quote } from "../components/quote";

const registerComponent = (strapi: Core.Strapi) => {
  strapi.components[`custom.quote`] = quote as any;

  const attributes = strapi.contentType("api::special.special").attributes;
  const schema = strapi.contentType("api::special.special")["__schema__"]
    .attributes;

  const componentReference = {
    type: "component",
    repeatable: false,
    component: "custom.quote",
  };
  // @ts-expect-error - attributes waiting to be updated https://github.com/strapi/strapi/blob/cc6c39db185a337e2eafce8bcf06544351e92cc5/packages/core/types/src/struct/schema.ts#L13
  attributes["customField"] = componentReference;
  schema["customField"] = componentReference;
};
Don't forget to add it to the exports.
export { registerDocumentMiddleware, registerComponent };Step 3: Import the function.
Finally, let's import the function in the src/plugins/my-plugin/server/src/register.ts file. The updated code should look like this:
import type { Core } from "@strapi/strapi";
import { registerDocumentMiddleware, registerComponent } from "./utils";

const register = ({ strapi }: { strapi: Core.Strapi }) => {
  registerDocumentMiddleware(strapi);
  registerComponent(strapi);
};

export default register;
Let's rebuild and restart and see if our component works as expected.
If you navigate to the content-type-builder you should see our new component injected into the Special contentType.

Finally, let's take a look at one more example. We will see how we can inject a cron job programmatically via our plugin.
4. Adding a Cron Job Programmatically via Our Plugin.
Step 1: Define the Cron Job.
Let's create a new folder called cron-jobs in the src/plugins/my-plugin/server/src folder, create a new file called my-first-job.ts, and export it.
The code will look like the following:
export const cronJob = {
  task: () => {
    console.log("cron job");
  },
  // only run once after 10 seconds
  options: {
    rule: "* * * * * *",
    // start 10 seconds from now
    start: new Date(Date.now() + 10000),
    // end 20 seconds from now
    end: new Date(Date.now() + 20000),
  },
};
This example is borrowed from the Strapi Documentation.
We programmatically add and enable the cron job in our configuration.
Step 2: Create registerCronJob function.
Inside the src/plugins/my-plugin/server/src/utils/index.ts file, let's create a new function called registerCronJob by adding the following code:
import { cronJob } from "../cron-jobs/my-first-cron-job";

const registerCronJob = (strapi: Core.Strapi) => {
  const serverConfig = strapi.config.server;

  if (serverConfig?.cron?.tasks === undefined) {
    serverConfig.cron.tasks = {};
  }

  serverConfig.cron.enabled = true;
  serverConfig.cron.tasks["myJob"] = cronJob;
};
Finally, let's import the function in the src/plugins/my-plugin/server/src/register.ts file. The updated code should look like this:
import type { Core } from "@strapi/strapi";
import {
registerDocumentMiddleware,
registerCronJob,
registerComponent,
} from "./utils";
const register = ({ strapi }: { strapi: Core.Strapi }) => {
registerDocumentMiddleware(strapi);
registerComponent(strapi);
registerCronJob(strapi);
};
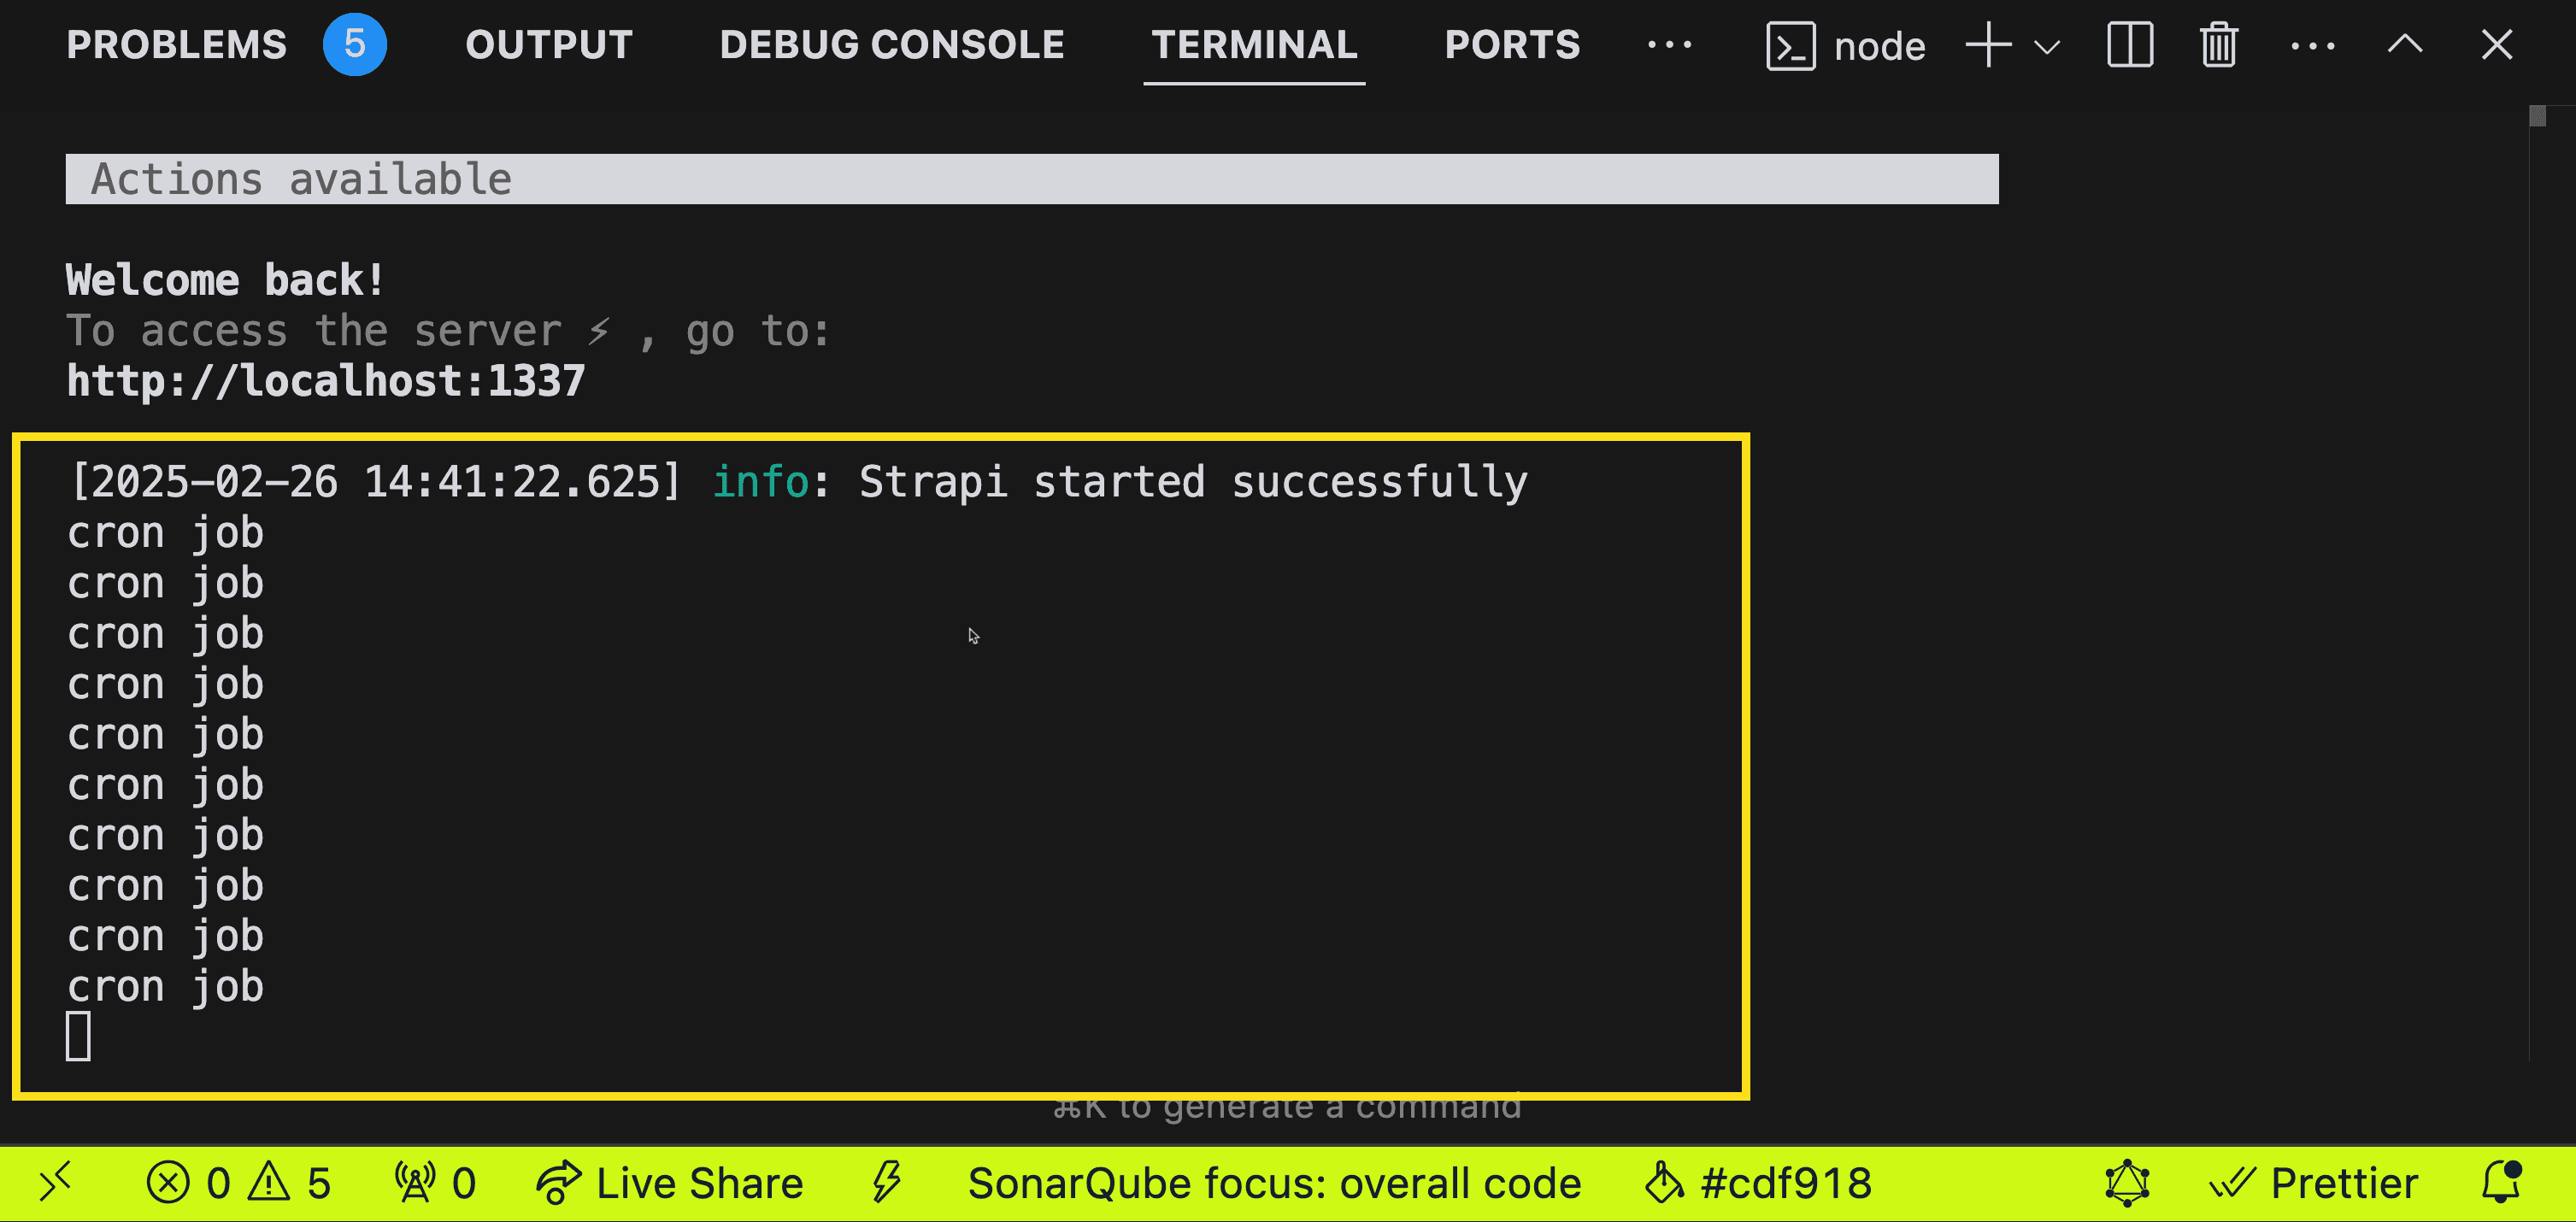
export default register;Let's rebuild and restart and see if our cron job works as expected. You should see the following in your console. Just be aware that it will start running after 10 seconds, run for 10 seconds, and then stop.
Conclusion
We just learned how to use the register function in Strapi and how to use it in plugins to inject custom middleware, components, and cron jobs.
Key Takeaways:
-
Understanding the register Function: The register function runs before the Strapi application initializes and allows developers to modify, extend, or inject functionality into the application.
-
Strapi Object Structure: We learned where different elements (APIs, plugins, middlewares, policies, services, content types, components, configurations, and cron jobs) are located within the Strapi object, providing direct access paths.
Injecting Custom Middleware: We learned how to define, register, and apply custom middleware to specific routes using the register function.
- Using the Register Function Inside a Plugin: We learned how to create a Strapi plugin and leverage the register function to inject middleware dynamically.
Programmatically Creating Components: We learned how to register new components and associate them with existing content types within Strapi using the register function.
- Adding Cron Jobs Programmatically: We learned to inject cron jobs into Strapi via plugins, allowing scheduled tasks without manual configuration.
I hope you enjoyed this blog post. If you have any questions, please leave a comment below.
Github Project Repo
You can find the complete code for this project in the following Github repo.
Strapi Open Office Hours
If you have any questions about Strapi 5 or would like to stop by and say hi, you can join us at Strapi's Discord Open Office Hours Monday through Friday at 12:30 pm - 1:30 pm CST: Strapi Discord Open Office Hours.