
Strapi plugins exist to make our work easier and our backend more functional. Plugins are convenient, and you can get them from the Strapi marketplace but sometimes, you will need some custom functions for your Strapi backend. Hence, we are going to learn how to make our own custom plugins. We will be making a simple reminder app that will send an email whenever you add a reminder. Let’s get started.
Prerequisites
- Basic knowledge of Javascript
- Basic knowledge of React
- Basic understanding of Strapi
- The system should have node.js installed.
What is Strapi?
The Strapi documentation says that "Strapi is an open-source headless CMS that gives developers the freedom to choose their favorite tools and frameworks while also allowing editors to manage and distribute their content using their application's admin panel." Through the admin panel, you can make functional plugins.
Creating a Strapi Project
You can read the Strapi documentation, where it explains in detail creating a boilerplate project using CLI.Let’s go with creating a quickstart project with SQLite database for this project, as it is easy to start with. You can use any you want though. Run the command below:
npx create-strapi-app@latest tutorialdev --quickstartThis will create a Srapi project with the name “tutorialdev”;you can replace it with any name you want.
To run project, run the command below:
npm run develop -- --watch-adminThis will run your strapi server on http://localhost:8000/
Creating Plugin Files Using CLI
To create the basic plugin files, we will use strapi CLI command which is really simple.
Run this command:
npm run strapi generateAnd then choose the plugin and name it anything you like. I named it “reminderapp” here. You will get a code in your terminal like this:
module.exports = {
  // ...
  reminderapp: {
    enabled: true,
    resolve: './src/plugins/reminderapp
  },
  // ...
}
Now, go to the config folder in the main directory and go to plugins.js. If you can’t find the file, create it and paste the code above. Change reminderapp to the name of the plugin that you put or just copy the code from your terminal and paste it.
Project Structure
Let's understand the basic structure of our project and what files are important to us. In your “src” folder, you will be able to find a “plugins” folder, inside which you will find a folder with the name of the plugin you created.
In our case, we will find “reminderapp”. It has two folders named “admin” and “server”. You will mainly work in the admin folder; when you open it, you will notice a folder named “pages”, inside which you will find “Homepage” folder where your main plugin frontend will be.

In the “server” folder, you will find controllers, routes, content-type, controllers, and services. I hope you are familiar with all terminology. We will be using content-type for storing reminders and the other three for extra functions. Let's get started with creating a backend for plugins like content-type, services for data querying,controllers,routes and other things.
Creating Content-Type for Saving Reminders
The content type is like a schema for our database; we will create a reminder content type.
Run this command:
npm run strapi generateHere, then choose content-type. Type the name for content type you want to create and keep clicking enter, below is an example how everything will look like:

Add attributes you want in your schemas, their names, and datatype. Once you are done with adding them, select “Add model to existing plugin” and choose our plugin name. In the picture, I used “todo”, but you have to use “reminder” instead as the picture is only as an example.
It will generate a schema.json; you can find it by going inside your plugins folder then to your server folder. Move to content type, there, you will see a folder generated with the name of the content type you specified, and inside it you will find schema.json.
You will be bedding four attributes for this tutorial: name, date, datetime, and isdatepassed. Now, let's go with creating routes, controllers, and services.
Making Routes, Controllers, and Services
Routes are basically API endpoints which we will hit. Services refer to where we will write all code for data query and other database operation. Controllers will be linking them.
Let’s make services first:
- Go to plugin root folder,
- Go to server/services,
- Create a file named “reminder.js”, and
- Put this code inside it:
'use strict';
module.exports = ({ strapi }) => ({
 async getall(query){
  strapi.db.query('plugin::reminderapp.reminder').updateMany({
    where:{
      datetime:{
        $lt:new Date()
      }
    },
    data:{
      isdatepassed:true
    }
  })
    const q=strapi.entityService.findMany("plugin::reminderapp.reminder",{
      filters:{
        isdatepassed:{
          $eq:false
        }
      }
    });
    return await q;
 } ,
  async deleteReminder(id) {
    return await strapi.entityService.delete("plugin::reminderapp.reminder", id);
  },

  async createReminder(data) {
    return await strapi.entityService.create("plugin::reminderapp.reminder", data);
  },

  async updateReminder(id, data) {
    return await strapi.entityService.update("plugin::reminderapp.reminder", id, data);
  },
});
Let's understand what each function is doing here.
- getall(): This function first updates the “isdatepassed” attribute of all reminders whose date is already passed then it queries to return every reminder whose isdatepassed attribute is false.
- DeleteReminder(): It will take the id of the reminder and will delete it.
- CreateReminder(): It will create a new reminder instance with the data you gave.
- UpdateReminder(): It will update the reminder whose id you passed with the given data.
Now go to the server/controllers folder and create reminder.js there and add this:
'use strict';

module.exports={
    async getall(ctx){
        try{
            return await strapi.plugin("reminderapp").service("reminder").getall(ctx.query);
        }
        catch(err){
            ctx.trow(500,err);
        }
    },

    async deleteReminder(ctx) {
      try {
        ctx.body = await strapi
          .plugin("reminderapp").service("reminder")
          .deleteReminder(ctx.params.id);
      } catch (err) {
        ctx.throw(500, err);
      }
    },
    async createReminder(ctx) {
      try {
        ctx.body = await strapi
          .plugin("reminderapp").service("reminder")
          .createReminder(ctx.request.body);
      } catch (err) {
        ctx.throw(500, err);
      }
    },

    async updateReminder(ctx) {
      try {
        ctx.body = await strapi
          .plugin("reminderapp").service("reminder")
          .updateReminder(ctx.params.id, ctx.request.body);
      } catch (err) {
        ctx.throw(500, err);
      }
    },
};
Here, we simply made our services accessible to our routes. The plugin takes the name of the plugin whose services we are going to use and service() takes the name of the service we will be going to access.
Now go to index.js in the controllers folder:
'use strict';

const myController = require('./my-controller');
const reminder =require('./reminder');

module.exports = {
  myController,
  reminder,
};
Now go to index.js inside the routes folder and add the following code:
module.exports = [
  {
    method: 'GET',
    path: '/',
    handler: 'myController.index',
    config: {
      policies: [],
    },
  },
  {
    method: 'GET',
    path: '/getall',
    handler: 'reminder.getall',
    config: {
      policies: [],
      auth:false,
    },
  },
  {
    method: "POST",
    path: "/create",
    handler: "reminder.createReminder",
    config: {
      policies: [],
    },
  },

  {
    method: "DELETE",
    path: "/delete/:id",
    handler: "reminder.deleteReminder",
    config: {
      policies: [],
    },
  },
  {
    method: "PUT",
    path: "/update/:id",
    handler: "reminder.updateReminder",
    config: {
      policies: [],
    },
  },
];
This will create routes for your frontend to access the plugin services that we created. Now, go to the plugin root folder, then to admin/src, and the API folder. Then, create a file named “reminder.js”.
Add this code to the file:
import { request } from "@strapi/helper-plugin";
const ReminderApiHandler = {
  getAllReminders: async () => {
    return await request("/reminderapp/getall", {
      method: "GET",
    });
  },
  addReminder: async (data) => {
    return await request(`/reminderapp/create`, {
      method: "POST",
      body: { data: data },
    });
  },
  editReminder: async (id, data) => {
    return await request(`/reminderapp/update/${id}`, {
      method: "PUT",
      body: { data: data },
    });
  },
  deleteReminder: async (id) => {
    return await request(`/reminderapp/delete/${id}`, {
      method: "DELETE",
    });
  },
};
export default ReminderApiHandler;
This way, you will be able to easily send requests to the Strapi backend from your plugin frontend. You are through with setting up the backend and setting up the connection between frontend and backend.
Let’s get started with creating a frontend for our plugin.
Developing the Frontend for the Plugin
Creating the frontend for the plugin is the next job for our development; this will be going to be the easiest part of our project. There are two ways to create a frontend for the plugin: creating CSS files and applying them or using Strapi default stylesheets.
We will be using the Strapi default stylesheets. Click here to view Strapi’s design system. Explore the whole storybook and find out amazing styled components. The best part is that it matches the default style of the admin panel of Strapi so you don’t need to worry for themes.
Let’s get started.
HomePage
import React, { memo } from 'react';
// import PropTypes from 'prop-types';
import { Layout,BaseHeaderLayout } from '@strapi/design-system/Layout';
import { Button } from '@strapi/design-system/Button';
import Plus from '@strapi/icons/Plus';
import { Box } from '@strapi/design-system/Box';
import { EmptyStateLayout } from '@strapi/design-system/EmptyStateLayout';
import Calendar from '@strapi/icons/Calendar';
import { Table, Thead, Tbody, Tr, Td, Th } from '@strapi/design-system/Table';
import { Typography } from '@strapi/design-system/Typography';
import { DatePicker } from '@strapi/design-system/DatePicker';
import Modal from '../../components/Modal';
import ReminderApiHandler from '../../api/reminder';
import { Flex } from '@strapi/design-system/Flex';
import { IconButton } from '@strapi/design-system/IconButton';
import Pencil from '@strapi/icons/Pencil';
import Trash from '@strapi/icons/Trash';
import EditModal from '../../components/EditModal';
function HomePage(){

  const [reminderList,setReminder]=React.useState([]);
const [ModalVisible,SetModalVisible]=React.useState(false);
  const [isEdit,setIsEdit]=React.useState(false)
  const [editedVal,setEditedVal]=React.useState({})
async function FetchReminders(){
  const reminders=await ReminderApiHandler.getAllReminders();
  setReminder(reminders)
}

async function DeleteReminders(id){
  const deleted=await ReminderApiHandler.deleteReminder(id)
  FetchReminders()
}

async function updateReminder(id,data){
  await ReminderApiHandler.editReminder(id,{"remindername":data.remindername,"date":data.date,'datetime':new Date(data.date)})
  FetchReminders()
}

function addReminder(data){
  ReminderApiHandler.addReminder({"remindername":data.remindername,"date":data.date,"datetime":new Date(data.date),"isdatepassed":false})
FetchReminders()
}


React.useEffect(()=>{
  FetchReminders()
},[])
  return (<Box>
      <Layout>

<Box background="neutral100">
<BaseHeaderLayout primaryAction={<Button startIcon={<Plus />} onClick={SetModalVisible}>Add an reminder</Button>}
 title="Add reminder" subtitle={`${reminderList.length} reminders found`} as="h2" />
    </Box>
    {reminderList.length==0?
    <Box padding={8} background="neutral100">
      <EmptyStateLayout icon={<Calendar />} content="You don't have any reminders yet..." />
    </Box>:
    <Table>
      <Thead>
        <Tr>
        <Th>
            <Typography variant="sigma">ID</Typography>
                </Th>
                <Th>
                  <Typography variant="sigma">Reminder name</Typography>
                </Th>
                <Th>
                  <Typography variant="sigma">date</Typography>
                </Th>

        </Tr>
      </Thead>
      <Tbody>
      {reminderList.map((k)=>{
      return(
      <Tr>
      <Td>
      <Typography textColor="neutral800">{k.id}</Typography>
    </Td>
    <Td>
      <Typography textColor="neutral800">{k.remindername}</Typography>
    </Td>
    <Td>
    <DatePicker selectedDate={new Date(k.date)} label="date" name="datepicker" selectedDateLabel={formattedDate => `Date picker, current is ${formattedDate}`} disabled />

    </Td>
    <Flex>
       <IconButton onClick={() => {
        setEditedVal({
          id:k.id,
          date:k.date,
          remindername:k.remindername
        })
        setIsEdit(true)
       }} label="Edit" noBorder icon={<Pencil />} />
      <Box paddingLeft={1}>
        <IconButton onClick={() => DeleteReminders(k.id)} label="Delete" noBorder icon={<Trash />} />
      </Box>
    </Flex>
    </Tr>

    )}
    )}
    </Tbody>
    </Table>}
      </Layout>
      {ModalVisible&& <Modal setShowModal={SetModalVisible} addReminder={addReminder}/>}
      {isEdit&& <EditModal setShowModal={setIsEdit} updateReminder={updateReminder} id={editedVal.id} dateGiven={editedVal.date} nameGiven={editedVal.remindername}/>}
    </Box>
    )
};
export default memo(HomePage);
This frontend simply calls all reminders from getall endpoint. On clicking “add reminder” button, it will open a modal from where you will be able to add a reminder. On clicking the trash icon, you will be able to delete the reminder. On clicking the edit button, a new modal will open a reminder whose value you are editing.
This will result in:
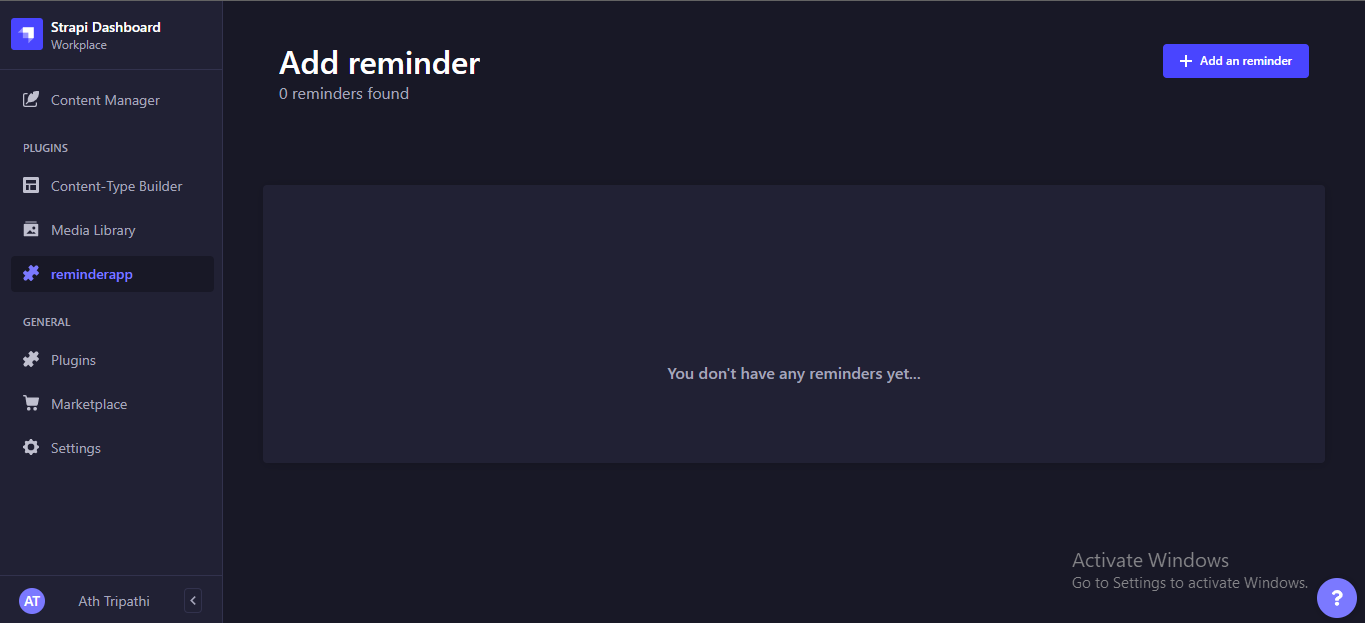
It will show a list of reminders in empty space. We don’t have any reminders so we will not see any right now but once we had it. We will be able to see them.
Let me show you how will it look:

Sending Emails Whenever You Create A Reminder
Go to admin/src/api and create a Mailer.js. First, download nodemailer library using following command:
npm i nodemailer --saveNow, go to file and put this code:
/*
    Video: https://www.youtube.com/watch?v=Va9UKGs1bwI
    Don't forget to disable less secure app from Gmail: https://myaccount.google.com/lesssecureapps TODO:
*/

const nodemailer = require('nodemailer');
const log = console.log;


\\Step 1
const mail=’mailer@gmail.com'
const mailTo='mailto@gmail.com'
const password=’password'
let transporter = nodemailer.createTransport({
    service: 'gmail',
    auth: {
        user:mail, // TODO: your gmail account
        pass:password// TODO: your gmail password
    }
});

// Step 2
let mailOptions = {
    from: mail, // TODO: email sender
    to: mailTo, // TODO: email receiver
    subject: 'Reminder added',
    text: 'reminder'
};

// Step 3
Export default function Mailing(){
transporter.sendMail(mailOptions, (err, data) => {
    if (err) {
        return log('Error occurs'+err);
    }
    return log('Email sent!!!');
});
}
For Passwords
Go to My Account > Sign-in & Security > App Passwords, scroll down and select app and choose ‘Other’. Name the app “nodemailer”, click generate and copy-paste long generated password as gmail password.
Now, go to api/reminder.js and import the above function and call it in create function:
import SendingMail from './Mailer'
…..
  addReminder: async (data) => {
    SendingMail()
    return await request(`/reminderapp/create`, {
      method: "POST",
      body: { data: data },
    });
  },
….
Now, you are all done with making everything. I hope you now understand how easy it is to make strapi plugins and how you can make them functional using third-party packages.
Here is the result:

Conclusion
- You learned how to make Strapi plugins.
- You learned how a project is structured in Strapi.
- How to setup routes, controllers, and services to make backend.
- How to establish the connection between plugin frontend and backend.
- Saving reminders using content type and making schema using content types.
Hope you will use your knowledge and make the cool plugin that will really help other Strapi developers and help the Strapi community.