REST API stands for Representational State Transfer Application Programming Interface, which is a bit of a mouthful. In basic terms, it's a way for two computer systems to communicate over HTTP (the protocol web browsers use) using a consistent set of rules. REST APIs power many apps and services that we use every day. They provide a standardized and flexible way for different software systems to "talk" to each other.
This REST API tutorial will explore the main concepts behind REST APIs, how they work, and how to use them, with real-world examples and a tutorial using Strapi as a headless CMS.
What is an API?
An Application Programming Interface (API) is something like a contract or a messenger that allows one program to request data or actions from another program, it's a set of rules or definitions that determines how software components should interact with each other. Think of it like a menu at a restaurant: the menu lists available dishes (operations) and how to request them, and the kitchen (the server) returns the prepared dish (the data).
Imagine a weather service API. The API might specify that the client needs to provide a zip code, in return the server will send back the current temperature for that area. The client doesn't really need to know how the server gets the weather data; it just needs to know how to request that data and the shape of the data it will get back (the weather info). The API acts as a translator between the different software systems here, so they can exchange information without exposing internal details.
Most modern APIs typically use HTTP and JSON, but there are different styles:
- REST APIs: Follow the REST architecture style using HTTP requests to access and manipulate data.
- GraphQL APIs: Use a single endpoint and a query language to let clients ask for exactly the data they need in one request.
- SOAP APIs: Use XML messages and a formal protocol for exchanging data. SOAP is more rigid and verbose, whereas REST is lighter and easier to use for web applications.
What is a REST API?
Representational State Transfer (REST) is an architectural style for designing networked applications, it was introduced by a computer scientist named Roy Fielding in the year 2000. This architectural style was created to define a standard way for two servers to communicate over the web, it offers a set of principles/constraints that yields a flexible, scalable web API design.
RESTful APIs have since become the backbone of web communication largely because they are simpler and more efficient for most tasks than older approaches. They are stateless (helps with scalability), cacheable, and rely on standards like HTTP, URLs, and JSON/XML.
REST API Principles
So seeing as REST isn't a specific technology but more of a set of guiding principles or constraints, to successfully design a REST API, you should aim to follow these core ideas:
- Statelessness: The server shouldn't store any client-specific context between requests. Each request from the client should contain all of the information needed to understand and process it, as nothing is kept on the server from previous interactions. This stateless principle makes it easier to scale and reduces the complexity of server-side session management.
- Resource-based structure: You model your data as resources (nouns), each with a unique identifier (a URL). By way of an example users, orders, and products can all be resources. Each resource type can be represented as a path in the URL (
/usersfor a collection of user resources), rather than send an action in the URL, you use the HTTP method to specify the action (more on methods below). - Client server separation: The client (frontend) and the server are kept separate. The client should only need to know the URI and protocol to use the API, it doesn't know or care about how the server implements logic or stores data, likewise, the server doesn't care about the client's UI or state. This allows the two to evolve separately.
- Uniform interface: REST has a consistent, uniform way to interact with resources, for instance, it uses standard HTTP methods for operations (GET to retrieve data, POST to create and so on), it uses standardized resource URIs so clients know how to access each resource, and consistently uses the correct status codes.
- HTTP methods for actions: RESTful APIs leverage HTTP verbs to signal the action to perform on a resource GET - retrieve a resource or collection of resources POST - Create a new resource PUT - Update an existing resource by replacing it with a new representation PATCH - Partially update an existing resource DELETE - Remove a resource These standard methods mean if you know the basics of HTTP, you can guess how to interact with a new REST API.
By adhering to these principles REST APIs aim to be simple, scalable, and loosely coupled.
Anatomy of a REST API Endpoint
A REST API endpoint is essentially a URL that points to a resource (or a collection of resources) on a server, understanding how they're structured will help you know how to form requests.
Breakdown of REST API Endpoint
Suppose we have the following URL as an example REST API endpoint:
https://api.example.com/v1/users/54?fields=name,emailThis URL can be split into parts:
- Protocol and Host:
https://api.example.com- This is the server's address (domain) - Path:
/v1/users/54- This is the path on the server identifying the resource,v1may indicate the version of the API,usersis the resource (user records), and54is an identifier for a specific resource in that collection (the user with ID 54) - Query string:
?fields=name,email- this is a query parameter, the part after the?provides additional filtering or instructions, in this case, the server allows specifying which fields to returnfields=name,emailtells the server to return only the name and email.
The endpoint (or URL) clearly specifies to the server what resource the client is interested in. By looking at a well-designed RESTful URL, you can clearly guess what it returns or does. This human-readable element of REST is what makes it intuitive.
REST API Request Structure
When a client calls a REST API, the request generally consists of the following:
- Endpoint URL: As discussed this is the unique address identifying the resource (
/users/54) - HTTP method: The action verb (GET, POST, PUT, DELETE, etc) that tells the server what operation you want to perform on that resource. These methods correspond to CRUD operations (create, read, update, delete) and follow standard HTTP semantics.
- Headers: Additional metadata sent with the request. Headers are key-value pairs that might include information about authorization, content type, caching directives, and more. For instance, a request might have a header of
Content-Type: application/jsonto indicate the format of the request body, or anAuthorizationheader to pass an access token. - Body (Payload): The data you send with the request. GET requests typically have nobody, as they ask for data, but for operations such as POST or PUT, the request body carries the data you want to create or update.
- Query parameters: Sometimes you include extra information in the URL as a query parameter (after a
?) often used for things like filtering results, pagination, or sorting. They refine what you are asking for.
As an example let's say you wanted to add a new user via a REST API:
Method: POST
URL: https: //api.example.com/v1/users
Headers:
  Content-Type:  application/json (sending JSON data)
  Authorization: Bearer <your-token-here> (if the API requires a token for auth)

Body:
{
  "name": "Strapi",
  "email": "strapi@example.com"
}
This request will tell the API to create a new resource under /users with the data provided, if authorized and valid the server will go ahead and process it.
REST API Response Structure
After a client sends a request, the server will process it and then return a response. A REST API response typically includes:
- Status code: This is a 3-digit code that indicates if the request was successful or not, and why, below is a list of the different status codes you will come across:
- 200 OK: This means that the request was successful for a GET or PUT request for instance the resource will be returned or updated as expected.
- 201 Created: This means that you have successfully created a new resource (Often returned after a POST adds data)
- 400 Bad Request: This means that the request was malformed or invalid in some way, it could be some missing data that is required or that the request is syntactically incorrect.
- 401 Unauthorised: This either means that authentication is required or that it has failed (provide valid credentials or token)
- 403 Forbidden: This means that the request is authenticated but it's not allowed to access that particular resource.
- 404 Not found: This means that the resource could not be found, it either doesn't exist or it's the wrong endpoint or ID.
- 500 Internal server error: This is a generic server error it's normally returned when something unexpected happens on the server side.
The status code is the first thing you should check in a response as it tells you how to interpret the result.
- Response body: This is the main data that is returned by the API, it's often in JSON format for REST APIs. If you requested a resource (GET), the body will contain the representation of that resource in JSON (if you requested a User you will receive a User object). If you created something (POST), the body might contain the newly created resource with its ID. If an error occurred, the body might contain an error message with details. The format normally depends on what the API supports, but JSON has become the de-facto standard for REST.
- Headers: The response also comes with its own set of headers. These might include
Content-Type(telling the client the format of the returned data), caching directives, cookies, or other metadata like server info of rate limit details.
To illustrate with a quick example, using the earlier scenario where we created a new user with POST, the server might respond with:
Status: 201 Created
Headers: Content-Type: application/json

Body:
{
  "id": 45,
  "name": "Strapi",
  "email": "strapi@example.com",
  "createdAt": "2025-05-01T10:00:00.000Z"
}
The body here is JSON showing the newly created user, which now has a server-assigned ID (45) and a timestamp. If instead, we had sent a GET request for an existing user, the status would have been 200 OK and the body would contain that user's data.
To summarise, a REST API response tells you whether your request was successful and provides the data or error info. By using HTTP's built-in status codes and headers, REST makes it easy for developers to understand the outcome of their API calls.
CRUD Operations with REST APIs
Now that we've covered the basics of requests and responses, let's walk through an actual REST API example by performing the classic CRUD operations: Create, Read, Update, and Delete. You can use a tool like Postman to send API requests, and there are example REST APIs you can use as examples like JSONPlaceholder.
POST Request Example
Create a POST request with the following details:
Method: POST
URL: https://jsonplaceholder.typicode.com/posts
Headers:
  Content-Type: application/json

Body:
{
  "title": "Hello World",
  "body": "This is my first test post",
  "userId": 1
}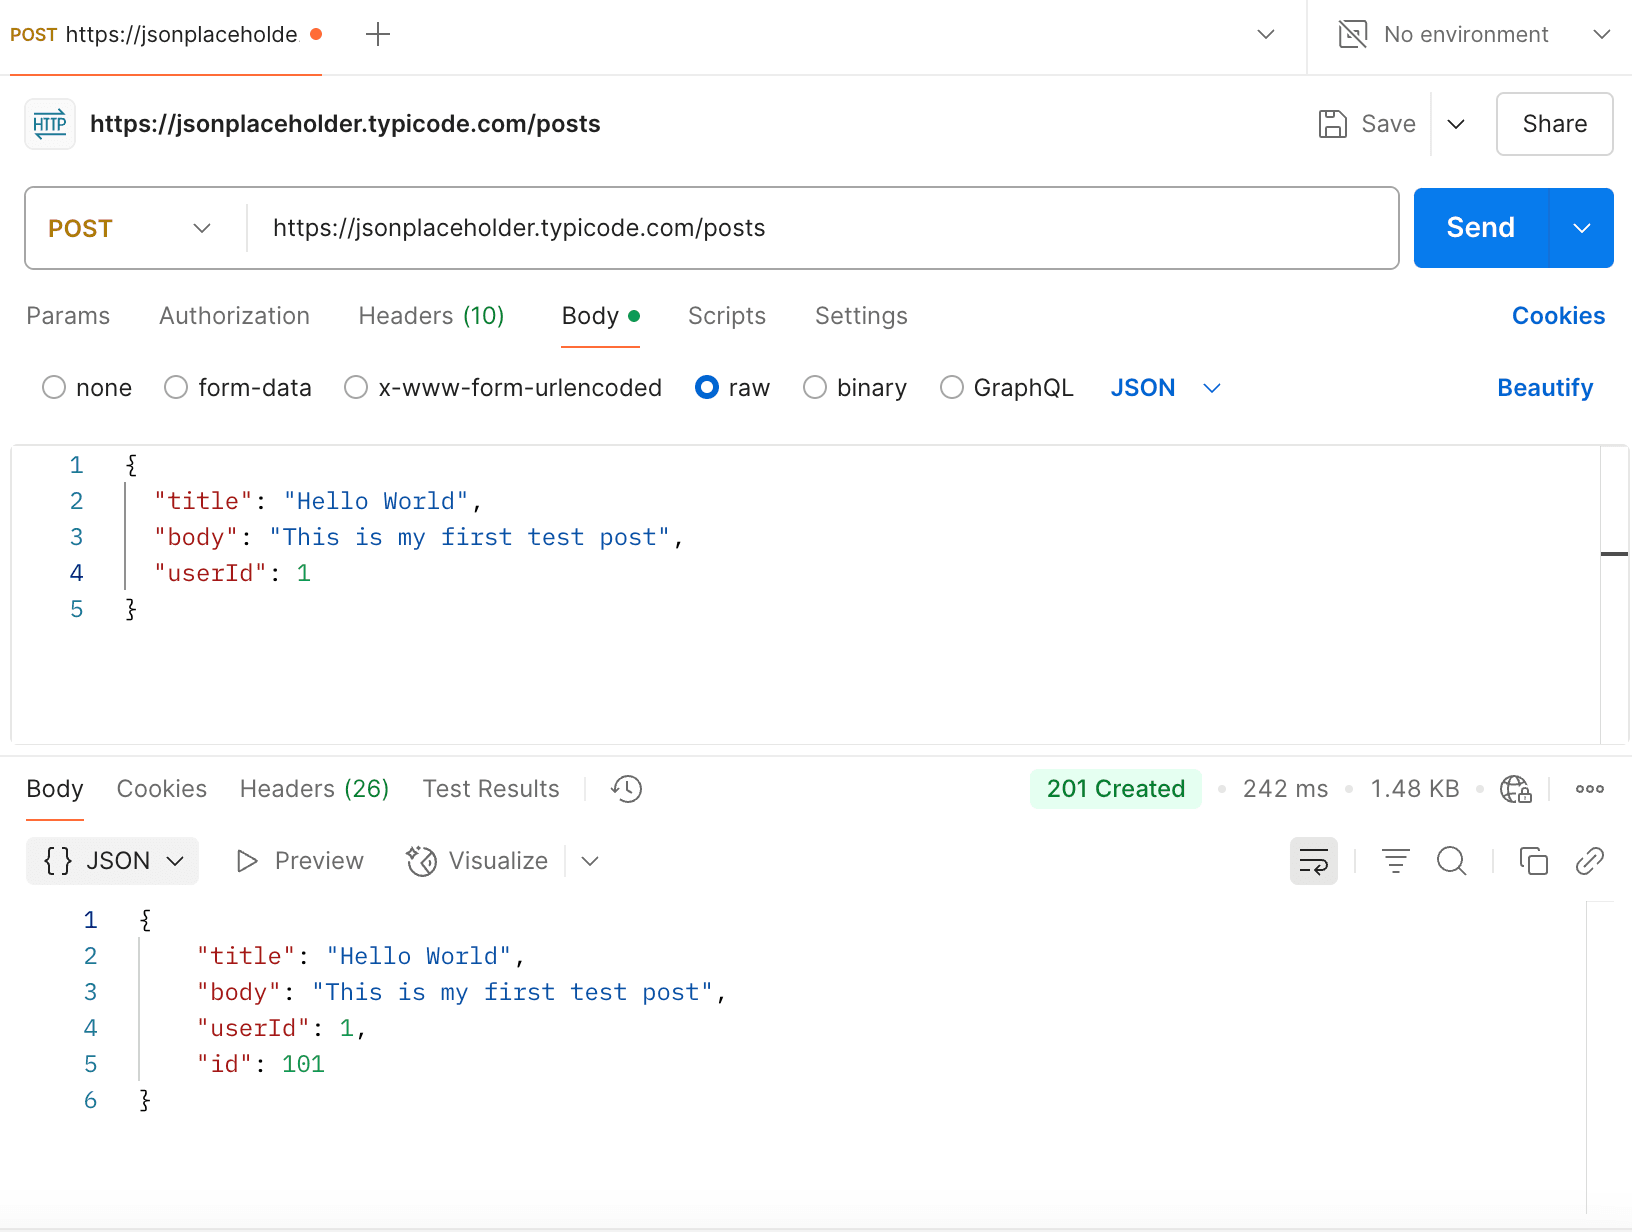
As you can see in the image above the response is 201 Created and it returns the created post with an id.
GET Request Example
Now perform a GET request separately to get post with the id of 1:
GET https://jsonplaceholder.typicode.com/posts/1
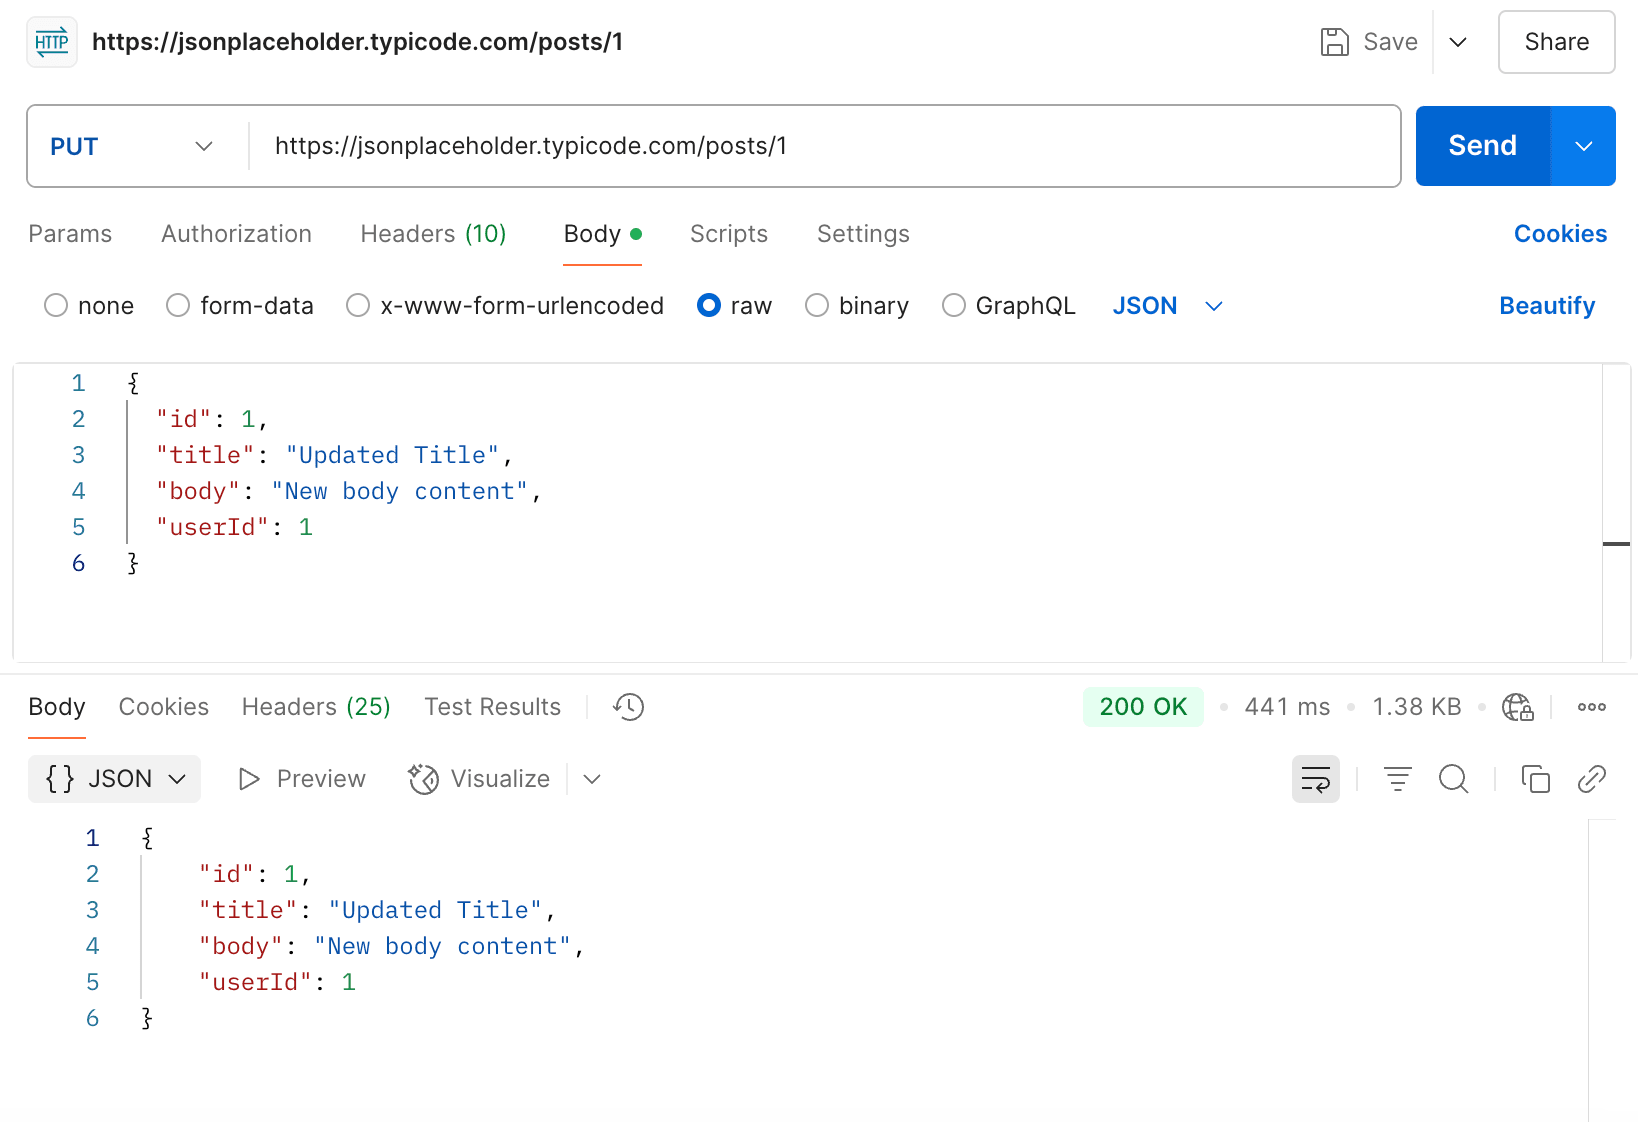
GET Request Example
Now perform an update by replacing an entire post with the following details:
Method: PUT
URL: https://jsonplaceholder.typicode.com/posts/1
Headers:
  Content-Type: application/json

Body:
{
  "id": 1,
  "title": "Updated Title",
  "body": "New body content",
  "userId": 1
}
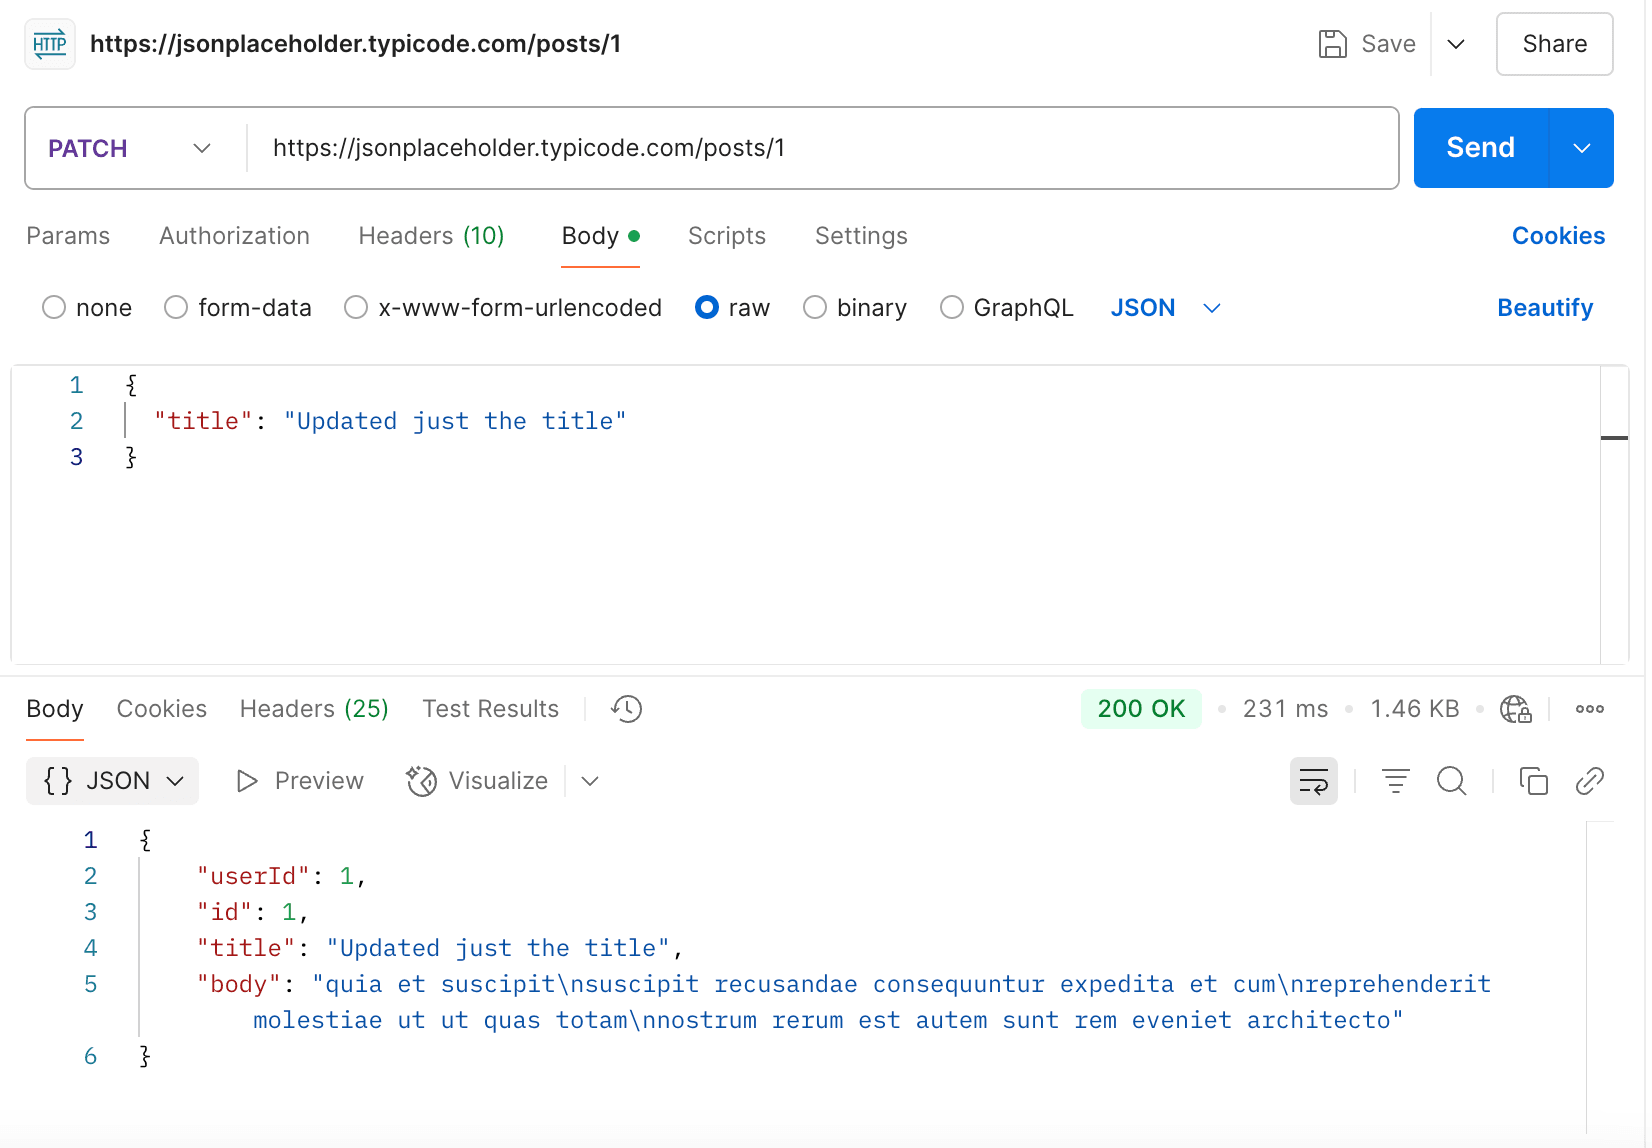
PATCH Request Example
Or use a PATCH to update only one field:
Method: PATCH
URL: https://jsonplaceholder.typicode.com/posts/1
Headers:
  Content-Type: application/json

Body:
{
  "title": "Updated just the title"
}
DELETE Request Example
Finally, try out deleting a post entirely using the DELETE HTTP verb:
DELETE https://jsonplaceholder.typicode.com/posts/1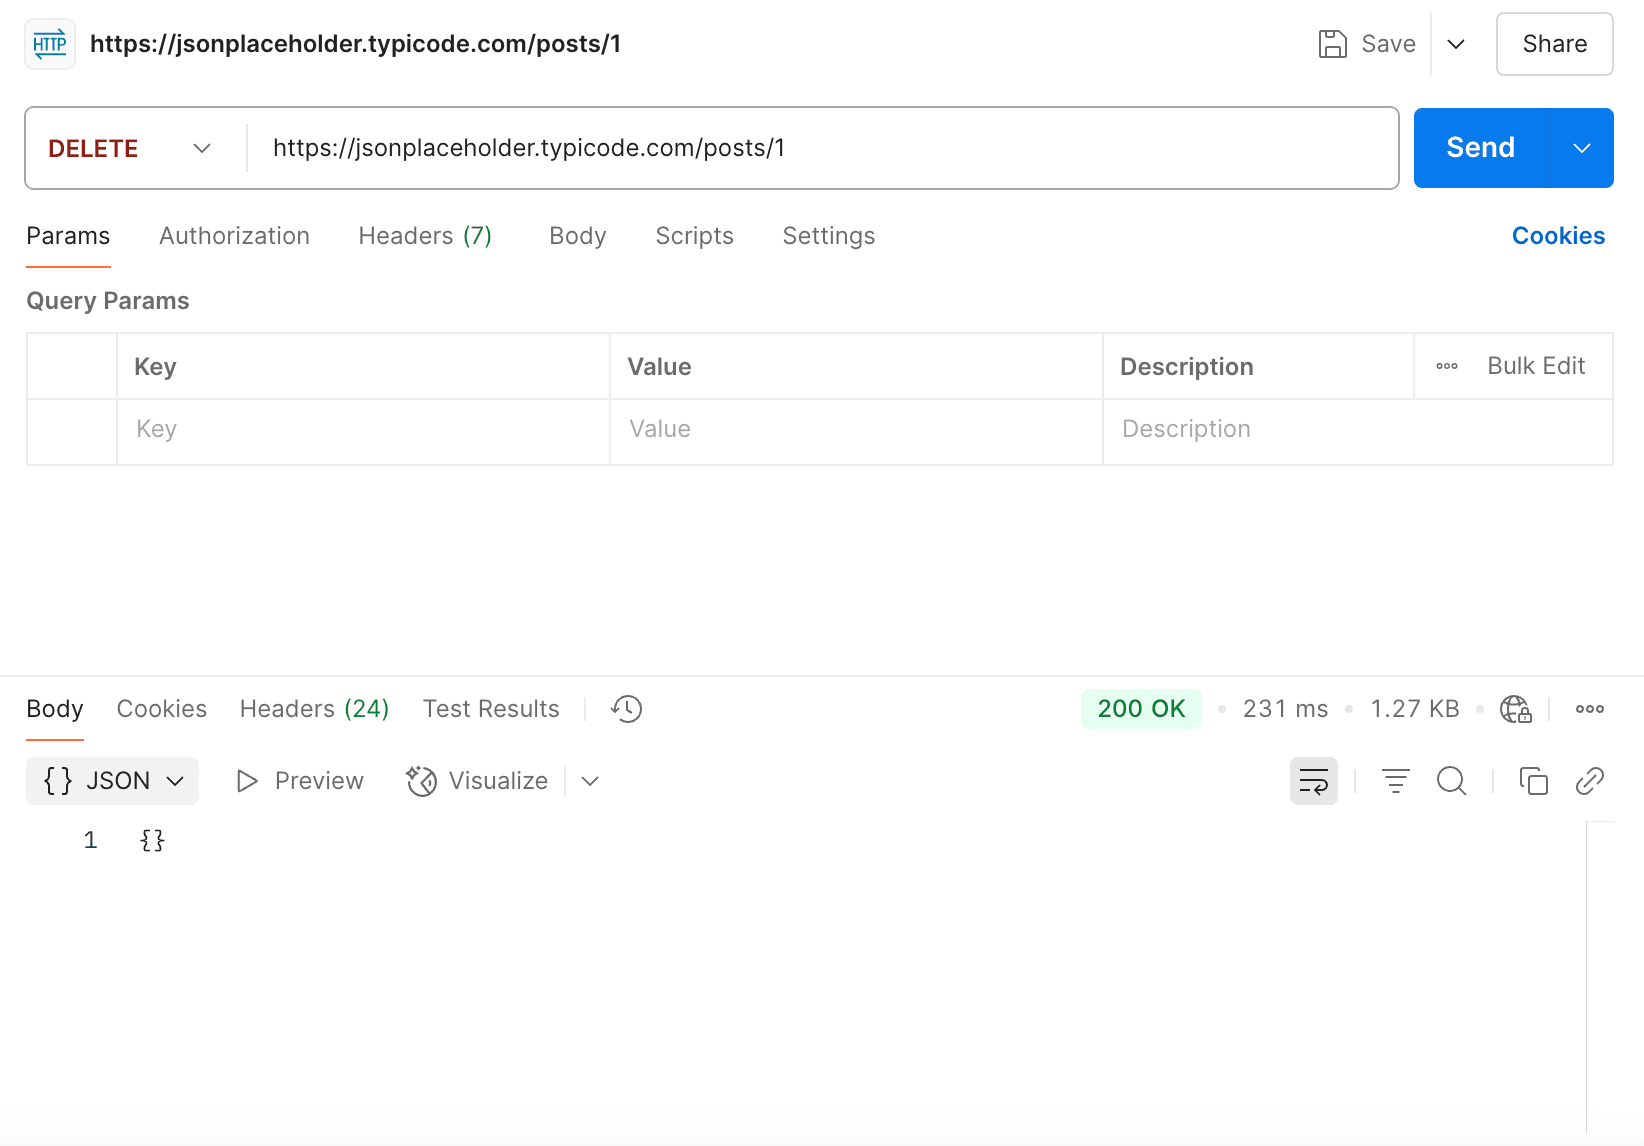
Which returns an empty object with a status code of 200 OK, to confirm the resource was deleted.
Authentication in REST APIs
Most REST APIs being used in the real world require authentication and authorization. In other words, they need to know who you are and what you're allowed to do before serving your request.
A few common methods to achieve this include:
1. API keys
An API key is a simple secret (a random long string) that a client includes with each request, usually via a header or as a query parameter. Think of it as a password that identifies the client. API keys are pretty straightforward but have some security limitations (they can be vulnerable if intercepted since they often don't expire quickly).
2. Bearer tokens
A bearer token is a string (often a JWT) that proves your identity and carries information about your permissions. The typical workflow is that you first authenticate with the server by providing login details, and then the server returns a token. From that point on you include the token in API requests, usually in the HTTP Authorization header, the server upon receiving requests then checks the token and if valid completes the request. Bearer tokens are stateless (the token carries the info) and are very common in REST APIs (JWTs in particular).
3. OAuth 2.0
OAuth 2 is an authorization framework often used when you want to allow 3rd-party apps to access an API on your behalf without giving them your password. For example, "Log in with Google" or "Log in with Facebook" uses OAuth under the hood. For an API developer, supporting OAuth means you accept tokens that an OAuth authorization server issues.
To summarise, in a REST API call, authentication info is typically sent in headers rather than in the body. The Authorization header is standard for tokens, it's important to note that authentication is about verifying identity, while authorization is about checking your permissions within the app, for instance, you may be authenticated by an API but then receive a 403 Forbidden when trying to access a certain resource.
For a quick illustration, here's how a request with a bearer token might look:
GET /v1/orders HTTP/1.1
Host: api.example.com
Authorization: Bearer <YOUR_TOKEN_HERE>
Content-Type: application/json
REST API Example with Strapi
To solidify your understanding of REST APIs, let's run through a quick hands-on REST API example. We will use Strapi, which is an open-source headless CMS that automatically creates RESTful APIs for content types that you define. This means we can get a REST API up and running with minimal coding and experiment with it.
Let's walk through the steps to create an example API for an Article content type (like with a blog) using Strapi:
1. Install Strapi
Make sure you have Node.js installed. In your terminal, run the following command:
npx create-strapi-app@latest restapi-example --quickstart2. Launch Strapi and create an admin user
This will start a new project and run it in your browser, once complete you should be presented with a screen as below:
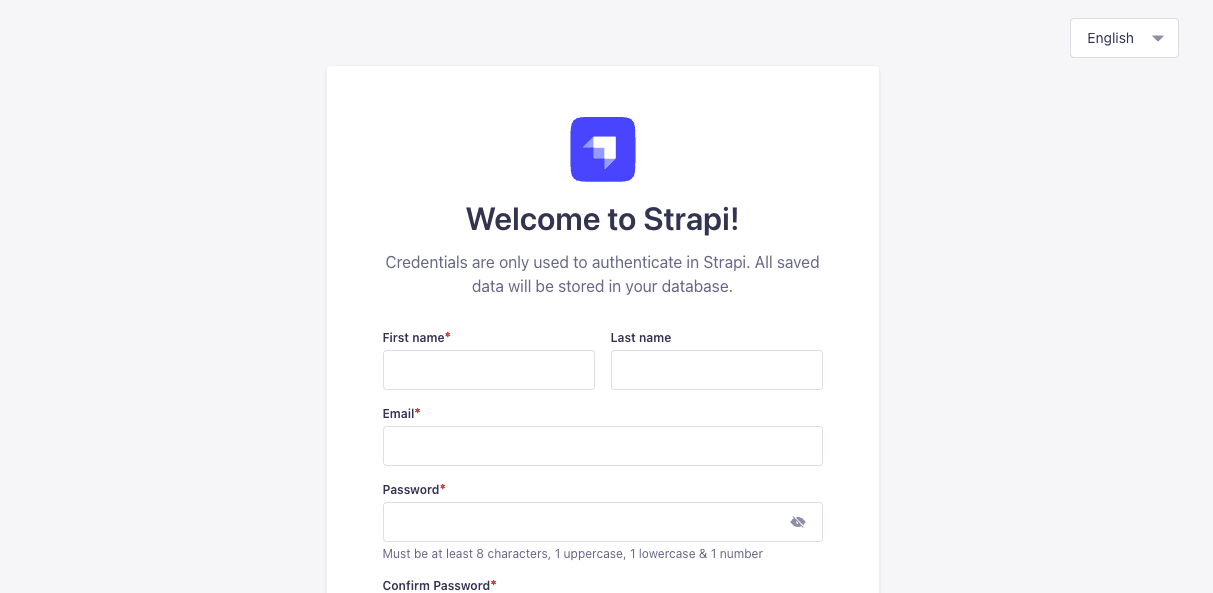
Create a new admin user by filling out the form and clicking Let's start, this will take you to the dashboard where you can create your first content type, click on Content-Type Builder from the left-hand side menu.
3. Create a Strapi Content Type
Click Create new collection type. Name it Article (Strapi will automatically set the API ID to "article" and pluralize it to "articles")
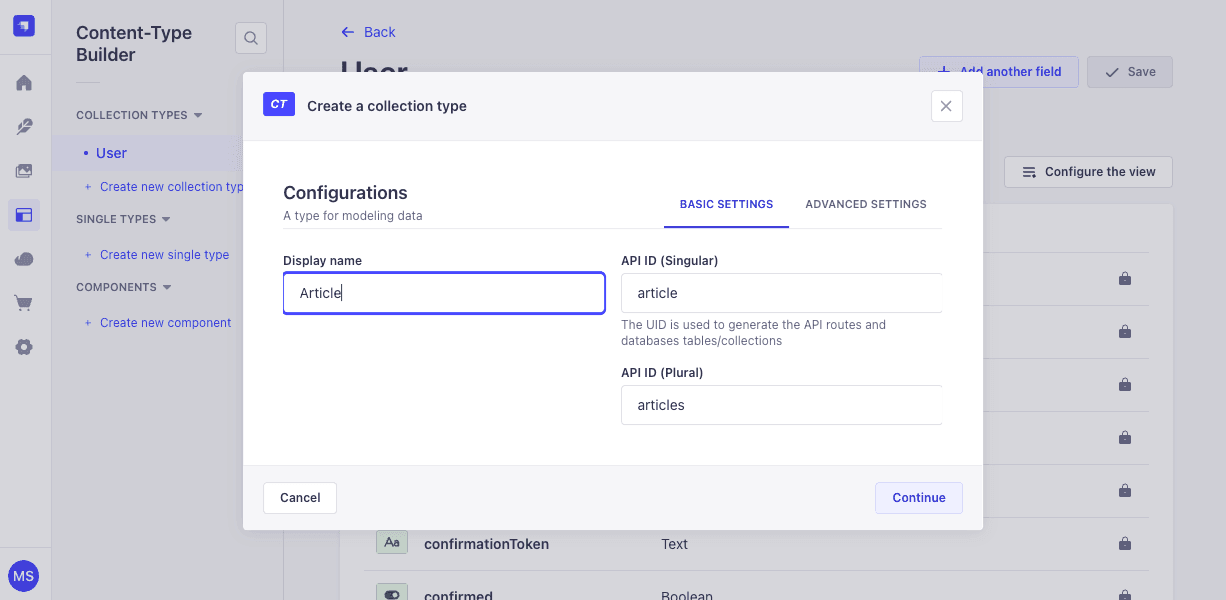
Now add some fields to the article, for example, add a Text field called "title", and another Text (Long text) field called "content", then click "finish".
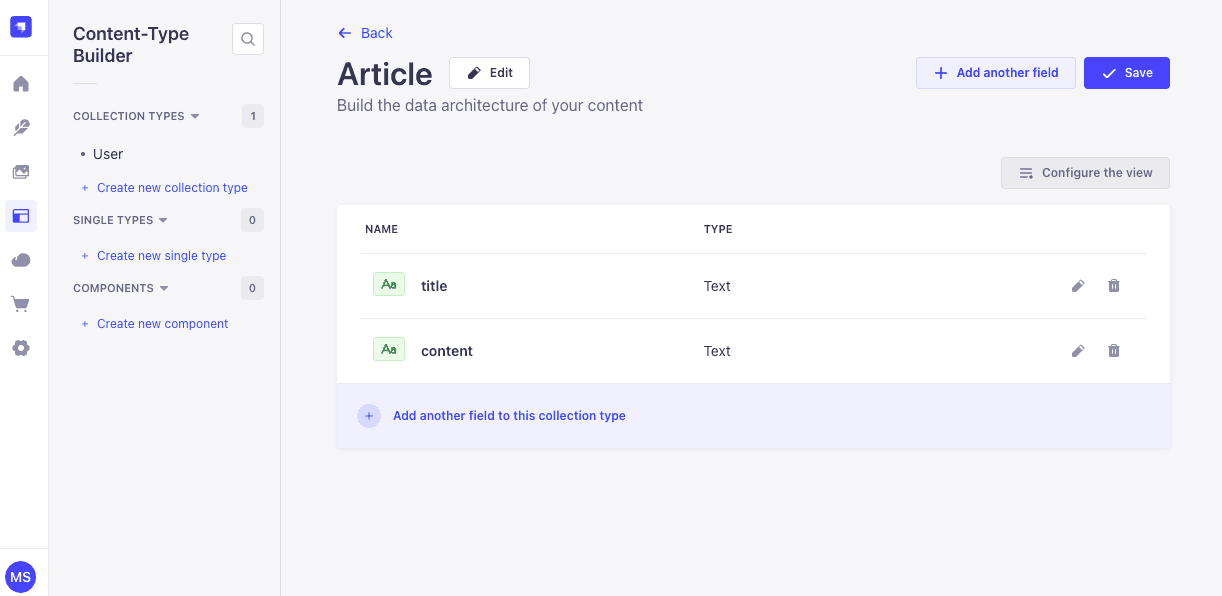
Now that your content type has some fields, you can click save in the top right-hand corner, Strapi will restart to apply the changes, and once saved Strapi automatically generates the REST API endpoints for this new Article type.
4. Configure permissions
By default, Strapi secures all content-type endpoints – meaning if we try to access the API right now, we’ll get unauthorized errors. We have two ways: use an API token or allow public access for learning. We’ll do the latter for simplicity.
In the Strapi admin panel:
- Navigate to Settings -> Users & Permissions Plugin -> Roles -> Public. Here you’ll see a list of permissions for public (unauthenticated) users.
- Locate the Article content type and enable the actions you want to test: typically “find” (to GET list), “findOne” (GET one by ID), “create” (POST), “update” (PUT), and “delete”.
- Save the permissions.
Test the Strapi Article API endpoints
Now for the fun part, open up Postman again and make some calls to the REST API which is running on http://localhost:1337/.
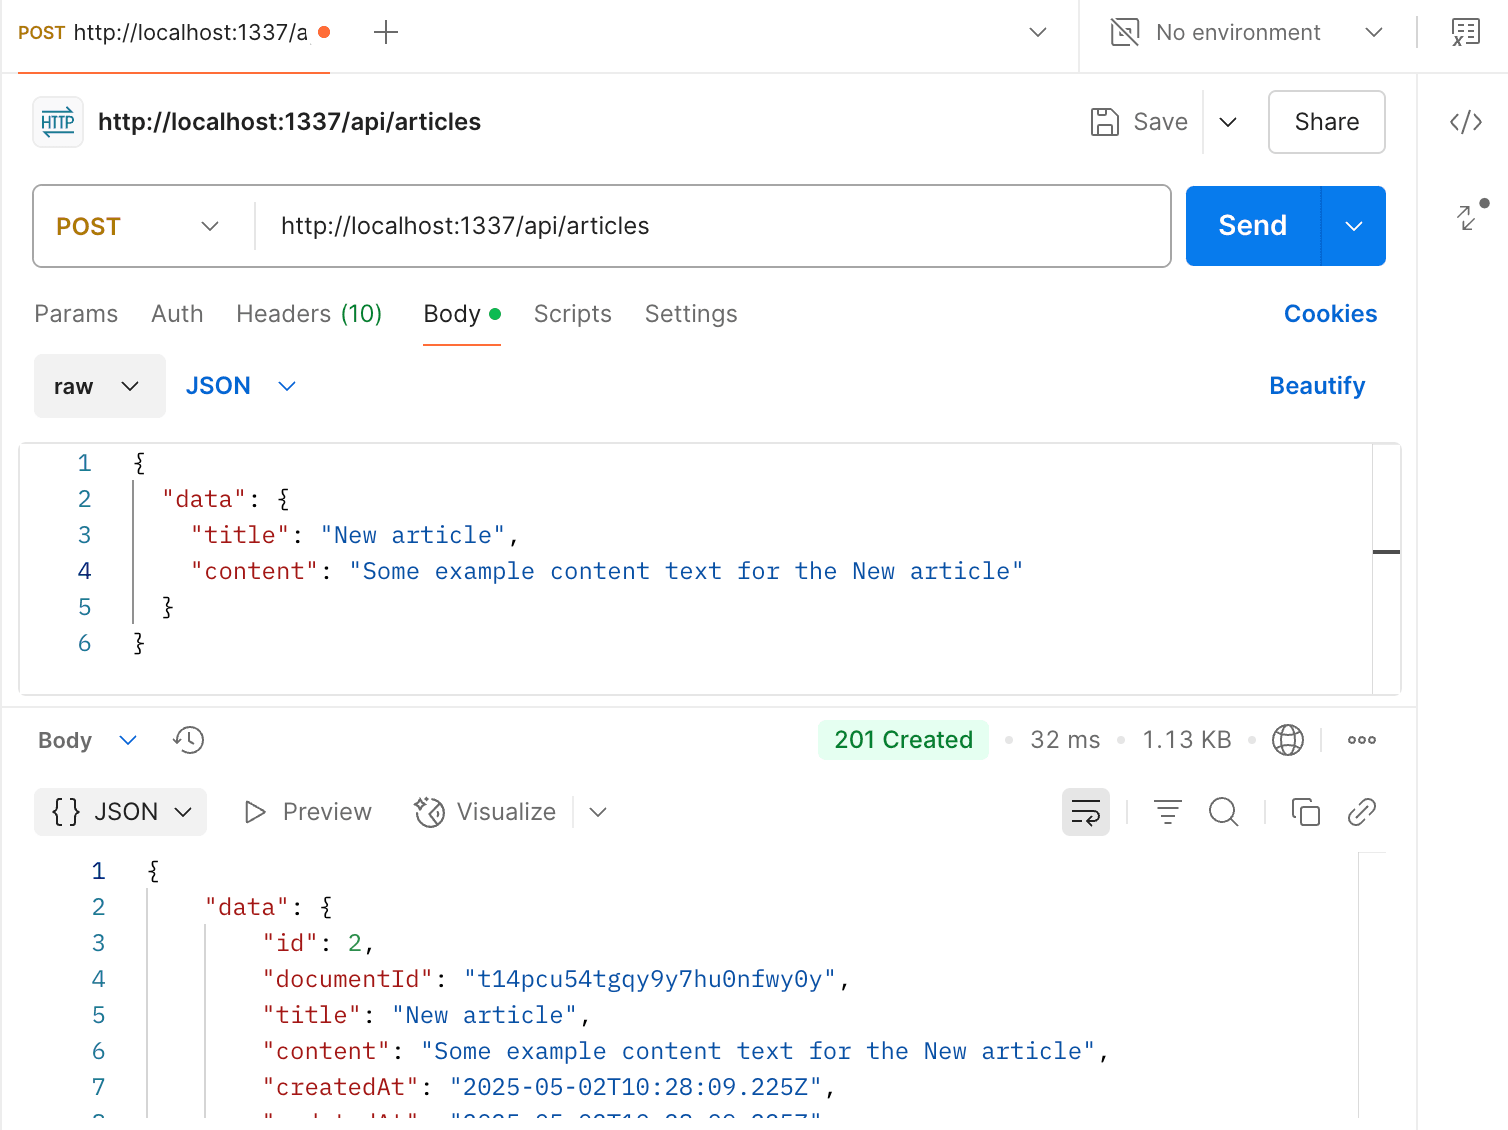
POST Request Example in Strapi
As you currently have no Articles stored in the database first make a POST request with the following body:
{
"data": {
"title": "New article",
"content": "Some example content text for the New article"
}
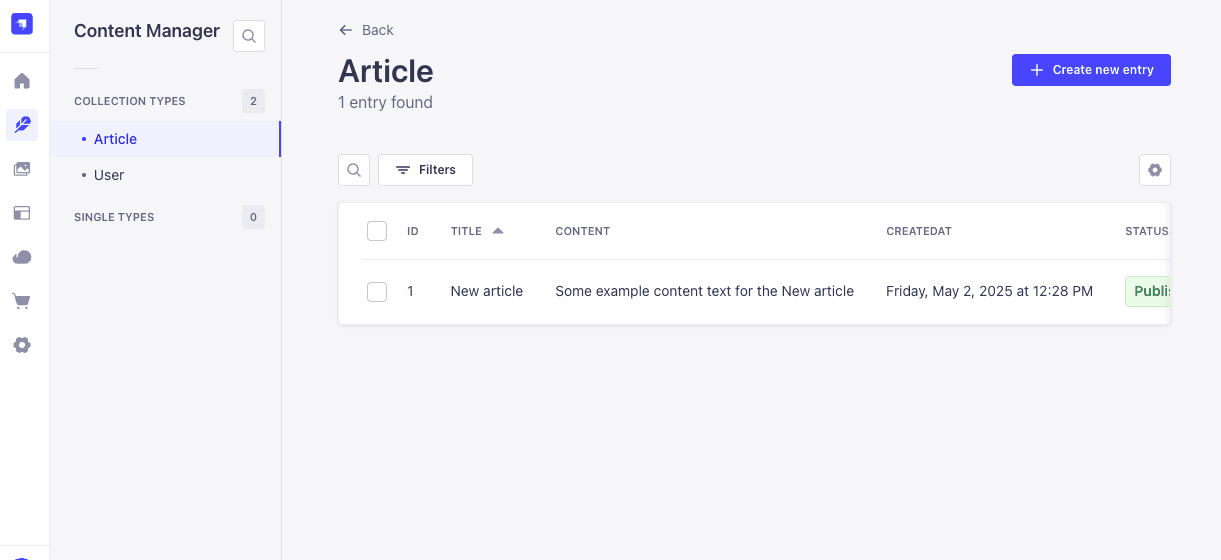
}
Now when accessing the Strapi dashboard, you should be able to see a newly created Article:
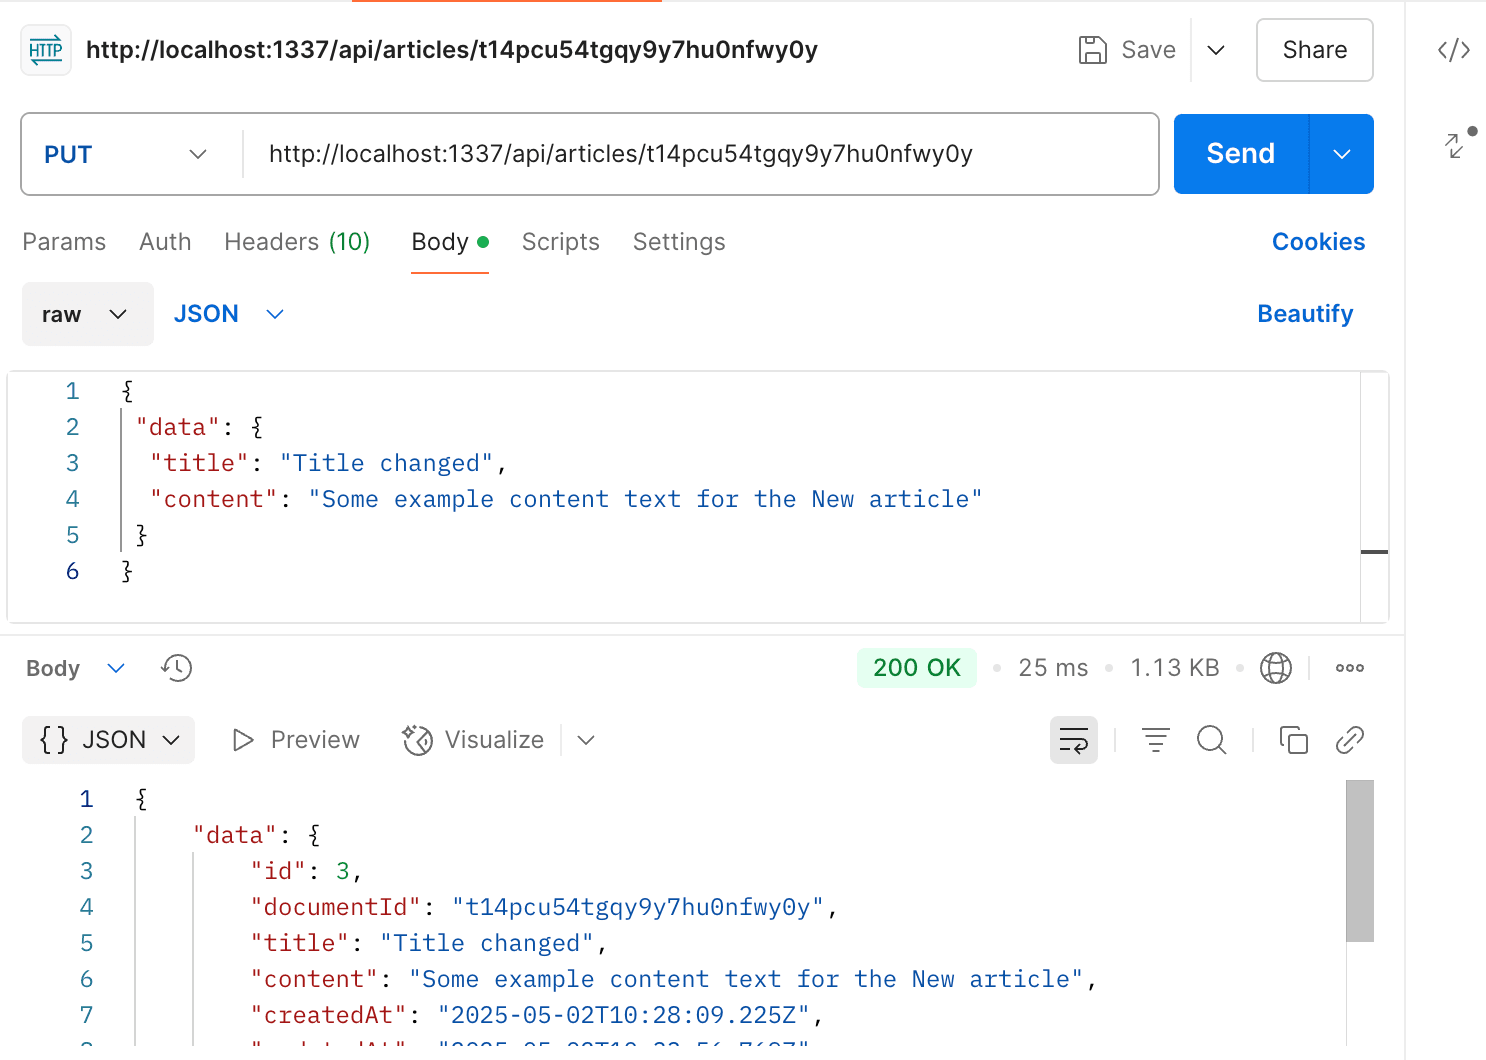
PUT Request Example in Strapi
Now update that article title with a PUT request with the following body:
{
 "data": {
  "title": "Title changed",
  "content": "Some example content text for the New article"
 }
}
GET Request Example in Strapi
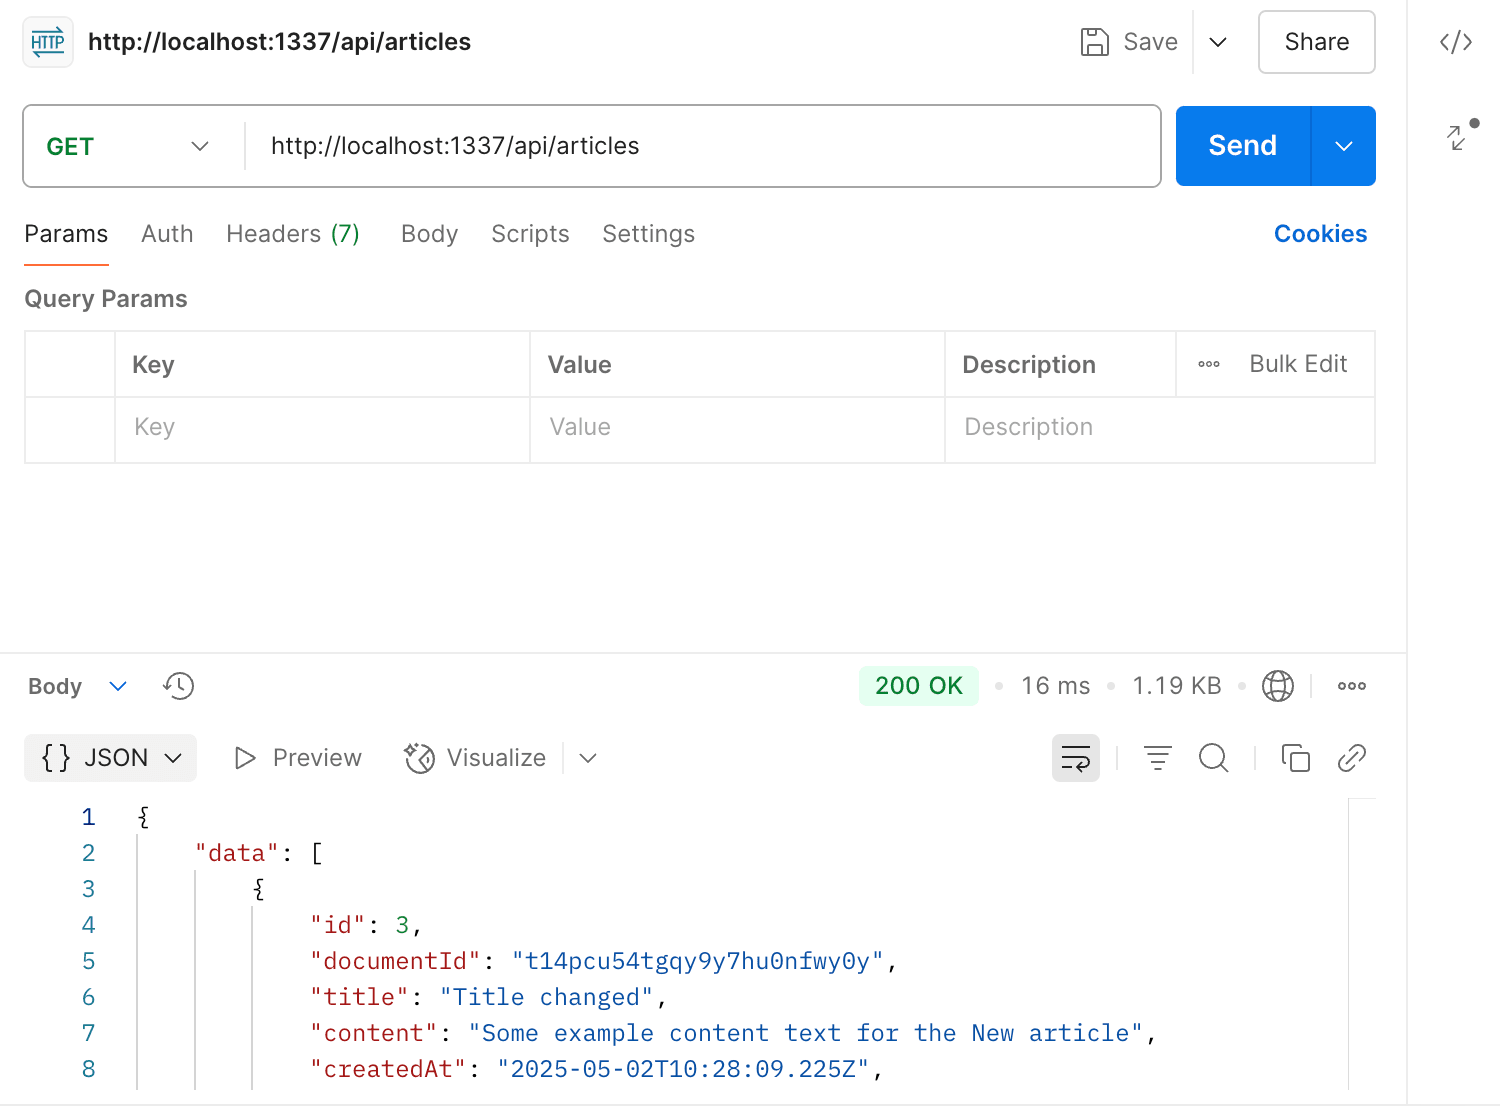
Now you can make a GET request to get all available articles:
DELETE Request Example in Strapi
And finally, DELETE the article that you created:

Congratulations you now know how to perform CRUD operations on a REST API and also how to spin up a REST API in minutes either for a new project or just to experiment and practice.
Strapi is just one way to build a REST API, you could also create one from scratch using a programming language and web framework (Node/Express, Python/Flask) but the concepts would be the same.
The benefit of Strapi for learning is that it instantly gives you a working API to play with, and even for startups trying to validate ideas it gives you the ability to rapidly prototype and build out from there.
To learn more about REST API in Strapi visit the REST API reference page of the Strapi docs.
Summary
In this REST API tutorial, we covered the fundamentals of what is a REST APIs, from understanding what a REST API is as a concept, to the details of requests, responses, and principles like statelessness and resource-based design. REST API at its core is a way to let different software clients interact with servers using simple HTTP commands, much like how browsers fetch web pages but in a structured, data-centric format. We also went through some practical examples using HTTP methods with example APIs and even set up our own API with Strapi.
If you found this article and example interesting, you might use Strapi as a starting point for a project, maybe a simple blog or task manager backed by Strapi's REST API. The more you tinker with sending requests and handling responses, the more comfortable you'll become with the whole concept of RESTful services.