
Introduction
Building a secure, scalable, and fully-featured newsletter subscription system from scratch can be a complex task.
In this step-by-step guide, you'll learn how to build a complete, production-ready newsletter platform using three powerful tools:
- Strapi — a flexible open-source headless CMS. We will use it to manage subscribers and newsletter content.
- Brevo (formerly Sendinblue) — a robust email delivery and automation service.
- Next.js — a modern React framework for building performant, user-friendly frontend applications.
Tutorial Goals
At the end of this tutorial, you should be able to do the following:
- Add new subscribers to the newsletter using a sign-up form.
- Manage subscribers within the Strapi Admin Dashboard.
- Create newsletters inside the Strapi Admin Dashboard.
- Send newsletters to a mailing list of subscribers.
- Implement Strapi Middleware for Logging, Subscription Validation, Rate Limiting, and more.
This guide covers everything from setup to production-ready security. See the demo below:
Let's get started!
Prerequisites
In order to proceed with this tutorial, ensure you have the following.
Set up Strapi
Open your working directory in your terminal, and create a Strapi app named newsletter using the following command:
npx create-strapi-app@latest newsletterAnswer the prompts as follows:
Ok to proceed? (y) y
? Please log in or sign up. Skip
? Do you want to use the default database (sqlite) ? Yes
? Start with an example structure & data? No
? Start with Typescript? No
? Install dependencies with npm? Yes
? Initialize a git repository? No
Create an admin user for your Strapi app inside the newsletter folder:
cd newsletternpm run strapi admin:create-user -- --firstname=Kai --lastname=Doe --email=chef@strapi.io --password=Gourmet1234How to Send Emails With Strapi and Brevo
Generate Strapi API for Email Delivery
Create an API and name it email-news. You will use it to send emails from the Strapi backend server.
npm run strapi generateChoose api - Generate a basic API. Name it email-news. Choose no for is this api for a plugin?.
The following files will be generated:
/api/email-news/routes/email-news.js/api/email-news/controllers/email-news.js/api/email-news/services/email-news.js
Configure Brevo
Sign in to your Brevo account, and generate a new API key in the API keys page.
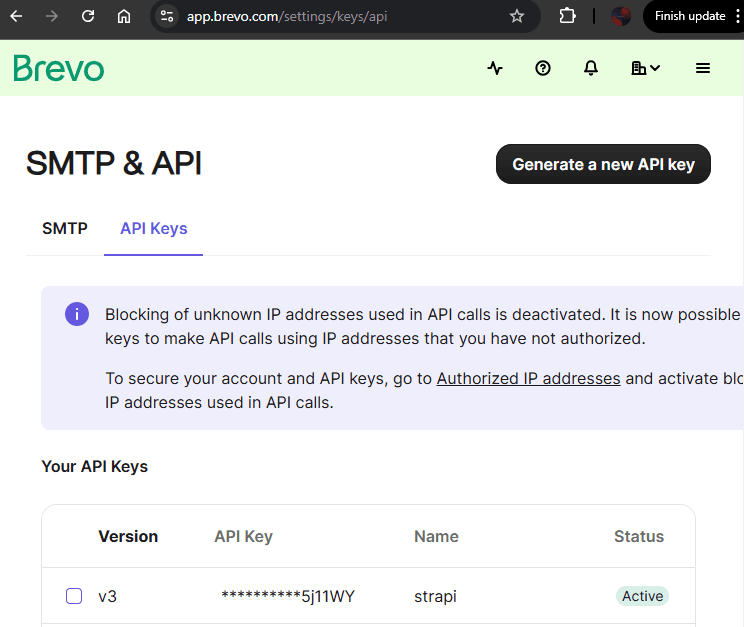
Add your Brevo API key to your environment variables by updating the .env file.
BREVO_API_KEY=Your-newly-generated-Brevo-API-keyInstall the Brevo SDK.
npm install sib-api-v3-sdkCreate a Strapi Custom Email Service
Create a custom email service by updating newsletter/src/api/email-news/services/email-news.js
// Path: newsletter/src/api/email-news/services/email-news.js

"use strict";

const SibApiV3Sdk = require("sib-api-v3-sdk");

module.exports = {
  async sendEmail({ to, subject, htmlContent }) {
    try {
      // Initialize Brevo API client
      const defaultClient = SibApiV3Sdk.ApiClient.instance;
      const apiKey = defaultClient.authentications["api-key"];
      apiKey.apiKey = process.env.BREVO_API_KEY;

      // Configure the email sender and recipient
      const apiInstance = new SibApiV3Sdk.TransactionalEmailsApi();
      const sendSmtpEmail = new SibApiV3Sdk.SendSmtpEmail();

      sendSmtpEmail.sender = { name: "Your Business", email: "your-email@example.com" };
      sendSmtpEmail.to = [{ email: to }];
      sendSmtpEmail.subject = subject;
      sendSmtpEmail.htmlContent = htmlContent;

      // Send the email
      const response = await apiInstance.sendTransacEmail(sendSmtpEmail);
      return response;
    } catch (error) {
      console.error("Error sending email:", error);
      throw new Error("Failed to send email");
    }
  },
};
This initializes the Brevo API client, configures the email sender and recipient, and then sends the email.
Replace your "your-email@example.com" with your Brevo account email.
Create a Strapi API controller to Send Emails
Create an API controller named send in newsletter/src/api/email-news/controllers/email-news.js.
// Path: newsletter/src/api/email-news/controllers/email-news.js

"use strict";

module.exports = {
  async send(ctx) {
    try {

      const { to, subject, htmlContent } = ctx.request.body;

      if (!to || !subject || !htmlContent) {
        return ctx.badRequest("Missing required fields: to, subject, htmlContent");
      }

      // Access service using `strapi.service()`
      await strapi.service("api::email-news.email-news").sendEmail({ to, subject, htmlContent });

      ctx.send({ message: "Email sent successfully" });
    } catch (error) {
      console.error("Email error:", error);
      ctx.send({ error: "Failed to send email", details: error.message });
    }
  },
};
This controller checks for the required email fields, then uses the sendEmail service created earlier to send the email.
Create a Strapi API Route for Sending Email
Create an API route at the path /send-email in newsletter/src/api/email-news/routes/email-news.js.
// Path: newsletter/src/api/email-news/routes/email-news.js

module.exports = {
  routes: [
    {
      method: "POST",
      path: "/send-email",
      handler: "email-news.send",
      config: {
        auth: false, // Set to true if authentication is required
      },
    },
  ],
};
You have added a route /send-email for the send controller.
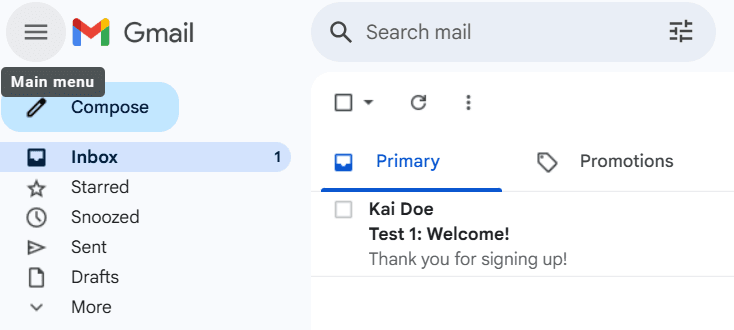
Test Strapi Email API
Test the email API by sending an email to a valid email address.
Run Strapi server.
npm run developRun the following command in a new terminal session:
curl -X POST http://localhost:1337/api/send-email \
     -H "Content-Type: application/json" \
     -d '{
           "to": "johndoe@email.com",
           "subject": "Test 1: Welcome!",
           "htmlContent": "<p>Thank you for signing up!</p>"
         }'
NOTE: Use an email address whose inbox you can access.
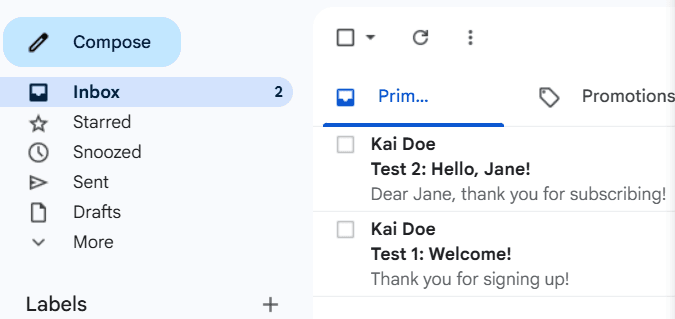
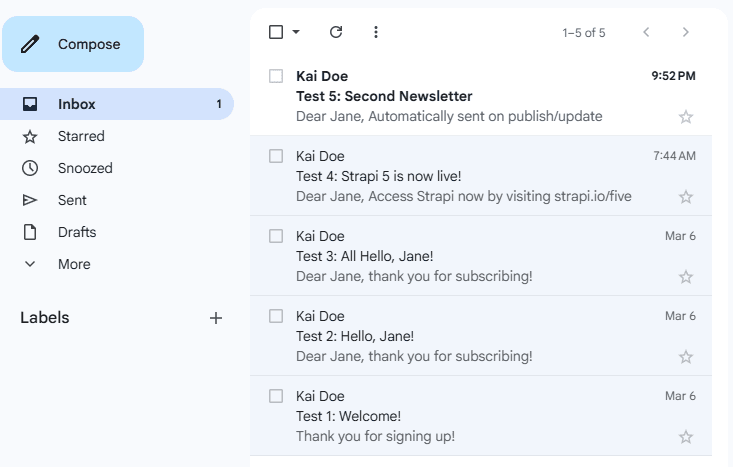
Verify email delivery. You will get this response:
{ "message": "Email sent successfully" }Check your mailbox to confirm delivery.
How to Send Email to a Single Subscriber
Now that we know that our Strapi email API is working and can send emails via Brevo API we can test sending emails to a collection created in the Strapi admin dashboard.
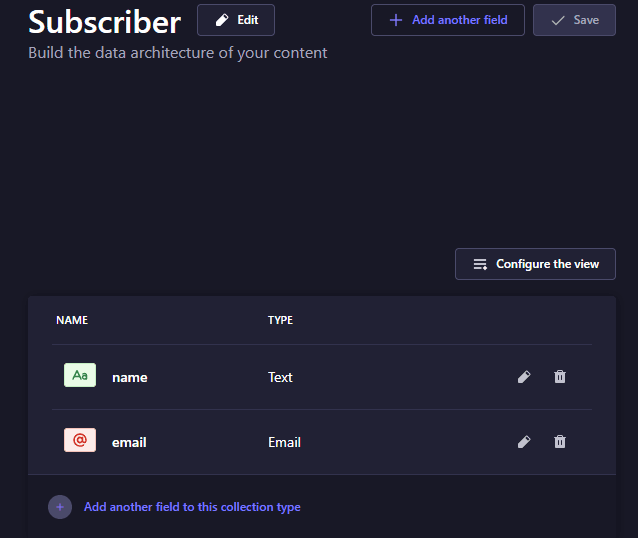
Create a Subscriber Collection
Visit your Strapi Admin dashboard in your browser: http://localhost:1337/admin.
Create a new collection named Subscriber. Give it two fields:
- A text field called
name. - An email field called
email.
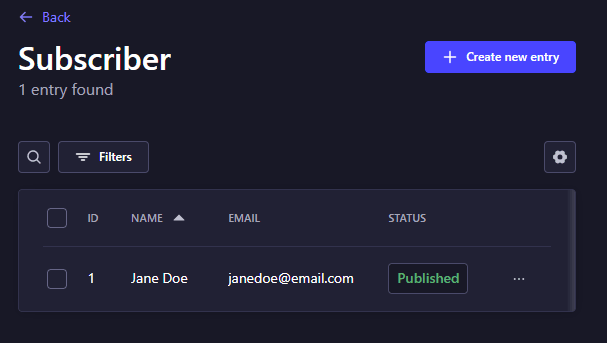
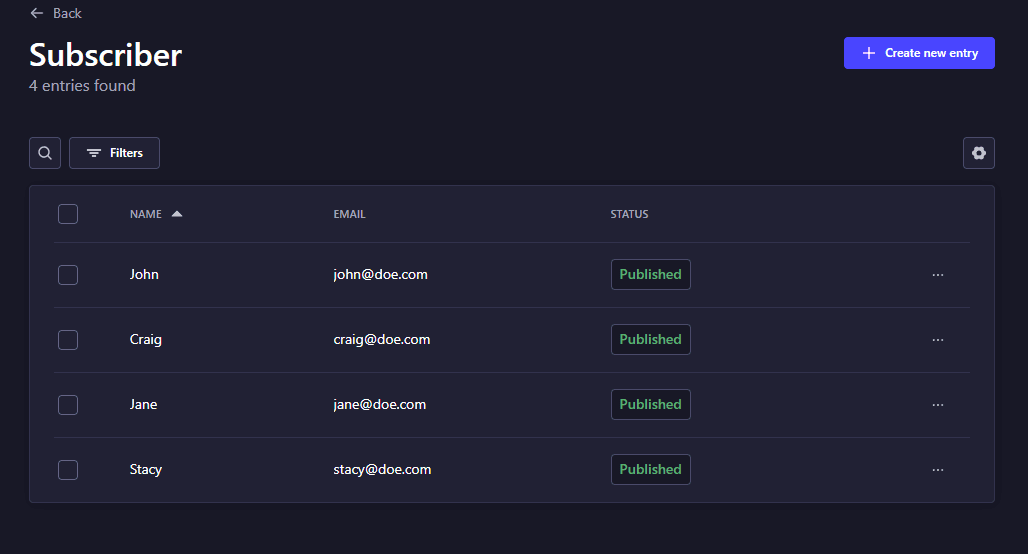
Add an entry to your collection using the Content Manager in the Strapi Admin Dashboard. Use an email address whose inbox you can access.
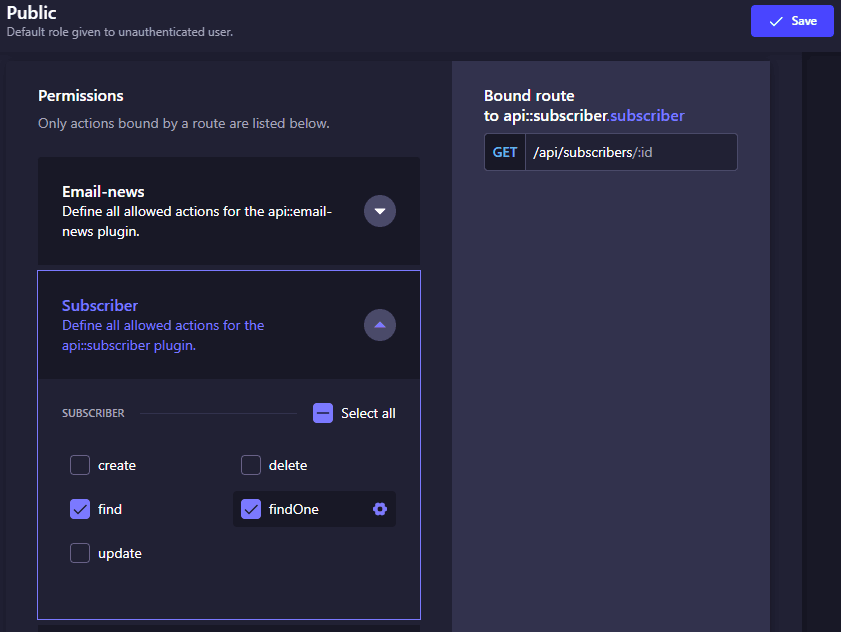
Enable Public Access to Subscriber Collection
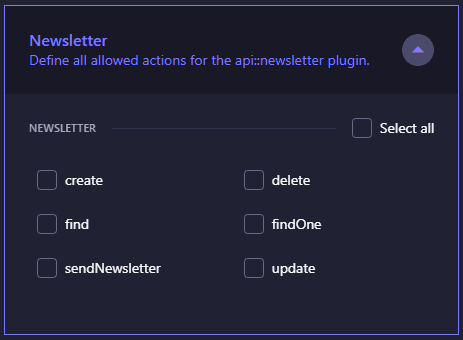
Enable public read access(find and findOne) to the Subscriber collection.
Click Settings, then Users & Permissions Plugin, then Roles, and then Public.
Create Strapi API Controller to Send Email To a Subscriber
The objective is to fetch an entry from the Subscriber collection using the documentId of the entry. Use the email and name fields to construct and send an email to the user.
Add a new controller, sendToSubscriber, in newsletter/src/api/email-news/controllers/email-news.js below the send controller created earlier.
// Path: newsletter/src/api/email-news/controllers/email-news.js

"use strict";

module.exports = {
  //... Previous code

  async sendToSubscriber(ctx) {
    try {
      const { id, subject, htmlContent } = ctx.request.body;
      // id in this case is documentId

      if (!id || !subject || !htmlContent) {
        return ctx.badRequest("Missing required fields: id, subject, htmlContent");
      }

      //Fetch subscriber from database - Using Document Service API
      const subscriber = await strapi.documents("api::subscriber.subscriber").findOne({
        documentId: id,
        fields: ["name", "email"],
      });

      if (!subscriber) {
        return ctx.notFound("Subscriber not found");
      }

      const { email, name } = subscriber;

      // Send email
      await strapi.service("api::email-news.email-news").sendEmail({
        to: email,
        subject: subject.replace("{name}", name),
        htmlContent: htmlContent.replace("{name}", name), // Replace {name} with subscriber's name
      });

      ctx.send({ message: `Email sent successfully to ${email}` });
    } catch (error) {
      console.error("Email error:", error);
      ctx.send({ error: "Failed to send email", details: error.message });
    }
  },
};
The sendToSubscriber controller fetches the subscriber entry from the collection using a documentId, retrieves the corresponding name and email, then sends an email using the sendEmail service.
Add a new API Route for Sending to a Single Subscriber
Update newsletter/src/api/email-news/routes/email-news.js.
// Path:newsletter/src/api/email-news/routes/email-news.js

module.exports = {
  routes: [
    //... Previous Code
    {
      method: "POST",
      path: "/send-email-to-subscriber",
      handler: "email-news.sendToSubscriber",
      config: {
        auth: false,
      },
    },
  ],
};
You have added a new route /send-email-to-subscriber for the sendToSubscriber controller.
Test API for Sending Email to a Single Subscriber
First, retrieve the documentId for the Subscriber entry you created earlier.
curl http://localhost:1337/api/subscribers?fields%5B0%5D=documentIdNOTE:
This query uses field selection. To learn more, check out Population and Filtering: Field Selection in the Strapi docs.
The result will look something like this:
{
    "data": [
        {
            "id": 3,
            "documentId": "ud8fkwy24ga5xm7iduc5wjyk"
        }
    ],
}
Copy the documentId and use it to test the API route localhost:1337/api/send-email-to-subscriber using the following command:
curl -X POST http://localhost:1337/api/send-email-to-subscriber \
     -H "Content-Type: application/json" \
     -d '{
            "id": "ud8fkwy24ga5xm7iduc5wjyk",
            "subject": "Test 2: Hello, {name}!",
            "htmlContent": "<p>Dear {name}, thank you for subscribing!</p>"
         }'
Check your mailbox to confirm receipt of the email.
How to Send Email to All Subscribers
Add Multiple Entries to The Subscriber Collection
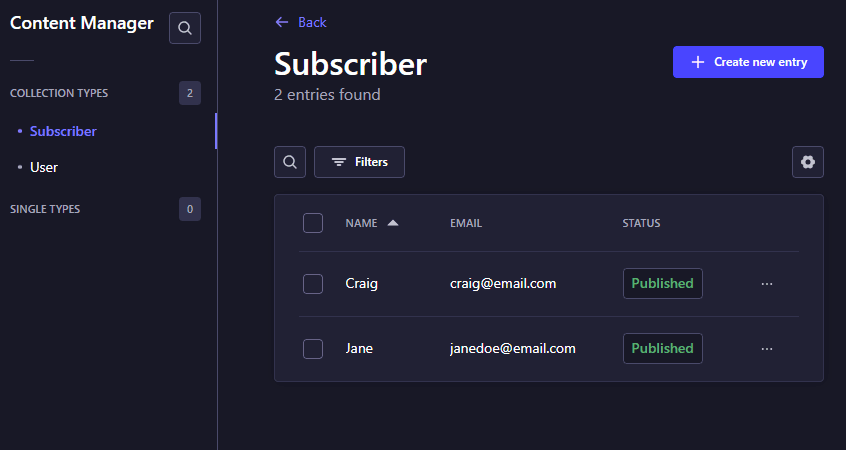
Add new entries to your collection using the Content Manager in the Strapi Admin Dashboard. Use email addresses whose inboxes you can access.
Your Subscriber collection should now have more than one entry.
Add a New API Controller for Sending Email to All Subscribers
Add a new controller, sendToAllSubscribers, in newsletter/src/api/email-news/controllers/email-news.js below the sendToSubscriber controller.
// Path: newsletter/src/api/email-news/controllers/email-news.js

"use strict";

module.exports = {
  //... Previous code

  async sendToAllSubscribers(ctx) {
    try {
      const { subject, htmlContent } = ctx.request.body;

      if (!subject || !htmlContent) {
        return ctx.badRequest("Missing required fields: subject, htmlContent");
      }

      // Fetch all subscribers - Using Document Service API

     const subscribers = await strapi.documents("api::subscriber.subscriber").findMany({
        fields: ["name", "email"],
     });

      if (subscribers.length === 0) {
        return ctx.notFound("No subscribers found");
      }

      // Send emails to all subscribers
      for (const subscriber of subscribers) {
        await strapi.service("api::email-news.email-news").sendEmail({
          to: subscriber.email,
          subject: subject.replace("{name}", subscriber.name),
          htmlContent: htmlContent.replace("{name}", subscriber.name),
        });
      }

      ctx.send({ message: `Emails sent to ${subscribers.length} subscribers` });
    } catch (error) {
      console.error("Email error:", error);
      ctx.send({ error: "Failed to send emails", details: error.message });
    }
  }
};
The sendToAllSubscribers controller fetches all subscriber entries from the Subscriber collection, retrieves the corresponding name and email for each Subscriber, then sends an email using the sendEmail service.
Add New API Route for Emailing All Subscribers
Add a new route /send-email-to-all for the sendToAllSubscribers controller in newsletter/src/api/email-news/routes/email-news.js.
// Path: newsletter/src/api/email-news/routes/email-news.js

module.exports = {
  routes: [
      //... Previous Code
    {
      method: "POST",
      path: "/send-email-to-all",
      handler: "email-news.sendToAllSubscribers",
      config: { auth: false },
    }
  ],
};
Test API for Sending to All Subscribers
Restart the Strapi server, then test the API:
curl -X POST http://localhost:1337/api/send-email-to-all \
-H "Content-Type: application/json" \
-d '{
"subject": "Test 3: All Hello, {name}!",
"htmlContent": "<p>Dear {name}, thank you for subscribing!</p>"
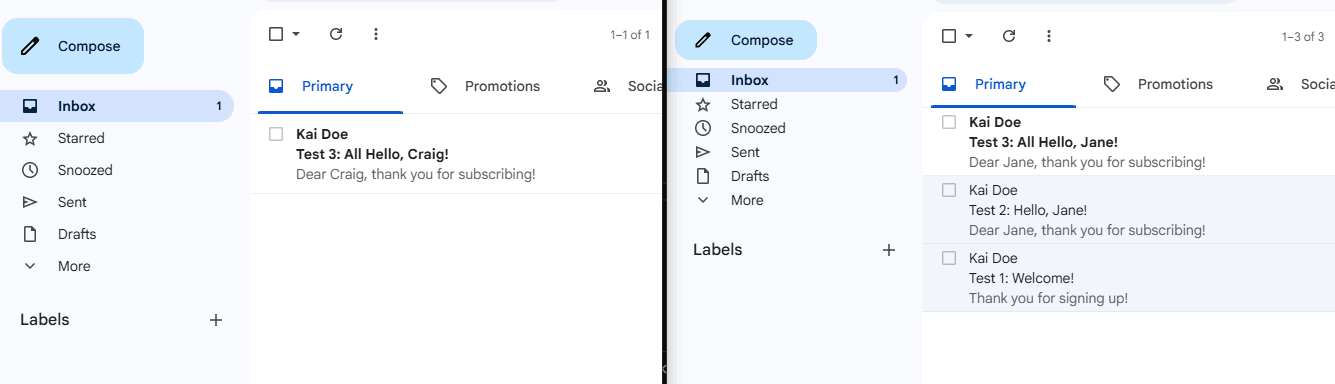
}'Check the mailboxes of the emails in the Subscriber collection to confirm receipt.
Sending Newsletter to Subscribers
Create Newsletter collection
Open your Strapi Admin and create a new collection called Newsletter. Add two fields:
- A text field (Short text) called
title. - A text field (Long text) called
content.
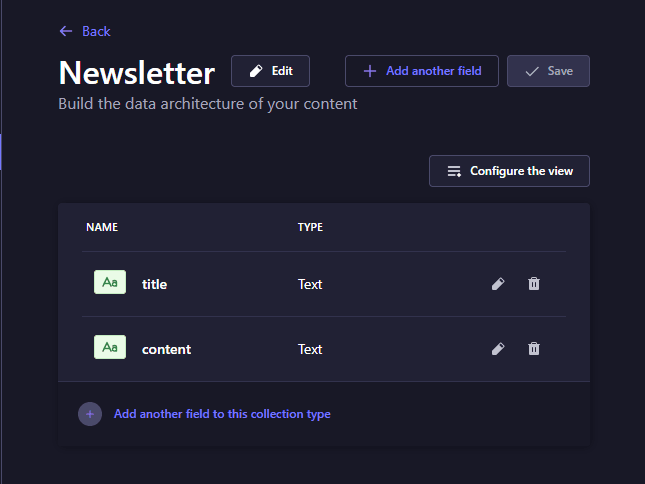
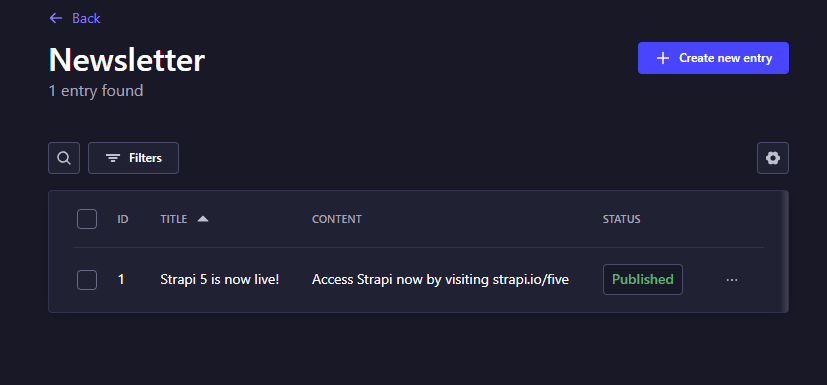
Add an entry to your Newsletter collection using the Content Manager.
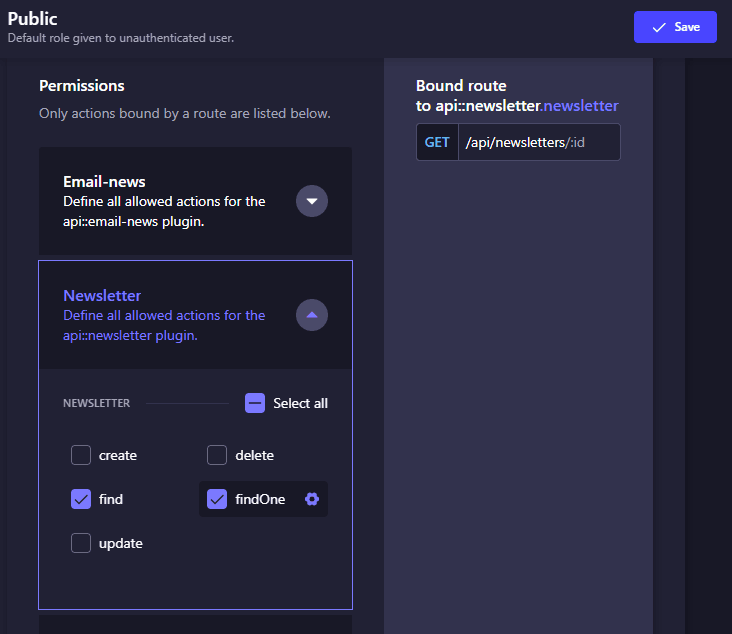
Enable Public Access for Newsletter Collection API
Enable public read access (find and findOne) for the Newsletter collection.
Click Settings, then Users & Permissions Plugin, then Roles, and then Public.
Create a Controller to Send Newsletters
Create a new controller called sendNewsletter inside src/api/newsletter/controllers/newsletter.js:
// Path: src/api/newsletter/controllers/newsletter.js

"use strict";

const { createCoreController } = require('@strapi/strapi').factories;

module.exports = createCoreController('api::newsletter.newsletter', ({ strapi }) => ({
  async sendNewsletter(ctx) {
    try {
      const { id } = ctx.request.body;
      // id in this case is documentId

      if (!id) {
        return ctx.badRequest("Missing required field: id");
      }

      // Fetch the newsletter from the collection - Using Document Service API

      const newsletter = await strapi.documents("api::newsletter.newsletter").findOne({
        documentId: id,
        fields: ["title", "content"],
      });

      if (!newsletter) {
        return ctx.notFound("Newsletter not found");
      }

      const { title, content } = newsletter;

      // Fetch all subscribers - Using Document Service API

      const subscribers = await strapi.documents("api::subscriber.subscriber").findMany({
        fields: ["name", "email"],
      });

      if (!subscribers || subscribers.length === 0) {
        return ctx.notFound("No subscribers found");
      }

      // Send the newsletter to all subscribers
      for (const subscriber of subscribers) {
        const personalizedContent = content.replace("{name}", subscriber.name);

        await strapi.service("api::email-news.email-news").sendEmail({
          to: subscriber.email,
          subject: title, // Use the newsletter title as the email subject
          htmlContent: `<p>Dear ${subscriber.name},</p><p>${personalizedContent}</p>`,
        });
      }

      ctx.send({ message: `Newsletter sent to ${subscribers.length} subscribers` });
    } catch (error) {
      console.error("Email error:", error);
      ctx.send({ error: "Failed to send newsletter", details: error.message });
    }
  },
}));
This sendNewsletter controller fetches a newsletter entry from the Newsletter collection, retrieves all subscribers from the Subscriber collection, and then sends an email containing the newsletter to each subscriber using the sendEmail service.
Create a Custom Route to Send Newsletters
Create a send-newsletter route to be handled by the sendNewsletter controller in a new file called src/api/newsletter/routes/custom-routes.js:
// Path: src/api/newsletter/routes/custom-routes.js

module.exports = {
  routes: [
    {
      method: "POST",
      path: "/send-newsletter",
      handler: "newsletter.sendNewsletter",
      config: {
        auth: false, // Set to true if authentication is required
      },
    },
  ],
};
Test Newsletter API
First, retrieve the documentId for the Newsletter entry you created earlier.
curl http://localhost:1337/api/newsletters?fields%5B0%5D=documentIdThe result will look something like this:
{
    "data": [
        {
            "id": 1,
            "documentId": "rxaoulexwvykziyuz25bqi8y"
        }
    ],
}
Copy the documentId and use it to test the API route, localhost:1337/api/send-newsletter using the following command:
curl -X POST http://localhost:1337/api/send-newsletter \
     -H "Content-Type: application/json" \
     -d '{
            "id": "rxaoulexwvykziyuz25bqi8y"
         }'
Check your mailbox.

How to Automatically Send Newsletter When Published
This step involves sending a newsletter to subscribers as soon as it is published, using lifecycle hooks.
Create Strapi Lifecycle Hook
Create a new file for lifecycle hooks in your Newsletter model:
Create src/api/newsletter/content-types/newsletter/lifecycles.js:
// Path: src/api/newsletter/content-types/newsletter/lifecycles.js

module.exports = {
    async afterCreate(event) {
      const { result } = event;
      if (result.publishedAt) {
        await sendNewsletterToSubscribers(result.documentId);
      }
    },

    async afterUpdate(event) {
      const { result, params } = event;
      // Check if the newsletter was just published
      if (result.publishedAt && (!params.data.publishedAt || params.data.publishedAt === result.publishedAt)) {
        await sendNewsletterToSubscribers(result.documentId);
      }
    },
  };

  async function sendNewsletterToSubscribers(id) {
    try {
      // Fetch the newsletter from the Newsletter collection

      const newsletter = await strapi.documents("api::newsletter.newsletter").findOne({
        documentId: id,
        fields: ["title", "content"],
      });

      if (!newsletter) {
        console.error("Newsletter not found");
        return;
      }

      const { title, content } = newsletter;

      // Fetch all subscribers - using Document Service API

      const subscribers = await strapi.documents("api::subscriber.subscriber").findMany({
        fields: ["name", "email"],
      });

      if (!subscribers || subscribers.length === 0) {
        console.log("No subscribers found");
        return;
      }

      // Send the newsletter to all subscribers
      for (const subscriber of subscribers) {
        const personalizedContent = content.replace("{name}", subscriber.name);

        await strapi.service("api::email-news.email-news").sendEmail({
          to: subscriber.email,
          subject: `Test 5: ${title}`,
          htmlContent: `<p>Dear ${subscriber.name},</p><p>${personalizedContent}</p>`,
        });
      }

      console.log(`Newsletter sent to ${subscribers.length} subscribers`);
    } catch (error) {
      console.error("Email error:", error);
    }
  }
When triggered, this lifecycle hook fetches a newsletter from the Newsletter collection, retrieves all subscribers from the Subscriber collection, and sends an email containing the newsletter entry to all subscribers using the sendEmail service.
The lifecycle hook will trigger in either of the following cases:
- A new newsletter is created with published status
- An existing newsletter is updated to published status
Test Automatic Sending of Newsletter
Publish a new newsletter in your Strapi Admin.
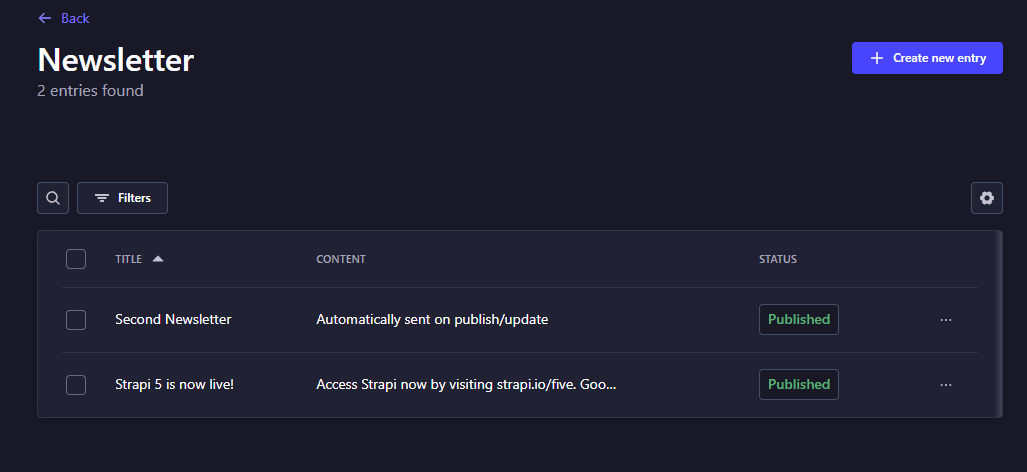
Check the mailboxes to confirm that the newsletter was delivered to the subscriber mailing list.
Create a Landing Page for Newsletter Subscription with Next.js
The next phase of this project involves configuring the Strapi backend Subscriber collection API to allow create and read operations.
You will also create a front-end landing page to allow users to subscribe using Next.js. One good thing about our project is that you can build a live Nextjs email marketing platform.
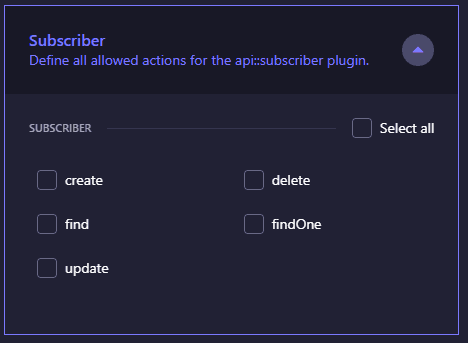
Enable Public Permissions (create, findOne, find) for Subscriber API
Update the permissions for the Subscriber collection using the User & Permissions Plugin.
Click Settings, then Users & Permissions Plugin, then Roles, and then Public.
The allowed actions for the Subscriber collection API should now be create, find, and findOne.

Test Subscriber Collection API
Test creating a new Subscriber using curl.
curl -X POST http://localhost:1337/api/subscribers \
     -H "Content-Type: application/json" \
     -d '{
           "data": {
             "name": "John",
             "email": "john@doe.com"
           }
         }'
You should receive a response similar to the following:
{
    "data": {
        "id": 10,
        "documentId": "or399je8658l18ivi5p3u4rz",
        "name": "John",
        "email": "john@doe.com",
        "createdAt": "2025-03-07T20:33:14.776Z",
        "updatedAt": "2025-03-07T20:33:14.776Z",
        "publishedAt": "2025-03-07T20:33:14.782Z"
    },
    "meta": {}
}
Verify the updated list of subscribers.
curl -X GET http://localhost:1337/api/subscribers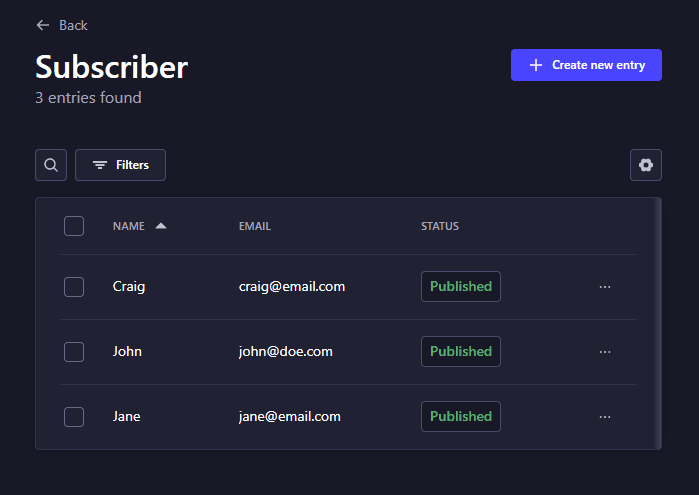
Create a Minimal Subscription Form (name, email) in Next.js
Next, let's introduce the Next.js frontend into this project.
Create a Next.js project
Create a directory named frontend.
mkdir frontend && cd frontendInstall react, react-dom, and next as npm dependencies in the frontend directory.
npm install next@latest react@latest react-dom@latestOpen your package.json file and add the following npm scripts
{
  "scripts": {
    "dev": "next dev",
    "build": "next build",
    "start": "next start",
    "lint": "next lint"
  },
  "dependencies": {
    "next": "^15.2.1",
    "react": "^19.0.0",
    "react-dom": "^19.0.0"
  }
}
Create Layout and Home Page in Next.js
Create an app folder, and then add a layout.tsx and page.tsx file.
mkdir app && touch app/layout.tsx app/page.tsxCreate the root layout inside app/layout.tsx:
// Path: frontend/app/layout.tsx

mport React from 'react';

export default function RootLayout({
  children,
}: {
  children: React.ReactNode
}) {
  return (
    <html lang="en">
      <body>{children}</body>
    </html>
  )
}
Create the home page, app/page.tsx:
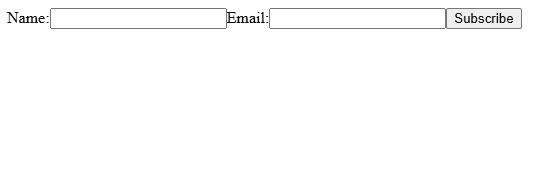
// Path: frontend/app/page.tsx

import React from 'react';

export default function Page() {
  return (
    <form action="#" method="post">
      <label htmlFor="name">Name:</label>
      <input type="text" id="name" name="name" required />

      <label htmlFor="email">Email:</label>
      <input type="email" id="email" name="email" required />

      <button type="submit">Subscribe</button>
    </form>
  );
}
Run the development server.
npm run devVisit http://localhost:3000 to view your site.
Soon, we will update the frontend with a more aesthetic design using Tailwind CSS.
Update the home page, app/page.tsx
Update the home page by modifying frontend/app/page.tsx as follows:
// Path: frontend/app/page.tsx

"use client";

import React from "react";
import { useState } from "react";

export default function Page() {
  const [name, setName] = useState("");
  const [email, setEmail] = useState("");
  const [message, setMessage] = useState("");

  const handleSubmit = async (e: React.FormEvent) => {
    e.preventDefault();

    try {
      const response = await fetch("http://localhost:1337/api/subscribers", {
        method: "POST",
        headers: {
          "Content-Type": "application/json",
        },
        body: JSON.stringify({
          data: { name, email },
        }),
      });

      if (!response.ok) {
        throw new Error("Failed to subscribe");
      }

      setMessage("Subscription successful!");
      setName("");
      setEmail("");
    } catch (error) {
      setMessage("Subscription failed. Try again.");
    }
  };

  return (
    <div>
      <form onSubmit={handleSubmit}>
        <label htmlFor="name">Name:</label>
        <input
          type="text"
          id="name"
          name="name"
          value={name}
          onChange={(e) => setName(e.target.value)}
          required
        />

        <label htmlFor="email">Email:</label>
        <input
          type="email"
          id="email"
          name="email"
          value={email}
          onChange={(e) => setEmail(e.target.value)}
          required
        />

        <button type="submit">Subscribe</button>
      </form>

      {message && <p>{message}</p>}
    </div>
  );
}
This code defines a React component for the subscription form. It allows users to enter their name and email address, and then submit the form to subscribe. The form data is sent to the Strapi backend (http://localhost:1337/api/subscribers) via a POST request. If successful, a success message is displayed; otherwise, an error message is shown.
Test Newsletter Subscription Form
Launch your Next.js development server and test the newsletter subscription form by entering a name and email address.
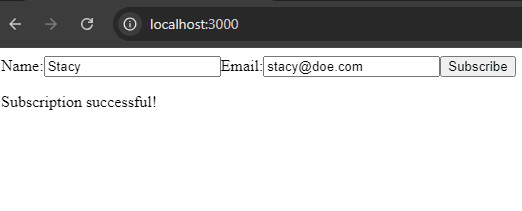
Verify whether the Subscriber collection has been updated in your Strapi admin.
Create Strapi Middleware for Form Validation, Request Logging, Duplicate Emails, and Rate Limiting
Create custom middleware in Strapi to handle form submission validation, log requests, check for duplicate emails, and apply rate limiting to prevent spam.
mkdir src/middlewaresCreate a Strapi Middleware to Log Form Submissions
Create a new middleware file, frontend/src/middlewares/form-handler.js, inside the Strapi backend folder:
// Path: frontend/src/middlewares/form-handler.js
module.exports = (config, { strapi }) => {
  return async (ctx, next) => {
    if (ctx.path === '/api/subscribers' && ctx.method === 'POST') {
      strapi.log.info(`Name: ${ctx.request.body.data.name} Email: ${ctx.request.body.data.email}`);
      }
      await next();
    };
};
Register the middleware by updating newsletter/config/middlewares.js to include your middleware:
// Path: newsletter/config/middlewares.js

module.exports = [
  'strapi::logger',
  'strapi::errors',
  'strapi::security',
  'strapi::cors',
  'strapi::poweredBy',
  'strapi::query',
  'strapi::body',
  'strapi::session',
  'strapi::favicon',
  'strapi::public',
  'global::form-handler',
];
Test the logger middleware by running the Strapi server.
Each time you submit the form, you should see the submissions logged in your Strapi backend terminal, similar to the following:
Name: John Email: john@strapi.ioCreate a Strapi Middleware for Rate Limiting
Update newsletter/config/middleware.js to add rate limiting to your project to prevent abuse.
// Path: newsletter/config/middlewares.js

module.exports = [
  'strapi::logger',
  'strapi::errors',
  {
    name: 'strapi::security',
    config: {
      rateLimit: {
        interval: 60 * 1000, // 1 minute
        max: 100, // maximum 100 requests per minute
      }
    }
  },
  'strapi::cors',
  'strapi::poweredBy',
  'strapi::query',
  'strapi::body',
  'strapi::session',
  'strapi::favicon',
  'strapi::public',
  'global::form-handler',
];
What This Configuration Does:
- Time Window:
interval: 60 * 1000sets a 1-minute window (60,000 milliseconds) - Request limit:
max: 100allows up to 100 requests per IP address within that minute. - Scope: Applies globally to all API routes
For more information on how rate limiting works in Strapi, check out this tutorial: How to Set Up Rate Limiting in Strapi: Best Practices & Examples.
Create Strapi Middleware for Name Validation
Update newsletter/src/middlewares/form-handler.js with the following code:
// Path: newsletter/src/middlewares/form-handler.js
module.exports = (config, { strapi }) => {
  return async (ctx, next) => {
    if (ctx.path === '/api/subscribers' && ctx.method === 'POST') {
      const { name, email } = ctx.request.body.data;

      // Initialize errors array
      const errors = [];

      //Validate name
      if (!name) {
        errors.push({ field: 'name', message: 'Name is required' });
      } else if (name.length > 255) {
        errors.push({ field: 'name', message: 'Name must be 255 characters or less'})
      }

      // Display errors
      if (errors.length > 0) {
        ctx.status = 400;
        ctx.body = { errors };
        return; // Stop execution and don't proceed to next middleware
      }

      // Log valid submission
      strapi.log.info(`Valid Submission - Name: ${name} Email: ${email}`);
      }
      await next();
    };
};
We have updated form-handler.js with validation checks for the submitted name. It verifies that a name is provided and limits it to a maximum of 255 characters.
All validation errors are collected into an array. If an error occurs, a 400 status code is returned with detailed error messages. Invalid data is prevented from proceeding to the next middleware.
To display the error messages in your Next.js frontend, update frontend/app/page.tsx with the following code:
// Path: app/page.tsx

"use client";

import React from "react";
import { useState } from "react";

export default function Page() {
  const [name, setName] = useState("");
  const [email, setEmail] = useState("");
  const [message, setMessage] = useState("");

  const handleSubmit = async (e: React.FormEvent) => {
    e.preventDefault();

    try {
      const response = await fetch("http://localhost:1337/api/subscribers", {
        method: "POST",
        headers: {
          "Content-Type": "application/json",
        },
        body: JSON.stringify({
          data: { name, email },
        }),
      });

      const data = await response.json();

      if (!response.ok) {
        if (data.errors) {
          // Display validation error
          setMessage(data.errors.map(err => `${err.field}: ${err.message}`).join(', '));
        } else {
          throw new Error("Failed to subscribe");
        }
      } else {
        setMessage("Subscription successful!");
        setName("");
        setEmail("");
      }
    } catch (error) {
      setMessage("Subscription failed. Try again.");
    }
  };

  return (
    <div>
      <form onSubmit={handleSubmit}>
        <label htmlFor="name">Name:</label>
        <input
          type="text"
          id="name"
          name="name"
          value={name}
          onChange={(e) => setName(e.target.value)}
          required
        />

        <label htmlFor="email">Email:</label>
        <input
          type="email"
          id="email"
          name="email"
          value={email}
          onChange={(e) => setEmail(e.target.value)}
          required
        />

        <button type="submit">Subscribe</button>
      </form>

      {message && <p>{message}</p>}
    </div>
  );
}
This setup:
- Prevents invalid names from being saved in the Subscriber collection.
- Provides feedback to users about validation issues.
- Logs only valid submissions to the server logs.
Test the name validation middleware by sending a blank name or providing a name that exceeds 255 characters.
Use browser Developer Tools (Ctrl + Shift + I) to make the form submissions.
Create Strapi Middleware for Email Validation
Update newsletter/src/middlewares/form-handler.js with the following code:
// Path: newsletter/src/middlewares/form-handler.js

module.exports = (config, { strapi }) => {
  return async (ctx, next) => {
    if (ctx.path === '/api/subscribers' && ctx.method === 'POST') {
      const { name, email } = ctx.request.body.data;

      // Initialize errors array
      const errors = [];

      //Validate name
      if (!name) {
        errors.push({ field: 'name', message: 'Name is required' });
      } else if (name.length > 255) {
        errors.push({ field: 'name', message: 'Name must be 255 characters or less'})
      }

      // Validate email
      const emailRegex = /^[^\s@]+@[^\s@]+\.[^\s@]+$/;
      if (!email) {
        errors.push({ field: 'email', message: 'Email is required' });
      } else if (!emailRegex.test(email)) {
        errors.push({ field: 'email', message: 'Please provide a valid email address' });
      }

      // Display errors
      if (errors.length > 0) {
        ctx.status = 400;
        ctx.body = { errors };
        return; // Stop execution and don't proceed to next middleware
      }

      // Log valid submission
      strapi.log.info(`Valid Submission - Name: ${name} Email: ${email}`);
      }
      await next();
    };
};
This setup:
- Checks if an email address is provided.
- Validates email format using a regex pattern
/^[^\s@]+@[^\s@]+\.[^\s@]+$/.
Test the email validation middleware by submitting a blank email field or providing an invalid email address.
Use browser Developer Tools (Ctrl + Shift + I) to make the form submissions.
Create Strapi Middleware to Check for Duplicate Email Addresses
In addition to email validation, you can prevent duplicate email entries by checking for existing email addresses.
Update newsletter/src/middlewares/form-handler.js with the following code:
// newsletter/src/middlewares/form-handler.js
module.exports = (config, { strapi }) => {
  return async (ctx, next) => {
    if (ctx.path === '/api/subscribers' && ctx.method === 'POST') {
      const { name, email } = ctx.request.body.data;

      // Initialize errors array
      const errors = [];

      //Validate name
      if (!name) {
        errors.push({ field: 'name', message: 'Name is required' });
      } else if (name.length > 255) {
        errors.push({ field: 'name', message: 'Name must be 255 characters or less'})
      }

      // Validate email
      const emailRegex = /^[^\s@]+@[^\s@]+\.[^\s@]+$/;
      if (!email) {
        errors.push({ field: 'email', message: 'Email is required' });
      } else if (!emailRegex.test(email)) {
        errors.push({ field: 'email', message: 'Please provide a valid email address' });
      }

      // Check for existing email to prevent duplicates
      if (email && emailRegex.test(email)) {
        try {
          const existingSubscriber = await strapi.documents("api::subscriber.subscriber").findMany({
            filters: { email: email },
          });

          if (existingSubscriber && existingSubscriber.length > 0) {
            errors.push({ field: 'email', message: 'This email is already subscribed' });
          }
        } catch (error) {
          strapi.log.error('Error checking for existing email:', error);
        }
      }

      // Display errors
      if (errors.length > 0) {
        ctx.status = 400;
        ctx.body = { errors };
        return; // Stop execution and don't proceed to next middleware
      }

      // Log valid submission
      strapi.log.info(`Valid Submission - Name: ${name} Email: ${email}`);
      }
      await next();
    };
};
Test the email duplication check by entering a duplicate email address in your newsletter subscription form.
Disable Public API in Strapi
Disable public access to your Newsletter and Subscriber collections in the Strapi project. This is to allow only authenticated users to use your app.
Click Settings, then Users & Permissions Plugin, then Roles, and then select Public.
For the Subscriber collection, remove all public access to the API.
For the Newsletter collection, remove all public access to the API.
Add Strapi Authentication using API Tokens
To secure your API endpoints while allowing controlled access from your Next.js front end, implement API token authentication.
Create an API Token in Strapi
Click Settings then API Tokens in your Strapi Admin Panel.
Click Create new API Token.
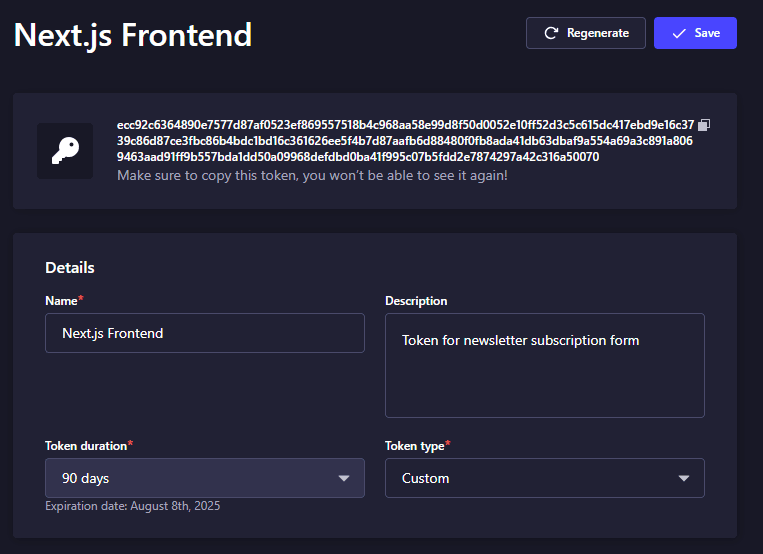
Configure the token as follows:
- Name:
Next.js Frontend - Description:
Token for newsletter subscription form - Token type:
Custom - Duration: Set preferred duration
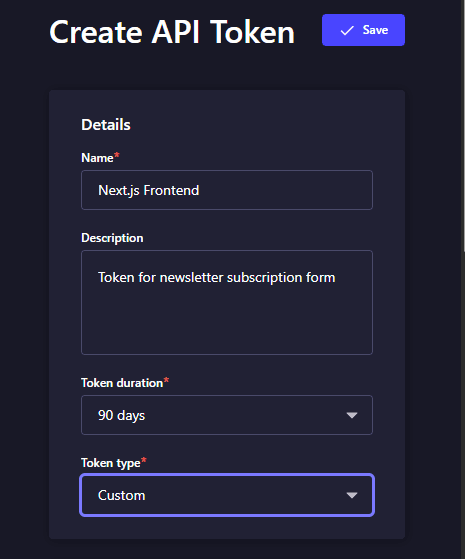
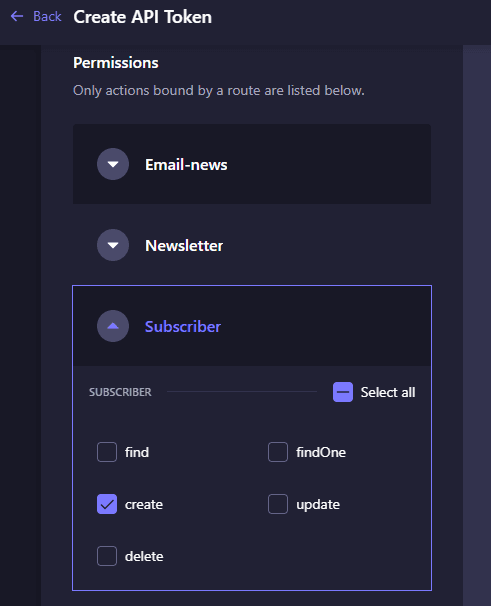
Under Permissions enable the create option for the Subscriber collection.
Click Save, and copy the generated token (store it securely).
Add Environment variables in the Next.js Frontend
In your Next.js frontend project folder, create a .env.local file and add your Strapi API token and Strapi server URL.
STRAPI_API_TOKEN=your-generated-token-here
STRAPI_URL=http://localhost:1337
Create a Server-side API route in Next.js
Create a Next.js API route named app/api/subscribe/route.ts to allow users subscribe using their name and email.
// Path: frontend/app/api/subscribe/route.ts

import { NextRequest, NextResponse } from "next/server";

export async function POST(req: NextRequest) {
    const { name, email } = await req.json();

    try {
        const response = await fetch(`${process.env.STRAPI_URL}/api/subscribers`, {
            method: "POST",
            headers: {
                "Content-Type": "application/json",
                Authorization: `Bearer ${process.env.STRAPI_API_TOKEN}`,
            },
            body: JSON.stringify({ data: { name, email } }),
        });

        const data = await response.json();

        if (!response.ok) {
            return NextResponse.json({ error: data }, { status: response.status });
        }

        return NextResponse.json({ success: true, data });
    } catch (error) {
        return NextResponse.json(
            { message: "Internal server error", error },
            { status: 500 }
        );
    }
}
Update the landing page
Here's the complete updated code for app/page.tsx that uses a secure API route (/api/subscribe) to handle Strapi subscriptions while keeping the Bearer token and Strapi URL private:
// Path: frontend/app/page.tsx

"use client";

import React, { useState } from "react",

export default function Page() {
const [name, setName] = useState("");
const [email, setEmail] = useState("");
const [message, setMessage] = useState("");

const handleSubmit = async (e: React.FormEvent) => {
    e.preventDefault();

    try {
        const response = await fetch("/api/subscribe", {
            method: "POST",
            headers: {
                "Content-Type": "application/json",

            },
            body: JSON.stringify({ name, email }),
        });

        const data = await response.json();

      if (!response.ok) {
        if (data.errors) {
          // Display validation error
          setMessage(data.errors.map(err => `${err.field}: ${err.message}`).join(', '));
        } else {
          throw new Error("Failed to subscribe");
        }
      } else {
        setMessage("Subscription successful!");
        setName("");
        setEmail("");
      }
    } catch (error) {
      setMessage("Subscription failed. Try again.");
    }
  };

  return (
    <div>
      <form onSubmit={handleSubmit}>
        <label htmlFor="name">Name:</label>
        <input
          type="text"
          id="name"
          name="name"
          value={name}
          onChange={(e) => setName(e.target.value)}
          required
        />

        <label htmlFor="email">Email:</label>
        <input
          type="email"
          id="email"
          name="email"
          value={email}
          onChange={(e) => setEmail(e.target.value)}
          required
        />

        <button type="submit">Subscribe</button>
      </form>

      {message && <p>{message}</p>}
    </div>
  );
}
Test Authentication
Submitting the form with a valid token should be successful.
Submitting the form without a token should fail with a 403 error.
Submitting the form with an invalid token should also fail with an error.
Remove Unused Code
Now that we have a complete newsletter system with lifecycle hooks, we can clean up redundant code and simplify our architecture.
Delete the following files from your Strapi project folder:
rm src/api/email-news/routes/email-news.js
rm src/api/newsletter/routes/custom-routes.js
This will remove the initial email-news route and the custom newsletter route, as they are no longer needed.
Add Design to Newsletter using Tailwind CSS
HTML Design
The final design of the landing page will look as follows:
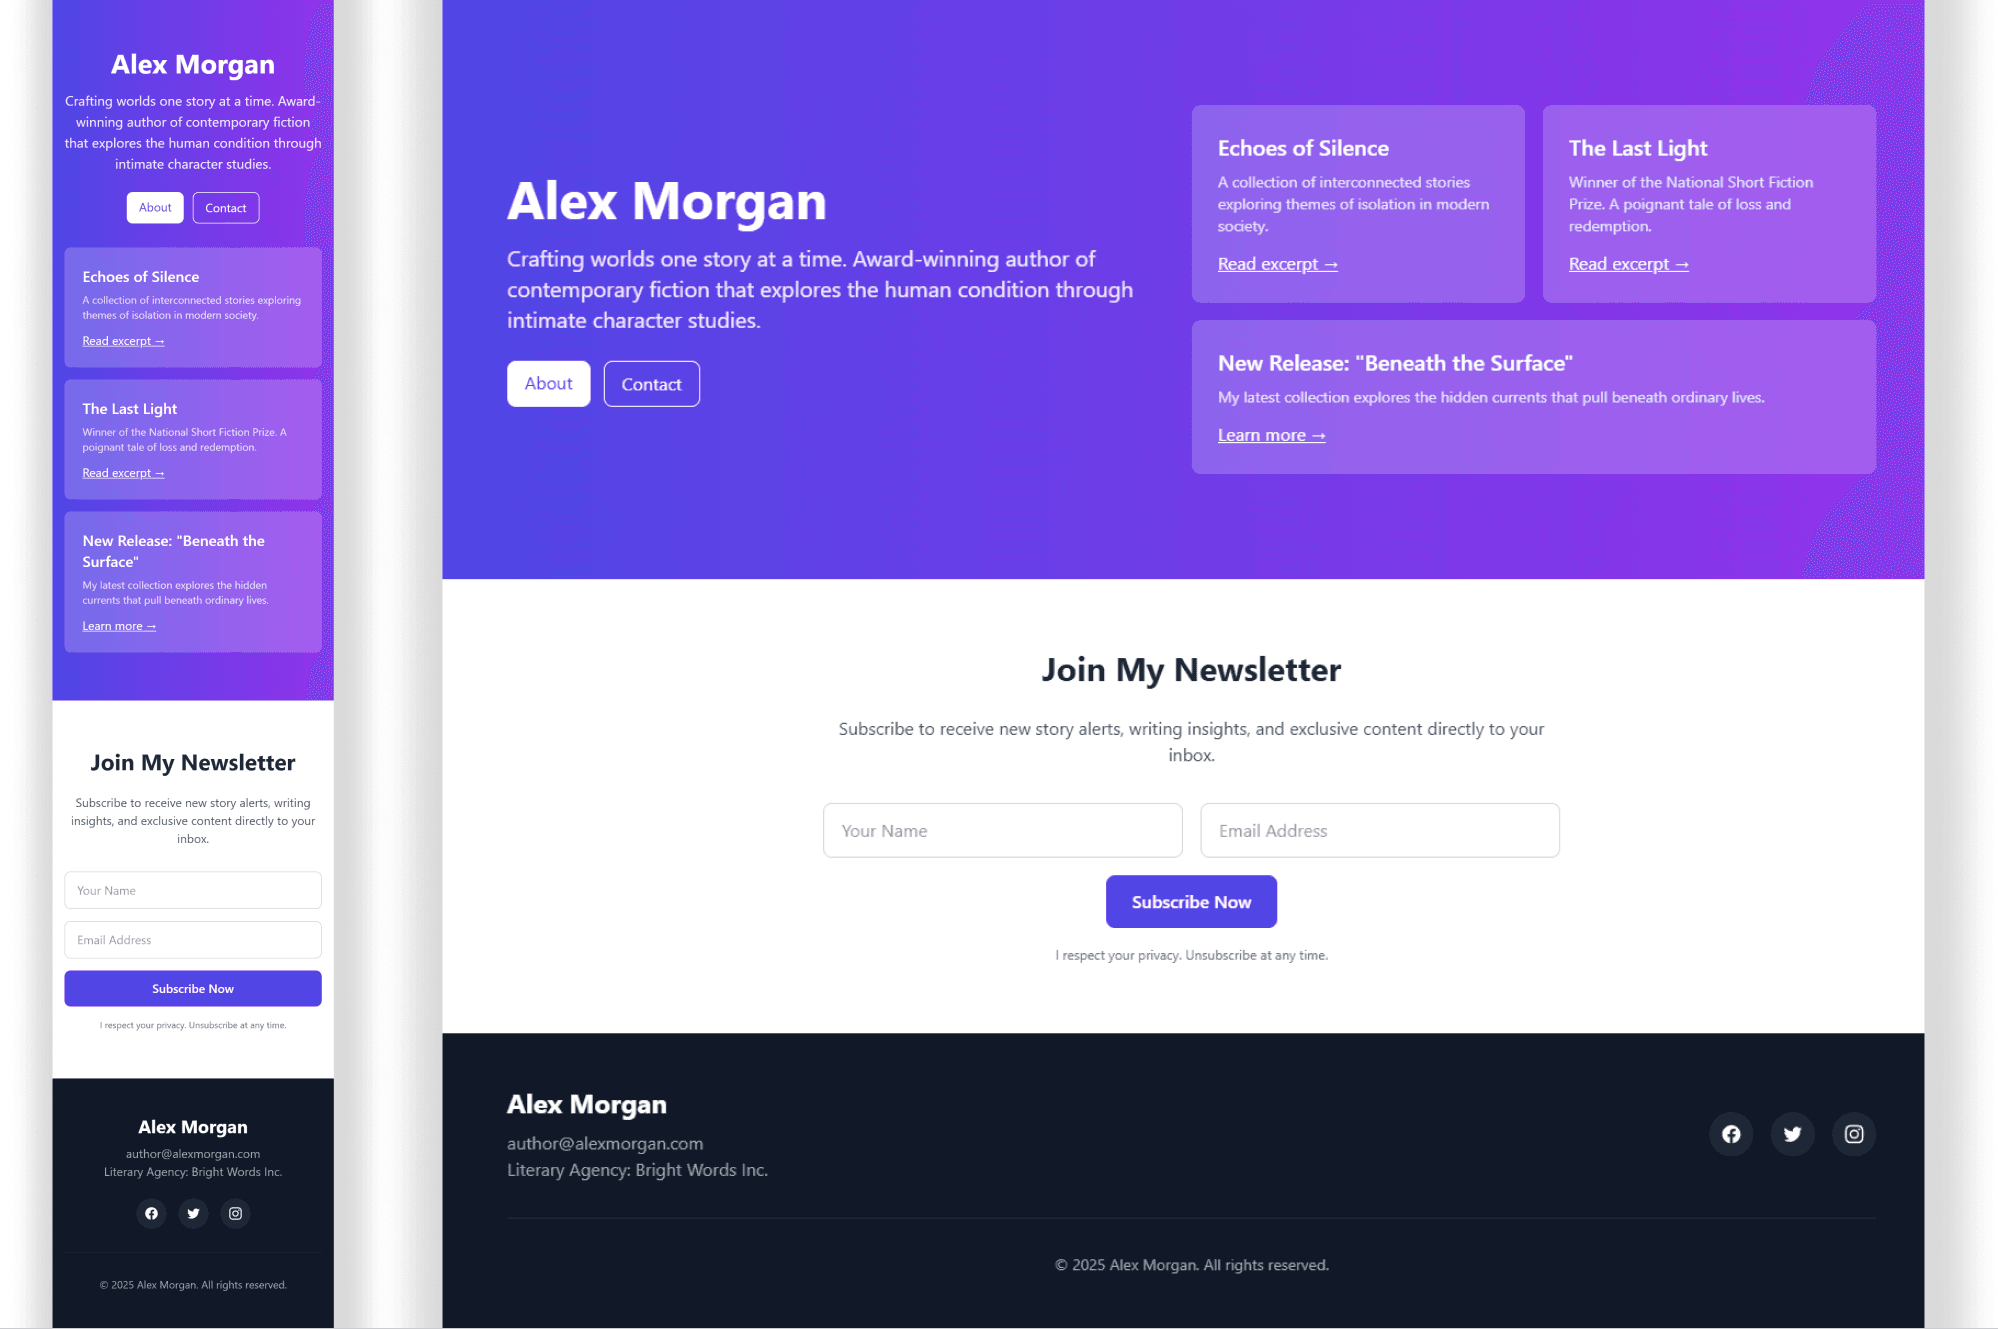
Here's the link to the raw HTML for the complete design: Newsletter Landing Page HTML Design
Install Tailwind CSS and its peer dependencies
The design incorporates Tailwind CSS.
Install Tailwind CSS in your frontend project.
npm install tailwindcss @tailwindcss/postcss postcssConfigure PostCSS Plugins
Create a postcss.config.mjs file in the root of your project, and add the @tailwindcss/postcss plugin to your PostCSS configuration.
const config = {
    plugins: {
        "@tailwindcss/postcss": {},
    },
};

export default config;
Add Tailwind directives to your CSS
Create your main CSS file named globals.css inside your app directory and add an @import directive for Tailwind CSS:
/* frontend/app/globals.css */
@import "tailwindcss";
Import your global CSS file into your app/layout.tsx file:
// Path: frontend/app/layout.tsx
import React from 'react';
import './globals.css';

export default function RootLayout({
    children,
}: {
    children: React.ReactNode
}) {
    return (
        <html lang="en">
            <body className="bg-gray-50 font-sans text-gray-800">{children}</body>
        </html>
    )
}
Update Landing Page With New Design
Update the app/page.tsx file with the following code:
"use client";
import React, { useState } from "react";
export default function Page() {
const [name, setName] = useState("");
const [email, setEmail] = useState("");
const [message, setMessage] = useState("");
const handleSubmit = async (e: React.FormEvent) => {
e.preventDefault();
try {
const response = await fetch("/api/subscribe", {
method: "POST",
headers: { "Content-Type": "application/json" },
body: JSON.stringify({ name, email }),
});
const data = await response.json();
if (!response.ok) {
if (data.errors) {
// Display validation error
setMessage(data.errors.map(err => `${err.field}: ${err.message}`).join(', '));
} else {
throw new Error("Failed to subscribe");
}
} else {
setMessage("✅ Subscription successful!");
setName("");
setEmail("");
}
} catch (error) {
setMessage("❌ Subscription failed. Please try again.")
}
};
return (
<section className="py-16 bg-white">
<div className="container mx-auto px-4">
<div className="max-w-2xl mx-auto text-center">
<h2 className="text-3xl font-bold mb-6">Join My Newsletter</h2>
<p className="text-gray-600 mb-8">Subscribe to receive new story alerts, writing insights, and exclusive content directly to your inbox.</p>
<form onSubmit={handleSubmit} className="space-y-4">
<div className="grid grid-cols-1 md:grid-cols-2 gap-4">
<div>
<label htmlFor="name" className="sr-only">Full Name</label>
<input
type="text"
id="name"
placeholder="Your Name"
value={name}
onChange={(e) => setName(e.target.value)}
required
className="w-full px-4 py-3 rounded-lg border-gray-300 focus:outline-none focus:ring-2 focus:ring-indigo-500"
/>
</div>
<div>
<label htmlFor="email" className="sr-only">
Email Address
</label>
<input
type="email"
id="email"
placeholder="Email Address"
value={email}
onChange={(e) => setEmail(e.target.value)}
required
className="w-full px-4 py-3 rounded-lg border border-gray-300 focus:outline-none focus:ring-2 focus:ring-indigo-500"
/>
</div>
<button
type="submit"
className="w-full md:w-auto px-6 py-3 bg-indigo-600 text-white font-medium rounded-lg hover:bg-indigo-700 transition duration-300"
>Subscribe Now</button>
</div>
</form>
{message && (
<p className="mt-6 text-sm text-gray-700">{message}</p>
)}
</div>
</div>
</section>
);
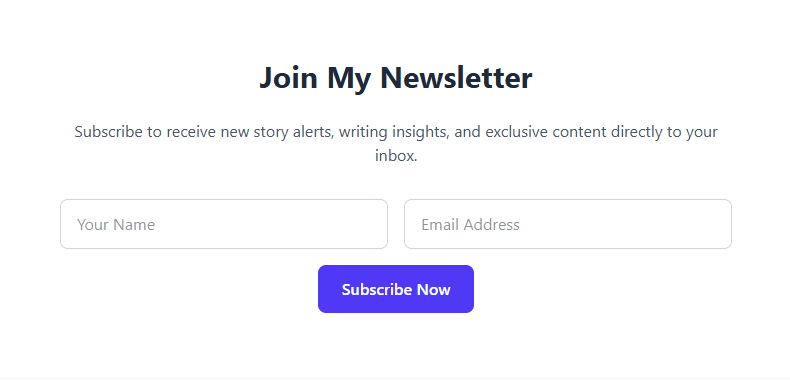
}View Updated Newsletter Landing Page Design
Stop and restart your Next.js development server to apply the changes. The landing page's sign-up form should be updated with the new design.
Demo: Newsletter Subscription System
GitHub Repo of Complete Code
The complete code for this project can be found here
Conclusion
By following this guide, you've successfully built a comprehensive newsletter subscription service leveraging the power of Strapi, Brevo, and Next.js.
You've learned to:
- Manage subscribers
- Create and automatically dispatch newsletters using lifecycle hooks
- Develop a frontend subscription form
- Implement crucial backend validation and security measures like API token authentication.
This setup provides a solid foundation for engaging with your audience, offering a scalable and secure solution for your newsletter needs and even a Nextjs email marketing platform. You're now well-equipped to expand on this system or deploy it with confidence.