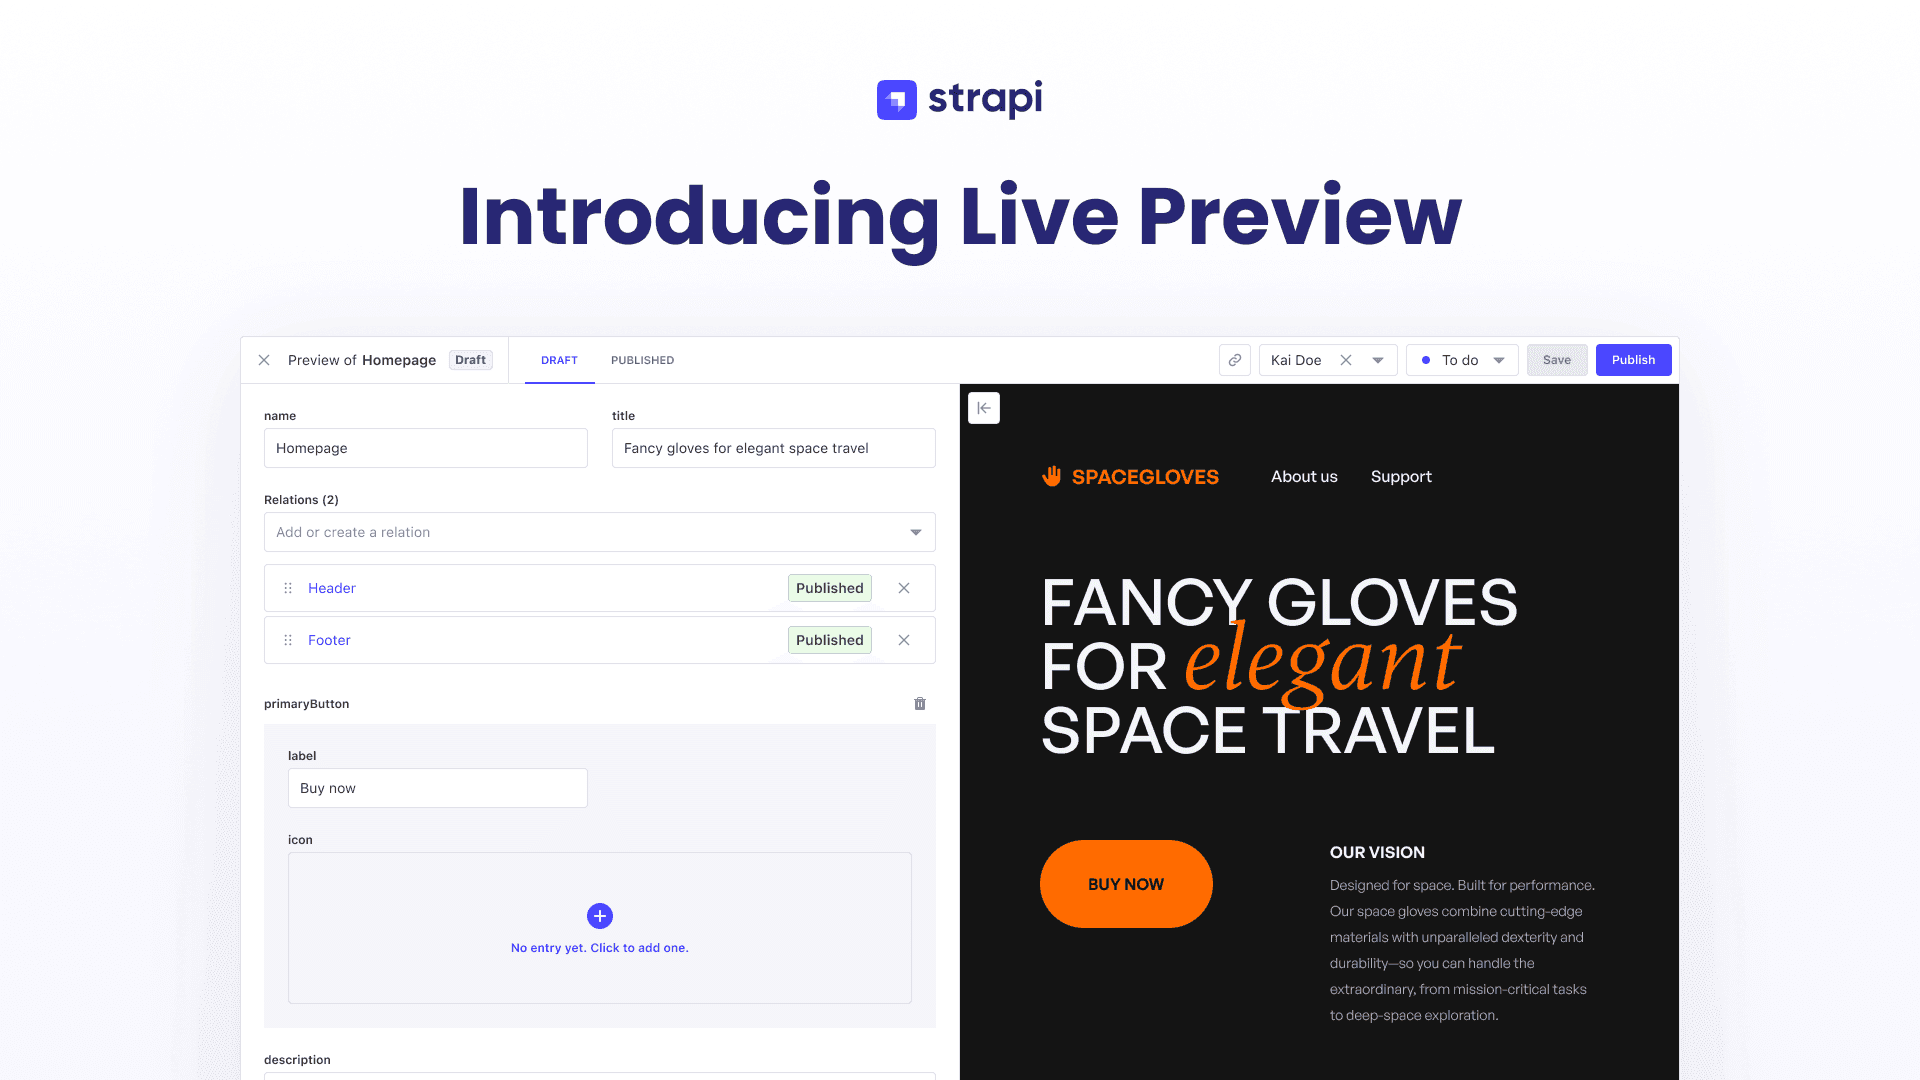
Introduction to Strapi 5 Preview Feature
The Strapi Preview feature allows you to preview your frontend application directly from Strapi's admin panel. This makes content management a whole lot smarter.
If you've been struggling to provide a preview experience for your team, you're in for a treat. The new Strapi 5 release brings the preview functionality that changes how you manage and visualize content across multiple platforms.
Let's dive into the nuts and bolts of Strapi preview feature and explore how it can transform your content management process.
Video Resource
The complete video for this tutorial is available here.
In this deep dive, Rémi from the Strapi engineering team reveals how the new Strapi 5 Preview feature enables real-time and multi-platform content workflows right inside the Strapi admin panel.
GitHub Repo for Complete Code
The complete code for this tutorial can be found in this project repo.
Also, you can clone the strapiconf branch of the LaunchPad repo to get the complete code.
Pre-requisites
For this tutorial, ensure you have Strapi LaunchPad installed and running on your local machine.
See this tutorial on how to set up LaunchPad locally.
How Strapi Preview Feature Works (Behind the Scenes)
The Strapi preview is a single iframe that puts your frontend inside Strapi. An HTML iframe is used to display a web page within a web page.
To set up a preview in Strapi, we first need to know the URL to render on the iframe. To get this URL, we need to provide a function in the Strapi config file that takes the entry the user is looking for. So when a user is looking at the Article content type, they get to see a Blog URL. See the image below.
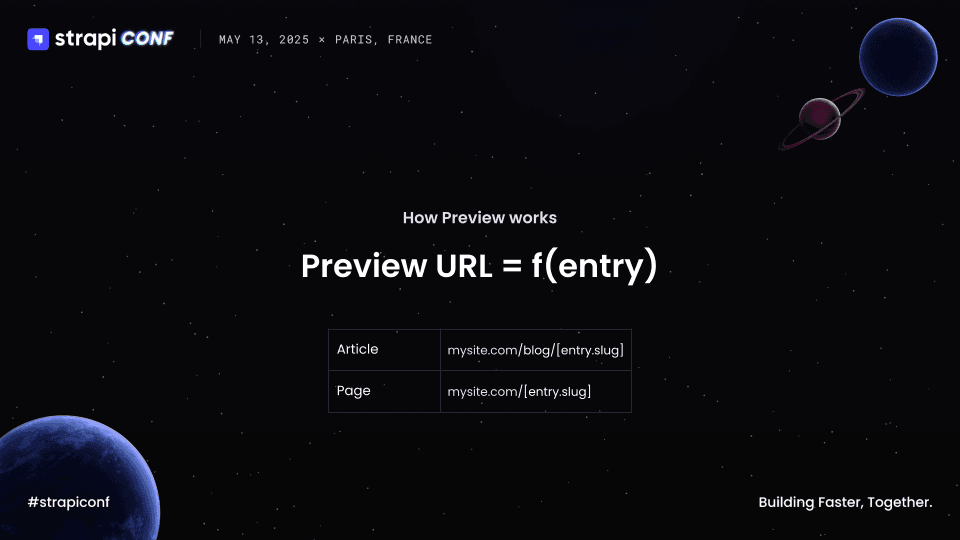
In the image above, the preview URL is the result of the function of the entry you provide. So if you are viewing the Article content type, the preview URL should be a Blog URL.
Similar to the image above, the logic function for a basic preview is usually in this form:
// Path: ./config/admin.js

switch (model) {
  case "api::page.page":
    if (slug === "homepage") {
      return "/";
    }
    return `/${slug}`;
  case "api::article.article":
    return `/blog/${slug}`;
  default:
    return null;
}
Strapi Preview Architecture
The Strapi Preview feature architecture looks like this.
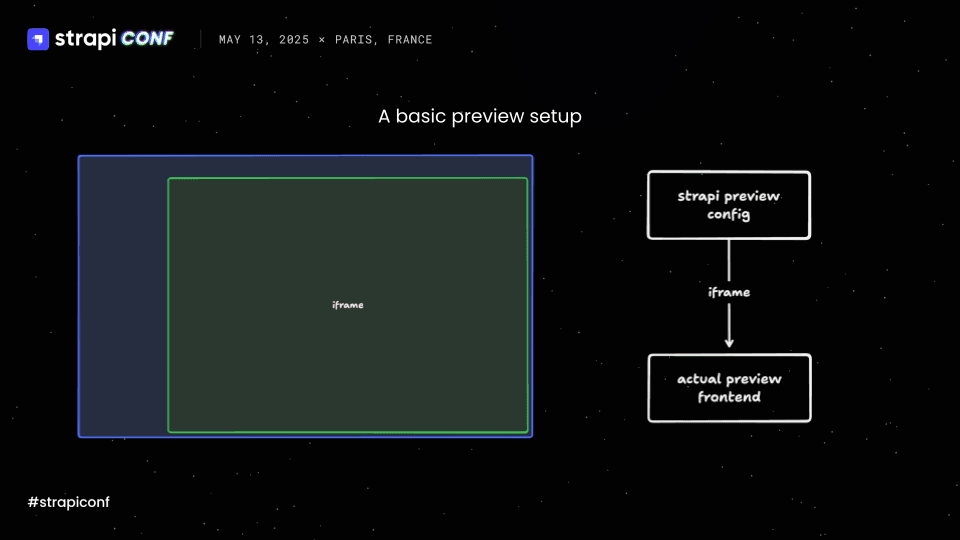
In the image above, which shows the Strapi preview architecture, the blue box represents Strapi which renders the iframe in green. The config is what provides the URL or source of the iframe.
So far, the basic preview setup is great, however, there is a problem. The problem is that it is limited! What happens when you want to preview some content or draft that is not live yet?
The solution will be that you need to be able to preview it directly on your Strapi admin without affecting the live production version that your clients are going to use. For this reason, we need to set up the preview mode in the config.
Let's set up preview mode to allow you to preview drafts that are not live yet without affecting your Strapi production version.
How to Set Up Preview Mode in Strapi Using LaunchPad
In order to continue with setting up the preview mode and other sections of this tutorial we will be using LaunchPad, the official Strapi demo app.
👋 NOTE: You can learn how to set up LaunchPad locally and also deploy to Strapi cloud using this blog post.
Navigate to the config file ./config/admin.js and update the code inside with the following code:
// Path: ./config/admin.js

const getPreviewPathname = (model, { locale, document }): string | null => {
  const { slug } = document;
  const prefix = `/${locale ?? "en"}`;

  switch (model) {
    case "api::page.page":
      if (slug === "homepage") {
        return prefix;
      }
      return `${prefix}/${slug}`;
    case "api::article.article":
      return `${prefix}/blog/${slug}`;
    case "api::product.product":
      return `${prefix}/products/${slug}`;
    case "api::product-page.product-page":
      return `${prefix}/products`;
    case "api::blog-page.blog-page":
      return `${prefix}/blog`;
    default:
      return null;
  }
};

export default ({ env }) => {
  const clientUrl = env("CLIENT_URL");

  return {
    auth: {
      secret: env("ADMIN_JWT_SECRET"),
    },
    apiToken: {
      salt: env("API_TOKEN_SALT"),
    },
    transfer: {
      token: {
        salt: env("TRANSFER_TOKEN_SALT"),
      },
    },
    flags: {
      nps: env.bool("FLAG_NPS", true),
      promoteEE: env.bool("FLAG_PROMOTE_EE", true),
    },
    preview: {
      enabled: true,
      config: {
        allowedOrigins: [clientUrl, "'self'"],
        async handler(model, { documentId, locale, status }) {
          const document = await strapi.documents(model).findOne({
            documentId,
            fields: ["slug"],
          });

          const pathname = getPreviewPathname(model, { locale, document });

          // Disable preview if the pathname is not found
          if (!pathname) {
            return null;
          }

          const urlSearchParams = new URLSearchParams({
            secret: env("PREVIEW_SECRET"),
            pathname,
            status,
            documentId,
            clientUrl,
          });

          return `${clientUrl}/api/preview?${urlSearchParams}`;
        },
      },
    },
  };
};
Here is what we did above:
- We created a logic to generate the preview URL.
- The
getPreviewPathnamefunction holds to the switch logic we mentioned earlier that computes the URL of the preview. So this gives us thepathname. - Instead of directly returning the pathname, we want to put it inside a search params object
urlSearchParamsobject. - The URL we are redirecting to or returning is an API endpoint:
${clientUrl}/api/preview?${urlSearchParams}that is a Next.js application. - Because we provided a secret
clientSecretas a search parameter, the Next.js application will perform authentication to make sure that it is a Strapi admin user making the request. - The Next.js app will also check for the
statusto see if it is a draft which sets a cookie that says Strapi in draft mode. It will then redirect to the actualpathname, read the cookies to see that it is in draft mode, and adjust the content it is going to fetch.
The code above is nothing new. This is how Preview has worked for quite some time. In summary, instead of returning the actual preview frontend, we are adding an API endpoint in between.
However, what happens when your company grows and you have many websites that want to consume the same content or even a native mobile application? In this case, it won't be one entry equals one URL.
This shows that our setup has its limit. Now let's create another layer for multi-frontend preview in Strapi.
Strapi Multi-Frontend Preview Setup - Web + Native
If you want to consume the same content across multiple websites or native applications you will need a multi-frontend preview setup. This is a proxy preview concept. Take a look at the image below:
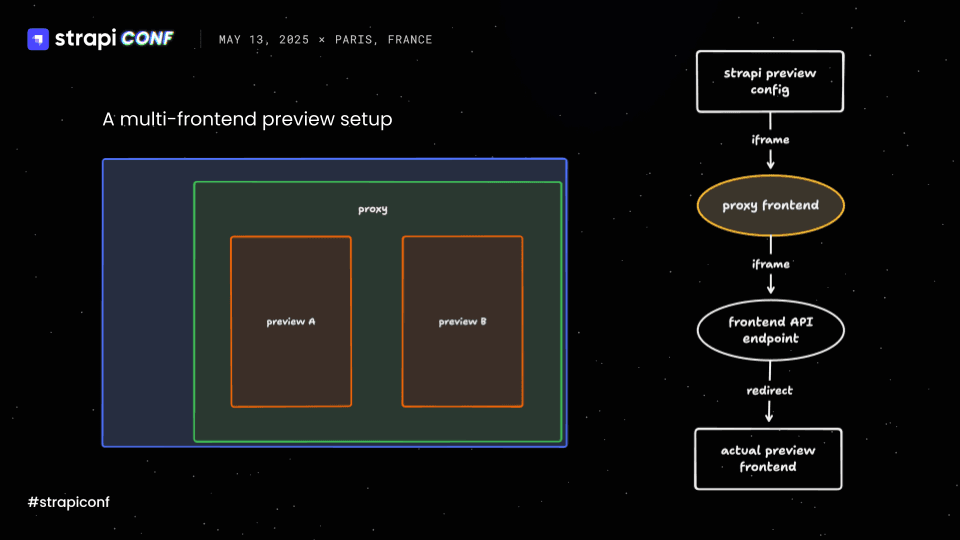
In the image above, Strapi represents the blue box. Instead of directly rendering your Next.js apps or your native apps which represent the orange boxes, you can have a single frontend that is dedicated to hosting the preview.
This single frontend is known as the proxy, which is represented by the green box above. The proxy will render multiple types of previews. The types of previews could be simultaneous previews, setting up tabs, or any kind of preview depending on your choice.
Let's set up a multi-frontend proxy page that will allow rendering multiple types of previews.
Creating a Custom Proxy Page Inside Strapi.
The proxy we will create will act as an intermediary, allowing you to switch between different preview types.
Since we are already in the Strapi dashboard, we can use the Strapi API to create routes in Strapi instead of creating an external React application or another frontend which might make the setup a complex task.
Step 1: Create a New URL
Head over to the config file we updated recently and modify the redirecting client URL with the following code:
// Path: ./config/admin.ts

...

return `/admin/preview-proxy?${urlSearchParams}`;

...
In the code above the /admin route is because we are working inside Strapi admin, and the nonexistent route is preview-proxy.
When you click the "Open preview" button, you will see that we now embedded Strapi admin within itself.
Step 2: Create Custom Admin Route for Proxy Preview
Let's create the preview-proxy non-existent route. The way to create an admin route inside of Strapi is to head over to ./src/admin create a file called app.tsx and add the following code.
// Path: ./src/admin/app.tsx

import type { StrapiApp } from "@strapi/strapi/admin";
import { lazy } from "react";

const PreviewProxy = lazy(() => import("./PreviewProxy"));

export default {
  config: {
    locales: ["en"],
  },
  register(app: StrapiApp) {
    app.router.addRoute({
      path: "preview-proxy",
      element: <PreviewProxy />,
    });
  },
};
With the new router API app.router, we created a route preview-proxy which renders the PreviewProxy React component. Let's create the PreviewProxy component.
Step 3: Create a Default Component for Preview
Head over to ./strapi/src/admin/ and add the following code. The code below will render a box for the preview.
// Path: LaunchPad/strapi/src/admin/PreviewProxy.tsx

// ... imports

const PreviewProxy = () => {
 // ... app variables

  return (
    <Portal>
      <Box
        position="fixed"
        top="0"
        left="0"
        right="0"
        bottom="0"
        background="neutral100"
        zIndex={4}
      ></Box>
    </Portal>
  );
};

export default PreviewProxy;
The code above uses the Strapi Design system. position=fixed is used because we don't want to have two navigation menus within the app. You can choose to change the background to any color of your choice. For this tutorial, we will use neutral100.
Recall that we want to be able to render for the web and native app. So, let's build this using Select.
Adding Support for Web and Mobile App Preview
Now that we have a proxy page for multiple-frontend, let's add a select logic to switch between web and native mobile apps.
We will be using Expo for our React Native application.
Add a device selector logic in the ./src/admin/PreviewProxy.tsx file:
// Path: LaunchPad/strapi/src/admin/PreviewProxy.tsx

// ... imports

const PreviewProxy = () => {
  // ... app variables

  return (
    <Portal>
      <Box
      // ... Box styling
      >
        // Selector Logic
        <Flex gap={4} justifyContent="center" padding={2}>
          <Typography>Preview on:</Typography>
          <SingleSelect value={selectedDevice.id} onChange={handleDeviceChange}>
            {devices.map((device) => (
              <SingleSelectOption key={device.id} value={device.id}>
                {device.name}
              </SingleSelectOption>
            ))}
          </SingleSelect>
        </Flex>
      </Box>
    </Portal>
  );
};

export default PreviewProxy;
This is what you should see.
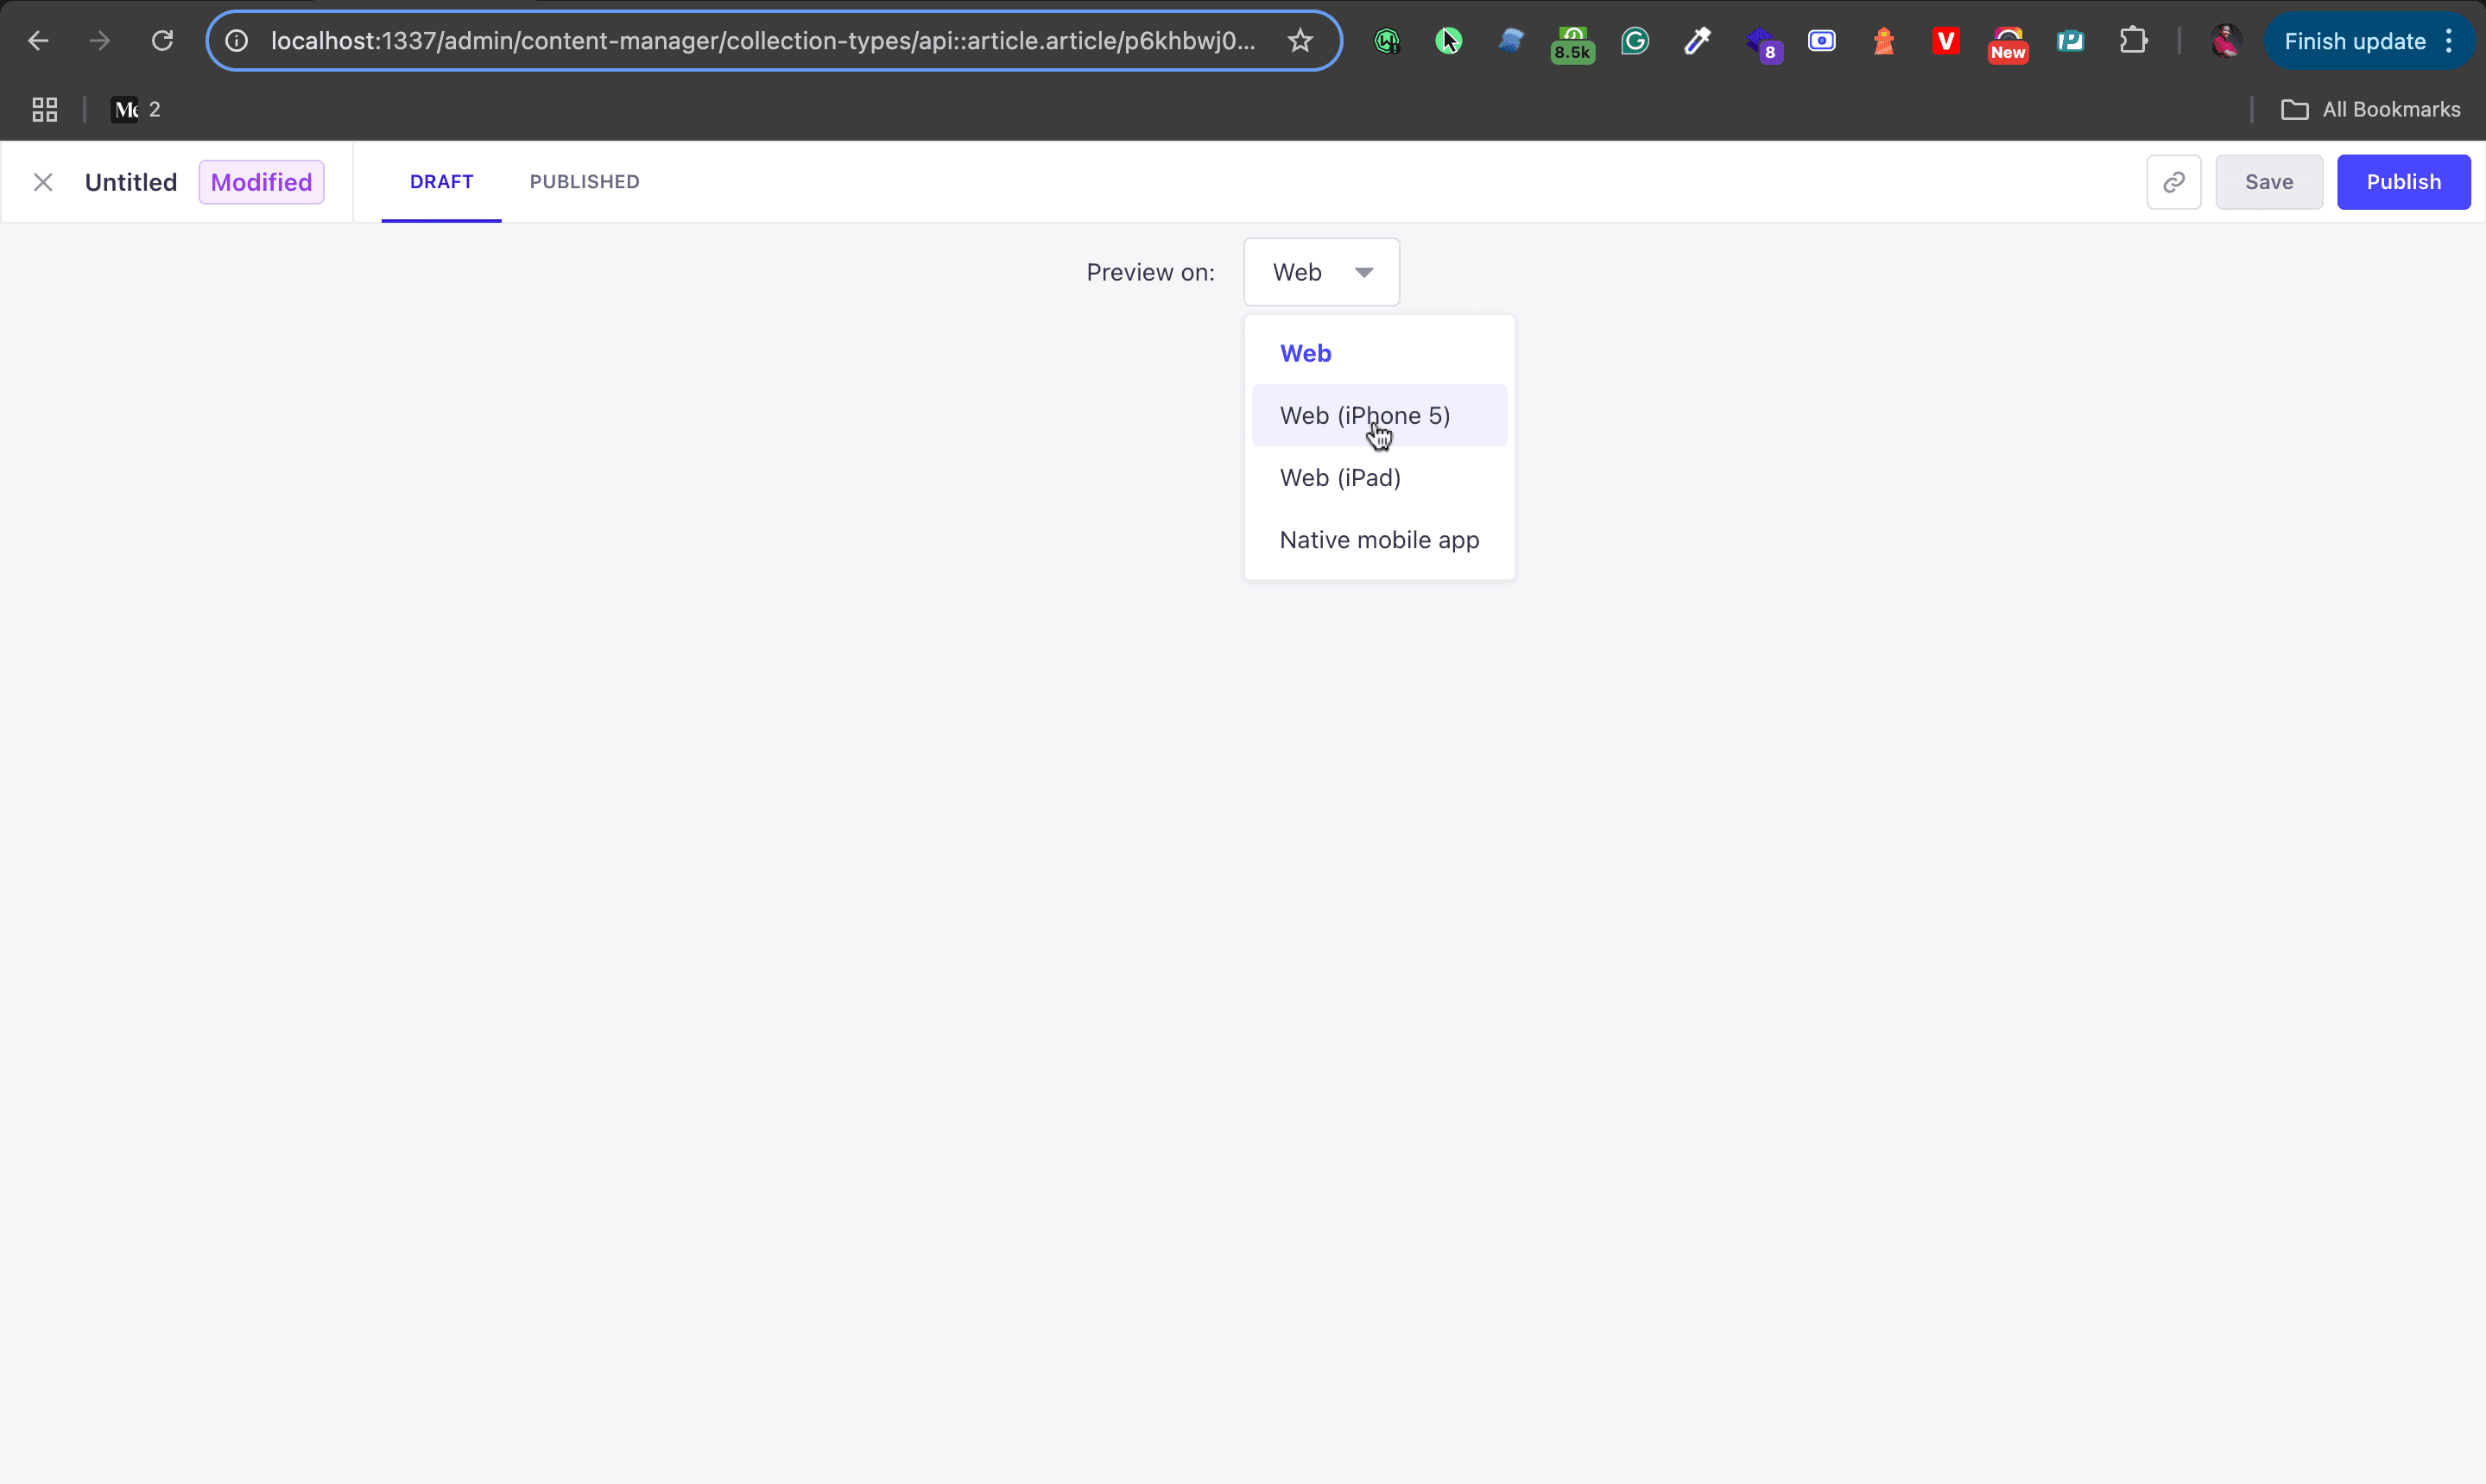
We can now switch between web and mobile apps.
Step 1: Rendering the Different Previews
The next goal is to render the actual preview below the selection.
We will toggle between web and mobile.
This is the code for it.
// Path: LaunchPad/strapi/src/admin/PreviewProxy.tsx

// ... imports

const PreviewProxy = () => {
  // ... app variables

  return (
    <Portal>
      <Box
      // ... Box styling
      >
        // Selector Logic
        <Flex gap={4} justifyContent="center" padding={2}>
          <Typography>Preview on:</Typography>
          <SingleSelect value={selectedDevice.id} onChange={handleDeviceChange}>
            {devices.map((device) => (
              <SingleSelectOption key={device.id} value={device.id}>
                {device.name}
              </SingleSelectOption>
            ))}
          </SingleSelect>
        </Flex>

        // Toggle Between Expo React Native and Web
        {isMobileApp ? (
          <ExpoPreview />
        ) : (
          <Box
            tag="iframe"
            src={previewURL}
            width={selectedDevice.width}
            height={selectedDevice.height}
          />
        )}
      </Box>
    </Portal>
  );
};

export default PreviewProxy;
We can now toggle between the web and the native app. For the web devices, we computed the height and width programmatically.
Let's create the ExpoPreview component.
Step 2: Create ExpoPreview Component
Create a component for previewing the Expo QR code.
// Path: LaunchPad/strapi/src/admin/utils/ExpoPreview.tsx

import * as React from "react";
import { Flex } from "@strapi/design-system";

export const ExpoPreview = () => {
  const qrCodeSrc = React.useMemo(() => {
    const qrCodeUrl = new URL("https://qr.expo.dev/eas-update");
    qrCodeUrl.searchParams.append(
      "projectId",
      "4327bdd6-9794-49d7-9b95-6a5198afd339",
    );
    qrCodeUrl.searchParams.append("runtimeVersion", "1.0.0");
    qrCodeUrl.searchParams.append("channel", "default");
    return qrCodeUrl.toString();
  }, []);

  return (
    <Flex
      display="flex"
      alignItems="center"
      justifyContent="center"
      height="100%"
      width="100%"
    >
      <img src={qrCodeSrc} alt="Expo QR Code" />
    </Flex>
  );
};
The ExpoPreview component above displays a QR code for you to scan and use the EAS service to preview on your device.
Step 3: Configure Expo Image Content Security Policy
You will need to create a security configuration for content security policy as shown in the code below the QR code for the Strapi:
// Path: LaunchPad/strapi/config/middlewares.ts
export default [
  "strapi::logger",
  "strapi::errors",
  {
    name: "strapi::security",
    config: {
      contentSecurityPolicy: {
        useDefaults: true,
        directives: {
          "connect-src": ["'self'", "https:"],
          "img-src": [
            "'self'",
            "data:",
            "blob:",
            "market-assets.strapi.io",
            "qr.expo.dev",
          ],
          "media-src": [
            "'self'",
            "data:",
            "blob:",
            "market-assets.strapi.io",
            "qr.expo.dev",
          ],
          upgradeInsecureRequests: null,
        },
      },
    },
  },
  "strapi::cors",
  "strapi::poweredBy",
  "strapi::query",
  "strapi::body",
  "strapi::session",
  "strapi::favicon",
  "strapi::public",
  "global::deepPopulate",
];
Step 4: Modify the Next.js API Preview Handler
Head over to your Next.js app and locate the LaunchPad/next/app/api/preview/route.ts file to handle the preview for the web.
// Path: LaunchPad/next/app/api/preview/route.ts

import { draftMode } from "next/headers";
import { redirect } from "next/navigation";

export const GET = async (request: Request) => {
  // Parse query string parameters
  const { searchParams } = new URL(request.url);
  const secret = searchParams.get("secret");
  const pathname = searchParams.get("pathname") ?? "/";
  const status = searchParams.get("status");

  // Check the secret and next parameters
  // This secret should only be known to this route handler and the CMS
  if (secret !== process.env.PREVIEW_SECRET) {
    return new Response("Invalid token", { status: 401 });
  }

  if (status === "published") {
    // Make sure draft mode is disabled so we only query published content
    draftMode().disable();
  } else {
    // Enable draft mode so we can query draft content
    draftMode().enable();
  }

  redirect(pathname);
};
This is what we should now see.
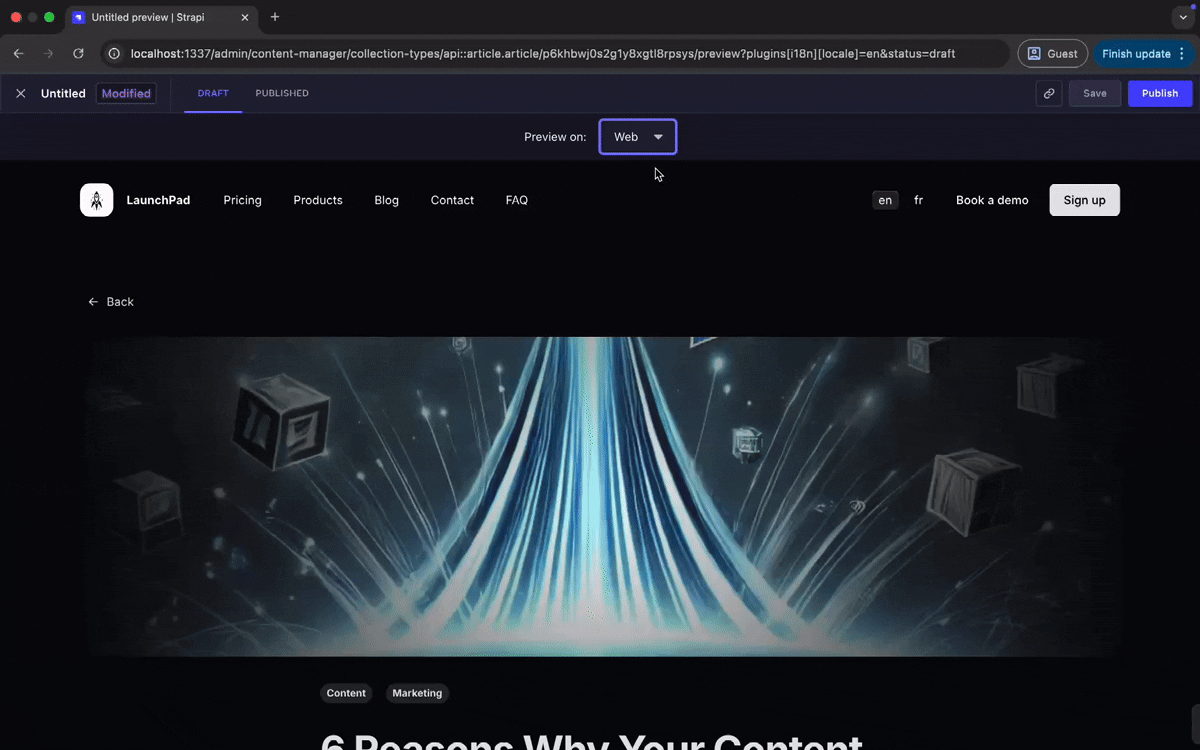
We can now see the QR code of our Expo app. Of course, we are not setting up emulators or using EAS but to demonstrate how to preview our content on multiple frontends, and even on a native mobile app.
Handling Real-Time Preview Changes and Events
There is currently a problem with our preview. When we make an update, it is no longer going to be reflected.
This is because the content update works by Strapi (the blue box) dispatching an event to the window of the iframe. So the proxy (the green box) receives the event but the event no longer reaches the previews (the orange boxes).
To achieve real-time updates, you need to implement event listeners in your proxy component. These listeners will catch update events dispatched by Strapi and forward them to the appropriate preview iframe.
// Path: LaunchPad/strapi/src/admin/PreviewProxy.tsx

// ... imports

const PreviewProxy = () => {
  // ... component variables

  // handle real-time changes
  const iframe = React.useRef<HTMLFrameElement>(null);
  React.useEffect(() => {
    const handleMessage = (message) => {
      if (message.data.type === "strapiUpdate") {
        iframe.current?.contentWindow.postMessage(message.data, clientURL);
      }
    };
    window.addEventListener("message", handleMessage);
    return () => window.removeEventListener("message", handleMessage);
  }, []);

  return (
    <Portal>
      // ... other codes

      // Attach ref to iframe
      <Box
        tag="iframe"
        src={previewURL}
        width={selectedDevice.width}
        height={selectedDevice.height}
        marginLeft="auto"
        marginRight="auto"
        display="block"
        borderWidth={0}
        ref={iframe}
      />
    </Portal>
  );
};
In the code above, we create a useEffect hook function to set up a listener to listen to the message from Strapi. We set up a ref to an iframe so we can dispatch an event on it.
Creating Custom Preview Features
The sky's the limit when it comes to custom features. For example, you could implement a change highlighting feature that visually indicates which parts of the content have been updated. This can be incredibly useful for content editors working on large documents.
// Highlighter Hook
export function useUpdateHighlighter() {
  const [searchParams] = useSearchParams();
  const { kind, model, documentId, locale } = Object.fromEntries(searchParams);

  const previousDocument = React.useRef<any>(undefined);
  const iframe = React.useRef<HTMLIFrameElement>(null);

  const { refetch } = useDocument({
    collectionType:
      kind === "collectionType" ? "collection-types" : "single-types",
    model,
    documentId,
    params: { locale },
  });

  React.useEffect(() => {
    const handleMessage = async (message: any) => {
      if (message.data.type === "strapiUpdate") {
        const response: any = await refetch();
        const document = response.data.data;

        let changedFields: Array<string> = [];
        if (document != null && previousDocument.current !== document) {
          // Get the diff of the previous and current document, find the path of changed fields
          changedFields = Object.keys(document).filter(
            (key) => document[key] !== previousDocument.current?.[key],
          );
        }

        iframe.current?.contentWindow?.postMessage(
          { ...message.data, changedFields },
          new URL(iframe.current.src).origin,
        );

        previousDocument.current = document;
      }
    };

    // Add the event listener
    window.addEventListener("message", handleMessage);

    // Cleanup the event listener on unmount
    return () => {
      window.removeEventListener("message", handleMessage);
    };
  }, [refetch]);

  return { iframe };
}


// iframe inside PreviewProxy Component
const { iframe } = useUpdateHighlighter();
Benefits of Strapi's Preview Feature: Why It's a Game-Changer
The Strapi Preview Feature offers several key benefits that make it a standout solution for content management workflows:
- Scalability: It can handle projects of varying complexities, from simple websites to complex multi-platform applications.
- Customizability: The feature provides the right primitives for you to build exactly what you need, rather than forcing you into a one-size-fits-all solution.
- Universal Compatibility: While the examples in this tutorial and the Strapi Preview docs often use Next.js, the preview feature works with any frontend framework that supports cookies and API endpoints. For example Astro, Remix, React Native, and so on.
GitHub Repo for Complete Code
The complete code for this tutorial can be found in this project repo.
Also, you can clone the strapiconf branch of the LaunchPad repo to get the complete code.
Conclusion
In conclusion, the Strapi 5 Preview Feature represents a significant leap forward in content management capabilities. By providing a flexible, customizable, and powerful preview system, Strapi CMS can provide content teams to work more efficiently and effectively.
Whether you're managing a simple blog or a complex multi-platform content ecosystem, the Strapi Preview Feature offers the tools you need to deliver outstanding content experiences.