

This article refers to Strapi v4. For Strapi v5, use the updated resources below:
Start here
- Strapi 5 docs (source of truth): Strapi 5 Documentation — official hub for setup, modeling, and APIs.
Model Dynamic Zones in Strapi
- Content‑Type Builder: Create types, components, and dynamic zones — add a Dynamic Zone to your page type and reuse components.
- Content Manager: Add and reorder blocks — edit entries and rearrange Dynamic Zone components.
- Models (Dynamic zones): Where DZs live in the model — define with
type: 'dynamiczone'and list allowedcomponents.
Fetch Dynamic Zone content (REST or GraphQL)
- REST — population & select: Populate & field selection — include components/media/DZ and trim fields for performance.
- REST — v5 change: Populate DZ per component with
on[...]— no shared population strategy anymore. - GraphQL plugin: Install & enable /graphql — add GraphQL endpoint and sandbox.
- GraphQL API reference: Queries, mutations, filtering — end-to-end reference for queries/mutations, filtering & pagination; v5 supports flattened format and optional Relay-style connections.
Permissions (so Nuxt can read data)
- Users & Permissions: Grant Public read in dev; lock down for prod.
If you’re still on v4
- ID change:
documentIdreplacesidin API calls. - All breaking changes: v4 → v5 reference.
A common challenge one would face when using any CMS is the constant back and forth between developer and content teams. Be it planning and updating content structures in the backend or rearranging content on the frontend of an application, making changes almost always means additional work for both teams. It gets even harder when there is uncertainty around the content structure, how often the content will be updated, and what it will look like. Strapi has an interesting way of making this process more efficient and it comes in the form of a feature called Dynamic Zones.
Dynamic Zones is a new native feature in Strapi that lets teams build reusable content models and minimize the number of changes developers need to make to add new content. It lets your developers build web experiences and have a good night's sleep without worrying about all the content being seamlessly added by the content managers.
In this tutorial, you will build a company website with Nuxt.js that utilizes Strapi Dynamic Zones. You will also learn how to consume data from the Strapi GraphQL API and render that data in a Nuxt application.
Prerequisites
What to expect
Your Strapi Backend
- Installing Strapi and creating a new project
- Create an Administrator user
- Create a Pages Collection Type
- Create an Image component
- Create a Quote component
- Create a Rich Text component
- Create a Dynamic Zone
- Add content to the Pages Collection Type
- Set Roles and Permissions
- Send requests to the Collection Types API
Your Nuxt Frontend
- Installing Nuxt and creating a new project
- Building our Header component
- Building our Hero component
- Building our ContentGrid component
- Building our Footer component
- Adding the Strapi Nuxt module to our application
- Creating our about page
- Creating other pages
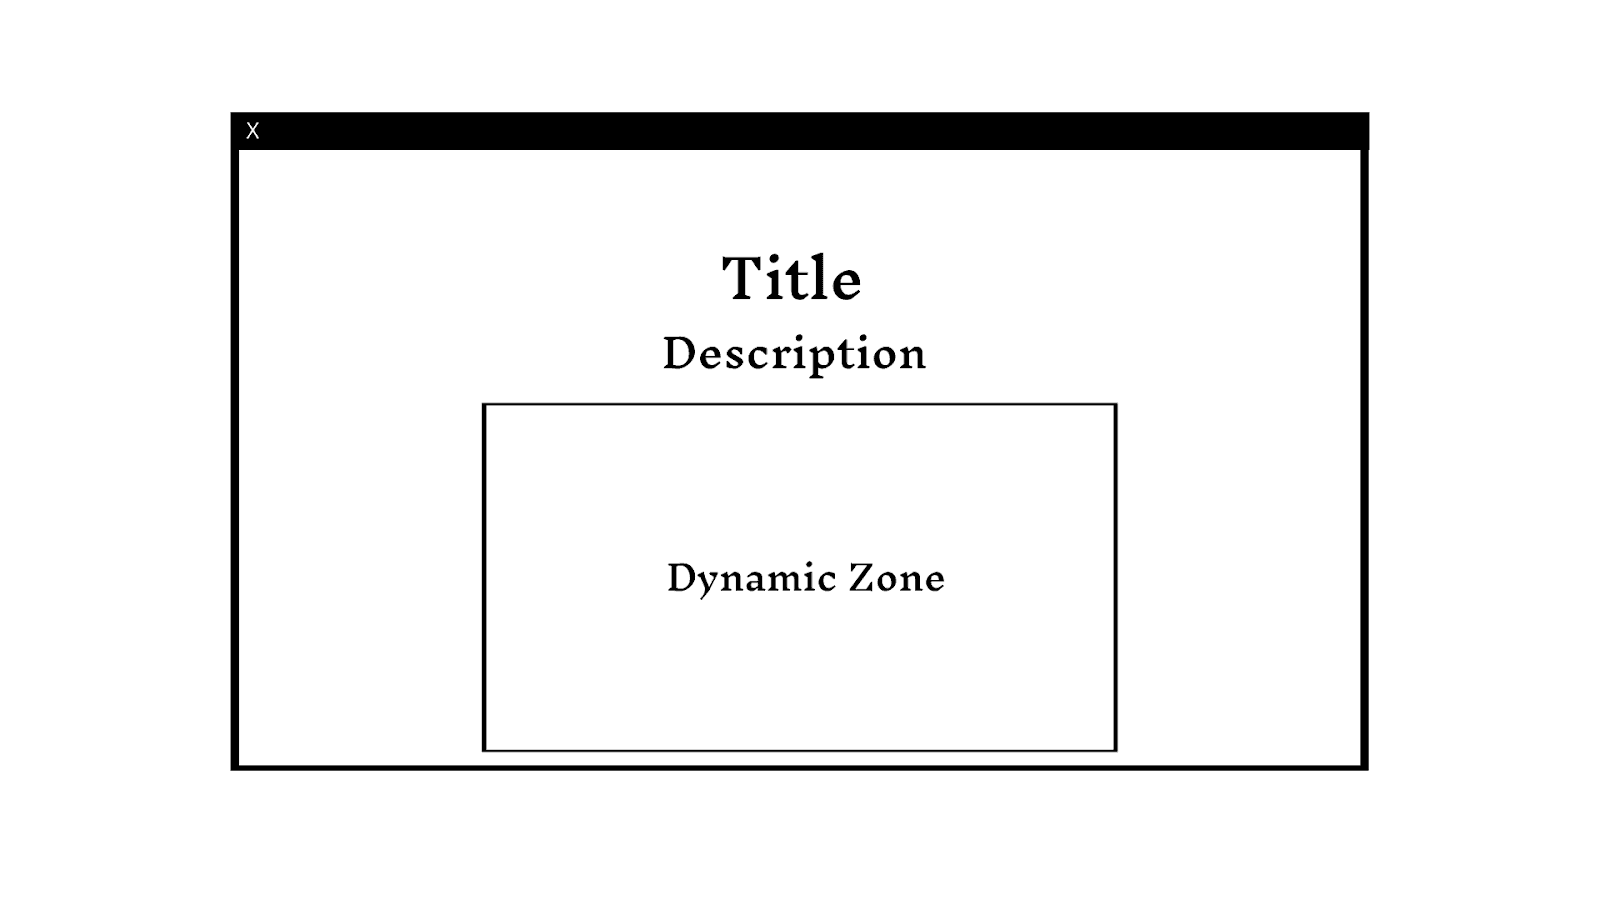
Let’s get into what this company website will look like. The website will have four pages - a home page, about page, a team page, and a testimonials page. The pages share a few common elements;, each has a title and description. However, the about page needs a few images and some rich text, while the testimonial page needs a couple of quotes and an image.
The remaining pages follow suit and need different types of content. Besides building a content model, we might need to update content by adding a few customer reviews, team quotes, and even add a video or two.
Traditionally, this would mean creating different content models for each page, with Dynamic Zones you can create a single reusable content model that gives you the flexibility to add content you need on the fly. Visually it would look a little like this.
Now that you understand where Dynamic Zones fit in your application and content workflow, you can get started with building one.
Your Strapi Backend
1. Installing Strapi and creating a new project Open your terminal.
- Run
yarn create strapi-app api --quickstart- this creates a new folder called api and builds the admin UI.
2. Create an Administrator user Navigate to http://localhost:1337/admin.
- Complete the form to create the first Administrator user.
- Click Ready to start
3. Create a Pages Collection Type Navigate to Content-Types Builder under Plugins in the left-hand menu.
- Click the "+ Create new collection type" link
- Name it pages and click continue
- Add a Text field (short text) and name it Title
- Click the "+ Add another field" button
- Add another Text field (long text) and name it Description
- Click the Save button and wait for Strapi to restart
These fields will store the title and description of your pages.

You will need images, quotes, and rich text in your Dynamic Zone, so you will build out components for each.
Navigate to Content-Types Builder under Plugins in the left-hand menu.
- Click the "+ Create new component" link
- Name your new component Image and pick an icon
- Create a new category for your component called pages
- Add a Media field (single media) and name it image
- Click the "+ Add another field" button
- Add a Text field (long text) and name it caption.
- Click the Save button and wait for Strapi to restart
5. Create a Quote component Navigate to Content-Types Builder under Plugins in the left-hand menu.
- Click the "+ Create new component" link
- Name your new component Quote and pick an icon
- Select the pages category for your component
- Add a **Text field **(long text) and name it quote
- Click the "+ Add another field" button
- Add a Text field (short text) and name it quoter
- Click the Save button and wait for Strapi to restart
6. Create a Rich Text component Navigate to Content-Types Builder under Plugins in the left-hand menu.
- Click the "+ Create new component" link
- Name your new component richText and pick an icon
- Select the pages category for your component
- Add a Rich Text field and name it richText.
- Click the Save button and wait for Strapi to restart
Now that you have created your components, you can create a Dynamic Zone.
7. Create a Dynamic Zone Navigate to Content-Types Builder under Plugins in the left-hand menu.
- Click the "+ Add new field to this collection" link
- Add a Dynamic Zone and name it pageZone
- Click “Use an existing component”
- Under the Pages category, select the Image, Quote, and richText components
- Click the Finish button
- Click the Save button and wait for Strapi to restart
There you go! You have a Dynamic Zone in your Pages collection. It should look like this.

Now that you've built your Pages collection, you can add content.
8. Add content to the Pages Collection Type Navigate to Pages under Collection Types in the left-hand menu.
- Click “Add new Pages”
- Fill in this information in the fields specified :
Title: About Description: What we're about image: Image of Man on a Desk caption: Who we are as a company richText: We're a company specialized in keeping people happy. Our products speak to this goal. Do you want it? We've got it.
Click Save
You can get the content for the teams, testimonials, and home page on this Notion page.
It’s here that you start to see what Dynamic Zones can do. While adding content, whenever you click ‘Add to pageZone’, you can add different components to your page.

Before making requests, you need to make your Pages collection type accessible by tweaking its permissions.
**9. Set Roles and Permissions Navigate to Settings then Roles & Permissions.
- Click the Public Role
- Scroll down under Permissions, find Pages
- Tick the boxes next to find and findone
- Click Save

You have a collection type, you’ve added some content to it, you’ve set up permissions, let’s send requests to your API? Yes!
10. Send requests to the Collection Types API Navigate to http://localhost:1337/api/pages?populate=* to query your data.
If everything went smoothly, you should get back some JSON data containing the content you just added. For this tutorial, however, you useStrapi's GraphQL API.
To enable it, navigate to ./api
- Run
cd apito change directories - Run
yarn strapi install graphqlto install the GraphQL plugin
or
Navigate to Marketplace under General in the left-hand menu.
- Click Download on the GraphQL card
- Wait for Strapi to restart.
When you have the GraphQL plugin up and running, you can test queries in your GraphQL Playground.
That is all for your backend. Now to render all this beautiful content.
Your Nuxt Frontend
1. Installing Nuxt and creating a new project Open your terminal.
- In your root folder, run
npx nuxi init client- this creates a folder called client that houses our Nuxt frontend. - Run
cd clientto change directories - Run
yarn installto install your project dependencies - Run
yarn devto run your app on https://localhost:3000 to see that everything is working well.
You should see the brand new Nuxt starter page.

Your application will be built out with a couple of components.
- NavBar.vue - To let you navigate between pages
- Hero.vue - To display your page title and description
- ContentGrid.vue - To render content from the Dynamic Zone
- Footer.vue - To display copyright and image attributions
2. Building our Header component Navigate to ./client/components
Create a file called NavBar.vue and paste the following code in it.
<template>
    <div class="header">
        <div class="container">
            <div class="left">
                <NuxtLink to="/" class="home-link">
                    <b>Company X </b>
                </NuxtLink>
            </div>
            <nav class="nav right">
                <NuxtLink class="nav__link" to="/about">About Us</NuxtLink>
                <NuxtLink class="nav__link" to="/team">Team</NuxtLink>
                <NuxtLink class="nav__link" to="/testimonials">Testimonials</NuxtLink>

            </nav>
        </div>
    </div>
</template>

<script>
export default {

};
</script>

<script setup>

</script>


<style scoped>
.header {
    position: relative;
    height: 6rem;
    z-index: 10;
}
.header.sticky {
    position: fixed;
    top: 0;
    left: 0;
    width: 100%;
}
.header > .container {
    display: flex;
    align-items: center;
    justify-content: space-between;
    height: 100%;
}
.home-link {
    text-decoration: none;
}
.logo {
    height: 4.5rem !important;
}
.site-name {
    font-size: 0.9rem;
    font-weight: 700;
    letter-spacing: 0.05em;
    text-decoration: none;
    text-transform: uppercase;
}
.nav > * {
    font-size: 0.9rem;
    font-weight: 600;
    text-decoration: none;
    margin-top: 4px;
    margin-right: 3rem;
    padding-bottom: 4px;
    border-bottom: 1px solid;
    border-color: transparent;
    transition: border 0.15s;
}
.nav > *:last-of-type {
    margin: 0;
}
.nav > *:hover {
    border-color: inherit;
}
.nav > .active {
    border-color: inherit;
}
</style>
This component gives you a navbar to navigate through different pages with the <NuxtLink> tag.
3. Building our Hero component Navigate to ./client/components
Create a file called Hero.vue and paste the following in it.
<template>
  <div class="hero">

    <!-- Displays page Title and Description -->

      <h1 class="hero-title" v-html="content.Title" />
      <h2 class="hero-subtitle" v-html="content.Description" />


  </div>
</template>

<script setup>
</script>

<script>
export default {
  // content is query data from parent page
  // title is the page title of parent page
  props: {
    content: Object,
    title: String
  }
};
</script>

<style>
.hero {
  text-align: center;
  width: 480px;
  max-width: 100%;
  margin: 0 auto;
  padding: 4rem 0 8rem 0;
}
.hero-title {
  font-size: 3rem;
  font-weight: 700;
  padding: 0;
  margin: 0 0 2rem 0;
}
.hero-title p,
.hero-subtitle p {
  margin: 0;
  padding: 0;
}
.hero-subtitle {
  font-size: 1.15em;
  font-weight: 400;
  line-height: 1.68;
  padding: 0;
  margin: 0;
  opacity: 0.6;
}
</style>
This component gets the props, content and title passed to it from its parent. title is the name of the page you want to display data for. content is the query result containing the page content you added earlier. Then you go on to display the title and description.
4. Building our ContentGrid component Navigate to ./client/components
Create a file called ContentGrid.vue and paste the following code in it.
<template>
  <div class="hero">
      <div v-for="zone in content.pageZone" :key="zone.id" class="project">
        <!-- Display all richText here -->
        <div class="sub-text" v-if="zone.__typename === 'ComponentPostRichText'">
          <p>{{ zone.richText }}</p>
        </div>

        <!-- Displays all Quotes here -->
        <div v-if="zone.__typename === 'ComponentPostQuote'">
          <p class="subtitle">{{ zone.quote }}</p>
          <p class="sub-text">by {{ zone.quoter}}</p>
        </div>

        <!-- Displays all Images -->
        <div class="sub-text" v-if="zone.__typename === 'ComponentPostImage'">
          <img :src="zone.image.data.attributes.url" />
          <p class="sub-text hero-subtitle">{{ zone.caption }}</p>
        </div>
      </div>
    </div>
</template>

<script setup>
</script>

<script>
export default {
  // content is query data from parent page
  // title is the page title of parent page
  props: {
    content: Object,
    title: String
}
};
</script>

<style scoped>
.hero {
  text-align: center;
  width: 650px;
  max-width: 100%;
  margin: 0 auto;
  padding: 1rem 0 8rem 0;
}
.sub-text {
  padding: 0 0 3rem 0;
}
.hero-subtitle p {
  margin: 0;
  padding: 0;
}
.hero-subtitle {
  font-size: 1em;
  font-weight: 400;
  line-height: 1.68;
  padding: 0;
  margin: 0;
  opacity: 0.6;
}
.subtitle {
  font-size: 1.5em;
  font-weight: 500;
  line-height: 1.68;
  padding: 0;
  margin: 0;
  opacity: 0.6;
}
.project {
  grid-column: auto / span 2;
  text-align: center;
}
@media (min-width: 920px) {
  .project {
    grid-column: auto / span 1;
  }
  .project:nth-child(3n + 1) {
    grid-column: auto / span 2;
  }
}
</style>
This is where you render the content from your Dynamic Zone. Just like Hero.vue, ContentGrid.vue gets props, content, and title passed from its parent. title is the name of the page that you want to display data for. content is the query result that contains the page content you added earlier. The Dynamic Zone data is stored in contents.pageZone and you use v-for to iterate through it.
Each component in the Dynamic Zone has its own type. In the code above, you create a zone in our component to display all the rich text by comparing the __typename with the type of the rich text component. You get this from exploring our schema in our GraphQL Playground. This lets us display the rich text using zone.richText.
Similarly, with the other components in your Dynamic Zone, you can use the same approach to create zones that display data that matches their type. You can also do this for any subsequent components you add to the Dynamic Zone that you want to render in your frontend.
5. Building our Footer component Navigate to ./client/components
- Create a file called Footer.vue and paste the following code.
<template>
<div>
<footer class="footer">
<div class="container">
<span /> Copyright © 2022 |<span> Thanks to <a href="https://unsplash.com/@wocintechchat">Christina</a>,<a href="https://unsplash.com/@galina88"> Galina </a>and <a href="https://unsplash.com/@bkotynski">Bethany</a> for the images.</span>
</div>
</footer>
</div>
</template>
<script>
export default {
};
</script>
<script setup>
</script>
<style scoped>
.footer {
font-size: 0.8rem;
padding: 6rem 0;
}
</style>This component displays some information at the bottom of your page.
6. Adding the Strapi Nuxt module to our application You’re almost ready to query your API and run your application. You will need to install a few packages to make sure GraphQL works in your application.
- Run
yarn add --dev @nuxtjs/strapito install them. - Paste the following code in nuxt.config.ts:
export default defineNuxtConfig({
    modules: ['@nuxtjs/strapi'],
    strapi: {

        url: process.env.STRAPI_URL || 'http://localhost:1337',
        prefix: '/api',
        version: 'v4',
        cookie: {},
        cookieName: 'strapi_jwt',
    }

})
We will add data to this file later.
Next up, in client/querys create a file called content.js and paste this in it.
export const contentQuery = `
query Pages($Page: String!){
  pages: pages(filters: { Title: { eq: $Page  }}) {
    data {
      attributes {
        Title
        Description
        pageZone {
          __typename
          ... on ComponentPostImage {
            caption
            image {
              data {
                attributes {
                  url
                }
              }
            }
          }
          ... on ComponentPostQuote {
            quote
            quoter
          }
          ... on ComponentPostRichText {
            richText
          }
        }
      }
    }
  }
}`
You can test this query in your GraphQL Playground - it gets page-specific content.
Now that you have your components created, you can piece them together and create your about page. To create a route in Nuxt, you have to add a new file to your page's directory. After this, in your app.vue file, replace <NuxtWelcome /> with <NuxtPage /> to activate Nuxt Pages.
7. Creating our about page Navigate to ./client/pages.
Create a file called about.vue and paste the following code in it.
<template>
  <div class="layout">
    <NavBar />
    <Hero :title="title" :content="pages" />
    <ContentGrid :title="title" :content="pages" />
    <Footer />
  </div>
</template>

<script setup>
import { contentQuery } from "~/query/content"
const graphql = useStrapiGraphQL()
const title = "About"
const result = await graphql(contentQuery, { "Page": title })
const pages = result.data.pages.data[0].attributes
</script>


<style>
* {
  box-sizing: border-box;
}
body {
  --color-base: rgb(255, 255, 255);
  --color-base-1: rgb(243, 243, 243);
  --color-contrast: rgb(0, 0, 0);
  --color-contrast-1: rgb(43, 43, 43);
  font-family: -apple-system, system-ui, BlinkMacSystemFont, "Segoe UI", Roboto, "Helvetica Neue", Arial, sans-serif;
  margin: 0;
  padding: 0;
  font-size: 16px;
  background: var(--color-base);
  color: var(--color-contrast);
  transition: background 0.5s ease;
}
body.dark {
  --color-base: rgb(0, 0, 0);
  --color-base-1: rgb(43, 43, 43);
  --color-contrast: rgb(255, 255, 255);
  --color-contrast-1: rgb(243, 243, 243);
}
h1 {
  letter-spacing: -0.01em;
}
.layout {
  padding: 0;
}
.layout.sticky-header {
  padding: 0 0 0 0;
}
.container {
  max-width: 1200px;
  margin: 0 auto;
  padding: 0 2rem;
}
@media (min-width: 860px) {
  .container {
    padding: 0 6rem;
  }
}
a {
  color: inherit;
}
img {
  display: block;
  margin-left: auto;
  margin-right: auto;
  width: 50%;
}
.label {
  display: block;
  font-weight: 700;
  margin-bottom: 0.5rem;
}
</style>
In this file, you import all your components and make a query to your GraphQL API using the Nuxt module. You then pass the result - pages and the data property page title - title as props into our header Hero and ContentGrid components so that they can display page-specific data.
8. Creating other pages
Just like you made your ‘about page’, you can create your home, team, and testimonials pages by pasting the same code and changing the data property title to the name of the page. The home page is an exception, you need to assign the string “Value” to the data property.
… aaand that’s it. Our application should work now as it does below.

Amazing! You have your application rendering Dynamic Zones now, but it doesn’t end here.
The beautiful thing is that if you make any updates to content in the Dynamic Zone, developers don't need to make changes in the front end. Let's say you want to add a customer review in the form of a quote, all you have to do is make changes to the Testimonials page in the Strapi backend by pressing the plus button and clicking quote. With no changes to the frontend code, the data shows up.
The same thing happens if you want to change the layout and order of data. Strapi lets you rearrange content on a site by tweaking its order in the CMS. Changes reflected with no extra effort from the developers.
Note: When you deploy your application and use it in a Heroku production environment, you will need a third-party provider to deal with uploads - the Strapi documentation has a nice guide on how to use various providers.
That’s it from me today, you can test out the working website or have a look at the GitHub repo. Hopefully, now, you have a better idea of how Dynamic Zones work and how best you can leverage them. It is an extremely powerful feature with limitless possibilities and I can’t wait to see what you build! Till next time!
Please note: Since we initially published this blog post, we released new versions of Strapi and tutorials may be outdated. Sorry for the inconvenience if it's the case. Please help us by reporting it here.